APPENDIX: Instructional Strategies for Co-Taught Classrooms
| Bloom’s Connection Puzzles | Discussion Chips | Temple Strategy | |
| Board Relay | Group Graffiti | Text Messaging Summary | |
| Brain Bookmarks | Highlighter Tape | The Answer Is … | |
| Challenge Authority Cards | Multiple Perspective Glasses | The Back of a Napkin | |
| Character Layers | Pen the Tale | Virtual Tug-of-War Debate | |
| Colored Acetate Strips | RAFTs | Webquest | |
| Connection Collection | Spelling Word Relay Teams | Work Masks | |
| Deal or No Deal | Symbolic Summary | You Lose Bingo |
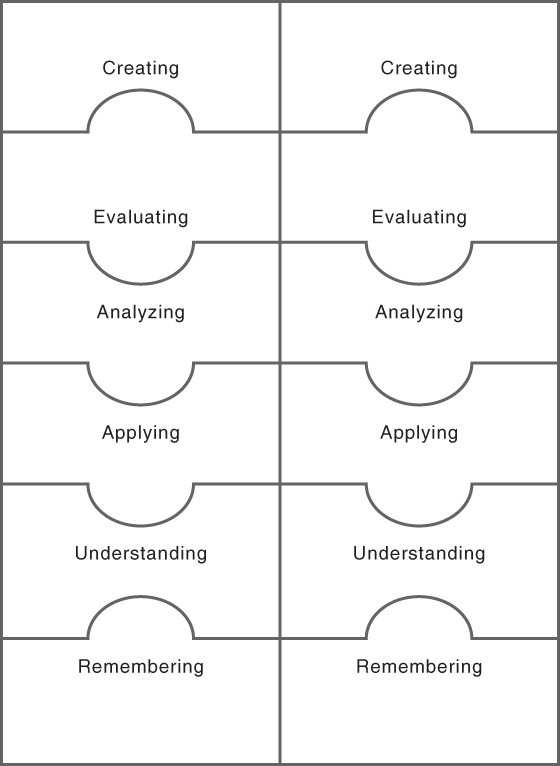
Bloom’s Connection Puzzles
Capitalizing on the human compulsion to fill in missing pieces, this strategy utilizes jigsaw puzzle pieces to encourage students to make higher-level connections. It incorporates all four sensory modalities in a low-prep, cross-content activity.
How to …
1. Copy the Bloom’s Connection Puzzle reproducible onto magnetic paper (available from office supply stores) or card stock. Cut the jigsaw pieces apart. If using card stock, adhere a small magnet to the back of each puzzle piece.
2. Stick the magnets to a magnetic white board, showing the correct hierarchy, and explain Bloom’s Taxonomy to the students.
3. Disassemble the puzzle, leaving the pieces scattered on the board. Tell the students that their task is to assemble the puzzle pieces by the end of the lesson (or unit.) In order to put a piece into place, a student must make a connection at that level of the taxonomy. For example, during a lesson on the ancient Egyptian ruler Thutmose IV, students made the following connections. As each piece was put into place, a few key words were written on the board next to it.
- Creating—“Machines could be invented that automatically lay bricks for the temples to speed up the building process. Kind of like the assembly plants for cars.”
- Evaluating—“If Thutmose had not been so vain and extravagant in his building projects, less people would have been employed. More people would have starved. So maybe he was a good ruler.”
- Analyzing—“Maybe Thutmose IV was like FDR. We learned about him and the Civilian Conservation Corp. He helped society by putting them to work.”
- Applying—“My church youth group raises money to buy animals through the Heifer Project. They say that giving someone an animal provides them with a job and a future, rather than just giving them food.”
- Understanding—“For someone in charge, Thutmose didn’t accomplish a lot. Mostly he just built stuff. My dad says that our current president isn’t accomplishing much either.”
- Remembering—“I saw something about those Egyptian monuments on the History Channel a few months ago.”
4. As students make connections, allow them to come up and put the related puzzle pieces in place. Write a few descriptive words next to each piece to capture the connection.
Copyright © 2012 by Anne Beninghof
Board Relay
Board Relay is an energizing activity that uses inconsequential competition to engage students in completing an assigned task. It can be used across grade levels and content areas, with very little preparation on the part of the teacher.
How to …
1. Divide the class into four relay teams. Team membership should be heterogeneous.
2. Review the rules of Board Relay with the students:
- No running.
- No shouting out answers.
- Marker or chalk must be placed on the ledge after each turn.
- Winners will be determined based on accuracy as well as speed.
3. Divide the board into four sections and place chalk or a marker on the ledge beneath each section.
4. Determine the task for Board Relay. For example, students might be required to list elements or examples of the concept just taught, compose a sentence using an assigned vocabulary word, skip-count by fives to fifty, and so on.
5. Explain to students that they will each take a turn in completing the task, as in a relay. Depending on the assignment, clarify for students how much should be done in each turn. For example, in skip counting by fives, each student would list the next number in the sequence. Students will most likely have multiple turns before the round is over.
6. Explain that finish times will be kept for each team, but that finishing first does not mean winning—accuracy is more important.
7. Determine and convey a scoring system. For example, finishing first is worth 100 points, second 90 points, third 80 points, and fourth 70 points, but for every error the team loses 15 points.
8. Start the Board Relay. As necessary, remind students of the rules.
9. Mark the finishing order of each team on the board. When the last team has completed the task, engage the whole group in reviewing the work of each team for accuracy.
10. Note total scores for each team and try again with a new task!
Variations …
- Board Relays can be done in partners, so that no student is left on his own to complete a step of the task. Partners should be assigned by the teacher with the purpose of pairing a more able student with a student in need of support.
- Relay teams can be given thirty seconds before the start to strategize about their approach to the task. This will allow struggling students to hear ideas from their peers.
- If boards are not available, place four sheets of chart paper on the wall, one per team.
- Seated Relay is a variation that reduces the physical movement in the room. For Seated Relay you will need one small whiteboard and marker per team. The student in the first position of the relay writes on the white board while seated at her desk, and then passes it back to the next student.
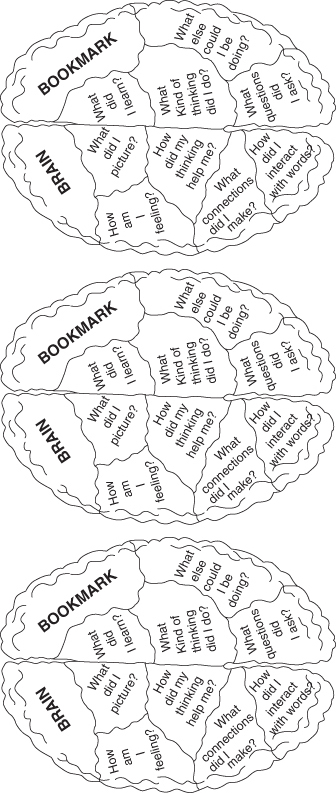
Brain Bookmarks
Metacognition, the act of thinking about thinking, is an important skill for students. When a student is aware of her attention to a task and the many ways her brain might approach the task, she can gain more control over the process. However, the concept of metacognition is very abstract and can be difficult for some students to grasp. This is especially true during independent activities, such as silent reading, in which a teacher is not guiding the thinking process. Brain Bookmarks provide the necessary cues for students to develop awareness of metacognition.
How to …
1. Provide each student with a Brain Bookmark cut out from the reproducible.
2. Explain to students that medical imaging technology has shown that areas of the brain light up with electrical impulses when they are being used. (Brief video clips of this can be found on the Internet and shown for emphasis.)
3. Further explain that some researchers believe that we can improve our own brain function by being aware of our thought processes. This is called metacognition or “thinking about thinking.”
4. Point out the different metacognitive prompts on the Brain Bookmark and explain as necessary.
5. Show students how they can use a yellow highlighter to highlight a section on their Brain Bookmarks that corresponds to their thinking. The goal is to eventually highlight all of the metacognition prompts.
6. Encourage students to glance at their bookmark before, during, and after they read.
Variation …
- Suggest that students write short sentences on the back of the Brain Bookmark that describe their thinking.
Brain Bookmark
Copyright © 2012 by Anne Beninghof
Challenge Authority Cards
The process of challenging authority involves several higher order thinking skills. Often, this type of critical dialogue is discouraged in classrooms, as many teachers are most comfortable with compliant students. The Challenge Authority Card strategy is a simple, make-ahead tool that can spark engaging discourse in a structured manner. Especially intriguing for students who are ready for higher level thinking, the cards are an easy way to address the needs of gifted students within the context of a heterogeneous class.
How to …
1. Copy the Challenge Authority Cards reproducible. Cut the cards apart. If desired, laminate each card for durability.
2. At the beginning of a lesson, distribute the cards to individual students who are ready for an intellectual challenge.
3. Explain to the whole class that some students have been given a task to do during the lesson. On future days other students will also have the chance to try the tasks.
4. As the lesson progresses, encourage students with Challenge Authority Cards to look for opportunities to follow through on their tasks.
Challenge Authority Cards
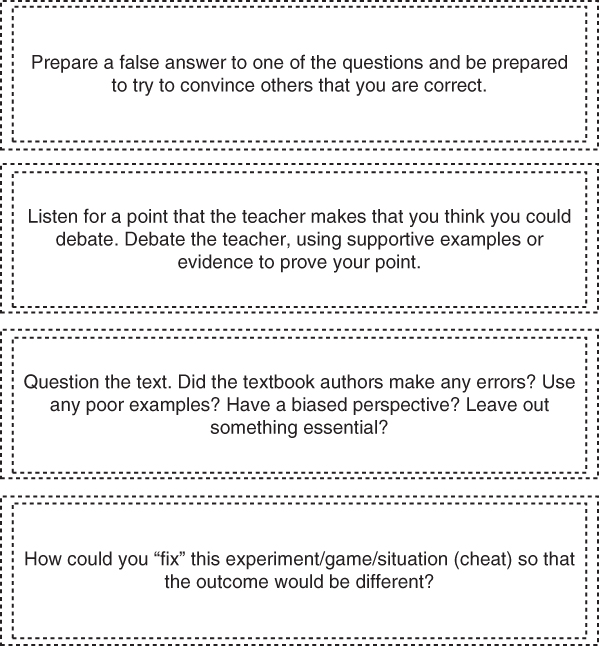
Copyright © 2012 by Anne Beninghof
Character Layers
Character Layers use a readily available scrap material to emphasize concepts that have layers or depth to them. Students can write and draw on the laminate layers with water-based markers, making them a visual and tactile instructional material.
How to …
1. Collect leftover scraps of laminate. (Clear plastic report covers, available from office supply stores, work equally well.)
2. Cut the laminate into strips approximately three-by-eight inches in size.
3. Stack six strips directly on top of each other and staple them together at one of the narrow ends.
4. Provide each student with one set of strips and a water-based wipe-off marker.
5. Assign a character to each student. If there are several characters being studied, assign the more complicated characters to the students most ready for a challenge.
6. Direct the students to write their character’s name on the first strip. On each successive strip, they are to write a character trait of that individual, and draw a simple, symbolic representation of that trait. The words and drawings should progress from top to bottom (see Figure A.1). For example, if considering Elie Wiesel from Night, a student might write the word “determined” and draw marching feet. On the next strip, the student might write “religious” and draw a Star of David.
7. After students have designed their layers, call each student up to the overhead projector or document camera. The student begins by showing the last strip first, progressively adding each layer, until all that is left to be revealed is the character’s name. Other students try to guess the character based on the descriptions provided.

Variations …
- Use layers to show steps in a process that build upon each other, such as the steps in photosynthesis or the layers of the earth. Laminate layers can also be used for concepts that have a hierarchy, such as the branches of government, the food web, or superlatives.
- Cut six-by-six-inch pieces of laminate for teaching students about multiple line graphs. Students can draw a different line on each layer and see how they intersect with each other.
Colored Acetate Strips
Colored Acetate Strips fit over a text page to highlight two or three lines of text at a time. As students read, they slide the strip down the page to continually highlight the lines being read. This strategy is effective for improving visual attention and reading fluency.
How to …
1. Obtain several Colored Glide Bind Report Covers (available from office supply stores.) Cut the covers into strips that are wide enough to cover three lines of text in a commonly used book. Be sure that the strips include the fold from the edge of the report cover so that it can wrap around the page.
2. Direct students to place the colored acetate strips over their book page, one half on the back of the page, one half on the front.
3. Model for the students how to fluidly slide the strip down the page as they read, highlighting a few lines of text at a time.
4. Explain to students that the strip will also help to save their place if they stop for a moment to discuss a feature of the text.
5. Allow students to sample the different colors to determine which one they prefer.
Figure A.2: Colored Acetate Strips
Connection Collection
To encourage students to make connections between prior knowledge and new learning, set up a Connection Collection board in the classroom. The board will highlight a theme or concept from the unit, and whenever a student makes a connection to the theme it is added to the board.
How to …
1. Find a place in the room that can be dedicated to your Connection Collection. This might be a section of your whiteboard, a bulletin board, or a chart hung on a wall. Label it “Connection Collection.”
2. Explain to students that they will be recording any connections that are made between their prior knowledge and new learning.
3. Model and lead a connection activity. For example, in a math class the concept being studied might be polygons. Write this heading on the board and then suggest a connection, such as “the newspaper is shaped like a polygon.” Ask students for ideas they have.
4. Encourage them to move to higher level examples such as “knowledge of polygons can help figure out the volume of a box.”
5. Throughout the week, encourage students to share connections as they think of them. Have the students add the ideas to the board.
Variations …
- Take a photo of the Connection Collection before removing it and upload it to your class website.
- Have students copy the connections into their subject-area notebooks.
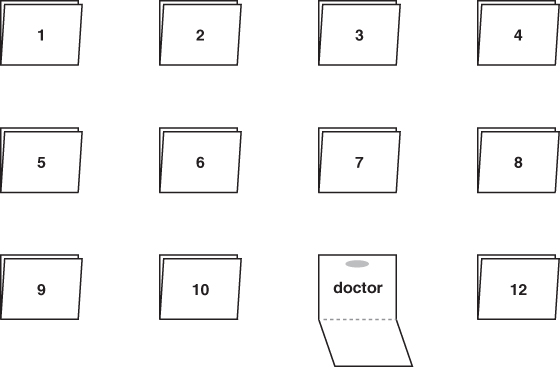
Deal or No Deal
This popular game show serves as an effective hook for student attention. Student contestants choose a briefcase that contains an unknown element. When the element is revealed, students use it to practice vocabulary in novel contexts. The cases contain a variety of contexts in which students can practice vocabulary application.
How to …
1. Gather a dozen or more three-by-five-inch index cards. Fold them in half to form a briefcase shape that measures three by two-and-a-half inches, and stick them closed with a bit of sticky tack.
2. Number the outside of the cases. Inside each case, write an occupation that your students might be familiar with. These could include firefighter, doctor, teacher, computer specialist, game designer, baseball player, and truck driver.
3. Hang the cases on a wall or bulletin board where students can access them.
4. When introducing a new vocabulary word to students, share the definition and discuss the meaning. Explain to students that it is important to know how to use words in contexts other than school.
5. Point out the cases and ask if they have seen a television show that has a similar array of briefcases (Deal or No Deal). Explain that, instead of money, these cases contain jobs where people can earn money. Students are to imagine how someone who has that job might use the new vocabulary word in his or her work.
6. Select a student to be the first contestant, open the suitcase of his choice, and read aloud the job he has won.
7. Direct students to talk with a peer and develop a sentence that uses the new word in the chosen occupation. If necessary, provide an example. If the vocabulary word was “regulate” and the occupation selected is firefighter, an example might be “Firefighters have to regulate campfires in drought-stricken areas.”
Figure A.3:
Variations …
- Replace the occupations with locations, names of famous people, or with a variety of hobbies. Ask students to apply vocabulary words in these other contexts.
- Place a number in each case and use the numbers for random pairing of students, selection of a problem to answer, or development of math stories.
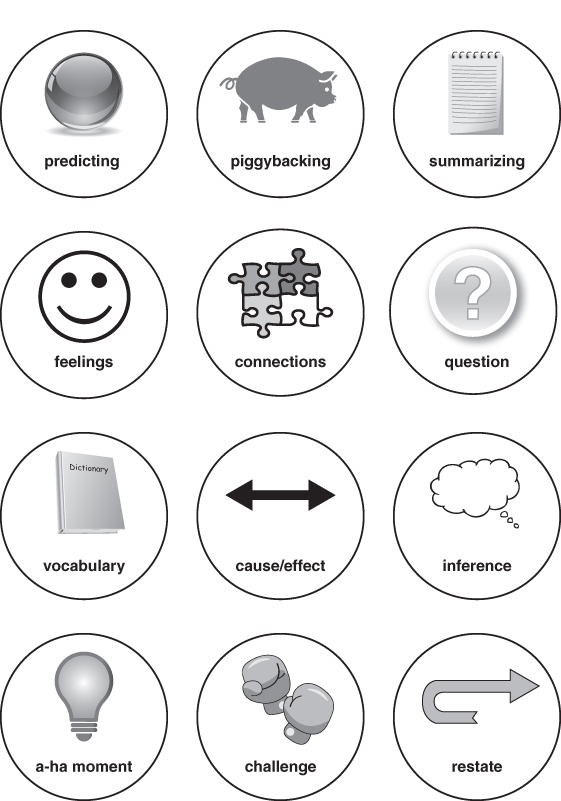
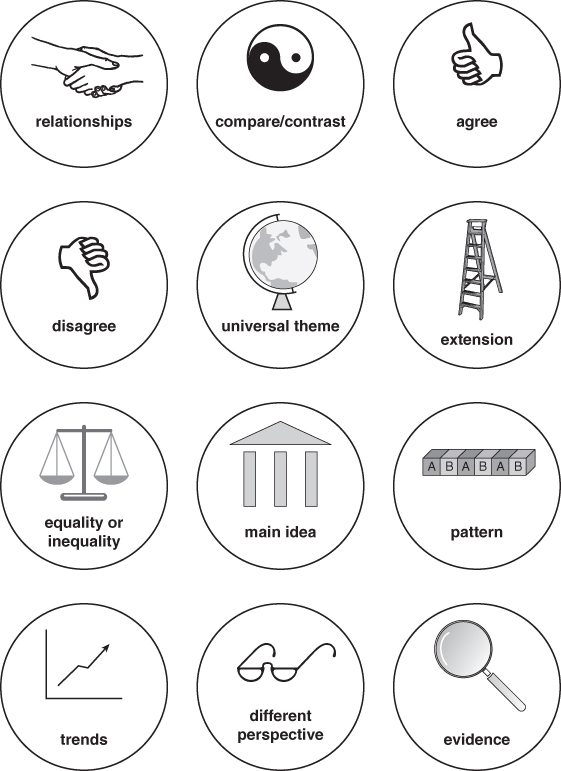
Discussion Chips
Small-group participation skyrockets when students have strategic tools to help them. In this visual/tactile strategy, students are provided with poker chips covered with graphic cues related to a variety of discussion strategies. Students are encouraged to toss a relevant poker chip into a container when they have something to say. The similarity to playing poker adds a game-like quality that enhances student participation.
How to …
1. Make copies of the Discussion Chip reproducible and cut out the icons. If desired, adhere each one to the top of a poker chip. Decide which chips are relevant to the topic to be discussed.
2. Ask students if they have ever played poker. Describe how poker players must choose to participate by calling “I’m in” and tossing poker chips into the middle of the table. Share phrases such as “get your head in the game” or “I’m really into skateboarding.”
3. Distribute a set of relevant chips to each student.
4. Discuss the icons and what they might represent in a discussion about your content.
5. Explain to students that when they are ready to participate in the discussion, they are to toss in a poker chip that represents the comment or question they would like to make. For example, if a student wants to piggyback on another student’s insight, he would toss in the “pig” poker chip.
6. Arrange students into small discussion groups and provide each group with a paper plate or small container. Direct students to sit in a circle and place the container in the center.
7. Monitor students as they engage in discussion. If you notice students who have not put in a poker chip, ask them to look at the pictures on the chips to help them think of something to add.
8. If desired, have students pause halfway through the discussion period and reflect on how “in the game” they are.
Discussion Chips
Copyright © 2012 by Anne Beninghof
Group Graffiti
Group Graffiti is a quick, creative way to awaken prior knowledge or reinforce new learning. Like graffiti (also known as tagging), thoughts or ideas are expressed in simple but bold artistic messages. The visual display is an appealing alternative to other brainstorming or K-W-L activities.
How to …
1. Cut two eight-foot lengths of white butcher paper.
2. Explain to students that they will be “tagging” or making graffiti about the lesson topic on the butcher paper. Remind students that graffiti usually consists of simple visual images or words, often symbolic. Add that they will be working on the floor so that the different plane will spark their creativity.
3. Have students grab a marker from their desk, backpack, or supply bin.
4. Ask students to quickly arrange the desks so that there are two large open floor areas, and then place the paper on the floor.
5. Divide the class into two groups and have students sit around the edges of the paper.
6. Write the topic (one to three words) in large print in the middle of the butcher paper.
7. Direct students to use their markers to quickly tag the paper with anything they can think of about the topic. For example, if the topic is “meteors,” students might write words such as “space, moving, large, hard, fall to earth” or draw symbols representing planets, earth, movement, speed, gravity, danger, orbits, or showers.
8. After a few minutes, stop the students. Have the two groups face each other, holding their graffiti poster for the others to see. Facilitate discussion about the words and symbols that came to mind for the topic.
Highlighter Tape
A removable alternative to highlighter pens for all kinds of texts, Highlighter Tape sticks securely, yet removes easily and is reusable. This tool is a wonderful adaptation for students who need the extra focus of highlighting but can’t write in the text.
How to …
1. Obtain Highlighter Tape from an office supply store or website.
2. Laminate thirty index cards for durability.
3. Place six or eight short strips of highlighter tape on each card. One end of each strip should have a tab folded under to make it easy to peel off. If available, use two different colors of tape so that you can choose to ask students to color code items.
4. Pass out the cards at the beginning of a text activity. Direct students to highlight specific words related to your lesson. For example, students might be directed to highlight important dates, adjectives, examples of alliteration, or directions.
5. At the end of the lesson, ask students to place the tape back on the cards before handing them in.
Variations …
- Send Highlighter Tape cards home with students to use when they are reading or studying. Direct them to highlight words or concepts that are confusing so that they can review them in class the following day.
Multiple Perspective Glasses
One way to add depth in almost any content area is to encourage students to view the topic from a perspective other than their own. Classroom discussion may bring in the perspective of their peers or teachers, but moving beyond the classroom walls can develop greater depth of understanding. A simple way to accomplish this is through Multiple Perspective Glasses. The props—mirrored sunglasses—add a novel element to liven the discussion.
How to …
1. Collect several old sunglasses or purchase inexpensive ones at a party or novelty supply store.
2. Using a water-based transparency marker, write the name of a well known individual on each pair of lenses. Names might include celebrities, politicians, historical figures, or athletes. Names might also stem from your content. For example, in a lesson on the American Revolution, the glasses might include George Washington, a merchant, a military horse, a British soldier, Martin Luther King, Jr., Oprah Winfrey, and Justin Bieber.
3. Place the sunglasses in a container.
4. Ask students to form small groups, and have one student in each group reach into the container and grab a pair of sunglasses.
5. Direct groups to discuss the topic from the perspective of the person they drew.
6. After a few minutes, ask groups to share their insights with the whole class.
7. Wipe off the lenses with a damp tissue and choose new names for new content.
Variation …
- Increase the challenge by choosing inanimate objects to write on the lenses. For example, in a lesson on triangles, students might consider the perspective of an acute angle, a vertex, a line, or a circle.
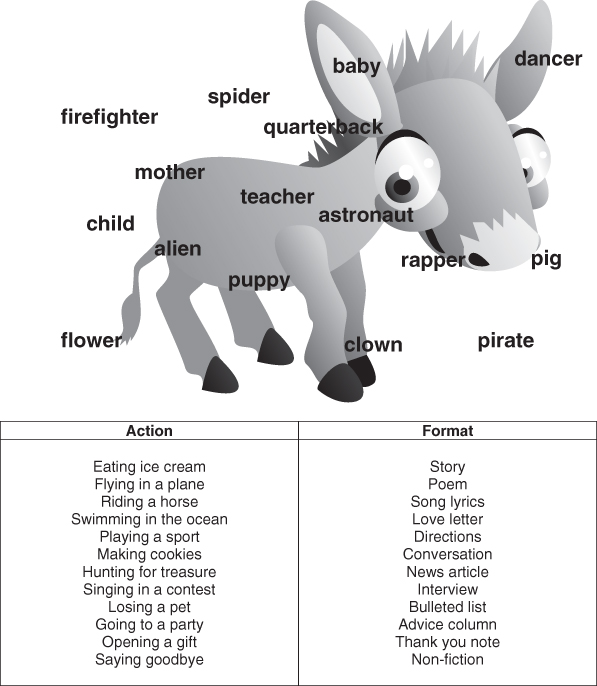
Pen the Tale
A variation on the popular RAFT approach for differentiation, Pen the Tale is a strategy for expanding students’ ideas for writing topics. Students randomly select a role, and then purposefully choose from a list of formats and actions. The process gives students the opportunity to explore new ideas and develop a creative writing piece.
How to …
1. Copy the Pen the Tale reproducible for each student. Enlarge one copy and place it on the board.
2. Provide each student with one colored restickable dot.
3. Ask the students if they are familiar with the popular party game, Pin the Tail on the Donkey. Draw comparisons, explaining that students will use the sticky dots instead of a tail to play Pen the Tale.
4. Select one student to help demonstrate. Ask him to close his eyes (or place a loose blindfold over his eyes).
5. Spin him twice and then aim him at the donkey. Direct him to stick his dot somewhere on the donkey chart.
6. Ask him to open his eyes to see what role he has selected. This will be the character closest to the dot.
7. Model how to choose an action the character will write about and a format for the writing.
8. Demonstrate once more before asking students to try it on their own papers.
9. After the students have selected all three components—role, action, format—direct them to list these in the idea section of their Writer’s Notebooks.
10. Repeat until students have recorded several different writing ideas for future use.
Variations …
- Ask students to add characters to their donkeys whenever they think of them.
- Develop a Pen the Tale reproducible that has an alternate set of actions and formats to provide variety for students.
Pen the Tale
Copyright © 2012 by Anne Beninghof
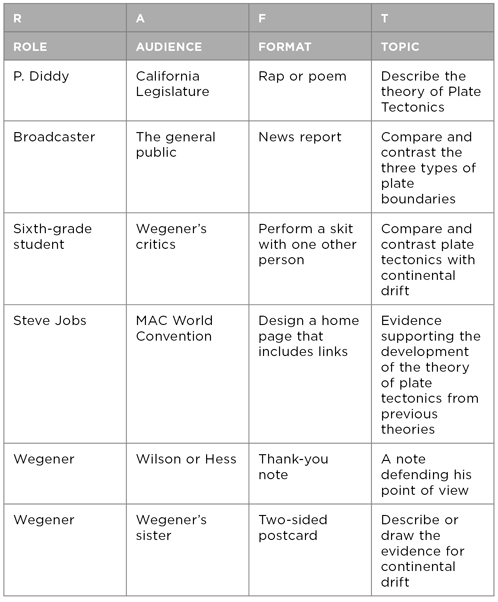
RAFTs
The RAFT strategy, originally conceived by Nancy Vandevanter as part of the Montana Writing Project (Santa, 2004), uses writing or performance activities to enhance understanding of information. Instead of writing a traditional short answer or essay to show knowledge and understanding, the students demonstrate their understanding in a nontraditional format. This technique encourages creative thinking and motivates students to reflect in unusual ways about concepts they have learned.
How to …
1. Develop a table with a heading that is similar to the RAFT example below.
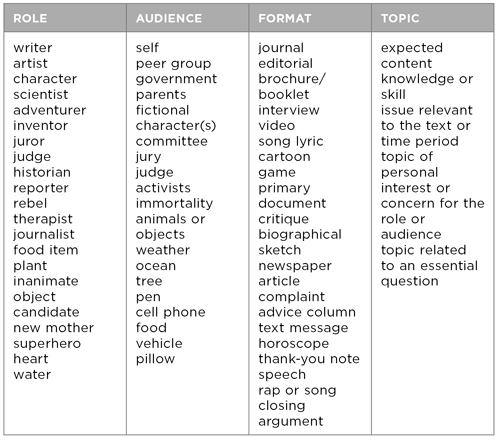
2. Begin with developing ideas for the Topic column, as this represents your learning objectives. You may choose just one topic for the entire column, or several topics. Next, complete the other three columns. Strive for one row that represents a higher level of complexity, two rows that represent grade-level complexity, and one row that has a simpler level of complexity. Explore the list of ideas on page 225.
3. Explain to students what each letter in RAFT represents.
- R = Role of the writer: What is the writer’s role? Options might include a reporter, observer, or object related to the content.
- A = Audience: Who will be reading or receiving the writing? Options might include the teacher, people in the community, historical figures, or an object related to the content.
- F = Format: What is the best way to present this information? Options might include a letter, an article, a poem, or an advertisement.
- T = Topic: What do we want the student to know and demonstrate? What is the objective or standard?
4. Allow students to choose any row that appeals to them as a way to show their knowledge of the subject matter. If necessary, offer guidance to individual students so that they make a choice matching their readiness level.
Example: Earth Science RAFT
RAFT Ideas
Spelling Word Relay Teams
Minor competition motivates many students to practice mundane learning tasks. In Spelling Word Relay Teams, students race their peers to spell out new spelling words for the week. The kinesthetic input causes the release of endorphins, helpful for neural processing and retention. This strategy can be used by classroom teachers with access to a large running space, or by the physical education teacher.
How to …
1. Obtain three hundred large paper or plastic drink cups. Place a single cup upside down on a desk. Using a marker, write the letter A on the front and back of the cup. Continue through the alphabet, making twelve of each letter. Twelve sets will allow you to work with four to six relay teams (depending on how frequently a letter is used in a word, for example, believe).
2. Place the cups on the floor at one end of the running space, and set up the relay teams at the opposite end.
3. Explain to students that you will call out a word from their current spelling list. On “Go” the first student on each team is to run down, retrieve a cup with the first letter, and bring it back to their team. Immediately, the second student runs to get the second letter. The team continues until they have completed spelling the word. Whichever team finishes first and correctly wins the round.
4. Continue playing for as many rounds as desired.
5. For added challenge, tell students that you will occasionally surprise them with a word from a previous spelling list.
6. Use this strategy for practicing math facts by adding numbers to the other sides of the cups.
Symbolic Summary
Nonlinguistic representations can be a powerful memory enhancer for students. The Symbolic Summary strategy encourages students to augment their notes with quick, symbolic representations of their learning.
How to …
1. Determine how many key concepts (four, six, or eight) you want to reinforce with the use of the Symbolic Summary.
2. Provide students with a loose sheet of plain white paper and ask them to fold the paper into fourths, sixths, or eighths.
3. After the first concept has been taught, tell the students that they will have one minute to draw a quick picture in the first space on their paper. The picture is to represent what they just learned, without using any words. Explain that the drawings should be simple, such as icons, logos, or symbols, rather than extremely detailed.
4. When fifty seconds have passed, give students a ten-second countdown. Then ask students to turn and share their drawing with a peer. If desired, solicit one or two students to share with the class.
5. Continue with each key concept, filling the paper with symbolic drawings. Have students store the paper in their notebooks for later review.
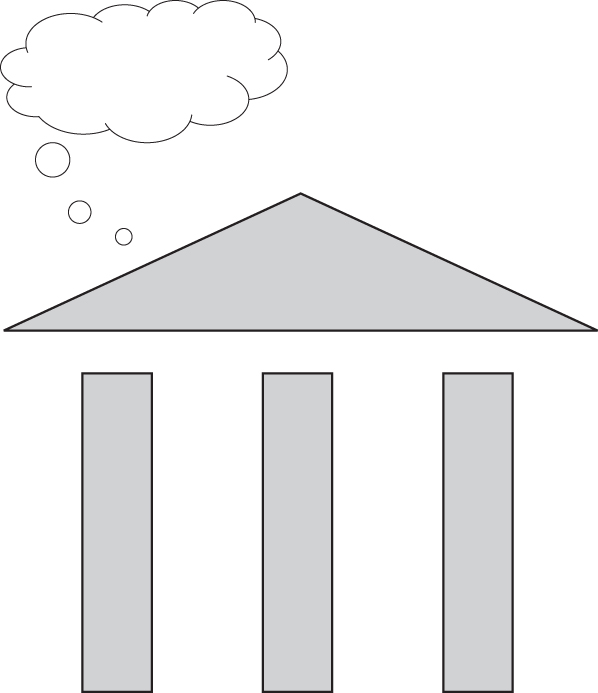
Temple Strategy
Understanding main idea and supporting detail requires students to recognize the relationship between components or ideas. There is usually a hierarchy, in which one idea sits over, or encompasses, the other ideas. The Temple Strategy reinforces this understanding by using a Greek temple as a visual metaphor.
How to …
1. Cut craft foam or construction paper into the temple shapes as shown in the Temple Strategy reproducible. The roof should be green, the pillars yellow, and the thought cloud white. Each student can have his or her own set, or you may have them work in partners and share a set.
2. Cut strips of plain paper, approximately one-by-four inches, for students to write on.
3. Show students a photo of a Greek temple and explain that it was a place where learned men went to exchange important ideas under one roof. Make a connection between this and main idea and supporting details in a piece of text—that several ideas (the pillars) fall under one main idea (the roof).
4. Model this concept with a set of words such as “happy, sad, emotions, angry.” Begin by writing each word on a strip of paper, and then adhere each word to the appropriate temple piece.
5. After practicing with single words, move to a short paragraph. Ask students to identify four ideas from the text that are important. Model how to decide which one encompasses the other three (this will usually come from the topic sentence.)
6. As students are ready, move to longer paragraphs and then multiple paragraph texts.
7. The thought cloud can be used for students who are ready to work with the more complex concept of theme. Explain that theme, like the cloud, may not be specifically expressed within the text, but is a universal concept such as “do unto others” or “interdependence of all living things.”
Variation
- Students may use the Temple Strategy reproducible as a graphic organizer when planning a piece of their own writing.
Temple Strategy
Copyright © 2012 by Anne Beninghof
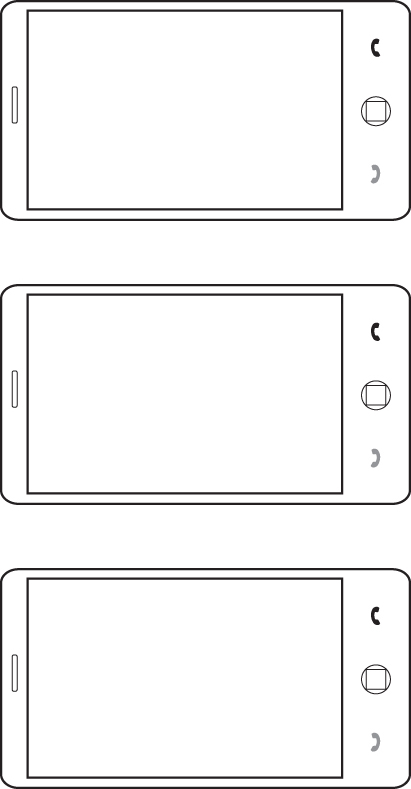
Text Message Summary
Text Messaging is a popular communication shortcut very familiar to students. Teachers can use this interest to practice succinct summarization of curriculum content.
How to …
1. Copy the Text Message Cell Phone reproducible and distribute one to each student.
2. Direct students to write a text message summary of their learning in the screen area, as if they were texting to a friend. Encourage them to use some of the shortcuts and alternative spelling that they might normally use when texting.
3. When they have finished their text message, ask them to count up the number of characters used and record the total in the small box at the bottom of the screen.
4. Encourage students to share their summaries with the class. This can be done verbally, or the cell phones can be shown under a document camera.
5. After the first summary is shared, ask the student how many characters were used. Then survey the class to see if anyone thinks they were able to capture the main idea of the learning with fewer characters.
6. Continue sharing for an appropriate amount of time.
Variations …
- Use text messaging as an exit slip. Near the end of the class period, distribute the paper cell phones and direct students to write a text message describing one thing they learned in class, or one thing they still have questions about. Each student must hand in a cell phone as they exit class.
- Use Internet sites such as www.polleverywhere.com to do live polling with students. Students use their cell phones to text in a response to a question the teacher has designed in advance. The website is projected onto the screen and students can watch their text message responses being received in real time.
Text Message Cell Phone
Copyright © 2012 by Anne Beninghof
The Answer Is …
This simple strategy promotes higher order thinking and can be used to activate prior knowledge or make connections. The Answer Is … can be used as a one-time activity or be made available for students to respond to during the course of a week or unit.
How to …
1. Cut a four-foot section of butcher paper or obtain a piece of chart paper.
2. Place the paper on the floor, surrounded by colored markers.
3. In the center of the paper write the phrase “The answer is … ” followed by a single word. The word may be related to your content, or could be randomly selected. For example, in a geometry lesson, the word might be “square” or “jumping.”
4. Direct students to generate questions that are answered by the chosen word, and write them on the paper. They can work individually or in pairs. Examples for “square” might include:
- What do you call a rectangle having all four sides of equal length?
- What shape is a box?
- What kind of person does not break the rules?
- What type of numbers are these: 1, 4, 9, 16, 25?
- What kind of dance has a caller?
- What shape is used in hopscotch?
Examples for jumping might include
- How do you wake up if your foot has fallen asleep?
- What rhymes with pumping?
- What are people doing when they are really excited?
- What is the kid doing on the trampoline?
- What is the frog doing?
5. Discuss student questions, highlighting the variety of thinking shown.
6. Hang the chart in a place that is accessible to students so that they can continue to generate questions throughout the week.
The Back of a Napkin
Many great ideas have been developed on the back of a napkin. Simple drawings can capture the essence of a concept in a unique way that may be more powerful than a paragraph of words. The Back of a Napkin strategy encourages students to capture their learning and ideas in a non-linguistic representation, using a readily available but unexpected medium.
How to …
1. Obtain a paper napkin for each student. (High quality is not important—often the cheaper napkins, like those found at fast-food restaurants and coffee shops, work best.)
2. Explain to students that many brilliant ideas and booming businesses have been developed on the back of a napkin. One company started this way is Southwest Airlines. (For details and additional examples, check out The Back of a Napkin by Dan Roam.)
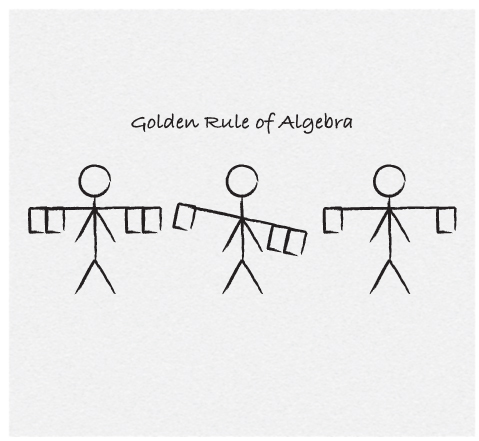
Direct students to capture their learning by drawing a simple design on their napkins. Words can be off-limits entirely or limited to a few. If desired, share an example, as shown in the figure. Students in an Algebra course had been taught the Golden Rule of Algebra (“Do unto one side of the equation what you do to the other”) and were asked to draw the concept.
3. Allow just a few minutes for silent drawing, and then ask students to share their sketches with each other.
4. Monitor sketches for content accuracy and offer feedback when appropriate.
Figure A.4:
Virtual Tug-of-War Debate
Engineered debate enhances student learning in many ways. Emotion increases attention and engagement, aids in memory, and can crystallize thought processes. If debate is carefully engineered, it can make content personally relevant and meaningful to students. In contrast, debate that is dull will have little positive impact. Virtual Tug-of-War Debates add visual stimulus through the use of technology to make discussion more multimodality and engaging.
How to …
1. Choose an animation web tool such as www.goanimate.com. Familiarize yourself with its features. Many students will be knowledgeable about these tools and can serve as debate designers.
2. Choose character images to represent both sides of the debate topic. Place the images in an open virtual space, with a rope between them.
3. Insert beginning dialogue for each character, appropriate to your topic, such as, “It is ethical to use animals for drug experimentation because …” or “It is unethical to use animals for drug experimentation because …”
4. After your basic animation setup is complete, save it for use during the lesson.
5. At the start of the lesson period, assign roles to students. Some will be “pro” and some “con,” with three students acting as judges. Assign a student to modify the animation during the debate.
6. Provide the students and the judges with a simple rubric (see Tug-of-War Debate Rubric) for effective debate.
7. Explain to students that they will be debating the topic. They will have a few minutes to work with their teammates to develop arguments. For every point they make that the judges deem valid, a character will be added to their side of the rope in the animation. The winning team is the one that has the most characters to tug on the rope.
Variations …
- A similar effect can be achieved without using an animation tool. Open a blank document with your word processing program. Insert two characters with a line or rope strung between them. For each argument made, paste another character into the scene on the corresponding side of the rope.
- Students will love the idea of doing a real tug-of-war. Bring in a one-hundred-foot length of rope. Tie a colorful ribbon in the center of the rope. Take your students outside to an open, grassy area. If a student offers a valid argument for or against the issue, he gets to tie a knot on his side of the rope and stand ready to pull. After all the students have taken sides, mark a line under the center of the rope and begin the tug of war. The game is finished when one team pulls the other team over the center line.
Tug-of-War Debate Rubric
| CRITERIA | LEVELS OF PERFORMANCE | |
| TRY AGAIN | JOIN YOUR TEAM AND PULL! | |
| Use of Arguments | No reason given or reason is irrelevant to the topic. | Reason is clear and relevant to the topic. |
| Use of Examples and Facts | No examples or facts. | Example or fact given to support argument. |
| Use of Rebuttal | No counter-argument offered. | Effective counter-argument speaks directly to other teams’ point. |
| Presentation Style | Tone of voice/gestures are inappropriate (rude, loud, silly, and so on) or not convincing. | Tone of voice and gestures are appropriate and convincing. |
WebQuest
A WebQuest is an inquiry-based learning experience that uses Internet technology and focuses on the use of higher-level thinking skills. Students are provided with structured task guidelines, including a variety of prescreened websites. Teachers differentiate the task by choosing websites at various levels of reading and navigation difficulty.
How to …
1. WebQuests can be designed using any document with hyperlinks. Tools such as PowerPoint and Prezi add the possibility for interesting visuals, but Word and Excel also work.
2. Choose an interesting task that is related to your content. WebQuests often have a real-life or career application. For example, in a unit on Japanese-American internment camps, a WebQuest might center on causes, comparisons to reactions after the 9/11 bombings, and developing opinions about whether internment camps could happen again. For younger students studying wind energy, a WebQuest might center on the role of engineers in studying wind and inventing applications.
3. Develop a document outlining the specific questions or tasks that students must address. Include hyperlinks to websites that will assist them with the tasks. WebQuests usually do not involve a lot of surfing and searching—instead they are time-efficient ways to use the Internet for information. Consider developing a color code or legend that guides students to more or less complex sites.
4. Websites such as www.webquest.org include numerous shared WebQuests developed by teachers all over the world. These can be used as is, or as models for developing your own WebQuest.
5. Students often work on WebQuests in small groups to encourage collaborative skills. If the WebQuest is designed for group work, be sure to include specific roles and responsibilities for each member so that all students participate fully.
Work Masks
Many students have difficulty processing visual information. A simple solution to this problem is to use Work Masks. Made from file folders, Work Masks cover a portion of a student worksheet or test so that the student can focus on the material needed at the moment.
How to …
1. Obtain one file folder for each student.
2. Holding the file vertically, divide the front into thirds and mark these locations with pencil.
3. Using scissors, cut a horizontal line through the front of the folder so that the folder has three flaps.
4. Show the students how to slide their worksheet or test into the folder, flipping back the top flap so that the top portion of the page is visible.
5. Explain that when they have finished the questions in the visible space, they can close the top flap and open the middle one, and then repeat for the bottom section.
Figure A.5:
You Lose Bingo
Bingo engages students quickly because of the random possibilities for winning. Random reinforcement has been shown in numerous studies to be more powerful than regular, predictable reinforcement. In You Lose Bingo, students experience the same randomness, but in ways that emphasize loss—loss of control, loss of goods, loss of health—and help students empathize with emotions related to loss.
How to …
1. Generate a bingo card template. Bingo cards usually include twenty-five squares arranged in a five-by-five-inch grid, with “Free Space” marked in the center square.
2. Consider your content and develop a list of a minimum of twenty-four things that might be lost as a result of an event or action. In primary grades, You Lose Bingo might be used for a unit on environmental pollution. Losses could include polar bears, clean air, clear mountain views, drinking water, and safe playgrounds. In a secondary level unit on Germany during World War II, a list of things lost by Jews might include a job, home, car, jewelry, food, family members, right to worship, travel, and freedom of speech.
3. For best results, develop twenty-four different variations of the You Lose Bingo card by typing the items into different spaces.
4. For each item that might be lost, develop a corresponding slip of paper to be pulled randomly from a container. The slip should contain an extended explanation of the loss. For example, if the item on the bingo card is “jewelry,” the slip of paper might state: “Your grandmother’s bracelet, your silver Star of David—even your wedding rings are taken from you.”
5. Provide each student with a You Lose Bingo card and bingo chips or pennies to place on the squares. Explain that when a slip is pulled from the box and read aloud, students should scan their card to see if they have that item. If so, they are to place a chip on the corresponding space. Each time a slip is read aloud, the teacher will say “If you have [name the item], You Lose.”
6. As play progresses, stop occasionally to allow students to talk about their losses, share feelings, and make connections.
7. When a student has chips on five items in a row (horizontally, vertically, or diagonally) they are to call out “Bingo!” In traditional bingo, this signifies the end of the game. You Lose Bingo is more effective if time permits you to continue on. By playing beyond the first “loser,” all students have an opportunity to experience greater loss and reflect on their simulated experience.