
![]() The use of fertilizers should be based on information that can only be obtained by having your soil tested.
The use of fertilizers should be based on information that can only be obtained by having your soil tested.
![]() A laboratory can evaluate the levels of the essential nutrients in a soil sample.
A laboratory can evaluate the levels of the essential nutrients in a soil sample.
![]() Other soil tests include those for salt content, organic matter content, pH, cation exchange capacity, texture, and the presence or absence of beneficial microbes.
Other soil tests include those for salt content, organic matter content, pH, cation exchange capacity, texture, and the presence or absence of beneficial microbes.
![]() To avoid contamination, use a plastic container and a wooden or plastic tool when taking soil samples.
To avoid contamination, use a plastic container and a wooden or plastic tool when taking soil samples.
![]() Find a laboratory that will provide the right kind of information, presented in a format that you can understand and interpret.
Find a laboratory that will provide the right kind of information, presented in a format that you can understand and interpret.
![]() Various government agencies and universities maintain soil laboratories and offer soil testing.
Various government agencies and universities maintain soil laboratories and offer soil testing.
![]() It’s important to follow the recommendations that accompany soil test results.
It’s important to follow the recommendations that accompany soil test results.
THE MODERN concept of fertilizers is predicated on Justus Von Liebig’s Law of the Minimum, which states that a plant’s yield is limited by the most limited nutrient. In agricultural situations, it is usually nitrogen, phosphorus, or potassium that are the limiting nutrients and hence the focus on these elements. This led to the development of artificial manures, which are now called fertilizers (talk about an image change).
This is a book about how plants eat, so the reference to Von Liebig’s law is appropriate. This is also a book about organic gardening, however, so I should also mention another law, this one enunciated by Sir Albert Howard, considered the pioneer of organic gardening. The Law of Return expresses the need to recycle plant and animal wastes in order to keep the system healthy and producing humus. Historically, these two laws of agriculture have been pitted against each other, but when it comes to gardening, they belong together. Simply put, if you apply Sir Howard’s Law of Return to the strictest extent (as you might with perennials and ornamental trees), then none of the nutrients in your garden should be limited, as per Von Liebig’s law. When a plant dies, it is decayed by the soil food web, and the fourteen mineral nutrients that it contained are returned to the soil. A seed of that plant grows in the same soil and eats the same nutrients that were in its parent. No one needs to fertilize California’s redwoods because they feed themselves in this way.
Farmers break the law when they take manures off the property and when they sell the livestock that ate the plants growing on the farm. Ah, but you are a gardener. Removal of animal waste is not the problem. You grow a cabbage, and at the end of the season you take it—and all the nutrients it has taken from the soil—into your house to be eaten. Hopefully, you leave the stem and roots, as per Sir Howard. But unless something is done to that soil, in future gardening seasons you will run up against the Law of the Minimum. Even removing weeds from the garden depletes the soil of nutrients. If conditions such as soil compaction, water, and temperature are in perfect shape (the goal of the gardener), it is breaking the Law of Return that results in the need to fertilize. (Having once been a government lawyer, I’ll call this the Von Liebig–Howard Regulation.)
The apple really doesn’t fall far from the tree. It drops, rots, and decays right where it will do the most good for the tree that produced it. Eventually, with the help of the soil food web, the apple returns the fourteen mineral nutrients that make up every single cell in it and its parent tree back into the soil, just over the tree’s root system. So do the leaves that fall. When a gardener removes the apples, rakes the fallen leaves, or picks up the dead limbs and detritus after a storm, those would-be recycled nutrients are removed from the system. Eventually, enough are removed that if a plant is to survive, nutrients must be added.
There are two points to take away here. First, many plants in a yard really don’t need additional input of nutrients and never will. They feed themselves. Ornamental trees and shrubs, for example, virtually never need additional nutrients provided that the soil food web is maintained and the Law of Return is applied. As long as the flowers are not harvested, most perennials don’t need fertilizer, either.
Plants don’t need fertilizer? This may sound contradictory to what you have been taught as a gardener, but this is science versus advertising. The rule should be obvious. Plants only need fertilizing when their soils become deficient in one or more of the fourteen mineral nutrients, regardless of what those ads say.
The second point is that once the system is out of balance because you ignored the Law of Return, you need to return the missing nutrients. Unless you do, your plants won’t thrive, defeating the purpose of gardening. Fortunately, it is not difficult to do so.
There is only one solution to making sure you are not breaking the Von Liebig–Howard Regulation: have your soil tested. Gardening interrupts the nutrient balance because we remove plants or parts of them from the system, and we often introduce plants into soils that can’t support their particular nutrient demands unless additional nutrients are provided. The answer is not to just pile on fertilizer. In the majority of cases, gardeners simply assume fertilizer is needed and toss it on (organic as well as artificial) as a prophylactic measure. This practice is wasteful, and it can result in environmentally damaging runoff. The take-home message here is to test your soils before applying anything.
Knowing which nutrients are in the soil and which are missing is the only logical way to know what needs to be replenished. If you can get an idea of how much of a particular nutrient is in the soil, then you can also figure out how much more really needs to be added. This seems like such a simple concept, yet most gardeners have never had their soil tested. Frankly, until researching this book, I never tested any of the soils in my gardens or greenhouses for the essential nutrients.
Because other soil factors affect the availability of nutrients, these should be tested for as well. The same laboratory that tests for nutrient deficiencies can conduct these other tests using the same sample, so this makes a lot of sense as well. A soil’s pH and its cation exchange capacity (CEC) tell a lot about the availability of nutrients. Many soil testing laboratories can also measure the content of organic matter in the soil, which is particularly important for those of us who garden without synthetic chemicals. Finally, to know how the soil food web, the organisms that make most natural fertilizers available to plants, is doing, biological tests are in order, although often these have to be done by a different laboratory.
 Finding a Laboratory It makes sense to find a soil testing laboratory in your local area, if possible. A local testing facility will have more experience testing and working with the kinds of soils in your garden and should know what inputs have corrected similar problems. They can also tailor the advice for collecting samples because they know what to expect. The Internet makes it easy to locate a nearby soil testing laboratory, as well as to check up on its reputation. What counts most is consistency between tests, so that whatever laboratory you choose, you’ll be able to compare test results from one year to the next.
Most books on gardening recommend getting soil tested, yet very few gardeners do so. This is a big mistake. How else are you going to know what your soils lack in terms of plant nutrients? Testing is the only way to get this information. Getting soil tested should be a regular part of gardening, not just something that gardeners pay lip service to.
It isn’t difficult to collect the test samples. Very little soil is needed and a simple wooden kitchen spoon and a clean plastic bag are the only equipment you need. Brass, bronze, and galvanized tools and containers should not be used, because these might contaminate the samples with copper or zinc. Most American state colleges and universities have a soil testing laboratory. But no matter where you garden, the nearest soil testing laboratory is only an Internet search away.

Only a small amount of soil is needed for a soil test.
A key factor that distinguishes laboratories is their reports. It’s important to find a laboratory that will provide you with the right kind of information, presented in a format that you can understand and interpret. You should be able to get sample reports from several laboratories to help you make a determination as to the one or ones that fit your needs.
Don’t overlook government agencies. In the United States, for example, offices of the Cooperative Extension Service, Soil and Water Conservation Districts, the Natural Resources Conservation Service, and the Farm Services Agency will test your soil or refer you to a laboratory that will. Most countries have similar agencies. In addition, many universities maintain soil laboratories and offer soil testing. Because universities are not normally in the business of selling products or nutrient systems, they provide straightforward test results.
Home testing kits are available, but most only test for nitrogen, phosphorus, and potassium and not the other nutrients. There are fourteen essential mineral nutrients, not just three, so these kits are of limited value. Similarly, home pH tests are not always reliable.
Most important, all good soil tests reports come with specific suggestions of how to correct any nutrient deficiencies or excesses. This is what makes the tests worth their minor cost. Most gardeners spend money on seeds and plants as a matter of course, and all invest lots of time tending to plants. Therefore, it makes sense to spend a little extra money (tests can cost as little as ten dollars) to test the soil that supports a garden so that the other investments in time and money are not wasted.
Although each laboratory has its own system for testing soils, essentially they all use the same process: soil is mixed in water, a chemical is added to free up the nutrients, and they are measured. The differences come about mostly in the type of chemicals added to release the nutrients. Some facilities use very strong acids, some use weaker acid solutions, and others use a simple water extract. Each system has its own merits, but some insist that using strong acids does not result in a real measure of available nutrients because those acids are not found in the soil. Some soil testing laboratories use patented methods, while others follow the teachings of famous agricultural professors who’ve lent their names to the test procedures.
If some of your plants are showing signs of nutrient deficiencies, you may want to test plant tissue in addition to testing the soil. Frankly, as much as we would like to believe that visual observations can tell us what is missing in a plant’s diet, the truth is that many problems will cause the same symptoms to appear in a leaf, for example. The only way to really know what a plant suffers from is to test the plant tissue. Information is power.
I have one final point regarding soil testing and choosing a soil laboratory. I am a firm believer in knowing as much as you can about the food web in your soils, as well as the nutrients they contain. In fact, some would argue that this is more important information than knowing the soil chemistry, although both are important.
The soil food web should be cycling the nutrients in your soil into inorganic, ionic forms that can be used by plants. Knowing the status of the food web will help you understand if that part of your system needs adjustment to help ensure your plants receive the necessary nutrients on a timely basis. We know that mycorrhizal fungi play an important role in nutrient uptake. A test may be in order to determine their presence and population health, for example.
Biological testing is not the same as a chemical testing, and these laboratories have an even greater variety of ways to report their results, which are often not comparable between laboratories. Therefore, it is important to shop around and get sample test reports. Biological testing may require a laboratory different from one that tests for mineral nutrients.
Again, you can use the Internet to help you make a decision. The laboratories’ web pages often show sample reports as well as suggested procedures for gathering the soil. Whatever laboratory you choose, once you’re comfortable with their system, stick with it. This will enable you to have consistency in test results so that you can compare them to see which way your efforts are trending.
Soil Sampling The soil testing laboratory will give you specific instructions for collecting, packing, and shipping samples. In general, however, you will need to take several samples from different areas (such as vegetable gardens, annual flower beds, lawns, and orchards). Also, take samples in areas that are problematic as well as those that do exceptionally well.
A soil test is only as good as the samples. It’s important not to contaminate the soil samples being collected for testing. Brass, bronze, and galvanized tools and containers should not be used. These can release copper or zinc into the samples, messing up these values. Because copper and zinc are reactive cations, they can distort other nutrient calculations as well. Instead, use a plastic container and a wooden or plastic tool.
If you are collecting soil samples for a biological test, make sure the container and tools have been sterilized. (I once got a pickle-based set of test results, because I failed to follow that rule and used an old pickle jar.) And don’t touch the soil either. If you need to clean the soil of sticks and stones, run the sample over with a rolling pin while the soil is in a plastic baggie, shake the bag to separate fines, and then pour out the unwanted stuff.
The soil testing laboratory will also specify the depth of the soil sample. For gardens, it is a good idea to take a sample down to 6 inches (15 cm). For shrubs and trees, go 4 to 6 inches (10 to 15 cm) deep and take samples from under the drip line. For lawns, 4 inches (10 cm) from the base of the plant down should be sufficient. Take several samples in each area. Although it sounds like a lot of samples, you can mix all the samples from one area together for a single test.
There are several basic tests that you should make sure the laboratory conducts. First is a measurement of soil CEC, the ability of the soil to hold cations. In theory, this gives you what many agricultural laboratories call the “soil savings account,” the total ability of the soil to hold positive cations. CEC ranges from 0 to 100, the latter being pure humus with lots of cations.
The CEC test is important for determining how much calcium, magnesium, potassium, and nitrogen in the form of ammonium is available in your soil. This is important because these elements almost always affect one another. Too much calcium can induce magnesium deficiency. Too much potassium has negative effects on magnesium uptake. Excessive magnesium isn’t good for calcium availability. The CEC is also used to determine what to add to change pH when the problem isn’t calcium related.
CEC tests can get very detailed. It’s possible to measure how many cations are available to create acids, which can tie up some nutrients. A laboratory may also report the percent base saturation for individual cations in the soil. This tells you how many of the cation sites are taken up by particular cations. While this is not a test of the all the available nutrients, some laboratories use this number as the basis for their fertilizer program.
Closely related to the CEC is the soil organic matter content. (Remember, organic particles hold cations and exchange them for hydrogen ions produced by the plant root cells.) Soil organic matter is reported on a percentage basis, and most garden soils have around 4 to 8 percent. This is a good number to watch over the years, as it should trend upward if you add sufficient organic material each season. If it trends downward, you are not following the Law of Return or compensating for what you take out of the garden. Remember, organic matter doesn’t mean fertilizer. Organic matter provides a place for the soil organisms to function, breaking down the fertilizers and making their contents available to plants. In addition, organic matter adsorbs nutrient cations for release to plant roots.
Next comes the pH test, which tells you the pH of the solution made by mixing your soil with water. The pH has a strong influence on nutrient availability, particularly that of phosphorus. The pH scale is logarithmic, meaning that moving one point makes a difference of ten times. So a pH of 8 is ten times more alkaline than a pH of 7. Again, the trend of the pH will tell a gardener much about his or her practices. If things get too acidic or basic, calcium or sulfur can be added to adjust the pH. However, the CEC, which usually increases with an increase of pH, also has an impact and is considered by a testing laboratory when making adjustment suggestions.
There isn’t much mystery to the pH reading. Somewhere around neutral, a pH of 7, seems best. You can’t change the pH of a soil instantly. It takes time. This is because the chemical reactions within the soil can continue to make the hydrogen ions that lower the pH. It is only after the buffer acid ions are used up that the pH can be raised. This is the case when there are excess aluminum ions in the soil. They react with water and release hydrogen ions.
The bulk of a soil test report, however, is dedicated to the nutrient numbers. Sometimes these are divided between the macronutrients and micronutrients, but the results of each nutrient test show the availability of each nutrient and how much, if any, needs to be added. This is the most straightforward part of the report.
Most laboratories put a great deal of emphasis on nitrogen, which for most farmers and gardeners is the limiting nutrient. This can be reported in several different ways, including ammonium (sometimes expressed as ammonia) and nitrate availability. Although all of the essential mineral nutrients are important, plants use more nitrogen and it can be replenished readily, so laboratories tend to concentrate on it. These tests were developed for farmers, whose living requires frequent soil testing, but we gardeners benefit.
Many laboratories cater to local conditions and may include special test results. For example, in areas where flooding by salt water is frequent, a sodium test might be conducted as a matter of course. This test is great for soils in northern climates that are affected by road and driveway salts, and a sodium test can be requested from all laboratories. By the same token, areas of heavy rainfall have different nutrient deficiencies than areas that don’t get much rain. Even previous uses of the land can be a factor.
Obviously, it makes sense to follow the recommendations of the laboratory based on the soil test results. Study the material you receive and use your computer if you need more help. Even if they don’t do testing, local agricultural agencies can provide lots of assistance once you are armed with soil test results. In addition, any decent laboratory will spend time with you on the phone or via email to answer questions pertaining to their tests, the results, or suggested remedial measures. If not, it isn’t a good laboratory for you.
Make sure your laboratory knows the size of your garden, so they can make recommendations accordingly. If you are gardening in a small backyard, you don’t need recommendations in pounds per acre or kilograms per hectare. Internet conversion calculators can also be used to bring things to the right scale.
It is also easiest if the laboratory you choose understands that you are an organic gardener or farmer and will provide recommendations using organic fertilizers. If not, you can access an organic fertilizer calculator via the Internet to convert recommended chemical fertilizers into organic ones. Oregon State University offers a good Excel spreadsheet for farmers and now has a separate one for gardeners. It is very easy to use (see Resources at the end of the book). Purdue University developed a similar free calculator for turf.
Finally, it’s important to have a second soil test done even if you don’t think your soils are deficient. The first soil test will establish a baseline, and a second test later in the first season or at the beginning of the next season will allow you to see where things are trending. A knowledgeable gardener gathers more than just great produce and flowers. Information is key.
For most home gardeners, and especially those who use organic practices, once you have the initial test results and at least a second test to see about trends, there is really no reason to test very often if you have been implementing the recommendations of your soil testing laboratory. You might consider a third check-up for annual, vegetable, and row crop garden soils 2 or 3 years after your last test. Lawns can go much longer without testing, 5 to 7 years. Soil around trees, shrubs, and display perennials left in place need only be tested if problems have started to develop.
The tests are not expensive and could be conducted each year. It is more a question of waiting long enough to see trending results. Still, there are times when it makes sense to test annually: if you are in a contest growing tomatoes or giant vegetables, for example, or if your income depends on growing the very best plants. Test annually if you drastically violate the Law of Return.
Discuss with your laboratory when appropriate follow-up tests should be taken—that is, when a test would show how your soils are being replenished or improving. Again, a local laboratory will have a lot of experience in this regard. You want to monitor trends, and sometimes these take a while to show up. Work with your laboratory.
Of course, as all gardeners know, the real test is how a plant is doing in the yard. If your plants are thriving, then you may have the right nutrients in your soil. Still, you now know how critical each and every one of the essential nutrients is. If an enzyme, for example, can’t be synthesized because there isn’t enough of a trace element, then something has gone or will go wrong with the plant. It makes sense to test your soils while things are working well, to ensure that there aren’t any essential nutrients close to becoming that Von Liebig limiter.
After slogging through a bit of chemistry, cellular biology, and some botany in reading this book, you should understand that when the essential nutrients are not available to plants, they will not survive. It helps to know why, but from a gardening standpoint, it helps more to do something about it. All of this starts with soil testing, which should be a prerequisite to all other garden chores.
![]() Gardeners violate the Law of Return by taking plant material out of the garden, which does not allow it to decompose and return its nutrients back to the soil. Fertilizer is needed to return the nutrients removed.
Gardeners violate the Law of Return by taking plant material out of the garden, which does not allow it to decompose and return its nutrients back to the soil. Fertilizer is needed to return the nutrients removed.
![]() The only way to know what nutrients are missing from your soils is to have them tested.
The only way to know what nutrients are missing from your soils is to have them tested.
![]() Organic gardening without chemicals is important to the soil structure, the soil food web, and the health of the environment. Look for a laboratory that provides organic recommendations.
Organic gardening without chemicals is important to the soil structure, the soil food web, and the health of the environment. Look for a laboratory that provides organic recommendations.
![]() When taking soil samples, use wooden and plastic tools and containers to avoid contaminating the sample.
When taking soil samples, use wooden and plastic tools and containers to avoid contaminating the sample.
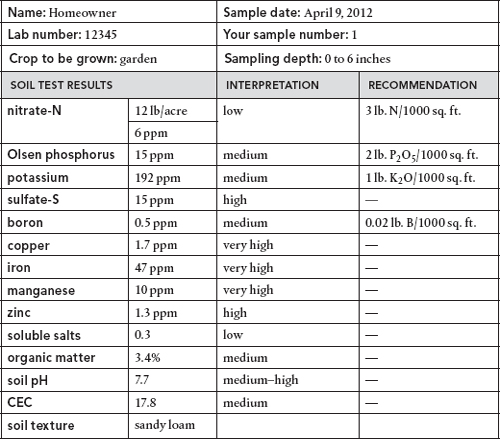
![]() In addition to testing for nutrients, test cation exchange capacity, pH, and any special local conditions.
In addition to testing for nutrients, test cation exchange capacity, pH, and any special local conditions.
![]() Follow the recommendations that accompany test results, and retest at the end of the season or the next year to discern trends.
Follow the recommendations that accompany test results, and retest at the end of the season or the next year to discern trends.
![]() You don’t need to test your soils every year unless you are seriously violating the Law of Return.
You don’t need to test your soils every year unless you are seriously violating the Law of Return.