Planting Guides and Seeders
Ah! The joy of planting! Your beds are prepared and ready to accept the seeds that will bring forth an abundant harvest, and the anticipation feels almost electric as you breathe in the smell of soil mingled with the scents of spring. You rush out the door eagerly with packets of seeds in one hand and a map of where everything will go in the other.
About an hour later, after you have painstakingly punched about 200 precisely spaced holes in the soil at two-inch intervals, your back is aching, your knees are dirty and the mosquitoes have come out in force. All you have done is poke holes and you still haven’t even planted a seed, but when it comes to that the seeds are so tiny you can barely pick them out of your hand. You know placing the seeds in the holes will take forever.
Intensive agricultural techniques that involve close plant spacings are certainly space efficient, but as you slap another blood sucker off your forearm, you start wondering if it is worth it. The produce aisle at the supermarket is starting to look appealing.
Leveling
Tamping
Making Holes
Let’s face it—as much as we may enjoy the fruits of our labor, on some days the details of mini-farming are sheer drudgery, and the initial planting of tiny and closely spaced seeds such as mustard and carrot is enough to make you think twice. Whenever I try to handle seeds that small, my fingers feel about six feet thick and as clumsy as an ox. It’s frustrating. And how on earth am I supposed to precisely space all of the holes for those seeds? After poking a couple of hundred holes, I want to space them further apart just to make the task end more quickly, and nature doesn’t reward shortcuts.
After thinking about these problems a bit, I developed a couple of solutions to making a lot of precisely spaced holes in your seedbed in a hurry, and have some methods for placing these seeds. This will help remove the drudgery and bring back the eager anticipation!

All-Purpose Fixed Planting Guide
Almost all seeds or transplants are spaced at multiples of two or three inches. That is to say plants are spaced at two, three, four, six, eight, nine, twelve or eighteen inches. This means that with rare exceptions, spacing can be accommodated using fixed measurements of two or three inches.
An easy way to accomplish this is to take a piece of board, mark off two-inch intervals, and drill a long deck screw into each mark, leaving about an inch and a half protruding.
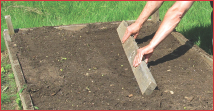
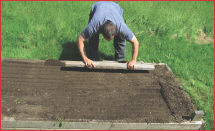
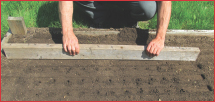
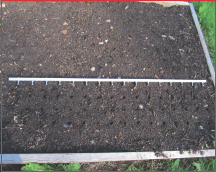
This board can be used to level the soil in a bed. It can also be used to tamp down the soil for a firm seed bed. Once the soil is leveled and tamped down, you can use the board to make hundreds of perfectly spaced seed holes in a hurry. To use it, lay it along the flattened soil in your bed, press the heads of the screws into the soil and wiggle it a bit. Now you have evenly spaced holes every two inches. If your seeds are spaced at four inches, just plant in every other hole. If they are spaced at six inches, then skip two holes after each one that is planted and so forth. So this board will work for spacings that are a multiple of two inches.
On the other edge of the board you can mark spacing at three inches, and this will work for spacings of three, six, nine, twelve inches and so forth. Using these two edges you can easily poke hundreds of perfectly spaced holes for seeds or transplants in just a minute.
Even better, the boards can also be used to make evenly spaced furrows for mesclun mix as well as evening out the soil in beds after mixing in soil amendments. After evening out the soil, you can use the flat side of the boards to pack down the soil a bit to make a picture-perfect seed bed prior to using the edge of the board to make the holes.
For this purpose, I would advise using 2”x4” stock between three and four feet long. Anything else will likely be either too fragile or too unwieldy. Once you have made the board, if you paint it with an exterior latex paint to protect it from the elements it will last for many years with just a touch-up of paint now and then.
The adjustable planting guide is the Rolls Royce approach to this problem. It is more flexible but can easily cost as much as $50, plus is more difficult to make. Nevertheless, I made one and I have to admit is works really well and that the larger head leaves a better hole for seeds. The materials that I have used in this case are just one way of accomplishing this task. Once you see how it works, you can do the same thing using other materials.
Materials:
1 6’ length of ½” aluminum “U” channel
24 5/16” 18 thread bolts, stainless
48 5/16” 18 thread nuts, stainless
Tools:
Hack saw
Drill or drill press
21/64 drill bit
Combination square
Measuring tape
Metal scribe or sharp nail
Nail
Hammer
Procedure:
Cut the aluminum U channel to a 4’ length, saving the 2’ piece for other projects.
Mark a center line along the exact center of the length of the channel using the combination square and a metal scribe or a fine-point magic marker. Using the measuring tape, use the scribe to mark one inch intervals along the center line. Use the hammer and a nail to make a slight indentation at each intersection between the one inch interval and center line.
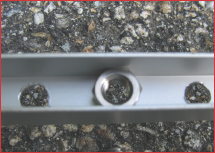
Drill a 21/64 inch hole using the drill or drill press at each indentation.
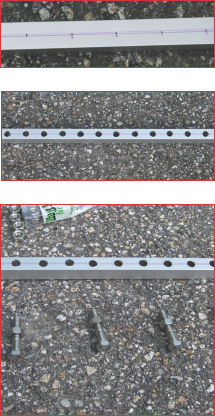
To use the adjustable planting guide, put a nut onto the bolt, leaving an inch of the thread protruding.
Put another nut into the U channel above the hole into which the bolt will be inserted. (The U channel fits the nut perfectly so no wrenches are needed.)
Screw the bolt into the nut through the hole in the U channel. Do this for whatever distance is needed. Adjust the bolts and nuts for proper depth and a snug fit.
To use the planting guide, place the properly spaced bolt heads on leveled earth and press to leave an indentation of the required depth. Then, lift and place the guide a suitable distance from the first row and repeat until done.
Putting Seeds in the Holes
Larger seeds, such as beans, peas, corn and so forth are easily handled and placed in the holes. But smaller seeds such as carrots, onions and lettuce can be challenging. It can be frustrating trying to pick up those seeds and place them in the beds one at a time. Usually, I use my daughter with her small fingers for such chores, but when she isn’t around other options are required.
Some seed producers have come up with pelletized seed to help with this. Carrot and lettuce seeds are surrounded by a coating that makes it easy to handle by hand or in automated seeders. The coating dissolves once the seeds are watered. This is a pretty good solution but so far it has unfortunately only been applied to a few vegetables. Luckily, there are some other solutions, though they all require some practice to master.
Seed spoons are tiny spoons formed in bright yellow plastic. You hold the seed in the cup of your hand, and use the other hand to manipulate the spoon. If you pick the right size (it comes with four sizes), every time you push the spoon into the mass of seeds in your hand, you will pull it back out with exactly one seed. Then you can easily put it where you wish. These cost less than a packet of seeds and work well.
Another option is a “Dial Seed Sower.” This device holds seeds in a reservoir and you regulate the rate at which seeds leave the reservoir to slide down a slick slide by changing the seed size on the dial and lightly shaking the device. Once you get practiced at it, you can put exactly one seed of practically any size exactly where you want it.
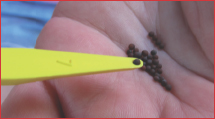
Seed spoon
Yet another option is a plunger-style hand seeder called the Mini-SeedMaster that looks like an oversized syringe. This takes a limited amount of seed into its canal at any given point in time and when held at a 45 degree angle it delivers seed from the reservoir to the soil with a depression of the plunger. I have found this works well with seeds like spinach and turnips, but not as well with the even smaller seeds such as carrot. Still, it allows planting a lot of chard in a hurry.
All of the foregoing devices are inexpensive in that they cost $10 or less. Considering that developing a bit of skill with them would easily repay their cost in time, they are a decent investment. At nearly $25, a vacuum hand seeder is a bit more expensive. This device uses a vacuum bulb with tips sized for the seeds you are planting. It allows you to pick up one seed at a time and deposit the seed where you’d like it. It requires a bit of manual dexterity, but once you get the hang of it you’ll start using it for seeding your indoor transplants as well. It’s a real time-saver.
Dial Seed Sower
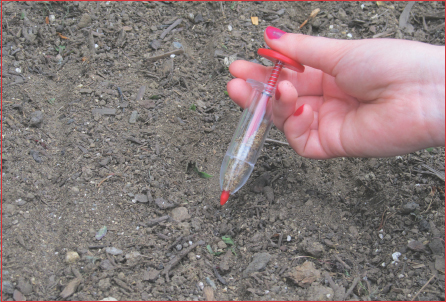
Mini SeedMaster
A vacuum handseeder