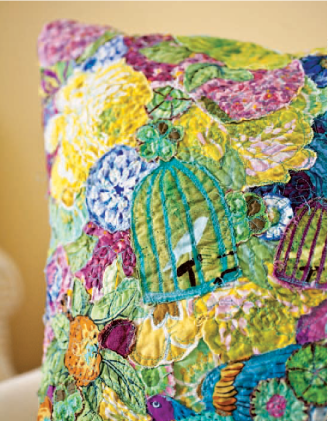
Free-Motion Quilting and Fabric Collage
One of my favorite sewing techniques is free-motion quilting used with fabric collage. For some time, I had been doing a variation on this technique by incorporating little scraps and using machine appliqué stitches to collage them together. And then I discovered free-motion quilting. A whole new world opened up.
Fabric collage uses free-motion quilting to create gorgeous fabric vignettes on quilts, clothing, pillows—pretty much anywhere you want to add a little flair. Motifs cut from a wide variety of large- and small-print fabrics are layered and then quilted together to create a usable piece of fabric art.
One thing I like is its instantly freeing nature. Using the freemotion quilting foot on your machine, with your feed dogs down, you simply doodle away using thread as your medium. You can trace the fabric motifs, add quilted leaves and flowers, even sign your name or throw in words and lines of poetry here and there.
There are no rules. Layer all kinds of fabrics together. I use everything from quilting cotton to lace and velvet to selvage edges, ribbon, and silk. I often cut out an appliqué shape rather than a fabric motif and throw that in the mix as well. Truly, anything goes. And you don’t have to be overly concerned about your stitch lengths because when you are finished, you wet down the piece and allow it to dry, giving it a lovely worn look and hiding any “flaws.”
Practice on scrap fabric to get used to it, and then—away you go! For some tips, see the following page.
* Use a free-motion foot (also called a darning foot), and drop the feed dogs so you can sew freely in every direction.
* Quilting gloves are wonderfully useful. They help you grip the fabric, and they keep your hands and wrists from becoming tired.
* Use tons of pins! The more the better. The last thing you want is flipping and flopping fabric pieces. When you have everything pinned down, pick up the piece and give it a good shake. Your pieces should all stay in place. Also, it’s a good idea to use bright or white pins that contrast with your fabric. If you should end up with a pin sewn underneath a motif (I’ll admit that I have—several times), don’t panic. Just trim it out, place a new motif on top, and quilt it again.

* When I first started free-motion quilting, my instinct was to turn the fabric the way I would when I turned a corner doing appliqué. But I soon found I was working against myself by doing that. Simply move your fabric up, down, and side to side, gliding it underneath the needle gently.
* The back of your work is just as important as the front, so be sure to bring up the bobbin thread to the front before you start. Turn the wheel of your machine manually to make 1 stitch. Then raise the needle and wiggle the wheel a bit while gently tugging at the thread. You’ll see the loop of the bobbin thread coming up. Pull it all the way to the front and continue sewing. Trim the threads on the top after several stitches to get them out of the way.
* Speaking of needles … just as when you are sewing a long distance, be sure that when you pause, you set your machine to the needle-down position to hold the fabric in place.
* You may need to play with the tension a bit to get it just right. Experiment on “practice” fabrics of the same weight as your project to adjust the tension.
* Stitch in 2 stages: First stitch the raw edges of all the pieces to get them attached so you can remove the pins. Then go back and do more decorative stitching to give the piece texture and depth.
* After quilting, wet down or wash the whole piece and hang it to dry or use your dryer. Washing allows the fabric to crinkle and gives you a nice, soft texture with frayed edges.