Chapter One
Caramels, Toffees and More
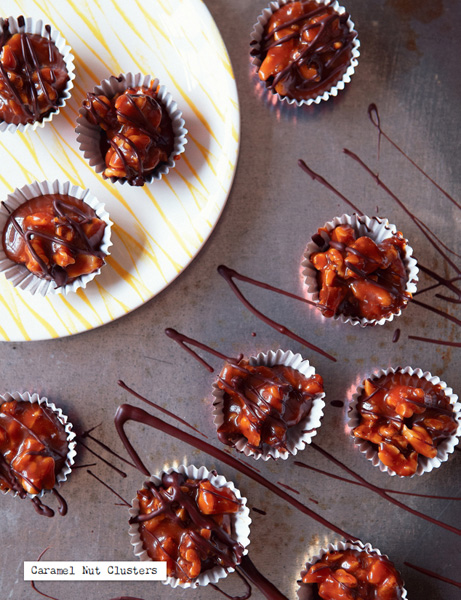
Caramel Nut Clusters
Soft caramel with chunky bits of walnut, together with thin trails of dark chocolate, make these clusters irresistible. Packaged in pretty cases or paper cups and arranged in an attractive box or tin, they make a good gift – if you can bear to part with them. Tempered chocolate will give a shinier and crisper finish, but you can simply melt the chocolate.
Makes 16 clusters of a satisfting size
175 g/6 oz/scant 1 cup demerara sugar
150 g/5½ oz/½ cup golden syrup or light corn syrup
2 tbsp water
200 ml/7 fl oz/generous ¾ cup double cream
⅛ tsp salt
125 g/4½ oz/1½ cups walnuts, coarsely chopped
250 g/9 oz/9 squares dark chocolate, tempered or simply melted
Put the sugar, syrup and water into a large heavy-based uncoated saucepan and stir over low heat until the sugar dissolves completely. Undissolved sugar will make your caramel grainy. Attach a sugar thermometer to the pan, increase the heat and leave to boil without stirring until it reaches 120°C/248°F (firm ball stage). It will take about 4–5 minutes.
Meanwhile, heat the cream in a small saucepan and have it standing by. Stir in the hot cream as soon as the sugar reaches the correct temperature, stirring constantly. It will hiss and spit in the beginning. Once the cream is well incorporated, leave the mixture to continue boiling without stirring until it reaches 120°C/248°F once again. This will take about 15–18 minutes (or longer for corn syrup), but rely on the thermometer and keep a close watch. Take the pan off the heat, remove the thermometer and stir in the salt and walnuts. Leave the mixture to rest for about 15 minutes, or until it thickens enough to hold its shape when scooped out.
Use 2 dessertspoons to scoop out and drop 16 clusters onto a sheet of baking parchment or directly into your cupcake cases. They should spread only minimally. Leave to cool.
When the clusters have cooled completely and set into soft caramel, they can be dipped or decorated. To dip: loosen them from the baking parchment. Prick a cluster with a cocktail stick or lay one on a dipping fork and dip it into the melted chocolate to coat. Tap the stick or fork several times on the edge of the bowl so that excess chocolate falls back into the bowl. Return the coated cluster to the baking parchment. Pull out the cocktail stick and neaten the tiny hole it leaves. Coat the other clusters in the same way. As you near the end, you may need to use a small spoon to help coat the tops. Alternatively: use a spoonful of melted chocolate to trail thin zig-zag lines over the tops of your caramel clusters. Leave to set.
Coconut Toffees
Trinidadians have a much-loved homely confection that is known as ‘tooloom’ or ‘touloum’. It is made from local molasses (dark treacle), sugar and freshly grated coconut, cooked together for a while until the mixture reaches the right consistency, then rolled into balls. I decided to go for a quick and easy hybrid that is in the style of ‘tooloom’, using desiccated coconut. It is supposed to be a sticky toffee, so don’t overcook the mixture or you will end up with coconut-coated hockey pucks. Conversely, if a trial toffee spreads too much, knead a few extra tablespoons of coconut into the warm mixture before continuing to shape the balls.

Makes about 24
125 g/4½ oz/generous ⅓ cup dark treacle
125 g/4½ oz/generous ⅓ cup golden syrup or light corn syrup
75 g/2¾ oz/¼ cup + 2 tbsp granulated sugar
25 g/1 oz/2 tbsp (¼ stick) butter, flaked
125 g/4½ oz/1⅓ cups desiccated coconut, preferably medium cut, plus about 40–50 g/1½–1½ oz/scant ½–½ cup extra desiccated coconut, for rolling
generous ¾ tsp ground cinnamon
¾ tsp freshly grated nutmeg
Put the treacle, syrup, sugar and butter into a medium uncoated heavy-based saucepan and stir over low heat until the butter melts and the sugar dissolves completely. The butter will melt quite quickly, but it will take a while for the sugar to dissolve properly. Attach a sugar thermometer to the pan, increase the heat and bring to the boil. Leave to boil just until it reaches 112–113°C/ 234–235°F (soft ball stage), then remove immediately from the heat. This can go extremely fast and the golden syrup version can get there in about 3–4 minutes, so keep a sharp eye on the thermometer. To hand-test, drop a little of the mixture into a bowl filled with cold water. If you can press it together into a soft ball, it is ready.
Working quickly or the toffee will harden, stir in the coconut and spices. Mix well for a minute or so, then leave to stand for about 5 minutes. Give the mixture a good stir and scrape it out onto a corner of a silicone mat or sheet of baking parchment. Leave to stand for a few minutes until cool enough to handle but still soft. Scatter the extra coconut onto the mat or baking parchment.
Using a small dessertspoon or a large teaspoon, dip spoonfuls of the toffee mixture, working from around the edges inwards. Roll into truffle-sized balls between your palms, moistening them lightly with water if necessary. Roll the balls in the coconut and set to one side as you continue to roll the rest. They are very attractive as they are, served on a pretty plate, but you can also make them more special by putting them in foil sweet cases or cups.
Caramels
My mother-in-law grew up in a sweet shop – or the next best thing – and remained an ardent supporter of the confectionery industry until her death. Her parents owned a delicatessen in The Hague, specialising in fine groceries, sweets, chocolates and nuts. Chocolate-coated toffees were one of her favourites and she kept them with the rest of her stash in a small cupboard conveniently situated next to her armchair. Letting ourselves in through the back door and calling out to announce ourselves, we would often receive a thick response as she hastily disposed of the remnant in her mouth. We now live in that house, but I keep CDs and DVDs in that cupboard and leave the sweets downstairs in the kitchen, because I could so easily fall into the same trap. She would have enjoyed these soft caramels, which are far easier on the teeth than her toffees were, although this caramel is firmer than the Caramel Nut Clusters.
Makes about 24
225 g/8 oz/generous 1 cup caster sugar
185 g/6½ oz/½ cup golden syrup or light corn syrup
2 tbsp water
250 ml/9 fl oz/generous 1 cup double cream
¼ tsp salt
¾–1 tsp vanilla extract
30 g/1 oz/2 tbsp (¼ stick) butter, flaked
250 g/9 oz/9 squares melted or tempered dark chocolate, for dipping (optional)
Line a large loaf tin with baking parchment.
Put the sugar, syrup and water into a large uncoated heavy-based saucepan and stir over low heat until the sugar dissolves completely. Undissolved sugar will make your caramel grainy. Attach a sugar thermometer to the pan, increase the heat and leave to boil without stirring until it reaches 120°C/248°F (firm ball stage). It will take about 4–5 minutes (corn syrup may need extra time).
Meanwhile, heat the cream in a small saucepan and have it standing by. Stir in the hot cream as soon as the sugar reaches the correct temperature, stirring constantly. It will hiss and spit in the beginning. Once the cream is well incorporated, leave the mixture to continue boiling without stirring until it reaches 122°C/252°F this time. This will take a little longer than 25 minutes, but rely on the thermometer and keep a close watch. Take the pan off the heat, remove the thermometer and stir in the salt, vanilla and butter. Pour into the loaf tin and leave to set.
Cut the caramel when completely set. You can cut them into squares and wrap in cellophane, or first dip them in chocolate (see Totally Truffles). Unwrapped or uncoated caramels will eventually spread at room temperature so store in an airtight container in a cool place. They will keep for about a week. Don’t refrigerate the chocolate-coated ones, or they will discolour.
Coffee Blocks
Haagsche Hopjes
These candies are said to have been invented in the latter half of the eighteenth century by Baron Hendrik Hop from The Hague. His fondness for coffee bordered on addiction and he gladly believed in the medicinal properties that were ascribed to it in those days, supposing it to relieve his gout. Eventually, he drank so much coffee that he developed a stomach complaint and his doctor forbade its use, and the sediment in a forgotten cup of sweet coffee inspired him to approach a local sweet maker with the request for a coffee-flavoured sweet. Another variant suggests that the addiction was so great that he longed for coffee while travelling around in his coach on diplomatic business. As it was not practical to drink liquids in a moving vehicle, he had the sweets made as a substitute. Sweets and legends live on and there is even a small museum in The Hague dedicated to Baron Hop and his creation. The coffee flavour here will depend on the strength of your brew.
Makes about 32 small squares
200 g/7 oz/1 cup granulated sugar
75 g/2¾ oz/scant ¼ cup golden syrup
50 g/1¾ oz/3½ tbsp butter, plus extra
for greasing
50 ml/1¾ fl oz/scant ¼ cup double cream
100 ml/3½ fl oz/scant ½ cup very
strong coffee
Line a small loaf tin (with a base measurement of approx. 10 x 15 cm/4 x 6 in) with baking parchment.
Put all of the ingredients into a large uncoated heavy-based saucepan and stir over low heat until the butter melts and the sugar dissolves completely. Attach a sugar thermometer to the pan, bring to the boil and leave to boil without stirring until it reaches 130°C/265°F (just past late hard ball stage and approaching soft crack stage). It will take about 25–30 minutes from the time it comes to a rolling boil, but rely on the thermometer.
Remove the thermometer and pour the mixture into the loaf tin. It will bubble up quite a lot, but keep on pouring steadily. Leave to cool until firm enough to cut.
Lift the block out of the tin and place on the work surface. Cut into about 32 squares with a greased knife and leave to cool completely, spaced well apart.
Store in an airtight container in a cool place, or they will stick together. You can also wrap them individually in small squares of greaseproof paper and store in a jar. They will keep for a week or two, but will become softer and stickier as time goes by.
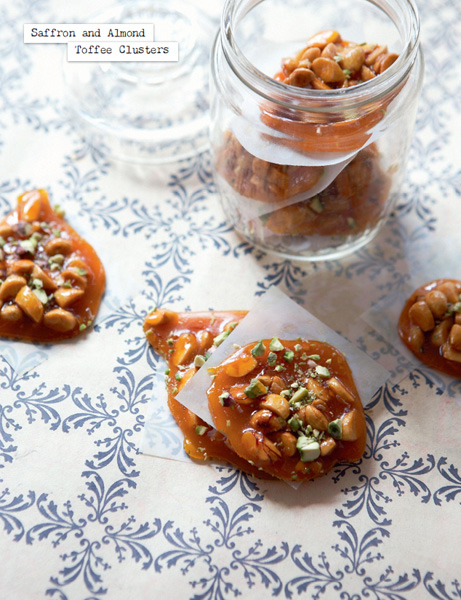
Saffron and Almond Toffee Clusters
Sohan Asali
This Iranian treat looks like brittle but has more of a toffee texture. It is surprisingly easy – and quick – to make. If you don’t have saffron strands, use a tsp ground saffron. And if you don’t have that either, leave it out and call it Almond Toffee Clusters. On no account is it to be replaced with something like turmeric. It may have the same colour, but your beautiful toffee will taste like curry. Note too that my timings and temperatures will not work if you substitute butter, so do use the oil, even if your inner feeling tells you that butter is so flavourful. It is, but it will also behave differently.
Makes about 16
150 g/5½ oz/1 cup blanched almonds
large pinch of saffron strands
1 tbsp boiling water
200 g/7 oz/1 cup caster sugar
50 g/1¾ oz/scant ¼ cup runny honey
3 tbsp neutral-tasting oil (e.g. peanut or sunflower)
25–30 g/1 oz/scant ¼ cup pistachios, coarsely chopped
The almonds can be lightly toasted for added crunch, but that is up to you. Leave them to cool if toasted, then chop them coarsely. There will be fine bits and even a little powder in between, but leave it all in. It will add body to the mixture.
Leave the saffron strands to steep in the boiling water, or add the ground saffron to the water.
Put the sugar, honey and oil in a medium uncoated heavy-based saucepan and stir over medium–high heat to dissolve the sugar crystals. It will be a thick paste at first but will become liquid as it gets hotter. Attach a sugar thermometer to the pan and continue to stir. When the mixture reaches 100°C/212°F, stir in the almonds. It should take about 5 minutes to get there, but rely on the thermometer. Leave to cook further, stirring constantly, until the thermometer registers 130°C/265°F (just about to pass from hard ball to soft crack). This takes a minute or so, so be watchful. Pour in the saffron liquid while stirring. It will spit, but continue to stir until it reaches 130°C/265°F again. This will take another minute. Immediately take the pan off the heat and remove the thermometer.
Spoon about 16 tbsp of the beautiful golden mixture onto a sheet of baking parchment and decorate immediately with the chopped pistachios, pressing to embed them. Leave to cool completely. Store in a glass jar for up to a week, with small squares of baking parchment in between to discourage sticking.
The Lingering Quality of Treacle
Growing up in the former British colony of Guyana left us with a taste for many British treats. When I was a child, we always had a huge tin of Quality Street (an extremely popular brand of British sweets containing a mix of toffees and chocolates) in the house; not one of those miserly little ones that you could get in the supermarket, but one that would have done a sweet shop proud. That tin was a source of joy to my sister and me and our mother wisely kept it out of the kitchen storeroom. What she didn’t know was that we knew that it was kept on the highest shelf in one of the cupboards that lined the corridor to the bedrooms. If the tin was at the front of the shelf, I could reach it by climbing onto a lower shelf. If it got pushed to the back, I couldn’t touch it. In that case we made use of our trusted accomplice: our father. We trusted him, not because he was our father, but because he liked all the sweets in the tin that we didn’t, like the soft centred strawberry and coconut ones. My sister liked almost everything else and my favourites were the green foil-covered chocolate triangle, the large pointed purple one filled with caramel and a nut, and the dark toffee in the amber-brown wrapper. There was something about that toffee that made it different from other toffees. Looking back, it must have been the treacly flavour.
Treacle Toffee
These treacle toffees are quite simple to prepare at home if you have 15 minutes or so to spare. They are hard and brittle until you put one in your mouth and allow it to exude treacly goodness onto your tongue, softening towards the end into one last bit of chewiness.
Makes at least 24 pieces
250 g/9 oz/1¼ cups demerara sugar
125 g/4½ oz/generous ⅓ cup dark treacle
60 g/2¼ oz/¼ cup (generous ½ stick) butter
1 tbsp water
1½ tsp white wine vinegar
sunflower oil, for oiling
Generously line a small–medium loaf tin with baking parchment.
Put all of the ingredients (except the oil) into a large uncoated heavy-based saucepan and stir over low heat until the butter melts and the sugar dissolves. The butter will melt quite quickly, but it will take a while for the sugar to dissolve properly. Be patient and keep at it, as undissolved sugar will make your toffee grainy. Attach a sugar thermometer to the pan, increase the heat and, stirring constantly, leave to boil until it reaches 125°C/257°F (hard ball stage). This will give a very firm toffee and 130°C/265°F a harder one. Beyond this you will end up with a more break-teeth toffee. The entire process should take about 20 minutes, but rely on the thermometer and keep a close watch.
Pour the mixture into the loaf tin and leave it to firm up. Once it is firm enough to be cut, use a thin metal spatula to mark small squares right down to the bottom. Oil the spatula before each downward movement.
Now you can take one of two options. Option one is for those who are inclined towards neat presentation. Remove the paper with the toffee and use the oiled spatula to separate the pieces, allowing them to harden without touching each other.
Option two is for those who long for the nostalgia of bygone days, before health and hygiene rules and regulations caused block toffee to disappear from the counters of sweet shops. Leave the toffee to cool and harden in the tin. Once it becomes brittle, put it into a thick plastic bag and tap it with a kitchen mallet or small hammer, or just slap it against the work surface to break the toffee into pieces. Some pieces will break along the markings and others will shatter where they like. However you serve it, it is absolutely delicious.
Store in an airtight container between layers of greaseproof paper.
Chewy sesame strips
Here is something with a nice chewy texture that could become a brittle if cooked to hard crack stage. This kind of simple confection has been made and eaten for countless centuries. When the Arabs introduced sugar from the Far East to the Western world, it gradually began to replace some or all of the honey in existing recipes. It is quick and easy to make and very wholesome. And I must say that the entire sheet lying on the mat looks very pretty, like a well-aged mosaic.
Quantity made will depend on the thickness
200 g/7 oz/generous ½ cup runny honey
100 g/3½ oz/½ cup granulated sugar
250 g/9 oz/2 cups toasted sesame seeds
Put the honey and sugar in a medium uncoated heavy-based saucepan and stir over low heat until the sugar dissolves completely. Increase the heat and let it come to a rolling boil. Lower the heat, attach a sugar thermometer to the pan and cook until it reaches 134°C/273°F (soft crack stage). It will take about 5–6 minutes. Immediately take the pan off the heat, remove the thermometer and stir in the sesame seeds.
Scrape the mixture out onto a silicone mat or large sheet of baking parchment and quickly flatten it with a spatula. Top with another sheet of baking parchment and flatten with a rolling pin, rolling gently back and forth to achieve a thickness of ¼–½ cm/⅛/–¼ in.
Remove the top sheet of parchment; it doesn’t matter if there is some sugar mixture clinging to it. Use a straight-sided bench scraper or blunt knife to mark into rows about 3 cm/1½ in wide, then again at right angles 5–6 cm/2–2½ in apart, to create bars. Press deeply and if using a knife and a silicone mat, be careful not to cut through it. Work fast, as the sugar will start to set. Leave to cool.
Once cool, transfer the mixture to a hard surface. Use a large knife to cut the bars apart along the depressions. The mixture is sticky, so press hard to cut right through.
Store in a tin lined with greaseproof paper, with sheets between each layer to prevent the pieces from sticking to each other. They will keep for several weeks.
Honeycomb
Honeycomb, known as ‘hokey pokey’ in New Zealand, and several other names, is made from three storecupboard staples, none of which is honey. The name simply refers to the texture and appearance, which is light, airy and crisp. It is perhaps best known in the form of the mass-produced chocolate-coated confectionery (Crunchie) bar and is quick and easy to make at home, even without the aid of a sugar thermometer. I enjoy preparing it because it makes me feel like an alchemist when it starts frothing and changes so completely after the bicarbonate of soda is added. It can be eaten as it is, mixed into ice cream, trifles and other creamy desserts, or used as a crisp last minute decoration straight from the freezer.
Makes a 20 × 20 cm/8 × 8 in square, to be broken into shards as desired
150 g/5½ oz/¾ cup caster sugar
75 g/2¾ oz/scant ¼ cup golden syrup
1¼ tsp bicarbonate of soda
Generously line a 20 x 20 cm/8 x 8 in baking tin with baking parchment.
Put the sugar and golden syrup into a large uncoated heavy-based saucepan.
Sift the bicarbonate of soda onto a saucer and set aside.
Stir the sugar and syrup over low heat until the sugar dissolves, then increase the heat slightly and bring to the boil. Watch it closely and try not to stir unless absolutely necessary. Lower the heat if necessary. It will take about 3–4 minutes to reach the right consistency and the desired deep amber colour. Be alert. The difference between the perfect consistency and disaster in the form of overcooking can be mere seconds. Err on the side of undercooking if anything at all. Brown syrup will mean a crisp but burnt and nasty-tasting mouthful.
As soon as the syrup turns dark amber, remove the saucepan from the heat and quickly stir in the bicarbonate of soda. Stop as soon as it is mixed in, or you will deflate the mixture. Pour the mixture into the prepared tin. It will not fill the tin, but allow it to find its own way and do not stir or level it. Leave to cool completely.
The honeycomb can be kept in an airtight container for several days and can also be frozen for later.
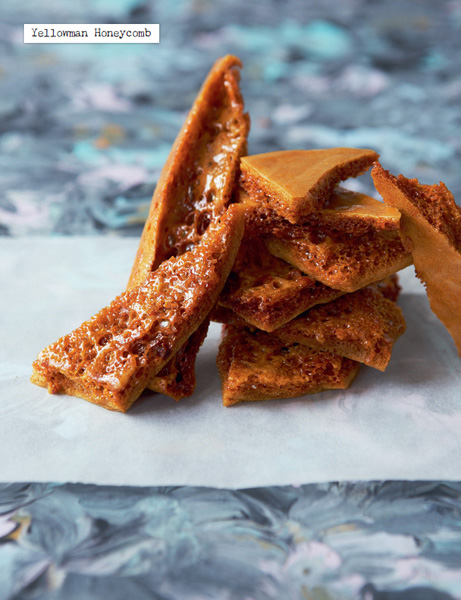
Yellowman Honeycomb
This is a harder and more robust version of the previous honeycomb. It takes a little longer to prepare and will require a sugar thermometer. It appears all over the world in many versions. In Ireland there is a yellow coloured honeycomb toffee that is graphically referred to as ‘Yellowman’ or ‘Yellaman’. It is a treat that is centuries old, still made and enjoyed by many, and has always had a special association with fairs, especially the ‘Lammas’ fairs held around late July and August. In America it appears as ‘sponge candy’ and ‘sea foam’ among other names. The most peculiar version I have ever eaten is the Spanish one called ‘carbón’ (coal). Colouring is added to make the mixture black and it does look quite realistic. It was often given to naughty children at Christmas time as a caution.
Makes a 20 × 20 cm/8 × 8 in square, to be broken into shards as desired
200 G/7 oz/generous ½ cup golden syrup
100 g/3½ oz/½ cup demerara sugar
20 g/¾ oz/1½ tbsp butter
1 tbsp water
2 tsp white wine vinegar
2½ tsp bicarbonate of soda
Generously line a 20 × 20 cm/8 × 8 in tin with baking parchment.
Put the golden syrup, sugar, butter, water and vinegar into a large uncoated heavy-based saucepan.
Sift the bicarbonate of soda onto a saucer and set aside.
Stir the ingredients in the saucepan over low heat until the butter melts and the sugar dissolves then increase the heat slightly and bring to the boil. Attach a sugar thermometer to the pan, lower the heat a little and leave to boil without stirring until it reaches 132°C/270°F (soft crack stage). It will take about 10–12 minutes from the time it comes to a rolling boil, but rely on the thermometer and keep a close watch.
Take the saucepan off the heat, remove the thermometer, then sprinkle on the bicarbonate of soda and quickly stir it in. It will foam up a lot more than the simple honeycomb recipe. Stop as soon as it is mixed in, or you will deflate the mixture.
Pour the mixture into the tin and do not stir or level it. The mixture will almost fill the tin, but will subside a little as it cools. Set aside to cool completely and do NOT mark it into squares; the pressure of the knife deflates it. It has to be broken randomly.
The honeycomb can be kept in an airtight container for several days and can also be frozen for later.
Boterbabbelaars
I am stumped as to how to translate ‘boterbabbelaar’. My hefty and usually reliable dictionary hesitatingly suggests ‘bulls-eye’; its component parts simply mean ‘butter’ and ‘chatterbox’. I’ll just describe it and leave it up to you to call it what you like. These boiled confections are a traditional homemade speciality of the southern Dutch province of Zeeland, and family recipes abound even though they are now also manufactured commercially. Sugar, vinegar, salt and a modest amount of butter are the main ingredients, with a secret touch here and there, such as the stock cubes I saw in one recipe. Dark treacle is often an optional ingredient, particularly when granulated sugar is used instead of the soft, syrupy brown sugar that appears to be unique to Holland. They are very easy to make, with no real pulling involved either, but you will need to stretch the fairly hot mixture into a rope before it cools.

Makes about 36
25 g/1 oz/2 tbsp (¼ stick) butter, plus extra
for greasing
150 g/5½ oz/¾ cup granulated sugar
50 g/1¼ oz/scant 2½ tbsp dark treacle
generous ¼ tsp salt
2 tbsp water
2 tbsp white wine vinegar
Grease a baking sheet with butter.
Put all of the ingredients into a medium uncoated heavy-based saucepan and stir over low heat until the butter melts and the sugar dissolves completely. Attach a sugar thermometer to the pan, bring to the boil and leave to boil without stirring until it reaches 130°C/265°F (just past late hard ball stage and approaching soft crack stage). It will take about 15 minutes from the time it comes to a rolling boil, but rely on the thermometer.
Remove the thermometer and pour the mixture out onto the baking sheet. It will bubble a bit and then spread out in a thin layer. Leave it to cool slightly; it should be warm and pliable.
Grease your hands with butter and roll the mixture up loosely. Use a pair of kitchen scissors to cut it into 3 portions and quickly stretch each portion with a massaging motion to make a rope with the thickness of an average-sized pinkie finger. Snip at 2 cm/½ in intervals and leave to cool on the baking sheet.
They will keep for a week or two, but will become stickier as time goes by.