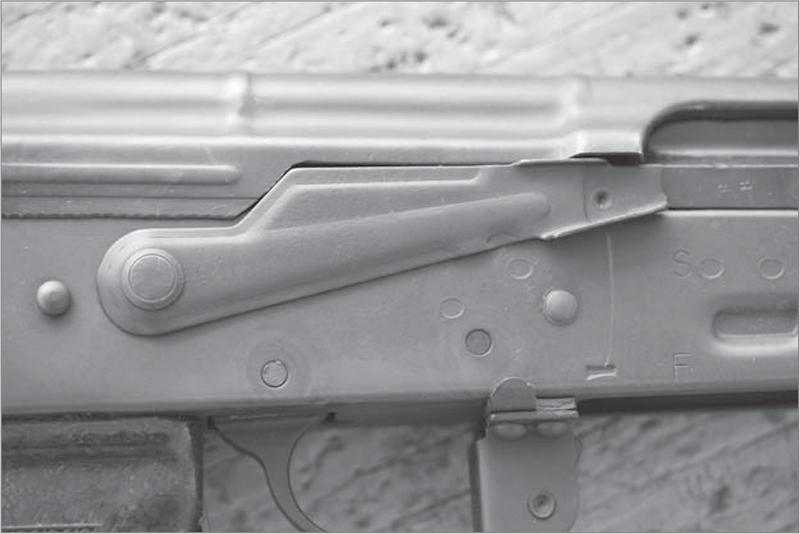
It may be simple to make and to keep operating, but you still have to know the details of what goes on in your AK. This is the selector.
I KNOW THERE’S SOMEONE READING THIS who thinks, “This is moronic. Everyone knows how to take an AK apart.” Au contraire, mon ami. Yes, it is so simple that even an illiterate peasant (the bulk of the Soviet Army for much of its existence) could do it, but even so, they had to be taught how to do it. Even the simplest tool has certain maintenance requirements, and even the cleverest person can get it wrong if they just jump in without instruction.
An example might be illustrative: the 1911 pistol. The 1911 is as simple a pistol as exists. However, you can still get it wrong. There was a top-ranked shooter in our club, one who was perhaps a single step below the pro shooters of the 1980s, who one day at a match was talking about how he’d done a trigger job on his pistol. From listening to the blow-by-blow description, it was pretty clear he had no idea how the 1911 worked. You see, he’d polished just about every surface on the hammer, sear, disconnector and associated springs — all the surfaces except those that really mattered. How it was that he ended up with a trigger pull that he liked was a mystery to me. The only thing I can assume from that was that I’d just seen an example of one of the aphorisms of sports in action: “If you think it matters, it does.”
You may be learning to take your AK apart in order to properly clean and lubricate it. Or you may be disassembling a parts kit preparatory to building your own, on a flat you’ve bent or a receiver — there is no lower-and-upper receiver, as on the AR-15 — and need to separate the various parts. There are minor variations between models, country of origin, time period, and between the AK-47 and the AK-74. Adapt as you go.
If you have experience with other rifles you may be surprised at how many of the parts of an AK are made as permanent attachments. The basic idea of the Soviet Empire was that AK rifles were made, issued, maintained, serviced and then scrapped. If they became too worn they were replaced. Incidental items like stocks, pistol grips and handguards could be replaced if they were damaged, but otherwise it was simply cheaper to build new rifles than overhaul old ones. Get your mind wrapped around that, and you’ll do fine. If not, you’ll be regularly frustrated that you can’t replace some part or another with a “better” one, or one with a higher “Chicks Dig It” (CDI) factor.
It may be simple to make and to keep operating, but you still have to know the details of what goes on in your AK. This is the selector.

This is your selector on “Fire.”
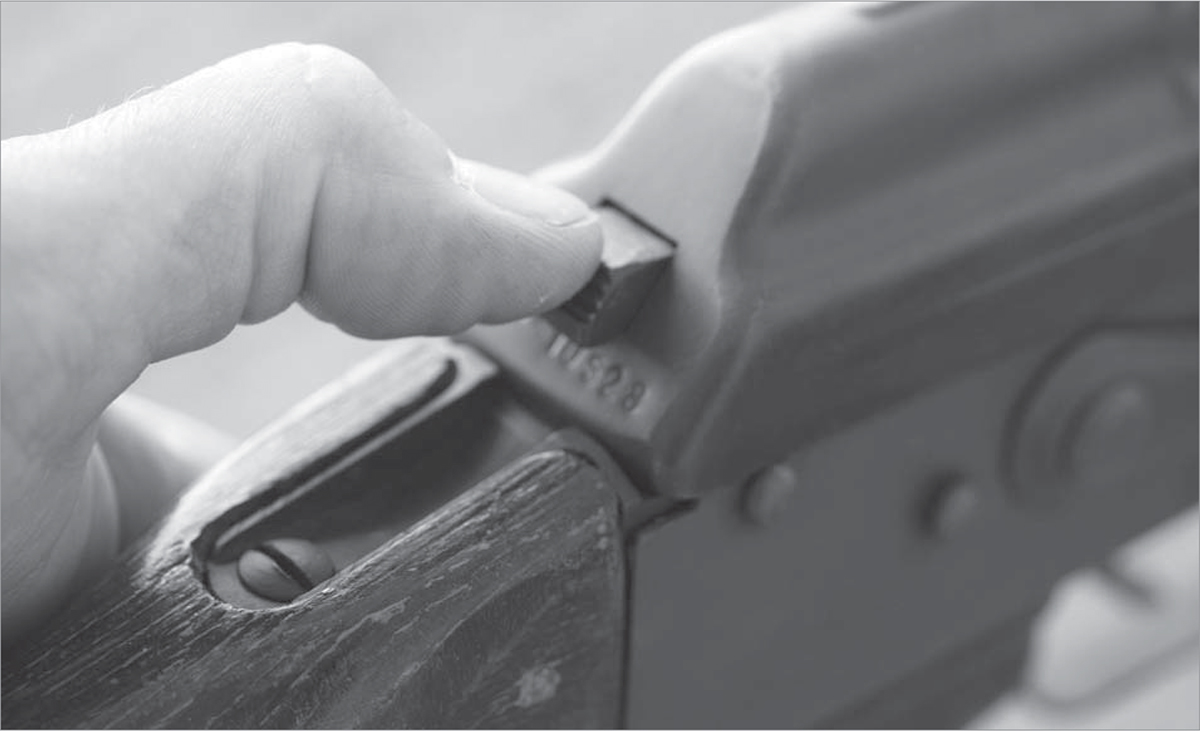
With the rifle empty (you did check, didn’t you?) push the recoil spring guide button in.
So, to take your AK apart without embarrassing hammer marks or chewing things up with pry marks, you need to know how it goes together. Grab your rifle, and follow me:
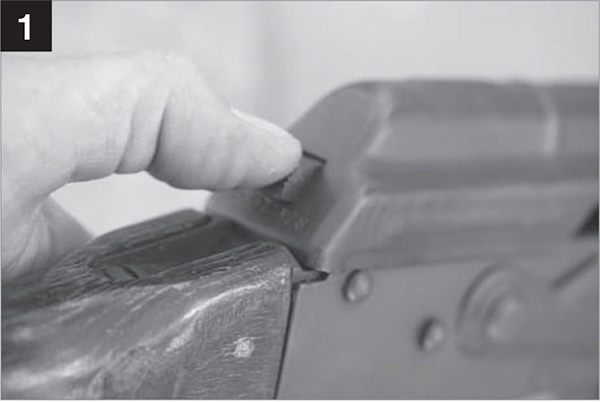
[1] Once the recoil spring guide button passes flush with the cover.

[2] Lift it with your thumb and take it off the receiver.
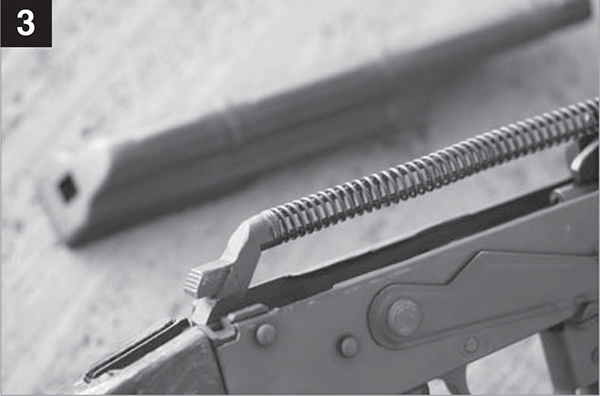
[3] Set it aside, the spring will stay in place.
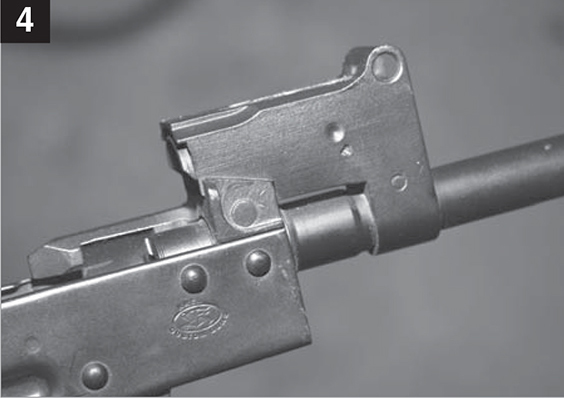
[4] Notice that the guide rides in its own slot, and is kept in place by the rear lip of the trunnion.

[5] Push the button forward, and lift it off the trunnion.
[6] With practice, you can do it one handed and look cool. If you fumble, the spring won’t go far.
If you have optics on your AK, you may have to remove them before you can proceed. Some optical mounts may crowd the top cover so much that you can’t weasel the cover out from underneath the mount, so it has to come off. In other situations, you are going to be doing some heavy duty scrubbing, hosing and cleaning, and you don’t want your optics or battery-powered sight systems exposed to the solvents. You may or may not have to remove the optics, but be aware that if you do, it would be prudent to check your zero when you put it back on. Yes, yes, yes, the manufacturer has assured you that it will “return to zero” but what if it doesn’t? You should have checked that before you went and took the scope off for a thorough cleaning.
First, make sure the gun is empty. Push the magazine lever and rock the magazine out. No cartridges? A good start. Push the selector down and rack the bolt. Nothing flies out? Again, good. Take a moment to peer into the chamber and make sure there isn’t a stray cartridge there. I know, you pulled the bolt back, so anything that had been in the chamber would have been extracted, right? Not necessarily. Perhaps you have a busted extractor. Or the cartridge is locked in the chamber, rusted in place, and the extractor ripped the rim off when you slammed the charging handle against the benchtop at the gun club.
Be certain, take a look. I know those of you who have read my other books will be sensitized to this, but the new readers should know a bit of background. I spent over twenty years working in various gun shops, and in that time I lost count of the number of times someone who had just presented a firearm for sale or repair remarked, “Oh, it isn’t loaded,” when I went to check. And equally, I’ve lost count of the times a cartridge would clatter across the counter and onto the floor right after that confident declaration. Heck, there’s a Galil on the easy chair right behind me, one that I checked to make sure it wasn’t loaded when I brought it out of the shop. And the next time I pick it up, whether to check some detail while writing or to return it to the shop, I’ll check again. Do I really think that my dogs have played a trick on me, and loaded it when I wasn’t looking? No. But checking each firearm for its loaded status each time you pick it up, even if you’ve just watched someone else do the exact same thing, is perhaps the best habit you can adopt.
Enough lecture, on to the fun stuff.
So you have an empty chamber AK, with magazine removed. Push the selector all the way down. Look on the back of the receiver cover and you’ll see a square button protruding from the rear of the cover. That is the back end of the recoil spring guide, which keeps the receiver cover in place. Push the button forward (usually with a thumb) and, once it is below flush with the surface of the receiver cover, lever your thumb up to lift the cover from its track in the receiver. Once clear, lift the cover off and set it aside. Look at the rear trunnion.
You’ll see the transverse slot (crossways) at the rear. That is the slot in which the bottom rear lip of the cover rides, keeping it from simply scooting off the rear of the receiver (and into your face) each time you shoot. Notice also that the recoil spring guide rides in its own slot. The recoil spring guide slot keeps that assembly centered in the receiver, and from springing off the rear of the receiver when you lift the cover off. To remove the recoil spring and its guide, push the square button end forward (toward the muzzle) until it clears the trunnion slot, and lift. Pull the assembly to the rear and out of the carrier.
Notice that the assembly is a self-contained unit. It does not come apart in normal maintenance, and you probably will wear out the barrel before you wear out the spring. The only reason I could see to take the recoil spring assembly apart would be to refinish the rifle. And then only if you wanted to Parkerize the recoil spring button end of it. Then, you might want to take the spring off before throwing the parts into the Parkerizing bath. Not because Parkerizing would harm the spring, but because you can fit the parts into a smaller tray, requiring less solution. The recoil spring system is a single unit. Unless you are going to replace a broken or worn-out spring (and who knows how much ammo one has to shoot in order to have to go about accomplishing either of those) you do not have to disassemble the recoil spring setup.
No, let me be more clear, and forceful, on that; do not disassemble the recoil spring system. Period. It needs nothing from you but to be brushed clean, if at all, and sprayed with a bit of oil to keep it from rusting. Then leave it alone. No good can come from adjusting, tuning or “beefing up” that spring. Leave it alone, unless you are going to replace entirely with something like the DPM Systems recoil spring assembly.
With the spring out, the carrier stays in place.
Pull the carrier back until it stops.

Then lift it straight up. If the builder made it correctly, it should lift with no problem.

The bolt won’t fall out.
Turn the carrier over.
Set the spring assembly aside.
Before you grab the carrier and yank it out of the receiver, take another look at the receiver rails. Notice at the back that the rails are cut away from the upper lip of the receiver? That gap at the rear of the bolt/carrier travel is the place where you lift the carrier out. Pull the carrier all the way to the rear and lift. It should come free of the receiver. If it doesn’t, or binds, that simply means whoever built that rifle didn’t cut the slot properly. If your rifle has a buffer in it, you’ll have to remove the buffer first, or you will lack clearance to lift the carrier out. Buffers, or shok buffs, are synthetic bumpers that you put in the rear of a receiver. The idea is that the shok buff takes the impact of the carrier when it cycles, saving wear and tear on the rifle, receiver and the trunnion rivets. Somehow, I think Mikhail was clever enough to have taken that into account. And I’ve seen high-speed video of AKs firing on full-auto with the cover off. (Yes, the rifle worked just fine. A bit hazardous, as the cycling parts aren’t covered, and you can find bits of clothing and such grabbed by the cycling parts. But mechanically, it works just fine, and as normally as with the cover on.) The carrier, at least in the video clips I’ve seen, does not strike the rear trunnion. Maybe on some it does. Maybe on yours it hits hard. And perhaps the shok buff you installed isn’t needed at all, and is just looking for a way to cause trouble.
Back to disassembly. Pull the carrier all the way back and lift. The carrier and the bolt will come free. Continue pulling to the rear until the gas piston clears the front trunnion, and you’re out. Set the rifle down, and let’s take a look at the bolt and carrier. Turn the carrier upside down and look at the bolt. You’ll notice that it is free to rotate in the carrier. Spin it back and forth. Rotated own way it goes forward and stops. Rotated the other way, it moves backward and stops. Rotate it back, then keep turning. The locking lug that is captured in the cam slot will come free. Once it does, pull the bolt forward and out of the carrier. The bolt contains the extractor and firing pin. The extractor has an extractor spring and an extractor retaining pin. Again, unless you’re planning to refinish the rifle, there is no need to remove the firing pin and extractor from the bolt.

[1] Notice the bolt slides back and forth in the carrier, cammed by the angled slot.

[2] Push the bolt with a finger.

[3] Push the bolt back until it stops, then rotate it to get the lug out of the cam slot.

[4] Then pull the bolt forward out of the carrier.
[5] That angled slot is where you want to put the grease when you reassemble.
There is one detail of which you need to be aware, should you detail strip the bolt. The extractor retaining pin has to be flush with the bolt surface or it can cause problems. I was once at a firearms class where the students were fussing over an AK, trying to figure out how to fit a new bolt to it. It seemed the bolt no longer fit. They were trying to fit a spare bolt, and wondering just what parts they had to stone, file or grind to make it work. Alarm bells went off in my head. An AK bolt that “stops fitting?” Something was wrong here. So I took a look, and after perusing things for a minute (and being distracted by being asked “Where do we stone this new bolt to fit?”) I noticed that the extractor pin had been incorrectly assembled — as in, not flush to the bolt surface. After working on it (time spent mostly trying to find the correctly sized drift punch) I positioned the pin so it was flush, and fit the bolt back into the rifle. If it fit before, and now didn’t, we needed to put away the cutting and grinding tools and determine how it got put together incorrectly. The rifle worked fine for that class, and as far as I know, worked for as long as the barrel lasted.
OK, we all know how to clean an AK, right? If we ever fall prey to the urge, we simply pop off the top cover, slosh it around in a ditch (hopefully one exquisitely slimed with algae, of course) and put it back together. That’s all it needs, right?
There are a large number of people who take great pride in having never run a brush, patch solvent or anything but a bullet down the bore of their AK. Their idea of cleaning is to use hot, soapy water (because the ammo is corrosive, dontcha know) and air dry, blow dry, or simply spray with water-displacing oil until the oil drips off.
Well, if you want to do that with yours, go ahead. But you’re not doing it with mine. And now that I think about it, no, you can’t borrow one of my rifles, either. If I’m going to clean my AK (and I’ll admit, there are some in the rack that have not seen much, if any, cleaning) then I do it right.
The cleaning of the AK is in some aspects like pretty much every other firearm, but because of the design elements stolen from other rifles, has some things requiring special attention. You also will want to be able to take the AK apart in order to install new parts, upgraded products, or just neat-o gear. So, once we have it apart enough to clean, we’ll just keep going, so you know what to do when it comes time to install new, replacement, or upgraded parts.
You’ll need a few tools, but not many, and not many of them specialized. However, the right tool can take a thankless, mindless and ugly task, and if not turn it into a fun experience, at least take the horrible edge off of it. There are a bunch of tools available for the AK, but I’m a fan of the ones from Real Avid. First, there’s a cleaning mat that keeps the gunk and funk off of your workbench. Keeping the grease you used on one rifle from getting on the optics of the next, can be a good thing. Second are the AK Scraper, Micro Tool and the Gun Boss cleaning kit. The cleaning kit includes the scraper. It’s a simple tool, but one made specifically for the tasks of cleaning the AK. Each edge and recess on it is designed to get into a particular part of the AK and scrape the grime off. The cleaning kit adds a rod, brushes and patches to the scraper. The Micro Tool has some cleaning edges on it, too, and a sight adjustment tool built in.
The cleaning kit comes in a zipped hard/semi-soft case, and that’s a good thing. It lets you seal things up, so they won’t get lost, or fall out. And it keeps the oil and solvent they will accumulate from getting on other stuff.
But, tools are tools, and you have to use them.
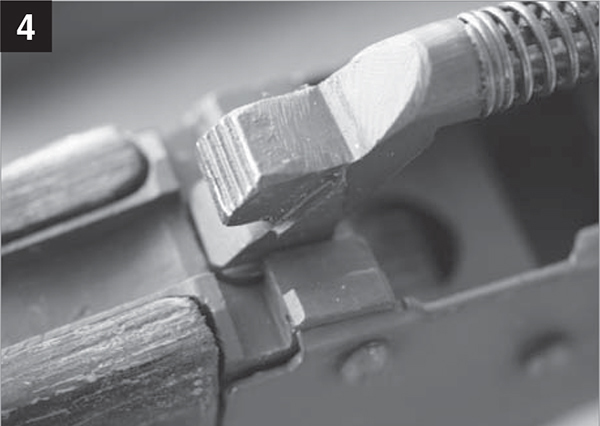
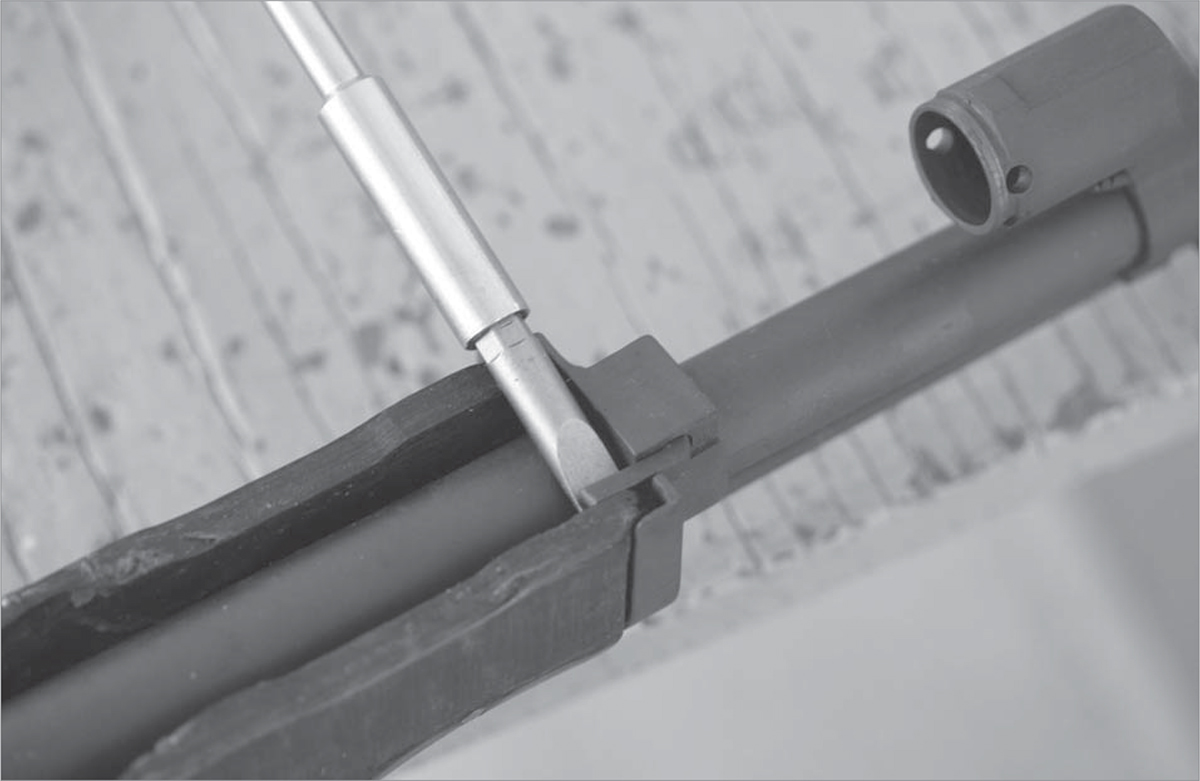
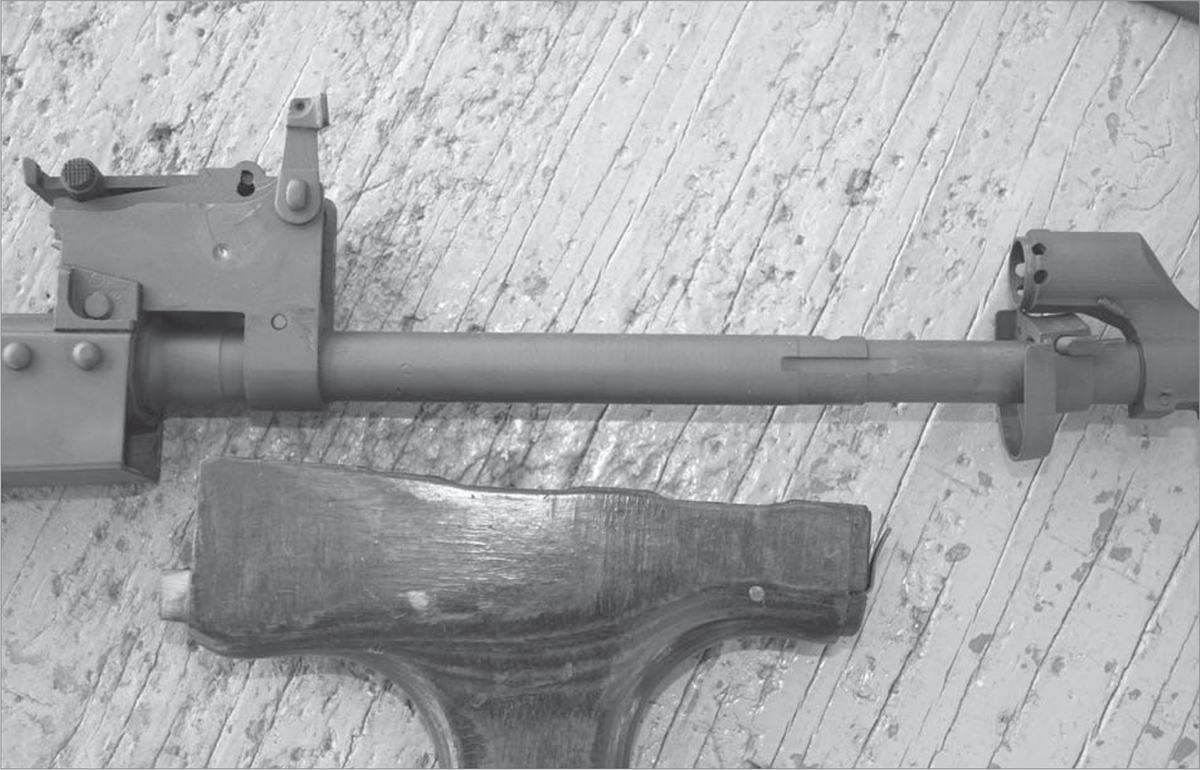
Next up is the gas tube itself. For that, you need to look at the lever on the side of the rear sight block. That’s the part that is above the barrel, above and forward of the trunnion, and which appears on some rifles to be one piece with the trunnion.
The lever is a flat piece with a little turned-up tab on it. It can be ferociously difficult to lift and move. Careful you don’t bend it. And don’t get all high-octane with a screwdriver, tactical knife or other tool, because it is easy to slip and stab yourself. (No, I haven’t done it, but I’ve seen the results. It was not pretty.) Use a drift punch and a hammer to bang it open. It rotates up toward the rear sight. This is where Real Avid’s Micro Tool comes in handy; it has a slot that helps you grab the tab and move it.

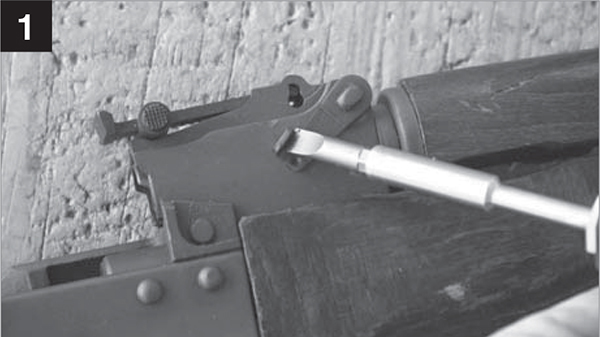
Fixed stocks are held on with wood screws.

There may be one, two or three screws. Use a properly fitting screwdriver, as the screws may have been in there for decades.
Once you get it moving, rotate it until it clears the gas tube. The rotating shaft has a flat milled on it, and that flat is what lets the rear of the gas tube lift up out of the rear sight block. Luckily, you can see this when you look down on the gas tube. Once the lever has pivoted enough to clear the tube (some levers will stop at the correct point, others will flop around) you can lift the rear of the gas tube out of the rear sight block. Standard references on field-stripping the AK will talk of moving the lever with your bare hands, in what I consider a laughable attempt to make it look easy. It isn’t. At least not in a new, properly built rifle. If you decide to go with a hammer and drift punch, be careful. You can break the lever if you hit it too hard. (Not that I’ve done it, but I’ve seen rifles where it was done.)

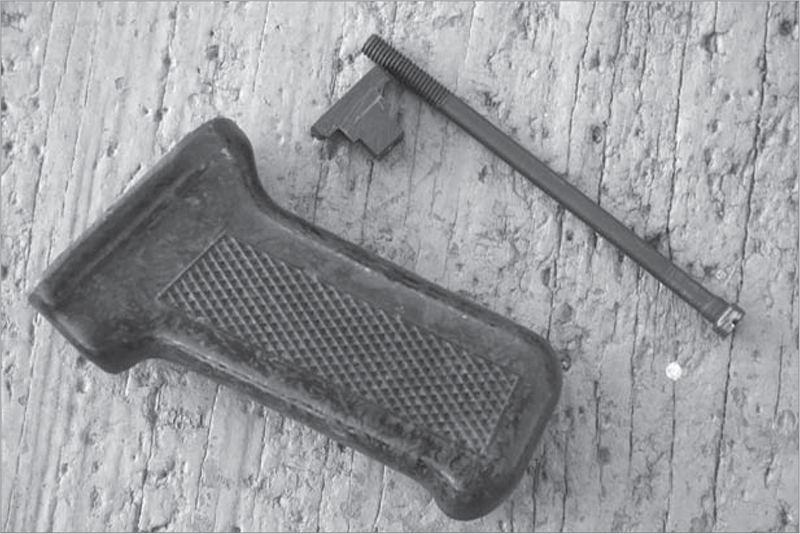
The pistol grip is held on by means of a bolt running up through the grip. Again, a properly fitting screwdriver is called for.
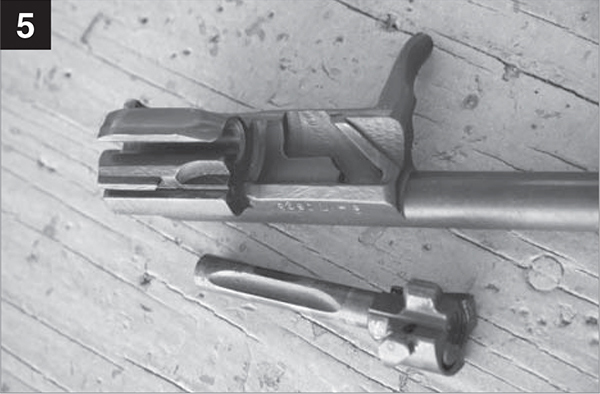
Here it is, apart, complete with the stirrup that locks into the receiver.
Once it comes time to remove the tube, your hassles are not necessarily over. You may well have to use a big screwdriver to pry the back end of the tube up to remove it, and it can be a pretty tight fit. Once free on the back end, pull it off the gas spigot housing on the front end and set it aside.
Above the gas tube retaining lever on the rear sight pillar is the rear sight. It is a non-removable part unless you are getting the rifle refinished. Then, if you pivot the rear sight all the way up you’ll see a flat spring underneath it. That powers the rear sight, and keeps it from flopping around. To remove the rear sight (again, not something you need to do for normal maintenance) you do not drift out what appears to be the rear sight pin. Instead, put the sight down flat again and press down on the front end of the sight assembly. Press hard enough so you can slide the rear sight backward. What looks like a pin are the shoulders of the rear sight pivot posts. Once the sight is clear, pull the flat spring out of its seat. The rear sight design is so clearly taken from the Mauser design that, had it not been for the Soviets that had just rolled over Germany from the east, the Mauser Company could have easily filed patent infringement suits in 1947 and won. Well, they would have won in German courts, not Russian. And not collected a single kopek in damages.
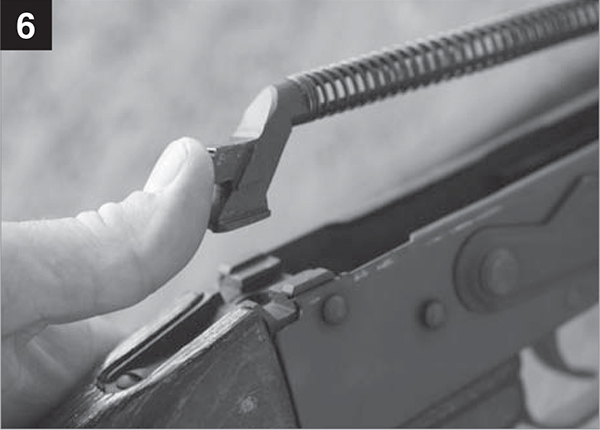
[1] Use a screwdriver or some other lever to push the gas tube lock up out of the way.

[2] It has to pivot all the way up. Don’t over pivot or it will block the tube.

[3] Once clear on the back, pivot the tube up and out. Done.
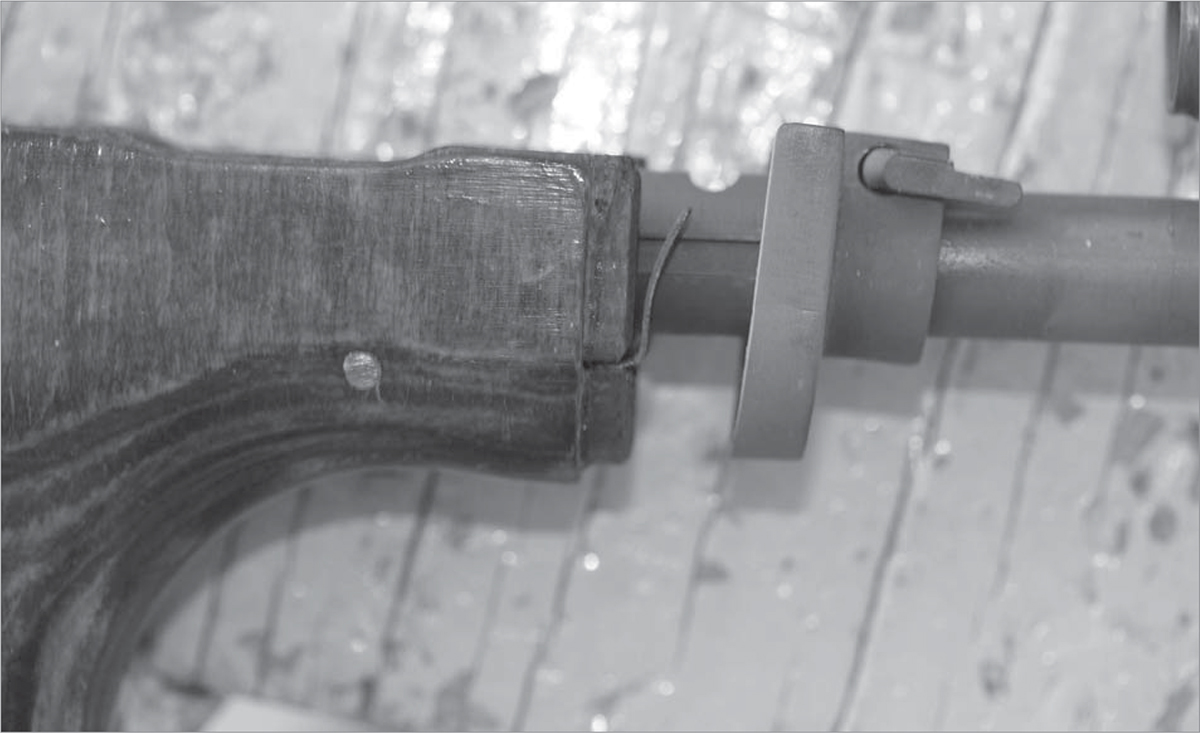
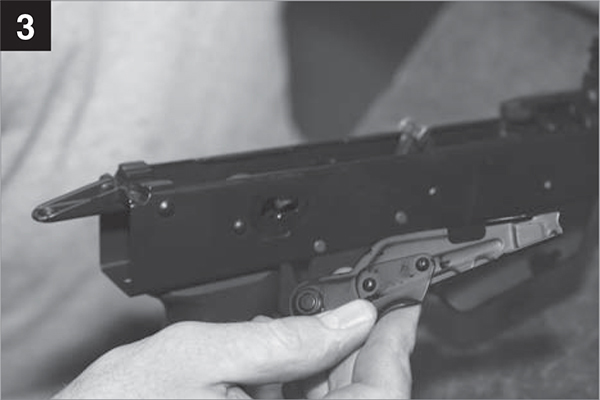
Now we’re off to the handguard. Well, what is laughingly referred to as the handguard, as it doesn’t really do much to protect hands from heat. The handguard is held onto the barrel by a cross pin and that pin is held in place by a little lever arm, nestled inside of the handguard. This will require some delicate and involved prying. The rear sight block crowds your approach angle. The lever is a tight fit inside the handguard, so coming at it from the side isn’t always an option. Basically you have to work at it with the corner of a large flathead screwdriver, until you can rotate the lever up.
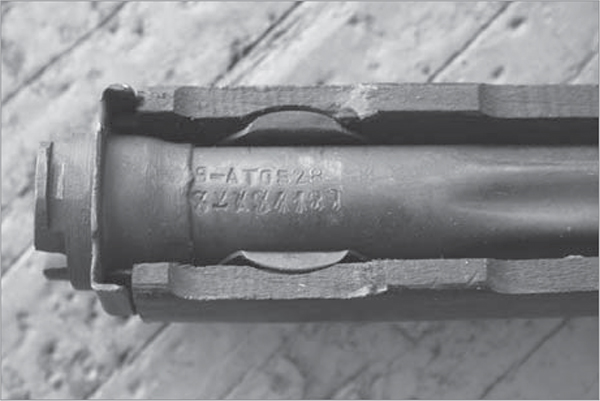
Don’t you love the parsimony of government agencies? Even before this rifle was parted out, it had a new gas tube installed. So of course, they “X’d” out the old serial number and stamped the new one.
Turn it completely, until the tip that had been inside the handguard is now pointed toward the muzzle. Slide the front handguard bracket forward. Again, this is likely to be a tight fit, and you may have to tap on it with the back end of your screwdriver, or a plastic mallet. Once the front housing clears the handguard, you can lever the handguard down and away from the receiver and remove it.
Out on the muzzle, life is simple. The little plunger you see on the top of the muzzle brake or slant brake is spring-loaded, and holds the brake in place. Press the plunger into the front sight housing and rotate the brake off. Oops, the clever commies made it a left-hand thread, so you have to spin it in the opposite direction you’re used to with normal threaded fasteners.
On the back end, the stock comes off one of two ways. A fixed stock is held to the trunnion tang with wood screws. (Generally speaking, milled receivers will have one screw, while stamped receivers will have two. Your AK may vary.) Nothing complex here, just use a big, well-fitting screwdriver, and remove the screws holding the stock in place. Ditto the pistol grip, there’s a screw up inside, use a properly fitting screwdriver. No left-hand threads on either stock or pistol grip.
The stock on stamped receivers is milled or molded with a section that goes into the socket in the rear of the rear trunnion. This is to give it a bit more strength (in the case of the synthetic stocks, a lot more strength) to prevent loosening or wobble. Grab the stock in one hand, the receiver in the other, and wiggle to pull apart. If they don’t separate easily, get a big, flat-blade screwdriver. Stick the blade end into the receiver and lever the stock backward, out of the trunnion. You are wearing safety glasses, right?
The pistol grip is a bit easier. The screw on the inside goes into a nut that rests in the bottom of the receiver. Unscrew and remove the pistol grip, and retain the nut. You’ll need it when you reinstall the pistol grip, or replace it with another.
Those with a milled-receiver AK may look at the nut — which is made as an angled part, and only properly goes back in one way — and ask, “Why this?” Sure, on a stamped receiver it seems to make sense, but a milled receiver? Why not just tap the bottom of the receiver, you might wonder. The answer is, because the designers, for all the socialist illusions they were working under, understood they were going to be dealing with the untrained. Sooner or later, someone was going to cross-thread the pistol grip bolt or otherwise mangle the parts. A new screw or bolt, that’s easy. But the receiver? If someone mangles the threads, the unit armorer can’t fit it. No, a separate nut and bolt is the easy way. That way, when someone mangles them, you replace both. And if someone loses the nut? The armorer can have a box of them in his kit.
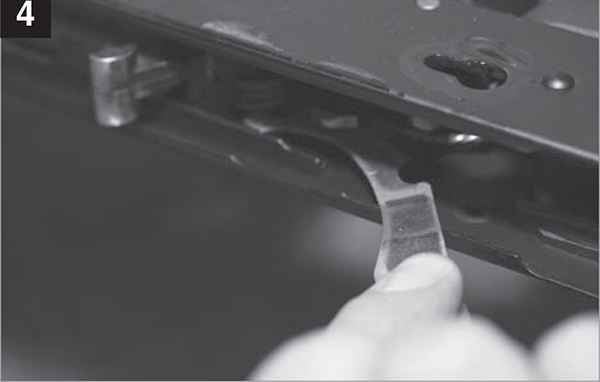
To remove the handguard, pry up the lock on its front right end.
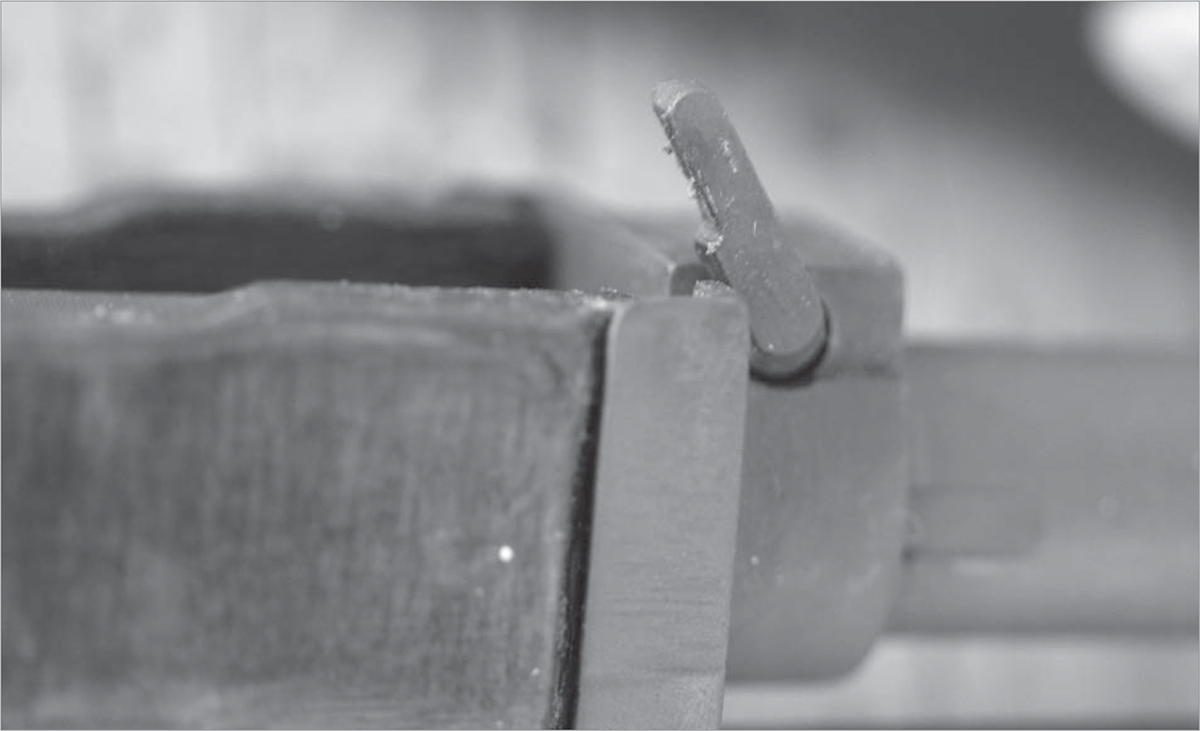
Up is not enough.

Turn it all the way toward the muzzle.
Then the bracket comes free, and you can push it forward to clear the handguard.
Once off, you can clean, refinish or replace the handguard. Remember, everything on an AK is hand-fitted.

The Real Avid AK scraper lets you clean lots of areas, including the piston head.
First, do you really have to take the internals out? If you are simply cleaning, the answer is no. An aerosol cleaner, a brush that reaches in followed by the application of proper lubricant will get the receiver clean. If, on the other hand, you are replacing the internals with a better trigger parts assembly, or you have to take it apart to deal with trigger slap, then yes, you have to get the internals out.
Be ready for more struggling.
For this part, you don’t have to take the rest of the parts off we discussed above, just the top cover, bolt carrier, spring and bolt.
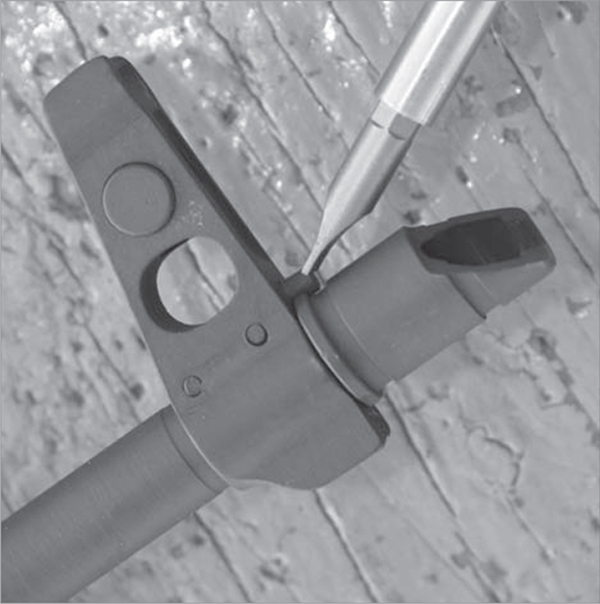
The muzzle brake is held on with threads, and locked in place via a spring-loaded plunger.
Hold the plunger down while you unscrew.
OK, we have all the outside stuff pried off, let’s get to work on the insides. First, take a look inside, and memorize where things are. You can even take a photo with your digital camera. It needn’t be perfectly lit or detailed, you simply need something to jog your memory. We have photos here, but they may not be exactly the angle you need, or be of your particular rifle.
Start with the selector. Pivot it all the way up. Normally, the receiver cover will stop it, and it can’t pivot higher than in line with the ejection port. First, put your thumb in front of the hammer, and dry-fire, lowering the hammer with your thumb. If you don’t, when the selector is pivoted up, the center cam on the selector will cam on the disconnector and trigger, releasing the hammer. With the cover off, the selector pivots all the way up. Once it is up, pull it from the receiver. Set it aside. Inside the receiver you’ll find one of two things as your next step: a retaining spring, or a curved plate. Reach in and lift the end of the spring off the pin it locks on, or weasel the retaining plate out.

The Micro Tool has one gadget that makes it a gem: a slot to lever the gas tube retainer open.
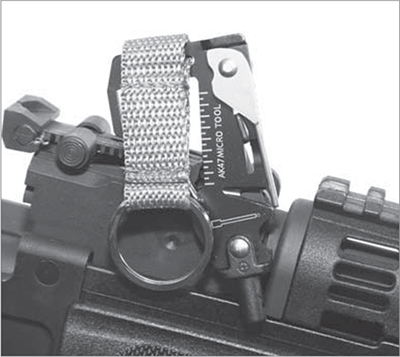
No risk of stabbing yourself, and you can unlatch with one finger. Wish I’d thought of it.
With the spring or plate out, the trigger and hammer pins can be removed. Make life easier on yourself and lift the rear of the trigger springs off the trigger legs to ease the tension. Then push the hammer and trigger pins out (you may have to use a small ball-peen hammer and a drift punch). They exit the receiver on the left side, as noted by comparing the side of the pinheads on the right and left sides. Once free, lift them out. The hammer may require a bit of tipping, as the pivot drums reach to the insides of the receiver, and without tipping you won’t be able to get the hammer past the internal rails (those being the ejector and bolt guide).
Those who professionally assemble or disassemble the AK use hooked rods to lift the spring ends off the trigger arms. Such devices are not hard to make. Cut one or two from coat hanger wire, and bend/cut a notch on the end. For the average AK shooter they are as much work to make as they save in annual cleanings. For the guy who strips and cleans his AK weekly, they are a worthy set of tools to make.

The Real Avid AK cleaning mat. A rubber back, a soft but oil-resistant top, and instructions.

If you forgot how to take a bolt apart, or put it back together, the mat helps you. Thanks, mat.
Note your trigger and hammer assembly. They come in two types: single and double hook. Does the type matter? Not really, except that you can’t mix and match the types without headaches. The bottom of your receiver, in the trigger area, is milled with relief areas for the trigger. You can’t install a double-hook setup in a receiver cut for single hooks; it won’t fit. If you install a single-hook setup in a receiver milled for double hooks, there will be a gap. So, if you plan to replace the trigger/hammer parts, replace them with the same type that you have. Or, accept the need for modifications or a gap.
One aspect of the AK that I didn’t address in the first volume of this book is cleaning rods. The receiver design of the AK is such that there is not a straight path through the bore, and to the outside. Unlike with a bolt action, you can’t remove the bolt and then stuff a cleaning rod straight through for the rear lip of the AK receiver gets in the way. This requires that you bend the rod, to make it enter the chamber and bore. This is bad for a couple of reasons.

Apart, cleaned and back together, should only take a few minutes. Let’s say 15 minutes if you’re really thorough.
First, bending the rod is bad for the rod. Bend it often enough, and it will stay bent. Second, the bent rod bears against the top surface of the chamber, leade and bore. This has the effect of wearing the rifling unevenly. It can hurt accuracy. Finally, it is hard on bore brushes. You’ll use them up faster, and perhaps even leave bristles in the bore.
There are two solutions. One is to use a shorter piece of a sectioned rod. Screw sections together that are just long enough to reach from the muzzle to receiver, and still give you a hand-hold. Poke the rod without patch or brush in from the muzzle. Install the brush, pulling it out toward the muzzle. Swap the brush for a jag, repeat. Install the patch when the jag is in the receiver, apply solvent, and pull out toward the muzzle.
Or use a BoreSnake, or other flexible cleaning tool, that you drop down the bore and pull out of the muzzle.
Let’s get down to the specifics of what you need to clean, starting with the bore. Face facts, a lot of AK ammo is corrosive. Even the stuff that is touted as “non-corrosive” probably is at least mildly corrosive. The only stuff you can count on being truly non-corrosive is American made, or the ferociously expensive ammo from Lapua. (Lapua is worth it, in my opinion.)
The corrosive part of the ammo is the chemical compounds used in the primers. They produce hygroscopic salts, which attract moisture. No moisture, no corrosion. However, unless you live in the Sahara or the desert of Namibia, moisture is going to be an everyday occurrence. There are many solvents touted, but the only thing you have to keep in mind is this: salts dissolve in water. The more water in your cleaning solution, the better the salts are flushed away. You can’t “neutralize” or “deactivate” the salts, they don’t work that way. You wash them out.
I used to advocate the “dishwasher” method of pumping hot, soapy water through the bore. After working with a bunch of AKs, I gave that up. I just use a starting patch wet with hot water as a prelim. That gets the salty tang of the residue out of the bore, well enough for the bore solvents to do their job. Then I use bore solvents.
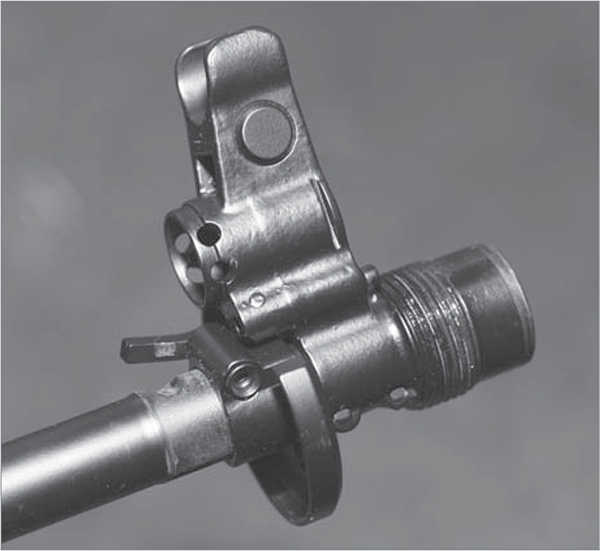
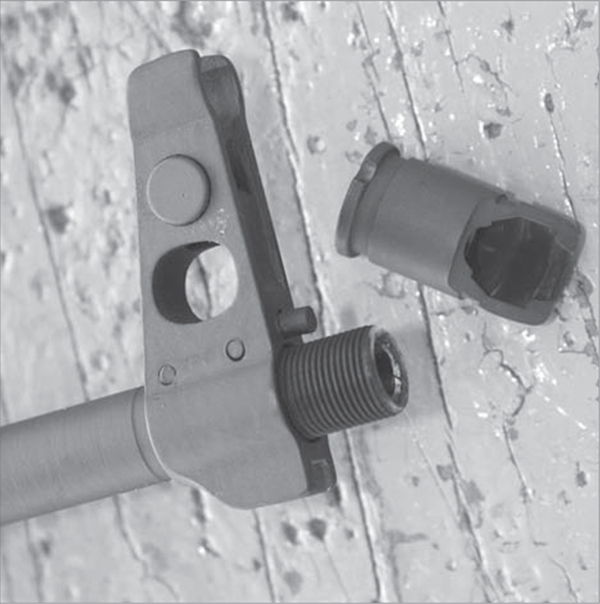
Note here the large diameter threads. Usually for an AK-74, but here on a “Krink.”
The rear sight pillar guides the gas piston, and provides a place for the rear sight. Here, it is the locating block for the Krink rear sight.
Once the bore is clean, set the receiver aside and scrub the gas piston in hot, soapy water. Dump the water and replace with clean, hot water. Rinse the piston with hot water, as hot as comes from the tap. The gas tube? Training sergeants who read this will shiver in horror or anger, but I don’t bother. The piston needs it only as a guide, and not much of that. If the inside rusts, so what? It can’t bind things, and I have too many other things to do to try and keep the interior of the gas tube clean.
Regarding the muzzle brake of an AK-74, take the brake off and drop it into the bottom of a bucket of hot soapy water, letting the water dissolve the salts. Dump the water and retrieve the brake. If I’ve been doing a lot of shooting, I’ll scrub the brake with a stiff brush, and give it another go-around in the soapy, clear water. Rinse in hot water and air dry. Then oil the threads of both barrel and brake on reassembly.
Next we go to the interior of the stripped receiver. A simple brushing with a firearms cleaning brush, followed by a few shots of an aerosol gun cleaner, will suffice. Yes, the powder residue will be laced with the salts from the priming compound. Scrub the interior of the receiver in the same hot/soapy, hot/clear water bath. Then, a general spray with some aerosol penetrating oil just to put down a non-corrosive barrier, and you’re done. Spray the exterior if you like, but a lot of shooters are just as happy leaving the exterior dry. It is less likely to attract dust, dirt, grit, and transfer the oil to your hands, clothes and gun case. A good exterior finish will work just fine without oil.

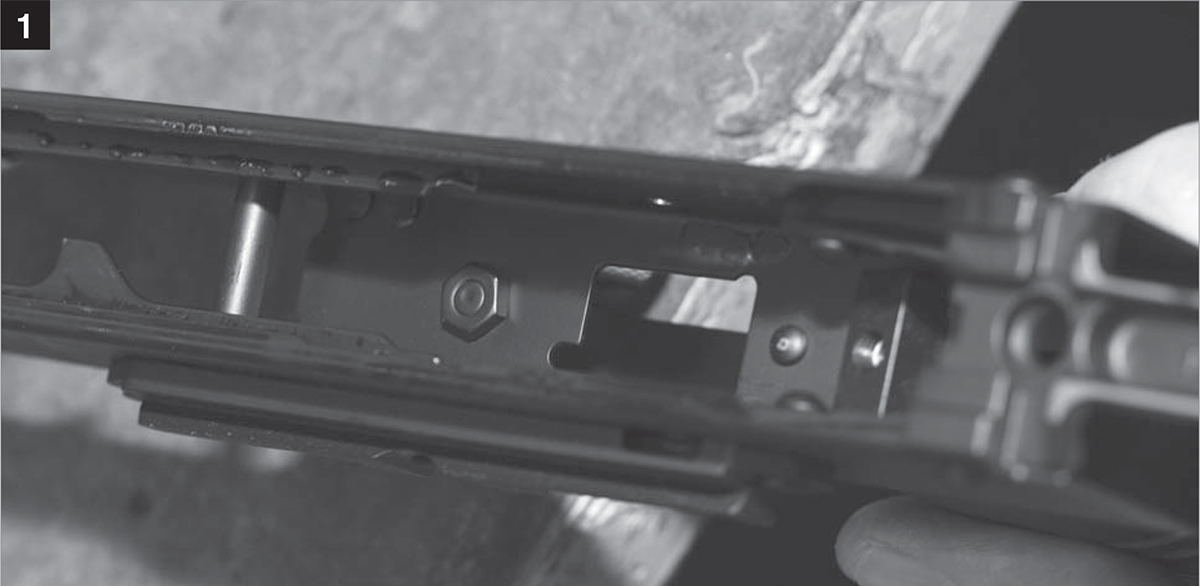
[1] You have to drop the hammer, or when you pivot the selector it will drop the hammer for you.

[2] Pivot the selector all the way up.
[3] Pull it out of the receiver.
[4] Pull out the curved plate that retains the hammer and trigger pins.
[5] Set it aside but don’t lose it, as it is far superior to the shepherds crook, and you don’t want to have to go back to that wretched thing.
While you’re scrubbing the stripped receiver, spend some time on the gas port block and the muzzle brake. You’re likely to find a residue of carbonized powder laced with lacquer and copper. If left to atmospheric moisture, this mixture will turn a light green from the copper oxidizing. Also, the primers on surplus AK ammo tend to be corrosive, even when they are touted as not. If it bothers you, clean this off. It will simply build up again. If you aren’t bothered by it, put some penetrating oil on it to reach under and loosen the caked-on residue. The muzzle blast and reciprocating parts will knock off chunks, which will re-accumulate as you shoot. It is a self-limiting problem, with one exception. If you do a lot of shooting, and build up a heavy residue, then put your AK away without cleaning or applying oil, the bolt might lock forward. What happens is, the gas piston has been grabbed onto by the residue, and despite being stainless or chromed, and will be held fast. You’ll have to bang the charging handle against a solid object hard enough to free it, and then you’re in business again.
Speaking of the gas piston, it is attached to the carrier by means of a cross pin, the fit is supposed to be loose, so the gas piston is self-centering in the gas tube. If you tighten it to “remove the play” then you may or may not have it centered in the gas tube, and it may or may not ride freely. Scrub the carbon and incidental rust (it comes from the gas tube) off the piston, and lightly oil it. Any rust that happens behind the gas piston, on the carrier itself, should be scrubbed off. (Rust as a normal operating characteristic of the steel parts of a firearm is a hard concept to deal with for some. Get used to it.)
The carrier should have all rust scrubbed off. The angled track of the bolt lug that cams the bolt into and out of locking should be scrubbed clear of rust, debris or petrified grease. When you’re putting it back together, an application of a good gun grease is advised. Yes, a plain old oil will do, but in this location more is better. Something like Lubriplate, used as a water-resistant lube for bearings (and the M1 Garand and M14 in the same application as the AK) is a good choice. A tube will last you many rifles, many years, and much shooting. You don’t need dollops of grease, but enough to give the whole cam slot a coating. The carrier has no moving parts, and is such a low-wear part that you could probably swap the same carrier through three or four builds before it became worn enough to be a problem. Since each parts kit comes with its own carrier, I don’t see carrier wear as an issue.
The bolt is a relatively high wear part, but compared to other designs the AK bolt is low stress and, again, could probably work through several rifles. In fact, when the future time comes to consider it, I’d bet that you could use the same bolt and carrier through two, three or four barrels. The trick then will be in figuring out how to do a barrel change that is inexpensive enough to make it attractive, versus building or buying another rifle.
The bolt has two cross pins, one for the firing pin and one for the extractor. They are simply drifted out with a correctly sized drift punch and hammer. Be careful with the extractor. The extractor spring powers the extractor, and it is likely to jump free (or try) when you pull the punch out. The firing pin is not spring loaded in most AKs, but those chambered in .223 often have a firing pin return spring. The spring is there to prevent the firing pin, under the inertia of chambering a round, from kissing the primer. AK ammunition is made with primers of extraordinary insensitivity. American primers are a bit more sensitive, and to avoid any problems the makers of .223 rifles have been known to change the bolt to one using a firing pin spring. Just keep an eye out for a spring in with the firing pin. If it has one, you want to put it back when you reassemble. If no spring, then no need to worry.
The bolt simply needs to be scrubbed clean of powder residue and re-oiled. The grease goes in the cam slot of the carrier, so there is no need to goop up the bolt lugs with it.
Wipe/scrub the hammer and trigger clean, and lightly oil. Ditto the hammer spring and retainer, either spring or plate, and the selector.
The usual route here is “reverse the above.” That’s too easy, and there are a few things to point out on the way. First the handguard and stock fit. Place the stock back into the trunnion and push it into place. If you have to, smack it. If you find yourself whacking the butt of the stock against your workbench to seat the stock, you might want to stop and look. Is there something in the way? If so, remove it. If not, the tight fit has to leave obvious marks on the stock tank. Take a large, flat file and dress down the areas that are such a tight fit. You don’t want your stock to wobble, but a hand pressed fit is a lot easier to live with than a hammer fit. (Congratulations, you’ve just taken the first course in the Soviet Armorers course.) Once it fits the way you want, install the screws.

[1] After you’ve lifted the spring legs off of the trigger, push the trigger pin out.
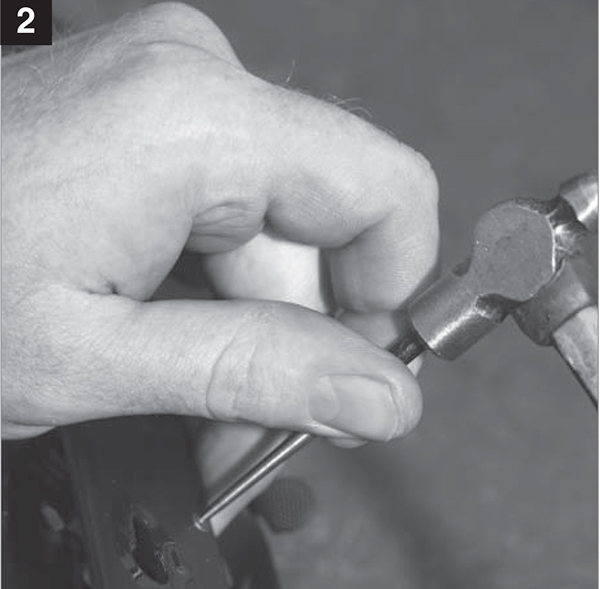
[2] Note that the pins are headed, and have a retaining lip. (That’s the part the curved plate hooks onto.)

[3] Frequent assemblers use hooks to lift the hammer spring legs.

Here the trigger comes.

The trigger and disconnector free of the receiver.
The handguard should be a tight fit, but not one you have to force. If it is loose you can bend the lips of the handguard retainer (sometimes) or shim the handguard itself. One way to shim to fit is to apply a bit of JB Weld or other epoxy mix to the front lip of the handguard. Apply a release agent to the front bracket, or build the lip and then file it back once it has hardened. You want a hand fit that stays snug, but doesn’t require force or impact to get it to close.
The gas tube can sometimes be a hammer fit as well. Use a file to dress down the binding parts of the rear end of it. If it is a loose fit, there isn’t much you can do. Both ends are metal-to-metal contact areas, and the only way to correct a loose fit is to either swap tubes until you find one that is a tight fit, or build one or the other end up with weld. Personally, I can’t find the time to waste correcting a loose gas tube fit. If you swap the gas tube, be aware of the ports. Some designs/models have ports, others don’t. The difference doesn’t matter for function, except that a rifle built to use one or the other has the piston fit manufactured accordingly. So, if you want to swap a gas tube that has ports (two, four or more) for another, use one that has the same number of ports. Or, once it is fitted, drill the extra you need. If you take off an unported tube and install one with lots of holes, you might find your rifle not working properly in extreme circumstances. Then again, the AK is so over-gassed anyway I sometimes wonder if we could make one work without a gas tube at all. (Not really, there would be nothing to guide it back into the opening in the gas tube block.)
Re-installing the trigger parts is easy, if fussy. First make sure they are oiled. Yes, oily parts are a bit harder to handle, but once the fire control parts are in, getting oil onto some of their surfaces can be decidedly difficult. Trigger first, with disconnector. Push it down into the receiver and run the trigger pin (the hammer and trigger pins are the same) through them. Make sure it sits flush on the right side. Then tilt the hammer sideways, making sure the attached spring legs run down over the trigger bar. Push the hammer down, tilt it upright, and press its pin across. Make sure the hammer spring legs rest on the rear of the trigger bars. Place the curved plate, or the retaining spring (called a “shepherd’s crook”) in the receiver, locking into the turned slots in the hammer and trigger pins. Then take your selector, turned upright, and push it into the receiver to trap the curved plate in place. Turn the selector down to the “Fire” position. Push the front of the trigger down, to move the disconnector out of the way and create clearance for the center cam of the selector. Once the selector is in and down to the “Fire” position, cock the hammer. Check the hammer spring legs one more time, and the trigger/hammer/selector function a few times to make sure it is all back the way it is supposed to be. At this point I’d usually say “You can’t get them back incorrectly,” but even the ingenuity of man can defeat the durability of Soviet engineering, and someone will be able to get it wrong. Check that it is right, and move on.

[1] With the trigger out, remove the hammer pin.

[2] The hammer and trigger pins are identical and interchangeable.
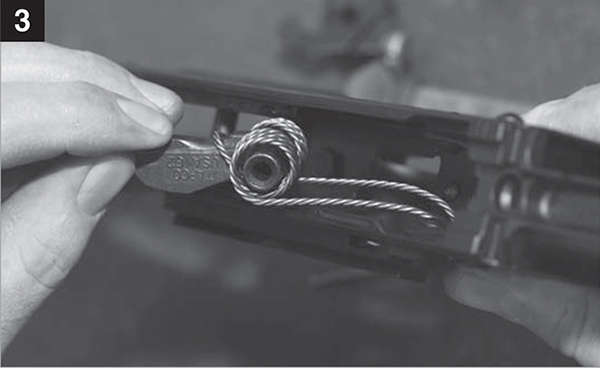
[3] Here you see the hammer, with spring, and the legs that bear on the trigger.

[4] There is no need to take the spring off, unless you are replacing a broken spring, or sending the parts off to be refinished.
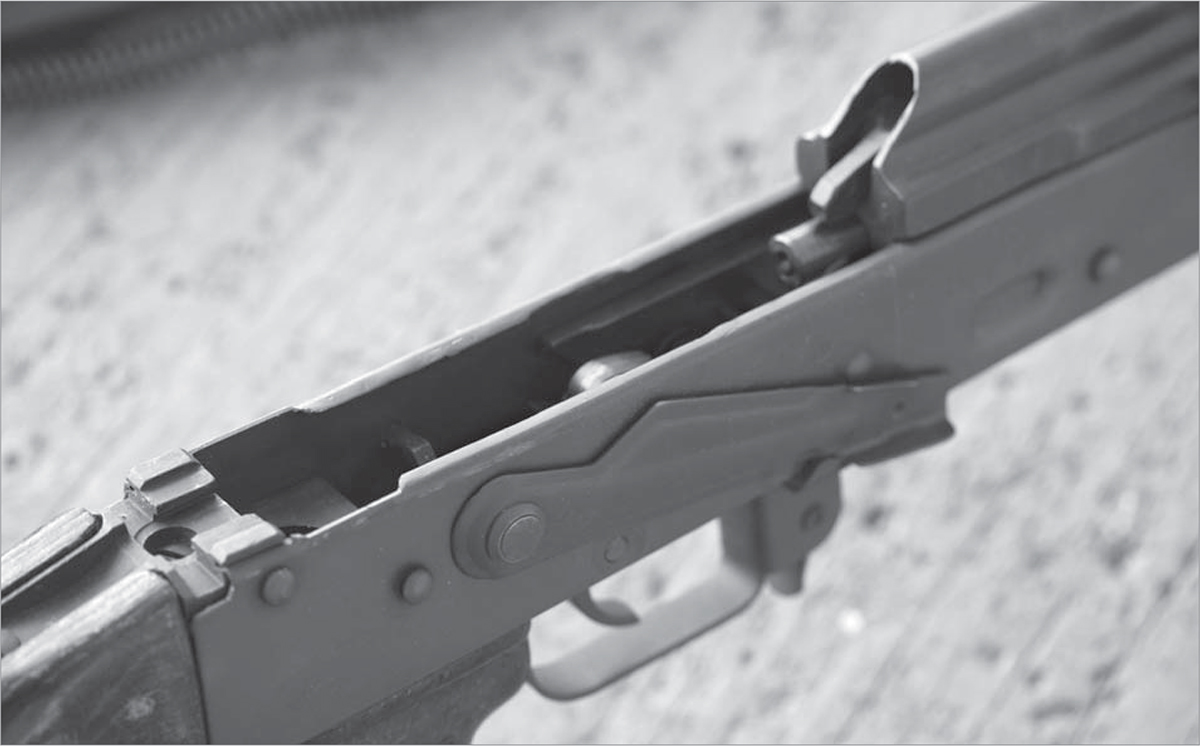
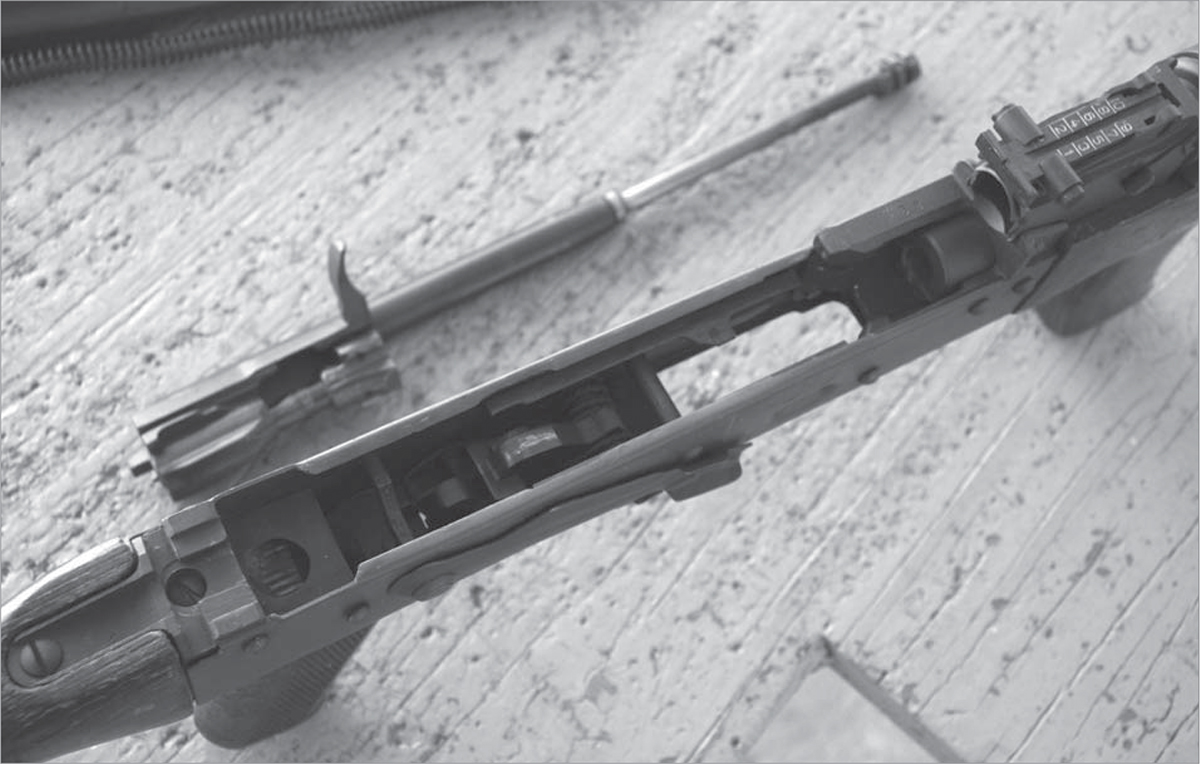
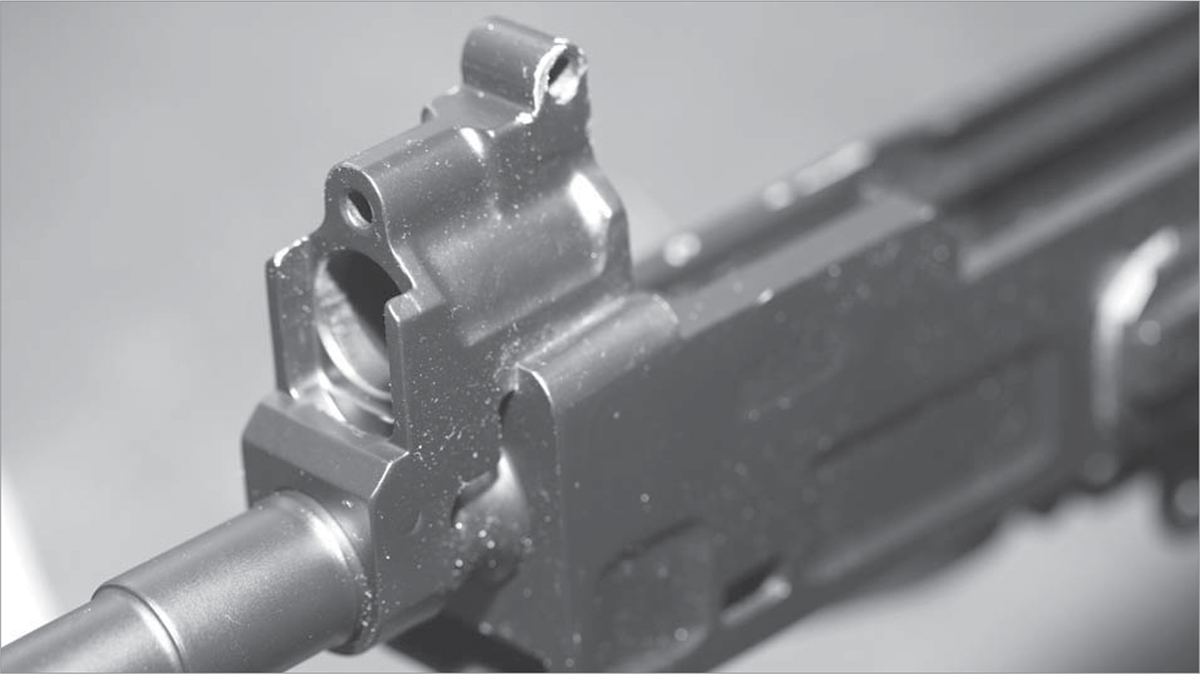
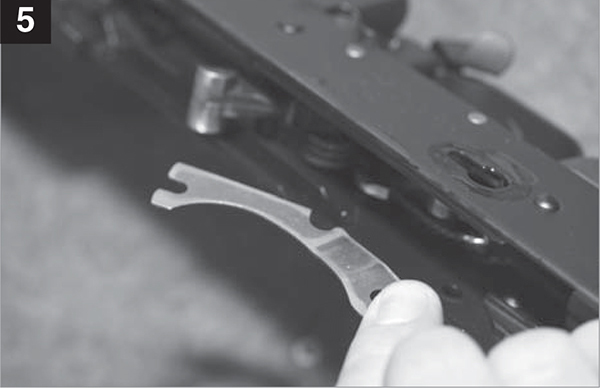
[1] Note the reinforcing bar in the middle of the receiver. It keeps the receiver from being pinched or twisted during rough use.

[2] Slots milled into the rear trunnion. One guides the recoil spring assembly, the other keeps the cover from coming off the receiver.

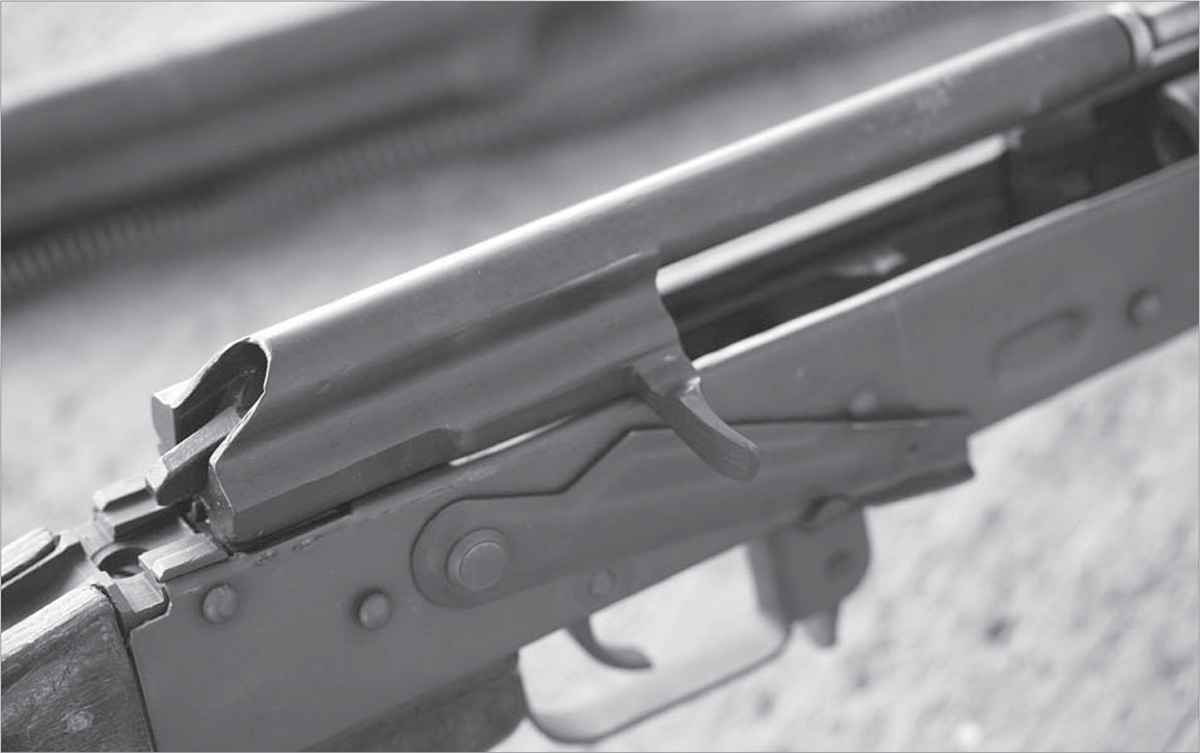
[3] The pins are headed. They go in and come out on the left side.
[4] The rear sight pillar guides the gas piston, but also indicates vertical to builders. It does not come off the barrel, unless you are using the old parts on a new barrel.

[5] Relief slots cut in a freshly bent receiver. The cuts allow the carrier to be lifted out of the receiver. The rear trunnion fills the gap at the end once assembly is complete.
On the carrier, make sure the gas piston is clean and wiped with an oily cloth, and then apply grease to the cam slots of the carrier. On the bolt, apply oil to the extractor pivot point and the spring that powers the extractor. Drop oil down the firing pin channel. Install the bolt back into the carrier, and shove the carrier and bolt back into the receiver.
The recoil spring assembly is something you never need to take apart, but if you really feel like you have to here’s how: Grab the spring stack with one hand and hold the square sticks-through-the-cover end on the bench. Compress the spring toward the bench. With your free hand, weasel the end cap out of the front wire of the assembly. Then allow the spring to ease forward and off the wire assembly. You can then do whatever it is you need to do with the parts. (I’d assume refinish them, but some people just have to take things apart.) If you don’t find this easy, that’s your clue that the Soviet Army did not expect, or intend, for its soldiers to be taking the spring assembly apart. To reassemble, reattach the wires (if needed), run the spring on, compress, and work the end cap back where it was on the end of the wire assembly.
Make sure the spring is well oiled, then shove the front end of it into the tunnel in the carrier. Compress the spring enough so that you can reintroduce the retaining end of the assembly in its slot in the rear trunnion. To install the cover, ensure that its front end is in the recessed slot of the front trunnion. If you don’t, you’ll be wrestling, hammering and cursing the cover while it resists your every effort. Once in the recess, press down on the rear. The angle of the rear of the cover will compress the recoil spring guide, allowing the cover to snap down into its rear slot in the trunnion. The recoil spring assembly should pop out through the square hole in the cover, and you’re done.
Lubing is easy. Put oil on the extractor and in the joint where the extractor pivots in the bolt. Stand the bolt on its face on the bench, and drop oil down the rear of the bolt, inside the firing pin tunnel. While you let that wick its way in, grease the carrier. As mentioned, Lubriplate works well, but any gun grease will do. A light film inside the cam track of the carrier is all you need. Do you need any at all? Not really. Unlike the AR-15, which does need lube, and cannot be counted on to work well dry, the AK works. But lube makes it better.
Congratulations, you’ve just stripped, cleaned and reassembled what was, up until the mid-1980s, one of the rarest firearms in America. After that, it quickly became one of the top five most common. You’ve managed what any illiterate peasant can do, with the exception of the lubrication part. They know nothing of that, and for the most part their AKs seem to work just fine. Then again, if theirs stopped working, they’d just pick up or be issued another. However, you want to protect your investment, so spend some time and clean it. 