Do you think that Titian persuaded this horse to take this rearing pose, then asked the rider to climb on the animal’s back, and finally persuaded them both to hold their poses for three hours while the artist lay on the studio floor and drew this picture? Titian drew the whole thing out of his head, of course. He just imagined he was on the floor and that the horse was rearing above him.
Furthermore, if Titian had wished, he could have imagined himself in any other location, at any distance from the horse and rider, with his models in any conceivable pose. And he still could have produced a picture.
In the life class, students ruin drawing after drawing because they insist on trying to draw the model exactly as they see it from exactly where they are sitting. When my classes are crowded, students sometimes have to sit three or four feet from the model; they proceed to draw the model exactly as they see it from close up, and the results are very funny indeed. The near shoulder assumes enormous proportions. Or the foot, if it is the nearest thing to them, becomes six times as big as the head. Even when students sit further back, they copy exactly what they see, with lamentable results. The most common fault is that forms at the students’ eye level seem larger than things above or below eye level. As the model’s buttocks are usually at eye level, these are forever enlarged to gigantic size.
The cure for these faults includes a large dose of perspective, ability to draw from the imagination, and esthetic understanding of what a picture really is.
Titian (Tiziano Vecelli) (1477/87-1576)
RIDER AND FALLEN FOE
charcoal
13⅝″ × 915⁄16″ (34.6 × 25.2 cm)
Graphische Sammlung, Munich
This is another imaginary drawing. I hope I have not given the impression that students should always draw without a model. You should draw from the model as often as you can; but you should also draw the figure out of your head as often as you can. When you draw figures from imagination, questions continually arise; if you cannot answer these questions, you put them aside and try to find the answers when you next draw the model. Drawings made from a model can be very good indeed. A model is invaluable in suggesting detail and striking unusual turns of pose.
In this drawing, Rubens had a hard time making up his mind about the thrust or direction of the legs. I think he finally preferred the leg at A, because he took the trouble to shade it carefully.
The highlight lines which circle the form (B) are interesting because they give direction and form to the upper arm. Cover these lines with your little finger and you will notice how weak the direction and the form are without them. The torso appears to have been conceived as a large cylinder, around which flow the circular lines of the drapery. These lines certainly impart a direction to the torso.
The foot (C) is an example of a form which is not sufficiently revealed to proclaim its identity. This form, within the context of this drawing, might well be a piece of drapery.
Peter Paul Rubens (1577-1640)
STUDY FOR MERCURY DESCENDING
black and white chalk
18⅞″ × 15½″ (48 × 39.5 cm)
Victoria and Albert Museum, London
Here is a drawing of one man cutting a piece of meat, while another man walks away with a piece of meat. Cutting is a repetitive action. Walking is both repetitive and continuous. The man with the ax is drawn with his ax raised; he might also have been drawn with the ax buried in the meat. Either pose would have suggested the action which Rembrandt had in mind. But if the ax had been drawn halfway between the man’s head and the meat, the action would not have been suggested as effectively. The walking man is shown at the beginning of the stride of the far leg. An action is best drawn at its beginning or its end, not at the midpoint.
The line (A) suggests the direction of the rib cage. The upper and lower legs (B and C) are visualized as if cut out of one simple block. The lines at B and C are drawn to give proper direction to the side plane of this block. The hand holding the ax is blocked and the wrist is blocked; the line D not only confirms this fact, but gives direction to the wrist. The lines at E show the direction in which the pig is going; if the pig were going in another direction, these lines would be going in another direction.
Rembrandt van Rijn (1606-1669)
TWO BUTCHERS AT WORK
pen and bistre
5⅞″ × 7⅞″ (14.9 × 20 cm)
Kunstinstitut, Frankfort
Hands are very hard to draw, but they will ultimately yield to study. Perhaps the first problem to tackle is mass and the direction of mass. Unfortunately, there are sixteen separate masses to consider: the body of the hand; each phalange of each finger; the two phalanges of the thumb, and its metacarpal. The student must create mass conceptions for each separate form and decide on the thrust or direction of each. No wonder the poor beginner can never draw hands!
The mass conception of the body of the hand presents many difficulties because the shape is not at all constant. For instance, the hand is normally rounded on the back; but press the palm down on the table, and the body of the hand becomes very flat. Or spread your fingers and see how flat it becomes. Furthermore, the back of the body of the hand becomes very long in flexion and very short in extension. Because of the webbing between the fingers, the palm of the hand seems much longer than the back. All these factors – and others, such as the direction of the chosen light – must be kept in mind by the student.
In this drawing, the body of the hand is thought of as a block, with front plane A and side plane B. Each phalange of each finger seems to be thought of as a block; where plane meets plane, there is a contrast of tones. This is most clearly seen where plane C meets plane D. Notice the cast shadow (E) on the front plane; realize this shadow is not continued on the side plane. Shadows cast by the principal light never fall on side planes. Shadows cast by reflected light may fall on side planes, but they are seldom permitted to do so.
Peter Paul Rubens (1577-1640)
STUDIES OF HEADS AND HANDS
black and white chalk
157⁄16″ × 109⁄16″ (39.2 × 26.9 cm)
Albertina, Vienna
In the hand on the left, the highlight is at A. The front plane is separated from the side plane at the dark edge (B). The principal light is from the left, the reflected light from the right. From the highlight to the dark edge of the hand, the general movement is light to dark.
The veins may be thought of as the flutes of a column. Each separate vein is shaded from light to dark, though the shading on each vein conforms in intensity to the general sweep of light to dark across the back of the hand.
The object of all this is to compel the observer to grasp the mass first and the details second. Hold this picture ten feet away. You will be unable to see the details – the individual veins – but you will clearly grasp the general massing of the hand.
You see how an artist can bring out detail as he moves from the highlight to the dark edge where the planes meet. Study your fluted column and realize how details may be brought out as you move from the dark edge through the area of reflected light.
The ring around the phalange (C) encircles an imagined cylinder, shares the tones of the cylinder, and gives direction to the phalange. The mass of this phalange corresponds very closely to the actual shape; examine this part on your own hand and feel the rounded bone forcing the form on the top plane. See how the ring compresses the bulging flesh on the palm side of the finger; the ring has been worn for many years!
Copy of Albrecht Dürer
STUDY OF HANDS
pen
9⅜″ × 9⅞″ (23.8 × 25 cm)
Museum of Fine Arts, Budapest
In this picture, the directions of head, rib cage, pelvis, arms, and legs have been carefully considered to satisfy the demands of composition, as well as the artist’s expressive intent.
The direction of the neck is revealed and reinforced by the black ribbon (A), which is but a line around an imaginary cylinder. But the values on the ribbon have been cast aside to increase the decorative effect. The ribbon around the waist (B) is but a line around the egg-like rib cage, which (for the moment) is thought of as a cylinder. The line of this ribbon wavers slightly to express the bulging flesh of a rectus abdominis beneath. The bracelet at C is given values, while the bracelet at D is given none; they both serve to reinforce the direction of the respective forearms. It is probable that the model wore no bracelets at all; Degas may have created them to express the direction of the wrists and to give them a little more form.
The artist here frequently jumps his light, though not on the individual forms. The light on the upper arm (E) is from the left; on the lower arm (F) it is from the right. The breasts are mere sphere symbols, with the light coming from the right. There is very little reflected light in this drawing, except on the slipper (G) where the direct light comes from the left and the reflected light comes from the right.
Edgar Degas (1834-1917)
DANCER ADJUSTING HER SLIPPER
pencil and charcoal
12⅞″ × 9⅝″ (32.7 × 24.4 cm)
H. O. Havemeyer Collection
Metropolitan Museum of Art, New York
On this work sheet, Leonardo practiced throwing heads into all sorts of difficult positions. It is necessary that an artist be able to draw a head in any position, and be able to do this from his imagination. If he cannot draw a head in a peculiar position from his imagination, he will not be able to draw it at all, even with a model in front of him. There are many reasons for this. One reason is that the direction of every feature changes as the head changes position. Since every feature changes position, one must be able to draw each feature in any conceivable position. Also, as the head changes position, the relationships of all the features change.
One difficulty of studying the work of an advanced artist is that his construction lines are usually invisible. An advanced artist does not use construction lines because they mess up the looks of his drawing. But he holds these lines in his mind when he draws. Indeed, I have a struggle to get my students to use construction lines; they too feel that they will ruin their precious drawings. But you will never learn to draw unless you mess up thousands of drawings with construction lines.
The construction lines here are mostly related to the position of the head as a whole. Line A-B, for instance, indicates a level head. Line C-D indicates a down head. And line E-F shows an up head.
Leonardo da Vinci (1452-1519)
SURFACE ANATOMY OF THE SHOULDER REGION AND HEAD
silverpoint
9⅛″ × 7½″ (23.2 × 19 cm)
Reproduced by gracious permission of Her Majesty the Queen
Royal Library, Windsor
In the Leonardo drawing on the previous page, construction lines are frequently used to show the simple massing of the head. At times, he uses the vertical center line of the face. In this more advanced drawing by Watteau, very few construction lines are visible. Perhaps line A-B is a segment of a construction line that indicated the mass of the head. If you watch a practiced artist as he draws, you can tell that he is thinking about his construction lines all the time; his hand moves as if he were drawing them, but he does not let the pencil touch the paper.
To draw a head well, you must first learn by heart the front and side views of the skull, memorizing the relationships of all important details, one to the other. The side view will show you that the base of the nose, the base of the ear, the bottom of the mastoid bone (C), and the bottom of the cheek bone, are all about on the same level.
By studying the side view of a skull, you will develop a feeling for the side plane of the head. Ask yourself all sorts of questions about the side view; what elements lie on a given horizontal construction line; what elements lie on a particular vertical construction line, etc. Memorize the answers by drawing them.
Do the same for the front plane of the skull. Eventually, I hope you will do the same with the back plane, top plane, and bottom plane. Then you will be able to think of your head as a block, and it will not matter what position the block is in; you will feel the relationship of part to part.
Antoine Watteau (1684-1721)
NINE STUDIES OF HEADS
red, black and white chalk
9⅞″ × 15″ (25 × 38.1 cm)
Louvre, Paris
On drapery, the influence of the thrust or direction of bodily forms is very great. The artist often changes the direction of bodily forms to procure a movement of folds that seems more expressive than the movement he actually sees on the model. At the same time, the artist uses the movement of folds to suggest or intensify the thrust or direction of bodily forms beneath the drapery. This, of course, cannot be done unless the artist is able to create figures out of his imagination.
Here the folds move as usual from the waist (A) to the high shoulder (B). The same result occurs on the front view. Furthermore, Tintoretto has given a spiral feeling to the folds to suggest that the rib cage is rotated against the pelvis.
In my classes, if the model poses in a costume that has been packed in a trunk and has become wrinkled, beginners will carefully copy every wrinkle they see. The result is that they produce pictures of a model posing in a costume that really looks as if it had been packed in a trunk. The advanced artist often creates the bodily thrusts his expressive intent demands and draws his folds to conform to these imaginary thrusts.
Tintoretto (Jacopo Robusti) (1512-1594)
DRAPED STANDING FIGURE
black chalk
13⅛″ × 71⁄16″ (33.4 × 18 cm)
Uffizi, Florence
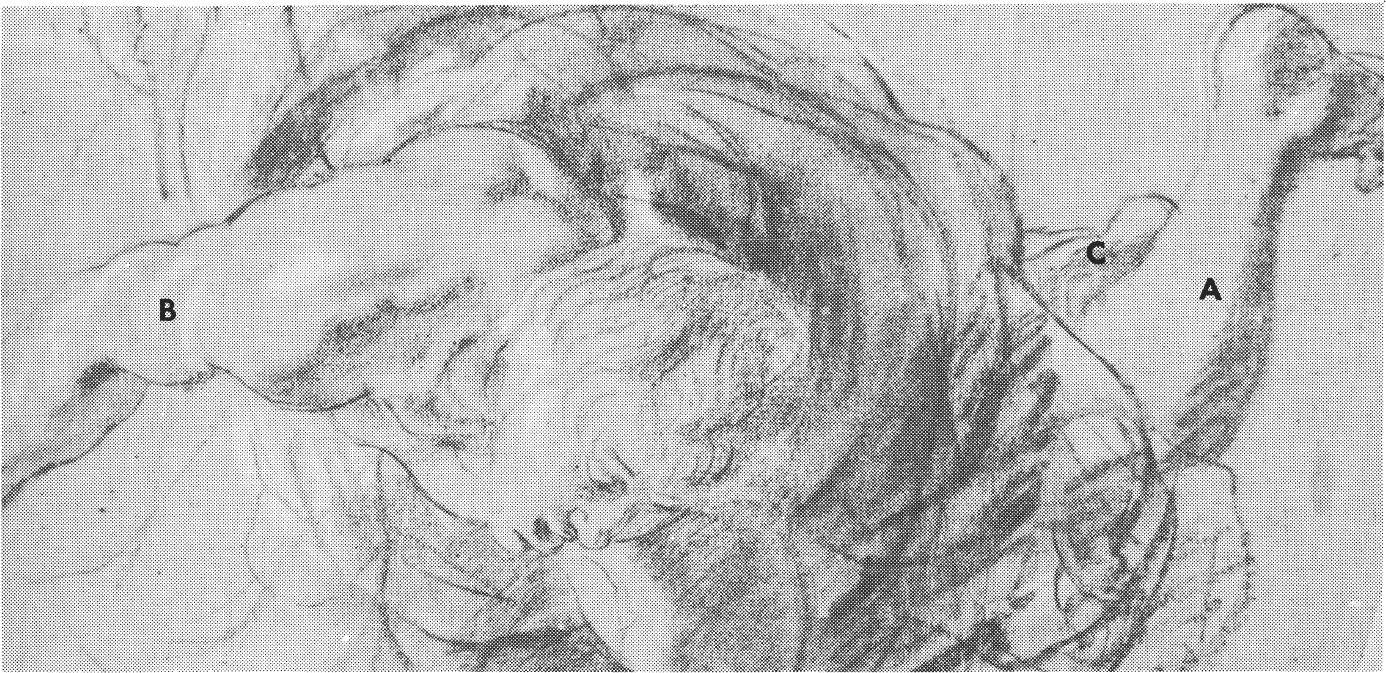
On the little figure (A), the folds spiral to show that the rib cage is rotated above the pelvis. Here the twist is so great that the folds cannot go to the high shoulder. The folds on the sleeve (B) are spiralled to suggest that the hand is in pronation, that the lower arm has been rotated in relation to the upper arm.
The folds on the chest (C) are most characteristic. They run from the armpit to the chest and reveal that the upper arm has a backward thrust. Similarly, the folds on the back (D) tell that the upper arm has a forward thrust. The characteristic bunching of the folds at the elbow (E) naturally suggests a bent arm. The folds at F are moving from the armpit to the top plane of the arm to show that the upper arm is raised.
Again and again, this drawing demonstrates that the artist had studied the effect of direct and reflected light on simple form symbols, such as the block, sphere, cylinder, egg, and even the cone. Notice how many planes meet on fields and houses: notice the mass symbols used for the bunched foliage of the trees, and the haycocks.
Pieter Bruegel (1525-1569)
SUMMER
pen and brown ink
8⅝″ × 11¼″ (22 × 28.5 cm)
Kunsthalle, Hamburg
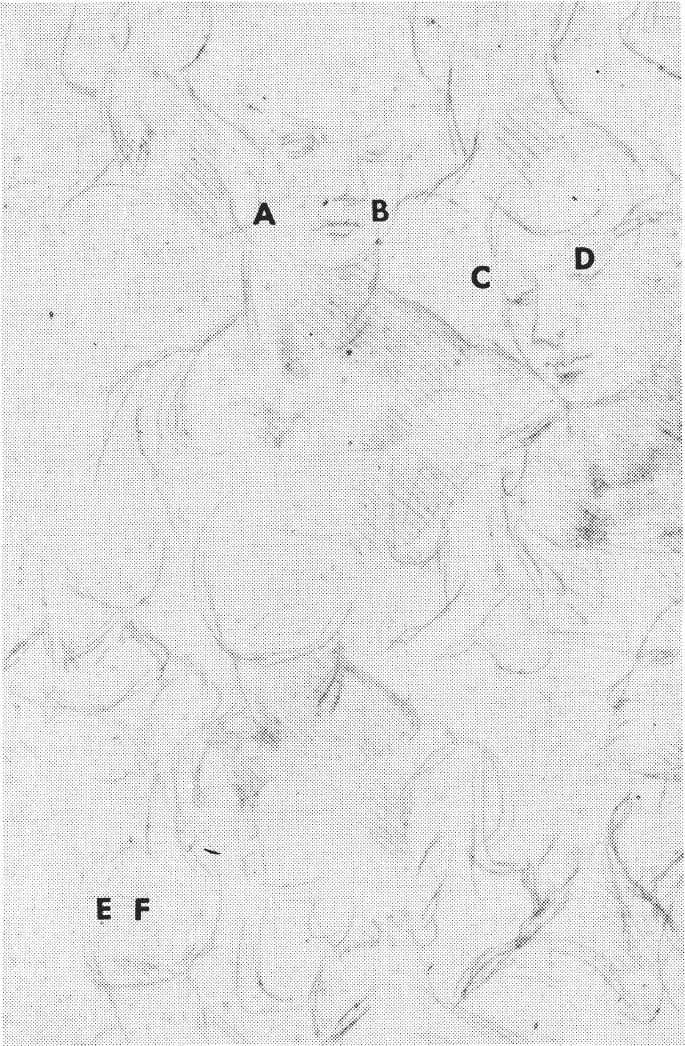
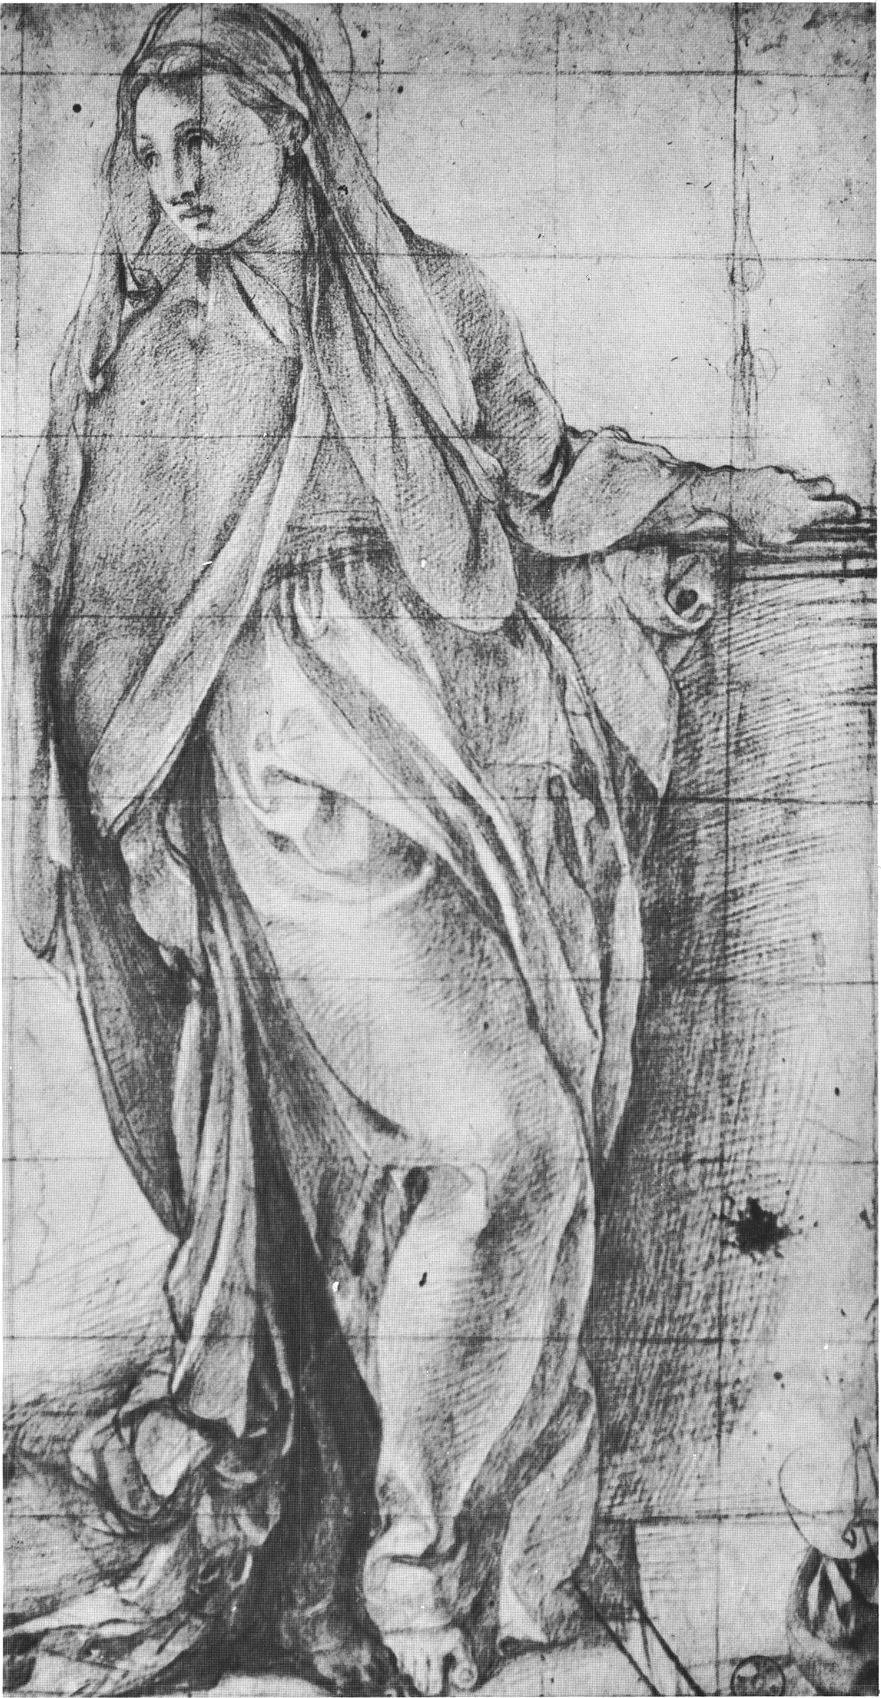
Drapery likes to fall from points of support (such as A, B, and C) in column-like folds. On the model, these columns have a horrid tendency to be very much the same shape and size. The artist must transform them into varied and interesting forms, as indeed they are here.
At D, the drapery takes on the broken-plane pattern of drapery on the floor. To learn about this, let a piece of cloth half fall to the floor and draw the drapery, transforming the dull shapes you see into interesting forms.
The drapery is bunched at the elbow (E) and at the ankle (F) at the abrupt meeting of interior planes.
Notice how the highlight on the thigh (G) kills the dark tones of the detail of the drapery. To draw drapery well, you must be able to visualize the tones on a spiral rope or a doughnut around a cylinder.
Folds and edges of drapery are often consciously changed to run over the mass conceptions beneath; H suggests the sphere of the abdomen and the shape of the foot is suggested at I.
Jacopo da Pontormo (1494-1557)
VIRGIN ANNUNCIATE
red chalk
15½″ × 8½″ (39.3 × 21.7 cm)
Uffizi, Florence
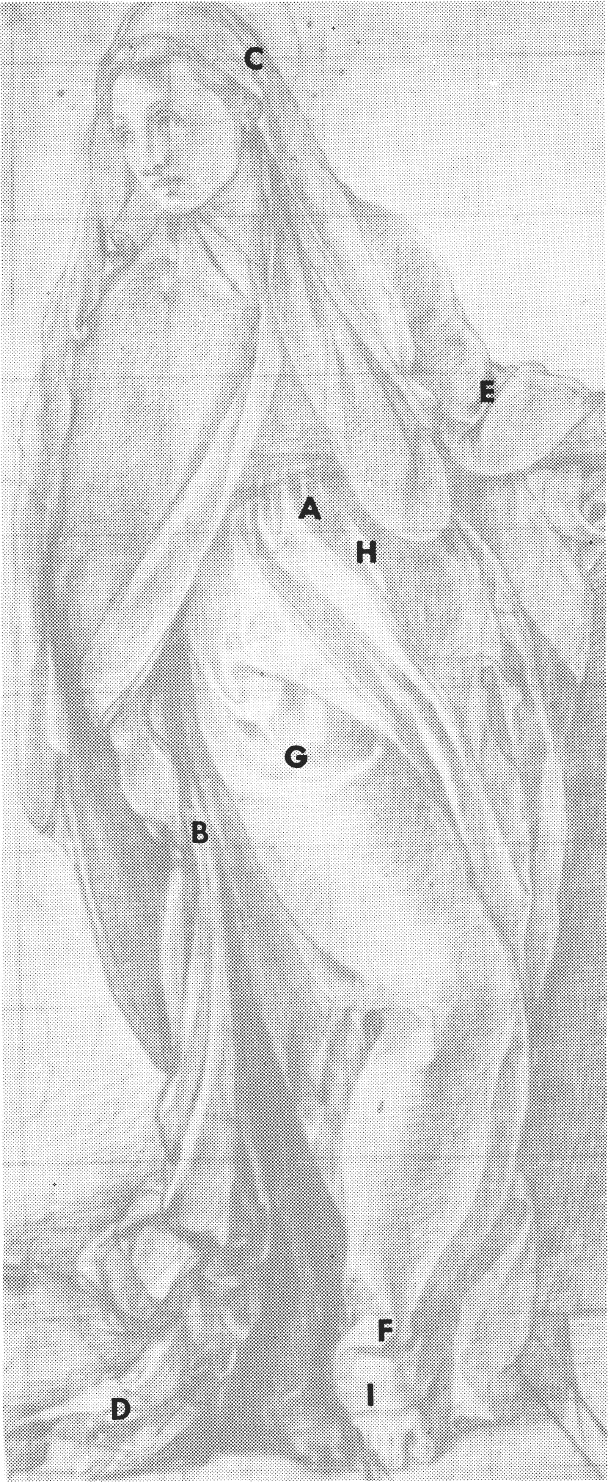
The underlying mass conceptions of the principal figure are extraordinarily simple in this drawing. The rib cage is an egg, on which are buried the spheres of the breast. The ball of the abdomen is a sphere. The thighs are simple, egg-like columns. At all times, the folds of drapery run over these mass conceptions, just as the necklace runs about the cylindrical mass of the neck. Line A-B, a segment of a circle, shows how a line may be run at a distance from a form to reinforce that form; in this case the form is the egg-cylinder conception of the lower arm. The belt (C) reinforces the mass conception of the abdomen in the same way.
The principal light on this figure comes from the left. There is an abundance of reflected light from the right.
The circular movement of the belt (D) imparts a forward thrust to the pelvis, as the circular movement of the arm band (E) imparts a backward thrust to the upper arm.
This figure is an act of pure creation. Botticelli created the light, the reflected light, the mass conceptions, the bodily thrusts, and the wind itself. The columns of drapery and every bit of windblown hair were completely created and designed by the artist.
The form of the hair (F) is the interior plane of a cylinder, with the direct light causing the highlight. The curl at G is a cylinder, as curls so often are, with the highlight taking its proper place.
Sandro Botticelli (1444-1510)
STUDY FOR THE ALLEGORICAL FIGURE OF ABUNDANCE
pen
12⅜″ × 10″ (31.5 × 25.5 cm)
British Museum, London