A picture may be worth a thousand words, but there are not enough words in the language to cope with visible reality itself. This is one of the most accurate pictures of a skeleton ever drawn, but we must remember that it is but an illusion of the real thing on a piece of paper. So try to get your full conception of the form of a skeleton from a real skeleton, rather than from pictures.
Note the following bones: pelvic points (anterior superior spinous processes of the ilium) (A); symphysis pubis (B); great trochanter (C); femur (D); patella (E); tibia (F); fibula (G); tarsal bones (H); metatarsal bones (I); clavicle (J); humerus (K); radius (L); ulna (M); carpal bones (N); metacarpal bones (O); phalanges (P); sternum (Q); ensiform cartilage (R).
Bernard Siegfried Albinus
TABULAE SCELETI ET MUSCULORUM CORPORIS HUMANI, 1747
Plate 1
Metropolitan Museum of Art, New York
Note the following: cervical vertebrae (A); thoracic vertebrae (B); lumbar vertebrae (C); sacrum (D); iliac crest (E); ischium (F); shoulder blade (G); spine of shoulder blade (H).
The weight is on the right leg. Notice how, because of this, the pelvis falls ever so slightly on the left. Note how delicately the backbone curves upward to the skull. However, since this skeleton is just an illusion, not the real thing, you cannot tell with accuracy how much the backbone curves toward or away from you. And what about the true shape of the twelfth rib? You cannot tell from this picture.
Bernard Siegfried Albinus
TABULAE SCELETI ET MUSCULORUM CORPORIS HUMANI, 1747
Plate 2
Metropolitan Museum of Art, New York
Here we can see the backbone curving under the skull and curving under the rib cage. This curve is stronger in the front than the back because of the protruding spines (A) of the vertebrae. On certain animals, such as the horse, these spines are so long at certain places that you could never guess just how the backbone curves, merely by observing the fleshed animal.
A most important construction line is that which indicates the pelvic crest (B). The pelvic crest has enormous influence on the form. I fear you will never get it right until you examine a real pelvis. This line has curious concave qualities, which are finally grasped by the student after he has concentrated on the outer, rather than the inner line of the crest.
The body has two girdles: the pelvic girdle (C), and the shoulder girdle (D). The shoulder girdle is made up of the collar bones and shoulder blades. The pelvis is a fixed form, but the shoulder girdle can be moved in many directions. When you draw the model, try to isolate the shoulder girdle in your mind and accurately place its components.
The left hand is in supination. In the previous picture, it was in pronation. It is difficult to grasp the complex movement of the lower arm bones that cause these differing actions. However, if you have the actual bones before you, pronation and supination may be easily understood. In order to draw the lower arm properly, you must be able to visualize the bones through the flesh.
Bernard Siegfried Albinus
TABULAE SCELETI ET MUSCULORUM CORPORIS HUMANI, 1747
Plate 3
Metropolitan Museum of Art, New York
The Albinus plates we have just seen were made in the eighteenth century. This Vesalius skeleton is a product of the mid-sixteenth century. In certain details, it is therefore not so accurate. But the Vesalius plates have such a splendid vigor of style that they have been greatly used by artists through the centuries.
Here the arms seem abnormally long and the curves of the backbone are virtually lacking. Turn to Albinus’ front view of the skeleton and notice how strongly these curves are suggested. Compare especially the curve (A) between the rib cage (B) and the pelvis (C). As a result of the suppression of the curves in the Vesalius plate, the ribs are much too horizontal here.
Andreas Vesalius
DE HUMANI CORPORIS FABRICA, 1543
Plate 21
New York Academy of Medicine
Vesalius’ faulty rendering of the curvature of the backbone is again visible here. On the left of the skull on the tomb is the little U-shaped (hyoid) bone (A), which embraces the windpipe; artists are most familiar with this bone because it forms part of the line which separates the planes between the neck and the flesh under the jaw.
We also have here a bottom view of the skull. The two brightly lit bumps are the condyles (B) which articulate with the atlas bone (C). The atlas bone is directly under the skull (remember, Atlas held up the world) and these two condyles fit into two hollows on the top of the atlas bone so that the skull can rock back and forth on the top of the backbone. The atlas, in turn, rotates on the bone beneath – the axis (D) – and thus the skull can turn from side to side. A study of the form and function of the atlas and the axis will enable you to fit the head gracefully on the neck.
In an earlier version of this plate, there was engraved upon the tomb: Vivitur ingenio, caetera mortis erant. Genius lives on, all else is mortal.
Andreas Vesalius
DE HUMANI CORPORIS FABRICA, 1543
Plate 22
New York Academy of Medicine
When you study the bones of the arms and legs, do not fail to examine them from the top and bottom views. When you do this, also look down their shafts and you will get a feeling of the slight twist which all these bones have. You will also understand much more clearly the cross-section of the top, shaft, and bottom of each bone.
The tibia (A), for instance, has a platform on the top, which resembles a half cylinder. This merges into the prismatic shaft, which in turn merges into the cube-like bottom of the bone. Once you have discovered how the edge lines on the shaft move to complete these mergers, you should be able to draw the tibia in any position. But can you do this from a picture? You need the bone itself.
At the end of the humerus bone, there are a spool (B) and a ball (C): the capitellum and trochlea. An understanding of these two forms usually enables the student to understand supination and pronation. For the radius is hollowed out on its proximal end and rotates against the ball, while the ulna grasps the spool and moves only with a hinge action.
If you should run a line through the little numbers on the back – from one to twelve – you would get the line that artists call the line of the angles of the ribs. (Actually, I think you would have to draw this line just a touch to the left of number eleven.) When the shoulder blades are at rest, their inner edges like to rest against this line, and artists very often cause the planes of the back to meet upon this line.
Andreas Vesalius
DE HUMANI CORPORIS FABRICA, 1543
Plate 23
New York Academy of Medicine
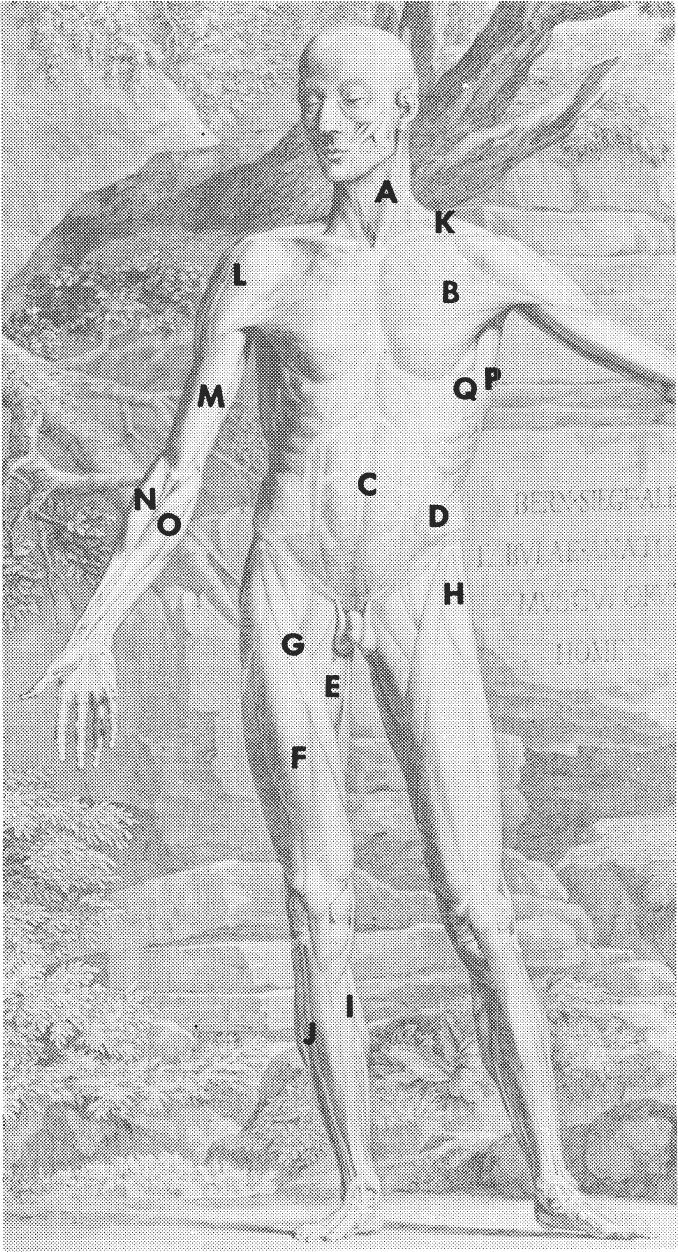
The muscle groups noted below comprise muscles related through function. In drawing, the group as a whole is stressed; the individual muscles within the group are usually subordinated.
There are other muscles in the flexor and extensor groups of the arm; but since they are not superficial, they are somewhat neglected by artists. To properly study the small muscles of the head, hands, and feet, it is best to consult a medical anatomy.
Note the following muscles: sternomastoid (A); pectoralis group – pectoralis major and minor (B); rectus abdominis (C); external oblique – some artists consider this as a group, combining it with the two muscles beneath, internal oblique and transversalis (D); adductor group of the thigh – adductor longus, adductor brevis, adductor magnus, pectineus, gracilis (E); quadriceps femoris group – vastus externus, vastus internus, rectus femoris, crureus (F); sartorius (G); tensor fasciae femoris (H); calf group – gastrocnemius and soleus (I); peroneal group – tibialis anticus, special extensor of the great toe, long extensors of the toes, peroneus tertius, peroneus brevis, peroneus longus (J); trapezius (K); deltoid (L); biceps group – brachialis anticus and biceps (M); supinator group – supinator longus, extensor carpi radialis longior (N); flexor group – flexor carpi ulnaris, flexor carpi radialis, palmaris longus, flexor sublimis digitorum, pronator radii teres (O); latissimus dorsi (P); serratus major (Q).
Bernard Siegfried Albinus
TABULAE SCELETI ET MUSCULORUM CORPORIS HUMANI, 1747
Plate 1
Metropolitan Museum of Art, New York
Here is a front view of the body from Vesalius. The tensor fascia femoris (A), which students often disregard, shows its full importance here. I hope students will carefully compare this picture with the previous plate from Albinus. I suspect the two illustrations could be used as the basis of a psychological test for artistic sensitivity.
Andreas Vesalius
DE HUMANI CORPORIS FABRICA, 1543
Plate 26
New York Academy of Medicine
This plate offers an excellent view of the adductor group (A) of the thigh. The basin-like quality of the pelvis is also well expressed. Sculptors like to think of the ball of the abdomen as a ball of clay resting in this basin, and artists often give this feeling to their drawings.
Notice the internal condyle of the humerus (B), which is always prominent in the fleshed figure. Note, too, the large size of the patella (C) in relation to the distal end of the femur. Students always make the patella too small. The egg-like mass of the rib cage is clear; on the front it is widest at the eighth rib.
Bernard Siegfried Albinus
TABULAE SCELETI ET MUSCULORUM CORPORIS HUMANI, 1747
Plate 7
Metropolitan Museum of Art, New York
Note the following muscles: gluteus medius (A); gluteus maximus (B); hamstring group – biceps of the thigh, semitendinosus, and semimembranosus (C); infraspinatus group – infraspinatus and teres minor (D); teres major (E); triceps group – external, internal, and long heads of the triceps (F); extensor group – extensor carpi radialis brevior, extensor communis digitorum, extensor carpi ulnaris (G).
The following were all noted in the front view: tensor fascia femoris (H); quadriceps femoric group (I); adductor group of the thigh (J); calf group (K); peroneal group (L); trapezius (M); latissimus dorsi (N); deltoid (O); supinator group (P); flexor group (Q).
Vesalius’ plates were first published in 1543. At that time, teres minor had not been recognized as an independent muscle. It was evidently thought of as part of infraspinatus; so it is therefore most natural to group teres minor with infraspinatus.
In the region of the back flap of the armpit, artists closely associate latissimus dorsi and teres major, so I suppose these two may be thought of as a sort of group in this region.
A magnificent artists’ trick, often employed, is to run the line of the outer edge of the tail of the trapezius in an exaggerated manner over the various muscles beneath as is done here, thus clearly revealing their shapes.
Andreas Vesalius
DE HUMANI CORPORIS FABRICA, 1543
Plate 32
New York Academy of Medicine
The hardest part of the body to draw is the back. The reason is that students must learn to think in terms of one, two, and at times three layers of muscle.
The rhomboid group (A) has a most active influence on the back. Because the rhomboid group is actually covered by the trapezius, this group is never sufficiently studied. The rhomboids may be thought of as rather heavy rubber sheets that stretch from the center line (B) of the back to the inner edges of the shoulder blades (C and D). When a shoulder blade is moved towards the center line of the back, the rhomboid group naturally creates a remarkable vertical bulge, which usually has a vertical wrinkle or two.
After the time of Vesalius, the rhomboid group was divided into the upper and lower rhomboids. But this division should be forgotten by the artist; as shown here, the two should be treated as one group.
Andreas Vesalius
DE HUMANI CORPORIS FABRICA, 1543
Plate 33
New York Academy of Medicine
The muscles shown here, running up and down on each side of the center line of the back, are of great importance to the artist. They are the muscles that hold the rib cage erect on the pelvis and the neck erect on the rib cage. Thus, these muscles have an essentially human quality. They are seldom sufficiently stressed in books on artistic anatomy because these important muscles of the back are well covered by superficial muscles, and illustrations in such books often present only the superficial muscles.
The group of muscles shown here, moving from the pelvis up the rib cage, is called the erector spinae. One muscle of this group, iliocostalis (A), should be especially stressed when drawing the small of the back, because this muscle is very thinly covered by latissimus dorsi at this point.
A similar situation exists in the back of the neck. Again, the influence of trapezius should be disregarded and the deep muscles should be stressed. Artists like to render these muscles as two strong, rope-like cords (B and C), one on each side of the center line.
You will see certain other subtle forms on each side of the center of the model’s back in the region of the rib cage. I fear you will never understand them unless you go to a modern medical anatomy and study longissimus dorsi (D) and spinalis dorsi (E), which also belong to the erector spinae group.
Andreas Vesalius
DE HUMANI CORPORIS FABRICA, 1543
Plate 35
New York Academy of Medicine
The adductor group (A) is most clearly rendered here. As I have said, it is essentially the bones, rather than the muscles, that determine bodily form. The adductor group creates the form of the inside of the upper thigh. It is evident here how the shape of the upper part of the adductor group is completely forced by the shape of the bottom of the pelvis.
The external oblique is missing; if it were present, it would fill the space at B. If you conceive the external oblique to be something like a sheet of rubber fastened to the rib cage above B, and fastened to the pelvic crest below B, you would arrive at a very close approximation of the form in the area of B.
Artists are acutely aware of the importance of understanding all cross-sections of the body, from the top of the head to the soles of the feet. Without this knowledge, it is impossible to place exactly the meeting of front and side planes under given lights. The cross-sections of many parts of the body are utterly dependent on the shape of bone. The cross-sections of the upper skull, the lower rib cage, the region of the pelvic crest, the knees, the ankles, the elbows, and the wrists are almost entirely cross-sections of bone. Take off your shoe and feel the top of your foot. Feel the back of your hands. You will feel hard bones. Study the bones and you can soon draw the feet and hands.
Bernard Siegfried Albinus
TABULAE SCELETI ET MUSCULORUM CORPORIS HUMANI, 1747
Plate 4
Metropolitan Museum of Art, New York
All the artists represented in this book were masters of artistic anatomy. If you want to draw the figure well, you too must study artistic anatomy as much as you can.
No one book will teach it all to you. No one book will exactly answer the manifold questions that should occur to you as you draw the figure. But every anatomy book has something of value to tell you. Actually, just a small number of books have been written on the subject. Try to beg, borrow, or buy as many as you can. What I did was to study one of them until I had practically memorized everything it said. Then I looked through the other books, which largely repeated the first, except that every one, here and there, contained fascinating turns of thought which the first book had omitted.
In this drawing, Raphael demonstrates a complete understanding of the form and proportion of the bones. He could draw them out of his head, in any position, and knew their comparative proportions. See how clearly the distal end of the ulna is indicated (A and B). Note the precise drawing of the distal end of the tibia (C); the movement of each individual lower rib and cartilage (D); the indication of the cheek bone (E). And how well he knew his shoulder blades!
Raphael Sanzio (1483-1520)
A COMBAT OF NUDE MEN
red chalk over stylus work
1415⁄16″ × 11″ (37.9 × 28.1 cm)
Ashmolean Museum, Oxford
When a beginner starts to draw the figure, his knowledge is sparse. On the torso, for instance, the only landmarks he will place on the body are the nipples and the navel. The practiced artist, however, has thought about bodily landmarks a great deal; on the torso alone, he could probably place hundreds. He can, for instance, place the tips of all the dorsal and lumbar spines of the vertebral column and the tips of all the ribs; here are forty-one landmarks right away.
The artist’s landmarks, you will notice, are related to bone rather than to flesh; a good thing, because landmarks of the flesh (the navel in particular) move about a good deal from model to model. Landmarks are valuable because the artist drives construction lines through them, such as the gravity line from the pit of the neck, or the line through the points of the shoulders. The artist establishes his proportions with these landmarks. As he draws down the body, his drawing is preceded by dots, real or imaginary, where the landmarks may be. And finally he drives his lines towards these landmarks.
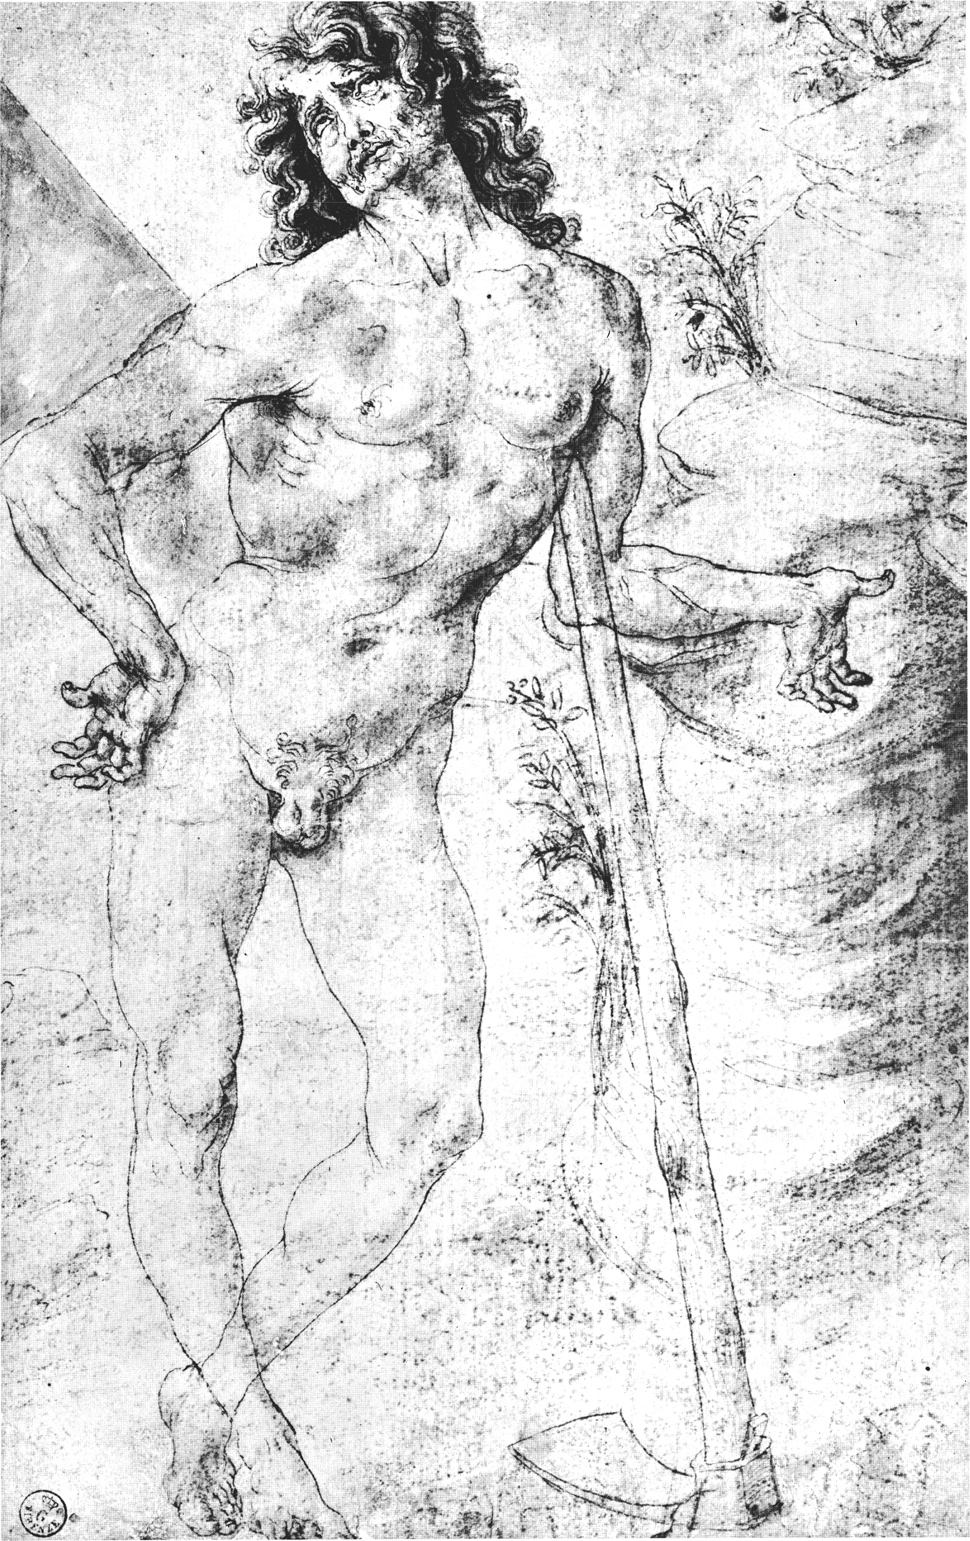
In the pelvic region of this figure, this last process is very clear. Landmarks visible here are the pelvic point (A), symphysis pubis (B), and great trochanter (C). The line of the external oblique (D) is driven to the pelvic point (A). The line of the abdomen or rectus abdominis (E) is driven downward to the symphysis pubis (B). The line of gluteus medius (F) is driven downward to the great trochanter (C). The front line of the tensor muscle (G) is driven upward to the pelvic point (A).
Baccio Bandinelli (1493-1560)
MALE NUDE FROM SISTINE CEILING
pen and bistre wash
15¾″ × 8¼″ (40 × 21 cm)
British Museum, London
I find that it helps my students when I explain the bodily alterations that took place as man’s ancestor changed from a horizontal, four-legged animal to an erect, two-legged animal. By this time, under my constant urging, I hope you have acquired a human skeleton. First draw it in the animal position and then revolve it at the great trochanters and draw it in an upright position. If you let your mind dwell on the muscles that hold this skeleton erect, you will think of many factors that characterize the human body, factors that your drawings may accentuate.
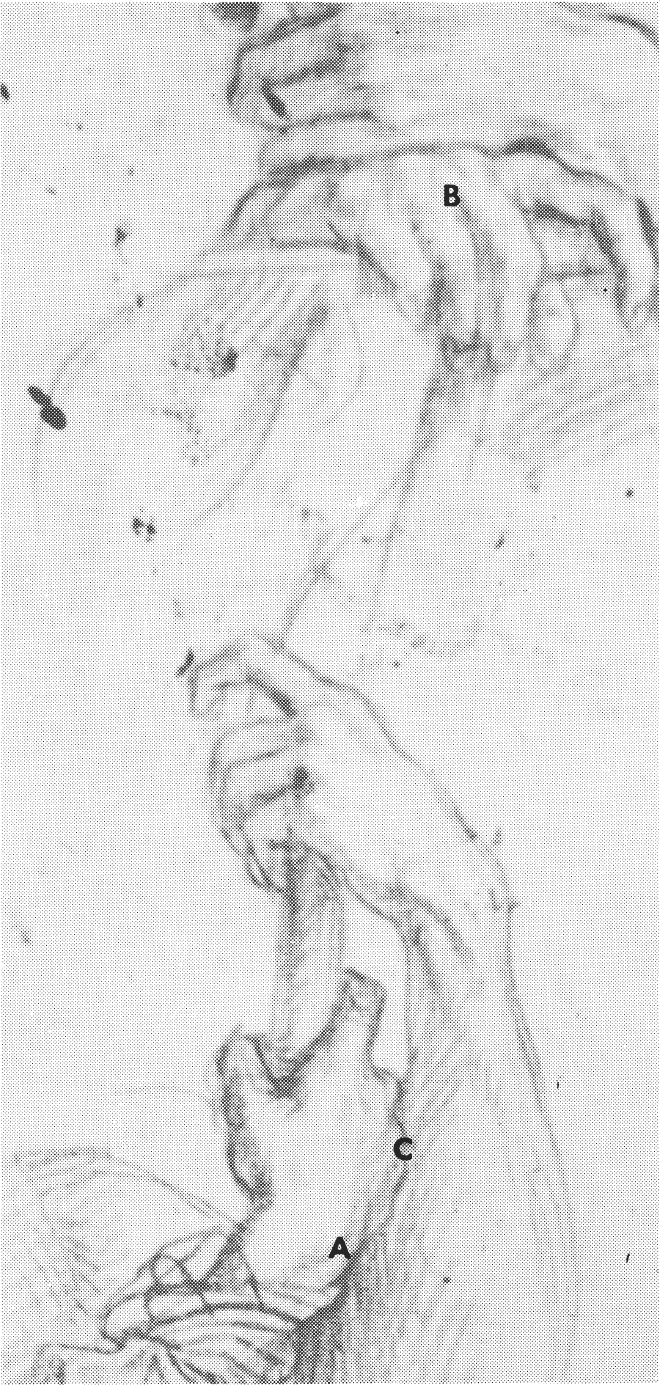
Most of the artists represented in this book may have been unaware of evolution, but almost all of them could draw beautiful horses. In other words, the artists in this book were familiar with comparative anatomy, and it certainly helped them in their figure drawing.
Here Leonardo opposes man’s rib cage, shallow from front to back (A-B), to the horse’s rib cage, deep from top to bottom (C-D). The shoulder blade on the back of the man’s rib cage (E) is compared with the shoulder blade on the side of the horse’s rib cage (F). Leonardo is aware of the similarity of muscle groups (G and H) and the similarity of the knees (I and K).
You might take a pencil and trace the movements of the backbones of man and horse in this drawing.
Leonardo da Vinci (1452-1519)
NUDE ON HORSEBACK
silverpoint
5⅞″ × 7¼″ (15 × 18.5 cm)
Reproduced by gracious permission of
Her Majesty the Queen
Royal Library, Windsor
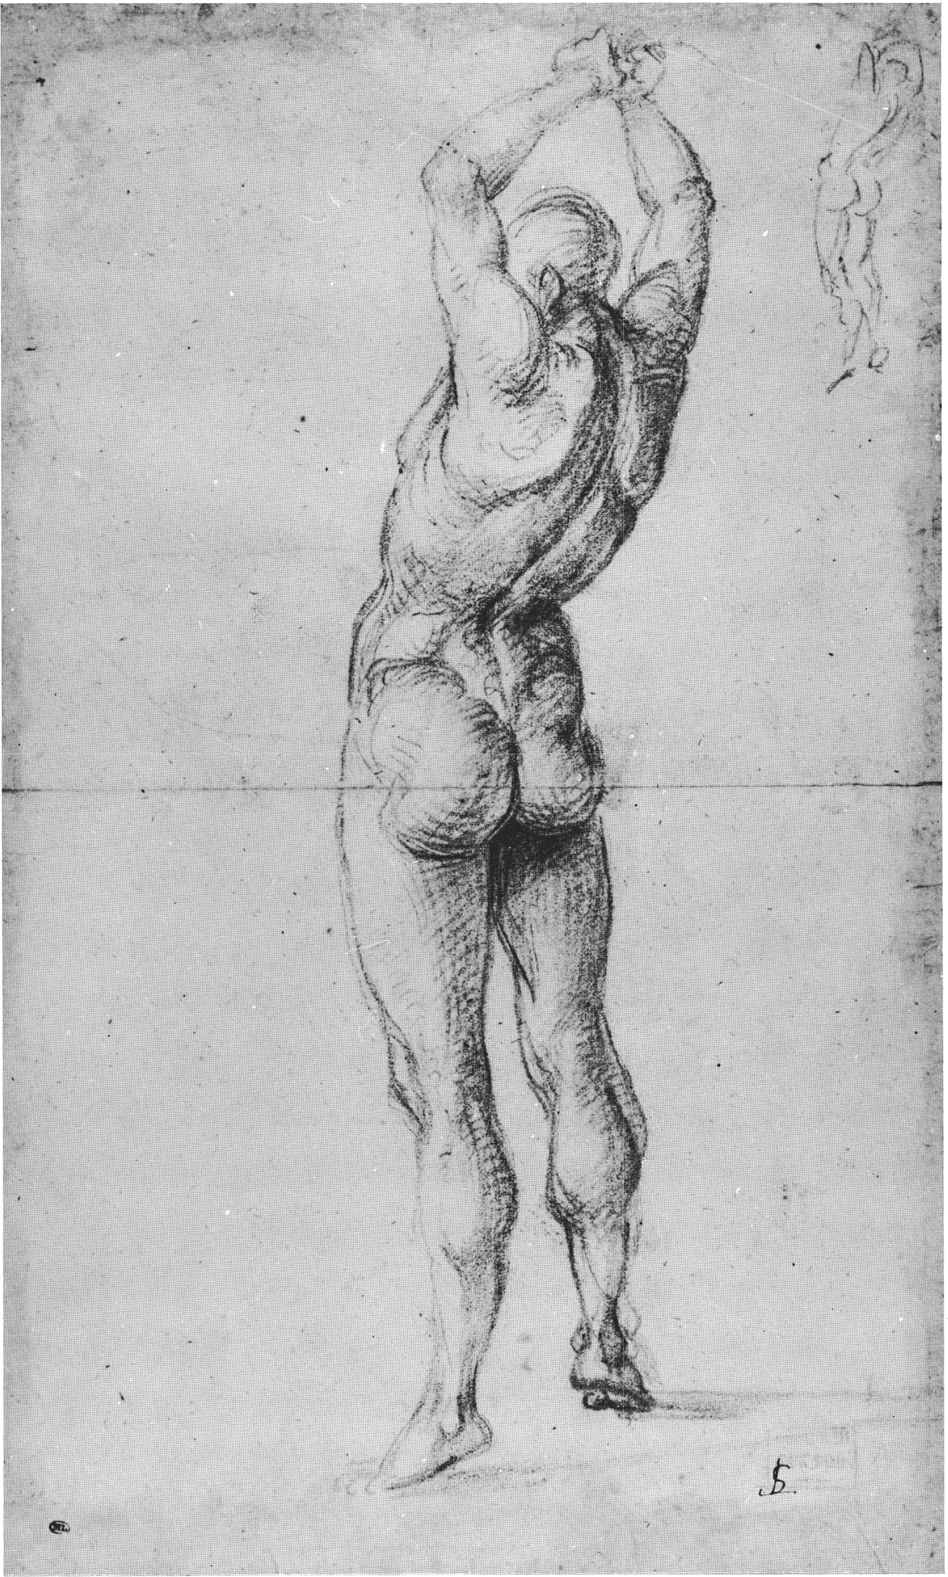
Draw some front, side, and back views of skeletons. Throw in the muscles or muscle groups that strive to hold the figure upright against gravity. Leave out the arms and the muscles of the shoulder girdle; we have been standing upright so long that they are fairly independent of the struggle against gravity. Concentrate on the erector spinae (A), which holds the rib cage erect; gluteus maximus (B), that most human of muscles, which holds the pelvis erect, and the two masses of the external oblique (C and D), which together prevent side sway of the rib cage.
Certainly, Signorelli was supremely aware of all these matters, or he would not have accentuated these muscles so strongly. Signorelli was also aware of the significance of grouping the muscles into functional masses. He has combined soleus and gastrocnemius to form the calf group (E), since he knew that these two muscles had a similar function. He was aware of the group of all the adductors of the thigh (F), and its antagonistic muscle, gluteus medius (G). He accentuated these last two because he knew that they were playing their part in locking the so-called hip joint against the pull of gravity.
Do not be discouraged. Excluding the hands, head, and feet, there are not many muscles and muscle groups to study. Only about as many as there are letters of the alphabet.
Luca Signorelli (c. 1441-1523)
NUDE MAN FROM REAR
black chalk
16⅛″ × 9⅞″ (41 × 25 cm)
Louvre, Paris
Here is Callot practicing his anatomy. One can tell, by the extraordinary assurance of this drawing, that he already knew his anatomy very well; but he still thought it worthwhile to keep in practice. Anatomy is something you cannot hold in your mind without constant drawing practice for the rest of your life.
Callot has concentrated on quadriceps femoris (A). He has evidently drawn it so often that he can render it with ease. He is already subconsciously aware of its function and form; the relative proportions of the three visible heads; and their proportions in relation to the surrounding muscles, notably the tensor (B). Were he drawing a less anatomical picture, he would not stress the separateness of the three heads as much, as their function is similar. The same is true of the hamstring group. You will notice that the line C-D is absent from the Callot drawing on the following page. This line separates muscles of similar functions; therefore it will not be stressed on a more advanced drawing.
There are other niceties of anatomy here: the artist’s understanding of how gastrocnemius (E) wraps about soleus (F) on the front view; the subtle indication of the one head of pectoralis major (G) which does not adhere to the rib cage; the precise understanding of the insertion of teres major (H) and latissimus dorsi (I) in the humerus and the subsequent course of these muscles.
Jacques Callot (1592-1635)
ANATOMY STUDIES
pen
1311⁄16″ × 8 15⁄16″ (34.8 × 22.7 cm)
Uffizi, Florence
This drawing was made from a model, but Callot brought to it his knowledge of anatomy. Now most beginners seem to have a knowledge of the body drawn mostly from nursery rhymes: they know that people have thumbs (because of little Jack Horner) and a few other evident things, but that is all. And they will sit in a drawing class, sedulously copying the flesh in front of them day after day, making no attempt to identify and analyze each separate part.
Now Callot knew the identity and function of every bump and hollow on this body. And what is more, because of his knowledge of anatomy, comparative anatomy, and function, he was able to characterize every bump and hollow so that they looked more like themselves than they actually did on the model.
Take the external oblique mass (A): Callot knew that it originated on the ribs and flowed to the pelvic crest. Knowing that bone dominates the form of muscle, he had carefully studied the movement of the ribs and the subtle inner and outer curves of the crest. And he knew that, among other functions, the external oblique rotates the rib cage above the pelvis. Like almost all rotators (sartorius and sternomastoid, for instance) this imparts to the muscle a spiral quality. Guided by this knowledge, Callot came to a conclusion as to the shape of the external oblique mass. He could then draw this mass with authority and character.
Notice the insertion of gluteus maximus (B) directly between the muscle groups, hamstring (C) and quadriceps (D). The muscle plunges into the line between the functions, intent on its insertion in the femur. This is as it should be, for it hints at how man holds himself erect.
Jacques Callot (1592-1635)
STANDING MALE NUDE
sanguine
12⅛″ × 7¼″ (30.8 × 18.5 cm)
Uffizi, Florence
Anatomically, the study of the hand may be divided into three steps: studying the bones of the hand; studying the short muscles of the hand; and studying the long muscles and their tendons that arise from the arm.
Studying the bones is most important, because bones, as usual, give the fundamental shape. In studying bones, it is best to think of them as simply as possible, at first, and to draw them that way in the beginning. The femur and the fibula, for instance, may be thought of as a rod with something at one end and something at the other. A rod you can draw, but you cannot draw a something. In your mind, you must create a simple form to put on each end of the bone. Take the metacarpals of the four fingers. Initially, each may be thought of as a rod with a cube on one end and a ball on the other. Then you can devote the rest of your life to refining the shape of the cube, the rod, and the ball.
However, you will find these simple, early conceptions used by artists again and again, even in their most sophisticated drawings. The carpus (A) seems to be thought of as a quarter of an apple (skin side on the back) and the ball-like appearance of the knuckles (the distal ends of the metacarpals) is obvious.
Notice how flat the body of the hand is at B – because the metacarpals are pressed against the wood – and observe how rounded the body of the hand is at C.
Andrea del Sarto (1486-1531)
STUDIES OF HANDS
red chalk
11¼″ × 7⅞″ (28.5 × 20 cm)
Uffizi, Florence
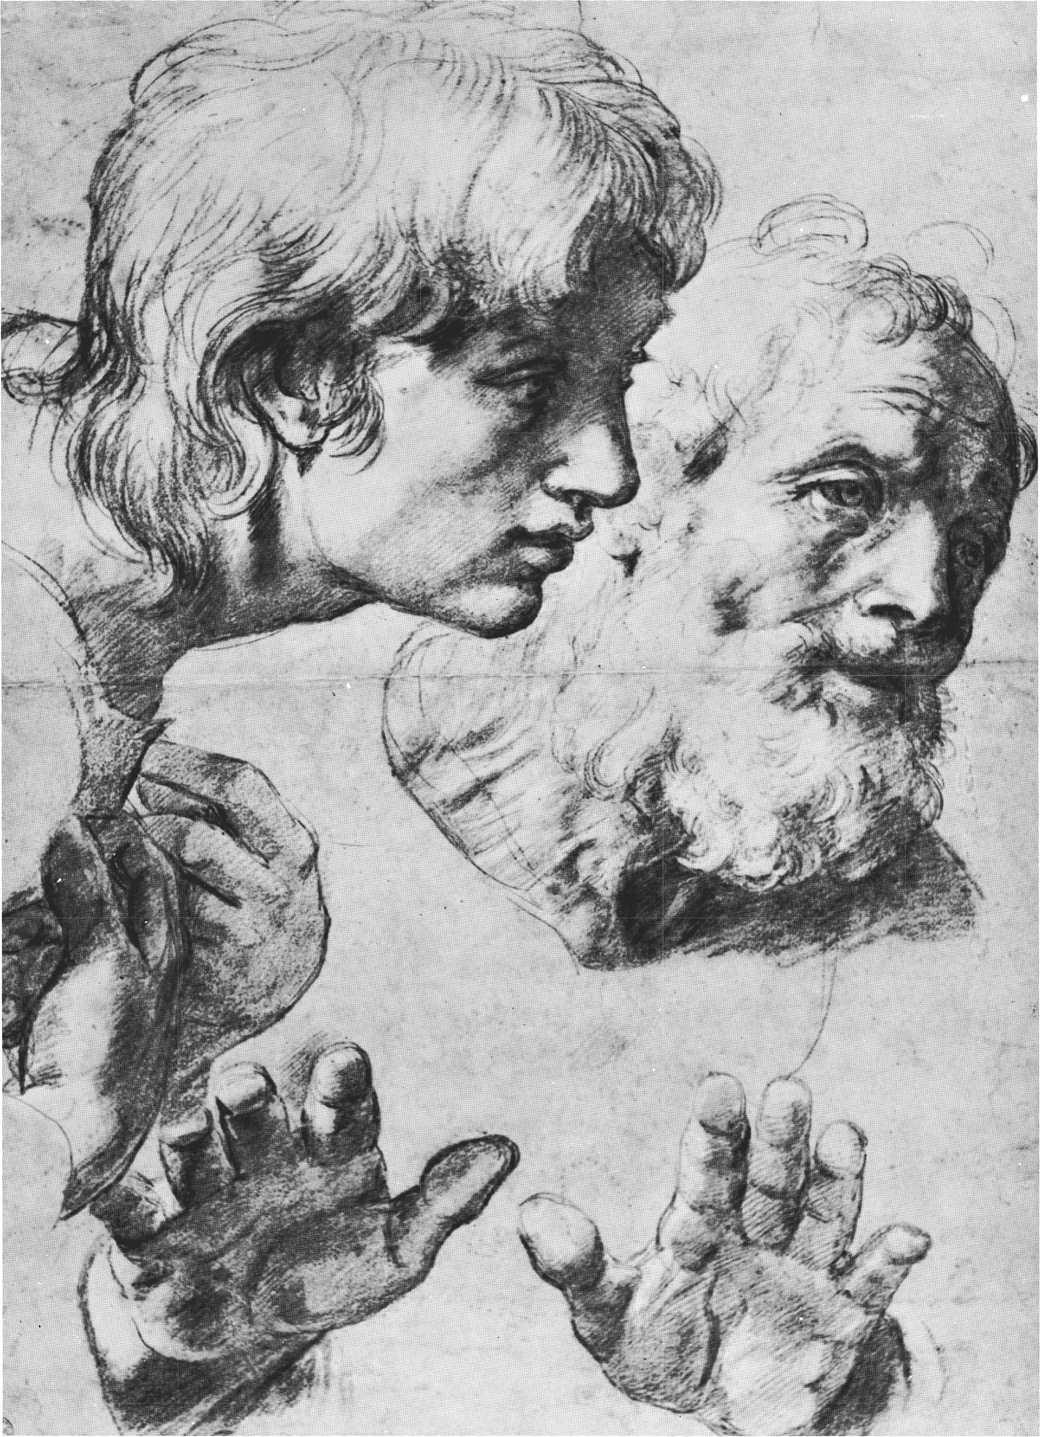
Wrinkles tend to run at right angles to the pull of a muscle. The wrinkles on the forehead of the old man are caused by the vertical fibers of the frontalis muscle. The wrinkle at A is caused largely by the zygomaticus muscle, which runs from the cheek bone to the mouth. The artist calls frontalis the muscle of attention, and the zygomaticus the smiling muscle. There are many other muscles like these that are responsible for the expression of varied emotions on the face. Study them and you may express any emotion you wish.
The wrinkle at B (the so-called life line) is caused by a small muscle that pulls the thumb towards the center of the hand. Almost all the other wrinkles on the palm side of the hand (such as C, D, E, and F) are caused by tendons of the flexor group of muscles, which originate far away on the internal condyle of the humerus.
The influence of some of the short muscles on the form is clear here. Mound (G) is caused by palmaris brevis; (H) by a little muscle group which arises from the palm and goes largely to the base of the first phalange of the thumb.
Remember, wrinkles are used as lines to express the form over which they run. If you will study your anatomy, you will be able to draw wrinkles even where you do not see them; thus you will get more form in your drawings.
Raphael Sanzio (1483-1520)
STUDY FOR THE TRANSFIGURATION
black chalk and some white
19⅝″ × 145⁄16″ (49.9 × 36.4 cm)
Ashmolean Museum, Oxford
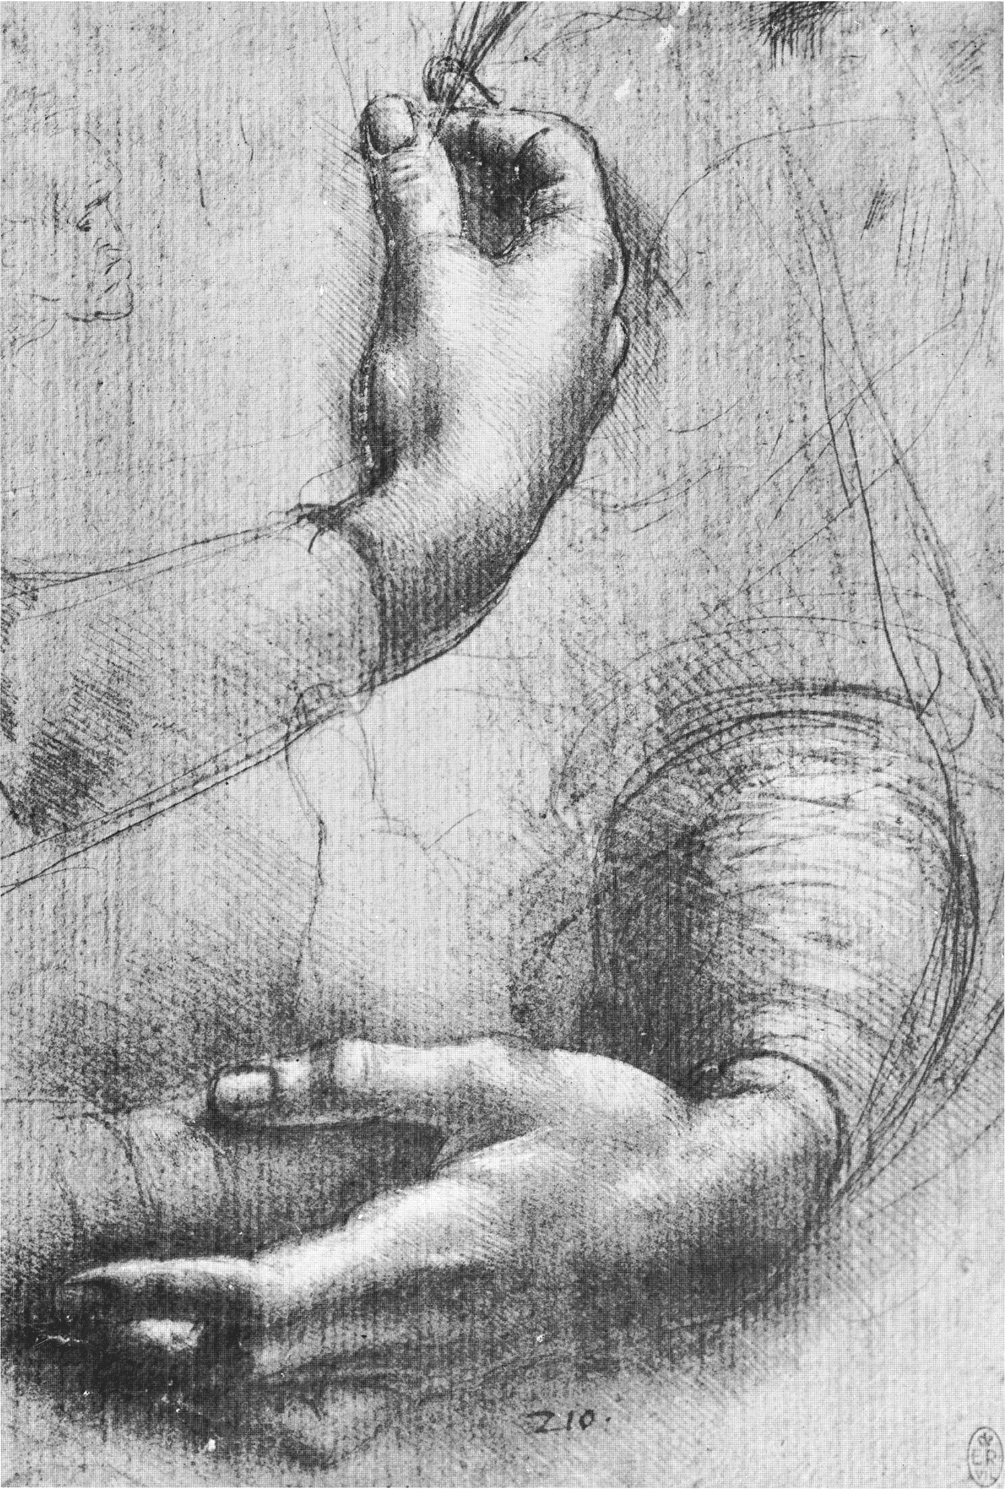
At A you can sense the ball at the end of the metacarpal of the index and clearly see the tendon of extensor communis digitorum running over this ball, on the tendon’s journey to the end of the finger. This tendon appears again at B. H is the same small muscle group labeled H in the previous picture. Mound C represents the abductor of the index; this muscle is so important that it alone will almost make the skeleton of a hand look like a fleshed hand.
Though you must study the bones of the hand separately, it is also necessary to study the hands (as well as the feet, rib cage, and skull) with the bones all put together. Two arches – the arch (D) where the carpus articulates with the metacarpals, and the half arch (E) at the distal ends of the metacarpals – are the best aids towards the construction of hands. These arches, naturally, are construction lines.
Our upper and lower limbs are much the same. This makes life much easier for the artist. If you learn all about the human upper limb, you already know a great deal about the lower limb, and vice versa. It’s true that our elbows look forward and our knees look back, but that is because they got twisted about in the course of evolution. But taking this into consideration, study the remarkable analogies between the muscles and bones of the upper arm and the thigh; the lower arm and the lower leg; and particularly the analogies in the hands and feet.
Leonardo da Vinci (1452-1519)
HANDS
silverpoint and white
8¼″ × 5¾″ (21 × 14.5 cm)
Reproduced by gracious permission of
Her Majesty the Queen
Royal Library, Windsor
In studying feet, remember again that the bones force the form. The arch (A) where the tarsus meets the metatarsals is most valuable. Pretend the foot is on the lawn, and put up a croquet wicket to represent this arch. Then draw a line on the lawn itself, where the distal ends of all the metatarsals reach the ground (B). Then draw lines to represent the movement of the metatarsals. This will give you a nice sense of the dorsum of the foot.
Artists like to think of the foot in terms of its two bone systems: the ankle system that starts with the astragalus and ends with the big toe and its two adjacent toes; and the heel system, that starts with the os calsis and ends with the little toe and its adjacent toe. Walk about on the floor with wet feet and see how the imprint of these two systems varies as you apply more weight to the foot.
Then look at your foot from the inside and sense the great arch on which the weight of the body rests.
Learn to draw footprints out of your imagination. Remember, many difficult views of the foot are but footprints in an odd perspective.
The short muscles of the foot are as influential as they are on the hand. The forms at C and D are caused by abductor minimi policis. They reappear at E and F. Notice the little bump at G: the proximal end of the metatarsal of the little toe.
Study the long muscles. Exclusive of the calf, most of them may be grouped on the side of the leg. I know that the names of none of them appeared in your nursery rhymes, but the tendon of tibialis anticus, when the foot is flexed, makes a form as big as your nose! And you wouldn’t think of leaving out the nose, would you?
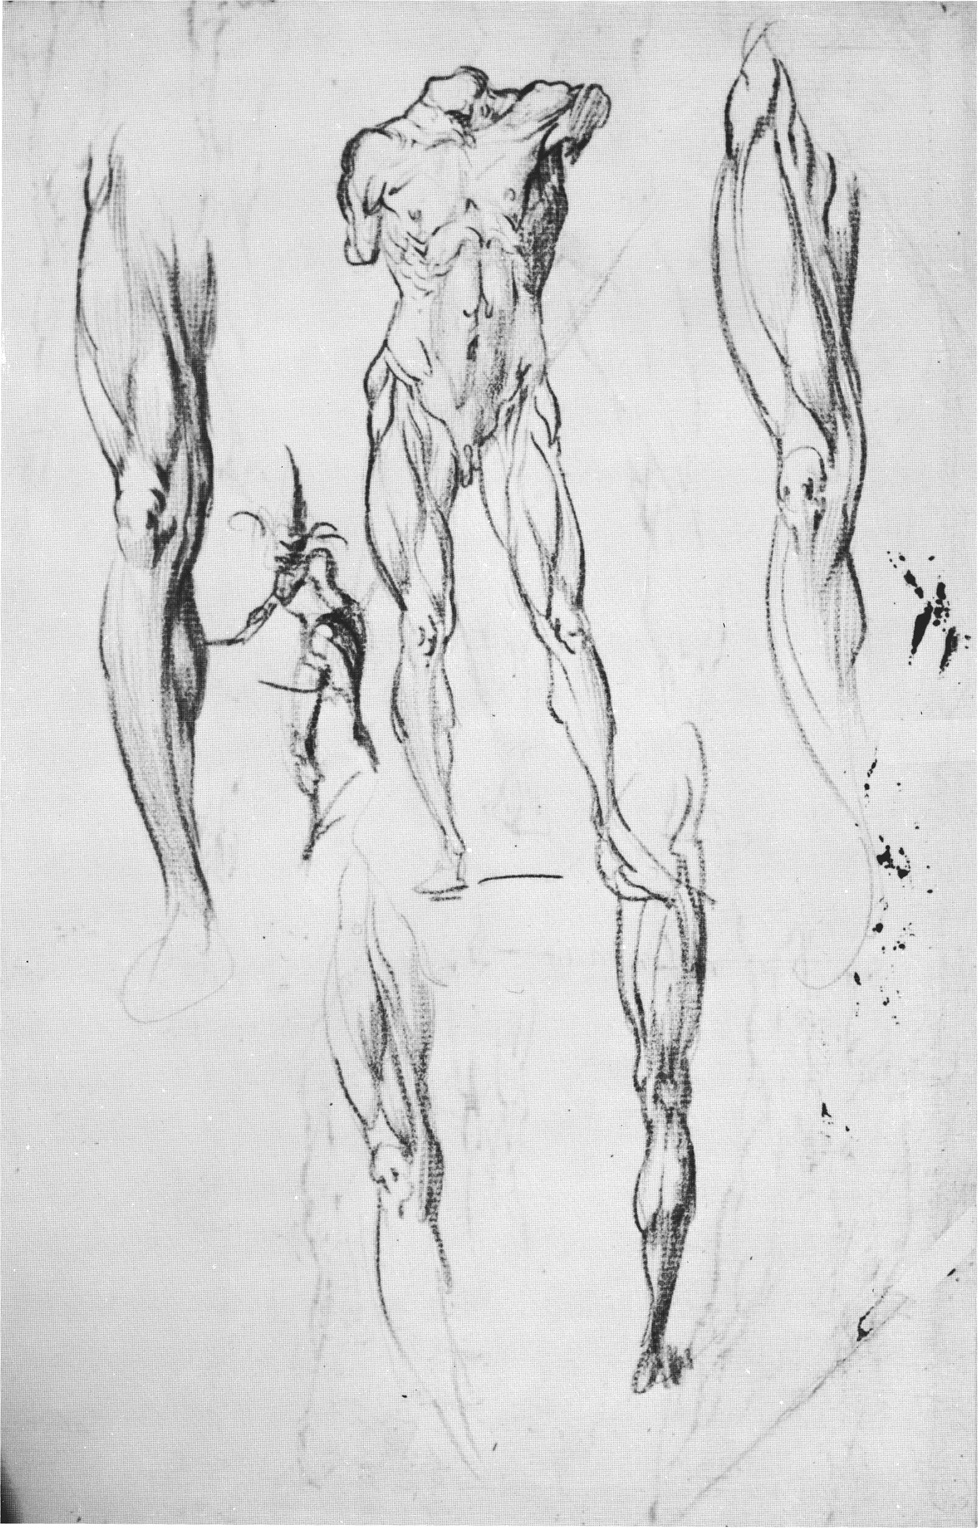
Peter Paul Rubens (1577-1640)
STUDIES OF ARMS AND LEGS
black chalk and some white
13¾″ × 97⁄16″ (35 × 24 cm)
Boymans Museum, Rotterdam
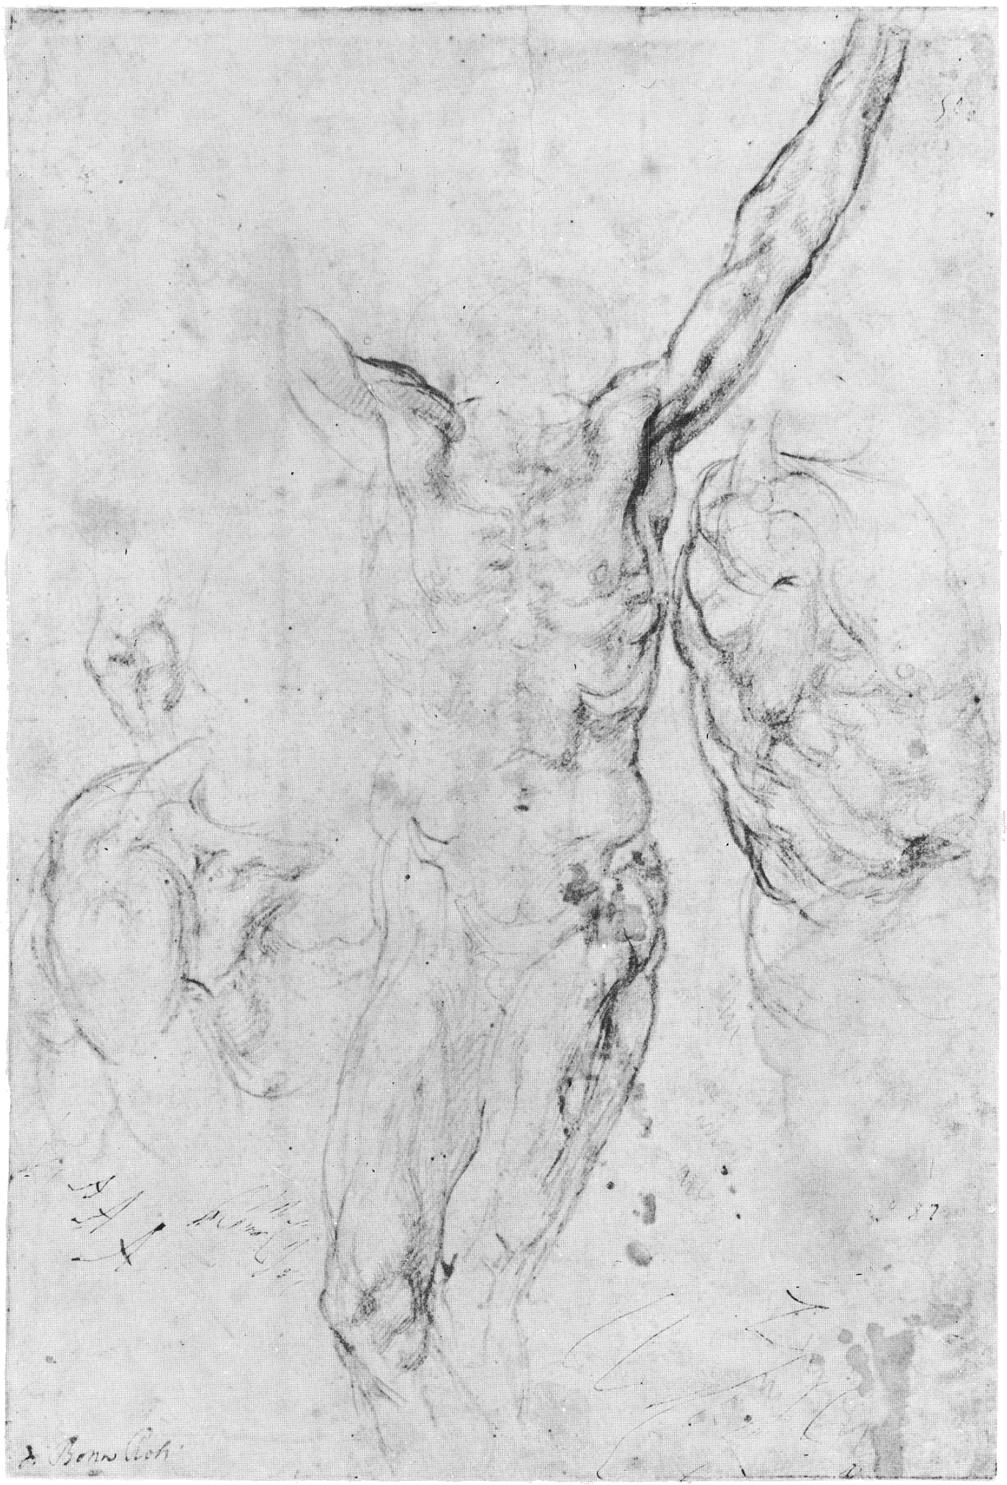
Here is a superb front and side view of the body. The great mass of the rib cage is conceived as an egg, somewhat flattened from front to back. This is the controlling mass; all details upon it are drawn with an awareness of its presence.
The little bumps of serratus magnus (A) are admirably shown on both front and side views. Realize that the lower four digitations of this muscle are not parallel; they fan from the lower angle of the shoulder blade. The bumps marked B are the fleshy origin of the external oblique; they fan out even more and are invariably mistaken by students for ribs.
The pectoralis (C) is moving under the deltoid to its insertion. Together, these two muscles make up the front flap of the armpit. The back flap of the armpit is composed of latissimus dorsi (D) and teres major (E) seeking its insertion in the humerus. Notice that the back flap of the arm is inserted between the biceps (F) and the triceps (G).
Notice the hollow made by the sternum bone (H) as the pectoralis piles up on each side of it. This may suggest why so many things that are prominent on the skeleton become depressions on the fleshed figure. The ensiform cartilage (I), a famous landmark, is at the bottom of the sternum.
Why is the ensiform a famous landmark? The distance from the pit of the neck to the top of the ensiform cartilage, if doubled, will give you the bottom of the rib cage. Since artists have a hard time deciding where the bottom of the rib cage is, this is a convenient bit of information.
Michelangelo Buonarroti (1475-1564)
STUDY FOR CHRIST
black chalk
129⁄16″ × 8¼″ (32 × 21 cm)
Teyler Museum, Haarlem
For centuries, artists have combined muscles of similar function into groups. Thus, the artist does not bother much with the individual muscles in the group, but presents a symbol of the group as a whole. Here are some of these muscle groups.
Rhomboid group (A): upper and lower rhomboid. Infraspinatus group (B): infraspinatus and teres minor. External oblique group (C): the external oblique is usually thought of in relation to the muscles beneath it. Quadriceps of the thigh (D): vastus internus, vastus externus, rectus femoris, and crureus. Hamstring group (E): biceps femoris, semitendinosus, semimembranosus. Adductor group of the thigh (F): all the adductors of the thigh that move from the pelvis to the femur, plus the gracilis. Biceps group (G): biceps of the arm and the so-called pillow muscle, brachialis anticus. Triceps group (H): the three heads of the triceps. Supinator group (I): brachioradialis and extensor carpi radialis longus. Flexor group of the lower arm (J): all the flexor muscles that go to the hand from the internal condyle of the humerus. Extensor group of the lower arm (K): all the extensor muscles that go to the hand from the vicinity of the external condyle.
Although I have never seen it mentioned, I think you might combine the six muscles at (L) that go down to the foot and call them the peroneal group.
Filippino Lippi (1457-1504)
ATHLETIC YOUTH
pen
6⅞″ × 315⁄16″ (17.5 × 10 cm)
Royal Library, Turin
Here Pollaiuolo clearly defines the three muscle groups of the lower arm: the supinator group (A); the extensor group (B); and the flexor group (C). Also evident is the group of muscles (D) that cluster about and include flexor brevis pollicis. The opposite mound (E) is caused by palmaris brevis. The adductor group of the thigh is presented as a simple egg shape (F), with no individual muscle showing. The form of the external oblique (G) is well thought out and in a state of mild compression.
There are many small but important details. Line (H) is drawn up over the mass of the adductor group (F) to show that the flesh of vastus internus (I) is in front of the adductor group. Line (J) moves forward on the leg to show that the inner hamstring (which this line represents) is in front of the calf. Notice how many times this device is repeated in this figure, down to the smallest details.
Notice the swelling of the biceps (K) and its sudden turn into tendon (L). Notice the two swellings of the deltoid, upper and lower (M and N). Remember, the greatest width of the upper body is through the lower swelling of the deltoid. The points of the pelvis (O and P), together with the symphysis pubis (Q) form the famous imaginary triangle at the front of the pelvis. There is a triangle in back: the sacrum. As these triangles are fixed in position, one to the other, a pelvis may always be constructed from them. Try it.
Antonio Pollaiuolo (1432-1498)
FIGURE OF ADAM
pen and ink, with black chalk
111⁄16″ × 71⁄16″ (28.1 × 17.9 cm)
Uffizi, Florence
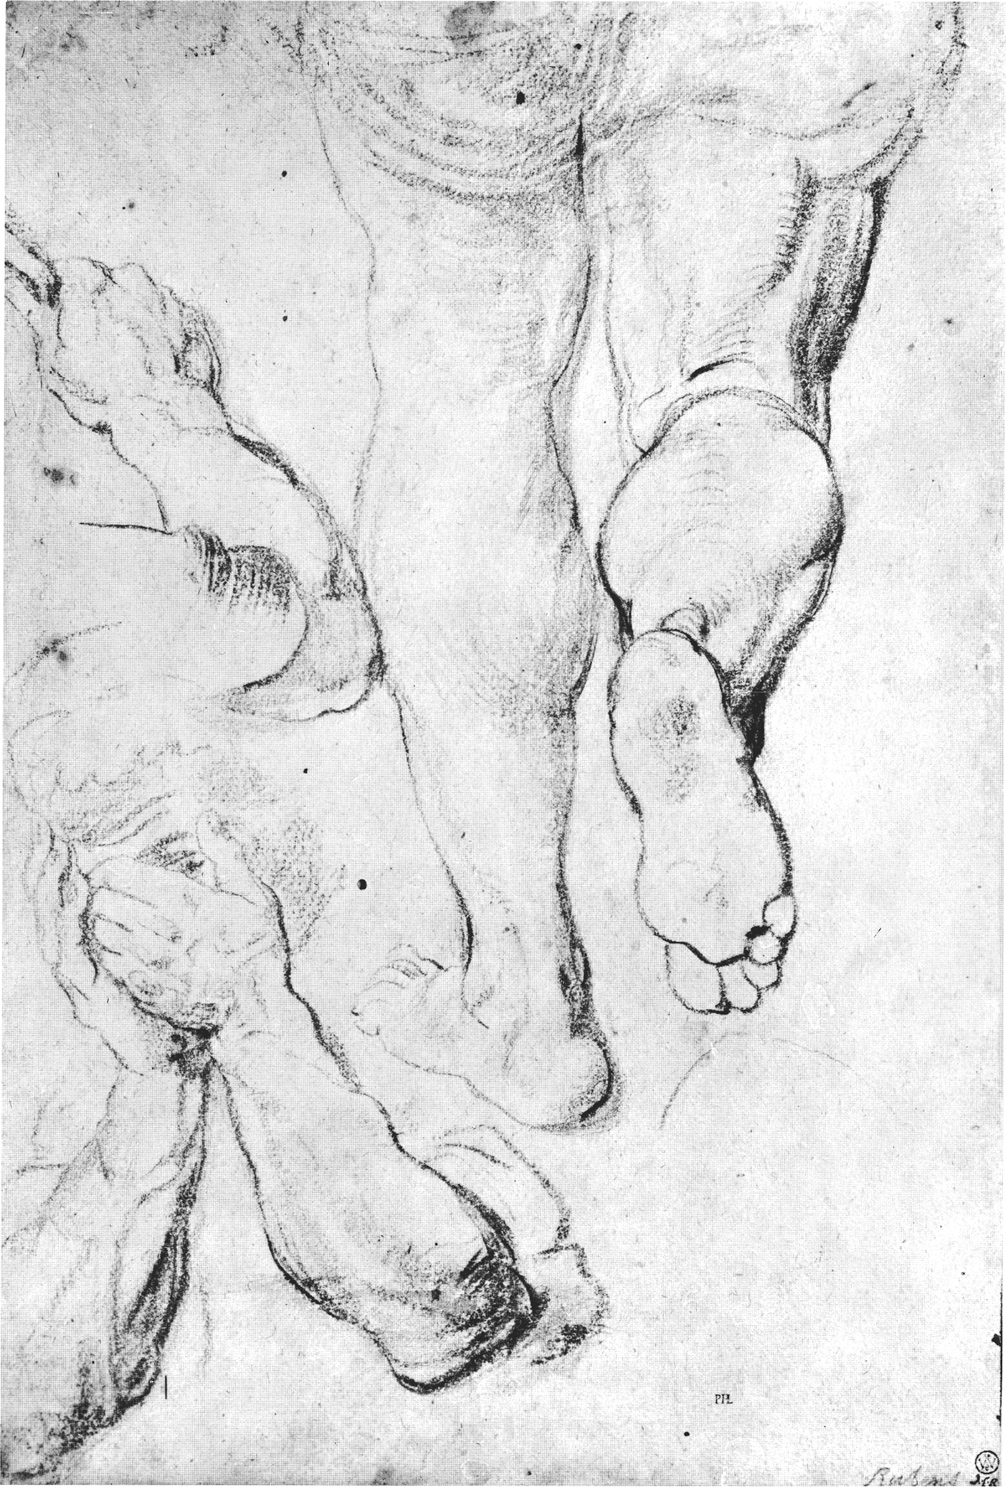
In these sketches, we have an excellent opportunity to study the five masses of the foot: the heel (A), which, on the outside view of the foot, is thought of as the first convexity of the abductor of the little toe; the distal end (B) of the metatarsal of the big toe; the second convexity (C) of the abductor of the little toe; the egg-like form (D and D) of the group of short extensors of the toes; and the great toe itself (E).
At F is a superb view of the tendon of tibialis anticus. This is a most important tendon because it carries “the flow of the form” (as artists say) from the lower leg to the foot. This is the way the deltoid carries the flow from the shoulder to the arm, or the external oblique from the rib cage to the pelvis. Think of how the side view of the front ankle would look if the tendon of tibialis anticus were not there. The outline would then be carried by the bones, and would offer a most jagged appearance.
The very obvious tendon at G is the tendon of the special extensor of the great toe. The similar tendons that go to the other toes are the tendons of the common extensor of the toes. Notice that the big toe (H) points its own way, the other toes to a point beneath the picture.
Andrea del Sarto (1486-1531)
STUDY OF FEET AND HANDS
red chalk
10⅝″ × 149⁄16″ (27 × 37 cm)
Louvre, Paris
This picture and the more developed drawing on the following page are interesting because they present many identical forms, with the bodily thrusts just slightly altered. In both, the direct light is from the left, and the reflected light is from the right.
You will notice that I mention light sources and their direction a great deal. This is because beginners always think of shade as a sort of dye on the body. They think of shade as something independent of the light source. The advanced artist never observes shade on the figure without subconsciously considering the light that causes this shade.
Here the two great gluteal muscles (A and B) are slightly altered sphere symbols, as usual. B is driving to the femur bone, between the quadriceps group (C) and the hamstring group (D), thus giving evidence of the primary function of the gluteal muscles. On the left leg, all the important masses of the thigh are strongly characterized: the adductor group (E); the quadriceps group (F); and the hamstring group (G). The inner and outer hamstrings (H and I) are accentuated on both legs.
There is no doubt that the artist was strongly conscious of the functions of all the forms he dealt with. You have a great advantage over Michelangelo. By simply studying a modern medical anatomy book for a month, you can learn twice as much about the function of bodily forms as poor Michelangelo gathered in his whole lifetime.
Michelangelo Buonarroti (1475-1564)
STUDY OF THE BACK AND LEGS OF A MAN
black chalk
9½″ × 73⁄16″ (24.2 × 18.3 cm)
Teyler Museum, Haarlem
We have here an excellent opportunity to observe what students call “the strong cords” (A and B) in the small of the back. These cords hold the rib cage erect on the pelvis. Because this is such a typically human function, these cords are always accentuated.
In actuality, they are the fibers of the iliocostalis, a part of the erector spinae. In artistic anatomy books, they are often omitted because they are really covered by latissimus dorsi. Latissimus is only a thin film here and not worth much attention. If your artistic anatomy book does not show the details of erector spinae, you must go to a medical anatomy book. The other components of erector spinae – longissimus dorsi and spinalis dorsi – are frequently used by artists.
The feet in this drawing are but footsteps in perspective. Notice the prominent little bump at C. Have you ever noticed it on your wet footprint? It is the proximal end of the metatarsal of the little toe. Put your finger down and feel it on your own foot.
Never forget that you have all the same bones and muscles as your model. Become familiar with your own body. Why not get down on your knees and take the same pose as this figure? Then you can feel your muscles in function, and observe the precise thrust of your bodily forms.
Michelangelo Buonarroti (1475-1564)
FIGURE OF MALE NUDE
black chalk
101⁄16″ × 6⅛″ (25.5 × 15.5 cm)
Casa Buonarroti, Florence