Chapter 8
Policy Academy: Setting Your Shop’s Policies
IN THIS CHAPTER
 Reviewing general policy tips
Setting up your shop policies
Adding seller details for EU compliance
Creating an FAQ
Rules. Who needs ’em? Well, you do. Or to be more precise, your Etsy shop does. As you set up your Etsy shop, it’s critical that you lay some ground rules for buyers. That means establishing clear store policies, especially with respect to shipping, returns and exchanges, cancellations, and privacy. That way, your customers know what to expect if they buy from you, and they’ll feel more confident and at ease. Setting clear policies also enables you to head off problems down the road.
Etsy offers several options to help you configure and communicate your policies. It also offers a few “fixed” policies. These apply to everyone’s shop and cannot be changed. You access these from the Policy Settings page in the Shop Manager. After you set your policies, they appear on your shop’s main page in the Shop Policies section, in each of your listings, and in emails sent to buyers when they make a purchase.
 You can also create different policies to cover different items in your shop.
In case you want to implement additional policies above and beyond those that appear in the Policy Settings page, you can create a Frequently Asked Questions (FAQ) section for your shop to cover your bases. This FAQ section appears below your shop policies.
Finally, if you plan to sell in the EU, you’re required to ensure that your privacy policy complies with EU regulations, and to supply your own personal info to buyers. This info appears under your FAQ (assuming you have one), but is visible only to shoppers in the EU.
 You can avert a lot of crises by establishing clear store policies. However, you’ll still face the occasional conflict with customers. When that happens, you need to take three actions: communicate, communicate, and communicate. Oh, and one more thing: communicate. For more on dealing with disagreements and other customer service issues, see Chapter 15.
Fair Play: General Policy Tips
Before we get into policy specifics in the rest of this chapter, we want to talk in general terms about what, apart from honesty, constitutes a good policy. A good policy has two key characteristics:
- It’s fair. Yes, you put policies in place to protect your business. But a good policy also protects your customers. Each shop policy should be one for which you would be grateful if, through some amazing breach in the space-time continuum, you were your customer.
- It’s simple. Although it’s important to use your words, you don’t want to use too many of them when crafting your shop policies. Keep your policies simple, clear, and concise.
When it comes to setting your shop’s policies, you have a lot of leeway. Different shops’ policies are often as unique as the items they sell. With that being said, you do need to adhere to Etsy’s terms of use and respect the site’s House Rules. And, of course, you must comply with all local and federal laws.
Policy Wonk: Using Etsy’s Policy Settings
As mentioned, you set and communicate your shop policies on the Policy Settings page. To access this page, follow these steps:
Click the Shop Manager link in the header bar that appears along the top of every Etsy Marketplace page.
The Shop Manager opens.
In the left pane of the Shop Manager, click Settings; then click Policy Settings.
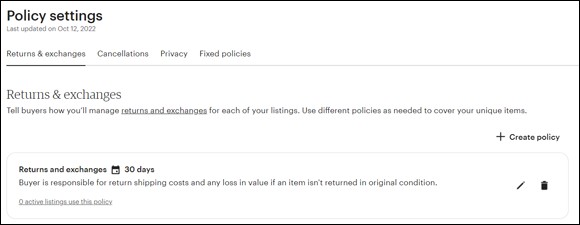
The Policy Settings page opens. (See Figure 8-1.)

Source: Etsy.com
FIGURE 8-1: The Policy Settings page.
As shown in Figure 8-1, this page contains the following tabs:
- Returns & Exchanges
- Cancellations
- Privacy
- Fixed Policies
The following sections explain each of these tabs.
Returns & Exchanges
Obviously, you want all your customers to love your items. But — no disrespect intended — sometimes they won’t. (What? We said “no disrespect”!) When that happens, you need to refer buyers to your policy on returns and exchanges.
You create this policy in the Returns & Exchanges tab of the Policy Settings page. Etsy gives you the option of applying a preconfigured “simple” policy that allows returns and exchanges for 30 days and stipulates that the buyer pays all return shipping costs as well as any loss in value if the item is not returned in its original condition. You can also create custom policies for returns and exchanges, and apply different policies for different types of items when you create your item listings. (See Chapter 12 for more on creating item listings.)
To apply the simple shop-wide policy, click the Use Simple Policy link in the Returns & Exchanges tab of the Policy Settings page. (Refer to Figure 8-1.) Figure 8-2 shows the result.
Source: Etsy.com
FIGURE 8-2: A simple shop-wide returns and cancellations policy has been applied.
As for creating a custom policy, here’s what you do:
In the Refunds & Exchanges tab of the Policy Settings page, click the Create Policy link.
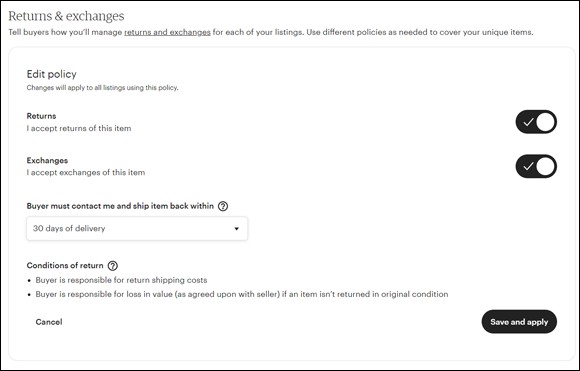
The tab expands to display additional options (see Figure 8-3):
- Returns: Toggle this setting on to accept returns exchanges.
- Exchanges: Toggle this setting on to accept returns.
- Buyer Must Contact Me and Ship Item Back Within: Use this drop-down list to indicate how long the buyer has to contact you and ship the item back. Options range from 7 Days of Delivery to 90 Days of Delivery.
- Conditions of Return: This section of the Edit Policy settings contains boilerplate text: “Buyer is responsible for return shipping costs” and “Buyer is responsible for loss in value (as agreed upon with seller) if an item isn’t returned in original condition.”
- Make your selections and then click Save and Apply.
If you mostly like the “simple” setting, but there’s just one thing about it that you’d like to change, click the pencil icon next to its entry on the Returns & Exchanges tab (refer to Figure 8-2) to display the Edit Policy settings and make whatever changes you like.
Source: Etsy.com
FIGURE 8-3: The Returns & Exchanges tab on the Etsy Policy Settings page.
Cancellations
Why would someone want to cancel an order? Maybe they ordered the wrong thing. Maybe they got cold feet. Maybe they thought they won the lottery but found out they were looking at last week’s ticket. (Hey, it happens.)
It’s up to you whether you want to accept cancellations. Some sellers do; some sellers don’t. Either way, the Cancellations tab on the Policy Settings page allows you to impart your policy to your buyers. (See Figure 8-4.)

Source: Etsy.com
FIGURE 8-4: The Cancellations tab on the Etsy Policy Settings page.
By default, the Cancellations option is turned off by default. In other words, your shop won’t accept cancellations. If you do want to accept cancellations, follow these steps:
In the Cancellations tab of the Policy Settings page, toggle the Cancellations button to On.
The tab expands to display additional options (see Figure 8-5).
- Click the down arrow in the Buyer Can Request a Cancellation drop-down box and choose Before Item Has Shipped, a numeral to represent a number of hours, or a numeral to represent a number of days.
- Click the Publish button.

Source: Etsy.com
FIGURE 8-5: Allow cancellations.
Privacy
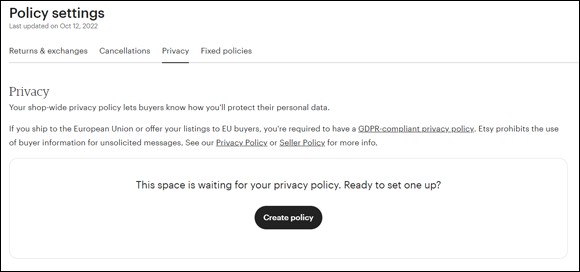
Etsy encourages every shop owner (which includes you) to include a privacy policy on their shop page. In a nutshell, this policy should convey what steps you’ll take to protect a buyer’s personal data. You enter your privacy policy from the Privacy tab on the Policy Settings page. (See Figure 8-6.)
When it comes to composing your privacy policy, just winging it won’t do. Your policy must be clear and thorough. Otherwise, you might put your buyers or yourself at risk. Fortunately, Etsy has published a sample privacy policy that you can adapt for your own use, along with various helpful tips.
Source: Etsy.com
FIGURE 8-6: The Privacy tab on the Policy Settings page.
To create your privacy policy, follow these steps:
In the Privacy tab of the Policy Settings page, click the Create Policy button. (Refer to Figure 8-6.)
The tab expands to display additional options. (See Figure 8-7.)

Source: Etsy.com
FIGURE 8-7: Set your privacy policy.
- To view Etsy’s sample policy, click the Sample Privacy Policy link.
- After you compose your privacy policy (using Etsy’s sample policy as your guide) and you’re confident it’s up to snuff, type it in the Privacy Policy box.
- Click Publish.
Viewing fixed policies
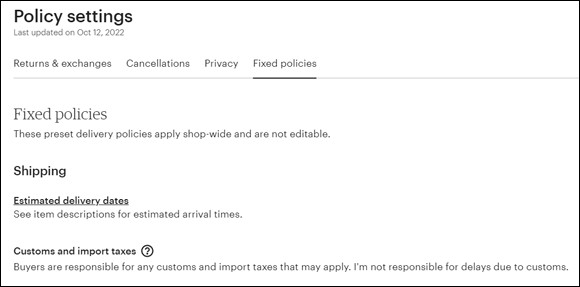
As mentioned, Etsy includes a few fixed policies. These apply sitewide and can’t be changed. They pertain to estimated delivery dates as well as customs and import taxes. To view these policies, click the Fixed Policies tab on the Policy Settings page. (See Figure 8-8.)
Viewing your shop policies
After you enter the necessary policy-related information into the various tabs of the Policy Settings page, you can check out how they look on your shop page. Here’s how:
In the left pane of the Shop Manager, under Sales Channels, click your shop’s name.
The main page of your shop opens.
- Scroll down to the Shop Policies section of your shop page. (See Figure 8-9.)
Source: Etsy.com
FIGURE 8-8: View fixed policies.
You can edit your shop policies anytime you like using the Policy Settings page.

Source: Etsy.com
FIGURE 8-9: View your shop policies.
Hey, EU! Adding Seller Details for EU Compliance
If you plan to sell in the EU, and you are a professional seller or you identify as an incorporated business on Etsy (or both), you must share certain info with your buyers, like your full name, business address, email address, and phone number. You do this by adding these details to your shop’s main page, under your shop policies. Here’s how:
- Open the Edit Shop page in the Shop Manager and scroll down to the Seller Details section. (See Figure 8-10.)

Source: Etsy.com
FIGURE 8-10: Add seller details to comply with EU regulations.
- Under Status, next to Private Individual, click the Edit link.
- Select the Trader option button. Then click Save.
Click the Add Contact Info link.
The Seller Details section expands to display several text boxes.
- Supply the requested information — your first and last name, business address, email address, and phone number.
- Click Save.
That’s a FAQ, Jack! Fielding Frequently Asked Questions
The Policy Settings page is great, but it doesn’t cover everything. So, Etsy provides yet another way for you to pin down your policies: by including a frequently asked questions (FAQ) section on your shop’s main page. For example, you might use the FAQ section to indicate whether you accept custom or personalized items, whether you offer gift-wrapping services, and whether you offer items wholesale. You could also use the FAQ section to convey information such as sizing details or care instructions. Or if potential buyers often ask the same question (“Are your sweaters really knit from kitten hair?”), you can choose the Custom option to provide your answer (“Yes”).
To add a FAQ section to your shop, follow these steps:
In the left pane of the Shop Manager, under Sales Channels, click the pencil icon next to your shop name.
The Edit Shop page opens.
- Scroll down to the Frequently Asked Questions section.
Click the Add an FAQ link.
The section expands to display a Question drop-down list and an Answer text box. (See Figure 8-11.)

Source: Etsy.com
FIGURE 8-11: Create a FAQ.
Click the Question drop-down list and select from the available options.
Options include Custom and Personalized Orders, Sizing Details, Care Instructions, Gift Wrapping and Packaging, Wholesale Availability, and Custom.
If you select Custom, a new text box appears under the Question drop-down list, where you can type a custom question.
- Type your answer to the question in the Answer field.
Click Save.
Etsy adds the question and answer to the main page of your Etsy shop, just below your shop policies. (Click the View Shop button to see it.)
- To add more questions and answers, repeat Steps 3 through 6.