Chapter 14
Super Market: Marketing Your Etsy Business
IN THIS CHAPTER
 Defining your brand
Promoting your listings on Etsy
Offering discounts
Connecting with customers on social media
Sharing videos with Etsy Explore
Marketing is as old as dirt. Indeed, the first marketer was most likely the first Cro-Magnon to convince a fellow knuckle dragger to barter for his mastodon-fur cape instead of the one offered one cave over. (“This mastodon-fur cape not stink like other!”) If you want your Etsy shop to evolve into a thriving enterprise, you need to do the same. This chapter is devoted to the ins and outs of marketing your Etsy business so that it doesn’t go the way of the Neanderthal.
 This chapter constitutes a very basic primer on marketing. If you’re serious about your Etsy business, you’ll want to study this subject in greater depth. Small Business Marketing Strategies All-in-One For Dummies (Wiley) is a great jumping-off point!
Brandy, You’re a Fine Girl: Building Your Brand
An important part of any business — whether it’s a multinational widget-making corporation with more employees than Lichtenstein has citizens, a small mom-and-pop pizzeria that serves the surrounding neighborhood, or your Etsy shop — is its brand.
So what exactly is a brand? Although many people believe that the word brand is synonymous with the word logo, it’s not. Yes, your logo is part of your brand (more on that in a moment), but the brand itself is a much broader concept. Think of your brand as the image your business projects. Your brand is what you’re known for.
 Before you begin building your brand, you need to pin down a few key pieces of information:
- Brand promise: There’s an old saying in sales: “People don’t buy drill bits — they buy holes.” That’s a good way to think about your brand promise. It’s what you really sell. For example, suppose your Etsy shop features homemade candles. The brand promise isn’t the candle’s wax and wick; it’s the pleasure your buyer will experience when they light it.
- Target market: Who is likely to be interested in your product? Men or women? Adults or kids? Singles or marrieds? What are their interests? Where do they live? How much disposable income do they have? And so on. You use this information to tailor your messaging.
- Competition: What brands is your brand competing with? What do they offer? How are they similar to your brand? How are they different? Do your target markets overlap? This assessment can help you position your own brand to gain an advantage.
- Brand personality: Whether it’s silly, sophisticated, snarky, smart, sweet, or something else entirely, your brand’s personality should spark an emotional connection with your target market. Visual elements such as your logo and color palette, and voice, like your tag line (discussed next), listing descriptions, shop announcement, and even the messages you send are how you convey your brand’s personality.
- Unique selling proposition (USP): Every good brand has at least one characteristic that makes it different from anything else. Going back to the candle example, maybe your candles burn longer, smell better, are prettier, or come in more varieties than other candles. Whatever special quality your candles have, that’s their USP.
With this information in hand, you’re ready to start building your brand. The following sections explain how to create tag lines and logos and discuss the importance of infusing your brand into everything related to your Etsy shop.
Composing a tag line
Do you recognize the phrase “You deserve a break today”? What about “Just do it,” “Taste the rainbow,” or “Got milk”? If so, you know the power of a tag line. A tag line is a memorable slogan that expresses what a brand is and does.
Part of building your brand is composing your own tag line. A good tag line
- Is short, concise, and specific: The longer the tag line, the more likely people are to lose interest in it.
- Is clever and catchy: These types of tag lines stick.
- Speaks to your target market: Don’t use language favored by your 60-year-old great aunt if your target market is 20-something hipsters.
- Reflects your brand’s personality: A quirky brand calls for a quirky tag line.
- Hints at your brand promise and its USP: Take the old tag line for Bounty paper towels: “The quicker picker-upper.” It suggests that these paper towels don’t just clean, they clean fast.
A great place for your tag line is your shop title, banner, or description. For help adding your tag line to these shop elements, see Chapter 6.
Creating a logo
A logo is a graphic symbol or design that represents your brand. Obvious examples of logos include the McDonalds golden arches and the Nike swoop. Like your tag line, your logo — along with other visual elements, such as the colors and fonts you use in your Etsy shop and in marketing materials like business cards and whatnot — must reflect your brand.
Keep these points in mind as you develop your logo:
- Consider your colors. Different colors evoke different emotions and convey different ideas. For example, if you specialize in motorcycle gear, a baby-pink logo may not be the way to go (unless your motorcycle gear is for babies).
- Send the right message. Your logo’s visual style says something about your brand. For example, if your logo is minimalist, it suggests that your brand is, too. Be sure your logo sends the message you want.
- Be original. It’s fine to look to other brands and logos for inspiration, but don’t copy — especially if the logo in question is a competitor’s.
Developing a logo can be harder than you may think, so don’t hesitate to get help. Even if you’re on a strict budget, you can always ask an artistic friend for assistance or try trading services with a professional designer.
Infusing your brand in all you do
The key to branding is infusing it in everything you do. You should express your brand, using your tag line and logo, in your business cards, letterhead, envelopes, postcards, packaging, and other marketing materials. (Tip: Include your social media handles on these branded materials, too. We talk more about social media later in this chapter.) Your brand also needs to permeate your Etsy shop, appearing in your shop’s banner and/or your shop icon and your order receipt banner. Showing your brand everywhere increases the chances of potential customers noticing your brand among the flotsam and jetsam of Etsy.
One more way to boost your brand is to create a custom web address for your Etsy shop — something a little snappier and easier to remember than the default www.etsy.com/shop/yourshopname. To do this, though, you must upgrade to Etsy Plus. (We cover Etsy Plus in Chapter 17.)
Poetry in Promotion: Advertising on Etsy
Here’s a fun fact: The word advertise derives from the Latin ad vertere, meaning “to turn the mind toward.” And if you’ve ever become ravenously hungry after watching a pizza commercial, you know it totally works.
Etsy offers an easy way advertise your listings: Etsy Ads. With Etsy Ads, you indicate how much you want to spend each day and which listings you want to promote. Then, when a shopper enters a keyword or phrase that relates to one of your advertised listings, Etsy Ads initiates an ad auction, during which your advertised listing competes with other similar advertised listings for a favorable spot in the shopper’s search results. Just where your listing lands depends on two things:
- Listing quality: Based on your shop history and on the strength of your listing’s title and tags, Etsy assigns a quality score to your listing. This quality score is used during the ad auction to assess how likely the shopper is to click your listing. Listings with higher-quality scores appear higher in the search results.
- Bid amount: The bid amount is how much you’ll pay per click. Etsy calculates this amount based on your item’s relevance to the shopper’s search (that is, how closely your listing title and/or tags match keywords or phrases entered by the shopper) and on the likelihood the shopper will buy it.
Setting up Etsy Ads
To set up Etsy Ads, follow these steps:
- Click the Marketing link in the left side of the Shop Manager and click Etsy Ads in the pane that appears to open the Etsy Ads page.
- Click the Get Started button.
- If prompted, select the option button that best describes why you want to use Etsy Ads — to increase visibility and awareness, to drive orders short-term, and so on — and click Submit.
In the Set Your Daily Budget dialog box (see Figure 14-1), choose a preset budget or click Choose a Different Amount and indicate your maximum spend.
By default, the maximum daily spend is $25, but this can increase over time based on your sales and other factors.
- Click Start Advertising button.

Source: Etsy.com
FIGURE 14-1: The Set Your Daily Budget dialog box.
By default, Etsy Ads advertises all your existing active listings and any new listings you create using the Etsy Seller app. To advertise new listings you create using the Add a New Listing page on the Etsy website, however, you need to select the Yes, Advertise This Listing option button (see Figure 14-2), which appears in the Add a New Listing page after you set up Etsy Ads.

Source: Etsy.com
FIGURE 14-2: Opt to advertise a new listing during the listing-creation process.
Viewing Etsy Ads stats
After you set up Etsy Ads, the Etsy Ads page displays a performance dashboard, which you can use to track performance-related stats on your Etsy Ads campaign. (See Figure 14-3.) For example, you can track the number of views, clicks, and orders resulting from Etsy Ads, as well as your total ad-related revenue and spend.
To change the period for which stats are shown, use the Your Ad Stats For drop-down list box above the dashboard.
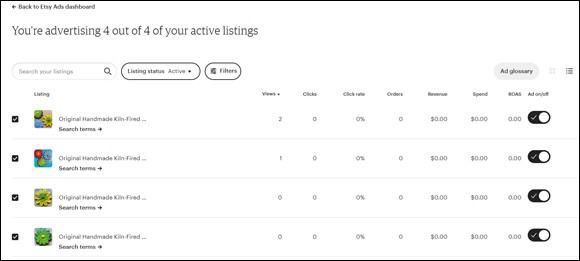
You can also view Etsy Ads stats broken down by individual listings. To do so, click the Manage Advertised Listings link below the Etsy Ads Performance dashboard (refer to Figure 14-3) to open the page shown in Figure 14-4. This page displays the same stats as the dashboard for each advertised listing, as well as stats for click rate and return on advertising spend (ROAS). Each listing entry on this page also features a Search Terms link, which you can click to see the keywords or phrases used to locate your item. This is a great way to identify which keywords and phrases are effective (or not).

Source: Etsy.com
FIGURE 14-3: The Etsy Ads Performance dashboard.
Source: Etsy.com
FIGURE 14-4: Manage your Etsy Ads listings here.
Deactivating Etsy Ads
By default, Etsy Ads promotes all the active listings in your shop. If you want to promote only certain listings (or none at all), follow these steps:
- On the Etsy Ads page, click the Manage Advertised Listings link below the Etsy Ads Performance dashboard. (Refer to Figure 14-3.)
Locate the listing(s) whose ad(s) you want to deactivate. (Refer to Figure 14-4.)
If you have a lot of listings, you can use the search box or Filter button to locate the one(s) you want.- Do one of the following:
- Click the Ad On/Off toggle button on the right side of a listing entry to toggle it off.
- Deselect the check box on the left side of the listing entry and click the Update button. Note: This approach works particularly well when you want to deselect multiple listings.
- Click the Yes, Turn Off button in the dialog box that appears to confirm your choice.
If you prefer to pause Etsy Ads rather than deactivate some or all of your listings, click the Pause Etsy Ads button at the bottom of the Etsy Ads page.
Changing your ad spend
Suppose you want to increase or decrease your daily ad spend. Here’s how:
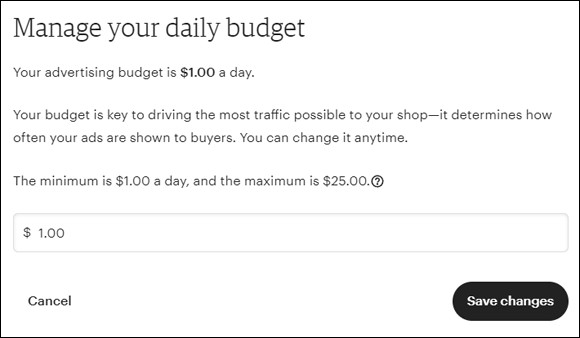
- On the Etsy Ads page, click the Manage Your Budget button below the Etsy Ads Performance dashboard. (Refer to Figure 14-3, in the previous section.)
- In the Manage Your Daily Budget dialog box (see Figure 14-5), enter your new ad spend in the text box and click Save Changes.
Source: Etsy.com
FIGURE 14-5: Change your ad spend.
Discount of Monte Cristo: Offering Discounts
Everybody loves a bargain. That’s why discount offers like sales, promo codes, and targeted offers are so effective! Sure, offering discounts means that each transaction is less profitable. But you conduct way more transactions (ideally), so it’s a win-win — for your customer and you.
You may want to offer a discount before a big shopping holiday like Christmas or Valentine’s Day, to celebrate your shop’s anniversary, or just because!
Etsy lets you set up discount offers for your Etsy shop in the form of free shipping (assuming that you don’t already offer this), a percentage off, or, in the case of promo codes and targeted offers, a fixed amount off. And discount offers can apply to specific items or to the customer’s entire order from your shop. Finally, you can also stipulate that customers purchase a certain number of items or spend a certain amount of money to qualify for the discount.
Running a sale
Here’s how you set up a sale:
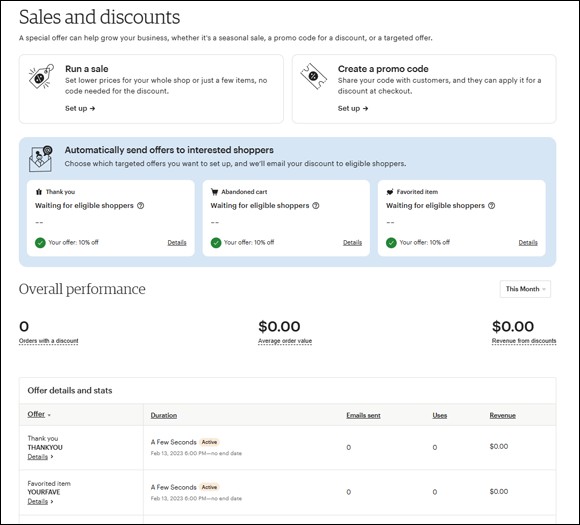
- Click the Marketing link in the left side of the Shop Manager and click Sales and Discounts in the pane that appears to open the Sales and Discounts page (see Figure 14-6).

Source: Etsy.com
FIGURE 14-6: The Sales and Discounts page.
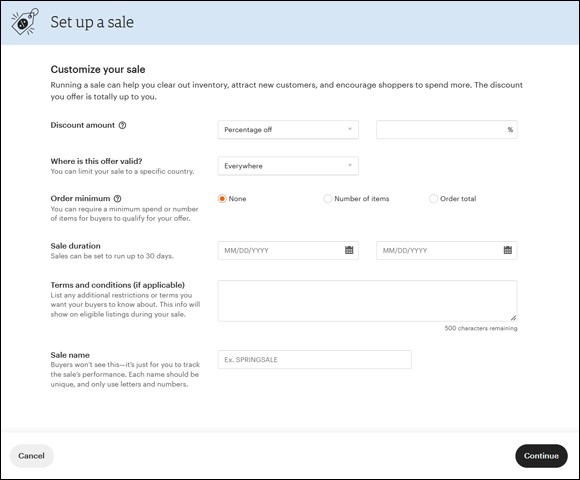
Click the Set Up link in the Run a Sale section of the Sales and Discount page.
The Set Up a Sale dialog box opens with the Customize Your Sale page displayed. (See Figure 14-7.)
- Open the Discount Amount drop-down list box and choose one of the following:
- Free Shipping: If you choose this option, you can also optionally select the Domestic Addresses Only check box that appears to limit the sale to domestic orders.
- Percentage Off: If you select this option, type the percentage off in the box that appears.
- To limit your sale to a certain country, click the Where Is This Offer Valid? drop-down list box and choose the country you want.
- Optionally, in the Order Minimum section, select the Number of Items or Order Total option button and indicate the minimum value required in the box that appears.
Source: Etsy.com
FIGURE 14-7: Set up a sale.
Use the Sale Duration calendar boxes to set a start date and end date.
Note: Sales can run for up to 30 days.
- Optionally, in the Terms and Conditions box, type additional information you want to convey to customers about your sale.
In the Sale Name box, type a name for your sale. Then click Continue.
Note: The sale name is for your use only. Your customers won’t see it.
In the Included Listings page, open the left drop-down list box and choose Multiple Listings. Alternatively, choose a shop section to apply the sale to items in that section only.
The Included Listings page displays all the listings in your sale. (See Figure 14-8.)
If you want to exclude a listing from the sale, click its X button.
If you have a lot of listings, you can use the search box to locate the one(s) you want to exclude.
Source: Etsy.com
FIGURE 14-8: Choose the listings for your sale.
Click Review and Confirm. Then review your settings and click Confirm and Create Sale.
Etsy notifies you that your sale is scheduled. It also provides you with an opportunity to share sale details via social media. (We talk more about linking Etsy to your social media accounts later in this chapter.)
- Optionally, click the Facebook, Pinterest, and/or Twitter button to share details about your sale on social media; then click Got It.
Creating a promo code
A promo code is a special series of letters and/or numbers that a customer can enter during the checkout process to receive a special discount or free shipping. To create a promo code, follow these steps:
- On the Sales and Discounts page (refer to Figure 14-6), in the Create a Promo Code box, click Set Up to open the Create a Promo Code dialog box. (See Figure 14-9.)
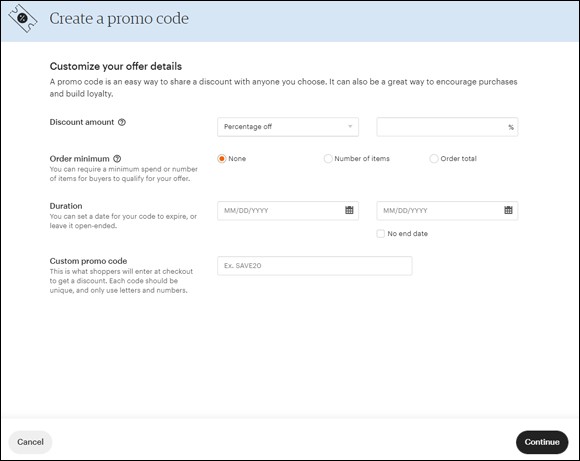
Source: Etsy.com
FIGURE 14-9: Create a promo code.
- Click the down arrow at the right of the Discount Amount drop-down list box and choose the type of discount you want to offer:
- Free Shipping: If you choose this option, optionally select the Domestic Addresses Only check box that appears to limit the promo code to domestic orders.
- Percentage Off: If you select this option, type a discount amount in the box that appears.
- Fixed Amount Off: If you choose this option, type a dollar amount in the box that appears.
- Optionally, in the Order Minimum section, select the Number of Items or Order Total option button and indicate the minimum value required in the box that appears.
Use the Duration calendar boxes to set a start date and (optionally) end date for your promo code.
Note: Promo codes can run forever or until you deactivate them. (We show you how to do that in a minute — see “Deactivating a promo code or targeted offer.”)
In the Custom Promo Code box, type the code you want to use.
This is what customers will enter at checkout to receive your discount. It must contain letters and numbers only — with no punctuation or spaces. (Note: After you use a code, you can never use it again. So, you know, no pressure coming up with solid codes for the rest of your life.)
Click Review and Confirm; then review your settings and click Confirm and Create Code.
Etsy notifies you that your promo code is scheduled. It also provides you with an opportunity to share sale details via social media, and to copy a URL for your promo code to send to buyers directly. (We talk more about linking Etsy to your social media accounts later in this chapter, in “Social Studies: Promoting Your Etsy Shop and Listings on Social Media.”)
- Optionally, click the Facebook, Pinterest, and/or Twitter button to share details about your sale on social media, and/or copy the URL and save it somewhere for future promotional use. Then click Got It.
Consider including promo codes in any orders you ship to drive repeat sales. You can also share promo codes with buyers in messages, in your shop announcement, or anywhere else you interact with your customers.
Sending targeted offers
Targeted offers are just like promo codes, but they’re for shoppers who you know are into your shop, because they’ve recently a) favorited a listing in your shop, b) bought an item from your shop, and/or c) almost bought an item from your shop — that is, they added an item to their cart but abandoned it. Also, targeted offers run until you deactivate them (see “Deactivating a promo code or targeted offer,” later in this chapter).
To create a targeted offer, follow these steps:
On the Sales and Discounts page (refer to Figure 14-6), in the Automatically Send Offers to Interested Shoppers box, click the Set Up link in the Thank You, Abandoned Cart, or Favorited Item box.
The Set Up Targeted Offers dialog box opens.
Select the Thank You, Abandoned Cart, and/or Favorited Item check box to send targeted offers to each group of buyers.
The dialog box expands to display settings for each group. (See Figure 14-10.)
- In the Thank You box, open the Discount Amount drop-down list box and choose the type of discount you want to offer:
- Free Shipping: If you choose this option, optionally select the Domestic Addresses Only check box that appears to limit the targeted offer to domestic orders.
- Percentage Off: If you select this option, choose a discount amount from the drop-down list box that appears.
- Fixed Amount Off: If you choose this option, choose a dollar amount from the drop-down list box that appears.
In the Promo Code box, type the code you want to use.
When setting up a special “thank you” offer for customers who’ve bought from you before — but not for buyers who have favorited your shop or abandoned a cart containing one of your items — you can set a minimum purchase requirement. You can also extend the offer to customers who have purchased from you within the last 90 days.
- Optionally, click the Set an Order Minimum link, choose Number of Items or Order Total from the drop-down list box that appears, and indicate the minimum amount.

Source: Etsy.com
FIGURE 14-10: Targeted offer settings.
- If you want, select the Include Customers from the Last 90 Days check box.
- To extend an offer to people who have abandoned one of your items in their shopping cart, repeat Steps 3 and 4 in the Abandoned Cart box.
- To extend an offer to people who have favorited an item, repeat Steps 3 and 4 in the Favorited Item box.
- Click the Create X Offers button.
- Etsy notifies you that your targeted offer is good to go. Click Got It.
Managing Your Discount Offers
You manage your sales, promo codes, and targeted offers from the same page where you created them: the Sales and Discounts page. This is where you track their overall and individual performance, and where you edit (in the case of a sale), end, and deactivate them. (See Figure 14-11.)
Source: Etsy.com
FIGURE 14-11: Managing sales and discounts.
Editing a sale or ending a sale early
To edit the listings to which a sale applies, follow these steps:
- On the Sales and Discounts page (refer to Figure 14-11), under Offer Details and Stats, locate the sale whose listings you want to edit. Then click its Details link to open a page like the one in Figure 14-12.
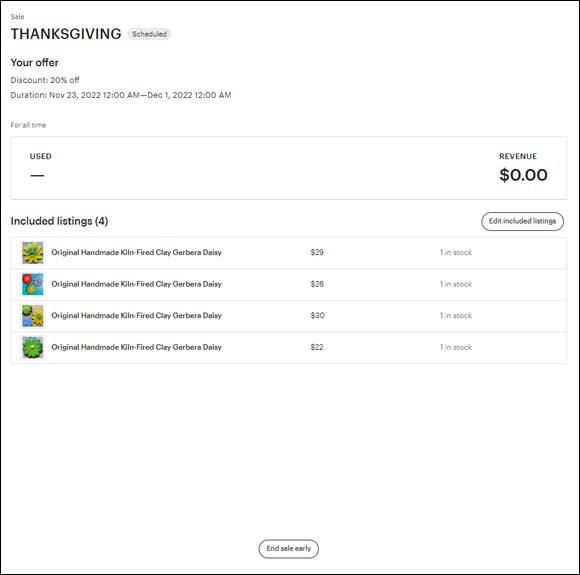
Source: Etsy.com
FIGURE 14-12: Edit or end a sale.
- Click the Edit Included Listings button to open a page that looks like the one you used to create the sale (refer to Figure 14-8).
- Do one of the following:
- Click a listing’s X button to exclude it from the sale.
- Use the Add Multiple Listings drop-down list box to add listings to the sale.
Click Save Changes.
To end the sale, simply click the End Sale Early button at the bottom of the page shown in Figure 14-12.
Deactivating a promo code or targeted offer
To deactivate a promo code, follow these steps:
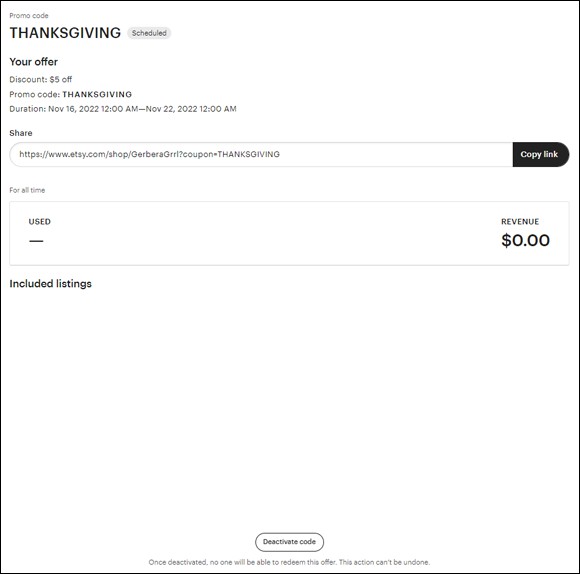
- In the Overall Performance section of the Sales and Discounts page (refer to Figure 14-11), under Offer Details and Stats, locate the promo code you want to deactivate and click its Details link to open a page like the one in Figure 14-13.
- Click the Deactivate Code button (near the bottom of the page).
Source: Etsy.com
FIGURE 14-13: Deactivate a promo code.
You deactivate a targeted offer the same way you do a promo code. However, you also have the option to stop sending offers. That way, the code remains active for anyone who has already received the offer, but the offer won’t be extended to anyone else.
Social Studies: Promoting Your Etsy Shop and Listings on Social Media
Everybody knows that social media — sites like Facebook, Pinterest, Twitter, Instagram, and TikTok — is a super marketing tool. But it’s particularly super for small businesses (like your Etsy shop) because it provides unparalleled reach at an incredible price: free. You can use social media to connect with customers and build brand awareness by sharing promo codes and links to new listings, revealing products in process or announcing new offerings, celebrating shop milestones, and more.
To help you capitalize on the power of social media, Etsy allows you to link your shop directly to your Facebook, Pinterest, Twitter, and Instagram accounts (though not TikTok — at least not at the time of this writing). That way, you can quickly and easily post to one or more of these accounts simultaneously, without ever leaving Etsy. Connecting your Etsy shop to these social media feeds doesn’t just help Etsy shoppers connect with you on social media; it also helps your social media followers connect with you on Etsy.
Don’t link your Etsy shop to your personal social media accounts. Instead, create special business pages on each platform for your Etsy shop, and link to those. Why? Two reasons: One, to maintain your privacy; and two, because business pages include tools to track performance, engagement, reach, and other stats, which can help you gauge how effective your social media efforts really are and to pivot as needed. To find out how to create business pages, see each social media platform’s help information.
Oh, and because we’re on the subject of social media, we urge you to follow Etsy’s social media channels. You can find them here:
- Facebook: Etsy, Etsy Success
- Twitter: @etsy
- Instagram: @etsy, @etsysuccess
- Pinterest: Etsy, Etsy Success
- TikTok: @etsy
- YouTube: Etsy, Etsy Success
Connecting your Etsy shop to Facebook, Pinterest, and Twitter
Connecting your Etsy shop to your Facebook, Pinterest, and Twitter accounts is easy. Here, we show you how to connect to your Twitter account, but the same basic steps apply for Facebook and Pinterest:
- Click the Marketing link in the left side of the Shop Manager and click Social Media in the pane that appears to open the Social Media page (see Figure 14-14).
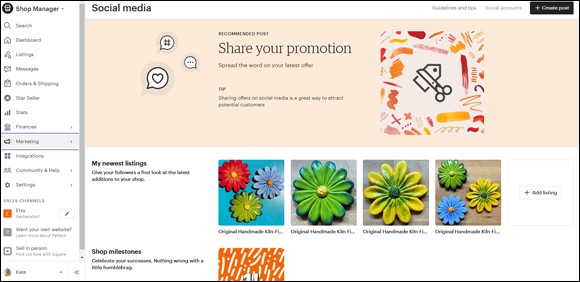
Source: Etsy.com
FIGURE 14-14: The Social Media page.
- Click the Social Accounts link in the upper-right corner of the page.
- In the Social Account Settings dialog box (see Figure 14-15), click the Connect to Twitter link.
When prompted, enter your Twitter account’s username and password, and click Authorize App.
Etsy links your shop to your Twitter page.

Source: Etsy.com
FIGURE 14-15: The Social Account Settings.
You don’t have to do anything special to connect to your Instagram account to share from Etsy; it’s set up by default. But you do need to have the Etsy Seller app installed on your phone to be able to post on Instagram from within Etsy. (We explain why in the following section.)
Posting on social media from within Etsy
Etsy assumes that you’ll usually want to post about new listings, sales or promotions, recent favorites — stuff like that. So it offers special tools to help you perform each of these operations.
For the sake of example, in the following steps, we set up a post about one of those new promos we show you how to create in “Discount of Monte Cristo: Offering Discounts,” earlier in this chapter:
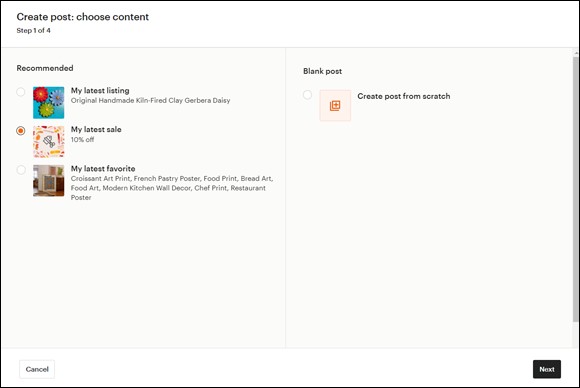
- Click the Create Post button in the upper-right corner of the Social Media page to open the Create Post dialog box. (See Figure 14-16.)
On the left side of the dialog box, under Recommended, click the My Latest Sale option button. Then click the Next button.
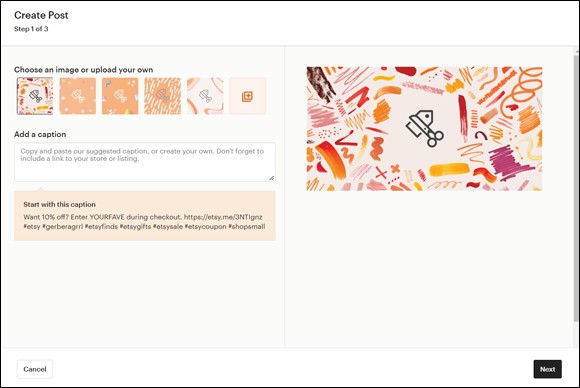
The Create Post dialog box changes to display various images that relate to promotions and suggestions for promotion-oriented caption text. (See Figure 14-17.) Note: If you had elected to post about a new listing or a recent favorite, the dialog box would contain different options.
Source: Etsy.com
FIGURE 14-16: Choose the type of content you want to post.
Source: Etsy.com
FIGURE 14-17: The Create Post dialog box for sale-related posts.
- Choose an image for your post from the choices provided, or click the blank image (with a box containing a plus sign) to open a file-selection dialog box and choose the image you want to use.
- Type a caption for your post in the Add a Caption box or copy the suggested caption below the box and paste it into the box.
- Click the Next button.
- In the Choose Networks page, select All Networks to post to Facebook, Pinterest, Twitter, and Instagram at the same time, or select the check box next to each social media site you want to post to. Then click the Post and Continuebutton.
The Finishing Up page confirms that your post was successfully uploaded. Click the Done button.
Note: If you elected to post to Instagram, you still need to complete one more step: responding to the push notification you receive on your mobile device from your Etsy Seller app.
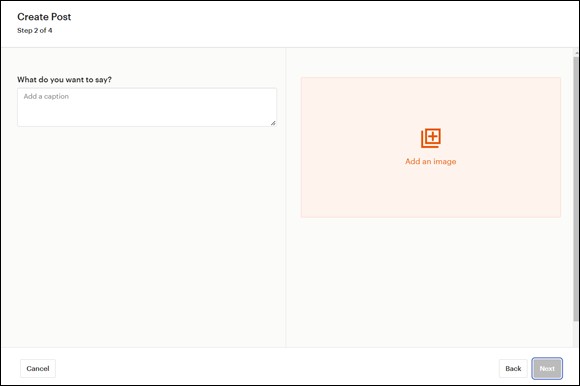
Maybe you want to upload a video showcasing your favorite knitting technique, a photo of your home studio, or some other content that does not pertain to new listings, shop milestones, sales or promotions, or recent favorites. Here’s how:
- Click the Create Post button in the upper-right corner of the Social Media page to open the Create Post dialog box. (Refer to Figure 14-16.)
- Click Create Post from Scratch and then click Next.
- Type a caption for your post in the What Do You Want to Say? box (see Figure 14-18).
- Click the Add an Image button to open a file-selection dialog box, and choose the image or video you want to post; then click Next.
- Choose the social media network(s) you want to post to.
Click Post and Continue; then click Done.
If you elected to post to Instagram, don’t forget to finish the operation from within the Etsy Seller app on your mobile device.
You can also share individual listings on social media from within the Listings page in the Shop Manager. To do so, click the Manage This Listing button on the listing you want to share and choose Share from the menu that appears. Then choose the social media site where you want to share your listing, and follow the prompts.
Source: Etsy.com
FIGURE 14-18: The Create Post page.
Social media best practices
Anybody can use social media, but not everyone can use it well. And unfortunately, when you use social media poorly, the result isn’t just neutral — it can actually be negative. So as you begin using social media to promote your Etsy shop, brand, and listings, keep these best practices in mind:
- Pick the right platform: Different social media sites call for different types of posts. For instance, Twitter is great for maintaining conversations with followers, whereas Instagram works well for more visual posts. And different channels cater to different groups. Facebook skews older, while TikTok is geared more toward the youngs. As for Pinterest, it’s used primarily by women aged 25–54 for inspo, or inspiration and motivation, purposes (think: meal ideas, home decor suggestions, wedding tips, and whatnot).
- Mix it up: Don’t just post shop announcements, or new listings, or promos, and don’t just post photos, or text, or videos. Instead, post a variety of content, on a variety of media.
- Post on the regular: Don’t send a flurry of posts one week and then send nothing at all the next. Develop a regular and predictable schedule. At least at first, posting two or three times a week should suffice. But if you build a big following, you’ll want to post more often.
- Use hashtags: A hashtag is a word or phrase preceded by a hash sign (#). Using hashtags on social media makes it easier for people who don’t follow you to find your posts. For example, if you sell yarn, you could use hashtags like #yarn and #knitting in your post so that people who search for those hashtags will find your post and maybe even follow. You can also include Etsy-related tags, like #Etsy, #EtsySeller, or #EtsySale. But avoid using too many hashtags. The sweet spot is between 5 and 10(-ish) hashtags per post.
- Respond to comments: If someone takes the time and trouble to comment on your post, the least you can do is respond! If someone asks a question, answer it. And if they mention a recent purchase from your shop, thank them. You can also comment on posts by other people in your target market to connect with potential buyers. Just don’t be spammy or desperate when you do. Keep it real and organic.
- Follow other relevant accounts: If you run across a social media account for an Etsy store you just love, follow it. There’s a good chance that shop’s owner will follow you back. This is a great way to build your audience and possibly develop collaborations (where you tag or feature their stuff on your social media channels, and they tag or feature yours on theirs) and maybe even friendships!
Camera Ready: Sharing Videos with Explore
People love seeing what Etsy sellers are up to, which is why Etsy created Explore. With Explore, you can use the Etsy Seller app on your mobile device to create or upload videos about what’s new with your Etsy biz. Etsy shoppers can then view your videos on the Etsy shopping app.
What kinds of videos are we talking about here? Anything goes, really, as long as it relates to your Etsy shop in some way, and it’s between 2 seconds and 3 minutes long. For example, you can use Explore to share a sneak peek of a new item in your shop, announce an upcoming sale, showcase your process, demonstrate an unusual technique, capture one of your items being used “in the wild,” introduce the people who help create or curate your items, or just show your golden retriever snoozing away in your studio. You could even share a silly meme or skit. (Note: Unlike listing videos, these videos can include sound.)
 Yeah, we know. We said “anything goes.” But we didn’t mean anything goes. For example, you may get away with a swear or two, but pervasive profanity is a no-no. Also verboten: Videos that harp on social, political, or religious topics; complain about Etsy, its partners, its members, or related services; or discuss other marketplaces or brands that do not factor into items in your Etsy store. Videos that run afoul of these rules may be yanked from the platform.
To capture and post a video using Explore, follow these steps:
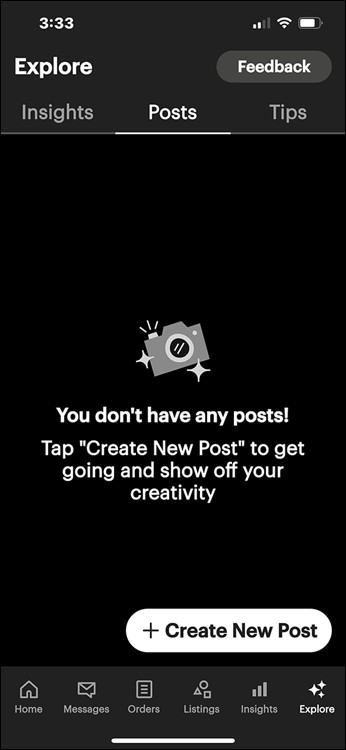
- In the Etsy Seller app, tap the Explore button in the bottom-right corner of any screen.
On the Explore screen, tap the Posts tab and then tap Create New Post. (See Figure 14-19.)
The first time you create a video in Explore, you may not see a Posts tab. Instead, you may see some introductory screens that explain how to create a video. In that case, step through those screens to begin creating your first video.
Source: Etsy.com
FIGURE 14-19: The Posts tab in Explore.
- In the New Explore Post screen (see Figure 14-20), tap Post Type, tap the type of video you want to make, and tap Save.
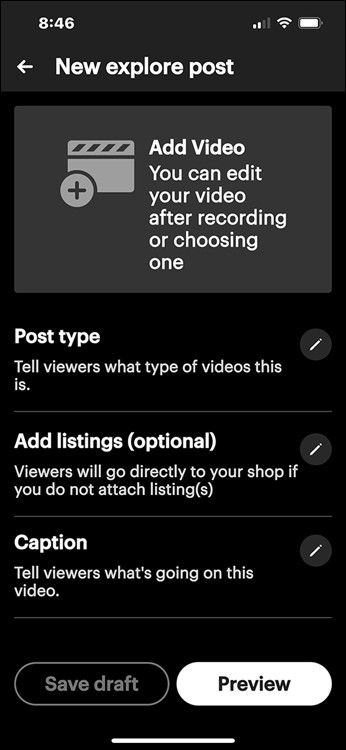
Source: Etsy.com
FIGURE 14-20: The New Explore Post screen.
- Optionally, tap Add Listings, choose any listing(s) you want to feature in your video, and tap Save.
- Tap Caption, enter a caption and any hashtags you want to include with your video, and tap Save.
- Tap Add Video.
In the Add Video screen, shown in Figure 14-21, tap one of the following options:
- Record Video: This option activates the camera function of your mobile device. Record a video clip as normal; then tap Use Video to use the clip in your Explore video, or tap Retake and try again.
- Upload Video: This option displays your camera’s photo album screen. (Note: You may have to give the Etsy Seller app permission to access this screen first.) Tap the video clip you want to use.
A thumbnail for the clip you created or selected appears in the Video Clips section of the Add Video screen.
Optionally, record or upload more clips to include in your video.
If you record or upload multiple clips, you can rearrange them as needed. To do so, tap the Reorder button that appears next to the Upload Video button and drag the clips to the desired order.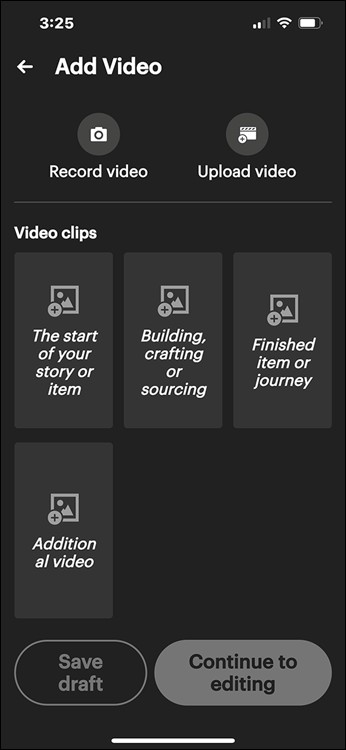
Source: Etsy.com
FIGURE 14-21: The Add Video screen.
- Tap Continue to Editing.
- Use the tools in the Editor screen (see Figure 14-22) to crop, transform, and adjust the video, and to add text if desired. Then click the right arrow in the top-right corner of the screen.
- Tap the Preview button to preview your video.
If you like what you see, tap Submit Post. Otherwise, tap Go Back and make any necessary changes.
Etsy posts your video to Explore.
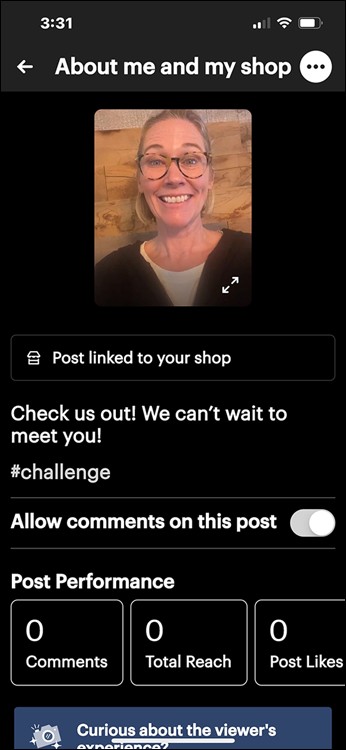
After Etsy posts your video, you can tap it in the Posts tab in Explore to enable comments for the post and to view performance-related stats — things like the number of comments, total reach, total likes, revenue, listing visits, and shop visits resulting from your post. (See Figure 14-23.) You can also delete your video from in here in case you decide you hate it. To do so, scroll all the way to the button in the upper-right corner of the screen (the one with three dots), tap Delete, and then tap Delete again.

Source: Etsy.com
FIGURE 14-22: The Editor screen.
Source: Etsy.com
FIGURE 14-23: View video stats and delete the video here.