Chapter 3: The Prerequisite to Renewable Energy: Seal up the Leaks!
Before you even consider installing a solar heating system, take time to seal up the leaks in the building envelope. When that’s done, the next step is to beef up the insulation.
The building envelope is the outside skin of a building. It includes the roof, walls, and foundation. It separates and protects the occupants of a building from the cold of winter, the blistering heat of summer, and all the rest of the unpleasantries that Mother Nature sends our way, including wind, rain, snow, and sleet. An airtight building envelope serves the same purpose as a windbreaker or the wind-protective fabric of a coat. It prevents wind from robbing us of valuable heat.
In this chapter, I’ll explore this crucial first step in successful solar home heating — sealing up the leaks. I discuss how big the problem is, the many sources of leaks in buildings, and how to locate and seal them. You may be surprised to learn how little it costs and how much money it can save.
How Leaky are Our Buildings?
Most buildings are like Swiss cheese — that is, they are riddled with holes. Some of these troublesome holes are nothing more than tiny cracks that run along the junction between walls and floors (Figure 3-1). Others are more substantial gaps, like the ones that run the entire perimeter of exterior doors. As you examine your home, you’ll probably find many openings. Some may be small holes in the building envelope, such as where pipes or electrical wires enter. Others, like missing panes of glass in basement windows, may be large enough for a raccoon or cat to enter.
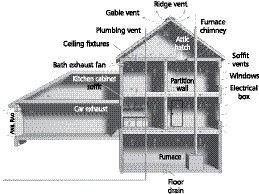
Fig. 3-1: Our homes are typically rather poorly built, with dozens upon dozens of leaks in the building envelope. Sealing the leaks in both new and existing buildings can dramatically reduce energy consumption, lower fuel bills, and reduce the size of a solar heating system.
When added up, the gaps in the building envelope can be quite substantial. To put things in perspective, remember that a one eighth-inch gap that runs 8 feet is equivalent to a one-square-foot hole in the building envelope. If you could add up all the cracks in the building envelope of older homes — many of those built in the 1800s and 1900s — they’d be equal to a 3-foot x 3-foot window that remains open 24 hours a day, 365 days a year. If your home was built before the 1980s, chances are it is riddled with holes that are robbing you blind and making your home a lot more uncomfortable — not just in the winter, but in the dead of summer, too.
While “modern” builders have paid more attention to the airtightness, the buildings they put up are still pretty leaky. If the leaks in the building envelopes of many modern homes were added up, they’d be equal to a 2-foot x 2-foot window open 24 hours a day, 7 days a week, and 365 days a year!
No one in their right mind would leave a 3-foot x 3-foot — or 2-foot x 2-foot — window open on a cold winter day. It would be sheer lunacy. But we are effectively doing just that. By not sealing up the dozens of leaks in our homes, we’re effectively leaving large, energy-wasting windows open all year.
In the winter, when the wind blows, cold air enters through the Swiss cheese exteriors of our homes and offices. At other times, warm air generated by our furnaces and boilers leaks out through these gaps. In the summer, leaks in a building envelope allow hot air to enter on windy days. On calm windless days, leaks allow cool, air-conditioned air to stream out. We compensate by simply turning up the heat or turning down the air conditioner, putting up with drafts and discomfort, and grimacing when we open the utility bill.
If energy were free, and global warming and the global climate crisis it is spawning didn’t exist, this waste might be tolerable. Faced with ever-rising fuel prices and the ever-worsening climate crisis, this waste is foolish and reckless. All the tiny leaks, when added to those in the millions of similar homes and businesses throughout the world, has a huge impact on annual energy consumption and thus an enormous impact on our planet, our lives, our economy, and our long-term future.
The Economic Savings of Airsealing
Most people I’ve talked with over the years seem blissfully unaware, or at least highly tolerant, of the multiple — and costly — leaks in the envelope of the buildings they work and live in. They shrug their shoulders in dismay and make comments like, “This house gets pretty cold in the winter” or “This building is pretty drafty.” People seem to accept these as immutable facts of life, like “Our bodies deteriorate as we get older.” Many people are surprised to learn that there’s a lot they can do to seal up the leaks. They’re even more surprised to find out that sealing up the leaks in a building envelope can save them a fortune on their energy bills.
How much one can save depends on many factors — most importantly, how leaky the building is. In some buildings, sealing the leaks can reduce heating and cooling costs by 30% or more. They’re that leaky! In others, the savings are more modest — around 10%. Even though 10% may not seem like a lot, it can be enormously beneficial over the long haul. If you are spending $1,000 per year to heat and cool your home, a 10% savings is $100 per year. In a decade, a 10% savings amounts to a full year of free heating and cooling. A 30% savings comes to a whopping $300 per year.
Sealing the leaks in a building envelope could cost as little as $50 to $100, so the return on an investment from these measures can be quite substantial. For example, if you spend $100 sealing up the leaks, which saves you $300 per year, your return on investment would be an amazing 300%. If only our retirement or savings accounts performed as well! And, lest we forget, you’re not just saving money, you are making your home more comfortable — immediately more comfortable. As a result of these simple changes, you’ll be a lot cooler in the summer and a lot warmer in the winter.
Locating Leaks
The first step to air sealing is to systematically locate the leaks. Once you’ve found them, you can begin sealing them. All this should take no more than a few hours in most homes, and at most a few hundred dollars in caulk, foam, and weather stripping.
To locate leaks in need of sealing, you can either hire a professional or perform an energy audit yourself.
Hiring a Professional
If you live near a major city, chances are there are at least two or three energy specialists who work in your area. Also called “energy auditors,” they perform an analysis of your home energy use — typically referred to as an energy audit. You can find a specialist in the Yellow Pages or online under “energy conservation” or “energy auditors.” Or, you may want to call a local solar installer or HVAC (heating, ventilation, and air conditioning) company for references.
Energy audits typically cost $300 to $700, depending on the size of your home and how far the auditor has to travel. Energy auditors begin by studying a customer’s utility bills. An auditor will probably want to look at your energy bills for at least one to two years. If you don’t save your bills, call your local utility and they’ll gladly provide the information you need. Or, you may be able to obtain this information on your utility company’s website. Using your customer number, you can usually access and download your bills — or a summary of energy consumption. Be sure to have this information ready when the auditor comes, or send it to the auditor’s office in advance.
Auditors will note which fuels you use — for example, home heating oil, electricity, propane, or natural gas. They will then examine all loads — that is, all devices like refrigerators, light bulbs, computers, and televisions that consume energy. Auditors often begin by studying the big ticket appliances. They’ll note which ones are old and inefficient and therefore in need of replacement. They will take note of unnecessary appliances — like that ancient fridge you hauled to the garage when you bought your new refrigerator. (Second fridges are often energy hogs, especially wasteful when used to house a six-pack or two of soda and a few jars of pickles. And they can cost $200 a year in electricity.)
The auditor will inspect the building envelope inside and out, looking for leaks. He or she will examine the walls, ceilings, floors, foundation, doors, windows, and skylights. During the visual inspection, the auditor searches for obvious leaks in the building envelope. Less obvious leaks will be discovered later by using a special test device.
Leakage occurs through the many cracks and holes in the building envelope, as noted earlier. It also occurs around doors and windows. The older and lower quality the door or window, the more likely it will leak.
Major sources of leakage — and energy waste — are whole-house fans and ceiling fixtures. They typically leak like sieves.
Auditors will also inspect the insulation in a home, approximating the R-value of the various parts of the building envelope, like the walls and ceiling. R-value is a measure of the resistance of a material to heat flow; it is primarily determined by the amount of insulation in the building envelope. The higher the R-value, the higher the resistance to heat flow.
Once an auditor has performed a complete visual inspection, he or she typically performs a blower door test to quantify leakage and locate the less obvious leaks. Shown in Figure 3-2, the blower door test device is simple, but ingenious, technology that’s installed in an exterior door opening. It contains a powerful electric fan that is used to draw air out of the house. (It simulates a 20-mile-per-hour wind blowing on the house.) As air is sucked out of the interior of a building, outside air streams in through cracks and other openings in the building envelope. A digital meter, shown in Figure 3-2, displays the airflow through the building envelope in cubic feet per minute. (A cubic foot of air is about the volume of a basketball.) Once the test is complete, the auditor converts the air leakage rate under pressure (by the blower door test) to natural air changes — how much room air is replaced naturally by leakage. A rate of around 0.35 air changes per hour or lower is desirable.
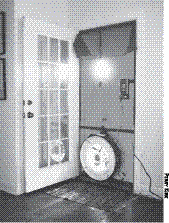
Fig. 3-2: This device is used to estimate the infiltration and exfiltration of air and to identify actual leaks.
To locate the less obvious leaks (of which there are often many), home energy auditors reverse the airflow through the blower door test device. With air blowing into a home, the auditor scours the home for leaks using an artificial smoke gun. This hand-held device produces a small stream of artificial smoke. When the device is held close to a leak, the smoke quickly escapes. The auditor will note the presence of these leaks. It’s a good idea to follow the auditor around during this process, especially if you intend to seal the leaks yourself.
Air sealing saves in two ways during the winter. In homes heated with forced-air furnaces, air sealing prevents hot air from being forced outside as the furnace blows heated air through the home. The movement of air out of a building is known as exfiltration. In most locations in North America, the greatest heat losses occur as a result of this phenomenon.
Sealing leaks also prevents cold air from leaking in on windy days. Air movement into a building is known as infiltration. When cold air blows in on the windward side of a house, it enters, then forces warm air out on the downwind side, robbing your home of its heat. This form of heat loss predominates in extremely windy areas, such as eastern Colorado, western Kansas, Nebraska, North Dakota, or the plains of Canada’s interior provinces, where winds blow consistently and fiercely throughout the winter.
Sealing the leaks in a building envelope is primarily important in windy areas or for buildings equipped with forced-air furnaces and air conditioning systems (which includes the majority of North America’s building stock). Sealing leaks also helps reduce heat loss in buildings that have radiant floor or hydronic heat. Don’t skip air sealing just because your home has a radiant floor heating system. And be especially vigilant about sealing leaks high in the building envelope — for example, ceilings in two-story buildings. Warm air builds up in these areas and will leak out through any opening it can find.
After an energy auditor studies your utility bills, examines appliances and the like, determines how leaky the building is, pinpoints all the leaks — both large and small — and determines the R-value of walls, ceilings, and floors, he or she prepares a report. The report should outline recommendations for weatherization (air sealing and insulation) and all other energy improvements such as replacing old, energy-inefficient appliances. These reports typically include the approximate cost and savings for each recommendation. Auditors also usually prioritize their recommendations — that is, they list recommended actions according to their cost effectiveness.
Most energy auditors leave the energy retrofitting to their clients, who can perform the work themselves or hire a professional energy retrofitter to do the job. If you hire a weatherization specialist, they’ll need to review a copy of the energy audit, which they will use to propose a plan of attack and determine a price. Once the homeowner and the energy retrofitter have agreed on the scope of the job and the price, the retrofitter will perform the improvements.
If you do nothing else to improve the energy efficiency of your home, be sure to seal up the leaks in the building envelope. This is the most important measure a homeowner can take. Be sure to seal up the leaks before you add insulation.
Why seal before you insulate? Because air sealing prevents moisture from entering wall cavities and ceiling insulation. This, in turn, helps to keep insulation dry. Why is that so important? Most forms of insulation experience a dramatic decline in R-value (insulation properties) when wet. In fact, even a tiny amount of moisture can decrease the R-value of insulation by half! So, be sure to seal the leaks in the building envelope first, then install insulation.
Weatherization specialists apply high-quality caulk, spray-in expanding foam insulation, and weather stripping to seal up leaks. It’s surprisingly simply and remarkably inexpensive.
Locating Leaks Yourself
An energy audit is one of the most important steps you can take to save energy and reduce your carbon footprint. If the price of a professional auditor is too steep for your pocketbook, however, don’t despair. You can perform your own audit to locate leaks and other avenues by which energy is being wasted. To perform a complete energy audit, however, you need to have a pretty good understanding of home energy and energy-efficiency measures. If you’re experienced in this area, by all means go for it. If not, you can still perform a pretty decent energy audit.
Begin by assessing air leakage. To do so, you’ll need to wait for a windy day. (Windy days are more prevalent in the late fall, winter, and early spring in most locations.) Start in the upper floors, then work your way to the main level, then the basement. Begin by looking for the largest and most obvious leaks. Remember: ceiling light fixtures, especially recessed lights, and whole-house fans tend to be major sources of leakage. You can use your hand to feel air leaks, or use a stick of smoldering incense to detect leaks. Air coming in will deflect the smoke stream.
Be thorough. Check the insides of cabinets in bathrooms and kitchens. Check attic accesses and ceiling lights. Check around windows and doors. Be sure to check the junctions where walls meet the ceiling and walls meet floors. Check electrical light switches and electrical outlets on all walls — yes, both inside and outside walls. Large cracks in the basement often occur between the foundation and wall. You can sometimes see light streaming in if you turn the lights off inside.
Sealing Leaks
As you locate leaks, seal them up. (You may want to enlist the help of another person to follow behind you, sealing leaks you identify.)
Really large cracks — like those between the foundation and sill plate — can be sealed with a foam product generically known as backer rod. It is available in hardware stores and home improvement centers. Backer rod is a solid foam rod that comes in six-foot-long coils. It is pushed into large gaps to block airflow, thereby sealing and insulating.
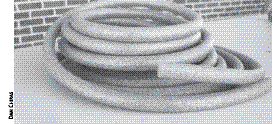
Fig. 3-3: Backer rod is used to seal large gaps. It seals and insulates and is extremely easy to install.
Many other leaks are sealed with caulk. Caulk comes in three basic types: silicone, silicone/modified polymer, and latex (Figure 3-4). Silicone is the most durable and longest-lasting product and, not surprisingly, the most expensive. The difference in price between silicone and other options is significant, but caulk is still pretty cheap. Shell out a few more bucks per tube to get the best product. You won’t regret the decision.
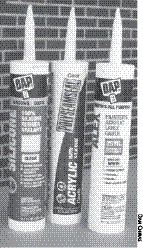
Fig. 3-4: Caulk comes in three types: silicone, silicone/modified polymer, and latex. Silicone is generally recognized as the longest lasting.
Silicone comes in several colors, but clear and white are the most common. Clear silicone is often used inside the home. It is pretty much invisible (when applied correctly) and will last forever. It expands and contracts without cracking.
To apply silicone, you’ll need a caulk gun. Cut the tip of the tube of caulk at a 45-degree angle using a very sharp knife, or better yet, a box cutter or utility knife. Poke a hole through the seal in the tube using the “poker” on the caulk gun. Cut a small portion of the tip off first to see how that works. If the bead is too small, cut a little more off and repeat this until you get it right.
To apply silicone, follow the directions on the tube. Be sure the surface is clean and free of dust. If there’s some silicone left in the tube when you’re done, don’t throw it out. You can insert a three-inch nail through the opening, then seal it with a plastic bag. I use a rubber band to hold the bag in place. You can also seal the tip with electrical tape. Next time you need the caulk, pull out the nail, and you’ll be ready to roll.
Cracks can also be sealed with expanding foam sprays (Figure 3-5). Like backer rod, expanding foam seals and insulates (silicone does not). I like working with expanding foam, but it does require a bit of practice and care. Many spray foam products expand at an astonishing rate, creating a cancerous eyesore at the site of application if applied in excess. So, be sure when starting out to apply expanding foam sparingly. If the foam expands out of the crack, cut the surplus off with a serrated knife or small, sharp saw after it cures. You can then sand and paint the dried foam so it blends in.
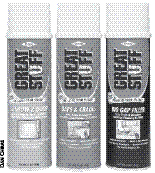
Fig. 3-5: Expanding foam in spray cans can be used to seal large and small cracks. Small cracks can be filled with Great Stuff’s Gaps & Cracks product. Larger cracks can be filled with the appropriately named Big Gap Filler. Small spray cans like the one shown here can be purchased for small jobs, reducing waste.
Sealing around windows and doors that open and close requires weather stripping, which is designed to seal gaps that can’t be sealed shut with caulk or foam. For example, weather stripping is used to seal door jambs (the frames into which doors fit) and operable windows, including double- and single-hung windows and casement windows. Weather stripping comes in many shapes and sizes. Which you use will depend on the job you want it to do.
Most new doors and windows come with weather stripping. But as they age, the weather stripping often cracks or breaks or peels off, requiring replacement.
Self-adhesive foam weather stripping was once commonly sold in hardware and home improvement stores, but, because it doesn’t last very long, it has been replaced by more durable products. The same goes for felt weather stripping. Felt weather stripping is tacked in place, but doesn’t last as long as newer products and doesn’t stop air leakage as effectively.
Most stores sell tubular EPDM rubber weather stripping with a self-adhesive backing. (EPDM stands for ethylene propylene diene monomer.) I’ve been impressed with these products. They go on easily and create a very airtight seal around doors. However, because they’re fairly new, I’m not sure how long they’ll last. Heavy-duty Duck EPDM rubber Weatherstrip Seal from Henkel Corporation in Avon, Ohio comes with a 10-year guarantee, for what it’s worth. M-D Building Products manufactures a tubular vinyl weather strip (Vinyl Gasket) that can be nailed or tacked in place.
Another easy and inexpensive way to seal up the leaks in a building envelope is to install door sweeps on doors and foam gaskets in light switches and receptacle outlets. Door sweeps attach to the bottom of doors and block airflow. Foam gaskets for light switches and receptacles are thin pieces of foam that are installed under the cover plates of light switches and electrical outlets. They block air flowing through walls from attics and can be extremely effective (Figure 3-6). Follow the instructions on the package.
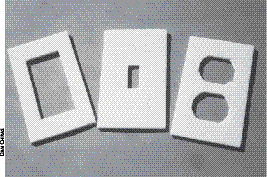
Fig. 3-6: These thin foam gaskets are installed under the cover plates of electrical outlets and light switches where they block airflow from attics. Air flows into an attic and through walls, then out through light switches and outlets.
For more on caulking and weather stripping, you may want to take a look at my book, Green Home Improvement. It includes numerous energy-saving projects and explains most of your options and the associated costs and savings. It also gives lots of advice for installation. Additionally, this book contains detailed instructions on performing home energy audits.
New Construction
This chapter has focused primarily on existing homes. But air sealing is just as important in new construction, and it’s easier to achieve. A good architect can design a building to be pretty airtight. If your builder carefully follows the architect’s instructions, your home can be extremely airtight and energy efficient. Concentrating on this at the beginning of a project will save you a fortune over time — and you won’t have to seal the building in the future.
To create an airtight building, sill seals should be installed between the foundation and sill plate. The sill plate is the 2 x 4 or 2 x 6 that sits on the top of the foundation. It is part of the wall framing. Sill seals are four-to-six inch rolls of foam applied under 2 x 4s or 2 x 6s, respectively, to block airflow.
Foam gaskets can be applied when installing drywall on walls, too. Be sure to look into airtight drywall installation techniques.
Openings in the building envelope should be carefully sealed. Airtight windows should be installed, as well as airtight insulation-contact recessed light fixtures for recessed lighting.
When building new, be sure to hire an architect and a builder who are experienced in designing and building super-airtight, energy-efficient buildings — not just folks who would like to. In other words, find an experienced professional, not just a hopeful. Visit their “end products,” too, and be sure to talk with owners and operators of the buildings to see how they’ve performed.
Parting Advice
Sealing with caulk and weather stripping is a pretty straightforward process. If hiring a professional, be sure he or she measures air leakage both before and after sealing to see how effectively they’ve sealed up the leaks. Before-and-after tests are vital to assessing the quality of their work and determining if additional measures are required.
If you perform your own weatherization, be sure to continue to check for leaks once you’ve completed the job. If your home still seems unreasonably cold and drafty, you may want to bring a professional in to find and seal the leaks you’ve missed. Or, they can locate the leaks using their blower door test device, and you can seal them.
Conclusion
It may have seemed odd in a book on solar home heating solutions to begin by calling on you to seal up your home before you even begin to think about installing a solar heating system. If you called a HVAC specialist to install a new furnace, he or she would visit your home and jot down a few statistics about your home (the square footage, for example), then size a system. Chances are, he or she would not even mention air sealing or insulation. Unfortunately, that’s the wrong approach.
Even if you don’t install a solar heating system or retrofit your home for passive solar, it should be clear that air sealing is vital to creating comfortable and affordable living and working spaces. Sealing up the leaks not only makes our buildings much more comfortable, it saves a ton of money while reducing our carbon footprint. If all buildings in the United States, Canada, and Europe — indeed the entire world — were made more airtight, the global community could put a huge dent in their annual emissions of carbon dioxide.
The next step, covered in Chapter 4, is to beef up the insulation. Combined, air sealing and insulation can dramatically lower heat load — the amount of heat you have to provide to stay warm in the winter. And both measures provide a second benefit: they help keep a home cooler in the summer by lowering the cooling load — the amount of energy you spend cooling your home.