Chapter 4: Insulate, Insulate, Insulate!
When most people think about energy retrofitting their homes or businesses, insulation is the first thought that comes to mind. As you learned in the last chapter, however, for best results, insulation should be the second thing on one’s mind. The very first measure should be — without an exception — sealing up the leaks.
As you may recall from the last chapter, sealing up the leaks creates a more airtight building that prevents cold air from blowing in on windy days and warm air from leaking out at other times. It makes our buildings much more comfortable year round, and saves a ton of money while reducing one’s carbon footprint. Air sealing also helps reduce the accumulation of moisture in insulation, which dramatically lowers its insulating properties. When energy retrofitting a home, insulation should always be preceded by air sealing.
Period.
Once you’ve sealed up the leaks in your home, it is time to insulate.
In this chapter, you will learn how to assess the level of insulation in a building, how much insulation you should add, and which places typically require an insulation shot in the arm. I also discuss common insulation materials and which ones work best in each part of the building envelope. In addition, I cover the costs and benefits of insulation. Although this chapter is primarily concerned with energy retrofitting (boosting the level of insulation in existing buildings), most of these ideas can — and should — be applied to new construction.
Should You Insulate?
When it comes to insulating a building, the question usually isn’t whether you need insulation, but how much you need and where you need to install it to do the most good. Fact is, most homes and businesses in North America are woefully underinsulated. Millions of buildings throughout North America — indeed the world — would benefit immensely from additional insulation, often lots more!
What is more, an aggressive nationwide weatherization and insulation program could save North Americans billions of dollars a year. It would create an industry with tens of thousands of jobs throughout the Continent that would last for many decades — the need is that great.
Even those who have added insulation in the past decade or so would very likely find that their homes and businesses would benefit from additional insulation, saving them even more on fuel bills. Why?
Until recently the US Department of Energy (DOE) recommended R-30 and R-38 insulation in roofs and ceilings in most parts of the United States. The higher levels (R-38) were recommended for the coldest parts of the United States for homes that were heated with the most expensive type of energy — electricity. The guiding principle behind DOE’s insulation guidelines was this: the colder the climate and the more expensive the source of energy for home heating, the higher the level of insulation. Unfortunately, the DOE’s recommended R-values that many people have achieved when retrofitting buildings are inadequate.
For years, a small, dedicated handful of building professionals interested in creating superefficient homes has been pushing much higher levels of ceiling insulation — R-50 to R-60 in most climate zones, and R-70 to R-80 in the coldest climates. For walls, they’ve been advocating R-30 to R-40 in most climate zones, and R-50 or so in the hottest and coldest climates.
Conventionally trained architects and builders often view these more stringent recommendations with skepticism. Like everyone else, they learned in school that there’s a point at which additional insulation results in diminished returns. So, they question why one would spend more money for marginal returns.
What architects and builders aren’t aware of — because they were never told — is that some forms of insulation lose their R-value over time. Loose-fill insulation (like dry-blown cellulose) may settle over time (Figure 4-1). As it settles, its R-value decreases. In addition, as you know from Chapter 3, even tiny amounts of moisture in insulation can dramatically lower R-values.

Fig. 4-1: Cellulose is made from ground-up newspapers, often with small amounts of cardboard. When blown into attics, this insulation can settle over time, and thus experience a decline in R-value.
Moreover, the idea of diminishing returns was based on cheap energy — very cheap energy. What architects and builders hadn’t been told — or figured out on their own — was that the point of diminishing returns shifts upward as energy prices increase.
For many years, North Americans have been blessed with cheap energy — extremely cheap energy — upon which the recommended insulation levels were based. Those days are gone. Making matters worse, energy prices will very likely continue to increase — and increase quite rapidly — in the coming years. Rising energy prices have dramatically changed the economics of insulation. The old rules no longer apply. More is indeed better — a lot better.
Fortunately, many enlightened architects and builders have adjusted their practices to reflect this new reality. Even the US DOE has quietly increased its recommendations for ceiling insulation from R-30/R-38 to R-49 for most locations, as shown in Table 4-1.
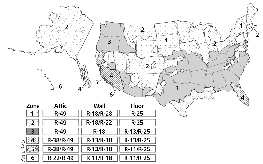
Table 4-1: DOE’s Recommended R-Values
While DOE’s recommendations for ceiling insulation have increased dramatically, their recommendations for wall insulation are still generally below those that the most energy-conscious green building consultants, architects, and builders recommend (typically R-30 to R-40 in most climate zones). DOE’s guidelines also call for R-25 floor insulation over unconditioned spaces, such as crawl spaces. Floor insulation is something builders have usually overlooked.
How Much Insulation?
When upgrading the insulation in a home or business — or when building a new one — I recommend pushing the limits for ceiling insulation to R-50 to R-60, except in very hot or cold climates, where R-70 to R-80 is advised. Wall insulation for most climates should be R-30 to R-40, except in the hottest and coldest climates, where R-50 is recommended. Floor and slab insulation should be at least R-25.Combined with air sealing, high levels of insulation can reduce heating and cooling costs by as much as 75%.
Contrary to popular belief, high levels of insulation are just as important in hot climates as they are in cold climates. Although conventional wisdom calls for lower levels of insulation in hot climates, in this case conventional wisdom is dead wrong.
Fact is, most of us share the same misconception about insulation. When asked what insulation is for, most people say it is to keep us warm during winter. That’s because most people think of insulation as a warm winter coat for their homes. So, it would be useful only during cold weather. You wouldn’t bundle up in a heavy coat on a hot summer day, would you?
I remind students that insulation in the building envelope is more like a thermos bottle than a heavy winter coat. If you put a hot beverage in a thermos bottle, it stays hot. If you put a cold drink in the same container, it stays cold.
Insulation reduces heat movement through the wall of a thermos bottle the same as it does through roofs, walls, foundations, and windows of buildings. In the winter, it keeps heat in. And in the summer, it keeps heat out. Because cooling requirements (and hence cooling costs) in hot climates often exceed heating requirements (and costs) in cold climates, it is just as important — often more important — to insulate a building in a hot climate as it is in a cold one.
Increasing the R-value of ceiling insulation in a new or existing home to R-50 to R-60 isn’t that difficult. For new homes, you can install energy trusses so the insulation levels remain high throughout the ceiling cavity (Figure 4-2). For existing homes, be sure not to block the soffit vents when installing new insulation in the attic.
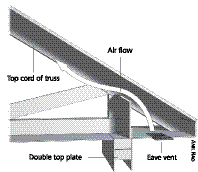
Fig. 4-2: (a) Energy trusses increase the amount of space available for insulation along the perimeter of a roof — specifically, at the point where the framing members of the roof attach to the top plate of the walls. This reduces energy loss and prevents ice damming, a common problem in cold, snowy climates.
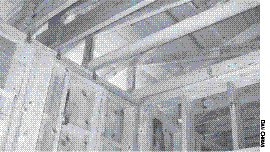
Fig. 4-2: (b) Energy trusses in a new building in Wisconsin.
Adding insulation to an existing building or boosting the amount of insulation of a new building is one of the least expensive upgrades you can make. In fact, in new construction, it could end up being cost neutral initially. That’s because increasing the level of insulation often allows one to downsize the heating and cooling system. In an existing home that needs a new furnace, adding insulation may mean you can install a smaller and less expensive unit. The savings created by installing a smaller furnace and air conditioner will easily pay for the additional insulation, making it a cost-neutral action in the short term. Over the long term, higher levels of insulation save money by lowering heating and cooling costs. As a result, they provide a healthy life-long return on the investment.
Insulation upgrades also reduce the cost of solar heating systems, saving money upfront that offsets the cost of the added insulation.
Assessing Existing Levels of Insulation
Before you insulate an existing home, you need to know how much insulation the builder installed initially or how much insulation, if any, previous owners have added. You also need to determine the type and the R-value of the insulation in the walls and ceiling and under floors over unconditioned spaces — that is, spaces that are neither heated nor cooled. (A good example is a floor over a crawl space.) You also need to assess insulation levels around the foundation — either on the outside of the foundation or along the inside of the foundation walls.
One of the easiest ways to assess insulation levels is to hire a professional energy auditor (discussed in the previous chapter). As part of the energy audit, the auditor will determine the type and thickness of the insulation in the walls, ceilings, floors, and foundation of a building. From this data, he or she will calculate the R-values for each part of the building envelope. The auditor will then make recommendations for beefing up the insulation.
Another inexpensive and simple way to determine R-values is to call in a professional insulator. Installers will perform an identical assessment for free, discuss your options, and provide a bid for the work. But please, only call for a bid if you are seriously thinking about hiring someone to do the work. Don’t just call for a free assessment; it’s not ethical.
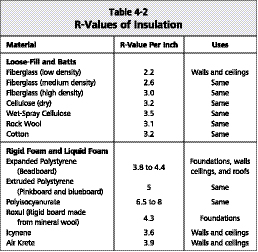
A third option is to assess insulation levels yourself. You can, for instance, climb into the attic to measure the depth and determine the type of insulation. You may be able to make your assessment from the safety of a step ladder erected in the attic access. (The attic access is an opening in the ceiling, typically located in a back hallway or closet.) You’ll need a flashlight and a ruler or tape measure. You may need to pull yourself into the attic and measure the insulation away from the attic access if the insulation tapers toward the opening, which is common. If you need to climb into the attic to assess the levels, be sure to tread carefully. Step only on ceiling joists, not between them. Once you have your measurement, multiplying the depth of the insulation in the attic by the R-value per inch (Table 4-2) gives the R-value of the ceiling insulation.
In homes with vaulted ceilings, there’s no easy way to assess insulation levels. Insulation is packed between framing members (the rafters), and there’s no attic to peer into to measure it. I refer to these as closed ceiling cavities.
If you live in a home with a vaulted ceiling, one option is to call the original builder to see if he or she can remember how much and what kind of insulation was installed. (Good luck with that!) If you were given a set of blueprints, the R-value of the ceiling insulation may be listed on them.
To assess wall insulation, many auditors simply remove the cover plate from an electrical outlet on an exterior wall. This will expose the wall insulation. What they’ll typically find is that the cavity is either uninsulated (this is common in homes built in the early 1900s and earlier) or it contains fiberglass batt insulation (batt insulation comes in rolls or precut lengths called “blankets”). Be sure to measure the depth of the wall cavity using a wooden ruler, not a metal ruler or tape measure. (It’s not a bad idea to turn off the circuit breaker to that outlet, just in case.) Most older homes were built with 2 x 4s, meaning the wall cavity is about 3.5 inches deep. If your walls were built from 2 x 6s, the wall cavity will be 5.5 inches deep. To determine the R-value of the insulation, multiply the depth of the wall cavity by the R-value per inch of the type of insulation you encounter.
Although this technique often gives a good assessment, many a professional insulation installer has been embarrassed when they showed up with their equipment to inject wall insulation, only to find that the walls were insulated after all. Their cursory test suggested there was no insulation in the walls, but what probably happened was that the electricians who installed the wiring had cut the batt insulation away from the electrical outlets for fire safety and ease of access.
To avoid this embarrassing mistake, you can drill a small hole in an exterior wall using a hole saw (Figure 4-3). This will provide positive proof. (To avoid messing up a wall, work in a closet built against an outside wall. Holes can be easily patched up with drywall plugs available from professional installers or a little drywall mud and the circular piece of sheet rock you removed with the hole saw.)
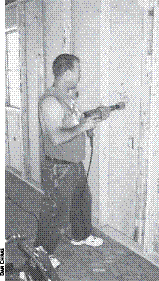
Fig. 4-3: To assess wall insulation, you can cut a hole in an outside wall using a hole saw. Drill your hole in an inconspicuous location, like a closet built against an outside wall.
Foundation insulation is pretty easy to assess as well. To see if the foundation was insulated, begin outside. Take a shovel and dig a hole at the foundation. Digging down 6 to 12 inches should be enough. Chances are, you won’t find any insulation. Insulating foundations was not a common practice until recently. Even today, many builders fail to insulate foundations.
If your home has a crawl space or a basement, be sure to check for insulation along the inside of the foundation wall. If the basement is finished, you can test for insulation by rapping on the walls as if you were knocking on a door. If the walls are uninsulated, they’ll produce a hollow sound. Insulated walls produce a more solid sound. To determine with certainty if the wall cavities are hollow or filled with insulation, you can remove a few cover plates on outside walls or cut a few holes in the wall to look for insulation. For more advice on this topic, you may want to check out my book, Green Home Improvement, or some of the other books on home energy efficiency included in the Resource Guide.
Where to Insulate and What to Use
A careful inspection of insulation performed by an energy professional or on your own will tell you where insulation is needed and how much you must install to properly retrofit your home.
Ceiling Insulation
If the energy audit indicates that you need ceiling insulation, and your home has an unfinished attic, you are in luck. The attic can be accessed via the attic access door and additional insulation is usually very easy to install. Two types of insulation are typically installed in an unfinished attic: loose-fill and batts.
Loose-fill insulation is a dry, fluffy material that’s blown into attics. Most loose-fill in use today is either cellulose or fiberglass. It’s blown over existing insulation to form a fluffy layer that increases the R-value of your ceiling (Table 4-2). Both products come in tightly packed bales wrapped in plastic. The bales are broken open and fed into the hopper of a blower. Rotating blades in the machine break up the bale and feed the crumbled material into the blower. The blower propels the fluffy cellulose through a large diameter flexible plastic hose that runs to the attic. The insulation is blown over the existing insulation until it reaches the desired depth and R-value.
Batt insulation consists of rolls or blankets cut to predetermined lengths (Figure 4-4). In attics, they can be laid over the top of existing batt insulation. Batts are available in fiberglass, wool, cotton, and rock wool. Fiberglass is the most widely used and therefore widely available. The most environmentally friendly materials are wool (from sheep) and cotton (made from blue jean factory waste). You’ll probably need to purchase wool or cotton batts from an environmental building supply outlet online, like Home Eco in St. Louis or SolSource in Denver.
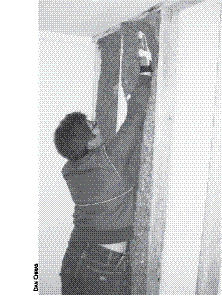
Fig. 4-4: Blankets of wool insulation shown here are being installed in a wall cavity in a basement to boost the R-value.
Batt insulation is typically laid over the top of existing batts. Unfaced batts, that is, rolls or blankets with no paper or foil backing, are typically used when retrofitting attic insulation. They allow moisture seeping up from the living spaces to pass through and escape into the attic and then to the outside via the gable end vents or roof vents. (Venting is vital to ensure that moisture escapes and does not accumulate in attic insulation.)
Wall Insulation
If your energy audit indicates that there’s no wall insulation in your home — or wall insulation is inadequate — you have several options. One of the least expensive and most common materials used for insulating uninsulated walls is cellulose. It is blown directly into wall cavities (the spaces between framing members known as “studs”) through large holes drilled into the walls, either from the inside or outside of the home. Although you can do this yourself, it’s best to hire a professional.
Cellulose is a great product, but it can get hung up in walls during retrofitting. It can, for instance, catch on electrical wires or plaster that protrudes between the wooden lath used in older homes. When cellulose “hangs up,” it produces cold spots — uninsulated areas — in the wall.
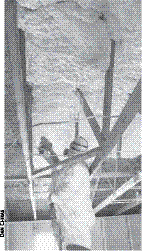
Fig. 4-5: Sustainable Energy Systems of Wichita, Kansas, used this spray rig to install liquid foam insulation in the classroom building of The Evergreen Institute. Liquid foam insulation effectively insulates and seals walls, but it must be installed by a professional who has the equipment and training required to do the job right.
Walls can also be retrofitted with a product generically referred to as “liquid foam” or “spray foam” insulation. Liquid foam requires an expensive set of equipment that is typically installed in a truck or trailer. To apply this product, you need training on proper mixing and application. As a result, virtually all liquid foam products must be applied by a licensed professional (Figure 4-5). To apply, a hole is typically drilled in the center of the wall. A tube is then snaked into the wall cavity (Figure 4-6), and the liquid foam is injected into the wall. It comes out of the nozzle as a liquid but quickly changes to a foam, which expands to fill the cavity.
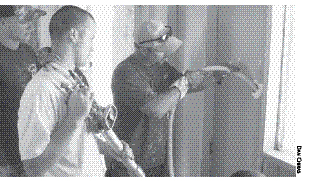
Fig. 4-6: The installers inserted a hose in a hole drilled in the wall of our classroom building during its energy retrofit. The hose was slid to the bottom of the wall cavity, and the foam was injected. The hose was drawn out as the foam filled the wall cavity. Once the lower cavity was filled, the hose was snaked to the top, and the rest of the wall was filled from the top down.
Liquid foam insulates and also reduces air infiltration and exfiltration. That is, it not only increases the R-value, it seals up the wall cavities, which dramatically reduces air movement and hence energy loss. To protect your health and the health of other occupants, it’s a very good idea to use a product that has no formaldehyde, such as Icynene, Air krete, or BioBased foam (made partly from soybean oil). (Formaldehyde is a suspected carcinogen and can cause other health effects like a rare, but serious, immune disorder known as multiple chemical sensitivity.)
Floor Insulation
If your home is built over a crawl space or an uninsulated basement, be sure to insulate under the floors. Seal up all openings in the floor first, then apply insulation between the framing members (floor joists) upon which the subflooring rests. Floor insulation can make a huge difference in the comfort of a home.
When insulating a floor, you have two options: liquid foam or batts. Liquid foam is sprayed from underneath, filling the space between the floor joists (Figure 4-7). Batts are applied between floor joists and held in place by small metal rods. Be sure to install the paper facing of the batt against the floor to prevent moisture from seeping into the insulation from the living area above. When installing insulation in a crawl space, it is often necessary to cover the bare ground with 6 mil polyethylene plastic to reduce the amount of moisture entering the crawl space. This protects the insulation from moisture and helps it retain its R-value.
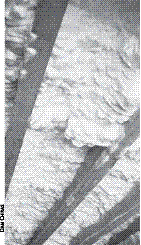
Fig. 4-7: Liquid foam insulation was installed under the floor of The Evergreen Institute’s classroom building during an extensive energy retrofit. The install was donated by one of our collaborators, Sustainable Energy Systems in Wichita, Kansas.
Foundation Insulation
Uninsulated foundations are a major source of heat loss in homes and businesses. Retrofitting, however, can be quite a challenge. One option is to install rigid foam insulation on the outside of the foundation. To do so, begin by digging a two to four-foot deep ditch alongside the foundation wall. The ditch can be dug by hand or with a back hoe operated by a skilled professional. Rigid foam insulation can then be installed tightly against the foundation wall (Figure 4-8). (If the wall needs additional waterproofing, this is a good time to do it!) The ditch can then be backfilled and the soil will hold the insulation in place.
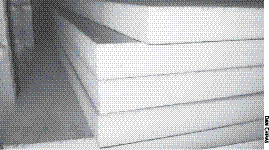
Fig. 4-8: Rigid foam is used to insulate the exterior walls of foundations.Be sure the product you use is rated for burial or underground applications.
Be sure to cover exposed (above-ground) insulation, as it will deteriorate in sunlight. Also be sure the insulation you use is rated for burial. Most are, but check just to be sure. Extruded polystyrene is an excellent product. It’s also known as blue board or pink board, and is widely available. Two inches of insulation is typically sufficient, though thicker layers will perform better. Personally, I’d install four inches of rigid foam.
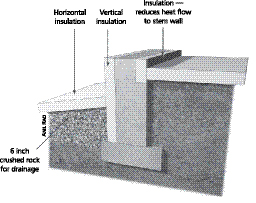
For optimum performance, you may want to install insulation both vertically and horizontally, as shown in Figure 4-9. The horizontal insulation, also known as wing insulation, helps trap heat around the foundation that migrates up from the ground on cold winter days. The vertical insulation lowers heat movement through the basement wall. This foundation design, used in many new energy-efficient homes, is known as a frost-protected shallow foundation. The design dramatically reduces heat loss, and, for new homes, it reduces the depth of foundations, saving time, energy, and money. (It reduces the depth of the foundation because it raises the frost line around a home. All foundations must be dug deeper than the frost line to prevent expansion and contraction of soils caused by freezing and thawing. Because the frost line is higher around a home with a frost-protected shallow foundation, a shallower and less expensive foundation can be used.)
