Chapter 7: Retrofitting Your Home for Passive Solar
If building a brand new passive solar home isn’t in the cards for you, don’t despair. It is often possible to retrofit an existing home to incorporate this amazingly clean, low-tech, cost-effective, and environmentally friendly way of heating. This chapter tells you how. As you shall soon see, there are three main options: opening up the south facade with windows that allow the low-angled winter sun to enter; incorporating passive solar into an addition; or adding an attached sunspace, a topic briefly mentioned in Chapter 6.
Option 1: Installing South-Facing Windows
To add windows to an existing home, your house must have one outside south-facing wall with unfettered access to the winter sun. This is the wall in which the additional windows will be installed. No trees or buildings can shade the wall during daylight hours — ideally from 9 am to 4 pm — if you want the retrofit to perform well. And the south-facing wall must be in line with incoming sunlight throughout most of the day throughout the heating season. In many parts of the world, the heating season starts in mid-to-late fall. It extends through the winter, and ends in mid spring. In colder climates, the heating season may begin very early in the fall and extend to late spring.
Newly built passive solar homes are typically elongated structures, often rectangular in shape. The rectangular footprint is oriented so that the long axis of the building runs from east to west. This allows the designer to “load up” the south-facing facade with windows to permit maximum solar gain.
In a passive solar retrofit, the south-facing wall doesn’t have to run the length of the building, although that’s ideal. Basically, the more south-facing wall space, the better.
In North America, many houses are oriented north–south. That is, their long axes run north and south, so they face the street. Because most are squeezed in on narrow lots, their south-facing exterior walls are pretty small. Don’t despair. Adding just a few windows can boost your solar gain and provide heat. You won’t be able to heat your entire home, but you can provide heat to a couple of rooms, helping to reduce your energy bill. Before you start installing windows, however, there are a couple things you need to do.
Step 1: Seal up the Leaks
Passive solar retrofitting begins not by adding windows, though this is an important measure, but by air sealing and insulating a building to the max. Collectively, this is referred to as weatherization, and is discussed in Chapters 3 and 4. For best results, be sure to conduct an energy audit or hire a professional to do the job to determine where leaks are and where and how much insulation must be added. If you haven’t read those chapters, be sure to do so.
Step 2: Insulate, Insulate, Insulate!
After the leaks have been sealed, it is time to insulate, based on your findings or the findings of the professional auditor. Be sure to insulate the walls, ceilings, and the foundation, as outlined in Chapter 4. Also be sure to insulate under floors over unconditioned spaces such as unheated basements and crawl spaces. It’s also a good idea to install insulated window shades over all windows to hold heat in at night. And don’t forget to use them!
Sealing a home or office, then insulating it, can reduce heating (and cooling) costs dramatically. Weatherization also helps your home retain the solar heat you invite into the building by installing windows along the south facade.
Step 3: Installing Energy-Efficient Windows
After you have sealed and insulated your home, it’s time to install windows on the sunny south side of the building to increase its direct solar gain — assuming, of course, you have the space for windows.
Simple as it may sound, adding a few windows on the south side of a home is no easy task. It requires a lot of knowledge and skill and can be tricky. You’ll probably need a building permit. Because the task is so complex, it’s a job usually best left to building professionals — either skilled handymen or handywomen or professional window installers.
A new energy-efficient window is only as good as its installation. If not done right, the window can leak, allowing tons of cold air in. Improper installation can trigger a cascade of problems. In addition to damage to the window itself, improperly installed windows can let moisture penetrate between the panes of glass. It can also allow water to leak into your walls, which can reduce the R-value of your insulation, promote mold growth, and even cause structural damage.
To properly install a window in an existing wall, you or the installer will first need to cut a hole through the siding, exterior sheathing, and interior wall (typically covered with drywall, plaster, or paneling). Once the hole is cut, the installer removes the existing studs (wood framing members) and installs a rough window opening (basically, a box to which the new window will be attached). This requires a header — a horizontal framing member over the top of the rough window opening, as shown in Figure 7-1. The header supports the weight of the wall above the window and transfers the weight to the framing members along the sides of the windows. This diverts pressure that would otherwise press directly onto a window, causing it to crack. Another way of saying this is that the headers prevent the weight of wall and roof above windows from pressing down on them.
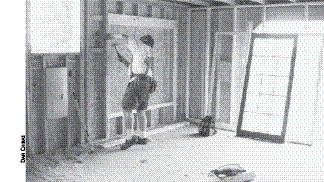
Fig. 7-1: This opening in my office was created to install south-facing windows to permit passive solar gain. Note that the vertical framing members (studs) have been removed and a header has been installed along the top of the opening.
After rough window openings have been created and properly framed in, it is time to install the solar windows. The windows you install must be sized about a half an inch smaller than the rough opening. This allows room for expansion in hot weather. Windows come in wooden, vinyl, fiberglass, or metal frames that attach to the rough opening. Be sure to read and follow directions provided by the manufacturer very carefully.
Windows are attached on the outside to the sheathing by a metal or plastic flange that attaches to the window frame. Nails are driven into the flange to hold the window in place. Be sure the window is level before you nail it in place.
The gap between the window and the frame is then filled from the inside with foam insulation such as backer rod or the type of spray foam insulation designed specifically for windows and doors (Figure 7-2.) Using the wrong product, for example, the spray foam used for sealing large gaps and cracks, can void the window manufacturer’s warranty, so read instructions carefully — or be sure your installer knows what he or she is doing.
Fig. 7-2: This product (made by Dow) does not expand as much as other liquid spray-in foam sealants, which can cause window frames to warp. It is therefore ideal for window and door installations. Some manufacturers require installers to use foam weather stripping instead to ensure that there is no expansion and so no damage to the newly installed window.
After the window is secured, be sure to apply adhesive sill flashing. It seals the window opening from the outside, as shown in Figure 7-3. This prevents air and moisture from penetrating from the outside.

Fig. 7-3: Newly installed windows should be sealed with this adhesive tape to prevent air and moisture from penetrating.
Once the window is in place, you or the installer will need to install trim. Be sure to caulk around the trim to ensure an airtight seal.
What Type of Window?
As you shop for windows, you will find a wide range of types and an equally wide range of prices. When it comes to windows, cheap is rarely better. Like so many things in life, you get what you pay for. A high-quality window will be more expensive, and it will generally be better built, more energy efficient, and more durable than a less expensive window. So, when it comes to purchasing windows, buy the best ones you can afford.
The most airtight windows on the market are those that don’t open — inoperable windows. These are ideal for solar glazing (south-facing glass) in passive solar retrofits, but there has to be at least one operable window in a room. (Building codes require an operable window for egress — escape in case of a fire — and you’ll need one for natural ventilation, too.)
If you want to or need to install operable windows, your best bet is to purchase hinged windows — that is casement, hopper, or awning windows. These windows open with the aid of a crank mechanism and shut very tightly against weather stripping — provided the window is well made.
Slider windows — single-hung, double-hung, and horizontal — tend to be less airtight and aren’t usually a good choice — unless you buy really high-quality ones. Don’t forget, quality is everything. A high-quality slider, in fact, could be more airtight than a cheaply made hinged window.
Solar glazing requires special windows designed to permit a lot of sunlight to enter. Be sure to ask for windows with a high solar heat gain coefficient (SHGC). Although SHGC sounds like a complicated engineering term, it’s actually quite simple. SHGC is a number from 0 to 1 that indicates the amount of solar energy that passes through a window. A window opening covered with plywood allows no solar energy to enter. It is, therefore, assigned a SHGC of 0. A window opening with no glass would have a SHGC of 1, indicating that it allows 100% of the incoming solar energy to enter.
For solar glazing (south-facing windows), the higher the SHGC, generally, the better. If you are in a cold climate, buy windows with SHGC of 0.5 or higher. In slightly warmer climates, windows with a lower SHGC will work, from 0.4 to 0.5.
Buying high-SHGC windows can be a huge challenge because they’re not typically stocked. Contact local window suppliers to see if they can order them for you. Window manufacturers can buy high-SHGC glass from PPG, a company based in Pittsburgh, PA. They offer two products: Sungate 100 and Sungate 500, both of which are high-SHGC glass. Window manufacturers can order and then install the glass in their own frames. (Individuals and businesses can’t buy directly from PPG. They are strictly a glass manufacturer and only sell glass to window manufacturers.) Thermotech, in Canada, also sells windows containing high-SHGC glass.
South-facing windows live a rough life. They are exposed to lots of sunlight, so buy high-quality windows. I recommend wood-framed windows with an exterior cladding of aluminum to protect against the weather. Fiberglass and vinyl windows work well, too, but they’re not as environmentally friendly as wood-framed windows. Stay away from aluminum-framed windows unless the frames are very well insulated. Otherwise, the metal frames will lose a lot of heat in the winter by conduction. Also, be sure to buy windows with warm-edge spacers. Spacers are foam pieces that are inserted between the two panes of glass, along their perimeter, blocking heat flow through the edges. In other words, they reduce heat loss around the perimeter of a window.
To learn more about windows, you can check out one of my books, either Green Home Improvement or The Solar House.Both have lengthy discussions of windows. I also strongly recommend that you contact a number of window installers in your area. Explain your goals — to increase solar gain — and ask them what products they have that will allow you to capture the low-angled winter sun. Be sure they understand your needs and can deliver windows with the proper SHGC.
When retrofitting a home for passive solar, it’s a good idea to reduce the number of windows on the east, west, and north sides. North-facing windows are especially troublesome, as they tend to lose huge amounts of heat on cold winter days. East- and west-facing windows can allow a lot of solar gain in the summer, leading to overheating. Unfortunately, removing windows is usually a costly venture, so it may not be feasible. It may also have an adverse effect on the appearance of your home, so may not be desirable. As noted earlier, though, be sure to install insulated window shades or shutters over all windows — especially the new windows — to decrease nighttime heat loss.
Adding Thermal Mass
If you end up dramatically increasing the amount of south-facing glass, you may want or need to add thermal mass. As you may recall from Chapter 6, thermal mass is any masonry material that can absorb heat generated by incoming solar energy during the day and release it at night or on cold, cloudy days. Thermal mass serves as a heat sponge that prevents overheating during the day. At night, or on cloudy days, thermal mass releases stored heat. As a result, thermal mass helps maintain a more consistent internal temperature in a passive solar home.
Thermal mass is easiest to install in new construction; it is much more challenging to install in retrofits. Floor tile or brick facing added to nearby walls may help. Adding a second layer of drywall to existing walls in direct contact with the incoming solar radiation works well, too. For best results, the thermal mass must be directly in the path of incoming sunlight. Mass should be a darker color to increase the absorption of sunlight. You don’t need to paint your walls black or dark brown. However, a dark green wall can help improve the performance of drywall mass.
One note of caution: For best results, the south-facing windows you are adding should be shaded by eaves (overhang) to prevent heat gain during the cooling season — late spring, summer, and early fall. You may need to build eaves over newly added solar glazing if there is no overhang on the south side of the building. You can also install retractable awnings that can be opened in the summer to prevent overheating.
Adding new windows is not cheap by any stretch of the imagination, but it will help improve the energy performance and comfort of your home, if done correctly. Reducing heating costs obviously saves on fuel bills. Adding solar glazing will increase the amount of day lighting — natural lighting during daytime hours. This, in turn, will reduce electrical costs by reducing the amount of artificial lighting you’ll use.
Option 2: Building a Solar Addition
If you are planning on increasing the square footage of your home, you may want to consider designing it for passive solar — provided at least one wall of the addition will be unshaded during the heating season. Installing solar glazing on the south-facing wall of an addition could, if done correctly, provide up to 80% of the heat required by the addition, perhaps even more in warmer climates. A solar addition can also provide a little heat to an adjoining room, if done correctly (Figure 7-4).
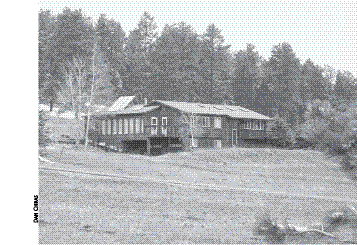
Fig. 7-4: This addition on the south side of this house was built with passive solar in mind. The homeowner installed plenty of glass on the south-facing wall, which heats the addition itself plus an adjoining room.
Solar additions can be designed as either direct gain or indirect gain structures, both described in the previous chapter. The least expensive is direct gain. In direct gain designs, additions serve as huge solar collectors — just like any other direct gain building. Solar energy heats the addition but as a rule, very little heat is available to adjoining rooms. Indirect gain (incorporating a thermal storage wall) works well for bedroom and office additions, but it costs more than direct gain, because it requires the installation of thermal mass. Additional thermal mass also requires a sturdier foundation, which costs more. However, the benefits could easily outweigh the higher costs.
When designing a solar addition, be sure to follow all the rules I outlined in the last chapter. Orient the addition to south (long axis east and west), concentrate the windows on the south, install adequate overhang to shade the structure in the summer, make it super airtight, and insulate it extremely well. I advise installing thermal mass if the solar glazing exceeds 7% of the floor space of a single-story addition.
Be sure to install energy-efficient, high solar heat gain coefficient glass on the south wall. Be certain not to overglaze, however, or the room may overheat. (Generally that means not exceeding 15% solar glazing.) If you want the structure to provide heat to neighboring rooms, you will need to find a creative way to move heat from the addition to adjoining living areas. Because this can get quite tricky, it is a good idea to hire an architect, an engineer, or a builder who is experienced in passive solar. An experienced passive solar consultant could help as well. Experienced professionals can help you work out the details so the addition will perform well — heating itself naturally without baking you and your pets in the process.
Option 3: Attached Sunspaces
Attached sunspaces — a.k.a. solar greenhouses — are often the easiest way to incorporate passive solar in an existing building. This design, known as isolated gain, is simple in theory, but very difficult to get right. So, proceed carefully.
Be wary of all-glass attached sunspaces. They are attractive, fairly inexpensive, available in kits, and required for growing vegetables year round (Figure 7-5). They’re often touted as three- or four-season rooms.
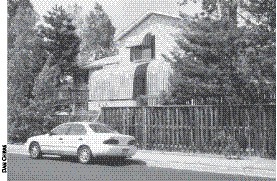
Fig. 7-5: This attractive solar collector built on the south side of a house may seem like a good idea, but it suffers serious problems, like overheating in the summer. These shades must be drawn to protect the space from overheating on sunny days throughout the late spring, summer, and early fall.
Unfortunately, all-glass attached sunspaces tend to overheat in the summer and can overheat during the heating season — even in the dead of winter. This often makes them virtually uninhabitable during daylight hours on many days. Intense sunlight is very rough on furniture and carpets. It’s even harder on tropical house plants. As you may know, many tropical plants grow in the shade or in less-intense sunlight than they will encounter in an all-glass greenhouse, especially in structures at higher elevations like Colorado where sunlight is more intense than at lower-elevations (there’s less atmospheric filtering of incoming solar radiation in high-altitude areas). During the summer, intense heat is very hard on vegetables. Most garden vegetables do very poorly in an attached sunspace if temperatures skyrocket, which they often do. Photosynthesis starts to slow down at 85° F and virtually stops at 100° F.
While all-glass attached sunspaces may generate a lot of heat, it’s not that easy to force heat to flow laterally to an adjoining room. Hot air rises, but it doesn’t move sideways very well unless forced to do so. That means you’ll need to devise some system to move heat out of the sunspace. A thermostatically controlled wall fan is often a good solution. It can blow heat from the attached sunspace into neighboring rooms.
As just noted, all-glass attached sunspaces tend to be drenched in sunlight during the day and are therefore too hot and sunny to occupy. At night, they tend to get very cold, making them pretty useless as additional living space. Because they can become extremely cold at night, attached sunspaces should be closed off from adjoining rooms to keep them from chilling down.
A far better option is an attached sunspace with south-facing glass and a solid roof, much like a solar addition (Figure 7-4). An attached sunspace with a roof will gain less heat during the day than its all-glass cousin, but will be more comfortable year round. Unfortunately, this arrangement isn’t well suited for growing plants in the summer. Because the Sun is high in the sky, plants will receive very little sunlight. As a result, they tend to grow spindly, or leggy, without overhead lighting. When designing an attached sunspace of this type, be sure to follow all of the rules for direct gain solar structures.
The amount of heat an attached sunspace delivers to the rest of the house depends on several factors. One of the most important is the amount of glass installed on the south-facing wall. The more glass you install, the more heat the sunspace will generate.
Also important is the amount of thermal mass in the attached sunspace. The more thermal mass that’s installed, the more heat that will be absorbed and used within the structure itself. When lots of thermal mass is installed, you create a space that heats itself, but has very little, if any, heat to give to adjoining rooms.
If you want an attached sunspace to heat adjacent rooms, you will need to install a lot less thermal mass in the sunspace — perhaps no additional thermal mass at all. This strategy turns the attached sunspace into a giant solar collector. The sunspace will, however, probably become unbearably hot during the day, unless you force hot air into neighboring rooms. A quiet, energy-efficient, thermostatically controlled fan mounted in the wall of the sunspace can move air into neighboring rooms. Another approach I recommend in many solar designs I consult on is to install a thermostatically controlled fan in the ceiling of the sunspace. It is attached to a duct that blows the hot air into adjacent rooms. (The duct runs through or below the ceiling into neighboring rooms.) Be sure to seal and insulate ductwork and keep duct runs as short as possible. Also be sure to install a quiet (low sone) fan.
Whatever attached sunspace style you choose, you should consider designing it so you can close it off from the main living area at night. This thermally isolates it from the rest of the home at night or on cloudy days, preventing heat from the house from moving into the sunspace and then into outer space, where it does you no good. You should also consider installing insulated shades to prevent heat loss at night, especially in an attached sunspace you are hoping will provide additional living space. For more details on attached sunspaces, you may want to check out my book, The Solar House: Passive Heating and Cooling.
Conclusion
Adding solar windows, creating a solar addition, or building an attached sunspace on the south side of a building can increase your reliance on clean, abundant, renewable, and economical solar energy. It will cut your fuel bill and add to the value of your home. As the price of fuels rises, and as concern over climate change increases, energy-efficient solar homes are likely to be hot sellers in the real estate market. No matter what you do, though, proceed with caution. Be careful. Pay close attention to air sealing and insulation. Seek professional advice. If you design and build correctly, you will be granted many years of free heat.