Chapter 13
Using Facebook Groups and Events for Your Business
IN THIS CHAPTER
 Discovering Facebook Groups
 Creating your own group
 Creating and using events
 Boosting your events
Facebook Pages keep Facebook users interested in your business, and Facebook Ads help spread awareness about your products and services. But to successfully market your business on Facebook, you should go further — to Facebook Groups and to promotions and events.
This chapter discusses how you can use groups, promotions, and events to grow your audience by promoting brand awareness and building community. You see how to create your own group on a topic that engages potential business clients, as well as how to promote that group to attract members and prospective customers. We also show you how to create events, and how to promote those events to your fans.
Discovering Facebook Groups
Facebook Groups allow people to connect with one another and collaborate around shared interests. As you can imagine, people share countless interests.
One example is this Facebook Group focused on knitting, as shown in Figure 13-1.

FIGURE 13-1: Facebook Groups allow people to connect about shared interests, such as knitting.
Groups are different from Pages or profiles because groups are less about promoting a business and more about people connecting around a shared interest or cause. And because groups focus on shared interests, using groups to promote your business as a primary objective usually isn’t a good idea.
Promoting your business in a Facebook Group isn’t recommended, for two main reasons:
- People join groups to connect with other people. Marketing messages tend to be received as uninvited annoyances.
- Groups lack the viral potential that Facebook Pages have. When a group member posts an update to the group, the only people who see it are other members of the group.
Facebook Groups aren’t good for promoting your business, but they are great for networking with potential customers in a way that focuses on the group’s interest and on creating value for the group as a whole.
Understanding How Facebook Groups Fit in with Your Business
The best way to use Facebook Groups for your business ultimately depends on what kind of business you have.
If the nature of your business is networking, you could use groups as a central part of how you interact with customers. Businesses such as these can use groups to network with people:
- Chambers of commerce
- Membership networks
- Alumni associations
These organizations could create private groups as an additional way to publish exclusive news or content for customers or to alert customers about special sales or events. They could also use groups to share PDF files and Microsoft Word, Excel, and PowerPoint documents.
A Facebook Group can even be used as an additional customer support channel where customers can learn from one another and even answer questions for other customers. Best Friends Animal Society (www.facebook.com/bestfriendsanimalsociety) once used email to communicate with its nonprofit partners. Although this approach had some success, many partners weren’t receiving emails or reading them.
Eventually, the organization switched to using a secret Facebook Group as a connection point, which has been extremely effective for partner communications.
Another common way that business owners use Facebook Groups is to network and collaborate with people who share an interest related to their business. Post Planner, for example, has a Facebook Group for social media marketers to find out about changes in social platforms, best practices, and other news (see Figure 13-2).
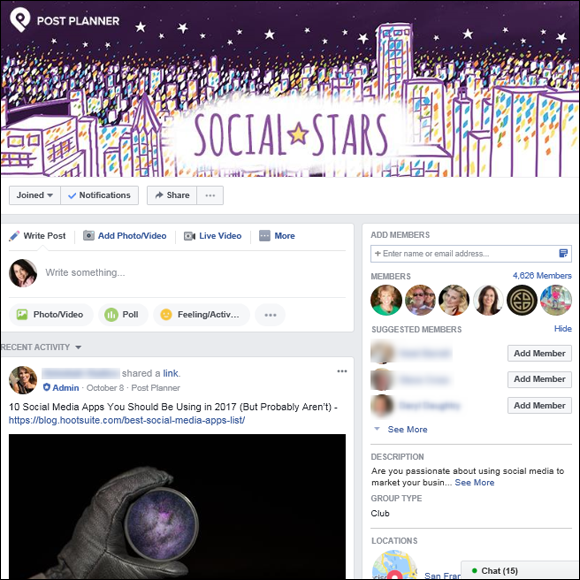
FIGURE 13-2: The Post Planner Social Stars group is interested in social media.
If you have a local business, such as a barbershop or a restaurant, you can use Facebook Groups to create a peer network of local business owners as a way to learn from one another and share best practices and promotions. In this case, it may be smart to create a secret group so that no customers can see these conversations.
Make sure to establish a set of agreed-upon rules for the group so that everyone is on board with the purpose of the group. You wouldn’t want a group member to show up only to share his own promotion. Make it clear that the purpose of the group is support so that all the participating local businesses become successful. Clearly state that if members post only news about their promotions, they’ll be removed from the group.
Using Facebook Groups
The following sections go into more detail about the differences between Facebook Groups and Pages. They also discuss how to find, join, and participate in groups to help market your business. (For the lowdown on starting a group, check out the section “Creating Your Own Facebook Group,” later in this chapter.)
Distinguishing Facebook Groups from Pages
Only an official representative of a business, public figure, nonprofit organization, artist, or public personality can create a Facebook Page and serve as its administrator (admin). Pages are designed to provide basic information about a business, feature community-building blocks (such as discussions and comments), upload user-generated content, and post reviews.
By contrast, any Facebook member can create a Facebook Group about any topic. Groups serve as a hub for members to share opinions and discussions about a topic.
When an admin updates a group’s Page, the News Feed story includes the name of the group’s admin. Pages, however, attribute updates to the Page and never reveal the admin’s name. Groups even allow you to post updates via the status update box. And just as with Pages, you can post links, videos, and photos, and even set up an event directly from the status update box.
The following are some key differences between Facebook Pages and Facebook Groups:
-
As the admin of a Facebook Group, you can dictate how open you want your group’s membership to be. Group admins can restrict membership access by requiring a member-approval process, whereas Pages can restrict members from becoming fans based only on age and location. You can make your group:
- Open (public) to all Facebook members
- Closed so that only members of the group can see the content, but anyone can see who is a member of the group
- Secret so that it’s invitation only, and content or members aren’t visible in a Facebook search
By contrast, all Facebook Pages are public.
- You can’t add apps to a group, as you can to a Page. Whereas Pages allow for a high degree of interaction and rich media with the addition of applications (apps), Facebook Groups don’t allow the addition of apps.
- Groups lack the viral capacity that Pages offer. When a group member posts an update or comments on an update, the only people who see those actions are other group members.
- You can’t sponsor posts from the group. Whereas Pages allow you to use published posts in an ad campaign, posts published in Facebook Groups aren’t eligible for use in a Facebook Ad.
The key is to keep the discussion flowing with the group members. Join a few groups to see how it’s done before jumping in to create your own.
In the next section, we discuss how to find groups that may be relevant to your business.
Finding a group
Joining an existing community is much easier than creating one from scratch.
Finding a group isn’t difficult. Just follow these steps to use the search box:
-
In the search box at the top of your screen, type a topic that interests you and then click See More Results For at the bottom of the list.
If your business designs custom T-shirts, you can search for a group related to fashion. Use the search terms fashion, designer clothes, or trends to yield some groups that you may want to join.
-
Click the Groups icon at the top of the search results page so that you look only at groups.
A Facebook search for Facebook marketing groups displays the results shown in Figure 13-3.
-
Search the results until you find a group you want to visit and then click the image or the group’s name.
In the search results, be sure to note the number of members and the type of group, as well as any recent activity so that you have some indication of how active the group is.
On the group page, note the recent activity (updates, photos, or videos). Some groups provide a description on their About tabs.
The most important part of groups is the News Feed; that’s really where the action is.
 Join a group to get a sense of how active that group is and whether you want to contribute. See the following section, “Joining a group.”
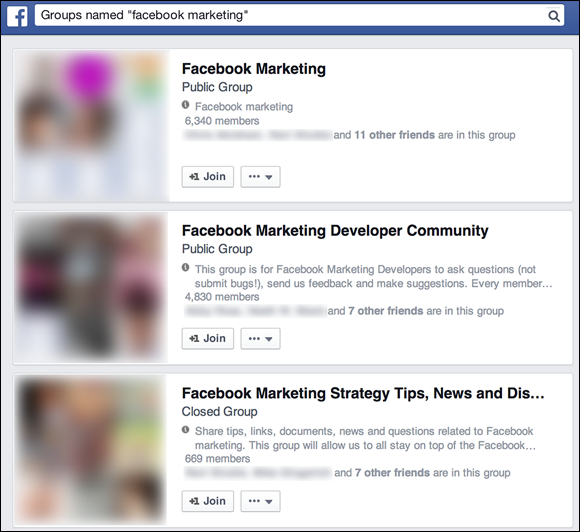
FIGURE 13-3: Results of a search for Facebook marketing groups.
Joining a group
After you identify a group that matches your interest and has an activity level that matches your objectives, join the group and interact with the other members.
To join a group, navigate to the page of the group you want to join and click the Join Group link in the top-left corner, as shown in Figure 13-4. (See the “Finding a group” section, earlier in this chapter, for the lowdown on finding a group.)
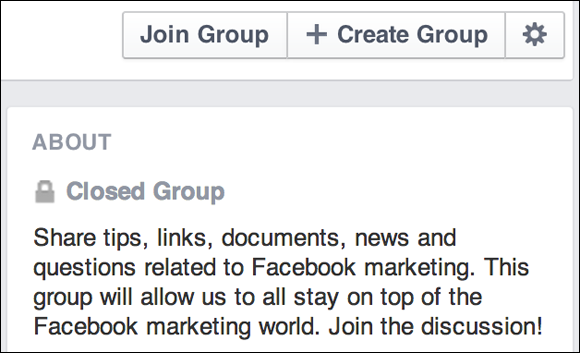
FIGURE 13-4: Joining a Facebook Group is as easy as clicking Join Group.
Accessing groups you joined
Your most recently visited groups are always listed in the left sidebar, below Shortcuts.
To access groups that don’t immediately appear on your News Feed page, follow these steps:
-
Click the Edit link next to Shortcuts in the left sidebar.
This link takes you to the Groups page, shown in Figure 13-5, where you have access to all the groups you’ve joined.
- Click the drop-down menu next to the group’s name and choose Pin to Top.
- Click Save.
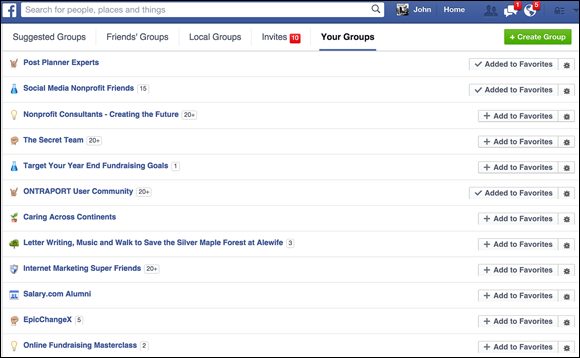
FIGURE 13-5: Access the groups you’ve joined.
Participating in a group
One of the Golden Rules of social networks and other forms of social media is to spend some time observing and listening to the conversation. Get a feeling for the rhythm of the group’s conversations before you barge in and change things.
You’ll find that only a portion of group members actively participate; many members just lurk. That’s okay, and don’t let that discourage you from participating. If you truly want to know more about groups, take the first step and jump into the conversation. That really is the best (and only) way to figure out how social networks operate.
A good place to start is to find a topic that you know a lot about and offer answers to any questions. This method is not only an easy, casual way to get started in group participation, but also goes a long way toward establishing yourself as a helpful member of the group and an expert on particular subjects.
You may find that in some of the larger groups, people try to hijack the conversation by posting links to their own groups or related websites. Don’t try this tactic. Technically, these links are spam, and Facebook members have very low tolerance for spammers. Any member who’s considered to be a spammer can have his profile shut down by Facebook. Facebook has strict terms for selling products with a Facebook profile.
Creating Your Own Facebook Group
If you’ve found an existing group that seems to be fruitful, focus on being useful in that group instead of starting your own group. If you can’t find a group related to your business, you may want to start your own.
Creating a group is quite simple, requiring just a few simple steps, which the next few sections describe.
Securing your group’s name
Before jumping in and creating your group, search for the name you want to use for your group so that you can see whether any existing groups or Pages have that same name. (See the earlier section “Finding a group” for details.)
Selecting a name that’s never been used on Facebook isn’t required, but a unique name does help you distinguish yourself. Select a name that’s easy to understand but also stands out and differentiates your group from others like it.
Setting up your group
After you choose a group name, create your group by following these steps:
-
On the Groups page (
www.facebook.com/bookmarks/groups), click the Create Group button in the top-right corner.The Create New Group dialog box appears, as shown in Figure 13-6.
-
Provide basic information about your group.
This information is as follows:
- Group Name: If you’ve already done the research (see the earlier section “Securing your group’s name”), plug in the name you chose.
- People: This section allows you to invite your friends to become members of your group. Just start typing a name in the box, and Facebook brings up a list of friends’ names that match.
- Privacy: Your group can be public, closed, or secret.
Here are some notes about your privacy settings:
- Public groups can be found by anyone on Facebook when doing a search. Anyone can join the group, and anyone can see group content.
- Anyone can see the group description and members of closed groups, but only members can see group content.
- Secret groups can’t be found in a search or even in member profiles; they truly are secret. Membership is by invitation only; therefore, only members of the group see the group’s content.
 When you are creating your group, you can also select a box that adds the group name to your Shortcuts list.
 All members can post comments, photos, videos, links, events, and documents, which is essentially a group’s version of creating a note. Keep this in mind when setting your privacy levels.
Depending on your needs for the development of your group, you may want to keep the group secret until you’re ready to launch.
- Click the Create button.
-
(Optional) Select a group icon.
You have a variety of options, as shown in Figure 13-7.
-
Click OK.
Congratulations! You’ve created your first group!
- Fill out the group description on the About tab and add a cover image, as shown in Figure 13-8.
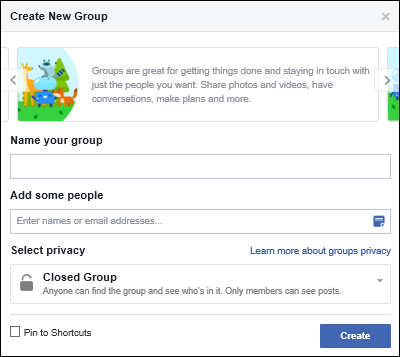
FIGURE 13-6: The Create New Group dialog box.
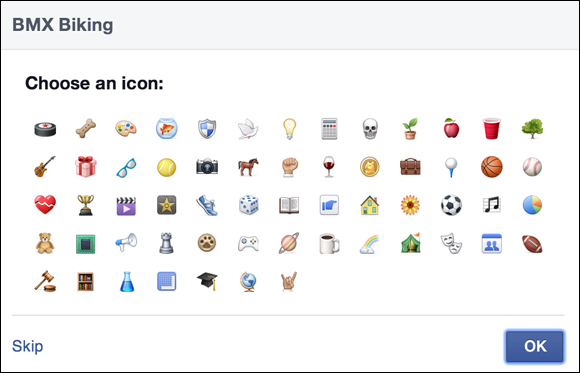
FIGURE 13-7: All groups offer an optional icon.

FIGURE 13-8: Creating a group description helps set expectations for the group.
Setting up a group URL and email address
Groups have an amazing feature that allows members to send emails that automatically post as updates to the News Feed. You can also create a unique URL for the group.
To set up the email address and URL, follow these steps:
-
Choose Edit Group Settings from the drop-down menu (which looks like three dots).
You may recognize that the information in the group settings is the basic information that you provided earlier, but this time, you can set up a group email address.
-
Click the Web and Email Address button, and choose a personalized email address.
All group email addresses end in
groups.facebook.com. Select what you like for both your email prefix and your URL. You have only 50 characters to work with, so choose wisely!
 -
Click the Customize Address button.
You return to the Basic Information page.
- Click the Save button to finish.
Configuring other group settings
In the basic settings area of your group, you can also decide who can post in the group (all members or just admins). You can also decide whether you want admins to approve posts by members before they’re published, as shown in Figure 13-9.
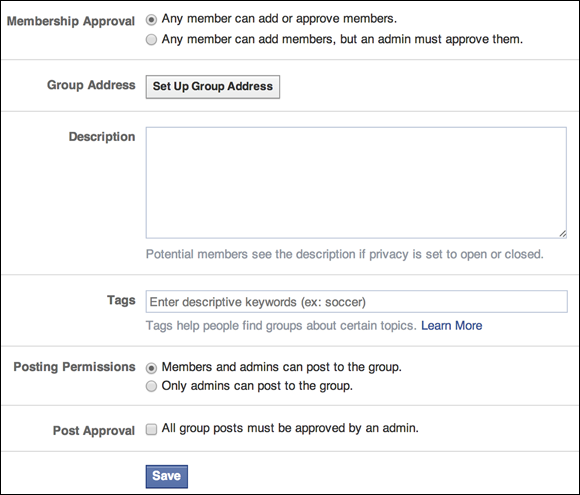
FIGURE 13-9: Group admins can decide who can post in the group and whether content needs approval.
Deleting a group
Facebook won’t allow admins to delete groups, but Facebook automatically deletes groups that have no members. If you created the group, you can delete the group by removing all members and then yourself. To remove members, click the gear icon below a member’s name, and select the option to delete him or her.
Using Insights with Facebook Groups
Facebook responded to the need that group admins had to be able to analyze what was happening in their groups. Previously, Insights did not allow activity tracking in groups. Facebook added Insights for groups so that admins can determine how fast their group is growing and which members are the most active, among other things. Such tracking helps you understand what your members care about.
Using Facebook Events to Promote Your Business
On Facebook, an event is a way for members to spread the word about upcoming social gatherings, such as parties, fund-raisers, and conventions.
Facebook Events is also a powerful way of getting the word out beyond your normal in-house marketing list by inviting fans of your Facebook Page or members of your Facebook Group. Facebook users can also help you promote your Facebook event by sharing the event with a group of their friends.
When you create a Facebook event, it lives on forever, long after the actual physical (or online) event ends. This fact allows you to stay in touch with those who attended, and even the ones who didn’t, by posting a steady stream of photos, videos, and updates recapping the event.
By encouraging attendees to post their own pictures, videos, and comments, you make the experience richer and much more interactive for all those on your guest list. Also, each time someone posts to your event Page, many of their friends automatically see that interaction, which creates even greater awareness of your awesome event and your business.
Creating an event
To create an event, you first must decide what the purpose of your event should be. Generally speaking, the purpose of most events is to get people introduced and interacting. Obviously, these interactions will be among the people who care about your business and the interests related to your business. These connections are valuable; they help promote your business because they’re associated with your brand. You should also decide whether to make the group private or public.
Next, develop a strategy that makes your event so compelling that people can’t help but talk about it with their friends. The Austin Weird Homes Tour, which helps fight poverty, is one example (see Figure 13-10).
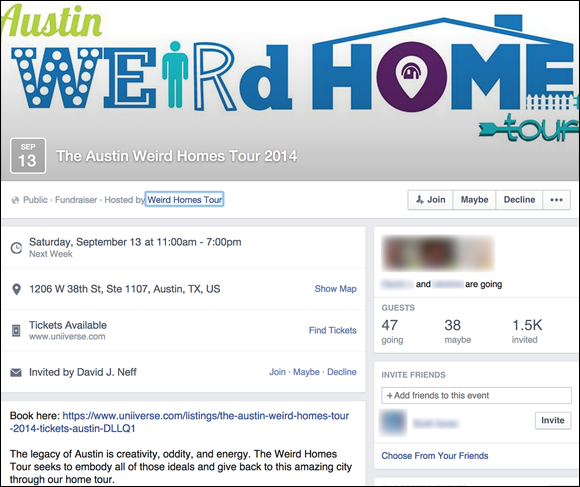
FIGURE 13-10: Make sure that your event is so interesting and remarkable that people talk about it.
To create an event, log in to Facebook, go to your Page, and then follow these steps:
- Click the Events, Products, Job+ link in the Publisher or the Events link on the left menu.
- Click Create an Event from the list of options.
-
Fill in the following details about your event (see Figure 13-11):
- Basic Info: Briefly describe your event in a way that makes it attractive to your audience.
- Event Photo or Video: Add or change the photo or video that represents your event.
- Event Name: Type the name of your event.
- Location: Enter the place where the event will be held. If the event will be held at your business location, enter your Facebook Page.
-
Frequency: From the drop-down menu, choose how often the event takes place — Once, Daily, Weekly, or Custom.
 To customize the Frequency of your Event, use the drop-down menu. Choose the Custom link and set the event dates; then click Done.
 - Starts and Ends: Enter the date and time of the event.
- Details: Let people know specific information about the event.
- Category: Select a category from the drop-down menu for your event. This category helps people find your event.
- Description: Enter more details about the event.
- Keywords: Start typing and choose from the list that appears. Think of the words that people will type in to find you.
- Kid Friendly: Select the check mark box if the event is Kid Friendly.
- Tickets: Tell people where they can obtain tickets.
- Ticket URL: Enter the URL of the web page where people can buy tickets to the event.
- Options: This designates those who can post or edit in this event.
- Co-hosts: Add any pages or friends who are cohosting this event with you.
- Posting Capability: You can choose to let anyone or only admins post to the event Timeline.
- Guest list: Choose whether to display the guest list.
 Use as many rich keywords as possible in the Name and Details fields, because Facebook Events are indexed by search engines, which could mean extra traffic for your event.
 -
Click Publish or click Save Draft if you are not ready to publish and want to save your work.
If you click Publish, your event is created, and an update is published in the News Feed for your fans to see. If you want to schedule your event and not publish it immediately, click the drop-down menu from the Publish button and click Schedule. Select your dates and click Schedule.
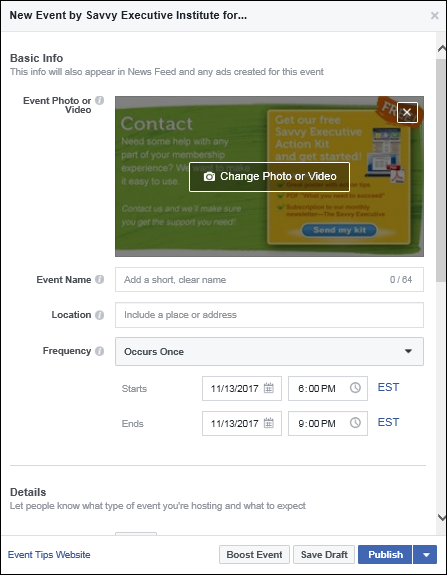
FIGURE 13-11: Giving as much information about your event as you can helps your audience find you.
Changing the cover image of your event
The next thing you want to do is make the event even more attractive with a cover image.
You can add a cover image by clicking the Change Photo or Video button in the center of your event Page. You have a choice of uploading a new photo or video or using one that you’ve already published on your Page (refer to Figure 13-11).
Inviting friends to your event
Inviting friends to the event isn’t mandatory; you can simply publish your event and hope for the best. Facebook makes inviting friends to your event so easy, however, that it’s hard not to. Also, it’s a good idea to get the ball rolling because you’re holding an event to promote your business in some way. So why wouldn’t you invite people to get the word out about your event?
You can invite friends to your event in several ways:
-
Invite button: Click the Invite button below the cover photo of your event Page and select either Choose Friends or Invite by Text or Email. Choose the people you want to invite and when you have made your choices click the Send button.
 Inviting non-Facebook members to an event means that they need to register with Facebook before responding to your request, so be judicious about using this option. If you think that some non-Facebook users you’ve invited will be hesitant to sign up for an account just for this purpose, make sure to include an alternative way for them to contact you to RSVP.
 - Invite button for the list of attendees: Click the Invite button under the list of attendees who have responded to add more people to your event after you have published it. A list of your contacts pops up. You can either type in names or click them and then click the Send button.
-
Share in Messenger: Type names in the Share in Messenger box to add people to whom you want to send a personal message.
In the Add a Message box, provide something compelling for the reader, and make sure that the value that invitees receive by coming to your event is front and center in your message. You can invite your first 100 people with this method. Click the Send button.
 Facebook allows each event host to invite a total of only 500 attendees per event.
Boosting your event
If you want to ensure that more people see your event, you can Boost it. When you Boost an event, you create an ad and select a targeted audience to receive it.
Click the Boost Event button to the right of your event on your Event page and then follow these steps:
-
In the Ad Creative box, describe the event you are promoting.
You can add an image or video.
- In the Audience box, click the Edit link next to People You Choose through Targeting (see Figure 13-12).
-
Choose your budget and time frame from the drop-down menu in the Budget box.
You see an estimate of the people you will reach based on the amount of your budget.
- Choose how long to run the ad from the calendar box.
- Approve or change the payment method.
-
Click the Boost button.
 When you click the Boost button, you agree to Facebook’s terms and conditions.
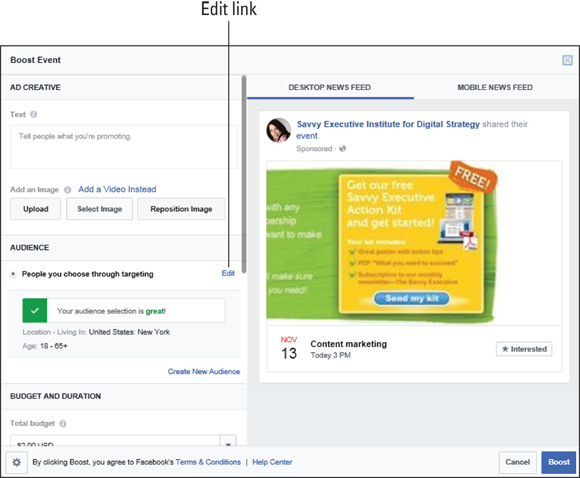
FIGURE 13-12: Selecting your target audience.
Editing your event
Making changes in your event’s page is easy. Simply choose the Event link in the left menu. Click the Edit button (see Figure 13-13). In the resulting page, you can change nearly everything about the event, including the location and time. You can also choose to cancel the event.

FIGURE 13-13: Edit your event.
Exporting your event
Choose Export Event from the drop-down menu (three dots), and Facebook allows you to export your event to a calendar on your desktop or to a web-based calendar.
Following up after an event
Smart marketers follow up after a Facebook Event to build a post-event community and extend the value of that event. If you had a very healthy debate with lots of questions, you could post a transcript in your Notes section for attendees or even nonattendees. If some questions weren’t answered because of time constraints, you could write the answers and send them to the attendees, too.
At the very least, a short thank-you note, sent via email or Facebook mail to those who attended, is just good form. Sending a “Sorry you couldn’t make it” note to those who didn’t attend, perhaps with a recap, is also good form. Taking several photos of the event and posting them is the single best way to reach out. By taking photos, tagging them with attendees’ name, and posting them, you can leverage the viral power of the Facebook platform.