Chapter 15
Integrating Facebook Features into Your Website with Social Plugins
IN THIS CHAPTER
 Using Facebook Social Plugins
 Getting Facebook friends’ likes and comments
 Connecting with buttons and plug-ins
Facebook offers 11 ways of integrating users’ social activities with your website. These ways — called Facebook Social Plugins — allow you to set up your website so that whenever a reader interacts with your site, such as by leaving a comment on a blog post, a story about that action appears on that person’s Timeline.
Facebook’s Social Plugins can personalize the content that your visitors see, display the names of Facebook friends who have visited the site, or allow visitors to engage with their Facebook friends without having to log in to your website. By integrating these plug-ins with your website, you essentially give your website the capability to engage Facebook users, increase website traffic, increase brand awareness, and even build your Facebook fan base.
In this chapter, you find out about the different Social Plugins available and which ones you can implement to meet your marketing objectives. We show you how to turn your site into a more personalized experience for your users by adding the Like Button plug-in. We also introduce the Share and Comments plug-ins, which let Facebook users share their opinions about your content with their friends. Finally, you find out how to use the Like Embedded Post plug-in to increase engagement with your Facebook Page, and how to use the Send button to allow visitors to send messages to Facebook friends about content from your website.
Extending the Facebook Experience with Social Plugins
Social Plugins allow visitors to your website to view content that their Facebook friends have liked, commented on, or shared. If visitors to your site are logged in to their Facebook accounts (most users are always logged in), they can help your website content spread throughout Facebook without ever leaving your site.
Facebook has created a special section within its developer site (at https://developers.facebook.com/docs/plugins; see Figure 15-1) that explains the Social Plugins, provides tools for generating the code needed to embed each Social Plugin in your site, and showcases superior implementations on real-world websites. The plug-ins are free to use and allow you to add an interactive layer to your site that complements your Facebook marketing strategy. You can use these plug-ins individually or in tandem, extending to your site many of the same features that people have become familiar with inside Facebook.
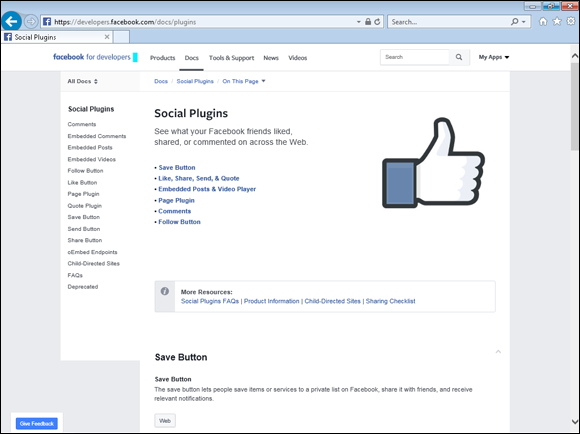
FIGURE 15-1: Facebook’s Social Plugins developer page.
Deciding which plug-in (or combination of plug-ins) to integrate into your site can be a bit daunting because some of the capabilities overlap. To help you decide which plug-in is right for your needs, here are brief descriptions and examples of each:
-
Comments: This plug-in gives users the option to add a comment to your website from their Facebook account. They can also share it with their friends on Facebook. The added exposure through the News Feed can provide you a good source of additional traffic (see Figure 15-2).
 You do have options to delete or report negative comments, but you have to manage the process manually.
 - Embedded Comments: The Embedded Comments plug-in allows comments from your Facebook Page to be displayed on your website or other web pages.
- Embedded Posts: The Embedded Posts feature allows you to embed public posts from your Facebook Page or profile in the content on your website. You can embed a Facebook Page update in a blog post that elaborates on the topic of that Page update, for example. This method lets your website visitors engage with your Facebook Page updates from your website. If they want to like, comment on, or share that update, they’re redirected to that post on Facebook.
- Embedded Videos: This plug-in allows you to display any videos in your Facebook Video Library or Facebook Live on your website. You can also display any other video that is public.
- Like Button: This simple one-button design allows anyone who’s signed in to Facebook to show approval of your content. The Like count increases as more people click it. When a user clicks the Like button, a news story publishes to his News Feed, and this story includes a link back to the content on your site. If your site offers a lot of content that users can like individually (such as in a catalog, blog, media site, or product description), the Like button is a good way to establish more opportunities to connect with users.
- Page Plugin: This plug-in permits you to display any Page that is on Facebook on your website. As long it is public, you can add it.
- Quote Plugin: This feature allows people on Facebook to highlight specific text on your Page and share it in their own post, adding to your credibility and helping to promote your business.
- Save Button: This helpful plug-in allows Facebook users to save your products or services to their own private list and be updated when you add deals.
- Send Button: Similar to the Like Button plug-in, the Send Button plug-in allows Facebook users to send your website’s content to specific friends (using Facebook messages) or Facebook Groups. This plug-in also gives website visitors the option to email your website content.
- Share Button: This button plug-in allows people to share your website content on Facebook. Website visitors can share with particular friends or a specific group. They can also share in a private message to their friends.
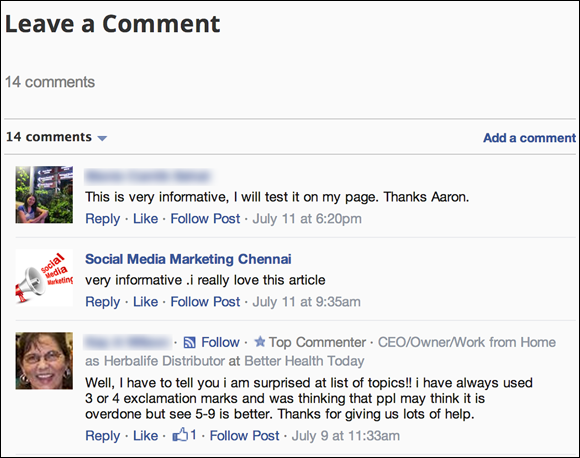
FIGURE 15-2: The Comments plug-in allows visitors to add a comment to your website.
Adding Plug-In Code to Your Website
Adding a Social Plugin to your site is as simple as embedding a single line of code in your website’s HTML code, in much the same manner that you add a YouTube video. Most of the sections in the rest of this chapter explain how to generate the code needed to embed most of these plug-ins within your site. After you have the code, follow these general steps to incorporate it into your website:
- Open the HTML file for your web page, using whatever editor you typically use to make changes in your files.
- Go to the spot in the HTML file where you want the Social Plugin to appear.
- Input the lines of code generated on the Facebook Developers site into the HTML file.
- Save the HTML file and, if necessary, upload the new HTML file to your website.
- Using a web browser, go to that web page (refresh your browser, if necessary) and make sure that the plug-in appears in the correct location.
Note: You must have access to your website’s source files. If you don’t know where these files are located, get your website developer to point you in the right direction.
In most cases, installing another plug-in is just a matter of using a different line (or lines) of code in Step 3. Refer to the Facebook Developers page for each plug-in for the specific code you need.
Integrating Facebook Insights into Your Social Plugins
One great thing about using Social Plugins is that they let you measure how those plug-ins are being used and determine who’s using them. As you can imagine, this data is critical information that can help you with marketing and even product development.
Facebook allows you to use Facebook Insights to see how visitors to your website interact with the Facebook Social Plugins you’ve installed on your website. When a user shares a link to your site on Facebook by using the Like button, for example, that action can be tracked in a Facebook Insights report about your website.
The next few sections show you how to do this.
Setting up your website as a Facebook application
To access Insights data for your website, you must create a Facebook application. Creating a Facebook application allows you to associate an application ID with each Social Plugin on your site, which enables Facebook to track the ways Facebook users interact with the plug-in. Creating an app gives you the capability to access Insights for each of your plug-ins.
To create an application, follow these steps:
- Visit
https://developers.facebook.com/appsand click the Create a New App button on the right side of the page. -
Enter the requested information, as shown in Figure 15-3:
 If you’re creating an application for the first time, you must grant Facebook permission to access your basic information.
 - Display Name: This name is a unique name for the application you’re creating. Because only you will see this info, you can simply use the name of your website or the Social Plugin you’re creating the app for.
- Contact Email: Use the email you use for Facebook communications.
-
Note that by creating an app, you’re agreeing to the Facebook Platform Policy.
Read more about the policy at
https://developers.facebook.com/policy. - Click Create App ID.
-
On the next screen, enter the captcha as you see it and then click Submit.
A screen opens asking you to select a product.
-
Click the Set Up button for the Analytics option.
A screen opens, asking you to select a platform (see Figure 15-4).
- Click the Web option to add the platform.
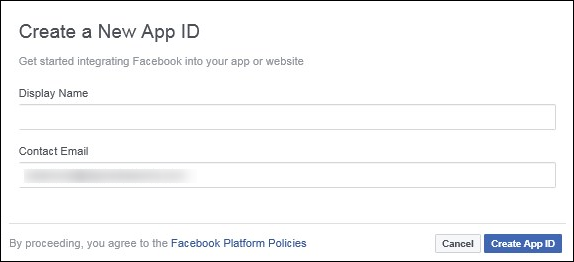
FIGURE 15-3: The first window you see when creating a new app.
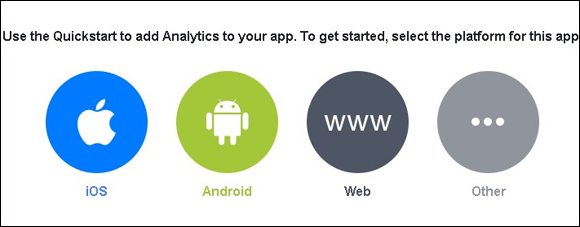
FIGURE 15-4: Choosing the web platform for your app.
Next, to allow Facebook to integrate with your app, you follow a four-step process:
-
Set up the Facebook software developer kit (SDK) for JavaScript.
To do this, you need to include the JavaScript SDK for the app on your web page, right after the opening
<body>tag. The JavaScript code appears in the window after you configure the desired app (see Figure 15-5). Click Next when done. The goal is to allow Facebook’s platform to collect information about the way people interact with the Social Plugins on your website. Your application ID, then, allows Facebook and your website to talk to each other.
 - For Tell Us About Your Website, enter the URL of your website and click Save and then the Continue button.
- For Log App Events, copy the code you see on the screen to log the events (actions people take). Then click Next.
-
For Logging Web Activity, copy the code you see onscreen to a button click handler (it tells you whether the button is clicked) in the app.
Facebook then asks you launch the app. Click the button where you added the code, thereby logging your first event. Then click Next.
You can now view your Facebook Analytics Dashboard to debug your app by going to
https://www.facebook.com/analytics. Click the name of your app to view your dashboard. Facebook sends you to Activity ⇒ Event Debugging to ensure that your activities are being logged.
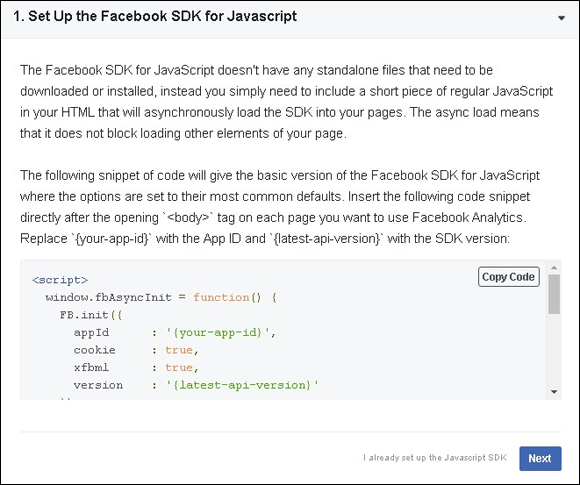
FIGURE 15-5: The code window for each app includes the JavaScript SDK for your website.
Adding Comments to Your Website
The Comments plug-in enables you to add a comments thread to any page on your website that allows visitors who are logged in to Facebook to add comments (see Figure 15-6). Users can choose to have their comments also posted to their Facebook profiles; those comments show up in those users’ News Feeds, viewable by all their friends. By installing this plug-in, you allow users to leave comments and interact with you, and because their friends see that activity, you can drive more traffic back to your website.
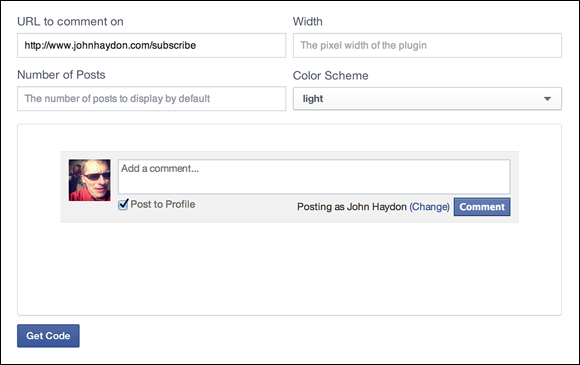
FIGURE 15-6: Add a Comments plug-in to get users engaged with the content on your website.
A mobile version of this plug-in automatically shows up when a mobile-device user agent is detected.
To add the Comments plug-in to a page on your site, follow these steps:
- Visit
https://developers.facebook.com/docs/pluginsand click the Web button. - Fill in the requested information to customize your Comments feature (refer to Figure 15-6), as follows:
- URL to Comment On: Enter the specific URL of the web page for the comment box.
- Width: Select the desired width of the plug-in in pixels.
- Number of Posts: Select the desired number of posts to display by default.
- Click Get Code and add to your website.
Sharing Embedded Comments to Your Website
The Embedded Comments plug-in lets you display comments on your website that come from your Facebook Page.
To add the Embedded Comments plug-in to your web page, follow these steps:
- Visit
https://developers.facebook.com/docs/pluginsand click the Embedded Comments link. - Fill in the requested information to customize your Embedded Comments plug-in (see Figure 15-7), as follows:
- URL of comment: Enter the specific URL of the web page on which the comment appears.
- Width: Select the desired width of the plug-in in pixels.
- Include Parent C (If URL Is a Reply): Select this box if you want to display the original comment to which you are replying.
- Click Get Code to add that code to your website.
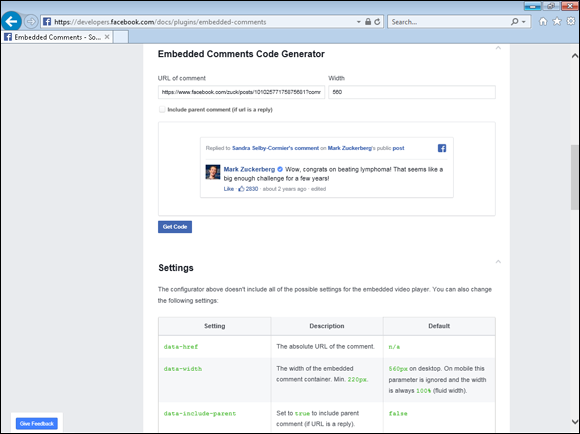
FIGURE 15-7: Creating the code for the Embedded Comments plug-in.
Creating More Reach with the Embedded Posts Plug-In
The Embedded Posts plug-in lets you add specific Facebook posts from your Page or profile to your website.
To generate code for the Embedded Posts plug-in, follow these steps:
- Visit
https://developers.facebook.com/pluginsand click the Embedded Posts link. -
Fill in the requested information to customize your plug-in (see Figure 15-8):
- URL of Post: Enter the Facebook URL for the post. Clicking the date associated with this post redirects visitors to this URL.
- Width: Select the width you’d like to use for the plug-in. It’s best to select the width of the page or the post you want to place the embedded post in.
 You have the option to select the check box if you want to include the parent comment (the entire post).
 - Click Get Code.
- Copy the code and place it where you want it to show up on your page.
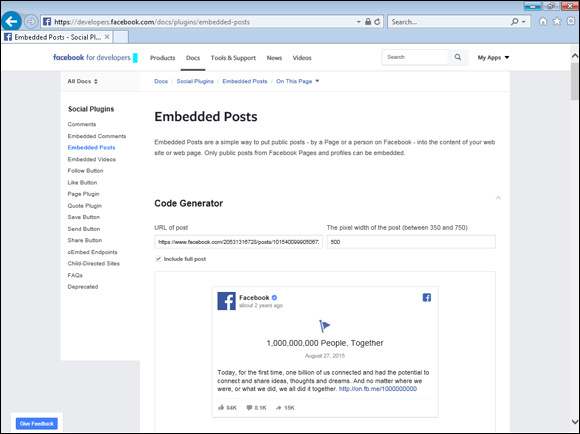
FIGURE 15-8: Generating code for the Facebook Embedded Posts plug-in.
Displaying Embedded Videos from Facebook
The Embedded Videos plug-in lets you share your own videos and other public videos from Facebook on your website.
To add the Embedded Videos plug-in to your web page, follow these steps:
- Visit
https://developers.facebook.com/docs/pluginsand click the Embedded Videos link. - Fill in the requested information to customize your Embedded Videos (see Figure 15-9), as follows:
-
URL of Video: Enter the specific URL of the video you want to embed.
Width: Enter the pixel width of the chosen video.
- Include Full Post: Select this box if you want to display the post that accompanies the video.
-
- Click Get Code to add the code to your website.
- Copy the code and place it where you want it to show up on your page.
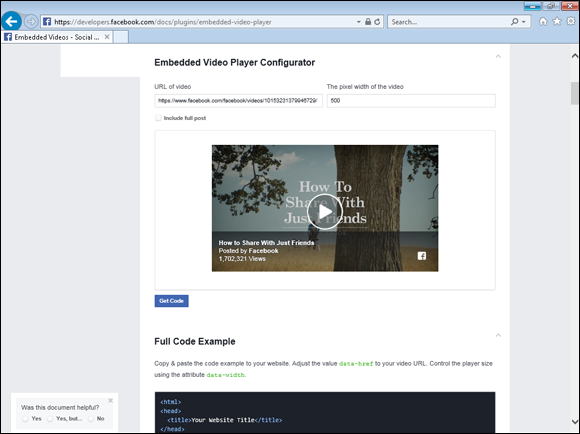
FIGURE 15-9: Customizing the Embedded Videos plug-in.
Getting More Visibility with the Like Button
The Like button lets visitors share your website content with their Facebook friends. When the user clicks a Like button on your site, a story appears in his friends’ News Feeds with a link back to your website. This plug-in is a must if you publish regular content on your website.
To integrate Facebook’s Like Button plug-in with your site, follow these steps:
- Visit
https://developers.facebook.com/docs/pluginsand click the Like Button link. - Fill in the requested information to customize your button (see Figure 15-10), as follows:
- URL to Like: Enter the exact URL you want visitors to like. Leaving this field blank defaults to the URL of the page on which the Like button is located.
- Layout: Choose one of three options: Standard, Button Count, and Box Count. You can view each in the preview pane on the right.
- Show Friends’ Faces: Selecting this check box sets the Like button to Show Friends Faces of users who clicked the Like button.
- Width: Enter the desired width of the Like button in pixels.
- Action Type: Choose either Like or Recommend.
- Button size: Choose a small or large button.
-
Click Get Code.
If you chose the capability to measure how people are using this plug-in, select your app to the right of the This Script Uses the App ID of Your App text. See the “Integrating Facebook Insights into Your Social Plugins” section, earlier in this chapter, for instructions on creating an app.
Copy the code and paste it into your website at the location where you want the plug-in to appear. If you’re not familiar with how your website works, please get a professional to help you.
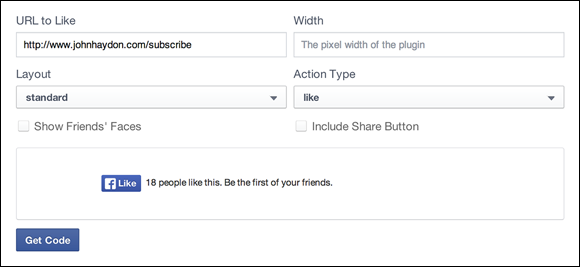
FIGURE 15-10: Customizing a Like button.
Sharing Pages Using the Page Plugin
The Page Plugin allows you to display on your website any page that appears on Facebook, which can facilitate promotions with other businesses on Facebook.
To add the Page Plugin to your web page, follow these steps:
- Visit
https://developers.facebook.com/docs/pluginsand click the Page Plugin link. -
Fill in the requested information to customize your Page Plugin (see Figure 15-11), as follows:
- Facebook Page URL: Enter the specific URL of the Facebook Page you want to share on your website.
- Tabs: Choose the tab you want users to click to share the Page.
- Width: Enter the pixel width for the embed.
- Height: Enter the pixel height for the embed.
Use the following check boxes to customize the look of the Page to share:
- Use Small Header: Select this box if you want to keep the original header of the Page small.
- Adapt to Plugin Container Width: Select this box if you want to adapt the plug-in to the container width.
- Hide Cover Photo: Select this box if you want to hide the cover photo of the original Facebook Page that you intend to share.
- Show Friends’ Faces: Select this box if you want to display the faces of friends who liked the page.
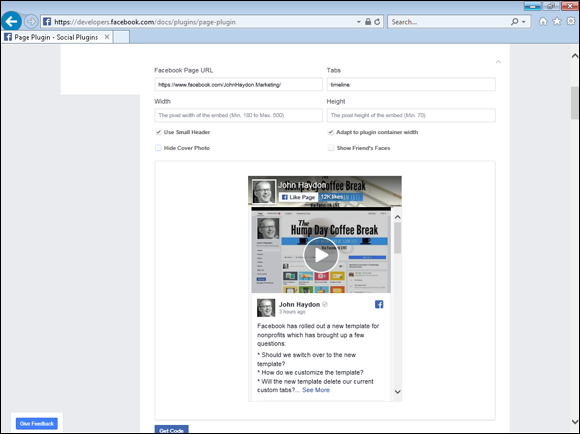
FIGURE 15-11: Creating the code for the Page Plugin.
Quote Plugin
The Quote Plugin lets website visitors highlight any text on your Page and share it with their friends. Users don’t need any special permissions to use a quote from your Page.
To add the Quote Plugin to your web page, follow these steps:
- Visit
https://developers.facebook.com/docs/pluginsand click the Quote Plugin link. -
To see how the Quote Plugin works, click the Try the Plugin button (see Figure 15-12) and highlight any part of the sentence displayed (select part of this sentence to see the plug-in in action).
When you highlight some of the text, you see a pop-up that says Share Quote.
- Click the Share Quote pop-up, and you get the screen shown in Figure 15-13 with a drop-down menu (near the top-left corner) that gives you the following choices:
- Share on Your Timeline
- Share on a Friend’s Timeline
- Share in a Group
- Share in an Event
- Share on a Page You Manage
- After you make your choice, enter a comment under your profile picture that you want to make about the quote.
- Click the Friends drop-down menu to choose who will see the share.
- Click Post to Facebook.
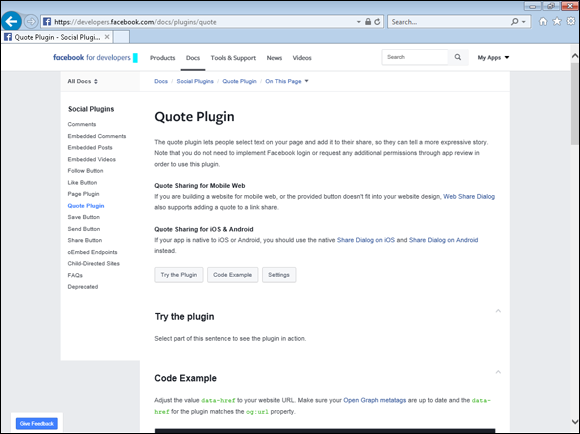
FIGURE 15-12: Creating code for the Quote Plugin.
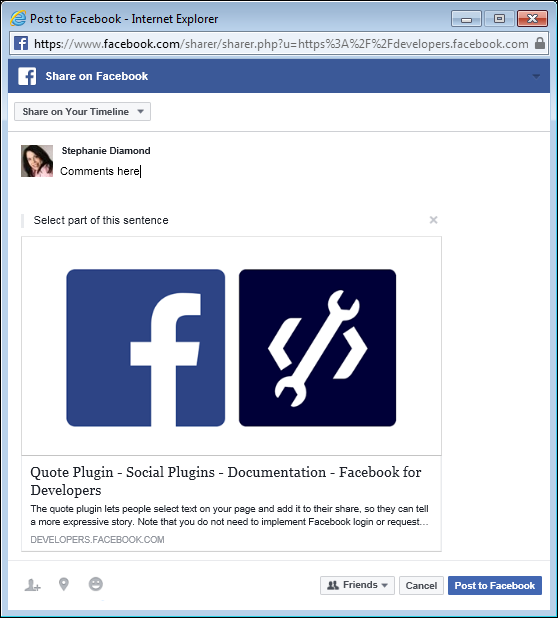
FIGURE 15-13: Completing the Share Quote screen.
Save Button
The Save button lets website visitors save your products or services to a private list that they can view later and see any updated promotions.
To add the Save button to your web page, follow these steps:
- Visit
https://developers.facebook.com/docs/pluginsand click the Save Button link. - Fill in the requested information to customize your Save button (see Figure 15-14), as follows:
- Link of a Service or Product to Save: Make sure to link anything you’re selling so that users can be reminded of them when you promote them.
- Button Size: Choose Large or Small.
- Click Get Code.
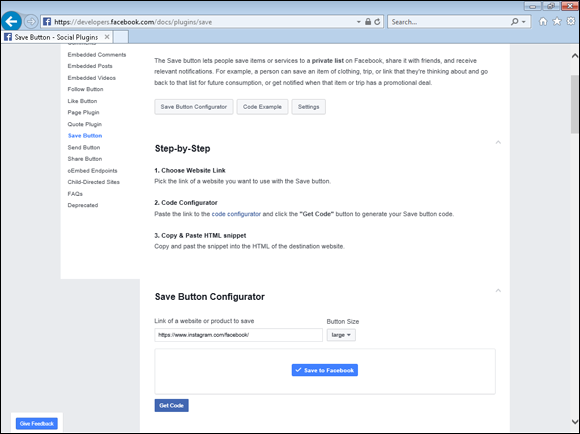
FIGURE 15-14: Customizing a Save Button.
Allowing for Private Sharing with the Send Button
The Send button lets visitors to your website send your content to friends. They can send a link and a short note as a Facebook message, Facebook Group post, or email message. The Share button is different from the Like button, which allows users to share content with their friends by publishing that content to their Timeline.
To add the Send button to your web page, follow these steps:
- Visit
https://developers.facebook.com/docs/pluginsand click the Send Button link. - Fill in the requested information to customize your Send button by entering the exact URL you want visitors to send under URL to Send (see Figure 15-15).
- Click Get Code to add to your website.
- Copy the code and place it where you want it to show up on your page.
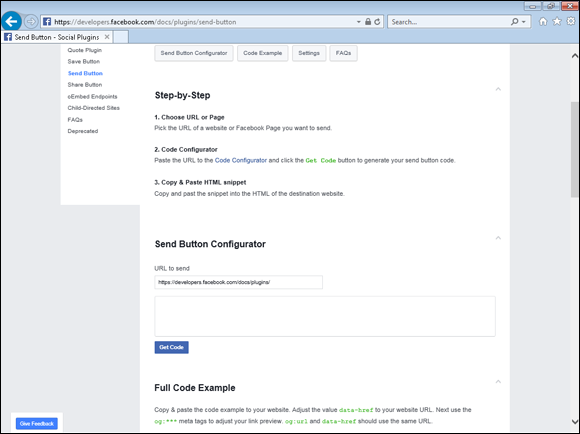
FIGURE 15-15: Customizing a Send button.
Allowing for Public Sharing with the Share Button
The Share button lets website visitors add a message to your website content before sharing it on their Timelines, with groups, or with friends in a Facebook message.
To integrate Facebook’s Share Button plug-in into your site, follow these steps:
- Visit
https://developers.facebook.com/docs/pluginsand click the Share Button link. - Fill in the requested information to customize your button (see Figure 15-16), as follows:
- URL to Share: Enter the exact URL you want visitors to like. Leaving this field blank defaults to the URL of the page where the Like button is located.
- Layout: Choose how the text and number should be displayed.
- Size: Choose either small or large.
- Mobile iframe: Click the box if you want to have the Share dialog displayed in an iframe on a mobile screen.
-
Click Get Code.
If you chose the capability to measure how people are using this plug-in, choose your app from the drop-down menu titled This Script Uses the App ID of Your App. See “Integrating Facebook Insights into Your Social Plugins,” earlier in this chapter, for instructions on creating an app.
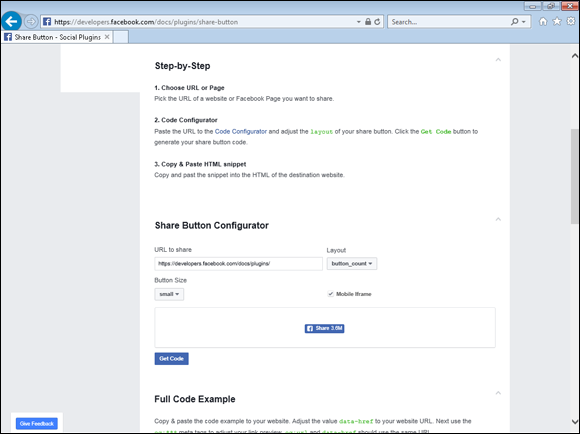
FIGURE 15-16: Customizing a Share button.