In this section, we explain how to master the simple crochet and finishing techniques that you need to make the projects in this book.
Holding the hook

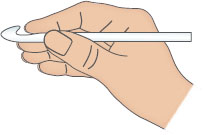
Pick up your hook as though you are picking up a pen or pencil. Keeping the hook held loosely between your fingers and thumb, turn your hand so that the palm is facing up and the hook is balanced in your hand and resting in the space between your index finger and your thumb.
Holding the yarn
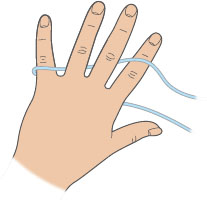
1. Pick up the yarn with your little finger in the opposite hand to your hook, with your palm facing upward and with the short end in front. Turn your hand to face downward, with the yarn on top of your index finger and under the other two fingers and wrapped right around the little finger, as shown above.
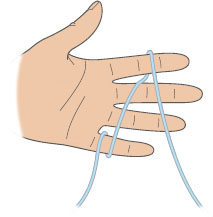
2. Turn your hand to face you, ready to hold the work in your middle finger and thumb. Keeping your index finger only at a slight curve, hold the work or the slip knot using the same hand, between your middle finger and your thumb and just below the crochet hook and loop/s on the hook.
Making a slip knot
The simplest way is to make a circle with the yarn, so that the loop is facing downward.
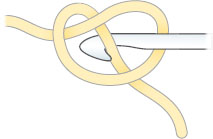
1. In one hand hold the circle at the top where the yarn crosses, and let the tail drop down at the back so that it falls across the centre of the loop. With your free hand or the tip of a crochet hook, pull a loop through the circle.
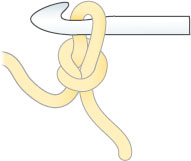
2. Put the hook into the loop and pull gently so that it forms a loose loop on the hook.
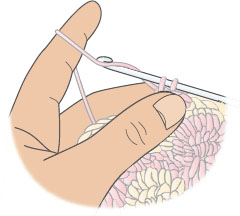
To create a stitch, catch the yarn from behind with the hook pointing upward. As you gently pull the yarn through the loop on the hook, turn the hook so it faces downward and slide the yarn through the loop. The loop on the hook should be kept loose enough for the hook to slide through easily.
Magic ring
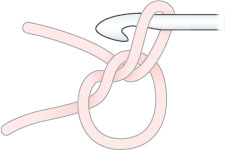
This is a useful starting technique if you do not want a visible hole in the centre of your round. Loop the yarn around your finger, insert the hook through the ring, yarn round hook, and pull through the ring to make the first chain. Work the number of stitches required into the ring and then pull the end to tighten the centre ring and close the hole.
Chain (ch)
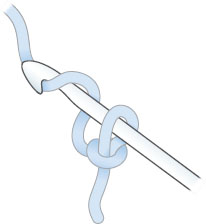
1. Using the hook, wrap the yarn over the hook ready to pull it through the loop on the hook.
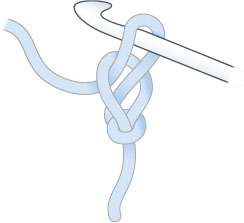
2. Pull through, creating a new loop on the hook. Continue in this way to create a chain of the required length.
Chain ring
If you are crocheting a round shape, one way of starting off is by crocheting a number of chains following the instructions in your pattern, and then joining them into a circle.
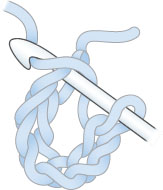
1. To join the chain into a circle, insert the crochet hook into the first chain that you made (not into the slip knot), yarn round hook.
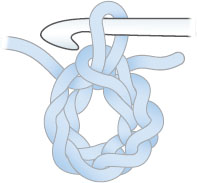
2. Pull the yarn through the chain and through the loop on your hook at the same time, thereby creating a slip stitch and forming a circle. You now have a chain ring ready to work stitches into as instructed in the pattern.
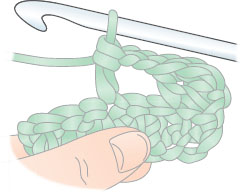
1. A chain space is the space that has been made under a chain in the previous round or row, and falls in between other stitches.
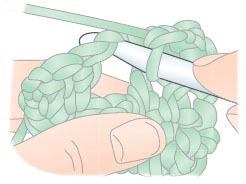
2. Stitches into a chain space are made directly into the hole created under the chain and not into the chain stitches themselves.
Slip stitch (sl st)
A slip stitch doesn’t create any height and is often used as the last stitch to create a smooth and even round or row.
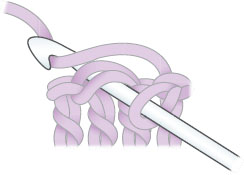
1. To make a slip stitch: first put the hook through the work, yarn round hook.
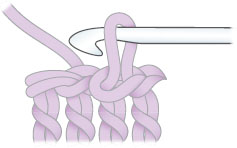
2. Pull the yarn through both the work and through the loop on the hook at the same time, so you will have 1 loop on the hook.
Making rounds
When working in rounds the work is not turned, so you are always working from one side. Depending on the pattern you are working, a “round” can be square. Start each round by making one or more chains to create the height you need for the stitch you are working:
Double crochet = 1 chain
Half treble crochet = 2 chains
Treble crochet = 3 chains
Work the required stitches to complete the round. At the end of the round, slip stitch into the top of the chain to close the round.
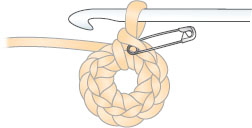
If you work in a spiral you do not need a turning chain. After completing the base ring, place a stitch marker in the first stitch and then continue to crochet around. When you have made a round and reached the point where the stitch marker is, work this stitch, take out the stitch marker from the previous round and put it back into the first stitch of the new round. A safety pin or piece of yarn in a contrasting colour is a good stitch marker.
How to measure a tension square
Using the hook and the yarn recommended in the pattern, make a number of chains to measure approximately 15cm (6in). Working in the stitch pattern given for the tension measurements, work enough rows to form a square. Fasten off.
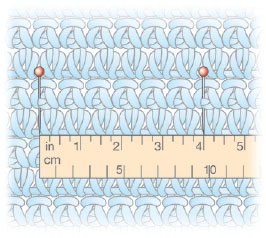
Take a ruler, place it horizontally across the square, and using pins, mark a 10cm (4in) area. Repeat vertically to form a 10cm (4in) square on the fabric.
Count the number of stitches across, and the number of rows within the square, and compare against the tension given in the pattern.
If your numbers match the pattern then use this size hook and yarn for your project. If you have more stitches, then your tension is tighter than recommended and you need to use a larger hook. If you have fewer stitches, then your tension is looser and you will need a smaller hook.
Make tension squares using different size hooks until you have matched the tension in the pattern, and use this hook to make the project.
When making straight rows you turn the work at the end of each row and make a turning chain to create the height you need for the stitch you are working with, as for making rounds.
Working into top of stitch
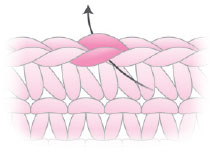
Unless otherwise directed, insert the hook under both of the two loops on top of the stitch – this is the standard technique.
Working into front loop of stitch (FLO)
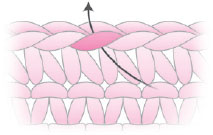
To work into the front loop of a stitch, pick up the front loop from underneath at the front of the work.
Working into back loop of stitch (BLO)
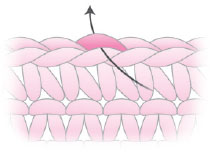
To work into the back loop of the stitch, insert the hook between the front and the back loop, picking up the back loop from the front of the work.
Double crochet (dc)

1. Insert the hook into your work, yarn round hook and pull the yarn through the work only. You will then have 2 loops on the hook.
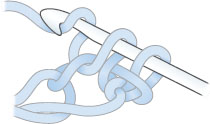
2. Yarn round hook again and pull through the two loops on the hook. You will then have 1 loop on the hook.
Joining new yarn
If using double crochet to join in a new yarn, insert the hook as normal into the stitch, using the original yarn, and pull a loop through. Drop the old yarn and pick up the new yarn. Wrap the new yarn round the hook and pull it through the two loops on the hook.
Half treble crochet (htr)
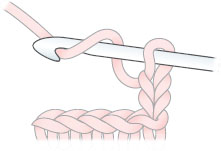
1. Before inserting the hook into the work, wrap the yarn round the hook and put the hook through the work with the yarn wrapped around.
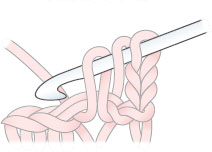
2. Yarn round hook again and pull through the first loop on the hook. You now have 3 loops on the hook.
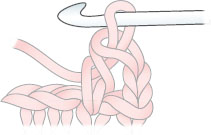
3. Yarn round hook and pull the yarn through all 3 loops. You will be left with 1 loop on the hook.
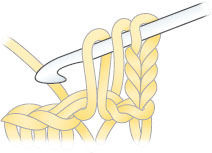
1. Before inserting the hook into the work, wrap the yarn round the hook. Put the hook through the work with the yarn wrapped around, yarn round hook again and pull through the first loop on the hook. You now have 3 loops on the hook.
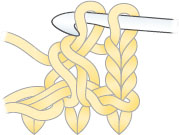
2. Yarn round hook again, pull the yarn through the first 2 loops on the hook. You now have 2 loops on the hook.
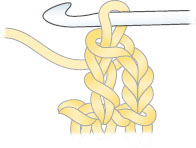
3. Pull the yarn through 2 loops again. You will be left with 1 loop on the hook.
Double treble (dtr)
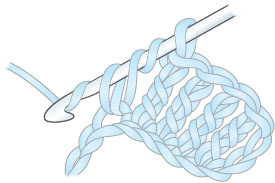
Yarn round hook twice, insert hook into the stitch, yarn round hook, pull a loop through (4 loops on hook), yarn round hook, pull the yarn through 2 stitches (3 loops on hook), yarn round hook, pull a loop through the next 2 stitches (2 loops on hook), yarn round hook, pull a loop through the last 2 stitches.
Front Post treble crochet (FPtr)
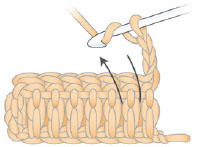
1. Yarn round hook and insert the hook from the front and around the post (the stem) of the next treble crochet from right to left.

2. Yarn round hook and pull the yarn through the work, yarn round hook and pull the yarn through the first 2 loops on the hook.
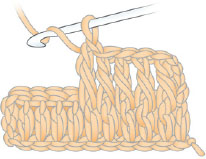
3. Yarn round hook and pull the yarn through the 2 loops on the hook. (1 loop on hook).
One Front Post treble completed.
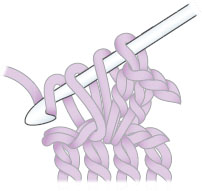
Make two or three stitches into one stitch or space from the previous row. The illustration shows a treble crochet increase being made.
Decreasing
You can decrease by either missing the next stitch and continuing to crochet, or by crocheting two or more stitches together. The basic technique for crocheting stitches together is the same, no matter which stitch you are using. The following examples show dc2tog and tr2tog.
Double crochet two stitches together (dc2tog)
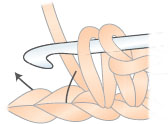
1. Insert the hook into your work, yarn round hook and pull the yarn through the work (2 loops on hook). Insert the hook in next stitch, yarn round hook and pull the yarn through.
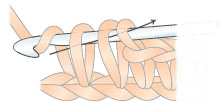
2. Yarn round hook again and pull through all 3 loops on the hook. You will then have 1 loop on the hook.
Treble crochet two stitches together (tr2tog)
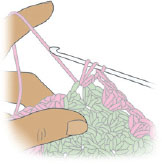
1. Yarn round hook, insert the hook into the next space, yarn round hook, pull the yarn through the work (3 loops on hook).
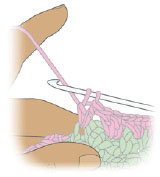
2. Yarn round hook, pull the yarn through 2 loops on the hook (2 loops on hook).
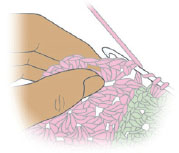
3. Yarn round hook, insert the hook into the next space.
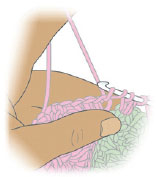
4. Yarn round hook, pull the yarn through the work (4 loops on hook).
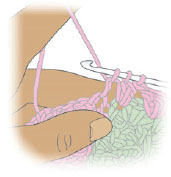
5. Yarn round hook, pull the yarn through 2 loops on the hook (3 loops on hook).
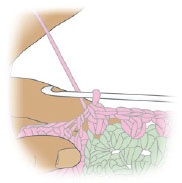
6. Yarn round hook, pull the yarn through all 3 loops on the hook (1 loop on hook). One tr2tog (decrease) made.
Changing colours
Note: You can use this technique when joining in a new ball of yarn as one runs out.
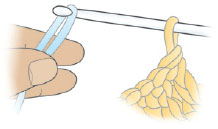
1. Keep the loop of the old yarn on the hook. Drop the tail and catch a loop of the strand of the new yarn with the crochet hook.

2. Pull the new yarn through the loop on the hook, keeping the old loop drawn tight and continue as instructed in the pattern.
Weaving in yarn ends
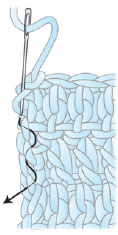
It is important to weave in the tail ends of the yarn so that they are secure and your crochet won’t unravel. Thread a tapestry needle with the tail end of yarn. On the wrong side, take the needle through the crochet one stitch down on the edge, then take it through the stitches, working in a gentle zig-zag. Work through four or five stitches then return in the opposite direction. Remove the needle, pull the crochet gently to stretch it, and trim the end.
Sewing up
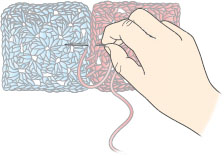
Sewing up crochet fabric can be done in many ways, but using a whip stitch is the easiest. However, you will be able to see the stitches clearly, so use a matching yarn. Lay the two pieces to be joined next to each other with right sides facing upward. Secure the yarn to one piece. Insert the needle into the front of one piece of fabric, then up from the back of the adjoining fabric. Repeat along the seam.
Crochet can tend to curl so to make flat pieces stay flat you may need to block them. Pin the piece out to the correct size and shape on the ironing board, then cover with a cloth and press or steam gently (depending on the type of yarn) and allow to dry completely.
Tassels and fringes
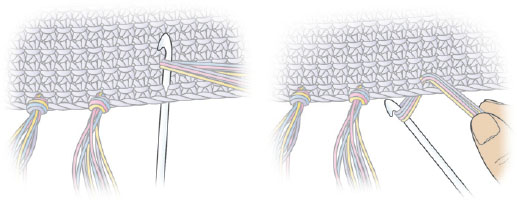
1. Cut yarn to quantity and length given in the pattern. Take suggested number of strands and fold in half. With right side of project facing, insert a crochet hook from the wrong side through one of the edge stitches. Catch the bunch of strands with the hook at the fold point. double crochet single crochet (dc) (sc)
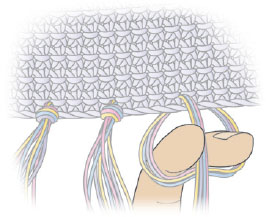
2. Pull through to make a big loop and, using your fingers, pull the tails of the bunch of strands through the loop.
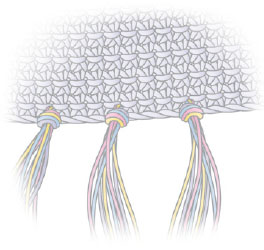
3. Pull on the tails to tighten the loop firmly to secure the tassel.
CROCHET STITCH CONVERSION CHART
Crochet stitches are worked in the same way in both the UK and the USA, but the stitch names are not the same and identical names are used for different stitches. Below is a list of the UK terms used in this book, and the equivalent US terms.
| UK TERM | US TERM |
|---|---|
| double crochet (dc) |
single crochet (sc) |
| half treble (htr) |
half double crochet (hdc) |
| treble (tr) |
double crochet (dc) |
| double treble (dtr) |
treble (tr) |
| triple treble (trtr) |
double treble (dtr) |
| quadruple treble (qtr) |
triple treble (trtr) |
| tension | gauge |
| yarn round hook (yrh) |
yarn over hook (yoh) |