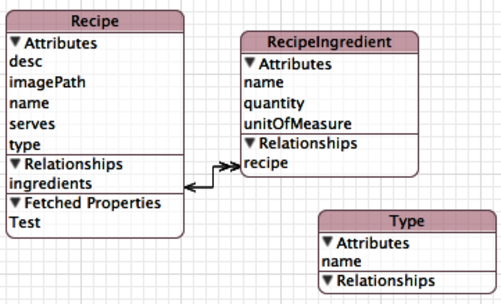
The first part of our exploration of the components of Core Data is the portion of the framework that’s the least accessed: the NSManagedObjectModel. An object model is a way to describe the data in terms of objects. The NSManagedObjectModel is a compiled, binary version of the data model that we create graphically in Xcode. When we say that we’re manipulating the object model, we mean we’re editing the source file in Xcode that will get compiled and used by the NSManagedObjectModel. From a database perspective, this file represents the schema of the database. In Xcode, this file is shown in two different styles; the easier of the two to recognize is shown here.

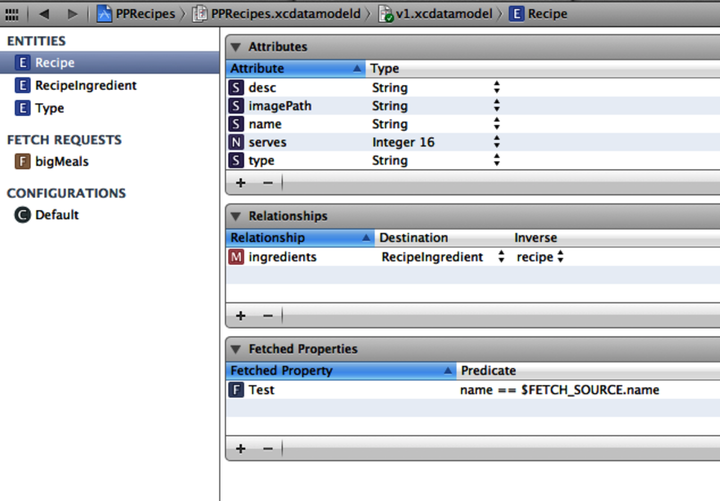
While this view is great for conceptualizing the data and the objects, it’s not great for editing. Therefore, the style can be changed using a control in the lower-right corner called Editor Style. The second style is shown here.

The NSManagedObjectModel—and, by extension, the associated source file in the object model—is what we think of when we need to change the object model. The source file is saved as an xcdatamodel file. That file is stored within a Cocoa style bundle that starts out with the same filename. If you were to look at the file structure directly you would see a folder with the xcdatamodeld extension and then you would find the actual data model file inside. The reason for this structure is explained in Chapter 4, Versioning and Migration.
Xcode understands how to compile these files in this bundle. When Xcode encounters these files during the compile process of a project, it compiles them into a binary form ending with the extension mom inside of a bundle with the momd extension. We can also build these files from the command line using the momc tool.
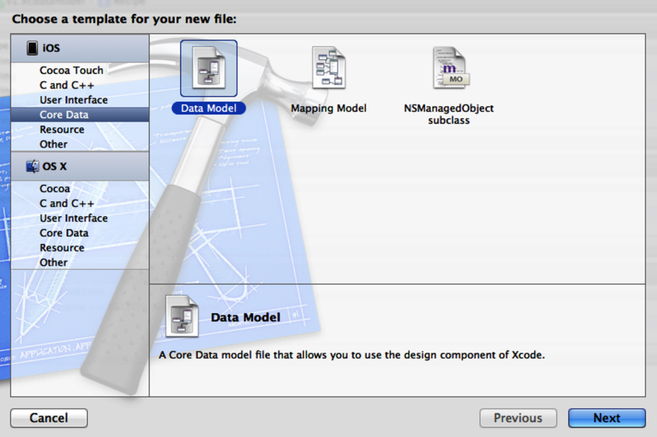
In Chapter 1, Building a Foundation, the sample project started with the data model already created. Let’s look at how that that data model was created. To begin with, we told Xcode to create a new file (File > New > File...), and we selected Data Model from the template, as shown here.

This presents us with a blank data model ready to be edited. From here, in grid view, we added the three entities being used in the project: Recipe, RecipeIngredient, and Type. We then added the attributes and relationships for each of those entities. For a discussion of entities, attributes, and relationships, take a look at Working with NSManagedObject Instances.
Once we’ve created the source file for the data model, we need to instantiate it within our application. In the Xcode sample projects, this is generally done in its own method in the application’s AppDelegate. However, this process is unnecessary and tends to add to code bloat in the AppDelegate. My preference is to treat Core Data, really the entire persistence layer, as a first-class citizen in the application. What this means is that we can create a new controller that’s a subclass of NSObject and place all of the Core Data--related code into that controller. From there we can instantiate that controller within the Application Delegate.
Further, I like to construct the entire Core Data stack in a single method. There’s rarely a situation where you wish to build only part of the stack. With that structure, you can kick off the initialization of the Core Data stack as soon as the application launches so that it’s available, in some form, immediately. Therefore, in our sample application, we have a method named ‑initializeCoreDataStack that starts off with constructing the data model.
| | - (void)initializeCoreData; |
| | { |
| | if ([self managedObjectContext]) return; |
| | |
| | NSURL *modelURL = [[NSBundle mainBundle] URLForResource:@"PPRecipes" |
| | withExtension:@"momd"]; |
| | NSAssert(modelURL != nil, @"Failed to locate momd in app bundle"); |
| | NSManagedObjectModel *mom = nil; |
| | mom = [[NSManagedObjectModel alloc] initWithContentsOfURL:modelURL]; |
To initialize the NSManagedObjectModel, we first need to locate it within the application bundle. We call upon the NSBundle and retrieve the ‑mainBundle, which represents the application bundle. From there, we call ‑URLForResource: withExtension: using the name of our data model—in this case PPRecipes—and the extension momd. We use an assertion and verify that we did receive an NSURL. We then initialize the NSManagedObjectModel with that NSURL. We again verify that everything worked correctly by checking the new instance against nil.
And that’s everything involved in constructing the NSManagedObjectModel. Our next step is to construct the NSPersistentStoreCoordinator, which uses the NSManagedObjectModel we just initialized.