A heavy migration is required when we go outside of the bounds of what a light migration can accomplish. A simple example of something that goes beyond a light migration is a logic-based migration. Imagine a situation in which, as part of a migration/application update, we need to change the data that’s in the database. Perhaps there’s a typo in the included data or a change in the logic. Changing the data during the migration is outside of the scope of a light migration. However, we can easily add it to a heavy migration.
A more complex example would be a situation that involves normalizing data. In our application, each recipe has one or more recipe ingredients. If we wanted to expand our application and extract the common parts of the recipe ingredient into new tables, we’d be stepping outside the boundaries of what a light migration can accomplish.
In this migration, we’re going to accomplish two goals. First we’ll massage the data during the migration and find every occurrence of Meat or Fish for the recipe type and replace it with Entrée. In addition, we’ll create new entities: Ingredient and UnitOfMeasure. During the migration of the RecipeIngredient entity, we’ll create or associate the appropriate Ingredient to the RecipeIngredient.
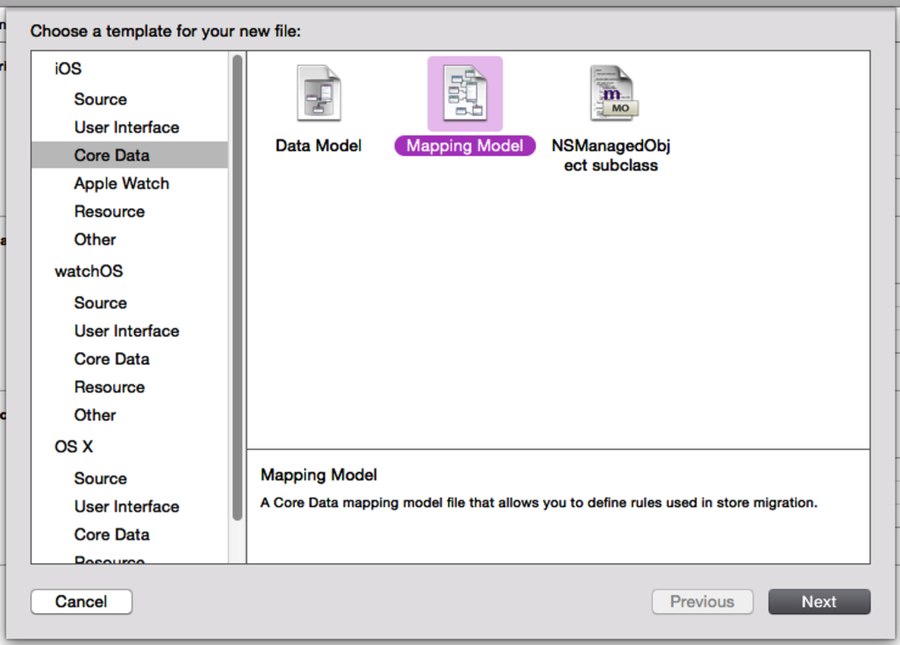
The first step is to create a mapping model for this migration. A mapping model is a description of how the migration is supposed to work. First we create a new file in Xcode, and select the section for Core Data. In that section, there’s a template called Mapping Model, as shown here. Once we select that template, Xcode asks us to choose the data model version to use as the source. For this migration, we’re going from v2 to v3, so we select v2. Then Xcode asks us to select the destination model; we’ll select v3. Finally, we must name the mapping model. I named it the very descriptive FromV2toV3.
Now Xcode will do a best guess at the migration from v2 to v3 and display its results, as shown next. There’s a lot of information in this view; let’s go through it piece by piece. As we step through this view, keep in mind that the view represents the migration from the perspective of the destination model. Everything is described as coming from the source into the destination.
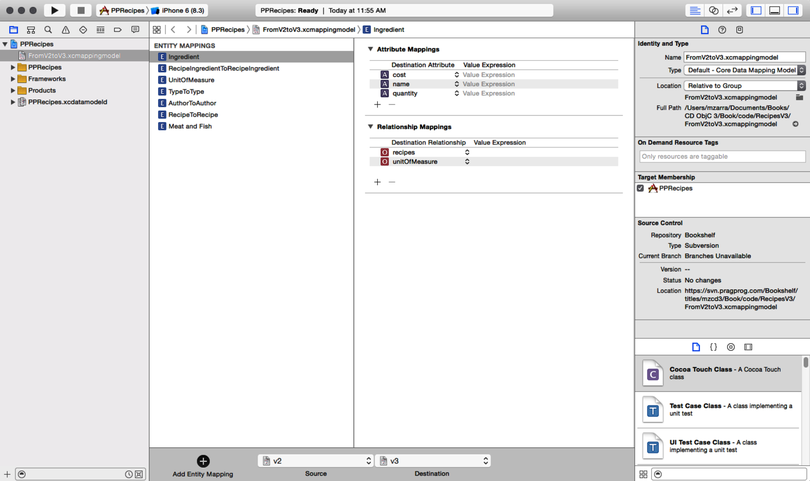
The entity mappings are on the left side of the view, just to the right of the project list. Each item in this list represents a part of the migration that will occur. They’re not one-to-one with the number of entities that we have; we can actually have more or fewer mappings than we have entities. Specifically, as we’ll see when we update this mapping model, we can have more than one mapping for an entity. In addition, if an entity is no longer represented in the new model, it may not have a mapping at all.
To the right of the entity mappings are the attribute and relationship mappings. The attribute mappings are located at the top of the view. This section of the view describes how the attributes of an entity are mapped from the source to the destination. Since we’re looking at this from the perspective of the destination, this list includes every attribute that exists in the destination entity. Xcode has already prepopulated the attributes and taken a guess at where the attributes come from. Reviewing what has already been populated by Xcode, we can see how the attribute mappings work. Several variables are available for these mappings:
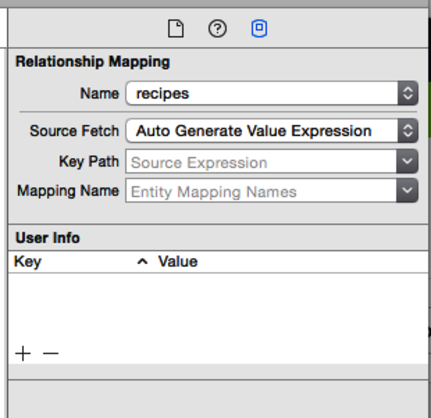
The relationship mappings are below the entity mappings. Like the attribute mappings, these resolve the relationships for the destination entity. Normally, these mappings resolve to an instance of an entity in the destination store that existed in the source store. To accomplish this, the mapping for the object at the other end of the relationship must be higher in the list (the list is migrated in order, top to bottom). Then it’s a matter of configuring the mapping properly, as shown here.
So far, the migration we built doesn’t do very much: it migrates the entities from the old store to the new store. We need to adjust the migration to make it perform the more complicated aspects of the migration, the ones that are beyond the abilities of the light migration.
The first part of this customization is to change the Type attribute on recipes that are currently set as Fish or Meat. To do this, we’ll utilize the filter feature of the migration. First, select the RecipeToRecipe mapping. Next, open the Mapping Model inspector, which is utility view 3 in Xcode (⌘⌥3). In that inspector, we see a Filter Predicate field. This filter determines which entities are migrated. Utilizing a filter, we can migrate only the recipe entities that have their type set to something other than Fish or Meat. The setting is shown in the screenshot.
However, this leaves our meat and fish recipes unmigrated. To include them, we first duplicate the RecipeToRecipe mapping (unfortunately by hand with the current version of Xcode) and change the filter to be inclusive of Meat and Fish. Then, in this second mapping, we change the Value Expression setting for the Type attribute to Entrée. Taking this step will migrate all of the meat and fish recipes and change the type to Entrée.
The second part of this migration is far more complex. For each RecipeIngredient, we want to either create a new Ingredient entity or link the destination RecipeIngredient to an existing Ingredient. In addition, for each Ingredient that we create, we want to create a UnitOfMeasure entity to go with it.
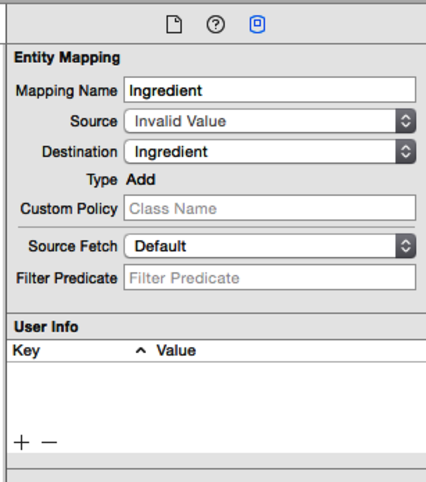
To complete this very complex migration, we must resort to code. The mapping model editor isn’t capable of handling the complexity we need for this next bit of the migration. Fortunately, we can step in and write the code to handle the migration directly. To set this up, we start off by modifying the mapping model. The first step is to delete the mappings for Ingredient and UnitOfMeasure. There’s no corresponding entity in the source model, so no mapping is needed.
Next, we have to modify the RecipeIngredientToRecipeIngredient. After selecting the RecipeIngredientToRecipeIngredient mapping, we need to look at the Mapping Model inspector and set a custom policy. The Custom Policy field tells the migration that instead of using its built-in migration policy (which will read from the mapping model), we’ll introduce custom code. This field accepts a class name that we’re going to set to RecipeIngredientToIngredientAndUnitOfMeasure.
Core Data will instantiate an instance of NSEntityMigrationPolicy for each mapping in the mapping model. NSEntityMigrationPolicy is designed to be subclasses so that we can override all or part of the migration. There are several methods that can be overridden in the subclass; in this example, we’re overriding two methods.
| | - (BOOL)createDestinationInstancesForSourceInstance:(NSManagedObject*)src |
| | entityMapping:(NSEntityMapping*)map |
| | manager:(NSMigrationManager*)mgr |
| | error:(NSError**)error |
| | |
| | - (BOOL)createRelationshipsForDestinationInstance:(NSManagedObject*)dest |
| | entityMapping:(NSEntityMapping*)map |
| | manager:(NSMigrationManager*)mgr |
| | error:(NSError**)error |
Let’s take a closer look at each of these.
The first method, createDestinationInstancesForSourceInstance:, is called for each entity in the source store that’s associated with this migration policy. For example, during the migration of the RecipeIngredient entities and the creation of the Ingredient and UnitOfMeasure entities, this method would be called for each RecipeIngredient, and it’d be expected that at least an Ingredient entity would be created or associated with the incoming RecipeIngredient as a result.
The code to implement this breaks down as follows:
| | - (BOOL)createDestinationInstancesForSourceInstance:(NSManagedObject*)src |
| | entityMapping:(NSEntityMapping*)map |
| | manager:(NSMigrationManager*)mgr |
| | error:(NSError**)error |
| | { |
| | NSManagedObjectContext *destMOC = [mgr destinationContext]; |
| | NSString *deName = [map destinationEntityName]; |
| | |
| | NSString *name = [src valueForKey:@"name"]; |
In the first part of the method, we’re simply setting up references that will be needed later. Specifically, we’re getting a reference to the destination NSManagedObjectContext, which we’ll need to create new entities, the name of the destination entity, and, most importantly, the name value from the entity.
Since the incoming entity is a RecipeIngredient, the name value will be the name of the ingredient that we now want to reference.
| | NSMutableDictionary *ui = (NSMutableDictionary*)[mgr userInfo]; |
| | if (!ui) { |
| | ui = [NSMutableDictionary dictionary]; |
| | [mgr setUserInfo:ui]; |
| | } |
| | NSMutableDictionary *inLookup = [ui valueForKey:@"ingredients"]; |
| | if (!inLookup) { |
| | inLookup = [NSMutableDictionary dictionary]; |
| | [ui setValue:inLookup forKey:@"ingredients"]; |
| | } |
| | |
| | NSMutableDictionary *uofmLookup = [ui valueForKey:@"unitOfMeasure"]; |
| | if (!uofmLookup) { |
| | uofmLookup = [NSMutableDictionary dictionary]; |
| | [ui setValue:uofmLookup forKey:@"unitOfMeasure"]; |
| | } |
In this next section of code, we deal with the possibility that the Ingredient entity that we need to reference has already been created. Rather than doing a fetch against the destination context every time, we have a hash built up and stored within the NSMigrationManager. The NSMigrationManager has an NSDictionary called userInfo that’s perfectly suited for this purpose. We first lazily initialize this dictionary, and then we lazily initialize another NSDictionary inside it to store references to the Ingredient entities using the name of the ingredient as the key. With this, we can make sure that each Ingredient is created only once.
For each Ingredient, we need to create or reference a UnitOfMeasure. We also grab a reference to the UnitOfMeasure lookup or create it if it hasn’t been created yet.
| | NSManagedObject *dest = [ingredientLookup valueForKey:name]; |
| | if (!dest) { |
| | dest = [NSEntityDescription insertNewObjectForEntityForName:deName |
| | inManagedObjectContext:destMOC]; |
| | [dest setValue:name forKey:@"name"]; |
| | [inLookup setValue:dest forKey:name]; |
| | |
| | name = [source valueForKey:@"unitOfMeasure"]; |
| | NSManagedObject *uofm = [uofmLookup valueForKey:name]; |
| | if (!uofm) { |
| | id entityName = @"UnitOfMeasure"; |
| | uofm = [NSEntityDescription insertNewObjectForEntityForName:entityName |
| | inManagedObjectContext:destMOC]; |
| | [uofm setValue:name forKey:@"name"]; |
| | [dest setValue:uofm forKey:@"unitOfMeasure"]; |
| | [uofmLookup setValue:uofm forKey:name]; |
| | } |
| | } |
Next we attempt to locate the Ingredient in the lookup dictionary. If it isn’t in the dictionary, we must create it and place it in the dictionary. If we need to create the Ingredient, we must resolve the UnitOfMeasure as well. Again, if it does not exist, we create it and put a reference to it in the lookup dictionary.
| | [manager associateSourceInstance:source |
| | withDestinationInstance:dest |
| | forEntityMapping:mapping]; |
| | return YES; |
| | } |
The last thing that we need to do is to tell the manager about the association. Since the manager keeps track of all associations between the two NSManagedObjectContext objects, we need to inform it of this new entity that was just created and that it’s associated with the source entity that was passed in. Once that’s complete, we return YES, and we’re done.
In a properly designed data model, this method will rarely, if ever, be needed. The intention of this method (which is called in the second pass) is to build any relationships for the new destination entity that was created in the previous method. However, if all the relationships in the model are double-sided, this method isn’t necessary because we already set up one side of them. If for some reason there’s an entity in the model that is not double-sided, additional code would be required in this method to handle the one-sided relationship. Since we don’t need that functionality in our model, we just return YES.
| | - (BOOL)createRelationshipsForDestinationInstance:(NSManagedObject*)dIn |
| | entityMapping:(NSEntityMapping*)map |
| | manager:(NSMigrationManager*)mgr |
| | error:(NSError**)error |
| | { |
| | return YES; |
| | } |
If you’re thinking this is a lot of work for migration, well, you’re right. Manual migrations require a great deal of effort on the part of the developer, and there isn’t a lot of benefit to doing one. This, plus their poor performance, is the reason for my recommendation to avoid them at nearly any cost. However, no matter how hard we try to avoid it, sometimes heavy migration is the only answer. Fortunately, as you just saw, the option is available.