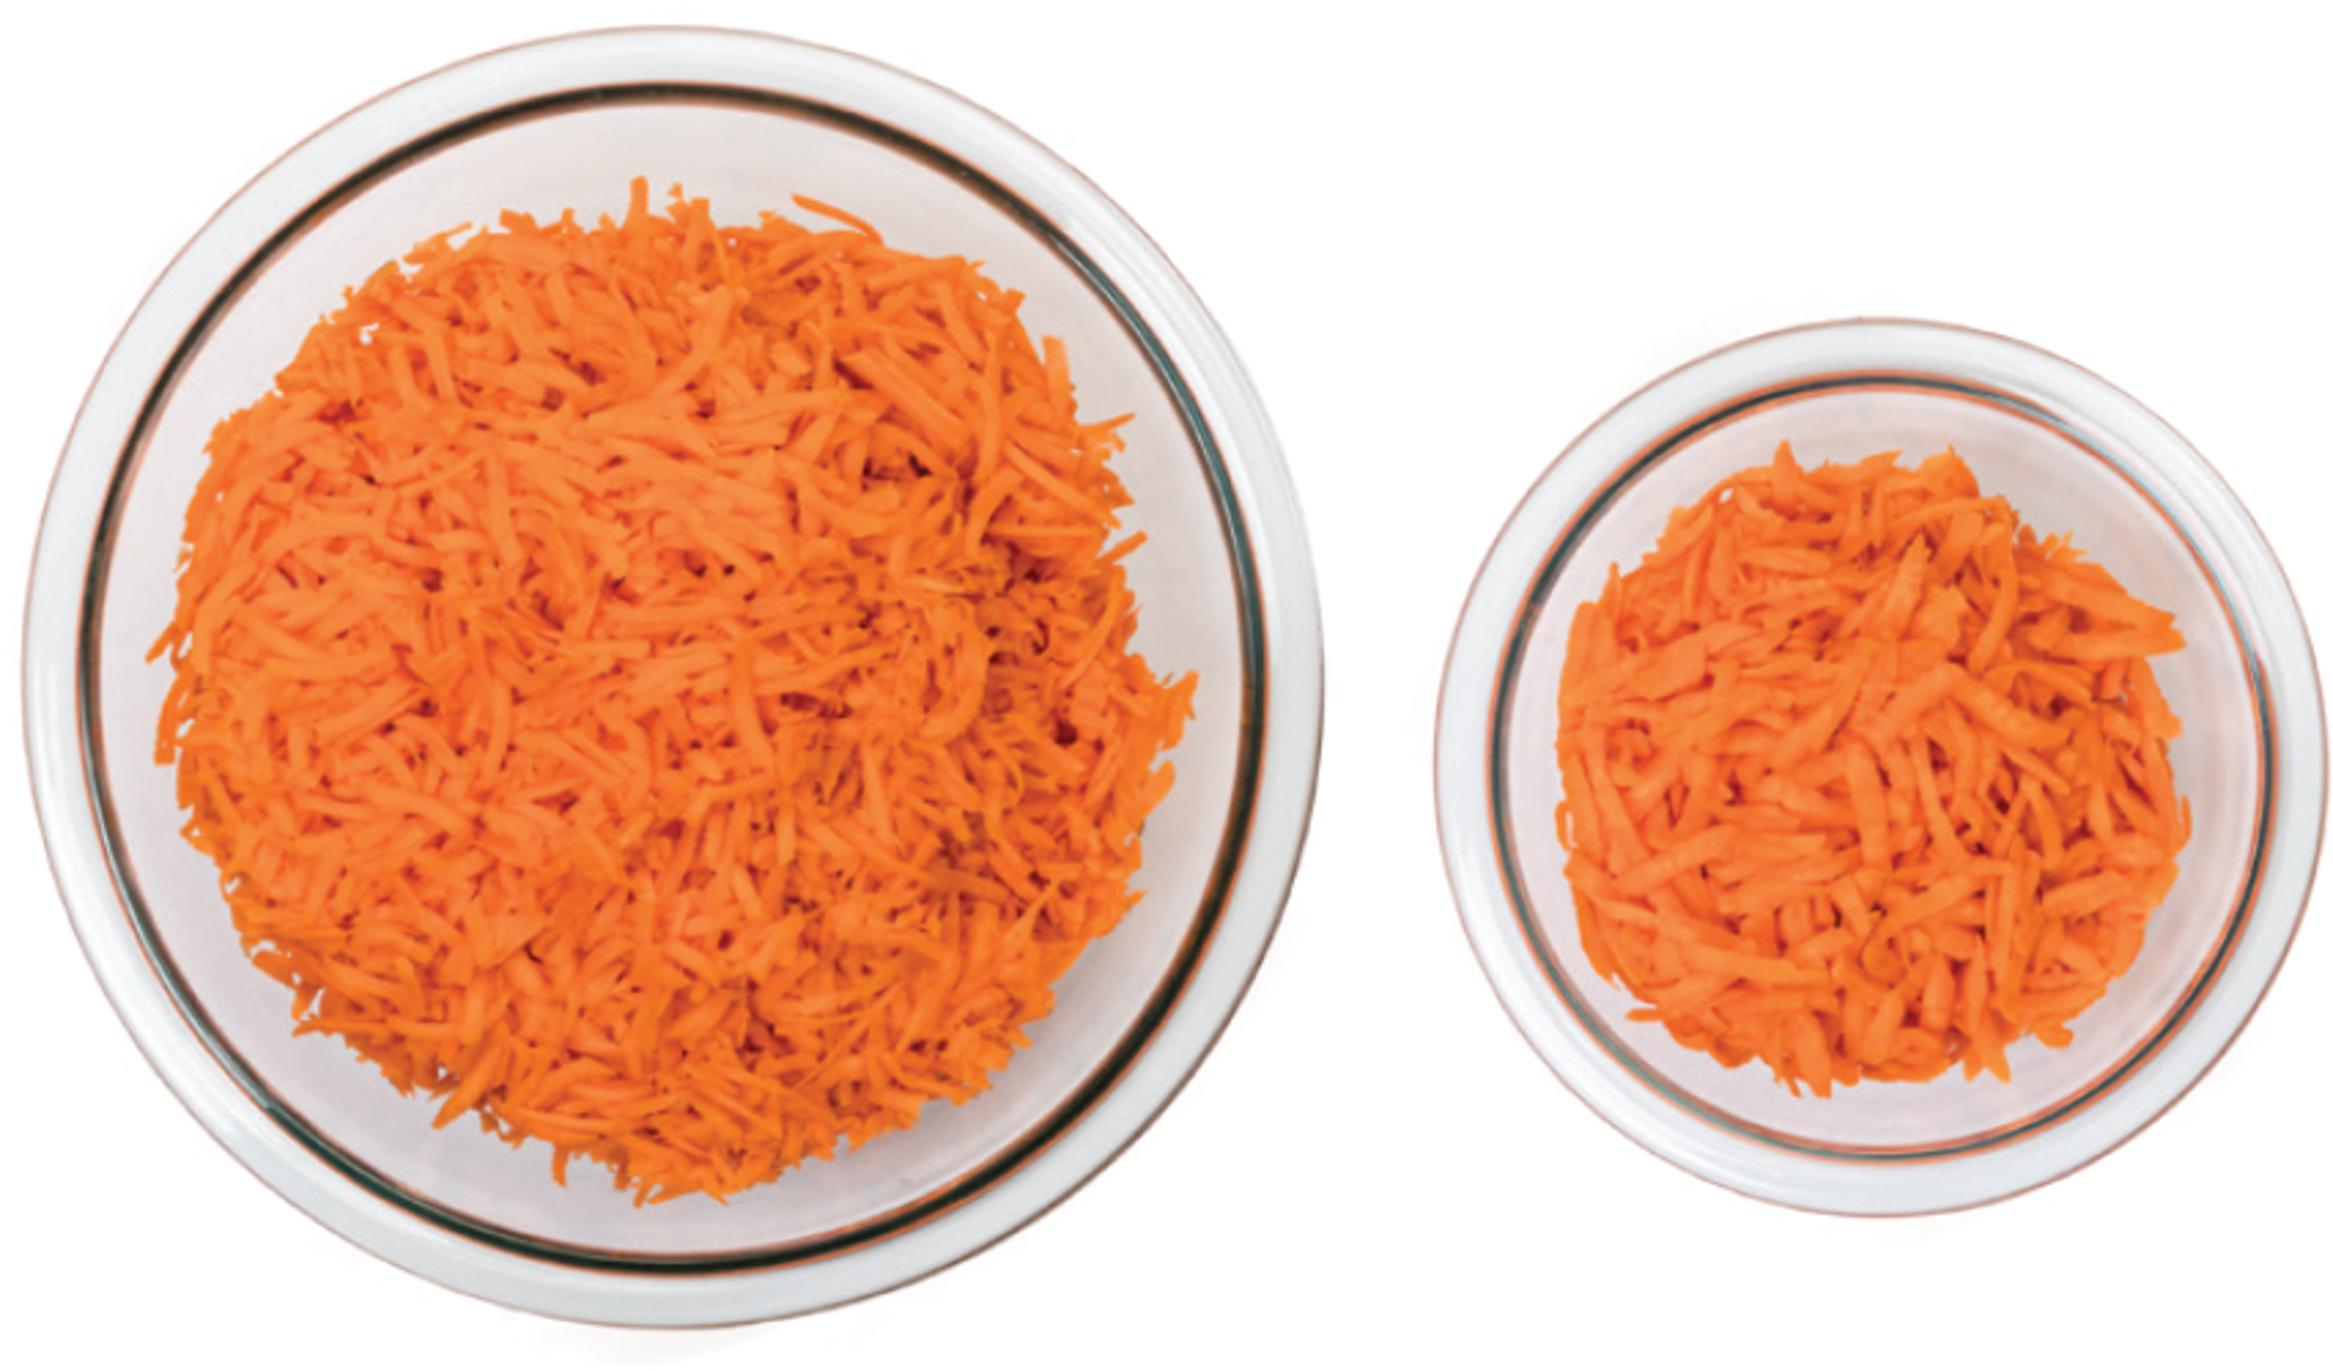
carrots shredded in 1 minute in the food processor (left) versus in 1 minute of hand-shredding (right)
Shaved Mushroom and Celery Salad
Shaved Mushroom, Fennel, and Orange Salad
Shaved Mushroom and Celery Salad with Goat Cheese and Almonds
Creamy Coleslaw with Chipotle and Lime
Sweet and Tangy Coleslaw with Apple and Tarragon
Sautéed Sliced Brussels Sprouts
Sautéed Sliced Brussels Sprouts with Bacon
Sautéed Sliced Brussels Sprouts with Dried Cranberries and Pecans
Pureed Butternut Squash with Warm Spices and Walnuts
Pureed Butternut Squash with Sage and Almonds
Sautéed Zucchini with Lemon and Herbs
Sautéed Zucchini with Olives and Oregano
Sautéed Zucchini with Pancetta and Herbs
A great side dish can be what makes the meal, but too often sides are left until the last minute and treated as an afterthought while the main dish gets all the attention. But it is precisely in these vegetable-focused dishes where the food processor shines, not only as a timesaver but also as a tool for creating consistent, evenly textured results in recipes as varied as cabbage slaw and potato gratin. We’ve mobilized the food processor to chop, slice, and shred a range of vegetables for sides and salads that won’t feel second-class even if they take only 5 minutes to throw together.
food processor findings
Here are a few tricks we’ve discovered for preparing vegetables in your food processor:
1 Vegetables have a lot of liquid in them, and once they’re shredded or sliced in the food processor, that liquid starts to leak out, so we frequently salt and drain prepped vegetables before cooking with them to get rid of excess moisture, which can interfere with browning. This also applies to vegetables served raw like cabbage; we salt the cabbage in our coleslaw recipe to keep it from watering down the dressing.
2 Slicing them very thinly with the food processor helps temper the bite of raw alliums like onions and shallots. We also like to let these sliced vegetable sit in an acidic vinaigrette for a little while before incorporating them into a dish, which helps even more. This trick also works for tenderizing chewy vegetables like raw mushrooms.
3 Leafy vegetables like lettuce and cabbage are easiest to process if they are in tightly packed bundles, such as hearts of romaine or quartered cabbage heads, rather than individual leaves.
any way you slice or shred it
There are many advantages to slicing and shredding vegetables in the food processor rather than by hand. First off, the processor creates much thinner, more even slices than the average home cook using a chef’s knife. Thinner slices mean more net surface area, which is a boon for everything from salting the vegetables, to marinating them, to browning them during cooking. The processor-sliced vegetables cook up faster and with more flavor. Thinner, cleaner slices are also important for fibrous vegetables like celery, onions, and fennel, which can have an unpleasantly stringy texture if sliced too thick. The same is true for shredded vegetables; with uniform pieces, shredded vegetables cook up much more evenly. Of course, one of the biggest advantages is that the processor makes prep easier, safer, and much quicker.
carrots shredded in 1 minute in the food processor (left) versus in 1 minute of hand-shredding (right)
serves 6
food processor size 7 to 14 cups
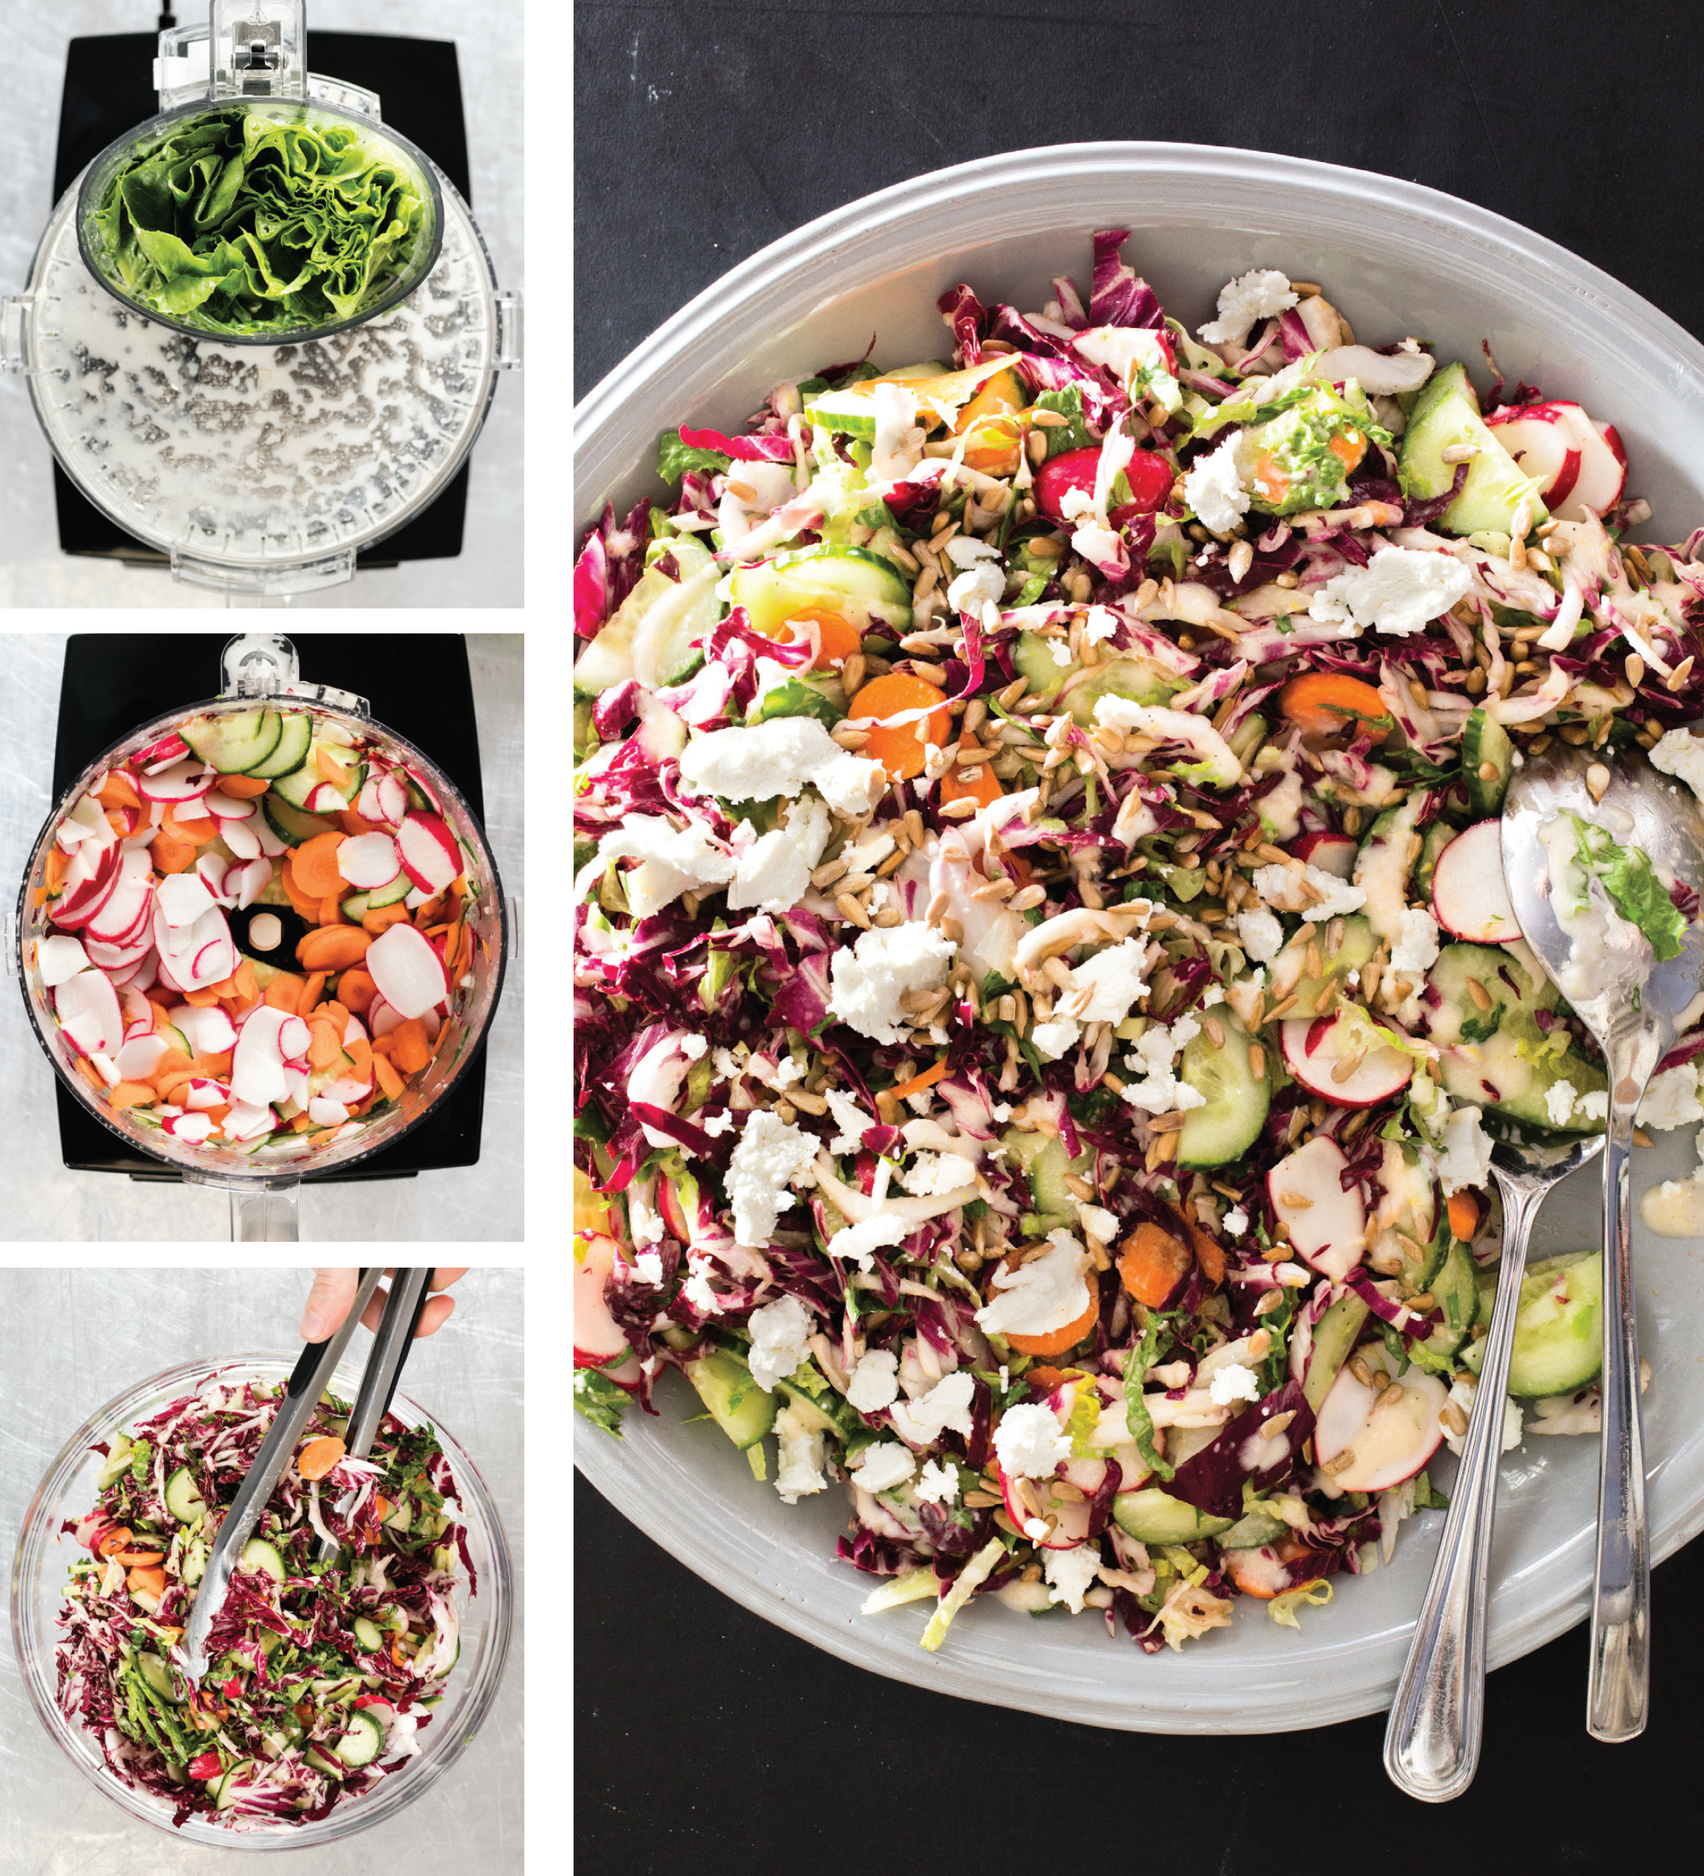
why this recipe works A good chopped salad offers a perfect mixture of flavors and textures in every bite, but it requires a lot of knife work to ensure that all the ingredients are evenly cut. We figured that the food processor would be the perfect tool for tackling this appealing salad without all the work. However, instead of chopping everything, we turned to the slicing blade to give us clean, even pieces of a variety of vegetables. So, after whizzing together a batch of quick, bright lemony vinaigrette, we attached the slicing disk to our food processor and thinly sliced a shallot. We let that sit in a bit of the dressing to mellow its oniony bite while we prepped the other vegetables. When it came to the base of our salad, we were surprised to see how well we could slice lettuce with the processor. In early efforts, some lettuces got stuck in the blade, spinning around under the lid without actually getting sliced, but the tightly packed leaves of hearts of romaine and compact radicchio worked wonderfully, slicing into clean, even ribbons, and we loved the texture of these short, thin shreds in the salad. For crunch and color we sliced up cucumber, radishes, and carrots, all of which took only seconds to prep in the processor. We topped our salad with cool, creamy goat cheese and nutty toasted sunflower seeds. We also developed an equally appealing Greek salad version that mixed up the flavors of the salad while keeping the method as simple and quick as possible. This recipe makes enough dressing for two to three recipes. Be sure to serve the salad immediately after tossing.
1 tablespoon mayonnaise
2 tablespoons Dijon mustard
1 shallot, cut into 1-inch pieces
3 garlic cloves, peeled and smashed
2 teaspoons grated lemon zest plus 7 tablespoons juice (3 lemons)
Salt and pepper
¾ cup vegetable oil
1 romaine lettuce heart, trimmed
1 small head radicchio, quartered and cored
½ English cucumber, halved lengthwise
6 radishes, trimmed
2 carrots, peeled
4 ounces goat cheese, crumbled (1 cup)
⅓ cup roasted sunflower seeds
1 Process mayonnaise, mustard, shallot, garlic, lemon zest and juice, ½ teaspoon salt, and ½ teaspoon pepper in food processor until smooth, about 10 seconds, scraping down sides of bowl as needed. With processor running, slowly drizzle in oil until completely emulsified, about 2 minutes. Transfer dressing to airtight container and set aside. (Dressing can be refrigerated for up to 1 week; whisk to recombine as needed.)
2 Working in batches, process romaine, radicchio, cucumber, radishes, and carrots in now-empty processor fitted with slicing disk until thinly sliced; transfer to salad bowl. Drizzle salad with ⅓ cup dressing and gently toss to coat. Season with extra dressing, salt, and pepper to taste. Sprinkle with goat cheese and sunflower seeds. Serve immediately.
Omit radicchio, carrots, and sunflower seeds. Substitute 1 teaspoon dried oregano and 7 tablespoons red wine vinegar for lemon zest and juice. Increase romaine to 2 heads and substitute 2 plum tomatoes, cored and halved lengthwise, for radishes, and crumbled feta cheese for goat cheese. Process ⅓ cup pitted kalamata olives with vegetables in step 2.
serves 6
food processor size 7 to 14 cups
why this recipe works Shaved salads require the ingredients to be sliced very thin, which can be tricky, fussy work, but the food processor makes it quick and easy to get even slices of vegetables for a perfect home version of these sophisticated salads. Earthy mushrooms and crunchy celery pair well in many dishes, so we were inspired to build a shaved salad around this appealing combination. We chose cremini mushrooms for their full flavor, which would allow them to share the spotlight with assertive celery without losing their identity. To tenderize their texture without losing any of their freshness, we marinated the mushrooms in a bright lemon vinaigrette. After a quick 10-minute soak in the acidic dressing, they were both softened and nicely seasoned. The fresh celery gave our salad great crunch, and we added parsley and celery leaves for extra flavor and leafy texture. Shaved Parmesan mixed in just before serving contributed a layer of nutty, salty richness. Since getting perfectly shaved vegetables was so easy with the food processor, we also created a variation with bright, crisp fennel. If celery greens (the delicate leaves attached to the celery stalks) are not available, increase the parsley leaves to 1 cup. Make sure not to marinate the mushrooms for longer than 10 minutes; otherwise the salad will be watery.
¼ cup extra-virgin olive oil
1½ tablespoons lemon juice
Salt and pepper
8 ounces cremini mushrooms, trimmed
1 shallot, peeled
4 celery ribs, plus ½ cup celery leaves
2 ounces Parmesan cheese, shaved
½ cup fresh parsley leaves
1 Whisk oil, lemon juice, and ¼ teaspoon salt together in large bowl. Working in batches, use food processor fitted with slicing disk to process mushrooms and shallot until thinly sliced. Transfer mushrooms and shallot to bowl with dressing and toss to coat; let sit for 10 minutes.
2 Process celery in now-empty processor until thinly sliced. Add celery and leaves, Parmesan, and parsley to mushroom-shallot mixture and toss to combine. Season with salt and pepper to taste. Serve.
shaved mushroom, fennel, and orange salad
Substitute 2 tablespoons orange juice and 1 teaspoon white wine vinegar for lemon juice and 1 fennel bulb, stalks discarded, quartered and cored, for celery.
shaved mushroom and celery salad with goat cheese and almonds
Substitute sherry vinegar for lemon juice and 1 cup crumbled goat cheese for Parmesan. Add ¼ cup toasted sliced almonds to salad before tossing in step 2.
serves 8 to 10
food processor size 7 to 14 cups
why this recipe works Despite its simplicity, summery coleslaw can be tough to get just right. Usually the coleslaw ends up limp and sitting in a pool of watered-down dressing. This happens because cabbage is naturally full of water; as the salad sits, that water leaches out from the chopped cabbage and dilutes the dressing. Tossing vegetables with a little salt beforehand is a simple method for drawing out excess moisture to keep the vegetables crisp and the salad creamy. Salting is more effective when there’s more surface area for the salt to come in contact with, so we started by using our food processor to thinly slice the cabbage and shred the carrot and onion. As for the dressing, cutting the mayonnaise with a bit of sour cream improved the texture and added richness and a pleasant tang. We balanced plain white vinegar with a small amount of sugar for a well-rounded flavor profile. We also created two flavorful variations to increase the versatility of our slaw. For the first one, we opted for a Latin-inspired version with smoky chipotle in adobo sauce paired with cilantro and lime. For the other, we created a sweet and tangy option by switching to apple cider vinegar and adding apple and tarragon for a pop of clean, fresh flavor.
1 head green or red cabbage (2 pounds), quartered and cored
1 carrot, peeled
½ small onion, halved through root end
Salt and pepper
½ cup mayonnaise
¼ cup sour cream
1 tablespoon distilled white vinegar
2 teaspoons sugar
1 Working in batches, use food processor fitted with slicing disk to process cabbage until thinly sliced; transfer to large colander set over bowl.
2 Fit now-empty processor with shredding disk and process carrot and onion until shredded. Toss cabbage with carrot, onion, and 2 teaspoons salt in colander and let sit until wilted, at least 1 hour or up to 4 hours. Rinse cabbage mixture under cold water. Press, but do not squeeze, to drain and blot dry with paper towels. (Salted, rinsed, and dried cabbage mixture can be refrigerated in zipper-lock bag for up to 24 hours.)
3 Whisk mayonnaise, sour cream, vinegar, sugar, and ¼ teaspoon pepper together in large bowl. Add cabbage mixture and toss to coat. Refrigerate coleslaw until chilled, about 30 minutes. Season with salt and pepper to taste. Serve.
creamy coleslaw with chipotle and lime
Substitute 2 tablespoons lime juice for vinegar. Add 2 tablespoons minced fresh cilantro and 2 tablespoons minced canned chipotle chile in adobo sauce to dressing.
sweet and tangy coleslaw with apple and tarragon
Substitute 1 apple, peeled, cored, and halved, for onion and 2 tablespoons cider vinegar for distilled white vinegar. Increase sugar to ¼ cup and add 2 tablespoons minced fresh tarragon and 1 teaspoon Dijon mustard to dressing.
serves 4 to 6
food processor size 7 to 14 cups
why this recipe works Brussels sprouts are delicious, but these tiny cabbages can be a huge pain to prepare by hand. While a quick-cooking method is the ideal way to get sweet, crisp-tender sprouts, they have to be thinly sliced to work in a high-heat recipe, and shredding the sprouts one by one with a knife is a laborious task. Instead, we used the food processor to power through a pound and a half of sprouts in record time. A quick soak in cold water helped keep the sprouts from burning as we sautéed them over relatively high heat. Allowing the sprouts to cook undisturbed for a few minutes also encouraged browning, which added some sweetness, and the addition of lemon juice and parsley at the end of cooking provided a shot of brightness and freshness. For variations, we turned to ingredients that went well with the caramelized profile of our sautéed Brussels sprouts. The sweet, tart flavor of cranberries complemented the sprouts’ natural sweetness, and pecans helped emphasize their nuttiness and added textural interest. Our other variation used the classic pairing of Brussels sprouts with the smoky, salty crunch of bacon. Briefly soaking the shredded sprouts reduces bitterness while providing extra moisture, which helps the vegetable steam; do not skip this step.
1½ pounds Brussels sprouts, trimmed
1 tablespoon vegetable oil
Salt and pepper
2 tablespoons chopped fresh parsley
1 tablespoon lemon juice
1 Working in batches, use food processor fitted with slicing disk to process Brussels sprouts until thinly sliced. Transfer Brussels sprouts to large bowl, cover with cold water, and let sit for 3 minutes. Drain well and set aside.
2 Heat oil in 12-inch nonstick skillet over medium heat until shimmering. Add Brussels sprouts, 1 teaspoon salt, and ¼ teaspoon pepper. Cover and cook, without stirring, until Brussels sprouts are wilted and lightly browned on bottom, about 4 minutes.
3 Stir and continue to cook, uncovered, until Brussels sprouts are crisp-tender, about 3 minutes, stirring once halfway through cooking. Off heat, stir in parsley and lemon juice. Season with salt and pepper to taste. Serve.
sautéed sliced brussels sprouts with bacon
Before cooking Brussels sprouts, cook 4 slices bacon, chopped, in 12-inch nonstick skillet over medium heat until crisp, 7 to 10 minutes. Transfer bacon to paper towel–lined bowl and pour off all but 1 tablespoon fat from skillet. Cook sprouts as directed, substituting fat left in skillet for oil. Substitute cider vinegar for lemon juice and sprinkle sprouts with bacon before serving.
sautéed sliced brussels sprouts with dried cranberries and pecans
Substitute balsamic vinegar for lemon juice. Stir ½ cup dried cranberries and ½ cup toasted chopped pecans into Brussels sprouts with parsley.
serves 4
food processor size 7 to 14 cups
why this recipe works Processed steamed cauliflower makes a surprisingly satisfying and pleasantly fluffy substitute for rice. To make our version of this health-food trend foolproof, we first needed to figure out the best way to chop the florets to the right size. Using the food processor made quick work of breaking down the florets and created just the right grainlike texture. Working in batches helped to ensure that all of the florets broke down evenly. Next, we needed to give our neutral-tasting cauliflower a boost in flavor; a shallot and a small amount of chicken broth did the trick. To ensure that the cauliflower was tender but still maintained a pleasant, ricelike chew, we first steamed the “rice” in a covered pot, then finished cooking it uncovered to remove any remaining moisture. We also decided to develop a couple of flavorful variations so that our cauliflower rice could accompany any number of meals. This recipe can be doubled; use a Dutch oven and increase the cooking time to about 25 minutes in step 2.
1 head cauliflower (2 pounds), cored and cut into 1-inch florets
1 tablespoon extra-virgin olive oil
1 shallot, minced
½ cup chicken broth
Salt and pepper
2 tablespoons minced fresh parsley (optional)
1 Working in batches, pulse cauliflower in food processor until finely ground into ¼- to ⅛-inch pieces, 6 to 8 pulses, scraping down sides of bowl as needed; transfer to bowl.
2 Heat oil in large saucepan over medium-low heat until shimmering. Add shallot and cook until softened, about 3 minutes. Stir in processed cauliflower, broth, and 1½ teaspoons salt. Cover and cook, stirring occasionally, until cauliflower is tender, 12 to 15 minutes.
3 Uncover and continue to cook until cauliflower rice is almost completely dry, about 3 minutes. Off heat, stir in parsley, if using, and season with salt and pepper to taste.
Add ¼ teaspoon ground cardamom, ¼ teaspoon ground cinnamon, and ¼ teaspoon ground turmeric to saucepan with shallot. Substitute 1 tablespoon minced fresh mint for parsley and stir ¼ cup toasted sliced almonds into cauliflower rice with mint.
Add 1 minced garlic clove, 1 teaspoon ground cumin, and 1 teaspoon ground coriander to saucepan with shallot. Substitute 2 tablespoons minced fresh cilantro for parsley and stir 1 teaspoon lime juice into cauliflower rice with cilantro.
serves 4 to 6
food processor size 7 to 14 cups
why this recipe works For a versatile side dish that went beyond the usual mashed potatoes, we turned to sweet, earthy butternut squash. After testing various cooking methods, including roasting, steaming, braising, and microwaving, we found that the microwave worked best. Not only was it one of the easiest cooking methods, but tasters far preferred the clean, sweet squash flavor that the microwave produced. All we had to do after microwaving the squash was drain the liquid that was released during cooking and then move the whole operation to the food processor. In just seconds, the processor gave us a perfectly silky-smooth texture. Plus we found that the drained pureed squash needed only 2 tablespoons of half-and-half and 2 tablespoons of butter to round out its flavor and add some richness for a seriously simple and crowd-pleasing side dish.
2 pounds butternut squash, peeled, seeded, and cut into 1-inch pieces (6 cups)
2 tablespoons half-and-half
2 tablespoons unsalted butter
1 tablespoon packed brown sugar
Salt and pepper
1 Microwave squash in covered bowl until tender and easily pierced with fork, 15 to 20 minutes, stirring halfway through cooking.
2 Transfer squash to food processor. Add half-and-half, butter, sugar, and 1 teaspoon salt and process until squash is smooth, about 20 seconds, scraping down sides of bowl as needed. Adjust consistency with hot water as needed. Season with salt and pepper to taste. Serve.
pureed butternut squash with warm spices and walnuts
Toss squash with ¼ teaspoon ground cumin, ¼ teaspoon ground coriander, and ⅛ teaspoon ground cinnamon before microwaving. Stir ¼ cup toasted chopped walnuts into squash before serving.
pureed butternut squash with sage and almonds
Add 2 teaspoons minced fresh sage to processor with half-and-half. Stir ¼ cup toasted sliced almonds into squash before serving.
serves 4
food processor size 7 to 14 cups
why this recipe works Because zucchini and summer squash are watery vegetables, they often cook up soggy and bland. We wanted to find a way to make sautéed zucchini or summer squash with concentrated flavor and an appealing texture. The key to avoiding sogginess was to remove as much water as possible before cooking the squash. We started by slicing the squash into thin pieces with the food processor, then salted the slices, drained them, and patted them dry. We also quickly sliced up and sautéed an onion to build depth in the dish before adding the drained squash along with some lemon zest. The squash became tender and lightly browned with minimal stirring. A little lemon juice and fresh basil stirred in off the heat lent bright flavors. For one variation, we combined the earthy, subtle sweetness of oregano with the briny, bright flavor of olives to complement the sautéed vegetable’s freshness. In another, we added richness to the dish with crisped pancetta. Salting causes the zucchini rounds to release excess water. This important extra step helps the zucchini to sauté rather than stew in its own juice. Do not add more salt when cooking, or the dish will be too salty.
3 zucchini or yellow summer squash (8 ounces each), trimmed
Kosher salt and pepper
1 small onion, quartered through root end
3 tablespoons extra-virgin olive oil
1 teaspoon grated lemon zest plus 1 tablespoon juice
2 tablespoons minced fresh basil, parsley, and/or thyme
1 Working in batches, use food processor fitted with slicing disk to process zucchini until thinly sliced; transfer to colander set over bowl. Toss zucchini with 1 tablespoon salt in colander and let drain until roughly ⅓ cup water is released, about 30 minutes. Process onion in now-empty processor until thinly sliced; set aside. Pat zucchini dry with paper towels and carefully wipe away any residual salt.
2 Heat oil in 12-inch nonstick skillet over medium heat until shimmering. Add onion and cook until softened, about 5 minutes. Increase heat to medium-high, add zucchini and lemon zest, and cook, stirring occasionally, until zucchini is golden brown, 6 to 8 minutes. Off heat, stir in lemon juice and basil and season with pepper to taste. Serve.
sautéed zucchini with olives and oregano
Substitute 1 teaspoon minced fresh oregano for basil. Add ¼ cup chopped pitted kalamata olives to zucchini with lemon juice.
sautéed zucchini with pancetta and herbs
Before cooking onion and zucchini, cook 2 ounces finely chopped pancetta in 12-inch nonstick skillet over medium heat until crisp, 5 to 7 minutes. Transfer pancetta to paper towel–lined bowl. Cook onion and zucchini as directed, substituting fat left in skillet for oil.
serves 4 to 6
food processor size 7 to 14 cups
why this recipe works Fried potatoes are great in all their forms, and latkes are arguably the culmination of everything we love about this cooking method for this ingredient, with a supercrisp outer shell and buttery-soft interior. Using the shredding disk of the food processor instead of a box grater let us prepare 2 pounds of potatoes in no time and kept our knuckles safe and sound. For latkes that were light and not greasy, with creamy interiors surrounded by a shatteringly crisp outer layer, we needed to do two things: First, we removed as much water as possible from the potato shreds by wringing them out in a dish towel. Then we briefly microwaved them. This caused the starches in the potatoes to form a gel that held onto the potatoes’ moisture so it didn’t leach out during cooking. We also took the starch that drained out with the water and added it back to the potato mixture. The extra starch gave us the supercrisp results we were looking for. Without excess moisture, the latkes crisped up quickly and absorbed minimal oil when we fried them. Serve the latkes with applesauce and sour cream.
2 pounds russet potatoes, unpeeled
1 onion, quartered through root end
Salt and pepper
2 large eggs
2 teaspoons minced fresh parsley
Vegetable oil
1 Adjust oven rack to middle position and heat oven to 200 degrees. Working in batches, use food processor fitted with shredding disk to process potatoes and onion until shredded; transfer to large bowl. Toss potatoes and onion with 1 teaspoon salt. Place half of potato mixture in center of dish towel. Gather ends together and twist tightly to drain as much liquid as possible, reserving drained liquid in bowl. Repeat with remaining potato mixture. Transfer drained potatoes to clean bowl.
2 Cover potato mixture and microwave until just warmed through but not hot, 1 to 2 minutes, stirring with fork every 30 seconds. Spread potato mixture in rimmed baking sheet and let cool for 10 minutes; return to bowl.
3 Meanwhile, let bowl of drained potato liquid sit for 5 minutes so that starch can settle to bottom. Pour off liquid, leaving starch in bowl. Whisk eggs into starch until smooth. Add starch-egg mixture, parsley, and ¼ teaspoon pepper to cooled potato mixture and toss gently to combine.
4 Add oil to 12-inch skillet until it measures ¼ inch deep. Heat oil over medium-high heat until shimmering but not smoking (about 350 degrees). Set wire rack in rimmed baking sheet and line with triple layer of paper towels.
5 Using ¼ cup potato mixture per latke, measure 5 latkes into hot skillet, pressing each into ⅓-inch-thick pancake. Cook, adjusting heat so fat bubbles around latkes edges, until golden brown on bottom, about 3 minutes. Turn and continue cooking until golden brown on second side, about 3 minutes longer.
6 Transfer latkes to prepared sheet and keep warm in oven. Repeat with remaining potato mixture, adding oil as needed to maintain ¼-inch depth and returning oil to 350 degrees between batches. Season latkes with salt and pepper to taste. Serve.
serves 4 to 6
food processor size 7 to 14 cups
why this recipe works Creamy scalloped potatoes make an elegant side dish, but because of their labor-intensive preparation and richness, they are usually relegated to indulgent holiday feasts. We wanted a lighter, quicker version that we could make for weeknight dinners, so naturally we turned to the food processor. The slicing disk cut both the potatoes and onion into thin pieces that melded into perfect layers in the oven. For a lighter take on the rich, creamy sauce, we cut heavy cream with an equal amount of chicken broth. We parboiled the sliced potatoes in the broth-and-cream combination, then poured the mixture into a casserole dish and baked it in the oven. The final touch was a sprinkling of cheddar cheese on top, which browned as the dish baked and formed a nice gooey crust. Prepare all of the other ingredients before slicing the potatoes or they will begin to brown (do not store them in water; this will make the dish bland and watery). If the potato slices do start to discolor, put them in a bowl and cover with the cream and chicken broth. You can substitute Parmesan for the cheddar, if desired.
4 ounces cheddar cheese, chilled
2 pounds russet potatoes, peeled
1 onion, quartered through root end
2 tablespoons unsalted butter
1 tablespoon minced fresh thyme or 1 teaspoon dried
2 garlic cloves, minced
Salt and pepper
1 cup chicken broth
1 cup heavy cream
2 bay leaves
1 Adjust oven rack to middle position and heat oven to 425 degrees. Grease 8-inch square baking dish.
2 Using food processor fitted with shredding disk, process cheddar until shredded; set aside. Fit now-empty processor with slicing disk. Working in batches, process potatoes until thinly sliced; set aside. Process onion in again-empty processor until thinly sliced.
3 Melt butter in Dutch oven over medium-high heat. Add onion and cook until softened, about 5 minutes. Stir in thyme, garlic, 1¼ teaspoons salt, and ¼ teaspoon pepper and cook until fragrant, about 30 seconds.
4 Add potatoes, broth, cream, and bay leaves and bring to simmer. Cover, reduce heat to medium-low, and simmer until potatoes are almost tender (paring knife can be slipped in and out of potato slice with some resistance), about 10 minutes.
5 Discard bay leaves. Transfer mixture to prepared dish and press into even layer. Sprinkle evenly with cheddar and bake until bubbling around edges and top is golden brown, about 15 minutes. Let casserole cool for at least 15 minutes before serving.
makes 7 cups
food processor size 7 to 14 cups
why this recipe works Stop settling for greasy, oversalted store-bought options: Making fresh, crisp, addictive potato chips at home is not as hard as you think, and with the help of your food processor, the prep is a cinch. There’s more to making great chips than just slicing potatoes and frying them, though. The thickness of the potato slices is the first important element. We chose Yukon Gold potatoes for their great potato flavor, and the food processor gave us perfectly even and consistent ⅛-inch slices, which were thick enough to hold their shape during frying, yet thin enough to cook up crisp and crunchy. The frying technique took a little work. On our first attempts, we got dark brown, bitter chips. We soon realized that the amount of starch in the potatoes was the source of our troubles, which led us to a method of rinsing, parboiling, and then frying. Rinsing washed away the exterior starch, and parboiling jump-started the cooking and further reduced the amount of starch in the potatoes. Frying the potatoes in batches ensured that the oil temperature didn’t drop too much and that the chips did not turn out greasy. It was a bit of extra work, but the reward of fresh, golden homemade potato chips was well worth it. These chips taste great with just a little salt sprinkled on them, but for fans of flavored potato chips, we also created buttermilk ranch and barbecue options. Use a Dutch oven that holds 6 quarts or more. These chips are best enjoyed the day they are made.
2 pounds Yukon Gold potatoes, unpeeled
2 quarts vegetable oil
Kosher salt and pepper
1 Working in batches, use food processor fitted with slicing disk to process potatoes until thinly sliced; transfer to large bowl. Cover potatoes with cold water and gently swirl to rinse off starch. Drain potatoes and repeat swirling with cold water until water no longer turns cloudy, about 5 rinses.
2 Line rimmed baking sheet with clean dish towel. Bring 2 quarts water to boil in large saucepan over high heat. Add potatoes, return to simmer, and cook until just beginning to soften, about 3 minutes. Gently drain potatoes and spread into even layer in prepared sheet. Top with another clean dish towel and press gently on potatoes to dry thoroughly.
3 Set wire rack in rimmed baking sheet and line with triple layer of paper towels. Add oil to large Dutch oven until it measures about 1½ inches deep and heat over medium-high heat to 350 degrees. Carefully add one-third of potatoes to oil and fry, stirring frequently to separate chips, until golden and crisp, 12 to 18 minutes. Adjust burner, if necessary, to maintain oil temperature of about 325 degrees. Using skimmer or slotted spoon, transfer chips to prepared sheet as they finish cooking and season with salt and pepper to taste. Let chips cool completely. Return oil to 350 degrees and repeat with remaining potatoes in 2 batches. Serve.
thick-cut ranch potato chips
Whisk 1 tablespoon kosher salt, 1 tablespoon buttermilk powder, 2 teaspoons dried dill weed, ¼ teaspoon garlic powder, and ¼ teaspoon onion powder together in bowl. Gently toss each batch of chips with one-third of ranch seasoning before transferring to prepared rack to cool.
thick-cut barbecue potato chips
Whisk 1 tablespoon kosher salt, 1 tablespoon packed brown sugar, 2 teaspoons smoked paprika, 1 teaspoon garlic powder, and ⅛ teaspoon cayenne pepper together in bowl. Gently toss each batch of chips with one-third of barbecue seasoning before transferring to prepared rack to cool.
makes 2 cups
food processor size 7 to 14 cups
why this recipe works A snap to make, these quick-pickled cucumber slices are an approachable fuss-free pickle for a novice or a great go-to recipe for anyone looking to satisfy a craving without the effort involved in larger-scale pickling projects. Just a few easy steps transform a handful of cucumbers into perfect pickle chips—crunchy, tangy, a bit sweet, and loaded with fresh, aromatic flavor. Like a classic bread-and-butter pickle, these chips get a hint of warm spice from black peppercorns, mustard seeds, and turmeric. Fresh dill sprigs add a mild anise flavor, befitting a hamburger pickle. To streamline our preparation time, we chose seasoned rice vinegar—which contains vinegar, sugar, and salt—and eliminated the work of separately measuring three ingredients. The slicing disk of the food processor made quick work of our cucumbers, producing perfectly cut chips in minutes. We heated our glass jar in hot water to ensure that it wouldn’t crack when we filled it with hot brine. After 3 hours, these pickles were thoroughly suffused with a lively combination of sweet, sour, and aromatic tones. This quick-pickling method also worked great for other firm vegetables like fennel and carrots in our simple variations. Be sure to choose the freshest, firmest pickling cucumbers available, for guaranteed crunch. These pickles can be refrigerated for up to 6 weeks; they will soften significantly after 6 weeks.
8 ounces pickling cucumbers, trimmed
¾ cup seasoned rice vinegar
¼ cup water
1 garlic clove, peeled and halved
¼ teaspoon ground turmeric
⅛ teaspoon black peppercorns
⅛ teaspoon yellow mustard seeds
2 sprigs fresh dill
1 Working in batches, use food processor fitted with slicing disk to process cucumbers until thinly sliced; set aside.
2 Bring vinegar, water, garlic, turmeric, peppercorns, and mustard seeds to boil in medium saucepan over medium-high heat.
3 Meanwhile, place one 1-pint jar under hot running water until heated through, about 1 minute; shake dry. Pack cucumbers and dill into hot jar. Using funnel and ladle, pour hot brine over cucumbers to cover. Let jar cool to room temperature, about 30 minutes. Cover jar with lid and refrigerate for at least 2½ hours before serving.
Omit dill. Substitute 1 fennel bulb (12 ounces), stalks discarded, quartered and cored, for cucumber and fennel seeds for turmeric.
Omit turmeric. Substitute 8 ounces carrots, peeled, for cucumber and fresh tarragon for dill.