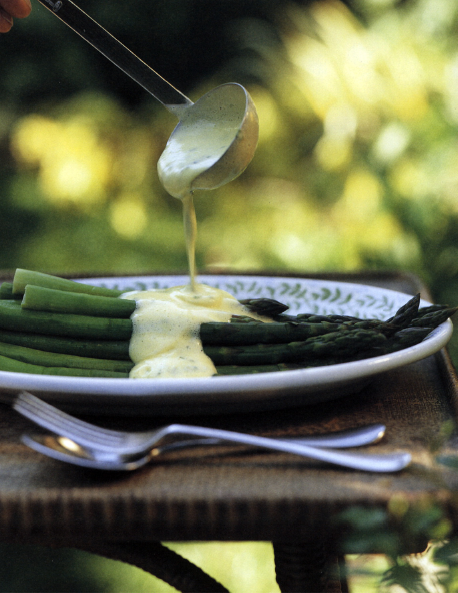
ASPARAGUS IN FROTHY TARRAGON SAUCE
ROASTED GAULIFLOWER WITH APPLE AND DILL
MASHED WINTER SQUASH WITH BAY BUTTER
MUSHROOM MARJORAM BREAD PUDDING
ASPARAGUS WITH HOLLANDAISE IS SO GOOD, but it’s so rich, prompting me to invent this tangy spin-off that requires far less butter. It’s just as tempting, but more of a dish for everyday, and you’ll find it much less tricky to make. While I was messing with a classic I naturally added a fresh herb.
2 pounds fresh asparagus, preferably fat stalks
4 large egg yolks
½ cup fresh lemon juice
½ cup water
¾ teaspoon kosher salt
Freshly ground black pepper
2 tablespoons unsalted butter
2 tablespoons chopped tarragon
Bring a large pot of salted water to a boil and choose a stainless steel mixing bowl that will sit on top of the pot without touching the water.
Cut off the bottom of the asparagus spears where they turn light colored and tough. If the asparagus is thick (which is how I prefer it), peel the bottom two-thirds of each spear with a sharp vegetable peeler. Whisk the egg yolks in the mixing bowl with the lemon juice, water, salt, and a few grindings of black pepper and set it aside.
Boil the asparagus until it’s tender but still has some snap, 4 to 6 minutes. Test it by holding a spear by the bottom with tongs held horizontally; it should be limp and bend like a bow toward the floor. When cooked, use the tongs to remove the asparagus from the water and arrange it on a warm platter.
Put the bowl of sauce ingredients on top of the rapidly boiling water and whisk vigorously until it is very thick and foamy. This will only take 2 to 3 minutes and you will easily be able to sense the point when the sauce becomes custardy and fully cooked. Whisk in the butter and, when it’s incorporated, add the tarragon.
Pour the sauce over the asparagus, or pass it separately in a serving bowl, and serve right away.
herbal improvisations In place of the tarragon, add 2 tablespoons dill, ¼ cup chervil, or 1 tablespoon lemon thyme.
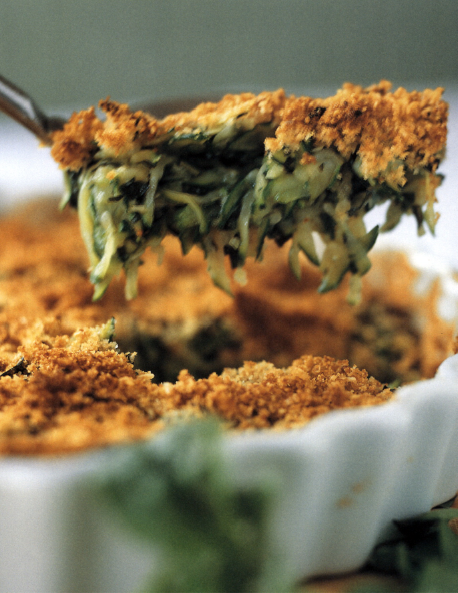
IF YOU HAVE A FEW ZUCCHINI PLANTS and basil in your garden, you’ll make this all summer. It’s easy, you can prepare it ahead, it goes with all kinds of other foods, and it brings out the best in this prolific vegetable.
2 pounds zucchini (about 3 medium)
2 teaspoons kosher salt
3 tablespoons olive oil
½ cup chopped basil
¼ cup plus 1 tablespoon dry bread crumbs
¼ cup freshly grated Parmigiano-Reggiano
Shred the zucchini on a box grater or with the shredding disk of a food processor. Put it in a large colander, mix in the salt using your hands, and let the zucchini sit and drain for at least 30 minutes.
Preheat the oven to 400°F. Spread ½ tablespoon of the oil over the inside of a 10-inch-round gratin dish or glass pie plate. Sprinkle with 1 tablespoon of the bread crumbs and shake to coat the bottom and sides evenly.
Squeeze the zucchini dry by picking up baseball-sized handfuls and firmly pressing out the moisture. Put it in a mixing bowl and incorporate 1 ½ tablespoons of the olive oil and the basil (it’s easiest to use your hands again for this). Loosely pat the zucchini into the gratin dish.
In the same mixing bowl, stir together the remaining ¼ cup bread crumbs, the cheese, and the remaining tablespoon of oil. Sprinkle the crumbs over the gratin (you can cover and refrigerate it at this point) and bake it for 30 to 35 minutes, or until the crumbs are deeply browned.
SPINACH AND LOVAGE ARE AS PERFECT A PAIR as basil and tomato. Enriched with a simple white sauce, they star in this gratin that’s a fitting complement to any sort of simply cooked meat or fish.
3 tablespoons unsalted butter
1 large shallot, finely chopped
12 ounces baby spinach, or 12 ounces coarsely chopped stemmed spinach (about 2 bunches), washed and spun dry
Kosher salt
2 tablespoons all-purpose flour
1 cup milk, whole or low fat
3 tablespoons chopped lovage (young leaves)
Freshly ground black pepper
1 ½ tablespoons melted butter
¼ cup plus 2 tablespoons dry bread crumbs
¼ cup freshly grated Parmigiano-Reggiano
Preheat the oven to 375°F.
Melt 1 tablespoon of the butter in a large saucepan over medium heat. Add the shallot and stir it around for a minute, then add as much spinach as will comfortably fit in the pan and ¾ teaspoon salt. Toss the spinach with tongs until it wilts down, and then keep adding more spinach until it is all wilted. Tip the spinach into a bowl and return the pan to the heat.
Melt the remaining 2 tablespoons butter in the same saucepan and whisk in the flour. When the roux bubbles, pour in the milk all at once and whisk until the sauce boils and thickens. Stir in the spinach, lovage, another ¾ teaspoon salt, and a good grinding of black pepper.
Use ½ tablespoon of the melted butter to coat the inside of a baking dish about 6 × 10 inches. Sprinkle it with 2 tablespoons of the bread crumbs and shake the pan to distribute them evenly. Pour in the sauced spinach. Mix the remaining ¼ cup bread crumbs with the cheese and the remaining tablespoon of melted butter and sprinkle it over the top. The gratin can wait at this point. When ready, bake it for 25 to 30 minutes or until bubbly and browned.
herbal improvisations In place of the lovage, add ¼ cup coarsely chopped dill or spearmint, or 1 cup coarsely chopped stemmed sorrel.
The mint family, or Labiatae, claims the largest number of culinary herbs, but second is the parsley family, or Umbelliferae. All Umbelliferas share several characteristics: They have umbrella-shaped flower heads, their hollow stems radiate from the center of the plant at ground level, and they have long taproots.
Perennial Umbels
Fennel and lovage are there for the long haul. Plant them once, and if they’re happy with where they are, they’ll stay there for many years, dying back each fall and coming up in a larger clump each spring.
FENNEL
The herb fennel is related to the vegetable fennel, but instead of forming bulbs at the ground level it grows into tall clumps of feathery stalks that bloom in midsummer. Fennel grows wild all over the West Coast, and there are two types grown in gardens: green and bronze; the bronze have reddish brown leaves and smaller flowers. All parts of the plant have flavor.
AS THE SWEET FEATHERY LEAVES EMERGE in spring you can tear them into salads or chop and stir them into sauces or soups.
WHEN THE PLANTS BLOOM, they produce umbels of tiny yellow flowers. Snip or pull them off the flower head and sprinkle the yellow dust over all kinds of foods, from summer vegetables and pastas to seafood and grilled meats. To make your own fennel pollen, harvest the yellow umbels and allow them to dry, then pull off the flowers and shake them through a medium-fine sieve.
AFTER THE FLOWERS FADE, the umbels are covered in strongly flavored soft green seeds. Chop them and add to foods you might flavor with dry fennel seed, but remember the flavor is much more intense.
THE STALKS CAN BE USED AS A BED for cooking whole fish or roasts. Cut them in even lengths and line them up in your roasting pan or on your grill. Leave some seed heads on for extra flavor.
LOVAGE
An herb that deserves to be better known, and one of the easiest to grow, lovage has a delightful, but powerful, celerylike flavor. It’s among the first to wake up in the early spring garden and soon after forms a soaring clump of hollow stalks, topped with foliage that looks like celery leaves. In late spring it sends up enormous flowering stalks. Lovage is lovage; you don’t have to be concerned about finding a good cultivar. Once you plant it you’ll always have it.
THE YOUNGER THE LOVAGE LEAVES, the better their flavor. They are ideal when just emerging and still light green and glossy. As they mature they become stronger tasting and then bitter.
LOVAGE CAN BE ADDED TO A DISH in the beginning of the cooking process, or at the end. The flavor will be subtler if added near the beginning.
TO ENCOURAGE NEW GROWTH, which will yield the young leaves you need for the kitchen, keep cutting the flower stalks and older leaf stalks back at ground level and keep the plant well watered.
THE HOLLOW STEMS MAKE THE ULTIMATE STRAWS for bloody marys or virgin marys; they flavor the drink as it passes through.
Biennial Umbels
Biennials generally live two years, producing leaves the first year and flowering the second, though sometimes they will bloom their first season.
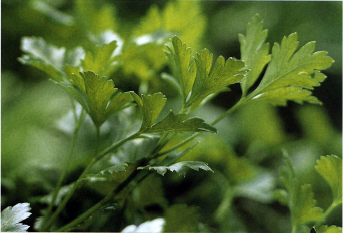
PARSLEY
There are three types of parsley, curly, flat-leaf, and Hamburg, which is grown for the edible roots. For the leaf, I always choose flat-leaf, which has the best texture for rough chopping.
TO WASH PARSLEY, dunk the bunch several times upside down in a large bowl of cold water. Shake or spin it dry.
IT’S RARELY NECESSARY TO INDIVIDUALLY PICK the leaves off the stems. Just whack off the stems at the bottom of the bunch, then quickly go through the leafy parts and pull out the really thick stems. When you chop it, the small soft stems will not be noticed.
I HARDLY EVER GIVE PARSLEY A FINE CHOP. A rough chop will offer more flavor, color, and character.

ANGELICA
This is not an herb you are likely to cook with often, but it is an interesting one to grow. When it blooms it soars into a huge dramatic plant, covered with fireworks-like umbels. If you plant it, make sure you grow Angelica archangelica; there are other garden-worthy species that are not culinary.
THE MOST TYPICAL THING TO DO with angelica is candy the stems. Young tender stems that emerge in the spring are best for this. Home-candied stems are far more flavorful than the commercially made product.
YOU CAN FLAVOR DESSERTS with angelica by steeping the stems and leaves in milk or cream (it’s nice to add slices of ginger also), then use the infused milk to make custards or ice creams.
ANGELICA IS A CLASSIC PARTNER to rhubarb. Add the chopped young stems to pies or cobblers.
Annuals in this family share a common trait: their taproots are sensitive and transplanting them usually triggers them to bolt (send up flower stems), which means leaf production halts. In general, it’s best to sow the seed for these herbs directly in the ground instead of buying little plants as starts. Grow them like a vegetable crop: Sow them in a row or scatter the seeds in a small plot. Every three or four weeks in the growing season plant another row, so that you always have some at its peak (this is called succession planting). To harvest these herbs, cut the stems down to the ground, a small section at a time.
DILL
If you’re buying seed, Fernleaf and Bouquet are the most common varieties. Flavor varies little from one to another.
DILL LEAVES ARE OFTEN CALLED DILL WEED to differentiate it from the flowering dill stalks used for flavoring pickles.
DILL IS BEST USED RAW OR ADDED at the very end of the cooking process.
DON’T FUSS WITH REMOVING the small stems. Pick out the really thick ones, then chop the rest of them with the leaves.
DON’T GROW DILL NEAR YOUR FENNEL. They’ll cross-pollinate, and next season you’ll have oceans of an herb that is inferior to both.
CILANTRO
CILANTRO IS EASY TO GROW FROM SEED, but short-lived. It’s best to sow a new crop every 3 to 4 weeks.
WHEN CILANTRO GETS READY TO FLOWER, it sends up leaves that are lacier and smaller. These can be used interchangeably, but they have a flavor that tastes a bit more like coriander seeds.
THERE’S NO NEED TO REMOVE THE STEMS when you chop cilantro; they’re soft and flavorful. Just wash the bunch, shake or spin it dry, and chop it coarsely from the top down, stopping where it becomes more stem than leaf.
ALWAYS ADD CILANTRO at the end of cooking.
CHERVIL
This is a low-growing herb, like delicate-leaved parsley with soft anise flavor. The most commonly grown variety is Crispum, or curled chervil.
CHERVIL IS ONE OF THE FUSSIEST HERBS to grow. If it likes its spot it might self-seed for you and grow there happily ever after. More often, it will be a struggle to grow a good crop. Start off with very fresh seed and choose a partially shaded spot with rich, evenly moist soil. If the crop fails, keep trying new places in the garden until you find one it likes. It often does well under the canopy of a lacy tree.
NEVER COOK CHERVIL; always stir it in at the end, or sprinkle the roughly chopped leaves over a dish to finish it.
LIKE CILANTRO, there’s no need to remove the thin stems. Just chop them with the leaves.
YOU’LL THINK YOU’VE DISCOVERED NEW VEGETABLES when you prepare this dish, so different are they from roots that are boiled or roasted. Shaving roots into long ribbons is a cinch if you have the right kind of vegetable peeler. I like the Swiss-made ones that have a sharp blade held horizontally in a colorful plastic handle.
2 pounds medium root vegetables, such as carrots, parsnips, burdock, rutabagas, yams, parsley root, or salsify (avoid beets)
3 tablespoons unsalted butter
¼ cup coarsely chopped sage
¼ teaspoons kosher salt
Freshly ground black pepper
1 tablespoon maple syrup
2 teaspoons fresh lemon juice
Peel the roots and discard the peelings. Continue to peel the vegetables from their tops to the root tips to produce ribbons, rotating the roots on their axis a quarter turn after each strip is peeled, until you’re left with cores that are too small to work with.
Melt the butter with the sage in a large skillet over medium heat. Stir for a minute to partially cook the sage. Add the root ribbons and toss them with tongs until they begin to wilt. Add the salt, a good grinding of black pepper, the maple syrup, lemon juice, and about ¾ cup water. Continue to cook the vegetables over medium heat, turning them with tongs every minute or so, until all the liquid boils away and the ribbons are glazed and tender, about 10 minutes total. Serve right away, or cool and reheat in the skillet when ready to serve.
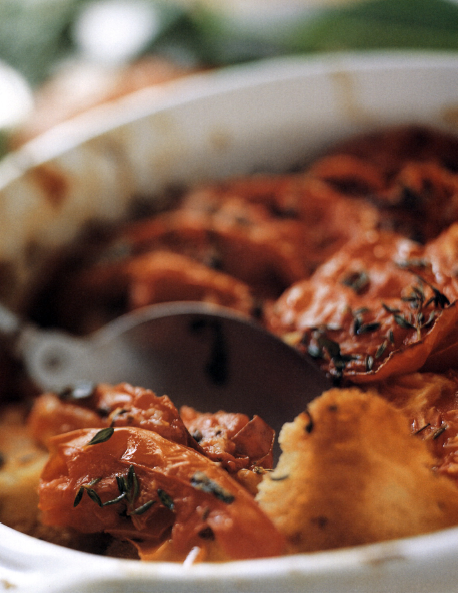
I WAS PLAYING AROUND, trying to come up with some sort of gratin to make use of a good crop of ripe tomatoes. I lined the bottom of an oiled heavy baking dish with slices of crustless bread, drizzled it with olive oil, sprinkled it with herbs and garlic, and topped it with juicy tomato slices, then more oil and herbs. What emerged from the oven surprised me: The bread was perfectly toasted on the bottom while moistened by the tomato, which was roasted and concentrated. And the flavor was huge, reminding me of the tomato bread I had in Barcelona, but in a much different form (the Catalonian version is toasted bread that is smeared with a ripe tomato). This dish is so simple and delicious I can’t imagine I was the first to invent it. There are probably thousands of grandmothers who have been making it all their lives, but I don’t recall ever hearing about it. Serve it as an accompaniment to a salad, a soup, or with grilled chicken or steak. Or have it for lunch or a snack all by itself.
¼ cup plus 1 tablespoon extra virgin olive oil
About ½ loaf of chewy (not fluffy) Italian-style bread, fresh or day old, sliced ½ inch thick
3 cloves garlic, finely chopped
Small bunch fresh basil
3 ripe juicy tomatoes (1 to 1 ¼ pounds), sliced ¾ inch thick
¾ teaspoon kosher salt
1 teaspoon thyme leaves
Preheat the oven to 400°F.
Spread 1 tablespoon of the olive oil on the bottom of a gratin dish about 8 × 10 inches in size. Gut the crusts off the bread and slice it into rough pieces about 2 × 2 inches. Fit the bread into a tight mosaic in the bottom of the dish to create a single layer of bread with no spaces. Drizzle with another 2 tablespoons of the oil and sprinkle with the garlic. Tear the basil leaves over the bread. Arrange the tomatoes in rows, overlapping them so they all fit. Drizzle with the remaining 2 tablespoons oil and sprinkle with the salt and thyme. Bake the dish for 25 to 30 minutes. It’s done when the underside of the bread is lightly toasted when you lift a corner to peek. Allow it to cool for about 10 minutes and serve it warm, scooped from the dish with a large spoon.
herbal improvisation In place of the thyme, sprinkle the top with 1 tablespoon chopped marjoram or oregano.
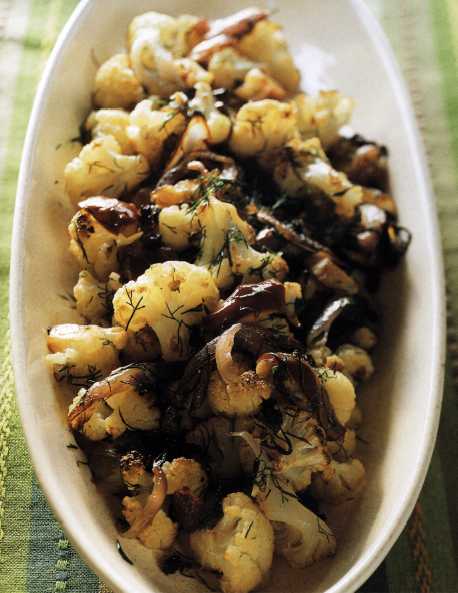
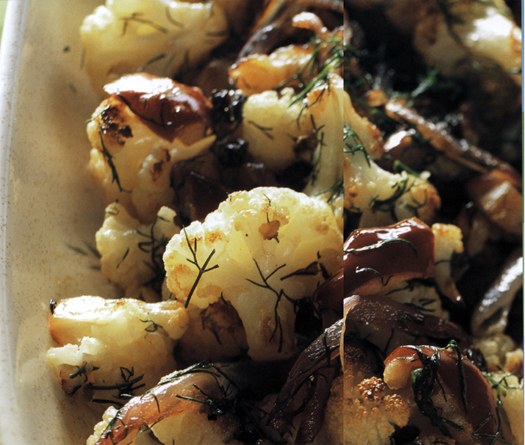
NO OTHER HERB COMPLEMENTS cauliflower as well as dill. Rather than steaming or boiling the cauliflower, I roast it in a very hot oven, which brings out its nuttiness and minimizes its cabbagelike characteristics. This is a stunning side dish that you can pop in the oven and pay very little attention to while you prepare the rest of your dinner.
1 cauliflower, about 1 ½ pounds, core removed and separated into florets
½ large red onion, cut into ¼-inch-thick slices from root to tip
1 large unpeeled apple, cored and coarsely diced
3 tablespoons extra virgin olive oil
¾ teaspoon kosher salt
3 tablespoons dried currants
¼ cup plus 2 tablespoons coarsely chopped dill weed
Preheat the oven to 450°F. Toss together the cauliflower, onion, apple, olive oil, and salt in a large shallow baking dish and spread the ingredients out into a single layer. Bake for 20 to 30 minutes, stirring once or twice along the way, until some of the edges of the cauliflower begin to brown. Stir in the currants and continue to bake for about 10 more minutes, stirring another time or two, or until most of the edges of the cauliflower are browned. Sprinkle with the dill, stir again, and scoop it into a serving dish.
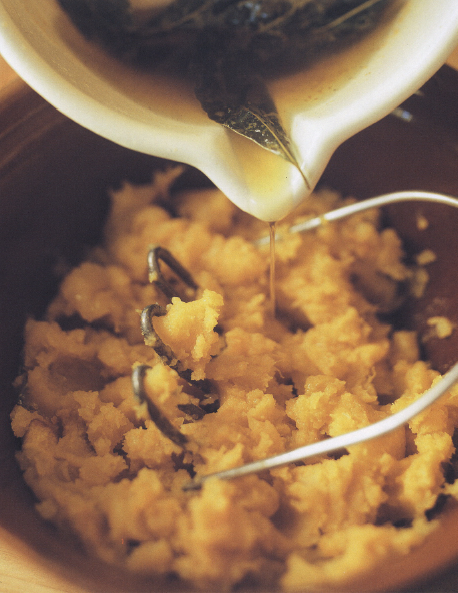
IN MY RESTAURANT KITCHEN this squash preparation is used as ravioli filling. At home it’s my favorite squash side dish, as is. The simple addition of browned butter, infused with the flavor of fresh bay leaves, gives the squash a gentle butterscotch richness. Use varieties of squash that retain a firm texture when cooked. Butternut squash is not one of those; it will end up like baby food.
3 pounds winter squash, such as delicata, carnival, or acorn
8 tablespoons (4 ounces) unsalted butter
8 fresh bay laurel leaves, lightly crushed (see page 79)
Kosher salt
1 to 4 tablespoons pure maple syrup, to taste (optional)
Preheat the oven to 400°F. Split the squash in half, scoop out the seeds, and put it cut side up in a small baking dish. Dot with 1 tablespoon of the butter and bake until the squash is very soft, 45 minutes to an hour.
Melt the remaining butter in a small skillet with the bay leaves. Cook slowly over low heat until the solids at the bottom of the skillet turn chestnut brown, about 10 minutes. The bay leaves may pop and sputter a bit along the way.
Scoop the squash out into a mixing bowl and strain the butter over it. Mash it all together with an old-fashioned potato masher or a large fork. If the squash seems stringy, you can break it up with an immersion blender or pulse it in a food processor. Add ½ to 1 teaspoon salt (I like the larger amount to contrast the natural sweetness of the squash, like salted toffee). Stir in the maple syrup, if desired, depending on your taste and the sweetness of the particular squash.
herbal improvisation If fresh bay laurel is not available, cook the butter with ½ cup coarsely chopped sage leaves. There’s no need to strain them out before adding the butter to the squash.
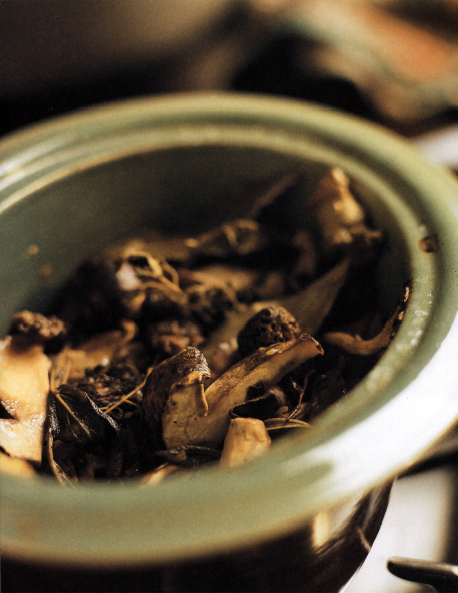
CERTAIN TYPES OF WILD MUSHROOMS that we prepare in the restaurant-like lobster mushrooms and blue chanterelles–require very long cooking because of their chewy texture. We put them in large covered pans with wine and herbs and bake them in our bread oven for an hour or two. It’s an utterly simple way of cooking them that I’ve found works just as well in my home kitchen with all types of more common mushrooms, even ordinary button mushrooms. You put everything in a covered casserole in the oven and come back an hour later to a sumptuous mushroom stew.
If you wish, you can bundle the herb sprigs with string and pull them out before serving, but I like to leave them loose. The cooked sprigs look beautiful lying among the mushrooms and are easy to push aside if they leap onto your plate.
2 pounds assorted mushrooms, wild or cultivated, cleaned and cut into bite-sized pieces
Small bunch thyme sprigs (½ ounce)
5 fresh or dried bay laurel leaves
2 large sprigs sage
¼ cup finely chopped shallots
3 tablespoons butter or olive oil
2 teaspoons kosher salt
½ cup dry vermouth or white wine
Preheat the oven to 375°F. Layer the mushrooms, herbs, and shallots in a lidded covered casserole that’s just large enough to hold them. Dot with the butter or drizzle with the olive oil, sprinkle with the salt, and pour the vermouth over the top. Cover tightly and bake for 1 hour, stirring halfway through the cooking. Serve the mushrooms hot from the casserole.
LIKE A CROSS BETWEEN A GLORIOUS Thanksgiving stuffing and a savory mushroom custard, this bread pudding is appropriate in any season. It is perfect if you’re looking for an out-of-the-ordinary side dish to serve on a buffet or to pass at a large dinner. To make it ahead, bake the casserole when you first mix the ingredients together and reheat it before serving.
1 ounce dried porcini mushrooms
One (20 to 24-ounce) loaf rustic white bread, crust removed
6 tablespoons unsalted butter, softened
1 large onion, chopped
1 pound button or cremini mushrooms, rinsed and sliced
¼ cup chopped marjoram
6 large eggs
3 cups milk, whole or low fat
1 tablespoon kosher salt and ¼ teaspoon black pepper
Preheat the oven to 375°F. Put the mushrooms in a 2 cup liquid measuring cup and fill it with hot water. Dice the bread into rough 1-inch cubes. Smear the interior of a large shallow baking dish (at least 9 × 13 inches) with 2 tablespoons of the butter.
Lift the dried mushrooms out of their soaking liquid so that any grit they have released stays at the bottom of the cup. Chop them finely. Pour the mushroom soaking liquid through a fine strainer, agitating it as little as possible and keeping the last ½ cup or so of liquid behind.
Melt the remaining butter in a large skillet over medium heat and cook the onion in it until it softens, about 5 minutes. Add the sliced button mushrooms and the chopped porcini and cook them for another 5 minutes. Pour in the strained liquid and simmer for another 5 minutes. Stir in the marjoram and turn off the heat.
Whisk the eggs, milk, salt, and pepper together in a very large mixing bowl. Stir in the cooked mushrooms and onion. Add the bread cubes and gently toss them with a rubber spatula. Pour the pudding into the buttered baking dish. Bake for 50 to 55 minutes, or until browned on the top and firm to the touch in the center.
Savory is not as widely known as other robustly flavored herbs, but it should be. The two species, summer savory and winter savory, have similar flavors but different ways of growing. Summer savory is a fast-growing annual with a lacy upright habit; winter savory is a semi-evergreen perennial with leathery leaves and a dense habit that can be upright or trailing. Both taste something like a cross between thyme, sage, and oregano, the winter being a bit stronger and heavier in flavor than the summer species.
BEANS ARE THE CLASSIC PARTNER for both summer and winter varieties of this herb. Any kind of beans—from dried navy beans, to fresh shell beans, to tender green beans—tastes good with it. Savory is also good with potatoes and with deeply flavored roasts and stews.
WINTER SAVORY IS BEST WHEN COOKED in a dish to mellow its flavor. Summer savory can go in at the beginning or the end of cooking.
GROW SAVORY IN LOOSE SOIL WITH FULL SUN. Summer savory is short-lived and always wants to bloom, even if you are diligent about cutting it back. Winter savory will grow fuller if you keep it trimmed. Cut it back hard in late summer to encourage new growth that you can harvest in the colder months.
A GOOD POTATO GRATIN IS ALWAYS A HIT, whether for a family supper or a holiday feast. I find they always turn out better if you slice the potatoes quite thinly, which is most easily accomplished with a mandoline. A French version of this gadget will work beautifully, but I’m partial to Japanese mandolines, which are lightweight, inexpensive, and well worth having. Savory is not an herb I cook with as often as others in my garden, but its muscular flavor is my first choice for this dish.
2 pounds Yukon gold or russet potatoes
2 tablespoons unsalted butter, softened
1½ teaspoons kosher salt
¼ cup finely chopped shallots
¼ cup coarsely chopped summer savory, or 2 tablespoons chopped winter savory
1 cup (3 ounces) shredded Gruyère
¾ cup whole milk
Preheat the oven to 400°F. Peel and rinse the potatoes and slice them about -inch thick, as if for potato chips. It’s easiest to do this on a mandoline, but if you don’t have one, use the slicing blade of a food processor. It’s possible to cut them thinly and evenly with a chef’s knife, but quite challenging.
Smear the butter on the bottom and sides of a 10-inch-round shallow baking dish or glass pie plate. Arrange about one-third of the potato slices in concentric circles over the bottom of the dish. Sprinkle with ½ teaspoon salt, 2 tablespoons of the shallots, one-third of the savory, and one-third of the cheese. Repeat the process with another third of the potatoes and the same toppings, then finish with a layer of potatoes and sprinkle with the remaining teaspoon salt, the savory, and cheese. Pour the milk over the top.
Bake the gratin for 40 to 45 minutes, or until deeply browned all over. Serve in wedges from the baking dish, or let the gratin cool slightly and slide it out onto a platter.
herbal improvisations Instead of savory, add ¼ cup chopped marjoram or 2 tablespoons chopped thyme.
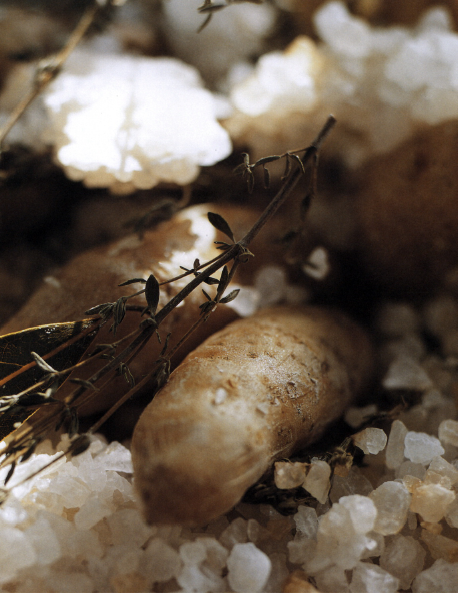
WHEN YOU UNEARTH THESE LITTLE POTATOES from their salty bed they are perfectly intact and dry to the touch, while soft and moist inside, and subtly flavored with ghosts of the toasty herb sprigs with which they were roasted.
2 pounds rock salt
1 bunch thyme (about 1 ounce)
6 bay laurel leaves, fresh or dried
1½ pounds small potatoes, such as fingerlings or small Yukon gold potatoes, rinsed and dried
Preheat the oven to 425°F. Pour half of the salt into a deep baking dish, large enough to hold the potatoes in a single layer. Strew half of the thyme sprigs and the bay leaves over the salt and arrange the potatoes on top of the herbs. Cover the potatoes with the rest of the thyme, and then bury them with the rest of the salt. Bake for 45 minutes, or until the tip of a paring knife easily slides into a potato. If you are not ready to serve the potatoes, you can leave them in the salt for up to 30 minutes. There are two ways to dig the potatoes from the salt: either scoop them out with a slotted spoon, or turn the baking dish upside down over a large baking sheet, break the salt apart, and extract the potatoes (my preferred method). Use a soft brush to sweep the excess salt off each potato and pile them in a serving dish.