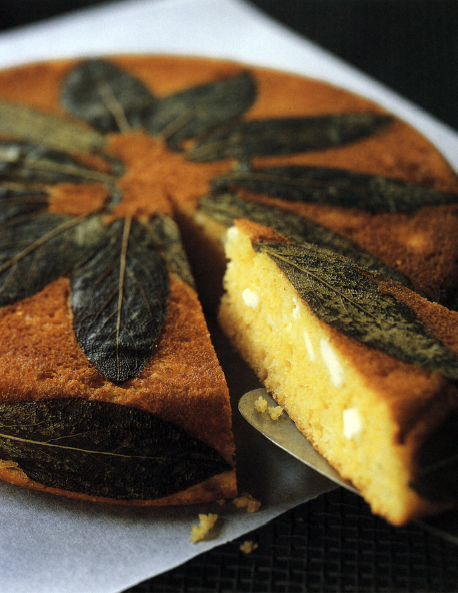
SAGE LEAVES, ARRANGED IN THE BUTTERED PAN before the batter is poured in, form a beautiful pattern on the crust of this bread and distinctly flavor it throughout. Crumbled feta contributes moistness and a salty bite.
1 tablespoon unsalted butter, softened, for the pan
18 to 24 large sage leaves
¾ cup stone-ground cornmeal
1 cup all-purpose flour
2 teaspoons baking powder
2 teaspoons sugar
½ teaspoon fine salt
2 large eggs
1 cup buttermilk
¼ cup olive oil
4 ounces (1 cup) crumbled Greek feta
Preheat the oven to 400°F. Smear the butter on the inside of a 9-inch glass pie plate. Press the sage leaves into the butter in a circular daisy pattern, saving about 6 to press into the side of the pie plate horizontally.
Stir the cornmeal, flour, baking powder, sugar, and salt together with a wire whisk in a medium mixing bowl. Whisk together the eggs, buttermilk, and olive oil in a second bowl. Stir the liquid into the dry ingredients until the lumps smooth out. Stir in the cheese.
Pour the batter into the pie plate over the sage leaves. Bake for about 25 minutes, or until the crust is browned and the bread springs back in the middle when you press on it. Let cool for about 10 minutes in the pan. Loosen the sides with a paring knife, then flip the cornbread out onto a plate or board with the sage leaves on top, and serve while still warm.
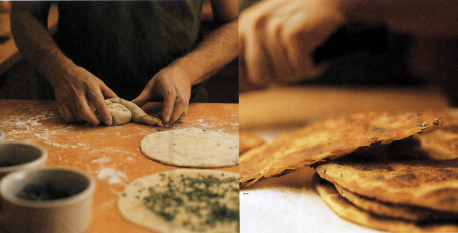
I’VE BORROWED THE TECHNIQUE for these breads from Chinese scallion breads, which I’ve been making ever since I read about them twenty years ago in Barbara Tropp’s groundbreaking The Modern Art of Chinese Cooking. To make the Chinese breads, a simple dough is rolled thin, coiled with scallions and sesame oil, rolled again into a flat pancake, then pan-fried. I love their particular texture, at once hearty and delicate, with thin chewy layers of dough and a bubbly browned, slightly crisped exterior. These have garlic oil in place of sesame and various herbs instead of scallions. Warm and cut into wedges, they make a fine snack, cocktail nibble, or accompaniment to soup or salad. They’re fun to make, especially if you put a different herb in each one, but allow yourself some unhurried time for their preparation.
2½ cups all-purpose flour, plus extra for dusting
1 cup boiling water
Extra virgin olive oil
4 cloves garlic, finely chopped
For each bread, one of the following: 2 tablespoons chopped basil, 1 tablespoon chopped chives, dill, marjoram, or sage, or 2 teaspoons chopped rosemary or Greek oregano
Kosher salt
Put the flour in a food processor and, with the motor running, pour in the boiling water. Process for about 15 seconds to knead the ball of dough that will form. Put the dough in a lightly oiled bowl, cover tightly with plastic wrap, and let it rest and cool for 30 minutes.
Heat ¼ cup olive oil with the garlic in a small skillet over medium-low heat until the garlic cooks but does not brown. Pour the oil into a small bowl and wipe out the skillet.
Turn the dough out onto a floured board and cut it in 6 equal pieces. Roll one of the pieces into a thin 9-inch circle, rotating it a quarter turn between rolls and using as much flour as needed to keep it from sticking. Brush the dough with some of the garlic oil and sprinkle it with your choice of one of the herbs and about ¼ teaspoon salt. Roll up the circle from one end so that you end up with a tube shape and pinch the loose end to secure it. Coil the tube into a spiral, like a snail, and fasten the loose end again. Roll the spiral into a flat cake about 7 inches in diameter. Don’t worry if a few of the herb pieces poke through the dough. Roll and fill the remaining pieces of dough in the same way. If you are not going to cook the breads right away, layer them between squares of parchment paper that have been lightly oiled or coated with pan spray.
Heat 1 tablespoon olive oil in a medium skillet. Slip in one of the breads, turn the heat to medium-low, and cook until the underside is dappled with a deep golden brown color and the top puffs a little, about 1½ minutes. Flip the bread and brown the other side. Drain the bread on paper towels, wipe out the pan, add more oil, and cook the remaining breads in the same way. Sprinkle the breads with a little more salt and cut each into 8 wedges. Serve warm.
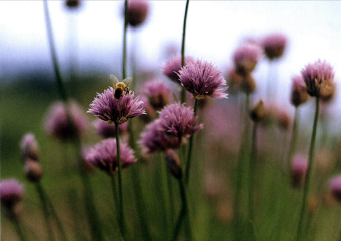
Since they are alliums, chives are essentially like onion leaves, only thinner, milder, and more tender. With the tubular leaves growing up to 18 inches tall, and balls of pink flowers in spring, common chives don’t vary much from plant to plant, even though you might see particular strains listed in catalogs. Garlic chives are different; they have flat leaves, a much stronger flavor, and white flowers. Don’t substitute one for the other.
TO CHOP CHIVES, LINE THEM ALL UP in the same direction on the cutting board and slice in lengths with a sharp knife—less than ⅛ inch for finely chopped to 1 inch for very coarsely chopped.
ALWAYS ADD CHIVES AT THE END OF COOKING or sprinkle them on before serving. They lose their flavor and color with heat.
CHIVE LEAVES ARE FAIRLY MILD, but the flowers have a strong onion flavor. Tear the individual florets apart and cook them in scrambled eggs or omelets, or sprinkle them over salads or pastas.
TO HARVEST CHIVES, CUT BUNCHES OF THE LEAVES all the way at the base, less than an inch above the soil. If you have several plants, alternate between which you cut, harvesting one completely before you go to another. That way the first will grow back by the time you cut back the last.
IF YOU HARVEST YOUR CHIVES while they are blooming, be sure to pick out all the hard, unpalatable flower stems from the leaves.
AFTER THE BLOOMS START TO FADE IN SPRING, cut all your chives down completely, or they will become sparse and the leaves will yellow. They’ll grow back full and healthy in no time.
I THINK I WAS WEANED ON NEW YORK ONION BAGELS and onion board (onion pletzel), so naturally I go in a big way for any kind of bread with onions. This focaccia, topped with a tangle of onion dappled with rosemary, is a favorite. With an electric mixer, it’s one of the easiest yeast breads you can make; you just need to give it time to rise.
1½ teaspoons dry yeast (two-thirds of a package)
1½ cups warm (110°F) water
1 teaspoon fine salt
6 tablespoons extra virgin olive oil
3½ cups unbleached all-purpose flour
1 large onion, halved and sliced ¼ inch thick from root to top
3 tablespoons coarsely chopped rosemary
¾ teaspoon kosher salt
Sprinkle the yeast into the water in the bowl of an electric mixer that has a dough hook. After several minutes, stir to dissolve it. Add the fine salt, 1 tablespoon of the olive oil, and the flour. Mix on low speed until the flour is incorporated, then knead on medium speed for 5 minutes. The dough will be very soft and sticky. Remove the bowl from the mixer and the dough hook from the bowl, cover the bowl with plastic wrap, and let the dough rise at room temperature until it more than doubles in size, about 1 hour.
Heat 3 tablespoons of the oil in a medium skillet. Add the onion, rosemary, and kosher salt and cook over medium heat until the onion wilts, but is still slightly undercooked, 3 to 4 minutes. Cool.
Preheat the oven to 400°F. Spread 1½ tablespoons of the oil over the bottom and sides of a baking sheet lined with silpat or parchment paper. Use a rubber spatula to deflate the dough and scrape it out onto the pan. Coat your hands with the last ½ tablespoon of oil and press and poke the dough to spread it evenly out to the edges. If it is very elastic and wants to spring back, let it rest for 10 minutes and then try again. Distribute the onion over the top of the dough. Let the bread rise until it looks puffy around the edges, about 30 minutes.
Bake the focaccia for 30 to 35 minutes, or until the crust is browned and the onion begins to brown at the edges. Slide it off the Silpat or parchment paper onto a rack or board. Serve warm or at room temperature within a few hours of baking.
OUR SHIBA DOGS, Ruggles and Lulu, eat pretty well. They get homemade beef and chicken stew every evening, and over the years have tasted everything from foie gras to Saint Marcellin cheese (okay, and they once had a few grains of caviar). They love these biscuits, probably more for the peanut butter and garlic than for the parsley, but that’s in there because I think it’s healthy for them. Both of them are very good dogs; Ruggles was just “acting” bad for the photo.
1½ cups rolled oats
2 cups whole wheat flour
¼ cup dry nutritional yeast
1½ tablespoons garlic powder
1 cup parsley sprigs, gently packed
½ cup peanut butter, preferably unsalted
1 egg
1 cup water
Preheat the oven to 275°F.
Whirl the oats, flour, yeast, garlic powder, and parsley in a food processor until finely ground. Add the peanut butter and process until combined. Add the egg and water and process until the dough forms a firm ball that spins around the blade.
Turn the dough out onto a board and knead briefly. Pinch off a piece of dough (a size corresponding to the size of your dog), and roll it into a cylinder. Use your fingers to form it into a bone shape, pressing a fingertip into both ends to create sockets (kids will have fun making these). Arrange the biscuits on a parchment-lined baking sheet. Bake the biscuits for about 2 hours, or until lightly browned and quite dry. Cool and store in an airtight container, out of paw’s reach.