“The lungs are placed in a recess so sacred and hidden that nature would seem to have specially withdrawn this part both from the eyes and from the intellect: for, beyond the wish, it has not yet been granted to any one to fit a window to the breast and redeem from darkness the profounder secrets of nature. For of all of the Parts of the body, the lungs alone, as if shrinking from observation, cease from their movement and collapse at once on the first entrance of light and self-revelation. Hence such an ignorance of Respiration and a sort of holy wonder. Still let me draw near to the inmost vitals, and concerning so obscure a matter, make at least a guess.”
— John Mayow, in Tractatus Quinque (1674), quoted from Proctor’s A History of Breathing Physiology, p. 153.
Yogis knew nothing of physiology, at least in terms that would have been helpful to 17th and 18th century European scientists and physicians like John Mayow, but for a long time they have made extraordinary claims about the value of studying the breath. They say flatly, for example, that the breath is the link between the mind and the body, and that if we can control our respiration we can control every aspect of our being. This is the endpoint, they tell us, that begins with simple hatha yoga breathing exercises. Every aspect of our being? That’s a lot, by any standard. No matter: even though such comments may stimulate our curiosity, their pursuit is outside the scope of this book. Our objective here is to pursue studies in breathing as far as they can be tested objectively and experientially, and then to discuss some of the relationships between yoga and respiration that can be correlated with modern biomedical science: how different patterns of breathing affect us in different ways, why this is so, and what we can learn from practice and observation.
Breathing usually operates at the edge of our awareness, but will and volition are always at our disposal. Just as we can choose how many times to chew a bite of food or adjust our stride when we are walking up a hill, so can we choose the manner in which we breathe. Most of the time, however, we run on “automatic,” allowing input from internal organs to manage the rate and depth of our breathing. Yogis emphasize choice. They have discovered the value of regulating respiration consciously, of breathing evenly and diaphragmatically, of hyperventilating for specific purposes, and of suspending the breath at will. But even though these aims might seem laudable, readers should be made aware that the classical literature of hatha yoga generally warns students against experimenting intemperately with breathing exercises. Verse 15 of Chapter 2 of the Hatha Yoga Pradipika is typical: “Just as lions, elephants, and tigers are gradually controlled, so the prana is controlled through practice. Otherwise the practitioner is destroyed.” This sounds like the voice of experience, and we ought not dismiss it casually. We’ll revisit the issue of temperance at the end of the chapter after having examined the anatomy and physiology of respiration. There are reasons for caution.
To understand the benefits of controlled breathing we must proceed step by step, beginning with a look at the overall design of the respiratory system, and then at the way skeletal muscles draw air into the lungs. Next we’ll see how breathing affects posture and how posture affects breathing. After that we’ll explore how the two major divisions of the nervous system—somatic and autonomic—interact to influence breathing. Then we’ll turn to the physiology of respiration and examine how lung volumes and blood gases are altered in various breathing exercises. That will point us toward the mechanisms by which respiration is regulated automatically and at how we can learn to override those mechanisms when we want to. Finally we’ll examine four different kinds of breathing—thoracic, paradoxical, abdominal, and diaphragmatic—and the relationships of each to yoga breathing practices. At the end of the chapter we’ll return to the issue of moderation in planning a practice.
THE DESIGN OF THE RESPIRATORY SYSTEM
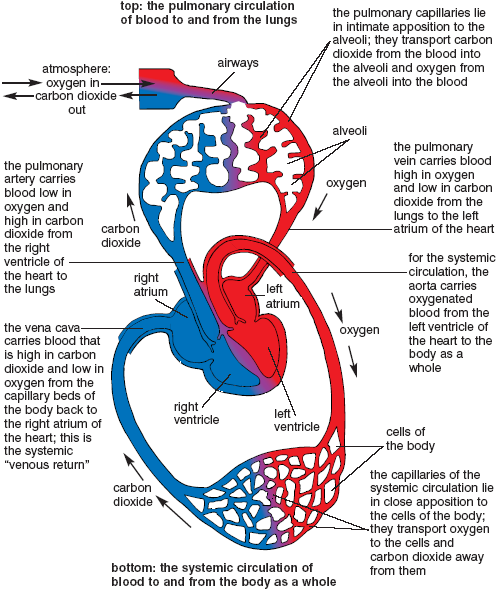
Every cell in the body needs to breathe—taking up oxygen, burning fuel, generating energy, and giving off carbon dioxide. This process, known as cellular respiration, depends on an exchange—moving oxygen all the way from the atmosphere to lungs, to blood, and to cells, and at the same time moving carbon dioxide from cells to blood, to lungs, to atmosphere. The body accomplishes this exchange in two steps. For step one we draw air into the lungs, where it comes in contact with a large wet surface area—the collective hundred million alveoli—into which oxygen can dissolve and from which carbon dioxide can be eliminated. For step two oxygen travels in the pulmonary circulation from the lungs to the heart and in the systemic circulation from the heart to the cells of the body. Carbon dioxide travels in the opposite direction, first from the cells of the body to the heart in the systemic circulation, and then from the heart to the lungs in the pulmonary circulation (fig. 2.1 and chapter 8).
Everything about the respiratory system is accessory to the movement of oxygen and carbon dioxide. Airways lead from the nose and mouth into the lungs (fig. 2.2). Air is pulled backward in the nose past the hard and soft palates, where it makes a 90° turn and enters a funnel-shaped region, the pharynx. From there it continues downward into the larynx, which is the organ for phonation and whose vocal cords vibrate to create sound. Below the larynx air passes into the trachea, the right and left primary bronchi, and then into the two lungs, each of which contains 10 bronchopulmonary segments that are served individually by secondary bronchi. The secondary bronchi in turn divide into tertiary bronchi and smaller subdivisions (bronchioles) that collectively compose the bronchial tree (fig. 2.3). The terminal bronchioles of the bronchial tree in turn open into the tiny alveoli, giving a microscopic view of the lungs the appearance of a delicate lacy network. The trachea and other large tubes in the airways are held open by incomplete rings of cartilage, and the alveoli remain open because a special surfactant on their walls limits their expansion during the course of a full inhalation and yet prevents surface tension from collapsing them during the course of a full exhalation.

Figure 2.1. Cardio-respiratory system. As indicated by the arrows, oxygen is transported from the atmosphere to the cells of the body: from airways to lungs to the pulmonary circulation, heart, and finally to the systemic circulation. Carbon dioxide is transported in the other direction: from the cells to the systemic circulation, heart, pulmonary circulation, lungs, airways, and atmosphere (Dodd).
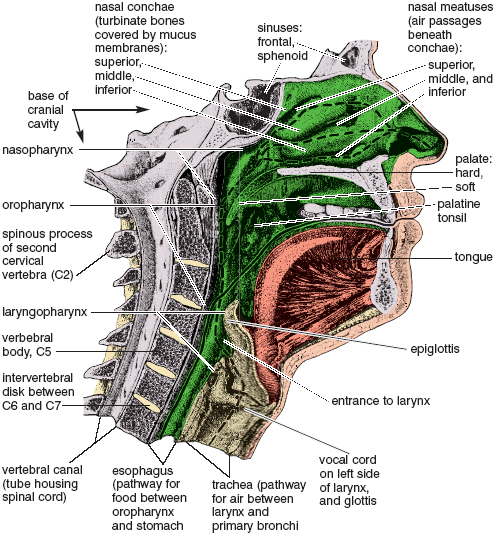
Figure 2.2. Nearly mid-sagittal cut (just to the left of the nasal septum) showing the left half of the head and neck, and revealing the crossing passageways for food (solid line from the oral cavity into the esophagus) and air (dashed lines from the nasal passages into the trachea). (from Sappey).
The pharynx is a crossroads for the passage of air and food. Air passes down and forward from the nasopharynx into the laryngopharynx and then into the larynx and trachea. Food is chewed in the mouth, and from there it is swallowed backward into the oropharynx and across the pathway for air into the esophagus, which is located behind the trachea just in front of the vertebral column (fig. 2.2). The glottis, which is the narrowed aperture in the larynx at the level of the vocal cords, closes when we swallow. You can feel that happen if you initiate either an inhalation or an exhalation and then swallow some saliva. You will find, no matter what part of the breathing cycle you are in, that swallowing obstructs breathing. If it doesn’t, food may “go down the wrong way,” as children put it, and we choke.
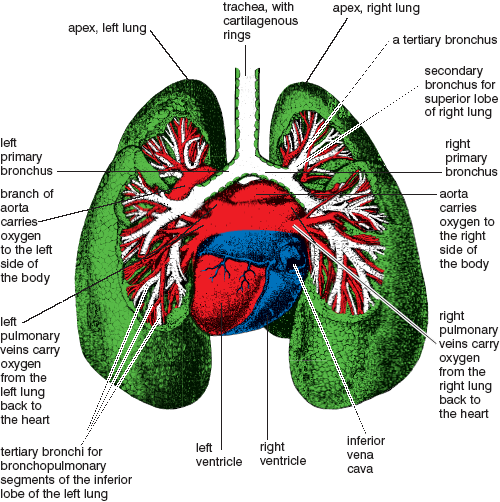
Figure 2.3. Isolated heart-lung preparation as viewed from behind. The aorta and superior vena cava are not visible from this perspective. The bronchial tree branches into right and left primary bronchi, 5 secondary bronchi (3 for the right lung and 2 for the left), and 20 tertiary bronchi to the bronchopulmonary segments (10 for each lung). Branches of the pulmonary arteries and veins are likewise associated with each of the bronchopulmonary segments (Sappey).
The lungs are mostly composed of air: 50% air after full exhalation and 80% air after full inhalation. If you slap the side of your chest you’ll hear a hollow sound; contrast this with the lower-pitched liquidy sound that comes from slapping your hand against your abdomen. A slippery membrane that is itself impervious to air covers the lungs, which can in turn be likened roughly to blown-up balloons that fill the rib cage, excepting that the “balloons” are not tied off at their necks. So why don’t they deflate just like loosed balloons that fly away? The answer is fundamental to the design of the respiratory system. The lungs have an inherent elasticity, and they remain inflated inside the rib cage only because they faithfully track changes in the volume of the chest as it gets larger and smaller. How can this be? It is because nothing lies between the outer surfaces of the lungs and the chest wall except a potential space, the pleural cavity. This cavity contains no air, only a vacuum which holds the lungs tightly against the inner surface of the chest wall, along with a small amount of lubricating fluid that permits the lungs to expand and contract as the chest expands and contracts through the agency of the surrounding muscles of respiration (figs. 2.4, 2.6, and 2.9).
TWO EMERGENCY SITUATIONS
Two emergency situations will put all this in perspective. First, if your rib cage were penetrated on one side in a traumatic injury, air would rush into the pleural cavity and cause the lung on that side to collapse. This is called pneumothorax. How quickly it develops depends on the size of the injury. With a large enough opening, the lung collapses almost like letting the air out of the neck of a balloon, as might be surmised from Mayow’s astute observations more than 300 years ago.
More perilously than pneumothorax for one lung, if both sides of the rib cage are grossly penetrated, both lungs collapse to their minimum size and shrink away from the chest wall. With the pleural cavities filled with air, the muscles of respiration cannot get purchase on the external surfaces of the lungs to create an inhalation, and unless someone holds your nose and blows directly into your mouth to give you artificial respiration, you will die in a few minutes.
[Technical note: There is one other alternative. If you were thinking fast enough and not too distracted by the injury, you could balloon out your cheeks and quickly (two times per second) “swallow” air into your lungs 10–15 times for inhalation, closing the glottis after each swallow. To exhale you simply open the glottis. For an interesting exercise in awareness, and to feel for yourself how the lungs effortlessly get smaller when you open your glottis to exhale, hold your nose and breathe this way for 2–3 minutes.]
The remedy for pneumothorax in a hospital setting also illustrates the architecture of the system. It’s simple, at least in principle. Tubes are sealed into the openings of the chest wall, and the air is vacuumed out of the pleural cavities. This pulls the external surfaces of the lungs against the inner wall of the chest and upper surface of the diaphragm, and the muscles of respiration can then operate on the inflated lungs in the usual manner.
A second emergency situation involves an obstruction in the airway, perhaps a big chunk of food that has dropped into the larynx instead of the esophagus. If it is too big to get all the way through into the trachea, the obstruction may get stuck in the larynx, block the airway, and prevent you from breathing. In such cases the natural reaction for most people is to try to inhale more forcefully, but this will almost certainly reinforce rather than relieve the obstruction. Trying to exhale may be more productive. Or a second person, someone who knows first aid, could try the Heimlich maneuver, pulling sharply in and up on the abdominal wall from behind to create enough intra-abdominal and intra-thoracic pressure to force the object from the laryngopharynx back into the oropharynx, where it can either be coughed out externally or swallowed properly.
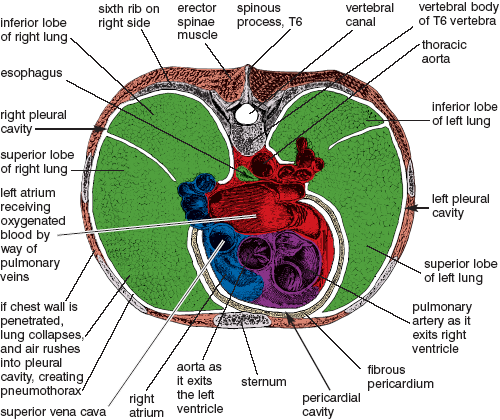
Figure 2.4. Cross-sectional view through the upper chest, looking from above at a section through the lungs and pleural cavities, and at a three-dimensional view of the upper portion of the heart with great vessels, pericardial cavity, and fibrous pericardium. Pericardial and pleural cavities are greatly exaggerated (Sappey).
The emergency surgical remedy for a complete obstruction of the larynx is a tracheotomy, making a midline incision between the larynx and the pit of the throat, quickly separating the superficial muscles, and opening the exposed trachea with another midline incision just below the thyroid gland. This allows inhalation and exhalation to take place below the obstruction.
In the case of pneumothorax, when the chest wall has been penetrated and the lungs are collapsed, the muscles of respiration can expand and contract the chest, but the effort is all for nothing since the requisite contact between the inner surface of the chest wall and the outer surface of the lungs has been lost. It’s like a car stuck in the snow—the wheels turn but they can’t move you forward. The second case is like a car with its drive wheels immobilized in concrete—the blockage in the airway completely frustrates the action of the muscles of respiration. In both situations we are trying to pull air into the lungs by using our force of will but we are unable to support our inner needs with our external efforts.
Inhalations can take place only as a result of muscular activity. Exhalations are different: the lungs have the capacity to get smaller because their elasticity keeps pulling them, along with the rib cage, to a smaller size. And as already mentioned, the size of the lungs follows the size of the chest in lockstep: anything that expands and contracts the chest also expands and contracts the lungs, whether it is lifting or compressing the rib cage, lowering or raising the dome of the respiratory diaphragm, releasing or pressing inward with the abdominal muscles, or allowing the elasticity of the lungs to draw in the chest wall.
The way in which the muscles of respiration accomplish breathing is more complex than the relatively simple way a muscle creates movements around a joint. Three main sets of muscles are active when you breathe normally: the intercostal muscles, the abdominal muscles, and the respiratory diaphragm. We’ll start our discussion with the intercostal muscles.
THE INTERCOSTAL MUSCLES
When we breathe, and in particular when we emphasize chest breathing, the short intercostal (between the ribs) muscles operate as a unit to expand and contract the chest (figs. 2.5 and 2.9). Two sets of these muscles, one under the other, act on the rib cage. The external intercostal muscles run between the ribs in the same direction as the most external sheet of abdominal muscles (figs. 2.7, 2.9, 3.11–13, and 8.8); they lift and expand the rib cage for inhalation, like the movement of an old-fashioned pump handle as it is lifted up from its resting position. The internal intercostal muscles run at right angles to the external layer; they pull the ribs closer together as well as down and in for exhalation (usually a forced exhalation). If you place your hands on your chest with the fingers pointed down and medially (toward the midline of the body), this approximates the orientation of the external intercostal muscles, and if you place your hands on your chest with the fingers pointing up and medially, this approximates the orientation of the internal intercostal muscles (fig. 2. 5). The external intercostal muscles do not always act concentrically to lift the rib cage; during quiet breathing they also act isometrically to keep the rib cage from collapsing inward when the respiratory diaphragm (see below) creates the vacuum that draws air into the lungs.
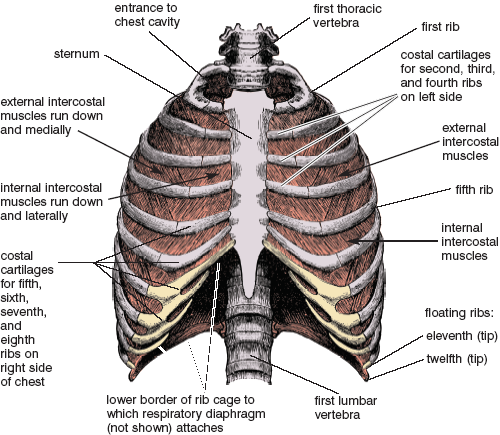
Figure 2.5. Surface view of chest. The internal intercostal muscles are visible in front near the sternum where they are not overlain by the external intercostals, and they are also visible laterally where the external intercostals have been dissected away (between the fifth and sixth ribs). As a group, the external intercostal muscles lift the rib cage up and out to support inhalation, and the internal intercostal muscles pull it down and in to complete a full exhalation (from Morris).
THE ABDOMINAL MUSCLES
In breathing, the abdominal muscles (figs. 3.11–13, 8.8, 8.11, and 8.13–14) function mainly in deep and forced exhalations, as when you try to blow up a balloon in one breath. For that task the muscles shorten concentrically, pressing the abdominal wall inward, which in turn pushes the abdominal organs up against the relaxed (or relaxing) diaphragm. In combination with the action of the internal intercostal muscles, this forcibly decreases the size of the chest cavity and pushes air out of the lungs. You can also feel the action of the abdominal muscles by pursing the lips and forcing the breath out through the tiny opening. In yoga the abdominal muscles are important for what yogis refer to as even breathing, and they are also key elements for many breathing exercises.
THE ANATOMY OF THE DIAPHRAGM
Because the respiratory diaphragm is completely hidden inside the torso, most people have only a rudimentary notion of what it looks like or how it operates. The simplest way to describe it is to say that it is a domed sheet of combined muscle and tendon that spans the entire torso and separates the chest cavity from the abdominal cavity (figs. 2.6–9). Its rim is attached to the base of the rib cage and to the lumbar spine in the rear.
The diaphragm is shaped like an umbrella, or an upside-down cup, except that it is deeply indented to accommodate the vertebral column. It consists of a central tendon, a costal portion, and a crural portion. The central tendon forms the top surface of the dome, which floats there freely, attached only to the muscle fibers of the costal and crural portions of the diaphragm. It is thus the only “tendon” in the body which does not attach directly to the skeleton. The largest part of the diaphragm is its costal component, whose muscle fibers fan down from the central tendon and attach all around to the lower rim of the rib cage (figs. 2.7–9). The crural portion of the diaphragm consists of the right crus and left crus, which attach to the forward arch of the lumbar spine (figs. 2.7–8). These are separated from one another by the aorta as it passes from the thoracic cavity into the abdominal cavity. The architecture of the diaphragm thus permits it to move the central tendon of the dome, the base of the rib cage, the lumbar spine, or any combination of the three.
You can note the site of the costal attachment of the diaphragm by hooking your fingers under the rib cage and tracing its lower margin. It is high in front where it attaches to the sternum, and lower where you trace it laterally (to the side), but you can’t feel it behind because the deep back muscles are in the way. You can also occasionally feel the region where the crura (plural form) of the diaphragm attach to the lumbar vertebrae, especially in someone slender who is lying flat on the floor, because the lumbar region sometimes arches forward to within an inch or so of the surface of the abdominal wall. This vividly illustrates how far forward the diaphragm can be indented by the spinal column.
The diaphragm has to be one of the most interesting and complex muscles in the body. Because it is a thin sheet, its shape bears the impressions of its immediate surroundings—the rib cage, the heart and lungs, and the abdominal organs, and it is dependent on the existence and anatomical arrangements of these structures for its function. The diaphragm’s extensive relationship with the chest wall is a case in point. Even though the costal portion of the diaphragm extends to the base of the rib cage, the lungs are never pulled that far inferiorly (toward the feet), and for much of its area the costal portion of the diaphragm is in direct contact with the inner surface of the rib cage, with only the potential space of the pleural cavity separating the two. This region into which the lungs never descend is called the zone of apposition (fig. 2.9); without its slippery interfaces, the outer surface of the diaphragm could not slide easily against the inner aspect of the rib cage, and the dome of the diaphragm could not move up and down smoothly when we breathe.
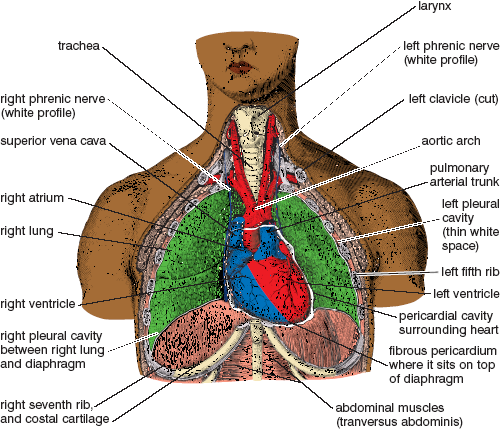
Figure 2.6. Front view of the chest, with the first six ribs, clavicles, and sternum cut away to reveal the internal organs, which include: the larynx, trachea, lungs and pleural cavities; the heart, great vessels (aorta, vena cava, pulmonary artery, and pulmonary vein, not all shown), pericardial cavity, and fibrous pericardium; the upper front portion of the respiratory diaphragm; and the right and left phrenic nerves. The pleural cavities are represented by the thin white spaces between the lungs and the body wall, and between the lungs and diaphragm (Sappey).
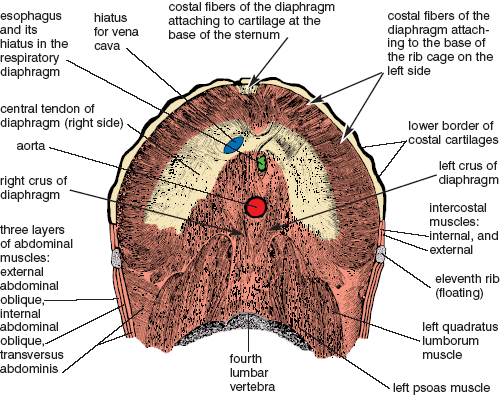
Figure 2.7. A view of the respiratory diaphragm looking at its underneath side from below. It’s like a rejected upside-down bowl that a potter pushed in on one side. The pushed-in place is the indentation for the vertebral column, and the bottom of the bowl contains hiatuses (openings) for the esophagus, aorta, and inferior vena cava. The central tendon of the diaphragm is represented by the large, lightly contrasted central arch. The muscle fibers of the diaphragm are disposed radially from the central tendon: the costal fibers attach to the base of the rib cage most of the way around (approaching the viewer in the third dimension); and the right and left crura attach to the lumbar vertebrae below (between and in front of the origins of the psoas muscles). (from Morris)
THE FUNCTION OF THE DIAPHRAGM
To analyze the origins and insertions of a muscle that is shaped like an indented umbrella is a bit daunting, but that is what we must do if we want to understand how the diaphragm functions in breathing and posture. We’ll begin with the simplest situation, which is found in supine postures. Here the base of the rib cage and the lumbar spine act as fixed origins for the diaphragm, and under those circumstances the central tendon has to act as the movable insertion. The dome of the “cup,” including the central tendon, descends and flattens during inhalation, putting pressure on the contents of the abdomen and creating a slight vacuum in the chest that draws air into the lungs. By contrast, the dome of the diaphragm is drawn upward during exhalation by the inherent elasticity of the lungs, and as that happens air escapes into the atmosphere.
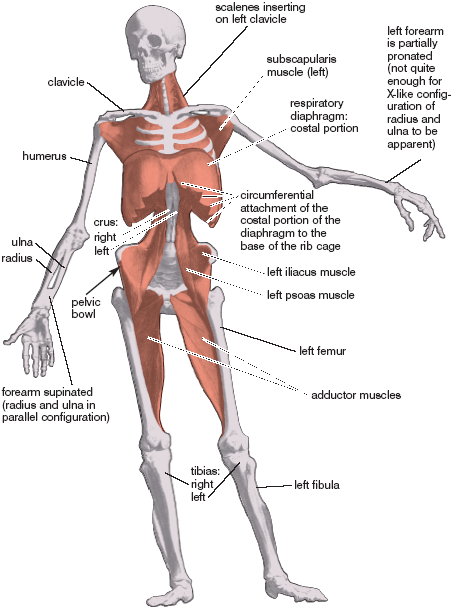
Figure 2.8. Respiratory diaphragm and other deep muscles of the body. With internal organs removed and most of the rib cage and sternum cut away, the dome-like structure of the diaphragm is readily apparent (Albinus).
Whenever the chest and spine are fixed, as typically occurs during relaxed breathing in a supine position, the top of the dome of the diaphragm is pulled straight downward during inhalation, like a piston, with the chest wall acting as the cylinder. During a supine inhalation the fibers of the diaphragm shorten concentrically and pull the central tendon inferiorly. During a supine exhalation its fibers lengthen eccentrically as the central tendon is both pushed from below and pulled from above—pushed by gravity acting on the abdominal organs and pulled by the elastic recoil of the lungs. The abdominal wall remains relaxed. It stretches out anteriorly (forward) as the dome of the diaphragm descends during inhalation, and it moves back posteriorly (toward the back of the body) as the diaphragm relaxes and rises during exhalation. Only in supine and inverted postures do we see the diaphragm act with such purity of movement.
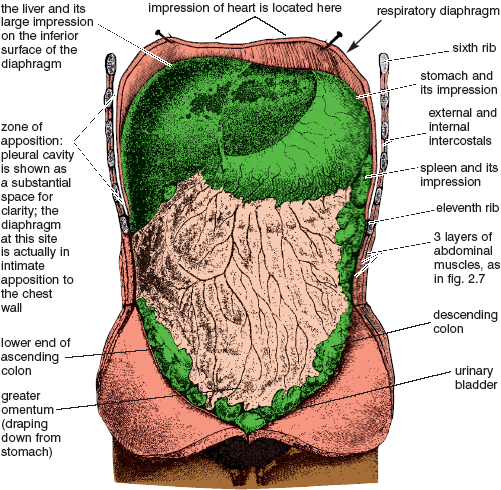
Figure 2.9. Abdominal organs in place, with the diaphragm and lower half of the rib cage cut to illustrate the extensive zone of apposition, into which the lungs do not descend even during the course of a maximum inhalation (Sappey).
This kind of breathing is carried out in its entirety by the diaphragm, but it is often referred to as abdominal breathing, or belly breathing, because this is where movement can be seen and felt. It is also known as deep diaphragmatic breathing in recognition of its effects in the lower abdomen. Finally, we can call it abdomino-diaphragmatic breathing to indicate that the downward movement of the dome of the diaphragm not only draws air into the lungs, it also pushes the lower abdominal wall anteriorly.
Another type of diaphragmatic breathing operates very differently. Amazingly, its principal mechanical features were accurately described by Galen (a first century Roman physician and the founder of experimental physiology) almost two thousand years ago, even though his concept of why we breathe was pure fantasy. During inhalation the primary action of this type of breathing is not to enlarge the lungs by pulling the dome of the diaphragm inferiorly, but to lift the base of the chest and expand it laterally, posteriorly, and anteriorly. It works like this. If there is even mild tension in the lower abdominal wall, that tension will impede the downward movement of the dome of the diaphragm. And since the abdominal organs cannot be compressed, they can act only as a fulcrum, causing the diaphragm to cantilever its costal site of attachment on the rib cage outwardly, spreading the base of the rib cage to the front, to the rear, and to the sides, while at the same time pulling air into the lower portions of the lungs. In contrast to the pump handle analogy for intercostal breathing, diaphragmatic breathing has been likened to lifting a bucket handle up and out from its resting position alongside the bucket (see Anderson and Sovik’s Yoga, Mastering the Basics for illustration and further explanation). Without the resistance of the abdominal organs, the diaphragm cannot create this result. The intercostal muscles serve to support the action of the diaphragm, not so much to lift and enlarge the chest but to keep it from collapsing during inhalation.
[Technical note: Precise language does not exist, at least in English, for describing in a single word or phrase how the respiratory diaphragm operates to expand the rib cage in diaphragmatic breathing. A “cantilever truss,” however, from civil engineering, describes a horizontal truss supported in the middle and sustaining a load at both ends, and this comes close. In the special case of the human torso, the abdominal organs and intra-abdominal pressure provide horizontal support for the dome of the diaphragm, and the lift and outward expansion of the base of the rib cage is a load sustained at the perimeter of the base of the rib cage.]
The origins and insertions of the diaphragm for abdominal inhalations are different than for diaphragmatic inhalations, and understanding the subtleties of these functional shifts will further clarify the differences between the two types of breathing. For abdominal breathing in the corpse and inverted postures, both the costal attachment to the rib cage and the crural attachment to the spine act as stationary origins; the only part of the diaphragm that can move (the insertion, by definition) is the central tendon in the dome, which moves inferiorly during inhalation and superiorly (toward the head) during exhalation. By contrast, for diaphragmatic breathing, the central tendon is held static by the relative tautness of the abdominal wall and serves mainly as a link between the spinal attachments of the crura, which now act as the stationary origin, and the costal attachment to the base of the rib cage, which now acts as the movable insertion.
To summarize, diaphragmatic breathing occasions an expansion of the rib cage from its lower border. To differentiate it from abdomino-diaphragmatic breathing, in which the rib cage remains static, we can call it thoraco-diaphragmatic breathing. It should be mentioned that the terms abdominal breathing, belly breathing, deep diaphragmatic breathing, and diaphragmatic breathing have all been in casual, although generally noncritical, use for a long time, but the terms “abdomino-diaphragmatic” and “thoraco-diaphragmatic” have not appeared in the literature before now.
The way breathing affects posture and the way posture affects breathing will be continuing themes throughout the rest of this book. The importance of these issues have long been recognized in yoga, but most commentaries are vague and imprecise. Here I am aiming for simplicity: photographic records of exhalations and inhalations, and superimpositions of computer-generated tracings of inhalations (since these are always larger) on the exhalations. As seen in both this chapter and in chapters 3 and 5, such images provide a source of raw data not only for how inhalations result in movements of the chest and abdomen but also for how they affect the body from head to toe. The single most important key to understanding all such effects is the operation of the respiratory diaphragm, and to introduce the subject, we’ll explore two exercises that will help you become aware of its anatomy and understand two of its main roles in movement other than those for respiration itself.
A VARIATION OF THE COBRA
Lie face down on the floor and interlock your arms behind your back, grasping your forearms or elbows. Or you can simply place your hands in the standard cobra position alongside the chest. Strongly tighten all the muscles from the hips to the toes, and use the neck and deep back muscles to lift the head, neck, and chest as high as possible. You are not making any particular use of the diaphragm to come into this position. Now inhale and exhale deeply through the nose. Notice that each inhalation raises the upper part of the body higher and that each exhalation lowers it (fig. 2.10). Because you are keeping the back muscles engaged continuously during both inhalation and exhalation, the lifting and lowering action is due entirely to the muscles of respiration.
In this variation of the cobra pose we hold the hips, thighs, and pelvis firmly, which stabilizes the lower back and the spinal attachment of the crus of the diaphragm. Inhalation creates tension at all three of the diaphragm’s attachments: one on the vertebral column, one on the base of the rib cage, and the third on the central tendon. But because the hip and thigh muscles have been tightened, the spinal attachment is stabilized, excepting only a slight lifting effect that is translated to the hips. What happens in the torso illustrates clearly how respiratory movements influence posture: with the abdomen pressed against the floor, the contents of the abdominal cavity cannot easily descend, and this restricts the downward movement of the central tendon, which now acts as a link between the two muscular portions of the diaphragm. With the crural attachments stabilized, the only insertion that can be mobilized without difficulty is the one at the base of the rib cage. This attachment therefore expands the chest from its base, draws air into the lungs, and lifts the upper body. If you are breathing smoothly and deeply you will feel a gentle, rhythmic rocking movement as the head, neck, and chest rise and fall with each inhalation and exhalation. This is a perfect illustration of thoraco-diaphragmatic breathing.
In this exercise the action of the diaphragm during inhalation reinforces the activity of the deep back and neck muscles and thus deepens the backward bend. During exhalation the muscle fibers of the diaphragm lengthen eccentrically as they resist gravity. When they finally relax at the end of exhalation, the backward bend in the spine is maintained only by the deep muscles of the back and neck. This is an excellent exercise for strengthening the diaphragm, because after you have lifted to your maximum with the deep back muscles, you are using the diaphragm, aided by the external intercostal muscles acting as synergists, to raise the upper half of the body even higher—and this is a substantial mass to be lifted by a single sheet of muscle acting as prime mover. Furthermore, if you keep trying as hard as possible to inhale deeply without closing the glottis, you will be creating the most extreme possible isometric exercise for this muscle and its synergists, the external intercostals. But be watchful. If this effort creates discomfort in the upper abdomen on the left side, please read the section in chapter 3 on hiatal hernia before continuing.
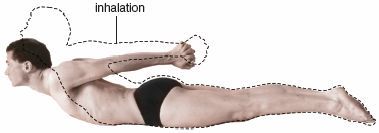
Figure 2.10. Cobra variation with tightly engaged lower extremities. Diaphragmatic inhalation (dotted line) lifts the upper half of the body over and above what can be accomplished by the back muscles acting alone (halftone). Contrast with the diaphragmatic rear lift in figure 2.11.
THE DIAPHRAGMATIC REAR LIFT
Next try a posture that we can aptly call the diaphragmatic rear lift. Again lie face down, placing your chin against the floor, with the arms along the sides of the body and the palms next to the chest. Keeping the chest pressed firmly against the floor, relax all the muscles from the waist down, including the hips. Take 10–15 nasal breaths at a rate of about one breath per second.
With the thighs and hips relaxed, and with the base of the rib cage fixed against the floor, the action of the diaphragm during inhalation can be translated to only one site: the spinal attachment of the crus. And because the deep back muscles are relaxed, each inhalation lifts the lower back and hips, and each exhalation allows them to fall toward the floor (fig. 2.11). Make sure you produce the movement entirely with the diaphragm, not by bumping your hips up and down with the gluteal (hip) and back muscles. Because the inhalations increase the lumbar curvature, this exercise will not be comfortable for anyone with low back pain.

Figure 2.11. Diaphragmatic rear lift. With the rib cage anchored against the floor, its lower rim acts as an origin for the diaphragm rather than an insertion (as happens in the cobra posture in fig. 2.10). If the gluteal region and lower extremities remain completely relaxed, the crural attachments of the diaphragm then lift the hips during inhalation and lower them back down during exhalation.
You can feel the diaphragmatic rear lift most easily if you breathe rapidly; the quick inhalations whip the hips up and away from the floor and the sudden exhalations drop them. But if you breathe slowly and smoothly you will notice that each inhalation gradually increases the pull and tension on the hips and lower back, even though it does not create much movement, and that each exhalation gradually eases the tension. When you are breathing slowly enough, you can also feel the muscle fibers of the diaphragm shorten concentrically during inhalation and lengthen eccentrically during exhalation as they control the gravity-induced lowering of the hips toward the floor.
The origins and insertions of the diaphragm are reversed in the diaphragmatic rear lift in comparison with the cobra variation, and this creates repercussions throughout the whole body. In the cobra variation we fix the hips and thighs, allowing the costal attachment of the diaphragm to lift the rib cage, and with the rib cage the entire upper half of the body. In the diaphragmatic rear lift we do just the opposite: we fix the rib cage, relax the hips and thighs, and allow the crural insertion of the diaphragm to lift the lumbar spine and hips.
These two postures also show us how important it is that the diaphragm is indented so deeply by the vertebral column that it almost encircles the spine. This enables it to act both from above and behind to accentuate the lumbar arch during inhalation, lifting the upper half of the body in the cobra variation, and lifting the sacrum and hips in the diaphragmatic rear lift.
THE SOMATIC AND AUTONOMIC SYSTEMS
The way we breathe affects far more than our posture, and we can best explore those ramifications by looking at the two great functional divisions of the nervous system—somatic and autonomic—and at the tissues and organs they each oversee. The somatic nervous system is concerned with everything from the control of skeletal muscle activity to conscious sensations such as touch, pressure, pain, vision, and audition. For the autonomic nervous system, think first of regulation of blood pressure, viscera, sweat glands, digestion, and elimination—in fact, any kind of internal function of the body that you have little or no interest in trying to manage consciously. This system is concerned with sensory input to the brain from internal organs—generally more for autonomic reflexes than for inner sensations—as well as for motor control of smooth muscle in the walls of internal organs and blood vessels, cardiac muscle in the wall of the heart, and glands (figs. 10.4a–b). Both systems are involved in breathing.
THE SOMATIC SYSTEM
Since breathing draws air into the lungs, and since the lungs are internal organs, we might suppose that the muscles of respiration are controlled by the autonomic nervous system. But they’re not. The act of breathing is a somatic act of skeletal muscles. In chapter 1 we discussed the somatic nervous system, although without naming it, when we discussed the control of the skeletal muscles by the nervous system. Respiration makes use of this system, whether we want to breathe fast or slow, cough, sneeze, or simply lift an object while going “oomph.” When we participate consciously in any of these activities we breathe willfully to support them, and we do so from the command post in the cerebral cortex that influences the lower motor neurons for respiration. If you are consciously and quietly using the diaphragm as you breathe, you are activating the lower motor neurons whose axons innervate the diaphragm by way of the phrenic nerves (figs. 2.6 and 2.12). If you are eight months pregnant the diaphragm can’t function efficiently, and in order to breathe you will have to activate lower motor neurons whose axons innervate the intercostal muscles by way of the intercostal nerves. And if you are trying to ring the bragging bell at a state fair with a sledge hammer, you will make a mighty effort and a grunt with your abdominal muscles, again calling on motor neurons from the thoracic cord to transmit the cerebral commands to the muscles of the abdominal wall.
The cell bodies for the phrenic nerves are located in the spinal cord in the region of the neck (the cervical region), and the cell bodies for the intercostal nerves are located in the spinal cord in the region of the chest (the thoracic region). In the neck the spinal cord contains eight cervical segments (Cl–8), and in the chest it contains twelve thoracic segments (Tl–12; figs. 1.5 and 2. 12). The diaphragm is innervated by the right and left phrenic nerves from spinal cord segments C3–5; the intercostal and abdominal muscles are innervated by the intercostal nerves from spinal cord segments T1–12 (figs. 1.5 and 2.12).
Both the phrenic and intercostal nerves are necessary for the full expression of breathing. If for any reason the intercostal nerves are not functional, leaving only the phrenic nerves and a functioning diaphragm intact, the diaphragm will support respiration by itself (fig. 2.12, site d). But in that event the external intercostal muscles will no longer maintain the shape of the chest isometrically, and every time the dome of the diaphragm descends and creates a vacuum in the lungs and pleural cavity, the chest wall will be tugged inward. On the other hand, if for some reason the phrenic nerves are not functional (see asterisks fig. 2.12), but the intercostal nerves and muscles are intact, the vacuum produced by activity of the external intercostal muscles will pull the dome of the flaccid diaphragm higher in the chest during the course of every inhalation.
Like all typical somatic motor neurons, those for respiration are controlled from higher centers in the brain, and life cannot be supported by spinal cord transections above C3 (fig. 2.12, site c). A transection at C6 is not quite as serious. It spares input from the brain to the somatic motor neurons whose axons travel in the phrenic nerve, and in that manner spares the function of the diaphragm, as mentioned above, but it eradicates input to the somatic motor neurons that innervate the intercostal and abdominal muscles, as well as to the rest of the skeletal muscles of the body from the neck down, resulting in quadriplegia (fig. 2.12, site d; also see chapter 1). If a complete transection occurs at L1—the first lumbar segment of the spinal cord—all input to all motor neurons for all muscles of respiration is spared and breathing is normal, although such a transection would result in paraplegia (fig. 2.12, site e; see also chapter 1).
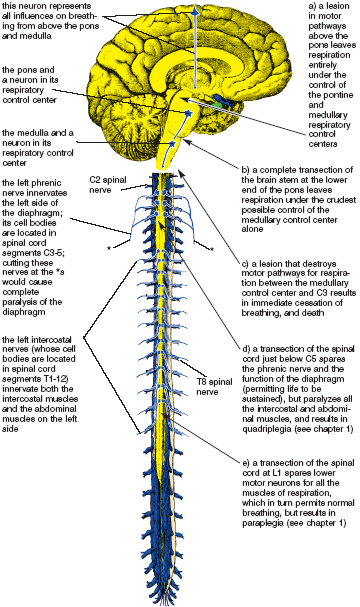
Figure 2.12. Central nervous system pathways and peripheral nerves for the motor control of respiration. Sites of lesions that affect breathing and/or that cause quadriplegia and paraplegia are indicated at asterisks and at a-e (Sappey).
THE RESPIRATORY CENTERS
Breathing goes on twenty-four hours a day. We can regulate it mindfully from the cerebral cortex if we want, in the same way that we can regulate our movement and posture, but most of the time our minds are occupied elsewhere and we rely on other motor centers to manage respiration. These respiratory control centers are located in the two lowest segments of the brain stem (the continuation of the spinal cord into the brain). A crude rhythm for respiration is generated in the lowest of these segments—the medulla—and this is fine-tuned by the next higher segment—the pons (fig. 2.12). Input from these centers to the motor neurons of respiration is unconscious. Willed respiration, of course, is directed from the cerebral cortex and can override the rhythms generated by the lower segments of the brain. But even if higher centers have been destroyed by a stroke or traumatic head injury (fig. 2.12, site a), the controlling centers for respiration in the pons or even just the medulla may still survive, allowing someone who is otherwise brain-dead to continue breathing indefinitely.
We depend on the respiratory centers to manage somatic aspects of breathing automatically, but sometimes the mechanisms do not work perfectly. In a rare form of sleep apnea—the central hypoventilation syndrome—the automatic control of ventilation is lost but the ability to breathe voluntarily is preserved. This is roughly similar to a circumstance immortalized in Jean Giraudoux’s play Ondine. Ondine, a water nymph and an immortal, married Hans, a mortal, even though she knew that such a union was forbidden and that Hans was doomed to die if he was unfaithful to her. When the prophecy was fulfilled, Hans was deprived of his automatic functions. “A single moment of inattention,” he tells Ondine, “and I forget to breathe. He died, they will say, because it was a nuisance to breathe.” And so it came to be. This form of sleep apnea is now known as Ondine’s curse.
Although the respiratory pathways in the brain stem support the most primitive form of rhythmic breathing, higher centers can either smooth this out or disrupt it. We all know that when we are in intense emotional states our breathing becomes jerky and irregular. Watch a baby struggle to breathe while it is preparing to cry, or think of how uncontrollable laughing affects a teenager’s breathing. By contrast, when we are calm, the somatic motor circuits for respiration will be delicately balanced and our breathing will be smooth and even. Maintaining such even-tempered states is one of the aims of yoga.
THE AUTONOMIC NERVOUS SYSTEM
When you think of the autonomic nervous system, the first point is not to confuse the terms automatic and autonomic. We can breathe automatically courtesy of the somatic nervous system, but the word autonomic is derived from “autonomy,” the quality of being independent. In the context of the two great divisions of the nervous system, the autonomic nervous system is largely independent of the somatic system; it consists of a vast auxiliary network of neurons that controls viscera, blood vessels, and glands throughout the body. It is not, however, completely autonomous, because it interacts with the somatic nervous system—it both feeds sensory information from within the body into the somatic systems of the brain and spinal cord (in this case our main concern is the respiratory centers), and is affected by the somatic motor systems in return.
We constantly depend on smooth interactions between the somatic and autonomic nervous systems. You race around the block using your skeletal muscles, which are controlled by the somatic nervous system, but you would not get far unless your autonomic nervous system sped up your heart, stimulated the release of glucose from your liver, and shunted blood from the skin to the skeletal muscles. And if, instead of running around the block, you sit down and read a book after dinner, you flip the pages using your skeletal muscles and depend on the unconscious operation of your autonomic nervous system to digest your meal. Respiration, as it happens, is the foremost function in the body in which signals from internal organs have a constant and continuing effect on somatic function, in this case the rate and depth of breathing, twenty-four hours a day.
If we look at an overview of how the autonomic nervous system operates, controlling autonomic influences from the central nervous system (the brain and spinal cord) are relayed to their visceral targets by two systems of autonomic motor neurons: sympathetic and parasympathetic. The sympathetic nervous system prepares the body for emergencies “fight or flight” and the parasympathetic nervous system maintains the supportive functions of the internal organs. Between them, by definition, these two systems execute the autonomic motor commands from the brain and spinal cord. More of these interactions will be discussed in chapter 10, in which we’ll be concerned with the importance of the autonomic nervous system in relaxation.
Here our concern is limited mainly to breathing, and the first thing to note is that the most important autonomic relationship involving the control of respiration is sensory. This does not mean sensory in regard to something you can feel; it refers to influences from sensory receptors that have an impact on breathing. Specifically, the sensory limb of the autonomic nervous system carries information on oxygen and carbon dioxide levels in the blood and cerebrospinal fluid to the respiratory control centers in the brain stem. You would see the important respiratory linkage between the autonomic and somatic systems in operation if you were suddenly rocketed from sea level to the top of Alaska’s Mount Denali. You would immediately begin to breathe faster because your somatic respiratory control centers receive autonomic sensory signals that your blood is not getting enough oxygen, not because you make a conscious somatic decision that you had better do something to get more air.
There are also purely autonomic mechanisms that affect breathing in other ways. The most obvious example is familiar to those who suffer from asthma, or from chronic obstructive pulmonary disease (COPD) combined with bronchitis, and that is the difficulty of moving air through constricted airways. It is not very helpful to have healthy skeletal muscles of respiration if the airways are so constricted that they do not permit the passage of air. Although this is a complex and multifaceted problem, the autonomic nervous system involvement appears to be straightforward. In quiet times when there is less need for air, the parasympathetic nervous system mildly constricts the smooth muscle that surrounds the airways, especially the smaller bronchioles, and thereby impedes the flow of air to and from the alveoli. But in times of emergency or increased physical activity, the sympathetic nervous system opens the airways and allows air to flow more easily. Those who have chronic respiratory diseases have an acute awareness of how difficult it can be to medicate and regulate this system.
HOW BREATHING AFFECTS THE AUTONOMIC NERVOUS SYSTEM
All of our concerns so far have been with how the nervous system influences breathing. These are all widely recognized. What is not as well-known is that different methods of breathing can affect the autonomic nervous system and have an impact on the functions we ordinarily consider to be under unconscious control. Abnormal breathing patterns can stimulate autonomic reactions associated with panic attacks, and poor breathing habits in emphysema patients produce anxiety and chronic overstimulation of the sympathetic nervous system. By contrast, quiet breathing influences the autonomic circuits that slow the heartbeat and reduce blood pressure, producing calm and a sense of stability. Our ability to control respiration consciously gives us access to autonomic function that no other system of the body can boast.
2:1 BREATHING
One breathing technique that can produce a beneficent effect on the autonomic nervous system is 2:1 breathing—taking twice as long to exhale as to inhale. For those who are in good condition, 6-second exhalations and 3-second inhalations are about right, and if you can regulate this without stress, the practice will slow your heart down and you will have a subjective experience of relaxation. As with almost all breathing exercises in yoga, both inhalation and exhalation should be through the nose.
This connection between heart rate and breathing, known as respiratory sinus arrhythmia, involves reflex activity from the circulatory system to the brain stem that causes the heart to beat more slowly during exhalation than it does in inhalation. It is a natural arrhythmia, called “respiratory” because it is induced by respiration, and called “sinus” because the receptors that stimulate the shifts in heart rate are located in the aortic and carotid sinuses, which are bulbous enlargements in those great vessels. If you take longer to exhale than to inhale, especially when you are relaxing, the slowing-down effect of exhalation will predominate. This is an excellent example of how we can willfully intervene to produce effects that are usually regulated by the autonomic nervous system.
There are limits on both ends to the effects of 2:1 breathing. If you are walking briskly, exhaling for two seconds and inhaling one second, you will not get this reaction, and if you take it too far in the other direction, which for most people means trying to breathe fewer than five breaths per minute (8-second exhalations and 4-second inhalations), the exercise may become stressful and cause the heart rate to increase rather than slow down. The golden mean—that which is entirely comfortable—is best.
There is one well-known practical consequence of respiratory sinus arrhythmia. For decades doctors have known empirically that pursed-lip breathing against moderate resistance is helpful for those with obstructive lung disease. What is not generally realized is that the practice is helpful mainly because it lengthens exhalations, slows the heart rate, decreases the amount of air remaining in the lungs after exhalation, and reduces fear and anxiety. Knowledgeable yoga teachers realize that the same end can be accomplished through a different approach—lengthening exhalations by pressing in gently with the abdominal muscles while at the same time breathing through the nose.
Different hatha yoga breathing exercises affect respiration in different ways, but before we can understand how they do this we need a little more background. We’ll start our discussion with a look at the amount of air found in the lungs and airways at different stages of the breathing cycle. These values—the lung volumes, capacities, and anatomic dead space—vary according to stature, age, sex, and conditioning, so to keep things simple we’ll always use round numbers that are characteristic for a healthy young man. The numbers are generally smaller for women, for older men and women, and for those in poor physical condition. That’s not so relevant to us here. Our main interest is not in how the lung volumes and capacities vary in different individuals; it is in how they vary with different breathing practices and postures. The numerical representations in fig. 2.13, as well as in all the charts on respiration, are only simulations, but they will be a useful starting point for more rigorous inquiry.
LUNG VOLUMES, CAPACITIES, AND THE ANATOMIC DEAD SPACE
There are four lung volumes (fig. 2.13). We’ll begin with the tidal volume, which is the amount of air that moves in and out in one breath. Textbooks state that in our healthy young man it amounts to one pint, or about 500 ml (milliliters) during relaxed breathing, but this volume is obviously circumstantial—when we are climbing stairs it will be greater than when we are sitting quietly. The inspiratory reserve volume, about 3,300 ml (3 1/2 quarts), is the additional air you can inhale after an ordinary tidal inhalation. The expiratory reserve volume, about 1,000 ml, is the additional air you can exhale after a normal tidal exhalation. The residual volume, about 1,200 ml, is the amount of air that remains in the lungs after you have exhaled as much as possible.
Lung capacities, of which there are also four, are combinations of two or more lung volumes (fig. 2.13). First, the vital capacity is the total amount of air you can breathe in and out; it totals 4,800 ml and is the combination of the tidal volume plus the inspiratory and expiratory reserve volumes. This is the most inclusive possible definition of the yogic “complete breath,” and is an important clinical value.
Second, the total lung capacity is self-explanatory. In a healthy young man is amounts to about 6,000 ml and is the sum of all four lung volumes, or alternatively, the sum of the vital capacity and the residual volume.
Third, the inspiratory capacity is the total amount of air you can inhale at the beginning of a normal tidal inhalation. This is a restrictive definition of the yogic “complete breath,” which is the combination of the tidal volume and inspiratory reserve volume (about 3,800 ml).
Fourth, the functional residual capacity, 2,200 ml, is the combination of the residual volume and the expiratory reserve volume. As its name implies, this is an especially practical quantity—the amount of air in the lungs at the end of a normal exhalation that will be mixed with a fresh inhalation. This usually amounts to a lot of air—more than four times as much as an ordinary tidal volume of 500 ml. One point of pursed-lip breathing, discussed earlier, is to drastically decrease this value so that the fresh air that you inhale is mixed with a smaller volume of oxygen-poor air.
Lung volumes and capacities differ markedly in different hatha yoga postures and practices. For example, agni sara (chapter 3) almost obliterates the expiratory reserve volume and increases the tidal volume from 500 ml to possibly 1,600 ml (figs. 3.31–33); inverted postures (chapters 8 and 9) decrease the expiratory reserve volume and shift the tidal volume closer to the residual volume; and the bellows breath, which will be discussed at length later in this chapter, minimizes the tidal volume.
The anatomic dead space is another extremely important clinical value—the air-filled space taken up by the airways, which include the nasal passages, pharynx, larynx, trachea, right and left primary bronchi, and the branches of the bronchial tree that lead to the alveoli. It is called a dead space because it does not, unlike the alveoli, transport oxygen into the blood and carbon dioxide out. This space ordinarily totals about 150 ml, so for a tidal volume of 500 ml, only 350 ml of fresh air actually gets to the alveoli. You can get an immediate idea of its significance when you are snorkeling. If you breathe through a snorkel tube with a volume of 100 ml, the practical size of the anatomic dead space increases from 150 ml to 250 ml, you have to inhale 600 ml through the end of the tube just to get 350 ml to the alveoli, and you might have a few moments of panic before you adjust to the need for deeper breaths. Clinical concerns with the anatomic dead space are often grim: in terminal emphysema patients its volume sometimes approaches and exceeds the vital capacity.
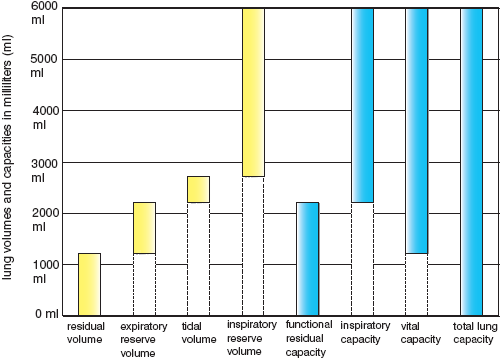
Figure 2.13. The four lung volumes(on the left) and the four lung capacities (on the right). The latter are combinations of two or more lung volumes. All the values are simulations for a healthy young man.
ALVEOLAR AND MINUTE VENTILATION
When we consider how much air we inhale and exhale over a period of time, the first thing we think of is the minute ventilation, the amount of air we breathe in and out over a period of 60 seconds. This is what we feel—the touch of the breath in the nostrils, in and out, over a period of one minute. All you have to do to calculate your minute ventilation is measure your tidal volume and multiply that value times the number of breaths you take per minute. According to textbooks, this would be 500 ml per breath times 12 breaths per minute, and this equals 6,000 ml per minute.
The minute ventilation does not tell us everything we need to know, however, because what is most important is not the amount of air that moves in and out of the nose or mouth, but the amount of air that gets past the anatomic dead space into the alveoli. This is also measured over a period of one minute and is called, logically enough, the alveolar ventilation. It is our primary concern when we want to know how breathing affects the content of oxygen and carbon dioxide in the blood, and that is our main interest in yoga breathing exercises. To calculate the alveolar ventilation, subtract the size of the anatomic dead space from the tidal volume before multiplying by the respiratory frequency. For example, 500 ml of tidal volume minus 150 ml of anatomic dead space equals 350 ml per breath, and 350 ml per breath times 12 breaths per minute yields an alveolar ventilation of 4,200 ml per minute.
The values given for lung volumes and capacities, as well as for minute and alveolar ventilation, are only textbook examples—it is not uncommon to breathe more rapidly and take in a smaller tidal volume for each breath. If you watch a dozen people closely in casual situations, such as when they are sitting on a bus with their arms folded across their chests, you can easily count the breaths they take per minute, and it is usually faster than the textbook standard of 12 breaths per minute: 24–30 breaths per minute is a lot more common. This is of no great consequence because everyone simply adjusts their tidal volume so that their alveolar ventilation stays within a normal range (fig. 2.14). In meditation the rate of breathing generally seems to slow down, but it can still vary widely and may either be faster or slower than the standards cited in the medical literature on respiration. Here too, you adjust the rate of breathing and the tidal volume so that the alveolar ventilation comes in line with the metabolic requirements of the practice.
ATMOSPHERIC, ALVEOLAR, AND BLOOD GASES
The whole point of breathing is to get oxygen from the atmosphere to the cells of the body and carbon dioxide from the body into the atmosphere, and to understand how this happens we need to know how diffusion and pressure differentials drive those processes. Here’s how it works: A gas moves from a region of high concentration to one of low concentration, just as a drop of dye placed in a glass of water gradually diffuses throughout, sooner or later equalizing the mixture until it has colored all the water in the glass uniformly. Very crudely, something similar happens in the body. There is much concentration of (or pressure from) oxygen in the atmosphere, less in the alveoli, less than that in the arterial blood, and less yet in the cells of the body that are using the oxygen. By the same token, there is much concentration of (or pressure from) carbon dioxide in the vicinity of the cells that are eliminating it, somewhat less in the veins and alveoli, and almost none in the atmosphere.
The standard measure of pressure we use for gases is millimeters of mercury (mm Hg), which is the height of a column of mercury that has the same weight as a column of gas that extends all the way out to the stratosphere. In other words, if we think of ourselves as bottom-dwellers in a sea of air, which we assuredly are, the weight of a column of air above us at sea level is the exact equivalent of the weight of a column of mercury of the same diameter that is 760 mm in height. We use this unit for measuring many values: total atmospheric pressure; the atmosphere’s itemized content of nitrogen, oxygen, and other gases; the decreased oxygen and increased carbon dioxide in the alveoli; and the content of oxygen and carbon dioxide in the blood.
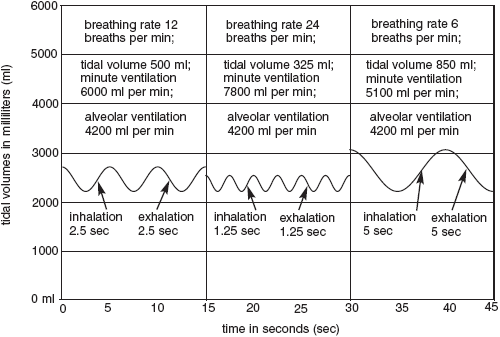
Figure 2.14. Three modes of breathing with identical alveolar ventilations. The numerical values are simulations for a healthy young man.
Atmospheric pressure decreases with increasing altitude. At sea level it is 760 mm Hg, and of this total, the oxygen share is about 150 mm Hg, the nitrogen share is about 580 mm Hg, and water vapor is about 30 mm Hg, depending on the humidity. At the summit of Pike’s Peak in Colorado atmospheric pressure is 450 mm Hg (oxygen 83 mm Hg), and at the summit of Mount Everest in the Himalayas it is 225 mm Hg (oxygen 42 mm Hg). Going in the other direction to a depth of 165 feet under water (which is considered by diving experts a prudent maximum depth for breathing atmospheric air that has been pressurized by the depth of the water), atmospheric pressure is 4,500 mm Hg and oxygen is 900 mm Hg.
Returning to more ordinary circumstances, let’s limit ourselves for the moment to what we would see inside and outside the body at sea level. If we are quietly breathing atmospheric air at our favorite seaside resort, where the oxygen content is about 150 mm Hg, we’ll end up with oxygen levels of about 104 mm Hg in the alveoli, which is reduced from 150 mm Hg because of the transfer of oxygen from the alveoli into the blood. Passing on down the pressure gradient, arterial blood contains slightly less oxygen, about 100 mm Hg. Venous blood, or blood that has just released its oxygen in the tissues, contains dramatically less, about 40 mm Hg. Carbon dioxide decreases in the other direction from the blood to the atmosphere, from a high of 46 mm Hg in venous blood to 40 mm Hg in arterial blood and the alveoli, and finally to a negligible 0.3 mm Hg in the atmosphere.
The numbers for atmospheric, alveolar, and blood gases can all be compared conveniently in table 2.1. The ones we are especially concerned with when we look at pulmonary ventilation and breathing exercises in yoga are the pressures for oxygen and carbon dioxide in atmospheric air, alveoli, arterial blood, and venous blood.
Too little alveolar ventilation is hypoventilation, and too much is hyperventilation. Both conditions will have repercussions in the alveoli, arterial blood, and venous blood, as well as on tissues throughout the body. Hypoventilation will result in reduced levels of oxygen and increased levels of carbon dioxide at all those sites, and hyperventilation drives the figures in the opposite direction (see table 2.2).
HYPOVENTILATION
Everyone has an intuitive understanding that we have to have oxygen to live, and most people have experienced an undersupply of oxygen at one time or another, if only from holding the breath. What’s not always recognized, at least from personal experience, is that the momentary discomfort of smothering is a warning of something more serious: that the cells of the brain and spinal cord are acutely sensitive to oxygen deficits, that a severe deprivation of oxygen will cause temporary damage to the tissue in less than a minute, and that neurons totally deprived of oxygen for about five minutes (as in the case of stroke) will die.
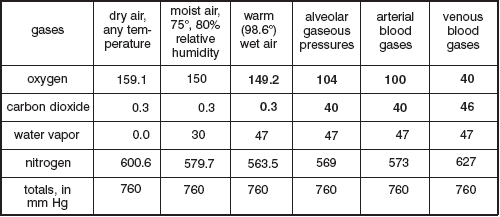
Table 2.1. The above chart shows pressures in mm Hg (millimeters of mercury) expected during the course of relaxed breathing at sea level ; the most important eight values are shown in boldface. Nitrogen is inert: its values are determined solely by altitude and the summed specific pressures for oxygen, carbon dioxide, and water vapor.
Hypoventilation, or underbreathing, is a related matter, and another condition that is familiar to people with respiratory problems. They call it shortness of breath. Hypoventilation is not usually a serious matter for anyone who is in good health, for whom a few deep breaths will usually step up the alveolar ventilation enough to bring the oxygen and carbon dioxide levels into balance. This is also the aim of several hatha yoga breathing exercises that increase ventilatory capacity, especially the bellows breath. But vigorous practice of bellows breathing brings up the question of hyperventilation, or overbreathing, and this, paradoxically, can create a deficit in the supply of oxygen for the cells of the central nervous system where we need it the most.

Table 2.2. The above chart shows simulations of alveolar and blood gases in mm Hg for hypoventilation, normal breathing, and hyperventilation. The six figures in boldface are the norms, repeated from table 2.1.
HYPERVENTILATION
Let’s say you are hyperventilating during the course of an extreme bellows exercise. If this involves breathing in and out a tidal volume of 500 ml three times per second, you will end up with an alveolar ventilation of 180 breaths per minute times 350 ml per breath, which equals 63,000 ml per minute, or fifteen times the norm of 4,200 ml per minute. If you were in world-class athletic condition and running full speed up forty flights of stairs, this would be fine. During heavy exercise your body will use all the oxygen it can get, and it will also need to eliminate a heavy overload of carbon dioxide. It’s not, however, a good idea for an ordinary person to breathe in this way. Extreme hyperventilation when you are not exercising strenuously skews the blood gases too much.
Our first thought is that hyperventilation must drive too much oxygen into your tissues, but this is inaccurate. Except for a few special circumstances, such as breathing 100% oxygen for prolonged periods, or breathing oxygen at high pressure in deep-sea diving, you can’t get too much, and the increased oxygen in the blood that results from hyperventilation is certainly not harmful.
The problem with hyperventilation is not that it increases arterial oxygen but that it decreases arterial carbon dioxide, and that can have an unexpected side effect. What happens is that a substantial reduction in arterial carbon dioxide constricts the small arteries and arterioles of the brain and spinal cord. The way this happens, or at least the end result, is very simple: an arteriole acts crudely like an adjustable nozzle on the end of a garden hose that can open to emit a lot of water or clamp down to emit only a fine spray. As carbon dioxide in the blood is reduced, the arterioles clamp down and the blood supply to the tissue is restricted until there is so little blood flowing to the brain that it doesn’t matter how well it is oxygenated. Not enough blood (and therefore not enough oxygen) can get through the arterioles to the capillary beds and adequately support the neurons.
Hyperventilating vigorously enough to dramatically lower blood carbon dioxide doesn’t necessarily result in death or even obvious clinical symptoms, but it can cause more general complaints such as fatigue, irritability, lightheadedness, panic attacks, or the inability to concentrate. It’s not illogical that the folk remedy for panic attacks, which is still routinely administered by triage nurses in emergency rooms, is to have someone who is in such a state breathe into a paper bag. Rebreathing our exhaled carbon dioxide increases carbon dioxide levels in the blood and opens the cerebral circulation. There are better solutions, however, and triage nurses who have also had some training in relaxed yogic breathing practices would be more imaginative, perhaps suggesting something as simple as having the patient lie supine and breathe abdominally with their hands or a moderate weight on the abdomen.
Extremely low blood levels of carbon dioxide can cause you to pass out. Children at play sometimes hyperventilate, hold their breath after a deep inhalation, and then strain against a closed glottis. If they do this for only 3–4 seconds they will drop to the floor like stones. Increasing intrathoracic pressure from straining will have diminished the venous return to the heart (and thus the cardiac output) immediately after the cerebral circulation has been partially occluded by hyperventilation, and these two ingredients combined cut off enough of the blood supply to the brain to cause an immediate but temporary loss of consciousness. The danger of passing out from constricted brain arterioles is also why lifeguards do not allow swimmers to hyperventilate vigorously before swimming underwater. Hyperventilating followed by holding the breath after a deep inhalation is not harmful to children on a grassy lawn who will begin to breathe normally as soon as they lose consciousness, but it is deadly under water.
One of the most demanding tests of aerobic capacity is mountain climbing without bottled oxygen at altitudes higher than 25,000 feet. Superbly conditioned athletes are able to meet this standard and reach the summit of Mount Everest by hyperventilating the oxygen-poor atmosphere (42 mm Hg at 29,000 feet) all the way to the top. They can jam enough oxygen into their arterial blood to survive (about 40 mm Hg), and that’s good; but the hyperventilation also drives their alveolar carbon dioxide down to less than 10 mm Hg, and that’s not so good. They have to train rigorously at high altitudes to adapt the cerebral circulation to such extremely low levels of carbon dioxide. If most of us were transported unprepared to such an altitude (as would happen if we suffered a sudden loss of cabin pressure in an airliner cruising at 29,000 feet), we would experience so much reflex hyperventilation and subsequent constriction of the cerebral circulation that without supplemental oxygen we would pass out in about two minutes and die soon thereafter.
Beginning hatha yoga students who practice the bellows breath excessively may experience some adverse symptoms of hyperventilation, especially irritability. But if they continue the practice over a period of time, the cerebral circulation gradually adapts to decreased levels of carbon dioxide in the blood, and they can intensify their practice and safely gain the benefits of alertness and well-being associated with higher levels of blood oxygen.
CHEMORECEPTORS
The levels of oxygen and carbon dioxide in the blood and cerebrospinal fluid are monitored by chemoreceptors, specialized internal sensors of the autonomic nervous system. Sensory nerve endings associated with these receptors then transmit nerve impulses coded for distorted levels of oxygen and carbon dioxide directly to the circuits of the somatic nervous system that regulate breathing (fig. 2.15). Accordingly, the chemoreceptors are important keys to linking the autonomic and somatic systems.
There are two classes of chemoreceptors: peripheral and central. The peripheral chemoreceptors, which are located in the large arteries leading away from the heart, react quickly to substantial reductions of arterial oxygen and strongly stimulate respiration. If you restrict your breathing, or if you are at an altitude that cuts your arterial oxygen in half (that is, from 100 mm Hg to 50 mm Hg), the input of the peripheral chemoreceptors to the brain stem respiratory centers will quadruple your alveolar ventilation from a norm of 4,200 ml per minute to about 16,000 ml (16 liters) per minute. Even if you are well enough conditioned to walk up a 30° grade at sea level with only moderate increases in alveolar ventilation, you will find yourself panting when you hike up that same grade at a high altitude.
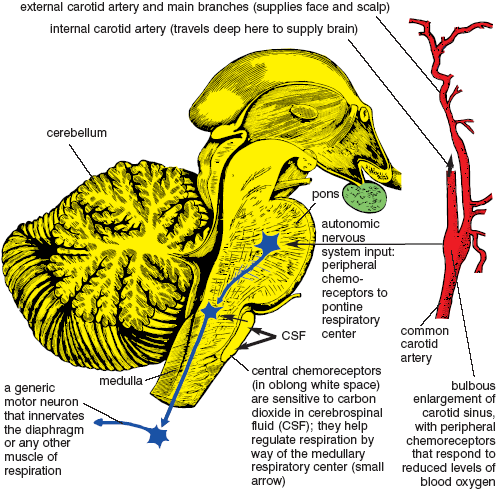
Figure 2.15. Brain stem and cerebellum on the left (with central chemoreceptors near the front surface of the medulla), and on the right, the carotid sinus (with peripheral chemoreceptors) just below the bifurcation of the common carotid artery into the internal and external carotid arteries (Quain).
Although the peripheral chemoreceptors respond to large decreases in blood oxygen, they do not respond significantly to small decreases. If you are only somewhat short of oxygen you may simply lose the edge of your alertness and just feel like yawning and taking a nap, which is the point at which yoga breathing exercises are indicated.
Central chemoreceptors, which are located on the surface of the brain stem immediately adjacent to the somatic respiratory control centers, stimulate the rate and depth of respiration in response to increased levels of carbon dioxide, and dampen respiration if levels of carbon dioxide fall. They are more sensitive to small changes than the peripheral chemoreceptors, but they are slower to react because the cerebrospinal fluid in which they are bathed is isolated from the blood supply and does not respond instantly to changes in blood carbon dioxide.
The differing sensitivities of the peripheral and central chemoreceptors sometimes results in their working at cross-purposes. For example, at high altitudes decreased oxygen stimulates the peripheral chemoreceptors to increase ventilation, but this also lowers carbon dioxide, and when that happens the central chemoreceptors start to retard ventilation. You may require the extra air for the sake of the oxygen, but the response to decreased carbon dioxide confounds that need. Training the system to adapt to such conflicting signals is part of the process of high-altitude acclimation.
THE ROLE OF WILL
Dozens of physical, mental, and environmental factors cooperate to influence respiration, and some of these work at odds with one another. Our will can override most of them. You can counter the state of being bored and sleepy by practicing bellows breathing. If you are bicycling behind a smelly bus you can hold your breath, at least momentarily, to escape the fumes. If you have the habit of breathing irregularly you can learn even meditative breathing. If you are upset you can breathe slowly and evenly to calm down. Most important, you can learn to observe healthier breathing patterns while you are doing hatha yoga postures; then you can carry the refined habits over into your daily life. To see specifically how this works in the practical environment of yoga postures, we’ll look at four different kinds of breathing: thoracic, paradoxical, abdominal, and diaphragmatic.
Specialists in holistic therapies often condemn thoracic, or chest, breathing, but there are two possible scenarios for this mode of breathing that should be considered separately: one is empowering and has an honored role in hatha yoga, and the other is constricting and can create physical and mental health problems if it is done habitually. First, we’ll look at the beneficial version.
EMPOWERED THORACIC BREATHING
To get a feel for the best of empowered thoracic breathing (fig. 2.29a), stand up, interlock your hands behind your head, pull your elbows to the rear as much as possible, bend backwards moderately, and inhale, expanding the chest maximally. Lift your elbows and expand the chest until you feel the intercostal muscles reach their outermost limits of isometric tension.
[Technical note: Although the diaphragm is not as obviously involved in this method of breathing as the intercostal muscles, it supports inhalation synergistically. How? Its muscle fibers resist lengthening by keeping the dome of the diaphragm from being pulled freely toward the head as inhalation proceeds (unlike what we’ll soon see for paradoxical breathing), and at the peak of inhalation, it holds momentarily in a state of isometric tension.]
Next, let your hands hang down and pull your elbows slightly to the rear, again while bending back moderately and inhaling as much as you can. If you observe carefully you’ll see that you can slightly increase your inspiratory capacity with the arms in this more neutral position. How can you prove this? Go back to the first posture, inhale as much as possible, then hold your breath at the glottis at the end of your fullest possible inhalation. Still holding your breath, assume the second position with your hands hanging and elbows back, and you will immediately confirm that you can inhale a little more. Then as a control experiment, just to be certain, try it the opposite way, first a maximum inhalation with the hands down and elbows back, and second with the hands behind the head and the elbows strongly lifted and pulled to the rear. You’ll find that coming into the latter position secondarily (after locking the glottis in the first position) mandates a release of air once you open the glottis. These are not yoga practices, of course, but experiments to test the effects of particular arm positions on your inspiratory reserve volume during the course of empowered thoracic breathing. You can also experiment with any number of other standing postures. If, for example, you grasp your elbows tightly behind your back with your opposite hands, or come into a forward bend supporting your hands on the thighs just above the knees, you will find that these arm positions markedly limit your inhalation.
In general, there are three major reasons for variations in inspiratory capacity that are due to posture. One is obvious: sometimes the position of the upper extremities compresses the chest and limits inhalation mechanically. The other two are more subtle: many of the muscles of the upper extremities serve either as synergists or as antagonists to the external intercostal muscles for enlarging the chest. The relationships are straightforward: any position that favors the synergistic effects will increase inspiratory capacity, and any position that favors the antagonistic effects will decrease it.
One of the most effective training exercises for increasing your inspiratory capacity takes its cue from a standard barbell exercise. In this case you can simply swing a broomstick or a light barbell without added weights from your thighs to 180° overhead, doing 10–15 repetitions while keeping your elbows extended. Exhale maximally as you bring the broomstick or barbell to your thighs, and inhale maximally as you bring it overhead. As a barbell exercise, this is designed to develop and stretch chest muscles such as the pectoralis major (fig. 8.8–9), but many of the muscles needed for moving the barbell through its arc also act synergistically with the external intercostals to facilitate inhalation. This is also a great exercise for children with asthma, who often tend to be parsimonious when it comes to using their chests for breathing. If their asthma is typically induced by exercise, they should of course use a broomstick instead of a barbell, and be sensitive to their capacity.
In hatha yoga generally, inhaling as much as you can is an excellent chest exercise any time you are doing simple whole-body standing backward bends (fig. 4.19), diaphragm-assisted backbends (fig. 5.7), cobra postures (especially those shown in figs. 2.10 and 5.9–12), the upward-facing dog (figs. 5.13–14), prone boats and bow postures (fig. 5.20–23), variations of the cat pose in which the lumbar region is arched forward (figs. 3.30 and 3.34b), or possibly best of all, any one of several variations of the fish posture (figs. 3.19a, 5.28, and 9.19). In fact, whenever an instructor suggests taking the deepest possible inhalations, this can only mean placing an emphasis on empowered thoracic breathing, and it works well in any relatively easy posture in which it is natural to thrust the chest out.
CONSTRICTED THORACIC BREATHING
Constricted thoracic breathing (fig. 2.29b) is typically shallow, rapid, and irregular. It is commonly associated with stress and tension, and our main interest in analyzing it is to understand why it is inadvisable to breathe that way habitually. Whenever someone criticizes chest breathing, this is what they are talking about.
To help students understand why constricted thoracic breathing is undesirable, ask them to lie in the corpse posture (figs. 1.14 and 10.2), placing the left hand on the abdomen and the right hand on the chest. First of all they should concentrate on moving only the front surface of the abdomen when they breathe; the right hand should be stationary and the left hand should rise toward the ceiling during inhalation and come back down during exhalation. Ask them to notice that this is natural and comfortable. Then, to do thoracic breathing, ask them to breathe so that the left hand is stationary and the right hand is lifted toward the ceiling. This feels so unnatural, at least in the supine position, that many students in a beginning class won’t be able to do it. You will probably have to demonstrate and explain that you are not teaching a relaxed or empowered yogic breathing practice; you simply want students to experience this form of thoracic breathing so they can contrast it with other options.
In thoracic breathing the hand on the abdomen is stationary because rigid abdominal muscles prevent the dome of the diaphragm from moving, and the only way you can inhale is to lift and expand the upper part of the chest. This is not a relaxing breathing pattern, and some people will know in advance that the exercise will be stressful—don’t insist that everyone do it.
When you breathe thoracically while standing (fig. 2.16), you can feel the external intercostal muscles expand the rib cage, especially during a deep inhalation, and you can feel them resist its tendency to get smaller during exhalation. This is fine for empowered thoracic breathing, but it feels out of place in the supine posture.
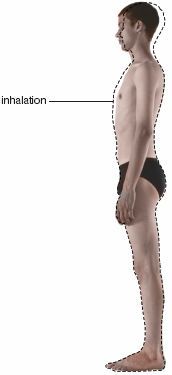
Figure 2.16. Thoracic breathing. The dotted line reveals the profile for a moderately empowered thoracic inhalation, with the sternum lifted up and out in accordance with the “pump-handle” analogy. The abdomen and respiratory diaphragm remain relatively fixed in position, and the head is pulled to the rear. The halftone profiles a normal exhalation.
The role of the internal intercostals, whether standing or supine, is not so obvious. In the first place they do not become fully active except in forced exhalation, even in someone who has healthy breathing patterns. Second, habitual chest breathers are generally compulsive about inhalation, as though they are afraid to exhale, and because of this they may not make much use of their internal intercostal muscles under any circumstances.
Other muscles in the neck, chest, and shoulders also support thoracic breathing as a side effect to some other action. The scalenes (figs. 2.8 and 8.13), which take origin from the cervical spine and insert on the first and second ribs, have their primary effect on the neck, but they also lift the chest during the course of a complete inhalation. We call this clavicular breathing to differentiate it from lifting the chest with the intercostal muscles. In addition, as mentioned earlier, most of the muscles that stabilize the scapula and move the arms also have indirect effects on breathing for the simple reason that they attach to the chest.
PROBLEMS WITH CONSTRICTED THORACIC BREATHING
During constricted chest breathing both inhalation and exhalation are hesitant and tentative. This breathing pattern is not common among experienced yoga students, who have a large repertoire of more useful forms of breathing, but you see it occasionally in beginning classes. And once in a while during the course of a classroom demonstration you’ll even hear someone say “That’s how I always breathe!” The abnormal upper body tension associated with this form of breathing is palpable—both literally and figuratively—in faces, necks, and shoulders.
Habitual chest breathing not only reflects physical and mental problems, it creates them. It mildly but chronically overstimulates the sympathetic nervous system, keeping the heart rate and blood pressure too high, precipitating difficulties with digestion and elimination, and causing cold and clammy hands and feet. In common usage chest breathing is known as “shallow” breathing, and if you watch people breathe in this fashion for any length of time you will notice that every once in a while they will sigh, yawn, or take a much deeper breath to bring in more air.
If you really want to understand shallow breathing you have to experiment with yourself. In either a supine or upright posture, try taking 20–30 constricted thoracic breaths, lifting only the upper part of the chest. Be careful not to move the abdomen, and try to keep the lower part of the chest from moving. To do this you have to keep the abdominal wall rigid and hold the lower part of the sternum and the lower ribs still. If you are healthy this will give you an unusual and unsettling feeling, and pretty soon you’ll have an irresistible urge to take a deep breath—if not two or three. You’ll wonder how anyone could possibly develop this breathing pattern as a lifetime habit.
Chest breathers often feel short of breath because constricted thoracic breathing pulls most of the air into the upper portions of the lungs. But when we are upright it is the lower portions of the lungs that get most of the blood supply. Why? The pulmonary circulation to the lungs is a low-pressure, low-resistance circuit in which the average pressure in the pulmonary arteries is only 14 mm Hg. By contrast, the pressure in arteries of the systemic circulation averages about 100 mm Hg (chapter 8). The 14 mm Hg pulmonary arterial pressure is more than enough to perfuse blood into the lower parts of the lungs, but it is inadequate to push the blood into the upper parts of the lungs. This means that when you are taking constricted thoracic inhalations, you are bringing the bulk of the air into the parts of the lungs that are most poorly supplied with blood. You can’t make efficient use of the extra ventilation to the upper parts of the lungs because of the poor circulation, and yet you get scanty ventilation to the lower parts of the lungs that are getting the bulk of the blood supply. It’s no wonder those who breathe thoracically need to take occasional breaths that will fill their lungs from top to bottom.
The disadvantages of constricted chest breathing are ordinarily emphasized, but this mode of breathing is occasionally necessary. If you should happen to overindulge in a holiday meal and then follow it up with a rich dessert, try taking a walk. You will notice that the restricted form of thoracic breathing is the only comfortable way you can breathe. A five-mile walk can be useful, but the last thing you’ll want to do en route is to press against your stomach with your diaphragm (figs. 2.9 and 2.29b).
THE NEED FOR EMPOWERED THORACIC BREATHING
In addition to certain postures in hatha yoga, thoracic breathing works beautifully in aerobic exercise, in which a freer and more vigorous style of thoracic breathing is combined with increased cardiac output. The aroused heart creates pulmonary arterial pressures high enough to perfuse the entire lungs with blood at the same time they are being ventilated from top to bottom. In hatha yoga this also happens in a series of briskly executed sun salutations or in any other postures that stress the cardiorespiratory system, such as triangles (chapter 4) or lunging postures (chapter 7), especially when performed by beginners. In hatha yoga we also frequently use an empowered and healthy form of thoracic breathing for the complete breath (which we’ll discuss later in this chapter) and in most other circumstances in which you are taking fewer than two breaths per minute.
Empowered chest breathing carried to extremes is paradoxical breathing (fig. 2.29c). Try inhaling so deeply that the abdominal wall moves in during inhalation rather than out. Or imagine a situation which shocks you. Let’s say you dart into a shower thinking that the water will be warm, and instead find it ice cold. You will probably open your mouth and suck in air with a gasp. Try breathing this way three or four breaths under ordinary circumstances and notice how you feel. This is paradoxical breathing, so-named because the abdominal wall moves in rather than out during inhalation, and out rather than in during exhalation (fig. 2.17). Unless someone is in a state of considerable anxiety, we rarely see this in the corpse posture—it is more common while sitting or standing.
During a paradoxical inhalation, the external intercostal muscles enlarge and lift the rib cage, lift the abdominal organs and the relaxed diaphragm, and suck in the abdominal wall. During a paradoxical exhalation, the abdomen moves back out because the rib cage relaxes and releases the vacuum on the diaphragm and abdominopelvic region.
Paradoxical breathing stimulates the sympathetic nervous system even more than thoracic breathing. In an average class only a few students will have the confidence to try it enthusiastically, and those who do it for 10–15 deep breaths may get jumpy and nervous. This is its purpose: preparation for fight or flight. Paradoxical breathing gives you an immediate jolt of adrenaline. The problem is that some people breathe like that much of the time, making life a constant emergency. Our bodies are not built for remaining this keyed up, and keeping the sympathetic nervous system in a constant state of arousal is hard on the supportive systems of the body. Digestion, circulation, endocrine function, sexual function, and immune function are all either put on hold or are stressed by continual sympathetic discharge.
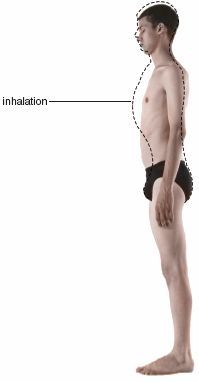
Figure 2.17. Paradoxical breathing. During inhalation, the external intercostal and other accessory muscles of respiration create a vacuum in the chest that pulls the relaxed diaphragm up and the relaxed abdominal wall in. The end stage of a natural exhalation is profiled by the halftone.
The antidote for chronic thoracic and paradoxical breathing is abdominal breathing, or abdomino-diaphragmatic breathing (fig. 2.29d). It is simple, natural, and relaxing—especially in the supine position. To try it, lie in the corpse posture, and again place the right hand on the upper part of the chest and the left hand on the upper part of the abdomen. Breathe so that the left hand moves anteriorly (toward the ceiling) during inhalation and posteriorly (toward the floor) during exhalation. The right hand should not move. Take the same amount of time for exhalation as inhalation. Notice that inhalation requires moderate effort and that exhalation seems relaxed. This is abdominal breathing. As discussed earlier, it is accomplished by the respiratory diaphragm.
Because the contents of the abdominal cavity have a liquid character, gravity pushes them to a higher than usual position in the torso when you are lying down. The diaphragm acts as a movable dam against this wall of abdominal organs, pressing them inferiorly (toward the feet) during inhalation and restraining their movement superiorly (toward the head) during exhalation. As the diaphragm pushes the abdominal organs inferiorly during inhalation, the abdominal wall is pushed out, thus pressing the left hand anteriorly.
We perceive the gravity-induced exhalation as a state of relaxation, but careful observation will reveal that the diaphragm is actually lengthening eccentrically throughout a supine exhalation. In other words, it is resisting the tendency of gravity to push the diaphragm superiorly. You can feel this for yourself if you breathe normally for a few breaths, making the breath smooth and even, without jerks, pauses, or noise. Then, at the end of a normal inhalation, relax completely. Air will whoosh out faster, proving that some tension is normally held in the diaphragm during supine exhalations. You can relax the diaphragm suddenly if you like, but exhalations that are restrained actively are more natural, at least for anyone who has had some training in yoga.
LUNG VOLUMES AND ALVEALOR VENTILATION
Since the abdominal organs and the dome of the diaphragm ride to a higher than usual position in the chest in a supine posture, less air than usual is left in the lungs at the end of a normal exhalation. This is reflected in a decreased expiratory reserve volume. You can prove this to yourself if you breathe abdominally, first sitting upright and then lying down supine, and subjectively compare the two expiratory reserve volumes. What you do is come to the end of a normal exhalation in each case and then breathe out as much as possible—all the way down to your residual volume. It will be obvious that the supine position decreases the amount of air you can breathe out to about one-half of your upright expiratory reserve volume, let’s say from 1,000 ml to about 500 ml (fig. 2.18).
Supine abdominal breathing is both natural and efficient. Using the above figures, if you were to maintain a tidal volume of 500 ml when you are supine, you will be mixing that tidal volume with only 1,700 ml of air instead of the 2,200 ml in your functional residual capacity when you are upright. And because your tidal volume for each breath is getting mixed with a smaller functional residual capacity, you will not need to breathe as deeply or as fast. In fact, if you were to keep your alveolar ventilation constant at 4,200 ml/minute as a textbook norm, the improved efficiency of the alveolar exchange would soon be reflected in increased blood oxygen and decreased blood carbon dioxide. What happens, of course, is that you either slow your rate of respiration or decrease your tidal volume (or both), and that keeps blood oxygen and carbon dioxide within a normal range.
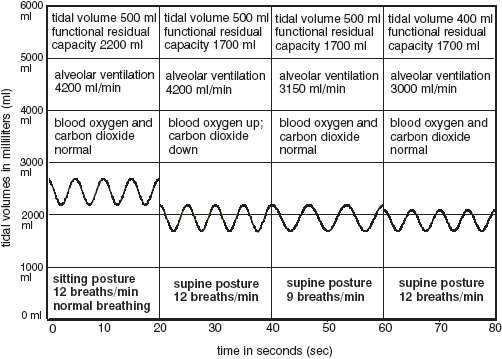
Figure 2.18. Tidal volume simulations for abdominal breathing in a sitting posture (far left), and for three conditions of abdominal breathing in a supine position, the first with alveolar ventilation identical to the sitting posture, second with the breathing rate slowed down, and third with the tidal volume decreased.
SMOOTH, EVEN BREATHING
The corpse posture is a good place to learn one of the most important skills in yoga: smooth, even breathing. When you are relaxed and breathing nasally and abdominally, it is easy to inhale evenly, smoothly merge the inhalation into the exhalation, and smoothly exhale. You may pause at the end of exhalation, but if you do so for any length of time the diaphragm will have relaxed completely during the pause and you may find that you are starting your next inhalation with a jerk. The best prevention for that disturbance is to begin your inhalation consciously just as exhalation ends.
USING A SANDBAG
The movements of the diaphragm are delicate and subtle, and not always easy to experience, but when you are supine you can place a sandbag that weighs 3–15 pounds on the upper abdomen just below the rib cage, and you will immediately notice the additional tension needed for inhalation and controlled exhalation. Make sure the chest does not move and that the weight is light enough to push easily toward the ceiling (fig. 2.22a). The exercise is valuable both for training and strengthening. It helps students learn to sense the activity of the diaphragm by increasing the amount of work and tension needed for inhalations (concentric shortening of the muscular parts of the diaphragm) and for controlled exhalations (eccentric lengthening of the muscular parts of the diaphragm). The cobra variant and the diaphragmatic rear lift (figs. 2.10–11) give the diaphragm more exercise by requiring it to lift large segments of the body, but a light sandbag brings the student more in touch with the delicacy of its function.
Since breathing evenly with a sandbag increases neuromuscular activity in the diaphragm, this makes you aware of the challenges involved in moving it up and down without starts, stops, and jerks. And developing the control necessary to accomplish this is an important aid to learning even breathing. First try it with a sandbag weighing 10–15 pounds to feel a pronounced increase in muscular activity, and then try it with a book or much lighter sandbag weighing 1–3 pounds. After you have practiced with a lighter weight for a while, you will have become so sensitive to the subtle activity of the diaphragm that you will be able to sense its delicate eccentric resistance during exhalation without any weight at all. After about twenty deep breaths with a sandbag you’ll also notice that it is natural to stop breathing for a few seconds at the end of an exhalation, and that this yields a moment of total relaxation. Here again, once you have experienced this with a sandbag you will notice that the same thing can happen with free relaxed abdominal breathing.
Caution: Don’t pause the breath habitually. It’s unnatural while inhaling and exhaling, or at the end of inhalation, so those times are not usually a problem, but at the end of exhalation, it’s tempting. Don’t do it except as an experiment in understanding the operation of the diaphragm. The medical lore in yoga (the oral tradition) is that the habit of pausing the breath at the end of exhalation causes heart problems.
THE INTERCOSTAL MUSCLES
If you are not using a sandbag, the extent to which the intercostal muscles are active during supine abdominal breathing is an open question. They may be serving to maintain the shape of the rib cage isometrically during inhalation (as in upright postures), but this may not be the case toward the end of a long and successful relaxation in the corpse posture. At that time the tidal volume and the minute ventilation are reduced so markedly that little tension is placed on the rib cage by breathing, and the intercostal muscles may gradually become silent. It would require electromyography using needle electrodes placed directly in the intercostal muscles to settle the point.
There will be no doubt about the activity of the intercostal muscles if you use a sandbag for this exercise. Now the diaphragm has to push the sandbag toward the ceiling, and as its dome descends its costal attachments pull more insistently on the base of the rib cage than would otherwise be the case. This pull can be countered only by isometric tension in the intercostal muscles; you can feel it develop instantly if you make a before-and-after comparison, first without a sandbag and then with one.
ABDOMINAL BREATHING IN SITTING POSTURES
We discussed abdominal breathing in the supine corpse posture first because in that pose we find the simplest possible method of breathing: the diaphragm is active in both inhalation and exhalation, the intercostal muscles act only to keep the chest stable, and the abdominal muscles remain completely relaxed. Abdominal breathing in sitting postures is quite different. First of all, when we are upright, gravity pulls the abdominal organs inferiorly instead of pushing them higher in the torso, and this is what causes the shift in expiratory reserve volumes from approximately 500 ml in the supine posture to about 1,000 ml in the upright posture. It also means that the diaphragm cannot act as purely like a piston as it can in supine and inverted postures.
The other major difference between supine and upright abdominal breathing is that when we are upright we can choose between exhaling actively or passively. We can simply relax as we do when we sigh, allowing the elasticity of the lungs to implement exhalation, or we can assist exhalation with the abdominal muscles, which we do in many yoga breathing exercises and for all purposeful actions such as lifting a heavy weight or yelling out a command. A quiet breathing pattern with relaxed exhalations is simpler, so we’ll look at that first.
ABDOMINAL BREATHING WITH A RELAXED ABDOMEN
Breathing abdominally with a relaxed abdomen is a prelude to meditative breathing because it gives one an opportunity to understand the subtle problems involved with breathing quietly. To begin, sit straight in a chair. Don’t slump but don’t pitch yourself forward with an arched lumbar lordosis, either. Make sure the lower abdomen is not restrained by tight clothing. Because the abdominal muscles wrap around to the rear it is better not to lean against the back of the chair. Now breathe so that the lower abdomen moves outward during each inhalation and comes passively inward during each exhalation. Breathe evenly and nasally, making sure the chest does not move. The abdominal muscles have to be completely free. If they are even mildly tensed you will not be doing abdominal breathing. Notice, even so, that the abdominal movement is minimal and that the rest of the body is stable except for a slight backward movement of the head during inhalation (fig. 2.19).
When you are sitting, the two most critical moments for relaxed, even breathing are at the transitions—one between inhalation and exhalation, and the other between exhalation and inhalation. These are the times when the breath is more likely to jerk or become uneven. But if you imagine that your breath is making a circular pattern it is easier to accomplish these transitions smoothly. Pretend you are on a Ferris wheel. Going up is inhaling; coming down is exhaling. The upward excursion smoothly decelerates to zero as you circle up to the top; the downward excursion smoothly accelerates from zero as you start coming down. At the bottom, just the opposite happens: a downward deceleration (exhalation) merges smoothly into an upward acceleration (inhalation).
If you are riding a real Ferris wheel with your eyes closed you know you have reached the top and bottom of its circular movement by feel—the only time there is a jerk is when it stops to let someone off. And therein lies the nub of the matter. What we want from relaxed, even breathing is no jerks—just the sensation that you are making a transition from inhalation to exhalation and from exhalation to inhalation. The actual pattern of breathing is elliptical rather than circular, but the image of a Ferris wheel is still useful, especially for beginners. The main point is that even though no air is moving in or out at the ends of inhalation and exhalation, you can merge inhalation with exhalation (and exhalation with inhalation) without effort if you focus on smooth movement along the ellipse. There will be different challenges at each junction, so we’ll look at them separately.
THE JUNCTION OF INHALATION WITH EXHALATION
The end of inhalation is the least troublesome. Nerve impulses keep impinging on the muscle fibers of the respiratory diaphragm even after exhalation begins, and this operates to smooth the transition between the end of inhalation and the beginning of exhalation. Picture your inhalation as you feel it. If you make the transition from inhalation into exhalation in slow motion, initiating your exhalation ever so slowly, you will feel a slight hesitation as you start to exhale, which reflects the continuing flow of nerve impulses into the diaphragm as its dome begins to ascend. If you have healthy breathing habits little effort is needed to tune this mechanism delicately and make an even transition from inhalation into exhalation, but if you find yourself holding your breath at the end of inhalation it is better to first concentrate on breathing evenly in bending, twisting, and inverted postures—the poses themselves correct bad habits.
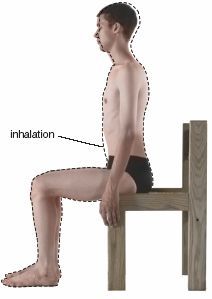
Figure 2.19. Abdominal, or abdomino-diaphragmatic breathing. During inhalation, the lower abdomen comes forward and the dome of the diaphragm descends. There is little movement or enlargement of the rib cage, although the external intercostal muscles are active enough to keep the chest from collapsing inward as the dome of the diaphragm is pulled downward. The head and neck are pulled slightly to the rear during inhalation.
[Technical note: In an upright posture the diaphragm continues to receive nerve impulses as its dome starts to rise during exhalation, but referring to its muscular components as lengthening eccentrically during that time would be pushing the use of the term eccentric too far. The phrase eccentric lengthening is customarily applied only to a muscle’s resistance to the force of gravity. There is no doubt that eccentric lengthening of the diaphragm occurs during exhalation in a supine posture and even more obviously in inverted postures (in other words, gravity aids exhalation and the diaphragm resists as its muscular components lengthen), but I am not using the term eccentric here because the primary cause of the upward excursion of the diaphragm during relaxed exhalations in an upright posture is the elasticity of the lungs, not gravity. On the contrary, under these circumstances gravity actually has the opposite effect: rather than aiding exhalation and resisting inhalation, in upright postures it resists exhalation and aids inhalation. Why? The liver is firmly adherent to the underside of the diaphragm (this association is shown artificially dissected and pulled apart in fig. 2.9), and the heart is situated just above the diaphragm. Under these conditions the force of gravity tends to pull all three (the liver, the dome of the diaphragm, and the heart) down at the same time, mildly aiding inhalation and restricting exhalation rather than the other way around.]
THE JUNCTION OF EXHALATION WITH INHALATION
As exhalation in an upright posture continues, the diaphragm finally relaxes, and toward the end of exhalation its motor neurons have largely ceased to fire. This makes it difficult to negotiate a smooth transition between the end of exhalation and the beginning of inhalation because the motor neurons create a jerk in the system when they start firing again, something like starting a cold car that cranks in fits and coughs before it runs smoothly. In an average beginning class, two or three times as many students will find it more difficult to avoid a discontinuity at the junction of exhalation and inhalation than at the junction of inhalation and exhalation.
ABDOMINAL BREATHING WITH ACTIVE EXHALATIONS
It is very easy to remedy the jerk at the beginning of inhalation. All you have to do is maintain tension in the abdomen throughout exhalation, especially toward the end, and merge that tension into the cycle of inhalation. If you are uncertain of how to do this, first learn to emphasize exhalation in a contrived situation. Purse the lips so that only a small amount of air can escape, and blow gently as if you are blowing up a balloon. Notice that the abdominal muscles are now responsible for the exhalation. Keep blowing as long as you can. After you reach your limit notice that inhalation is passive, especially at its start. Why? If you have exhaled almost to your residual volume, the chest will spring open passively and the abdominal wall will spring forward of its own accord, at least until you have inhaled your normal expiratory reserve volume. Then, as you begin to inhale your normal tidal volume, the diaphragm begins its active descent.
After you have gotten a feel for exaggerated exhalations, try even abdominal breathing while you are sitting in a chair. Again, your clothing must be loose so there are no restrictions on the movement of the lower abdomen. Begin by taking 2-second exhalations and 2-second inhalations. Imagine the ellipse, the exhalation going down and the inhalation going up, one count each second: down, down, up, up, down, down, up, up. Then create an image in your mind in which you are actively pressing in the abdominal muscles during exhalation and releasing them forward during inhalation. Still riding the ellipse, think “travel down” the ellipse and “push in” the abdomen for exhalation, and think “travel up” the ellipse and “ease out” the abdomen for inhalation: down and in, up and out, down and in, up and out. Assisting exhalations with the abdominal muscles does two things: it masks any jerks and discontinuities that come from starting up the contraction of the diaphragm, and even more important, it keeps alive your intent to breathe evenly.
THE IMPORTANCE OF POSTURE
No breathing technique will work unless you are sitting correctly, as two simple experiments will show. First sit perfectly straight and breathe evenly, remaining aware of the elliptical nature of the breathing cycle and making sure that you are not creating pauses or jerks at either end of the ellipse. Now slump forward slightly and allow the lumbar lordosis to collapse. Notice three things: inhalation is more labored, exhalation starts with a gasp, and it is impossible to use the abdominal muscles smoothly to aid exhalation. Breathing evenly is impossible and meditation is impossible. The lesson is obvious: Don’t slump.
Now sit on the edge of a chair. Keep the lumbar lordosis maximally arched but lean forward, making an acute angle between the torso and the thighs. Watch your breathing. The abdominal muscles now have to push strongly against a taut abdomen to aid exhalation. Then, at the beginning of inhalation, if you relax your respiration, air rushes into the airways. Try restraining inhalation and notice that active abdominal muscles are required to prevent the sudden influx of air. The lesson here? Don’t lean forward, even with a straight back.
THE BELLOWS BREATH AND KAPALABHATI
The bellows breath (bhastrika) and kapalabhati are both highly energizing abdominal breathing exercises. In their mild form they are excellent for beginners, because they require only that students be acquainted with even abdominal breathing. The bellows breath imitates the movement of the blacksmith’s bellows, and kapalabhati requires sharp exhalations and passive inhalations. The chest should not move very much in either exercise even though the intercostal muscles remain isometrically active.
To do the bellows exercise, sit with your head, neck, and trunk straight and unsupported by a wall or the back of a chair. To begin, exhale and inhale small puffs of air rapidly and evenly through your nose, breathing abdominally and pacing yourself to breathe in and out comfortably about 30 times in 15 seconds. Keep your shoulders relaxed and your chest still.
The blacksmith’s bellows operates by pulling air into a collapsible chamber and then blowing it forcibly into a pile of glowing coals. In the bellows breath the diaphragm pulls air into the lungs and the abdominal muscles force it out. And just as the blast of extra oxygen from the air in the blacksmith’s bellows kindles additional combustion in the coals, so does the additional oxygen pulled into the lungs by the bellows exercise increase the potential for combustion throughout the body.
The bellows is an easy and rewarding exercise if it is not overdone. The main problem beginning students encounter is coordinating the actions of the diaphragm and abdominal muscles without breathing thoracically or paradoxically. The secret is to start with active, even, abdominal breathing. Watching yourself in a mirror, breathe evenly, using 2-second exhalations and 2-second inhalations (15 breaths per minute). Then gradually increase your speed, taking 1-second exhalations and 1-second inhalations (30 breaths per minute), making sure not to move your shoulders or heave your chest up and down. Notice that the entire body is stable during inhalation except for the abdomen (fig. 2.20a). Then take one breath per second, then two breaths per second, then three, then possibly four. Make sure you give equal emphasis to both phases of the cycle. When and if you lose control, slow down.
Kapalabhati is similar to bellows breathing except that it consists of a sharp inward tap with the abdominal muscles, a quick pressing in that results in a sharp exhalation. To inhale, just relax. Inhalation is passive and requires only releasing tension in the abdominal wall (fig. 2.20b). Try the exercise for one breath per second at first, and gradually increase your speed as you get more confidence and experience.
Kapalabhati is one of the six classic cleansing exercises in hatha yoga, and it is especially effective in lowering alveolar carbon dioxide in the lower segments of the lungs. Like the bellows, kapalabhati is not only energizing, it develops strength and stamina, and it teaches you to coordinate the abdominal muscles for skillful use in other exercises such as agni sara, uddiyana bandha, and nauli, all of which we’ll discuss in chapter 3.
The physiological correlates of bellows breathing and kapalabhati differ (fig. 2.21). If we assume a tidal volume of 200 ml for the bellows and 300 ml for kapalabhati, we’ll get 50 ml of alveolar ventilation per breath for the bellows and 150 ml of alveolar ventilation per breath for kapalabhati. At a rate of three breaths per second, your alveolar ventilation for the bellows would be 180 breaths per minute times 50 ml per breath, or 9,000 ml per minute. By contrast, if you take two breaths per second for kapalabhati, your alveolar ventilation would be 120 breaths per minute times 150 ml per breath, or 18,000 ml per minute.
Looking carefully at the graph (fig. 2.21), notice not only that kapalabhati creates more alveolar ventilation than the bellows, but that its functional residual capacity is smaller. The reason for this is that each sharp exhalation in kapalabhati begins before you have inhaled up to the point at which an ordinary tidal inhalation would begin in the bellows. On the other hand, kapalabhati is nearly always practiced for a shorter period of time than the bellows. So even though the projected alveolar ventilation is 50% greater in kapalabhati, doing the bellows for longer times can easily make up the difference.
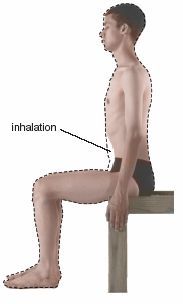
Figure 2.20a. The bellows breath, which is accomplished by breathing abdominally at the rate of 1–4 breaths per second, with inhalations and exhalations equally emphasized and equally active. The exercise mimics a blacksmith’s bellows, with a tidal volume of about 200 ml.
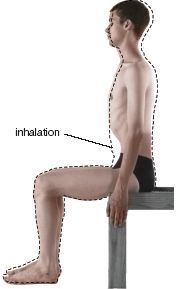
Figure 2.20b. Kapalabhati, an abdominal breathing exercise in which exhalations are emphasized by sharply pressing in with the abdominal muscles. Inhalations are mostly passive and the tidal volume is about 300 ml. The exhalations thrust the head, neck, and chest slightly forward even as they drive the dome of the relaxed diaphragm toward the head and the abdominal wall to the rear.
Which exercise should be learned first? The simplicity and ease of a moderately paced bellows (two breaths per second) argues for concentrating on it first, but if you compare a few seconds of kapalabhati with one minute of a fast-paced bellows breath, kapalabhati will be the milder exercise and less likely to result in hyperventilation. Either choice is fine. After a little experience students naturally adjust the rate, extent, and depth of their respiration so that both exercises are comfortable.
For beginners the most common challenge of these two exercises is to stay relaxed and not breathe diaphragmatically, thoracically, or paradoxically. The chest and shoulders should remain still except for the moderate impact on the chest of movements that originate from the lower abdomen. It is easier to accomplish this with kapalabhati because all of the emphasis is on the lower abdomen. In the bellows, if it is difficult to keep the chest still, the only solution is to return to even abdominal breathing and start over. Go slowly enough to maintain control, even if you have to slow down to 30–60 breaths per minute.
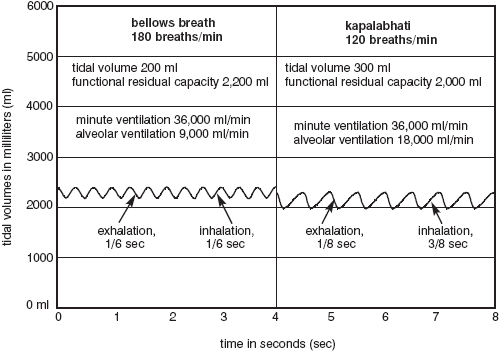
Figure 2.21. Bellows and kapalabhati, simulated comparisons. The bellows exercise is usually faster, but kapalabhati ordinarily makes use of a larger tidal volume and a decreased functional residual capacity.
In both exercises it is important not to maintain any tension in the lower abdomen during inhalation, for if you do, it will impede the downward displacement of the dome of the diaphragm and force a lateral expansion of the chest (thoraco-diaphragmatic breathing), or even frankly thoracic breathing. This is impractical because the chest is a cage—rigid in comparison to the abdominal wall—and except for speedy thoraco-diaphragmatic and thoracic breathing in aerobic exercise, it is unreasonable physiologically and unsettling neurologically to breathe by enlarging and contracting such an enclosure quickly. The most efficient way to breathe rapidly in hatha yoga exercises such as the bellows breath and kapalabhati is to create most of the motion in the softest tissues—and that means the lower abdomen. This is easier to regulate in kapalabhati than in the bellows because of the extra emphasis on exhalation.
Once you have mastered the technique of quickening the bellows to one breath per second with even abdominal breathing, it isn’t too difficult to increase the speed to over 120 breaths per minute. Serious students can speed up gradually to 180–240 breaths per minute, and advanced practitioners approach 300 breaths per minute. It’s fun, and the faster the better. But beware of hyperventilating: build your capacity slowly but surely.
THE LONG VIEW OF LEARNING AND TEACHING
Bad breathing habits are likely to be insidious, but they are not intractable. Even though they go on 24 hours a day year in and year out, change is still possible because the respiratory motions are entirely controlled by somatic motor neurons—you have the potential of thinking the actions through and controlling them willfully.
How to proceed? Whether bad breathing habits involve constricted chest breathing, reversing the movement of the abdomen in paradoxical breathing, jerking the breath, or pausing between inhalation and exhalation, anyone who has such problems should first master abdominal breathing. Thoraco-diaphragmatic breathing is not advisable at first; it will be especially confusing to chronic chest breathers. The best solution for such students is a regular practice of a variety of postures in hatha yoga, and the corpse posture is the place to start. In the supine position almost everyone can learn to breathe in a way that allows a hand or sandbag on the abdomen to move smoothly toward the ceiling. As soon as problem breathers have that mastered, they should work with abdominal breathing while sitting up straight in a chair, first just inhaling and exhaling naturally. This means: first, making sure that the lower abdomen relaxes completely and protrudes during inhalation, and that the chest does not lift up and out; and second, allowing the abdominal muscles to remain passive during exhalation, thus permitting the abdominal wall to sink back in. It may help to make tiny sighs to insure that each exhalation is entirely passive.
After mastering abdominal breathing with passive exhalations in an upright posture, students should learn to use the abdominal muscles to aid exhalation and cultivate even breathing. This will lead naturally to the bellows breath and kapalabhati. Both of those exercises should be approached with a sense of experimentation, observation, and play. Rushing yourself or someone else into developing new breathing habits will only create anxiety and disrupt rather than benefit the nervous system.
Yogis are not the only ones who know about diaphragmatic breathing (fig. 2.29e). Martial artists, public speakers, and musicians are all united in its praise. But even those who practice it have a hard time describing precisely what they do and how they do it. This is not surprising—it’s a difficult concept. We’ll approach it here by looking at how diaphragmatic breathing differs from abdominal and chest breathing and take note of how it feels and where you feel it in the body.
Abdominal breathing, or abdomino-diaphragmatic breathing, brings your attention to the lower abdomen. If you sit with it for a while in meditation you will be relaxed, but your attention will be drawn to the pelvis and the base of the torso. It is a good technique for beginners, but in the long run it results in a depressed, overly relaxed sensation. Thoracic and paradoxical breathing go to the other extreme. They bring your attention to the upper chest and spin you off into realms that are not wanted for meditation: heady sensations for thoracic breathing, and tangents of anxiety and emergency for paradoxical breathing. Diaphragmatic breathing, or thoraco-diaphragmatic breathing, is the perfect compromise. It brings your attention squarely to the middle of the body, to the borderline between the chest and the abdomen, and from there it can balance and integrate the opposing polarities.
Diaphragmatic breathing is also the most natural way to breathe in everyday life. Whenever you gear up mentally and physically for any activity, the additional concentration is reflected in diaphragmatic breathing. And in the yoga postures that call for it, the effort to maintain the required tension in the abdominal muscles will bring you more control and awareness of the torso than any other type of breathing.
DIAPHRAGMATIC BREATHING IN THE CORPSE POSTURE
We’ll start with diaphragmatic breathing in the corpse posture. To begin, lie supine and breathe abdominally for five or six rounds, allowing the lower abdomen to relax and protrude during inhalation and to drop back toward the floor during exhalation. Then, to create thoraco-diaphragmatic breathing, hold enough muscle tone in the abdominal muscles as you inhale to prevent the lower abdomen from moving anteriorly during that phase of the cycle. You can feel what happens next. Since the tension in the abdominal muscles does not allow the abdominal wall to protrude as the central tendon starts to descend, the diaphragm can act only at its costal insertion to lift and expand the rib cage. This draws air into the lungs and at the same time enlarges the upper abdomen, as opposed to the lower. As in abdominal breathing, the external intercostal muscles remain active; you can feel them lengthen actively against the resistance of the lungs’ elasticity as the chest wings out during inhalation, especially toward the end of inhalation. Diaphragmatic breathing in the corpse posture requires more attention than abdominal breathing, and because of this it is useful as a concentration exercise and for the deep inhalations and long exhalations in 2:1 breathing.
SANDBAG BREATHING
In the corpse posture, sandbags of various weights will strengthen and further educate the diaphragm, intercostal muscles, and abdominal muscles. As mentioned earlier, a sandbag weighing 3–15 pounds is best for training in abdominal breathing because it can be comfortably pressed toward the ceiling with each inhalation, and its fall can be comfortably restrained during exhalation. The chest is stable, and both the upper and lower abdomen are thrust anteriorly (along with the sandbag) by inhalation (fig. 2.22a).
To intensify the exercise and create diaphragmatic breathing, increase the weight of the sandbag to the point at which it is a bit awkward to press it toward the ceiling. This much weight, about 20–30 pounds for a healthy young man with good strength, makes it more convenient to breathe diaphragmatically than abdominally. If you adjust the amount and placement of the weight perfectly, the tension on your upper abdomen will cause the diaphragm to flare the rib cage out from its base. You have to play with the resulting sensations and analyze the movements carefully. In this case (fig. 2.22b), if a 25-pound bag of lead shot is placed just beneath the rib cage, inhalation lifts the chest and upper abdomen up and forward, but the movement of the lower abdomen is checked, at least in comparison with abdominal inhalation shown in fig. 2.22a.
If you increase the weight even more, to 30–50 pounds or so, you will create so much tension in the abdomen that the dome of the diaphragm is unable to descend at all. In that event the only way you will be able to breathe comfortably will be by lifting the upper part of the rib cage and breathing thoracically (fig. 2.22c). Placing two 25-pound bags of lead shot on the abdomen creates two results: it requires that there will be a substantial increase in the anterior displacement of the upper chest during inhalation, and it holds the middle and lower portions of the abdomen fixed in position.
BREATHING IN THE CROCODILE POSTURE
If you still have trouble sensing the ways in which abdominal and diaphragmatic breathing operate and differ from one another, the distinctions will become more clear if you try breathing in two variations of the crocodile posture. First, to experience abdominal breathing, lie prone, with the feet apart, the elbows flexed, and the arms stretched out in front. Your hands should be pulled in enough for the forehead to rest on the bony part of the wrist. This is the most relaxed variation of the crocodile (fig. 2.23). The position of the arms restricts thoracic breathing, the position of the chest against the floor restricts diaphragmatic breathing, and the position of the lower abdomen against the floor restricts what we conventionally think of as abdominal breathing. Still, in a modified form, abdominal breathing is what this is, with the hips and lower back rather than the front of the abdomen responding to the rise and fall of the dome of the diaphragm.

Figure 2.22a. Abdominal, or abdomino-diaphragmatic breathing, with a 14-pound sandbag. The diaphragm pushes against the abdominal organs, ultimately pressing the abdominal wall and sandbag toward the ceiling.

Figure 2.22b. Diaphragmatic, or thoraco-diaphragmatic breathing with a 25-pound bag of lead shot. The extra weight is somewhat more difficult to lift than the 14-pound sandbag, and this creates more of a tendency for the rib cage to be enlarged from its base than for the weight to be pushed toward the ceiling.

Figure 2.22c. Thoracic breathing, as required by 50 pounds of weight placed on the abdomen and lower border of the chest. After a modest downward excursion of the dome of the diaphragm (inhalation), its muscle fibers remain in a state of isometric contraction and the brunt of inhalation must be borne by the external intercostals.
Abdominal breathing in this sleepy, stretched-out crocodile requires a more active diaphragm than abdominal breathing in the supine position. Why? The weight of the entire torso against the floor in the prone position restrains inhalation more than the weight of the abdominal organs by themselves in the supine position—it feels something like breathing in the corpse posture with a lead apron spanning your entire chest and abdomen. If you make a nominal effort to breathe evenly, the diaphragm also has to work more strongly to restrain exhalation. At the end of exhalation, of course, it can relax completely, just as it does in the corpse posture.
Next, to experience an unusual form of diaphragmatic breathing, lie in the more traditional easy crocodile with the elbows flexed and the arms at a 45–90° angle from the torso. The hairline should rest against the forearms. Adjust the arms so that the lower border of the chest is barely touching the floor. This arches the back and creates a mild backbending posture (fig. 2.24). Now we are entering complex and unexplored territory. The lower abdomen still cannot protrude because it is against the floor; thoracic breathing is restricted by the extreme arm position even more than in the previous posture; and the attempt of the diaphragm to descend is checked because the base of the rib cage and upper abdomen is still held in position. The only parts of the body that appear to yield for inhalation are the lower back and hips (fig. 2.24), just as in the stretched crocodile. Isolated comparisons of the dashed superimpositions for inhalations in these two postures is not helpful to our analysis, however, because the experience of breathing in them is completely different. Although it is not reflected in the photographs, inhalation in the beginner’s crocodile creates a characteristic tension at the base of the rib cage which is absent in the stretched-out posture. For that reason we can—indeed we must—classify breathing in the beginner’s crocodile as thoraco-diaphragmatic breathing.

Figure 2.23. A specialized type of abdominal breathing created by a stretchedout crocodile posture. The floor cannot yield to the descending dome of the diaphragm during inhalation, so the lower back and hips are lifted by default.
DIAPHRAGMATIC BREATHING IN SITTING POSTURES
To experience the center-of-the-trunk sensation that characterizes diaphragmatic breathing in sitting postures, sit upright in a chair and first review abdominal breathing as a basis for comparison. Then to breathe diaphragmatically, inhale gently while holding just enough tension in the abdominal muscles to make sure that the lower abdomen is not displaced anteriorly during inhalation. There is a sense of enlargement in the lower part of the chest and a feeling of expansion in the upper part of the abdomen just below the sternum. The lateral excursion of the rib cage (fig. 2.25 a) is more pronounced than the anterior movement (fig. 2.25 b), but you may have to take a few slow, deep inhalations to confirm this.
All of these observations will be lost on chest breathers because the difference between the mild lower abdominal tension that creates diaphragmatic breathing and the frank rigidity of the entire abdominal wall that is associated with constricted thoracic breathing is far too subtle for them to feel and comprehend. They will get mixed up every time. As discussed earlier, anyone who has the habit of chronic chest breathing should not try to do thoraco-diaphragmatic breathing until they have become thoroughly habituated to abdominal breathing. Their first goal must be to break the habit of constricted chest breathing forever.

Figure 2.24. Objectively, this beginner’s crocodile posture again appears to lift the lower back and hips as in abdomino-diaphragmatic breathing, but appearances can be deceiving. The subjective feel of the posture is that the mild back-bending position severely restricts lifting of the lower back; more emphasis is felt at the base of the rib cage. For that reason, and because the extreme arm position also restricts thoracic breathing, this posture is admirably suited for training in thoraco-diaphragmatic breathing.
HOW DIAPHRAGMATIC BREATHING AFFECTS POSTURE
If you examine your body carefully when you are breathing diaphragmatically in the easy crocodile (fig. 2.24), the cobra (fig. 2.10), or the diaphragmatic rear lift (fig. 2.11), you will notice that inhalation raises your posture up and back, and that exhalation lowers it down and forward. This principle also holds true when you are standing, sitting straight, or even lounging in a soft chair. During inhalation in all such postures the head moves back, and during exhalation it comes forward. During inhalation the cervical lordosis (the forward arch in the neck) decreases, thus raising the head; during exhalation it increases, lowering the head. The shoulders move back during inhalation and forward during exhalation. The thoracic kyphosis (the posterior convexity in the chest) decreases during inhalation and increases during exhalation. Finally, if you are sitting straight the lumbar lordosis increases during inhalation and decreases during exhalation. The movements are subtle, but if you purposely try to make them in the opposite direction, you will see instantly that they are contrary to the normal pattern.
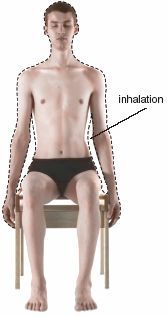
Figure 2.25a. Diaphragmatic, or thoraco-diaphragmatic breathing, from a front view. Holding moderate tension in the abdomen dictates that the diaphragm will cantilever the base of the rib cage out and up (the “bucket-handle” analogy).
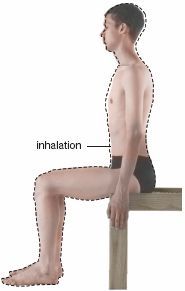
Figure 2.25b. Diaphragmatic breathing from the side, illustrating the forward movement of the chest when moderate tension is held in the abdominal muscles during inhalation.
An understanding of these principles is of practical value to meditators because they can take advantage of the slight postural changes caused by breathing to adjust and improve their sitting postures. Try it. Sit comfortably on the edge of a straight chair and breathe evenly and diaphragmatically in a cycle of 4–6 seconds for each round of inhalation and exhalation. Resolve not to make noticeable movements for the next five minutes. Now, with each inhalation lift your posture, allowing the inhalation to pull the head back, flatten the thoracic kyphosis, and increase the lumbar lordosis. These adjustments should be so slight that they are barely perceptible, even to the practitioner. Press the abdomen in actively during each exhalation so as not to lose ground. Pretend that the breath is acting like a ratcheting mechanism on a pulley that is lifting a weight. With each inhalation you gain a single cog, and during exhalation the ratchet prevents the weight from falling. You can also imagine that the breath is a thread which lifts the posture during inhalation and then holds it from falling during exhalation. The resolve not to move in this exercise is critical, so good concentration is required. If you make adjustments that are externally visible, the body accepts the habit of moving, and the posture deteriorates when concentration lapses.
Next check the effects of diaphragmatic breathing when you are slouched. You will notice the same problems you encountered with abdominal breathing in a slouched posture: labored inhalations, an inability to start exhalations without gasping, and the difficulty of using the abdominal muscles to aid exhalation. The entire torso is lifted up and back with each breath, but each exhalation drops it forward. You can see an extreme example of this if you dip your head forward while you are slouched. Each inhalation rolls the body up, and each exhalation rolls it down.
Now try sitting perfectly straight (but without arching your torso forward from the hips). Notice that the posture itself defines diaphragmatic breathing. Unless you are too flabby, the abdomen is held taut enough by the posture to make abdominal breathing inconvenient. You can play with the edges of this. Hold the posture less rigorously, and you will see that you begin to breathe abdominally. Sit straight, and the taut abdomen will force you to breathe diaphragmatically. Carrying this to an extreme, if you bend forward from the hips markedly while maintaining a prominent lumbar lordosis, the abdomen gets so taut that inhalation becomes very laborious. You will then either have to resort to chest breathing or make excessive effort to breathe diaphragmatically.
EVEN DIAPHRAGMATIC BREATHING
Many of the principles underlying even abdominal breathing apply to even diaphragmatic breathing as well. Make sure there are no jerks in your breath. This is more difficult in diaphragmatic breathing than it is in abdominal breathing because the process is more complex and you are constantly monitoring the tension in your abdomen. Until you get accustomed to doing this, it may create slight disruptions during inhalations.
Be careful that you are not creating a pause at the end of inhalation. This is less of a problem in diaphragmatic breathing than it is in abdominal breathing because the additional tension in the abdomen (as well as the focus of mental attention at the junction of the chest and abdomen) keeps the diaphragm in a state of tension well into exhalation. Be even more watchful that you are not creating a pause at the end of exhalation. As with abdominal breathing, it is important to assist exhalation with the abdominal muscles, causing that part of the cycle to flow smoothly and naturally into the inhalation. As inhalation proceeds, however, there is an important difference between abdominal and diaphragmatic breathing: during abdominal breathing, the abdominal muscles facilitate even breathing only at the beginning of inhalation, but during diaphragmatic breathing, they remain active throughout inhalation so that their isometric tension can force the diaphragm to spread its costal attachment laterally and enlarge the rib cage.
Breathe through your nose, and try not to create noise. If your breathing is noisy, you may have to work with cleansing, diet, allergies, and breathing exercises to solve the problem, but this is essential. Noisy breathing will distract your mind as long as it lasts.
Observe in your mind’s eye the elliptical nature of the breathing cycle. Smoothly decelerate your rate of inhalation and merge it into exhalation exactly as you would round off an ellipse at the top of a chalkboard. Smoothly accelerate your exhalation under the control of your abdominal muscles as you draw the chalk down the ellipse; smoothly decelerate your exhalation and merge it into the inhalation as you carry your mark around the bottom of the ellipse.
Until you have mastered even breathing don’t try to lengthen your inhalations and exhalations. A 2-second inhalation and a 2-second inhalation is fine, or a little faster or slower. The longer you try to make the cycle, the more difficult it is to make it even. So be completely natural at first without thinking of trying to accomplish anything.
After several months of practice you can slowly work up to making your breaths longer, so long as you are still not jerking, pausing, or making noise. If you are taking fewer than six breaths per minute, you will be adding a thoracic component to diaphragmatic breathing, which means that you are activating the external intercostal muscles concentrically, especially toward the end of inhalation. You will also be pressing more insistently with the abdominal muscles to lengthen the exhalation. And if you carry this to an extreme, going slowly, you will finally approach breathing your vital capacity with each cycle of exhalation and inhalation. This is the complete breath, our next topic.
THE COMPLETE BREATH
The complete breath is one of the simplest and yet most rewarding of all the yoga breathing exercises. To begin, breathe in and out a few times normally and then exhale as much as possible, all the way down to your residual volume. Then for the complete breath inhale as much as possible, which will be your vital capacity (fig. 2.26). Continue by exhaling and inhaling your vital capacity as many times as you want.
This is a lot of ventilation even if you breathe slowly. If you inhale and exhale your vital capacity three times in one minute, your minute ventilation will be 14,400 ml per minute (4,800 ml per breath times three breaths per minute), and your alveolar ventilation will be 13,950 ml per minute (4,650 ml times 3 breaths per minute). After just six such breaths your blood gases will have shifted perceptibly—arterial oxygen will have moved from perhaps 100 mm Hg to 120 mm Hg and arterial carbon dioxide from perhaps 46 mm Hg to 35 mm Hg (fig. 2.27). For this reason the complete breath is both cleansing and energizing, but if you do it slowly and evenly it will also produce a sense of calm and stability.
You can practice the complete breath when you are sitting, standing, or lying down, but it is most commonly done in a supine position with the hands stretched overhead, usually at the end of a class or at the end of a series of sun salutations. Most instructors will suggest filling the lungs from below—expanding the lower, then the middle, and finally the upper parts of the lungs.
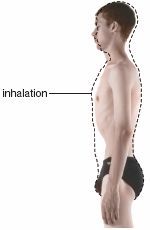
Figure 2.26. The complete breath, or inhalation and exhalation of the vital capacity. The halftone shows a profile of the fullest possible exhalation, and the dotted outline shows the fullest possible subsequent inhalation.
A common and less extreme variation of the complete breath is to simply inhale and exhale your inspiratory capacity instead of your vital capacity, and unless the instructor specifically asks you to exhale as much as you possibly can before starting the complete breath, inhaling and exhaling the inspiratory capacity is what most people will do naturally.
[Technical note: In addition to the proven anti-aging effects of a calorie-restricted and high-nutrition diet in experimental animals, the ability to quickly inhale a commodious vital capacity appears to be one of the most reliable predictors of longevity in humans. Whether this argues for the principle of trying to increase your inspiratory and vital capacity is not so certain, but it certainly can’t hurt anyone who is in good enough health to do the postures. In chapter 3, we’ll concentrate on exercises that focus on exhalation rather than inhalation—increasing your vital capacity by developing the ability to exhale your full expiratory reserve volume and minimize your residual volume.]
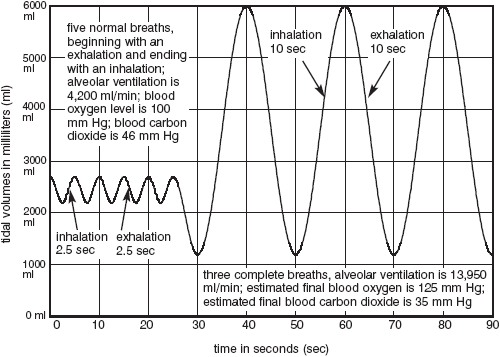
Figure 2.27. Simulations of three complete breaths (in this case inhaling and exhaling the vital capacity) following an initial exhalation of the expiratory reserve volume. Even though the subject is only taking three breaths per minute, breathing in and out the full vital capacity a few times is expected to markedly increase blood oxygen and decrease blood carbon dioxide.
ALTERNATE NOSTRIL BREATHING
One of the best breathing exercises for calming the nervous system is alternate nostril breathing, or nadi shodanham. This is a concentration as well as a breathing exercise, and it is possibly the single most important preparation for meditation in hatha yoga. There are dozens of variations to suit differing needs, abilities, and temperaments. At one extreme, mental patients, flighty or hyperactive children, or anyone who has difficulty concentrating can simply sit up straight, rest their elbows on a desk, press the right nostril shut with the right index finger, and exhale and inhale three times. Then they can press the left nostril shut with the left index finger and again exhale and inhale three times. This simple exercise can be repeated for 5 minutes at a pace of 1- to 2-second exhalations and 1- to 2-second inhalations (15–30 breaths per minute) using abdominal breathing. It trains concentration because it requires sitting straight, counting the breaths, switching nostrils at the proper moment, and, most important of all, breathing evenly with no noise, jerks, or pauses.
A slightly more complex version of alternate nostril breathing begins with making the classical mudra (gesture) with the right hand, curling the index and middle fingers in toward the palm. Closing the right nostril with the thumb, exhale and inhale once through the left nostril (fig. 2.28a). Then, closing the left nostril with the ring (fourth) finger (fig. 2.28b) exhale and inhale once through the right nostril. Go back and forth like that for 5 minutes. Breathe abdominally or diaphragmatically as your abilities permit.
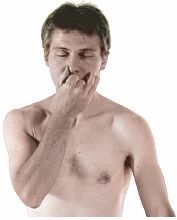
Figure 2.28a. Alternate nostril breathing, closing the right nostril with the right thumb.
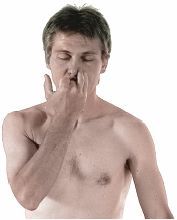
Figure 2.28b. Alternate nostril breathing, closing the left nostril with the right fourth finger.
The following version of this exercise is the one ordinarily taught in hatha yoga classes even though it is more elaborate and demanding of concentration than the previous exercises. Using the same hand mudra as for the second exercise, exhale through the left nostril and inhale through the right three breaths, then exhale through the right and inhale through the left three more breaths. Then breathe three breaths evenly with both nostrils open. Next, exhale through the right and inhale through the left three times, then exhale through the left and inhale through the right three times, and again take three even breaths with both nostrils open. That’s 18 breaths. Repeat this three times, for 54 breaths total. As before, your concentration will be on posture, abdominal or diaphragmatic breathing, and, above all, on even breathing. If you can avoid sacrificing even breathing, you can slow down to 3-second exhalations and 3-second inhalations, or ten breaths per minute.
If you do this practice three times a day, it centers the attention and calms the mind, and it is therefore ideal for anyone who wishes to remain balanced and focused. For a more advanced practice, students will gradually slow down the pace of breathing until they are finally taking 20-second exhalations and 20-second inhalations. Ultimately they will practice pranayama, or breath retention (which, as will be discussed shortly, should never be undertaken except under the supervision of a competent instructor).
Cautions to be judicious and respectful of breathing exercises abound in the literature on hatha yoga. And it does indeed seem from anecdotal reports of explorers in this field that the rhythm and record of our respiration resonates throughout the body. It seems to accentuate whatever is in the mind, whether it be benevolence or malevolence, harmony or disharmony, virtue or vice. On the negative side, experienced teachers report that quirkiness of any sort gets accentuated in students who go too far. It might be an abusive streak, laughing inappropriately, speaking rudely, flightiness, twitchiness, or nervous tics. Right to left physical imbalances also become exaggerated. Unfortunately, novices often close their ears to warnings: having become addicted to their practice, they will not be denied. Competent teachers of hatha yoga will be watchful of these simple matters and wary of tutoring refractory students. Even the beginning exercises discussed in this chapter should be treated with respect.
Apart from psychological concerns, the special physiological hazards of breathing exercises is that they can cause problems without giving us traditional signals warning us against doing something harmful. In athletics, the practice of asana, experiments with diet, or just tinkering with any object in the physical world, we depend on our senses to tell us that we are exceeding our capacity or doing something inadvisable. But breathing exercises are different. In that realm we are dealing with phenomena that our senses, or at least our untutored senses, are often unable to pick up, even though they can still affect the body. And because of this, advanced exercises should be undertaken only by those who are adequately prepared. Given such preparation, and given that one is enjoying a balanced life of cheerful thoughts, positive feelings, and productive actions, the yoga breathing exercises have the potential for producing more powerful and positive benefits than any other practice in hatha yoga. Again, that’s a big claim, but experienced yoga instructors will agree.
“With respect then to the use of respiration, it may be affirmed that an aerial something essential to life, whatever it may be, passes into the mass of the blood. And thus air driven out of the lungs, these vital particles having been drained from it, is no longer fit for breathing again.”
— John Mayow, in Tractatus Quinque (1674), quoted from Proctor’s A History of Breathing Physiology, p. 162.
an empowered thoraic inhalation
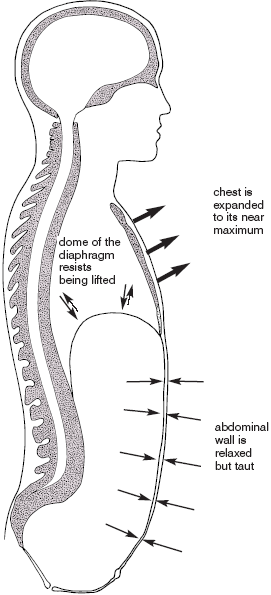
Figure 2.29a. Empowered thoracic breathing: inhalation.
1) The dome of the diaphragm resists being pulled toward the head, and thereby supports inhalation indirectly.
2) The abdominal wall is relaxed but taut.
3) The external intercostal muscles actively lift the chest up and out.
4) The rib cage expands to its near maximum.
5) The mental state is celebratory.
a constricted thoracic inhalation
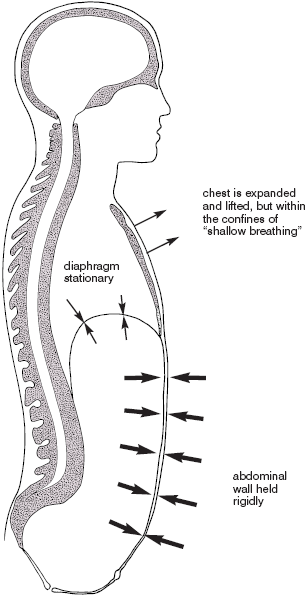
Figure 2.29b. Constricted thoracic breathing: inhalation.
1) The diaphragm is relaxed and almost immobile.
2) The abdominal wall is held rigidly.
3) The external intercostal muscles actively lift the chest up and out.
4) The rib cage expands to within self-imposed and constricted limits.
5) The mental state can become anxious.
a paradoxical inhalation
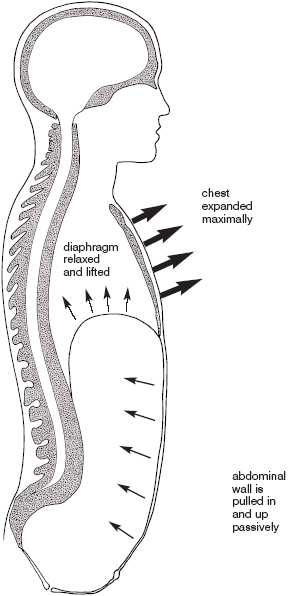
Figure 2.29c. Paradoxical breathing: inhalation.
1) The diaphragm is completely relaxed and lifted by the chest.
2) The abdominal wall is pulled in and up passively.
3) The external intercostal muscles actively lift the chest up and out.
4) The rib cage expands maximally.
5) Overdone, the mental state can become anxious and panicky.
an abdominal (abdomino-diaphragmatic) inhalation
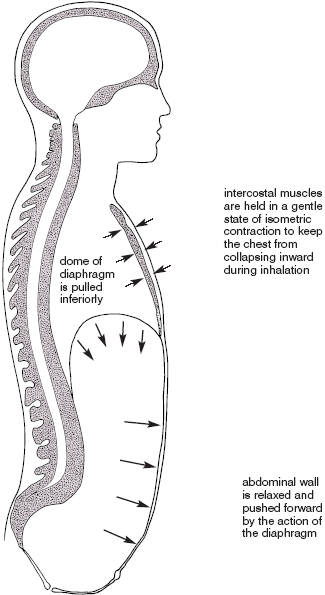
Figure 2.29d. Abdominal (abdomino-diaphragmatic) breathing: inhalation.
1) The dome of the diaphragm moves down in a fairly simple piston-like action.
2) The lower abdominal wall is relaxed and pushed forward by the diaphragm.
3) The intercostal muscles actively hold the chest wall in a stable position.
4) The rib cage remains about the same size in all parts of the breathing cycle.
5) The mental state is relaxed and may get sleepy.
a diaphragmatic (thoraco-diaphragmatic) inhalation
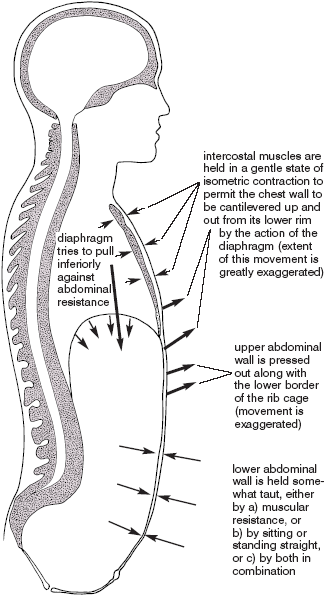
Figure 2.29e. Diaphragmatic (thoraco-diaphragmatic) breathing: inhalation.
1) The diaphragm presses down against the abdominal organs.
2) The abdominal wall is relatively taut, in part from muscular activity.
3) The intercostal muscles maintain the overall integrity of the chest wall.
4) The rib cage is flared at its base by the costal attachment of the diaphragm.
5) The mental state is clear and attentive, and is focused on the mid-torso.