“Agni sara means ‘energizing the solar system,’ the area of the body associated with digestion. Agni sara also benefits the bowels, bladder, nervous system, circulatory system, and reproductive system. Of all the exercises this one is the most beneficial, and if time is very short, it may be performed alone.”
— Sri Swami Rama, in Exercise Without Movement, p. 53.
A sure way to develop what yogis call inner strength is to tone the abdominal region. If energy in the arms and shoulders is weak, a strong abdomen can give you an extra edge, but if the abdomen is weak, look out, because even the strongest arms and shoulders are likely to fail you. One of the most memorable boxing matches of the century (Muhammad Ali vs. George Foreman, Oct. 30, 1974) is a perfect example. Ali knew he had lost his edge for dancing around the ring “like a butterfly,” and that he probably couldn’t win unless he adopted unconventional tactics. Suspecting that Foreman would not have the stamina for a long bout, Ali had prepared a steely but resilient belly with thousands of repetitions of sit-ups and other abdominal exercises. He called on this secret strength early in the match, repeatedly going to the ropes and letting his opponent punch himself to exhaustion. Reality hit in the eighth round—with a few precise strokes Ali brought Foreman down for the count.
The structural foundation for abdominopelvic strength and energy (this is obviously a literary rather than a scientific use of the term “energy,” something like saying someone has “a lot of pep,” or “a lot of guts”) is the pelvis and abdomen, a complex region whose architecture can be understood most easily by studying two simple and familiar exercises: crunches and sit-ups. Then we’ll be able to make more sense of the general design of the abdominopelvic region in relation to the chest and lower extremities. This in turn will enable us to discuss leglifts, sit-ups, the boat postures, and the peacock. These seemingly diverse exercises not only strengthen the torso, they stimulate abdominal energy by using the abdomen as a fulcrum for manipulating large segments of the body in relation to one another in the field of gravity.
In the second half of the chapter we’ll shift our attention to the anatomical perineum and discuss practices that work with that region and with the abdomen and pelvis in relative isolation, in contrast to the abdominal exercises, which demand use of the body as a whole. The practices in the second half of the chapter include ashwini mudra, mula bandha, agni sara, uddiyana bandha, and nauli kriya. Last, we’ll take a critical look at contraindications and benefits.
If you asked the instructor at your local health club to show you the best abdominal exercise, you would probably be told to do crunches. You would lie down supine, draw the feet in, bend the knees, interlock the fingers behind the head, and then pull the upper half of your body into a fourth of a sit-up, just enough to lift your shoulders well off the floor. Then you would lower yourself back down and repeat the movements as many times as you want. This is not a bad exercise. It strengthens the abdominal muscles and stretches the back in one of the safest possible positions. Sit-ups are a different matter. In high school gym classes from years gone by, students used to count the number of rapid-fire sit-ups (jerk-ups, actually) they could do in a minute with the knees extended and the hands interlocked behind the neck. If you are strong and under eighteen this probably won’t hurt you, but if you are older and have a history of back problems it is likely to make them worse.
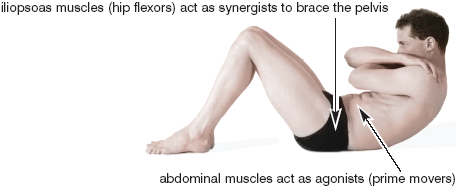
The muscles responsible for crunches and sit-ups include both abdominal muscles and hip flexors. The abdominal muscles encircle the abdomen and extend from the chest to the pelvis. The hip flexors, which are located deep in the pelvis (and thus hidden from view), flex the femur at the hip joint. They include the iliacus and psoas muscles (or the iliopsoas, considering the two of them together as a team). They run from the pelvis to the upper part of the femur in the case of the iliacus, and from the lumbar spine to the femur in the case of the psoas (figs. 2.8, 3.7, and 8.13).
Crunches are relatively safe because the knees are bent and the lumbar region is rounded posteriorly (to the rear). Under these circumstances, the abdominal muscles pull you up and forward, and the iliopsoas muscles aid that movement as synergists by bracing the ilia and the lumbar region (fig. 3.1). By contrast, if you do sit-ups with the knees straight, the psoas muscles first pull the lumbar spine into a more fully arched position anteriorly (to the front), and then they pull the torso up and forward. If you have back problems, it is this initial pull on the lumbar arch that can create problems. Later in this chapter (fig. 3.2la–b) we’ll see several ways to approach sit-up exercises more safely.
To understand how crunches, sit-ups, and leglifts operate mechanically, as well as to lay the groundwork for discussing standing, backward bending, forward bending, twisting, and sitting postures in later chapters, we must look at the pelvis and its relationships with the spine and thighs in detail.
THE HIP BONES AND SACRUM: THE PELVIC BOWL
We’ll first examine the pelvic bowl, which is formed from the combination of the two pelvic bones (the hip bones) and the sacrum—the lowest of the four main segments of the spine. The pelvic bones have two roles: one is to link the vertebral column with the thighs, legs, and feet; the other is to define (in combination with the sacrum) the base of the torso and provide a skeletal framework for the pelvic cavity and the organs of elimination and reproduction.
In the fetus each hip bone is made up of three segments: the ilium, the ischium, and the pubis. We often speak of them individually, but in adults they are fused together into one piece, with one hip bone on each side. To the rear, the iliac segments of the pelvic bones form right and left sacroiliac joints with the sacrum (fig. 3.2–4).
To understand the three-dimensional architecture of the pelvic bowl, there is no substitute for palpating its most prominent landmarks. You can start by feeling the crests of the ilium on each side at your waistline. Then locate the ischial tuberosities (the “sitting bones”) behind and below; these are the protuberances upon which your weight rests when you sit on a bicycle seat or on the edge of a hard chair.
To continue your exploration, locate the two pubic bones in front, just above the genitals. They join one another at the pubic symphysis, a fibrocartilaginous joint which keeps the two sides of the pelvis locked together in front (figs. 1.12 and 3.2–4); their rami (ramus means “branch”) connect with the ilia and ischia on each side (figs. 3.2–4). First trace the upper margin of each pubic bone laterally. What you are feeling are the superior pubic rami, bony projections that extend into the groin toward the ilium on each side. An inch or so lateral to the pubic symphysis, these projections are overlain by the iliacus and psoas muscles passing out of the pelvis to their combined insertion on the front of the femur. And beyond the softness of these muscles, the superior pubic rami connect with the ilia, which are again easily palpable.
Figure 3.1. Crunch exercise, safely lifting up and forward with bent knees.
Next locate the inferior pubic rami, which connect to the ischia (figs. 3.2–4). To find them, stand with your feet wide apart and locate the bones that extend from the base of the pubic region inferiorly, laterally, and posteriorly. They form a deep upside-down V. About halfway back each inferior pubic ramus merges into the next component of the hip bone, the ischium. It’s hard to locate the lateral border of the inferior pubic ramus because the tendons of the adductor muscles (figs. 2.8, 3.8–9, and 8.13–14) are in the way. And in the male it is also difficult to palpate the inside, or medial, border of the inferior pubic rami because the penis is rooted in the converging arms of the V. In the female the medial borders of these bones are more accessible. In either case, following them posteriorly will finally lead you to the ischial tuberosities.
Returning to the ilium, which continues laterally from each superior pubic ramus, you will find a prominent bony point, the anterior superior iliac spine, and just below this protuberance, the less obvious anterior inferior iliac spine (figs. 3.2–4). If your abdomen is not in the way, you will become aware of the right and left anterior superior iliac spines when you lie prone on a hard surface. From these landmarks, trace the crests of the ilia laterally along the waistline. If you are slender and not heavily muscled, you can poke your thumb inside the iliac crest and feel the top half inch or so of the inside of the pelvic bowl from which the iliacus muscle originates. Then, as you follow the crest of the ilium around to the back, you will come to a solid mass of muscle, the erector spinae, below which the ilium articulates with the sacrum.
THE SACROILIAC JOINTS AND THE SPINE
The two pelvic bones connect with the rest of the torso through the sacrum at the two sacroiliac joints (figs. 3.2–4), which are formed on each side of the sacrum at the junction of two rough but matching surfaces (figs. 3.3 and 6.2)—the lateral surface of the sacrum and the medial surface of the pelvic bone. Even though these are movable synovial joints whose mating surfaces are bathed in synovial fluid, and even though their matching L-shaped groove-and-rail architecture permits some movement in children and healthy young adults, heavy bands of deep fasciae and well defined sacroiliac and iliolumbar ligaments (fig. 3.4) bind the joints together on the outside and restrain their movement in most people over the age of 25. Athletic young women are notable exceptions; their sacroiliac joints are generally more mobile than those for men in comparable condition. We’ll explain the nature of the complex movements that are possible at the sacroiliac joint in chapter 6.
Anatomical differences account for some of the variations in sacroiliac mobility between men and women, along with the female hormones estrogen, progesterone, and relaxin. The latter all become especially important in the last month of pregnancy for loosening up the sacroiliac joints, along with the pubic connections in front. All must yield to permit the passage of the baby through the birth canal.
Internally, the sacroiliac joints sometimes become ankylosed, which means they have formed a partial or complete bony union. Older men are particularly apt to develop this condition, and once it begins, their sacroiliac components can slip relative to one another only with considerable difficulty and unpleasantness. Such slippage usually happens as a result of a fall, but any impact that disturbs the partially locked relationship between the two sides of the joint will traumatize the opposing surfaces and probably cause extreme pain. Sacroiliac sprains (tears) of the binding ligaments are yet another problem: in this case they are a common cause of lower back pain.
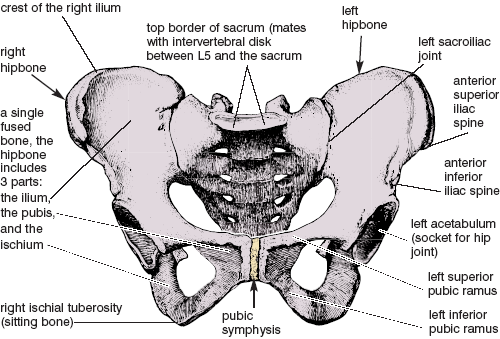
Figure 3.2. The female pelvis, with sacrum and two hipbones. The sacrum articulates in the rear with the ilia at the sacroiliac joints, and the two hipbones articulate with one another in front (by way of the right and left pubic bones) at the fibrocartilagenous pubic symphysis. Also see fig. 1.12 (Sappey).
Because the sacroiliac joints in adults bind the pelvic bones so firmly to the sacrum, every tilt, rotation, and postural shift of the pelvis as a whole affects the vertebral column, and with the vertebral column, the entire body. If you rotate the top of the pelvis posteriorly (which is by definition a posterior pelvic tilt, or colloquially, a pelvic “tuck”), the top of the sacrum is carried to the rear, and this causes the lumbar curvature to flatten and lose its lordosis (forward arch), or in the extreme to become rounded posteriorly. On the other hand, pulling the top of the pelvis forward, which is defined as an anterior pelvic tilt, increases the depth of the lumbar lordosis. And if you stand on one foot the tipped pelvis will create side-to-side deviations of the spine.
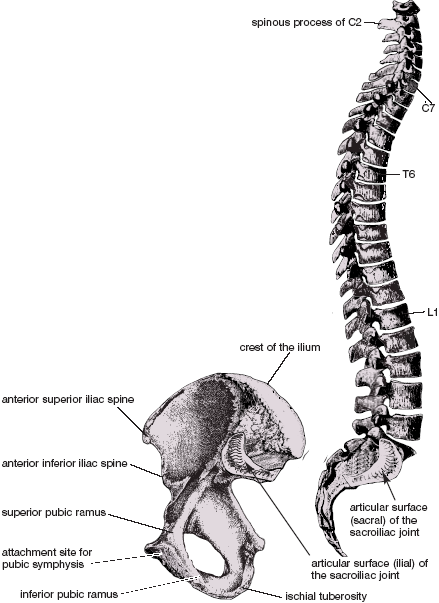
Figure 3.3. The vertebral column (far right) is viewed from its right side, and thus reveals the sacral articular surface of the right sacroiliac joint. The right hip bone (below and to the left) is disarticulated from the sacrum and flipped horizontally, thus revealing its inside surface and the ilial face of the right sacroiliac joint (Sappey).
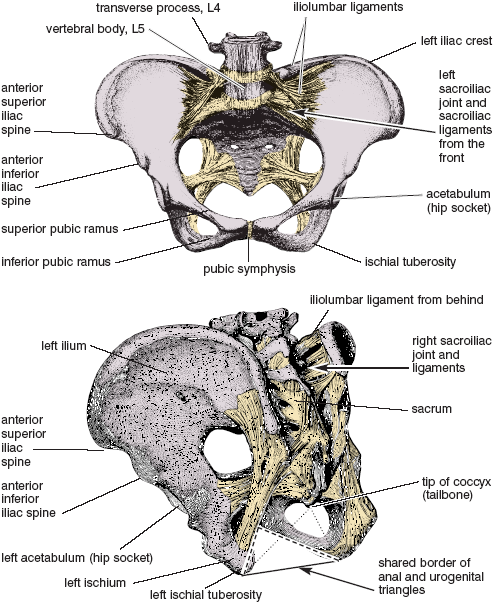
Figure 3.4. Pelvic restraining ligaments from the front (above) and from the side and behind (below). The borders of the diamond-shaped anatomical perineum are shown below, and include the anal triangle behind (dotted line), and the urogenital triangle in front (dashed line), with a shared border (solid line) connecting the two ischial tuberosities (Sappey).
THE HIP JOINTS AND THEIR PRIME MOVERS
Most people understand the hip joints intuitively so long as they are dealing with a simple imperative such as “bend forward from the hips,” or understanding that a simple “hip replacement” involves replacing the head of the femur with a steel ball that will fit into the hip socket. Questioned beyond that, most people will fall silent; they have no notion of what makes up the socket or how movements take place. But now we have begun to develop a distinct image of the pelvic bowl. We have seen how the two pelvic bones are united in front at the pubic symphysis and how the pelvic bones articulate with the sacrum behind, and we have palpated several bony landmarks on each side. We only need a few more details to complete the picture.
The acetabulum (socket) for each hip joint is located at the lateral and inferior aspects of the pelvic bowl (figs. 3.2 and 3.4–5). You can’t feel the acetabulum, but you can feel the bony protuberance just below the joint that sometimes bumps into things—the greater trochanter of the femur (figs. 3.5–6). If you stand up and locate this landmark near where your hands fall alongside your thighs, you will notice that it moves around as you swing your thigh back and forth.
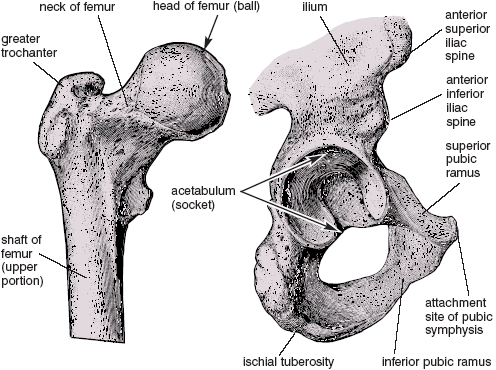
Figure 3.5. Right femur (on the left) as viewed from the front, and right hip bone (on the right) as viewed from the side. The head of the femur fits snugly into the acetabulum, forming a ball-and-socket joint (Sappey).
The pelvic bowl is the foundation for all movements of the thighs at the hip joints, including flexion, extension, abduction, adduction, and rotation. To flex the thigh in a leglift (figs. 3.15–17) you contract the psoas and iliacus muscles (figs. 2.8, 3.7, and 8.13), which, as we have seen, run from the pelvis to the upper part of the femur in the case of the iliacus, and from the lumbar spine to the femur in the case of the psoas. For activities such as lifting each knee (as in running in place), or for stepping forward (as in walking), the origins of these muscles are on the torso and their insertions are on the thighs, but for sit-ups and crunches (fig. 3.1), the origins and insertions are reversed—the thighs are fixed and the entire body is pulled up and forward.
To extend the thigh actively in a posture such as the locust (figs. 5.15–19) you tighten the gluteus maximus muscle (figs. 3.8, and 8.9–10), which takes origin from the posterior surface of the ilium and which has two insertions, one on the femur (fig. 3.10b), and the other in a tough band of connective tissue—the iliotibial tract—that runs all the way down past the knee to the leg (figs. 3.8–9 and 8.12). You can feel the activity of the gluteus maximus become pronounced if you stand up and pull the thigh to the rear while pressing against the gluteal region with your hand. By contrast, many other postures such as the camel (figs. 5.34–35) hyperextend the hip joint passively, and this is resisted both by the psoas and iliacus muscles (figs. 2.8, 3.7, and 8.13), and by the rectus femoris component of the quadriceps femoris muscle (figs. 3.9, 3.11, and 8.8–9).
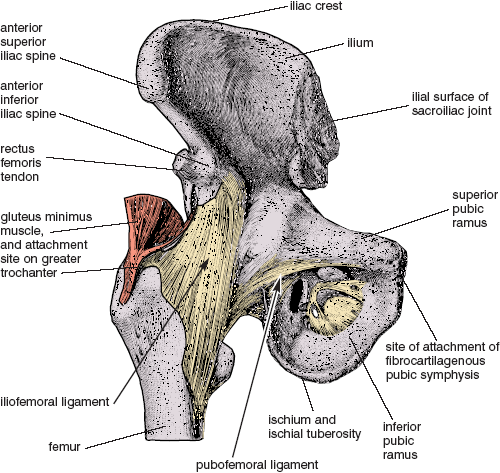
Figure 3.6. Right hip bone. femur, and joint capsule, with the iliofemoral and pubofemoral ligaments visible in front, and the ischiofemoral ligament hidden behind. These three ligaments in combination become taut during hip extension, and loose during hip flexion (for example, when the knee is lifted); (from Sappey).
To abduct the thigh, which you do when you lift the foot straight out to the side, you tighten the gluteus medius and gluteus minimus muscles (figs. 3. 8, 3.10a–b, 8.9–10, and 8.12), which take origin from beneath the gluteus maximus and insert on the greater trochanter. To adduct the thighs, which you do by pulling them together, you tighten the adductor muscles, which take origin from the inferior pubic rami and insert below on the femurs and tibias (figs. 2.8, 3.9, and 8.13–14).
If the muscles of the hips and thighs are strong and flexible, and if you are comfortable extending the thighs fully in any standing, kneeling, or prone posture, you’ll finally encounter resistance to extension in a deep spiral of ligaments that surround the ball and socket hip joint—the iliofemoral, ischiofemoral, and pubofemoral ligaments (fig. 3.6). You won’t feel this spiral unless you know it is there, but it will become increasingly taut as the thighs are extended. When that happens, the head of the femur is driven into the acetabulum of the pelvic bone in a near-perfect fit, and the thigh will extend no more. The spiral will unwind as the thighs are flexed. If this spiral is removed and the hip joint opened up, the head of the femur and the acetabulum become visible (fig. 3.5).
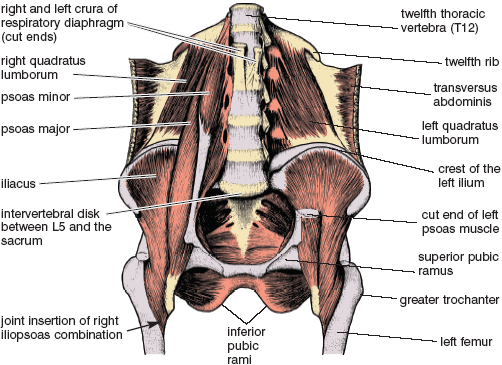
Figure 3.7. Deep dissection of the pelvis and lower abdomen revealing the psoas and iliacus muscles and their conjoined insertions on the femurs. Their contraction lifts the thighs, thus bringing about hip flexion (Sappey).

Figure 3.8. Right gluteal region and upper thigh from behind, with superficial dissection on the left (a) and deeper dissection on the right (b). The partial cutaway of the gluteus maximus on the right (b) exposes deeper muscles of the hip, as well as a clear picture of the dual insertion of the gluteus maximus to he iliotibial tract and the femur (Sappey).
THE QUADRICEPS FEMORIS MUSCLE
The quadriceps femoris is the largest muscle on the front of the thigh (figs. 1.2, 3.9, and 8.8–9) and the foremost anti-gravity muscle in the body. Three of its four components, or “heads,” take origin from the femur and act on the tibia by way of the patellar tendon. Its fourth head, the rectus femoris (figs. 3.9, 3.11, and 8.8–9), takes origin from the front of the pelvis (the anterior inferior iliac spine, figs. 3.2–6) and joins the other three components below. The quadriceps femoris is the muscle, more than any other, that stands you up from a squatting position. You can test its strength by standing in a 90° bent-knee position for 30 seconds with your back flat against a wall and then slowly rising. For those who are older and in a weakened condition, this is the muscle that gives them pause when they want to climb up or down stairs without holding onto a handrail. It is also Waterloo for inexperienced skiers who are trying to negotiate a bowl of deep powder for the first time: they are firmly (even though wrongly) convinced that they have to keep their weight back and their ski tips visible to avoid toppling over into the snow. Although that can indeed happen—it’s called a “face plant” or “header”—most novices overcompensate for the possibility and quickly pay for their error: quadriceps femoris muscles that are soon burning with pain.
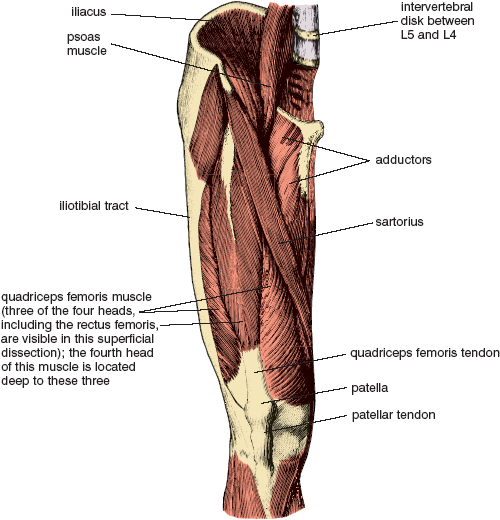
Figure 3.9. Right side of pelvis (deep dissection), right thigh, and right knee, as viewed from the front (Sappey).
THE HAMSTRING MUSCLES
On the back sides of the thighs are the hamstring muscles, most of which have their origin on the ischial tuberosities. Like the quadriceps femoris muscles, the hamstrings insert below the knee joint, in this case both medially and laterally (figs. 3.10, 8.10, and 8.12). Tight hamstrings are the bane of runners—thousands of repetitive strides make these muscles shorter and shorter until they are barely long enough to permit full extension of the knees.
As two-joint muscles that pass lengthwise across two joints instead of one (from the ischial tuberosities of the pelvis all the way to the proximal ends of the tibias and fibulas), the hamstrings contribute both to extension of the thighs at the hip joints and to flexion of the legs at the knee joints. This architectural arrangement facilitates walking and running beautifully, but it creates a problem in hatha yoga. Since the hamstrings reside on the back sides of two joints—the knee and the hip—each of which is crucial in its own way for forward bending, these muscles are major obstacles to such movements. It’s obvious that you could relieve tension on the hamstrings in forward bends by easing up either on hip flexion or knee extension, but releasing flexion of the hips would be contrary to the whole idea. What everyone does naturally is to flex their knees slightly, insuring that the hamstring muscles don’t tug so insistently on the base of the pelvis as one attempts to bend forward. This was the principle involved in chapter 1 when we bent the knees before pulling the torso down against the thighs in the standing hamstrings-quadriceps thigh pull, and this is why we keep the knees bent in crunches. It is also why the knees should be bent if you insist on doing high-speed sit-ups. Otherwise the hamstring muscles tug on the ischial tuberosities from below and create too much tension in the lower back as you jerk yourself up and forward.
THE SPINE AND ABDOMINAL WALL
The pelvic bowl is not merely the link between the thighs and the upper half of the body; it is also the foundation for the torso. Knowing this, if you look at a skeleton, even with one glance, you will sense an immediate cause for alarm: there are many bones and much skeletal density in the pelvis and lots of ribs and vertebrae in the upper torso, but there are only five lumbar vertebrae connecting the two regions (figs. 4.3–4). This arrangement could not provide adequate support to the torso if it were acting alone. It needs the help of the soft tissues, especially sheets of muscle and fasciae. To that end the skeleton is supported by a “tube” containing the abdominal organs, a tube that is bounded in front and on the sides by the abdominal muscles, braced posteriorly by the spine and deep back muscles, capped by the respiratory diaphragm, and sealed off below by the pelvic diaphragm. The tube runs all the way from the sternum to the pubis in front but is quite short laterally.

Figure 3.10a. Nerves to muscles of the back of the hip and thigh originate from spinal segments L4, L5, S1, and S2, and run down the back of the thigh on the extensor side of the hip joint. The large sciatic nerve and associated branches to the gluteus maximus emerge from just underneath the piriformis muscle (shown intact in fig. 3.8b, in two parts connected by the dotted lines here in fig. 3.10a, and removed except for its tendon of insertion in fig. 3.10b). Nerves to the gluteus medius, gluteus minimus, and piriformis are shown above, and nerves to the hamstrings, gastrocnemius, and adductors are shown below. A superficial branch of the common peroneal nerve swings around to an anterior, subcutaneous, and vulnerable position just below the knee (chapter 10); (from Sappey).
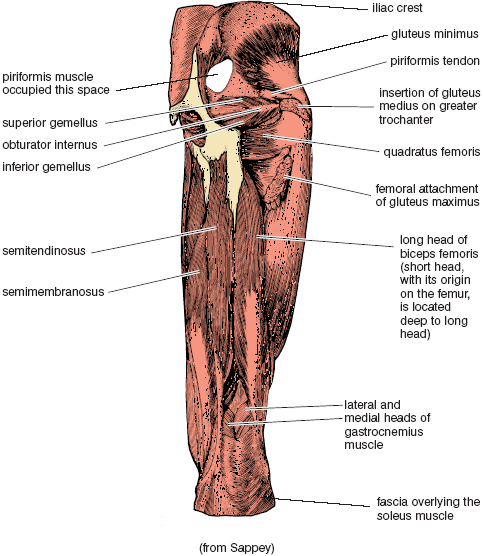
Figure 3.10b. Right thigh, knee joint and hamstring muscles from the rear. The hip dissection, now revealing the gluteus minimus, is even deeper than the one shown on the right side of fig. 3.8. The piriformis and gluteus medius are now removed except for their tendons of insertion on the greater trochanter, and the only remaining part of the gluteus maximus is its femoral attachment.
We have four pairs of abdominal muscles (figs. 2.7, 2.9, 3.11–13, 8.8, 8.11, and 8.13). Three of these form layers that encircle the abdomen, and the fourth is a pair of longitudinal bands. The external abdominal oblique layer runs diagonally from above downward in the same direction as the external intercostal muscles. If you place your hands in the pockets of a short jacket with your fingers extended, the fingers will point in the direction of the external abdominal oblique muscle fibers. The internal abdominal oblique layer is in the middle. Its fibers also run diagonally but in the opposite direction, from laterally and below to up and medially in the same direction as the internal intercostal muscles. The innermost third layer, the transversus abdominis, runs horizontally around the abdominal wall from back to front. These three layers together act as a unit, helping to support the upper body and contributing to bending, twisting, and turning in a logical fashion. They are also necessary for coughing, sneezing, laughing, and various yoga breathing exercises.

Figure 3.11. Torso, with superficial muscles of the chest and neck, fascia covering the rectus abdominis muscles, and the external abdominal oblique muscles (Sappey).
The fourth pair of abdominal muscles, the rectus abdominis muscles (rectus means “straight”), run vertically on either side of the midline between the pubic bone and the sternum. As discussed earlier in this chapter, the rectus abdominis muscles are the prime movers (agonists) for flexion of the spine in crunches, while the hip flexors serve as synergists for bracing the pelvis and lumbar region. The roles are then reversed for old style sit-ups, in which the hip flexors become the prime movers for jerking the torso up and forward at the hip joints, and the rectus abdominis muscles serve as synergists for bracing the spine.
THE CAVITIES AND INTERNAL ORGANS
Within the “tube” of the torso are the thoracic, abdominal, and pelvic cavities, as well as most of the internal organs. The heart, lungs, and esophagus lie within the thoracic cavity, which is bounded externally by the rib cage and inferiorly by the respiratory diaphragm (figs. 2.6–9). The stomach, intestines, liver, pancreas, spleen, and kidneys are contained within the abdominal cavity (figs. 2.9 and 3.14), which is separated from the chest by the diaphragm, protected posteriorly by the spine and deep back muscles, and surrounded anteriorly and laterally by the abdominal muscles. The urinary bladder, the terminal end of the colon, and portions of the reproductive systems lie in the pelvic cavity (figs. 2.8 and 3.7) and open to the external world by way of passages through the pelvic diaphragm at the base of the pelvic bowl (figs. 2.29a–e, 3.14, and 3.24–26). The pelvic cavity is defined above by the upper limits of the bony pelvis and below by the pelvic diaphragm, but otherwise it is confluent with the abdominal cavity. Thus, we refer to them together as the abdominopelvic cavity (fig. 3.14, illustration on the right).
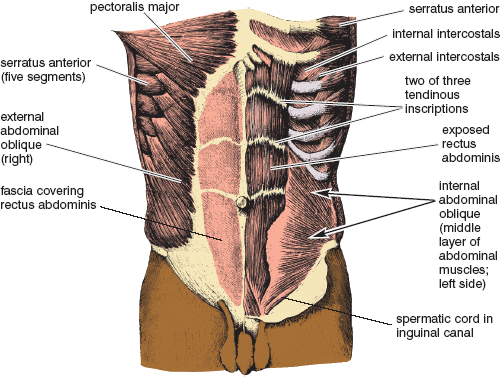
Figure 3.12. External abdominal oblique and rectus abdominis fascia on the torso’s right side, and internal abdominal oblique and exposed rectus abdominis muscle on the torso’s left side (Sappey).
Most of the internal organs are not fixed in position but can slide around by virtue of slippery external surfaces: pleural and pericardial membranes in the chest, and peritoneal membranes in the abdomen and pelvis. Within the thoracic cavity, the pericardial membranes surround the heart and enclose the pericardial cavity while the pleural membranes surround the lungs and enclose the pleural cavities (figs. 2.4 and 2.6). Within both the abdominal and pelvic cavities, the peritoneal membranes surround the abdominal and pelvic organs and enclose the peritoneal cavity. Like the pleural and pericardial cavities, the peritoneal cavities are potential spaces only, as illustrated by a schematic midsagittal section through this region (fig. 3.14). These spaces contain only a small amount of fluid which allows the organs to move relative to one another. The most famous trick question in a medical gross anatomy course is: Name all the organs in the pleural, pericardial, and peritoneal cavities. The correct answer is: None.
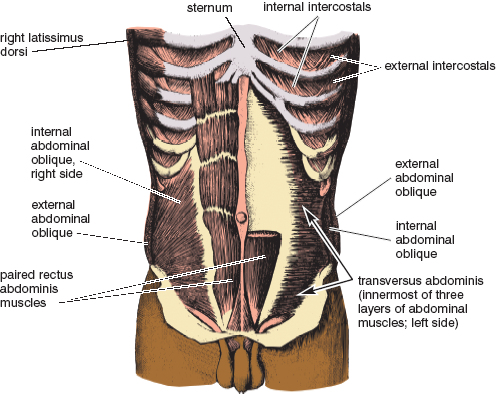
Figure 3.13. Internal abdominal oblique and exposed rectus abdominis on this torso’s right side, and transversus abdominis and sectioned rectus abdominis muscle on the torso’s left side (Sappey).
INTRA-ABDOMINAL AND INTRATHORACIC PRESSURE
Lubricating fluids in the peritoneal cavity impart a liquid character to the internal organs in the abdominopelvic cavity and allow that region to act as a hydraulic (having to do with liquid) system. This means that if something presses against the abdominal wall, hydraulic pressure is transmitted throughout the entire region just like squeezing a capped tube of toothpaste at one site will cause the tube to bulge out everywhere else. The abdominal wall is the soft part of the tube, and the respiratory and pelvic diaphragms seal it at either end. A separate unit, the chest, is bounded by the rib cage and the respiratory diaphragm. The glottis can seal the air within the chest, with the result that the chest can act as a pneumatic (having to do with air) system. Such a system remains at atmospheric pressure anytime the glottis is open, but if you inhale and close the glottis, the system can be compressed (and is indeed often compressed) by the action of the abdominal muscles and external intercostals.
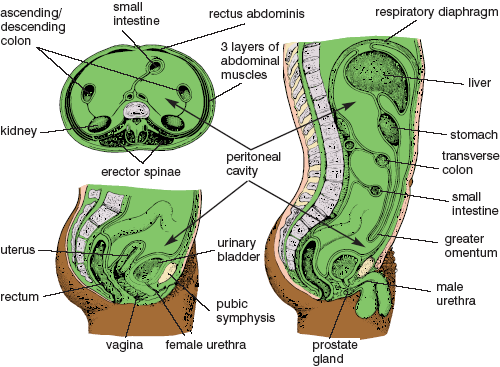
Figure 3.14. Schematic drawings of the peritoneal cavity and a few abdominal and pelvic organs: male on the right, female on the lower left, and gender-neutral cross section on the upper left. White spaces indicate the peritoneal cavity (greatly exaggerated) in all three drawings. The entirety of the abdominopelvic cavity (within which reside the abdominopelvic organs and the peritoneal cavity) is illustrated in the mid-sagittal section on the right (Sappey).
Even though the thoracic and abdominopelvic regions are anatomically independent, the former functioning as a pneumatic system and the latter as a hydraulic system, the trunk as a whole operates as a cooperative unit. For example, if you bend over from an awkward position to pick up a heavy object, and if you have to do that with your knees straight, your spine is vulnerable to injury from too much stress on the lumbar region. If you were to try that maneuver from a bent-forward position when you are breathing freely—or even worse, if you were to hold your breath after an exhalation—the weight of the object would create a frighteningly efficient shearing effect on all the intervertebral disks between the chest and the sacrum. Were it not for our ability to supplement skeletal support with the hydraulic and pneumatic pressures within the abdominopelvic and thoracic cavities, the intervertebral disks in the lumbar region would quickly degenerate and rupture. To protect yourself you will have to increase intra-abdominal pressure, and you can do this with or without the aid of compressed air in the chest.
You can protect your spine with respect to how you use your hydraulic and pneumatic systems in one of three ways. First, before you lift you can inhale, close the glottis, and hold your breath. Then you can tighten your abdomen, pelvic diaphragm, and internal intercostal muscles all at the same time so that the pneumatic pressure in the chest comes into equilibrium with the hydraulic pressure in the abdominopelvic cavity. This allows the respiratory diaphragm to remain relaxed and increases pressure in the torso as a whole. That increased pressure then supports the action of the back muscles in two ways: it creates a taut, reliable unit from which to lift the object, and it produces a lengthening effect on the spine which spreads the vertebrae apart and eases strain on the intervertebral disks. (It should be noted that for older people, especially those who might be vulnerable to cardiovascular problems, this is an emergency measure only, because it will result in an immediate increase in blood pressure.)
A second way to protect your back, if you have a strong respiratory diaphragm and know how to use it, is to keep the glottis and airway open as you lift, and at the same time press down with the diaphragm, in with the abdominal muscles, and up with the pelvic diaphragm. This is a very different situation from the first one. Here it is the respiratory diaphragm rather than the glottis that seals the top of the tube and counters the action of the abdominal muscles and pelvic diaphragm. Just the same, it eases strain on the intervertebral disks in the critical lumbar region. The main difference between the two techniques is that now the thoracic region is not involved because the airway is open and intrathoracic pressure is not increased.
The third way to protect the spine, and one that comes naturally to most of us, is to mix and match the options. Prepare yourself with an inhalation, partially close the glottis, press down with the diaphragm, and coordinate your lifting effort with a heavy grunting sound, which is a signal that the glottis has been partially closed. What happens exactly? You start with an intent to use method number two—increasing intra-abdominal hydraulic pressure alone—but augment that effort by increasing pneumatic pressure in the chest at the precise moment that maximum protection for the back is needed. This is the choice of championship weightlifters, who continue to breathe during the easier portions of the lift, and then emit a mighty grunt to complete it.
In all hatha yoga postures that involve bending forward and then lifting back up in a gravitational field (for practical purposes this means anywhere but in a swimming pool), it is increased intra-abdominal pressure far more than the action of individual muscles that protects and braces the back. If you want to strengthen the abdominopelvic region to the maximum, and if you want this region to link the upper and lower halves of the body in the most effective and efficient manner, you will have to exercise the second option—keeping the glottis open—when you do the exercises and postures that follow. This means always placing the burden for creating intra-abdominal pressure on the respiratory diaphragm, the abdominal muscles, and the pelvic diaphragm. The first option, holding the breath at the glottis, should be used only as an emergency measure for extricating yourself safely from a posture that is beyond your capacity.
ABDOMINOPELVIC ENERGY
Yoga is concerned first and foremost with the inner life, and the abdominopelvic exercises are no exception. On the most obvious level yoga postures strengthen the abdominal region and protect the back. But when you do them you also come alive with energy that can be felt from head to toe. Leglifts, sit-ups, the sitting boat postures, and the peacock all create these effects through manipulating the limbs and torso in a gravitational field while you are using the abdominal region as a fulcrum for your efforts. And the harder you work the more energizing the exercise.
“Safety first” is a wise slogan, and the frailties (or challenges) of the human frame offer us many opportunities to practice it. If you have not had much experience with abdominopelvic exercises, please read the section on contraindications at the end of this chapter before doing them. Even the simplest leglifts and sit-up exercises should be approached with caution. The first rule: Until you know your body and its limitations well, your first line of protection is to keep the lower back flattened against the floor as you do these exercises. With a little training you can confidently make skillful use of the hydraulic nature of the abdominopelvic region, and after you are certain of yourself you can explore other options.
SUPINE SINGLE LEGLIFTS
Supine single leglifts are the safest beginning leglifting exercises because they are not likely to strain an inexperienced or sensitive back. Start with the thighs adducted, the knees extended, the feet extended (toes pointed away from you), and the hands alongside the thighs, palms down. Slowly raise one foot as high as possible (fig. 3.15) and then slowly lower it back to the floor. Repeat on the other side. Keep breathing. If you are comfortable you can try several variations of this exercise. One is to keep the knee extended, pull the flexed thigh as close as possible to the head (using the hip flexors, not the upper extremities), and hold it there for 30–60 seconds. And after you have come most of the way down you can hold the foot isometrically an inch or two away from the floor.
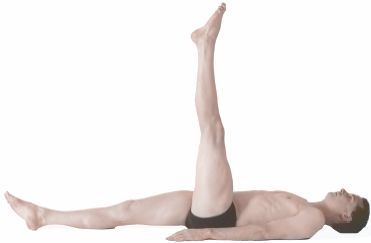
Figure 3.15. Single leglift. This posture is a safe hamstring stretch for the flexed thigh because the pelvis and lower back are stabilized against the floor.
What happens in single leglifts is that the psoas and iliacus muscles flex the hip while the quadriceps femoris muscle keeps the knee extended. The rectus femoris (the straight head of the quadriceps femoris) assists in both roles: it aids flexion of the hip because of its origin on the anterior inferior iliac spine, and it assists the rest of the quadriceps in keeping the knee extended (fig. 3.9). The posture itself creates the stable conditions that make single leglifts an easy exercise. First, the hamstring muscles of the side being lifted pull inferiorly on the ischial tuberosity on that same side, which keeps the pelvis anchored in a slightly tucked position and the lumbar spine flattened against the floor, and second, keeping the opposite thigh and leg flat on the floor improves the stability of the pelvis and lumbar spine even more. The combination permits flexion of one thigh with little or no stress on the lower back.
THE BICYCLE AND OTHER VARIATIONS
To further prepare for more difficult yoga postures, and to get both lower extremities into the picture but still without placing a great deal more stress on the lower back than is occasioned by single leglifts, flex both knees, draw them toward the chest, and bicycle your feet around and around. Next, and a little harder, lower your feet closer to the floor and pump them back and forth horizontally. Intensifying even more, straighten your knees and press your feet toward the ceiling. This is easy if you have enough flexibility to keep your thighs and legs perpendicular to the floor. If you can’t do that, bend your knees slightly, and from that position, keep one leg lifted and slowly lower the opposite foot to within an inch of the floor, straightening the knee on the way down; then raise it back up and repeat on the other side. Keeping one foot up while lowering and raising the other is almost as easy as keeping one leg flat on the floor. You can also create a scissoring motion, with the feet meeting midway or near the highest position. And any time you need to create less pull on the underside of the pelvis from the hamstrings, bend the knees.
When you do variations that are more demanding than the simple bicycling motion, you’ll find that your abdominal muscles tighten, increasing intra-abdominal pressure and pressing the lower back against the floor in cooperation with the respiratory diaphragm. This assumes, of course, that your airway is open; if you lock it at the glottis, the diaphragm will remain relaxed and you will miss one of the main points of the exercise.
THE FIRE EXERCISE
As soon as you are comfortable doing single leglifts and their variations for 5–10 minutes, you can try the fire exercise, named from its energizing effects on the body as a whole. To get in position for this one, sit on the floor, lean back, support yourself on the forearms, and place the hands under the hips or slightly behind them, palms down, or up, if that feels easier. Keeping the feet together, extend the toes, feet, and knees, and draw the head forward while keeping the back rounded. Exhale, and at the same time slowly lift the feet as high as possible, drawing the extended knees toward the head (fig. 3.16). Slowly come back down, not quite to the floor if your strength permits. Come up and down as many times as you can without strain, inhaling as required and always breathing evenly. If coming all the way up and down is too difficult, simply tighten the muscles, lift the feet an inch or so, and hold in that position isometrically. After a few days you may have enough strength to do the full exercise.
The fire exercise is intended for breath training as well as for building abdominal strength, and if you watch your breathing carefully, you’ll notice that the posture feels more powerful when you exhale. As is true for many day-to-day activities, inhalation is mostly a preparation for the intensity associated with exhalation. In the case of the fire exercise, it’s a matter of muscle mechanics: to support the posture efficiently with intra-abdominal pressure, the diaphragm must be continuously active, and to do this it must operate within a fairly narrow range with its muscle fibers moderately stretched and its dome high in the torso. For this reason you will find yourself exhaling almost as much as you can and taking small inhalations. If you take a deep inhalation as an experiment, you will immediately sense a loss of abdominal and diaphragmatic strength. As always for exercises such as these, unless you are faced with an unexpected emergency keep the airway open, supporting the posture only with hydraulic pressure in the abdominopelvic unit.
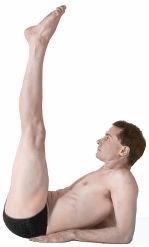
Figure 3.16. Fully lifted position for the fire exercise. Its key feature is that the back remains rounded posteriorly. An alternative and slightly easier hand position is to place them under the pelvis, palms up.
Like health club crunches, two features of this practice make the fire exercise safe: the back is rounded posteriorly, and the psoas muscles help lift the thighs from a stabilized origin on the inner curvature of the lumbar spine (fig. 3.16). If you start with the back straight or less firmly rounded to the rear, the psoas muscles will destabilize the lumbar region by pulling it forward before they begin to flex the hips; this is fine if your back is strong and healthy, but too stressful if it is not.
You will immediately sense the difference between the straight and the curved-to-the-rear positions of the spine if you do the following experiment. First round your back and try the fire exercise in its standard form. Sense your stability. Then (provided your back is sound) try lifting your feet after lowering your head and shoulders to the rear and letting the lumbar region relax and come forward. The instability of the second starting position will shock you. The lesson: if you are unable to maintain a stabilized posterior curvature, don’t do the fire exercise. Instead, work with crunches and the single leglift variations until you are strong enough to keep the back rounded to the rear.
THE BASIC SUPINE DOUBLE LEGLIFT
No matter what kind of leglift you try, if you do not do it while keeping your lower back flattened against the floor in the supine position or rounded to the rear when the head and upper back are lifted, it has to be considered an advanced practice. The supine double leglift is a case in point. Lying flat with the legs extended, a small amount of space will usually be found between the lumbar region and the floor, and if this is allowed to remain when the psoas muscles flex the thighs, those muscles will not be pulling from a stabilized lower back that is pressed to the rear, but from a wavering and inconstant lumbar lordosis. It is therefore essential, before starting the supine double leglift, to press this region to the floor with a posterior pelvic tilt and hold it there for the duration of the exercise.
To begin the supine double leglift, lie down with your thighs adducted, knees extended, feet and toes extended, and hands alongside the thighs, palms down. Next, in order to establish enough intra-abdominal pressure to dominate the lumbar region decisively, strongly engage the abdominal muscles along with the respiratory and pelvic diaphragms, and holding that position tenaciously, slowly lift the feet (by flexing the hips) as high as possible (fig. 3.17) and then lower them to within an inch of the floor. Come up and down for as many repetitions as you want, breathing evenly throughout the exercise.
Since the muscular leverage for pressing the lumbar region to the floor comes from the abdominal muscles, especially from the rectus abdominis, learning to activate those muscles is the most important part of the exercise. If you cannot get the feel of tightening them when you are lying flat on the floor, which is the case for most beginning students who have never been very athletic, lift your head and shoulders while holding your hands against your abdomen for feedback—it is impossible to lift your upper body without engaging the abdominal muscles. Then try to generate that same feeling as a preparation for the leglift, but without lifting the upper body.
Double leglifts are difficult not only because they depend on strong abdominal muscles that are acting in a manner to which they are not accustomed, but also because the knees must be kept fully extended. To flex the hips with the knees straight, a tremendous force has to be exerted on the insertions of the iliopsoas muscles at the proximal (near) end of the femur, and this is like trying to lift a board by gripping it with your fingers at one end. The rectus femoris muscles aid leglifts as synergists because they are pulling from the front of the pelvis to their insertions on the patella (kneecap) instead of from the pelvis to the proximal portion of the femur, but even with help from these muscles, the exercise is still a test of strength for many students. The endeavor is further complicated by the fact that keeping the knees straight during the leglift stretches the hamstring muscles, which are antagonists to the iliacus, psoas, and rectus femoris muscles. That stops a lot of people in a hurry.
TRAINING ALTERNATIVES
There are fewer sights more unnerving to a yoga instructor than watching a group of beginners struggle with double leglifts, permitting their lumbar regions to lift off the floor as they start to raise their feet, and at the same time holding their breath at the glottis. If you are teaching a class in which several people are struggling, you should stop everything and demonstrate the proper technique. Try this: Lie down and ask two volunteers, one on either side of you, to press their right hands against your abdominal wall and place their left hands under your lower back. Then tighten your abdominal muscles. This will push their right hands toward the ceiling, and at the same time it will flatten your lumbar region to the floor against their left hands. Then do a double lift showing first how the lower back should be kept down, and second, letting it lift inappropriately away from the floor. Keep up a stream of conversation to prove that you are supporting the effort with your diaphragm and not holding your breath.

Figure 3.17. End position for the supine double leglift. The key requirement of this posture is to actively keep the lower back flattened against the floor using the abdominal muscles.
If students have the knack but not the strength to keep their backs against the floor during the double leglift (which is very common), another trick is to try this exercise: before beginning the lift tell them to bend the knees enough to raise the thighs to a 30–45° angle, then lift the feet off the floor and straighten the knees. This will make it easier to keep the back against the floor and make it possible to complete the leglift properly from the higher angle. They should come partially down in the same way, being sensitive to when they can no longer keep their back braced against the floor, at which time they should bend their knees and either lift back up or come all the way down.
BREATHING
The respective natures of the chest and the abdominopelvic regions of the torso are very different from one another: the abdominopelvic cavity is like an oblong rubbery egg filled with water, and the egg is topped by a cage of bone filled with air. Everyone doing leglifts should increase pressure only in the egg. You will have to squeeze down from above with the respiratory diaphragm, up from below with the pelvic diaphragm, and in with the abdominal muscles. To maintain this pressure the respiratory diaphragm has to be strong enough during both inhalation and exhalation to counteract the effects of the abdominal muscles, and this effort must be sustained throughout the exercise. So when do we breathe? All the time. And how? It depends. If you have excellent hip flexibility, you will be able to lift the thighs 90°, exhaling as you lift, and when you have reached that position you can relax and breathe any way you want. But if your hip flexibility is limited, and if you have to keep working against tight hamstring muscles even in the up position, your breathing will be intense and focused on exhalation all the time. You will be taking tiny inhalations whenever you can.
You can take breathing one step further and intensify the energizing effect of leglifting exercises, as well as their difficulty, by keeping as much air out of the lungs as possible, exhaling all the way to your residual volume and then taking small inhalations. If your residual volume is 1,200 ml, you might breathe in and out a tidal volume between 1,200 ml and 1,400 ml instead of between 1,400 ml and 1,600 ml, which approximates what would be most natural in the active stages of double leglifts (fig. 3.18). Breathing this way is more difficult because the already hard-working abdominal muscles (especially the rectus abdominis) now have to work even harder to keep air out of the lungs.
THE SUPERFISH LEGLIFT
We have seen that the lumbar region can be stabilized for leglifts either by rounding it posteriorly as in crunches or the fire exercise, or by keeping it flattened against the floor. But anyone with a sound back can also try leglifting with the lumbar region stabilized in an arched forward position. This is a variation of the fish posture (figs. 3.19a, 5.28, and 9.19)—a posture I’m calling a superfish leglift (fig 3.19b).
To do this posture place your palms up under the hips, stretch your feet out in front, and support all or most of your weight on your forearms. Let your head barely touch the floor. Now arch up maximally by lifting the chest and abdomen into the most extreme possible position. This will stabilize the lumbar arch (fig. 3.19a). Then keeping the feet together, and the toes, feet, and knees extended, slowly raise the heels away from the floor. Raise up only as far as you can without degrading the arch in the back. If you have excellent hamstring flexibility you may be able to flex your thighs to a 30° angle (fig. 3.19b), or even more, but most people will only be able to raise their feet a few inches before the hamstrings start tugging so much on the base of the pelvis that they pull the lower back toward the floor. So you have a choice: either lift your feet up and down and allow the back to follow in reverse—back down feet up, followed by back up feet down—or lift your feet only until the lower back starts to lose its emphasized forward curve. The main benefit of the exercise comes not from how far you raise the feet but in experiencing the intense pull of the hip flexors on the accentuated lumbar arch. Keep breathing, but for this posture focus on inhalation rather than on exhalation, because emphasizing exhalation will press the lumbar region posteriorly and defeat your purpose.
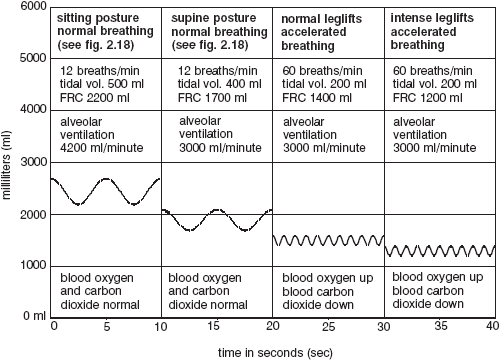
Figure 3.18. Simulated shifts in respiration during leglifting. The two conditions on the left are repeated from fig. 2.18. FRC= functional residual capacity.
THE SLOW LEGLIFT WITH A RELAXED ABDOMEN
This next leglifting exercise turns everything we have said so far on its head because it is carried out with relaxed abdominal muscles; for this reason it is only for advanced students with healthy, flexible, and adventuresome backs. The sequence of movements is not only an excellent strength-building exercise for the iliopsoas muscles, which will be doing most of the work, it is also a golden opportunity to observe complex muscular action.
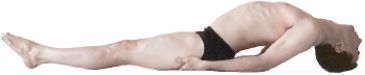
Figure 3.19a. Fish posture. The chest and abdomen are lifted as high as possible and the posture is supported mainly by the upper extremities.
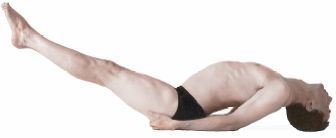
Figure 3.19b. Superfish leglift. The thighs are flexed as much as possible without degrading the lumbar arch, which is stabilized in the forward position.
Begin in the supine position. Keep the abdominal muscles relaxed, and in slow motion develop enough tension in the iliopsoas muscles to prepare to lift your feet. Notice that as tension develops, the lumbar arch increases (fig. 3.20a). This is a formidable concentration exercise. What you are doing is diametrically opposed to the standard double leglift, and keeping the abdominal muscles relaxed as you increase tension in the hip flexors goes against every natural inclination.
It is important to sense that the iliopsoas muscles are raising the lumbar arch maximally before they lift the heels off the floor. Follow the movement of the lumbar region to its limit. As soon as that point is reached the arch will be stabilized and the hip flexors will finally begin to lift the thighs (fig. 3.20b). At that precise moment focus your concentration on not, repeat not, tightening the rectus abdominis muscles. Although this is counter to your natural predilections, any tension in those muscles pulls the lower back toward the floor. As with the superfish leglift, unless you have long hamstrings and exceptional hip flexibility you will not be able to lift up very far and at the same time maintain the deep lumbar lordosis. Nearly everyone will find that their hamstrings start pulling the lower back toward the floor before they can even get their thighs flexed 45°, much less 90°.

Figure 3.20a. For the first stage of a double leglift with a relaxed abdomen, tension in the iliacus and psoas muscles lifts the lumbar arch forward as the abdominal muscles remain completely relaxed.
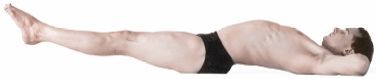
Figure 3.20b. Completion of slow leglift with relaxed abdomen. Its key feature is keeping the lumbar arch stabilized in the forward position before and while the feet are lifted slightly off the floor.
AN ADVANCED BREATHING EXERCISE
In a second variation of the leglift with relaxed abdominal muscles, instead of focusing primarily on exhalation as we do for the fire exercise and ordinary double leglifts, inhale slowly as you develop tension for raising the lumbar region and for starting to lift the feet off the floor. This facilitates arching the lumbar region forward. Then to continue the leglift, exhale as you flex the thighs to 90° while your lower back is being pulled down against the floor by the hamstrings and abdominal muscles. Breathe to suit yourself while resting at 90° of hip flexion. Then brace yourself and exhale while lowering the feet back to a few inches away from the floor. Next, inhale as you cautiously relax the abdominal muscles, which allows the lumbar arch to become re-established. Then lower the feet the rest of the way, exhale and rest with your feet on the floor, and inhale again to begin a new lifting cycle.
This method of breathing helps you coordinate the challenging musculoskeletal requirements of the exercise. When you start the sequence, the thighs are the fixed origins for the iliopsoas muscles, and the lumbar region and pelvis serve as the insertions. Then, as soon as the lumbar region is lifted to its maximum, the origins and insertions reverse: the lumbar region and pelvis serve as origins and the thighs become the insertions. Coordinating the breath with all of this while you are watching the activity of the rectus abdominis muscles and the hamstrings, and at the same time keeping in mind everything else that is going on, will make you aware of the architecture of the abdominopelvic region more than any other exercise.
Yoga sit-ups are a far cry from the fast, jerky exercises in a high school gym class. For one thing, they should always be done in slow motion. For another, they should always be done with full awareness of the spine as you roll up into a sitting position “one vertebra at a time,” as hatha yoga teachers like to say. Yoga sit-ups also differ fundamentally from leglifts in that for sit-ups you are rolling up the part of the body (the torso) that controls the movement itself, while in leglifts you are raising up a part of the body that is merely connected to the lifting unit.
The initial position for sit-ups is lying supine, keeping the thighs together, flexing the feet and toes, extending the knees, and pressing the lower back to the floor. Then, with the hands pointed toward the feet and the lower back held against the floor, flex the head toward the chest. Breathing evenly, continue to roll up one vertebra at a time (fig. 3.21a) until you are in a sitting position. Concentrate on the action of the abdominal muscles, and stretch the hands forward as much as possible. Come down from the posture in reverse order, slowly rolling down, first the sacrum, then the lumbar region, chest, and finally the head and neck, breathing evenly all the way. If you are unable to lift up significantly, just squeeze up as much as is comfortable, hold the position isometrically for a few seconds, and slowly roll back down. You will still benefit from the posture. Work on it every day, and you will soon be lifting up with ease. When you have developed enough strength to do sit-ups with the hands pointing toward the feet, you can work with progressively more difficult hand and arm positions—placing the fists in the opposite armpits (figs. 6.13–14), catching the opposite earlobes, interlocking the hands behind the head, and stretching the arms overhead.
Holding your back flat against the floor while initiating a sit-up powerfully activates the abdominal muscles, and this enables them to act as prime movers for rolling you up and forward, but if you start with the lower back arched forward, beware. The abdominal muscles will be relaxed and less effective, and the psoas muscles will create excess tension at the lumbar lordosis, exactly as in old-style sit-ups. Do not let that happen. If you don’t have enough control to keep the back against the floor, bend the knees before you do the sit-up just as you would in crunches.

Figure 3.21a. Intermediate position for a slow easy yogic sit-up.
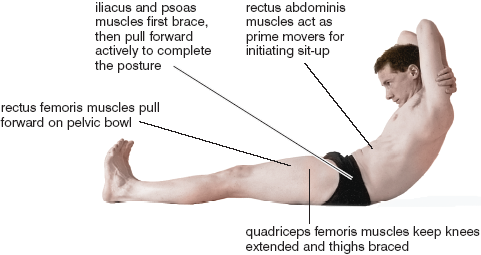
Figure 3.21b. Locations of muscles involved in slow sit-ups.
Sit-ups in yoga, whether done with extended or flexed knees and hips, complement leglifts because they involve some of the same muscles. But there the similarities end. Leglifts simply flex the hips, but for sit-ups, muscles from head to toe on the front of the body act first to brace and then to bend the torso up and forward like an accordion. The iliopsoas and rectus femoris muscles first act as synergists, bracing the pelvis and lumbar region and merely supporting the action of the rectus abdominis. Then as the upper body is pulled further up and forward, the hip flexors take a more active role. Picturing the locations of all three hip flexors plus the rectus abdominis muscle from the side makes it obvious that the rectus abdominis is the only one of the four that has a good mechanical advantage for initiating the sit-up, especially when the knees are straight and the thighs are flat against the floor (fig. 3.21b).
Even if you are careful to keep the lower back against the floor as you start the sit-up, the exercise still compresses the spine and should be done for only a few repetitions. If you are looking for an athletic abdominal exercise that can be repeated hundreds of times, all modern trainers recommend that you do sit-ups by first bending your knees and pulling your heels toward your hips. When the hips are partially flexed as in fig. 3.1, the iliopsoas and the rectus femoris are able to act more powerfully as synergists from the beginning to support rolling up and forward, keeping the pelvis stabilized at the crucial moment the sit-up is being initiated by the rectus abdominis muscles.
Leglifts and sit-ups are dynamic exercises that feature isotonic movements, whereas sitting boats are classic yoga postures that are held isometrically. The latter resemble boats when viewed from the side, and are even as tippy as boats because of the way you must balance your weight on the pelvic bowl. And since the sitting boat postures are ordinarily held for 30–60 seconds, they require more coordination and balance than leglifts or sit-ups. We’ll explore two variations: one makes use of a rounded back—a flat-bottom boat; and the other makes use of a straight back—a boat with a keel.
THE FLAT-BOTTOM BOAT
The boat posture with the back rounded should be mastered first because it is safer and more elementary, and because it doesn’t require nearly as much hip flexibility as the posture with the straight back. Start from a sitting position with the fingers interlocked behind the head or neck, the feet and toes extended (pointed away from the head), and the knees extended. Round the back posteriorly and slowly lean to the rear. You will be lengthening the iliopsoas and abdominal muscles eccentrically as gravity pulls your head and shoulders closer to the floor. Then lean back even further while flexing the thighs, and right after that pull the torso forward with the abdominal muscles. Finally, flex the thighs as much as possible with a combination of the psoas, iliacus, and rectus femoris muscles. Keep the knees extended and hold the pose isometrically for 10–60 seconds (fig. 3.22a). If you start shaking, you’ve gone beyond your capacity and should come back down. Your back should be rounded enough for your weight to be supported on the relatively flat surface of the sacrum—the flat bottom of the boat—so balance ought not be a serious problem, but if it is, sit on a softer surface or a pillow.
The other way to come into this posture is to raise up from a supine position. With the toes, feet, and knees extended, press the lower back to the floor using the abdominal muscles. Holding that position, raise the head and pull the shoulders up and forward, and when that movement is partially underway, tighten the psoas and iliacus muscles concentrically to flex the thighs. If you have developed the requisite strength from leglifts and sitting-up exercises, the entire sequence should be easy. Try it slowly to analyze its components. You will probably find yourself minimizing your tidal volume and focusing on exhalation, exactly as you did with the fire exercise and most of the other leglifts.
THE BOAT WITH A KEEL
The back is kept straight in the second sitting boat posture, and this may not be easy. From a sitting position with the feet together and with the toes and knees extended, sit ramrod straight, which includes arching the lower back forward. Next, stretching your hands out in front of you, lean backward, keeping the hips flexed at a 90° angle, which of course lifts the feet. You will be supporting the posture with the psoas, iliacus, and abdominal muscles, and especially (in contrast to the round-bottom boat), with the rectus femoris muscles (figs. 3.9, 8.9, and 8.11), which are prime movers for keeping the front of the pelvis pulled forward and for maintaining the 90° angle between the pelvis and the thighs. Hold the pose isometrically for 10–60 seconds (fig. 3.22b). It is harder to balance in this posture than in the previous one because you are poised on your sitting bones (the keel of the boat) instead of the flat of the sacrum. Again, use a pillow if balancing is too difficult.
If you have limited hip flexibility because of tight hamstrings, you will find yourself struggling to keep your back straight. The problems are comparable to those faced by students trying to do 90° leglifts while keeping their lumbar regions arched forward in the superfish leglift, as well as in trying to lift up in a double leglift while keeping the abdomen relaxed. All such postures, including this straight-back boat pose, are impossible if hip flexibility is poor. And even intermediate-level students find it difficult to resist the hamstring stretch and at the same time summon the strength to calmly hold the posture in its ideal form.
Peacocks are said to have extraordinary powers of digestion and assimilation, and that is one reason the posture has been given this name. The hatha yoga literature tells us that the peacock pose so enlivens the abdominopelvic region that if you have mastered it and hold it regularly for three minutes a day, you can ingest poison without harm. It might be wise to take that with a grain of salt, but the peacock is certainly the supreme posture for developing abdominopelvic energy. What is more, the completed posture looks like a male peacock as it struts its stuff with a long plume of colorful feathers trailing behind.
There are several ways to approach and complete the posture. Here’s one: To come into the preparatory position, you first kneel with the thighs abducted and the toes flexed. Then you lower the top of the head to the floor, and place the palms on the floor between the knees with the fingers pointing behind you. Bring the wrists and elbows together tightly, and pull the hands toward the head until the forearms are perpendicular to the floor and the elbows are in contact with the abdomen (fig. 3.23a). The wrists will be extended about 90°. If this is a problem because of previous wrist injuries or wrist inflexibility, you may not be able to do the peacock until the situation has been corrected with other stretches. Most women will have to squeeze their breasts between the arms above the meeting point for the elbows. If you try to create more room for the breasts by allowing the elbows to come apart, one or both elbows will slip to the side and off the abdomen when you attempt to complete the posture.
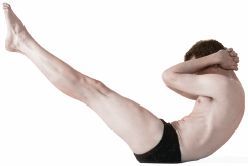
Figure 3.22a. Flat-bottomed boat. This is a beginner’s rounded-back posture, and is especially valuable for those with poor hip flexibility.

Figure 3.22b. Straight-back keel boat, for advanced students who have good strength and hamstrings long enough to permit 90° of hip flexion.
Holding this position, take the knees back as far as possible and then straighten them, sliding the toes as far back as you can, supporting your weight on the top of the head, the hands, and the feet (fig. 3.23b). This may be all you can do. If so, remain in this position for 20–60 seconds to build your capacity.
Still keeping the elbows in position, lift the head. Then slowly take your weight forward by extending the elbows, supporting most of your weight on the hands and some of your weight on the extended feet (fig. 3.23c). Again, you may find it useful to remain in this position for 20–60 seconds rather than go further and fall forward.
Now, while bracing the back and thighs to keep the body as straight as possible, pitch your weight forward by extending the elbows until you are balancing all of your weight on the hands, paying special attention to the fingertips. You have to keep the body rigid enough for the toes to lift off the floor (fig. 3.23d), and the back muscles have to be very powerful to accomplish this, especially if you want to keep the back relatively straight in the final pose. Although we’ll delay detailed comments on the design of the upper extremities until chapter 8, the muscles that stabilize the two scapulae (the shoulderblades) are also crucial to this effort, especially one—the serratus anterior—that keeps the scapula flat against the back and pulled to the side (figs. 3.11–12 and 8.9).
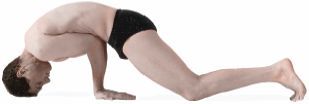
Figure 3.23a. Preparatory position, peacock.
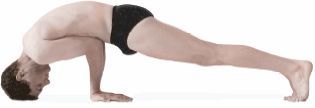
Figure 3.23b. Second position, peacock, with elbows flexed about 90°.
Assuming that your abdominal muscles, back muscles, and scapular supporting muscles are strong enough to support the posture, and assuming that you have been able to keep the elbows in position, the main problem for most people is developing enough strength in the flexors of the forearms to permit a slow and controlled eccentric extension of the elbows. To complete the posture, the forearm flexors have to support the entire weight of the body. They lengthen eccentrically as you bring your weight forward, and as you try to come into the final isometric position you may exceed their limits. One of three reactions is typical: you may fall forward on your nose as the flexors suddenly relax and give way under the influence of inhibitory input to motor neurons from Golgi tendon organs; you may fall to one side, usually as the weaker arm slips off the abdomen; or your motor pathways may just deliver up a resounding objection because they sense at some level that you will not have the strength to support the final posture. In this last case students often do something silly, like tossing their feet into the air as if they were trying to levitate. Their feet, of course, fall back to earth just like anything else that is tossed in the air. You can complete this posture, at least using the approach described here, only by bringing your weight forward.

Figure 3.23c. Third position for the peacock, with weight supported only between the feet and the hands.
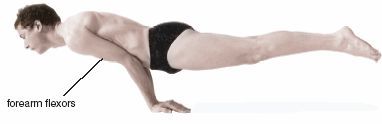
Figure 3.23d. Peacock posture completed. As the weight comes further forward, the forearm flexors lengthen eccentrically to support the posture.
A successful peacock pose depends to a great extent on your body type and weight distribution. If you have a big chest and small hips and thighs the bulk of your weight will be forward and you will not have to extend the elbows a lot to complete the posture. But if you have a small chest, big hips, and heavy thighs and legs, a greater proportion of your weight will be to the rear and you will have to extend your elbows more fully. As you do that, however, the forearm flexors start losing their mechanical advantage and the pose becomes more difficult to complete and hold. This is easy to prove. If it happens that you can complete the posture easily you’ll not have any trouble supporting a 25-pound weight on your midback without additional extension of the elbows. But if someone were to place a 5-pound weight on your feet, the increased elbow extension needed to bring your weight forward to a point of balance will probably drop you to the floor like lead.
It is commonly said that the peacock is more difficult for women than for men because they have less upper body strength, but the main reason that women have more difficulty is that a greater proportion of their weight is distributed in the lower half of the body. It follows, then, that to make the posture easier, all they need to do is to fold in some of their lower body weight. The classic solution: do the posture with the legs folded up in the lotus pose so the elbows will not have to extend as much to support it. This is possible, of course, only if you are comfortable in the lotus.
The peacock develops more intra-abdominal pressure than any other posture because the abdominopelvic unit (which is bounded by the respiratory diaphragm, the pelvic diaphragm, and the abdominal muscles) is supporting the weight of the body through the elbows and arms. And because the diaphragm is working so hard, you can breathe only under duress. Nevertheless, you should always keep breathing. It is tempting to hold the glottis shut and equalize intra-abdominal pressure with intrathoracic pressure, but that is impractical because you can hold your breath for only so long. In addition, the substantial increase in intrathoracic pressure could be dangerous to the heart and circulation. It is much better to keep the airway open and limit the increase in pressure to the abdominopelvic cavity. Obviously the peacock is only for those who are in splendid athletic condition.
THE PELVIS AND THE ANATOMICAL PERINEUM
A famous conductor, rehearsing the chorus for the Verdi Requiem, once stopped the music and shouted to the performers, “No! No! Squeeze it in—push it up!” He may not have known it, but he was telling them to seal off and control the anatomical perineum—the base of the pelvis—and thereby cultivate what we have been calling abdominopelvic energy. All trained singers have learned that the purest and richest sound originates from this region. In the language of singers, the base of the body “supports” the voice.
The perineum and pelvis not only establish a foundation for creating an intensely lyric sound, they form the lowermost portion of the abdominopelvic unit, support the weight of the abdominal and pelvic organs, and bear their full share of intra-abdominal pressure. As an experiment, next time you sense an impending sneeze or a fit of violent coughing, notice that you prepare for the sharp increases in intra-abdominal pressure by pulling the base of the body in and up with an intensity that will match the expected explosiveness of the expected sneeze or cough.
For singers and public speakers who are engaging an audience, a tripartite muscular effort within the torso is apparent. The anatomical perineum pushes up against the pelvic organs, the abdominal muscles squeeze in from the front, the sides, and behind, and the muscle fibers of the respiratory diaphragm lengthen against resistance, slowly submitting to the ascent of the dome of the diaphragm during exhalation. All three act together to oversee a whole-body regulation of the passage of air past the vocal cords in the larynx.
THE PELVIS AND THE PERINEUM
The pelvis and the perineum contain the pathways for elimination, serve as focal points for sensual pleasure, and accommodate all aspects of procreation; but even though these functions are all enormously significant to us personally and are treated at length by all esoteric traditions, our main purpose here is to understand how the pelvis and perineum are important in postures and breathing exercises. To that end we’ll simply outline their anatomy and concentrate on several important practices that enable the student to sense their architecture experientially and lay the groundwork for more advanced study.
The pelvis and perineum are difficult terms to comprehend because the words “pelvis,” “pelvic,” and “perineum” each have more than one meaning. First consider the pelvis. The way we used this word in the first half of the current chapter was in reference to the pelvic bowl, which, in addition to the two pelvic bones, includes the pubic symphysis plus the sacrum, the sacroiliac joints, and all the pelvic restraining ligaments (fig. 3.4). But lay people occasionally refer to the pelvis more generally as including the region of the body between the upper portion of the thighs and the lower abdomen, and indeed, in the section of this chapter on intra-abdominal pressure, we referred to the pelvic cavity as a part of the combined abdominopelvic region. And finally, we commonly make reference to the contents of the pelvic bowl, that is, to the pelvic organs.
The word “perineum” also has more than one meaning. Gross anatomy textbooks usually include a chapter titled “The Perineum” that describes the contents of a diamond-shaped region that forms the base of the pelvis and that contains the anus, the genitals, and their supporting muscles. The more common definition of the perineum, however, refers to a much smaller region, not inclusive of the anus and the genitals, but between them. This is the site hatha yoga teachers are referring to when they tell you to place one heel in the perineum, and this is the region the obstetrician slices through to do an episiotomy. These variations in usage are rarely a problem, however, for anyone who has awareness of both possibilities, because the meaning of the term is nearly always clear from its context.
CONTENTS OF THE PELVIC BOWL
The contents of the pelvic bowl are best seen in a dissection in which a midsagittal cut has been made from the waist down (figs. 3.24–25). The reason for this is simple: most of the pelvic structures in which we are interested either lie in the midline or are visible from the perspective of a front-to-back cut that runs straight down the middle of the body. In both sexes, the skeletal framework of the lumbar, sacral, and coccygeal spine are visible behind, along with the pubic symphysis in front. Also in both male and female, the rectum, anus, bladder, and urethra are plainly seen. The penis, prostate gland, and scrotum are found exclusively in the male (fig. 3.24), and the uterus, vagina, labia, and clitoris are found exclusively in the female (fig 3.25).
THE ANATOMICAL PERINEUM
The anatomical perineum is shaped roughly like a diamond. It is defined by four points: the inferior border of the pubic symphysis, the tip of the coccyx (the tailbone), and the two ischial tuberosities. The diamond is made up of two triangles: the urogenital triangle anteriorly, and the anal triangle posteriorly (figs. 3.4 and 3.27). These two triangles share a common base, which is an imaginary line between the two ischial tuberosities, but except for this one line, the two triangles lie in different planes. The anal triangle extends up and back to the coccyx, and the urogenital triangle extends up and forward along the inferior pubic rami to the pubic symphysis (fig. 3.4). The line connecting the two ischial tuberosities is lower than any other part of the perineum, which is obvious to any slender person sitting upright on a hard seat.
THE PELVIC DIAPHRAGM
We can best understand the structures included within the anatomical perineum if we build our understanding from the inside out. The deepest layer, the pelvic diaphragm, is a broad, thin sheet of muscle and fasciae that spans the entire diamond-shaped region, encircling the anus posteriorly and lying deep to the genitals anteriorly. Seen in three dimensions it is shaped like a deep hammock. Stand up and envision such a hammock at the base of the body. It is suspended between the pubic bones in front and the sacrum behind, and it supports the internal structures of the pelvic cavity just as a hammock in your back yard supports the human frame. The midsagittal segment of the hammock that runs from the anus to the coccyx is visible to the rear in figs. 3.24–25. The pelvic diaphragm is interrupted by the anus and its sphincters to the rear, and by the midline structures of the genitals in front. A frontal section (male) through the prostate gland and urethra illustrates how the borders of the hammock extend up and to either side (fig. 3.26). In a superficial dissection of either male or female only the rear half of the funnel comes into view because the genitals cover it in front (figs. 3.28–29); in a deeper dissection (female) with the genitals removed (fig. 3.27), it becomes obvious that the pelvic diaphragm forms a sling around cross sections of the vagina and urethra.

Figure 3.24. Midsagittal (longitudinal, front-to-back) section through the male pelvis revealing midline parts of the reproductive system, the midline terminal portions of the digestive and urinary systems, and the rear portion of the pelvic diaphragm (front portion is interrupted by the genitals). (Sappey)
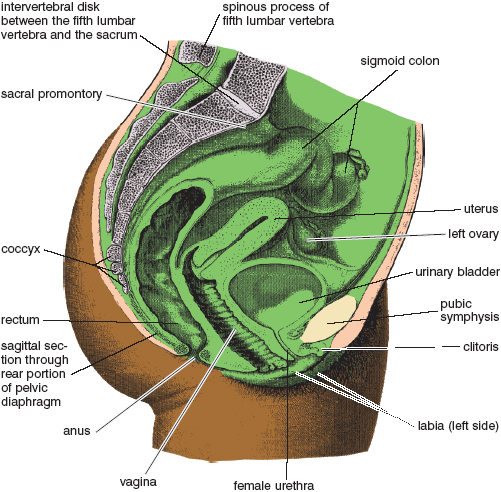
Figure 3.25. Midsagittal section through the female pelvis revealing midline parts of the reproductive system, the midline terminal portions of the digestive and urinary systems, and the rear segment of the pelvic diaphragm (Sappey).
In hatha yoga the pelvic diaphragm is activated consciously by two practices: ashwini mudra and mula bandha. There are subtle and not-so-subtle differences between the two. We’ll begin with ashwini mudra.
Ashwini is the Sanskrit word for “mare” (“horse” would be an appropriate translation except that the word mudra, which means “gesture,” is a feminine noun in Sanskrit and requires a feminine modifier), and ashwini mudra in hatha yoga is named for the movement of the pelvic diaphragm in a horse after it has expelled the contents of its bowel. During the expulsion phase, the cone-shaped pelvic diaphragm moves to the rear, and after the contents of the bowel are dropped, the muscles of the pelvic diaphragm pull strongly inward. In so doing they cleanse the anal canal. In human beings the same thing happens—you first bear down, opening the anus and expelling the contents of the bowel, and then the pelvic diaphragm pulls inward and upward while contracting the anal sphincter. The pulling inward motion, which we also do reflexly from moment to moment during the day, is ashwini mudra. This is not as obvious as it is in a horse, because in humans the whole region is enveloped in loose connective tissue and covered with the superficial structures of the perineum, but it is the same gesture.
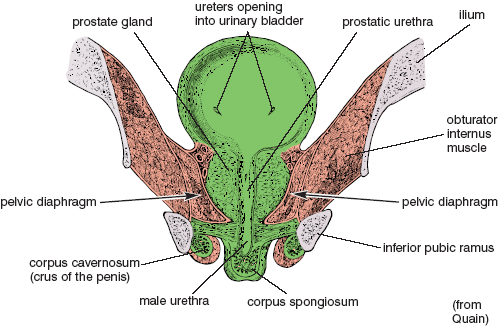
Figure 3.26. Frontal (longitudinal, side-to-side) section through the male pelvic diaphragm, urinary bladder, prostate gland, prostatic urethra, and corpus spongiosum, as well as the paired corpora cavernosa, inferior pubic rami, and ilia. The pelvic diaphragm forms a deep hammock that extends lengthwise from the pubis to the coccyx and that supports the internal pelvic organs. Here we see a section through the sides of the hammock, and in fig. 3.27 we see it as a whole.
As a natural movement, ashwini mudra is often forceful, especially when it is associated with keeping the base of the abdominopelvic cavity sealed during sharp or extreme increases in intra-abdominal pressure, or when it is used as a last-ditch means for retention (think of restraining diarrhea). As a yoga practice, ashwini mudra is not so intense, but it still acts as a perineal seal, fortified in this case by tightening the gluteal muscles along with the pelvic diaphragm and anal sphincter. The mudra is applied for a few seconds, released, and repeated. Ideally, only the gluteals, the pelvic diaphragm, and the anal sphincter are activated, but the proximity of muscles overlying the genitals anteriorly sometimes makes this difficult, and you will often feel them tighten along with the rest when you try to create the gesture.
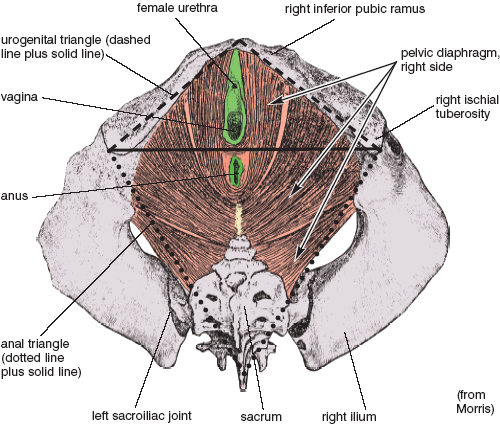
Figure 3.27. A deep dissection of the pelvic diaphragm of the female (view from below). The superficial muscles and external genitals (see figs. 3.28-29) have all been removed, revealing the underlying hammock-like pelvic diaphragm (see figs. 3.24-26), as well as the urogenital and anal triangles (see also fig. 3.4). A comparable male dissection is almost identical, except that a cross-section of the penis and male urethra is substituted for the vagina and female urethra.
Some postures make a pure ashwini mudra easy, and others make it difficult. If you stand with the feet well apart and bend forward 20–30°, you will find it awkward to contract the anus and pelvic diaphragm, and almost impossible to contract them without activating the muscles around the genitals as well. Now stand upright with the heels and toes together and try it again. This is easier. If you don’t tighten too vigorously you may be able to isolate the pelvic diaphragm and the gluteals from the muscles of the genitals. Next, bend backward gently, keeping the heels together and the thighs rotated out so the feet are pointed 90° away from one another. Keep the knees extended. Then tighten gently behind and try to release in front. This is one of the easiest upright postures in which to accomplish a pure ashwini mudra. Last, bring the toes together and rotate the heels out. This again makes it difficult.
These simple experiments illustrate the general rule: any posture that pulls the hips together will make ashwini mudra easier, and any posture that pulls the hips apart will make it more difficult. That, as it happens, is one problem with all cross-legged sitting postures. Try it. When the thighs are flexed with respect to the spine and abducted out to the sides, it is almost impossible to contract the gluteals and only a little less difficult to isolate the anus and pelvic diaphragm from the genitals. But if you try the mudra in the shoulderstand or headstand with the heels together and the toes out, you will find that it is easy because gravity is already pulling the pelvic diaphragm toward the floor. Little or no effort is needed to achieve a fully pulled-in feeling, and that effort need not involve the genitals. Now lie supine on the floor and notice that you can easily tighten up in the rear without recruiting muscles around the genitals. Prone, it is more difficult, at least in men, in whom the muscles associated with the genitals are stimulated by contact with the floor.
One of the best postures for ashwini mudra is the upward-facing dog. As long as the pelvis is lifted slightly off the floor (figs. 5.13–14), it is impossible to do this pose without activating the pelvic diaphragm, yet it does not stimulate the muscles in the urogenital triangle in the least. The down-facing dog (figs. 6.17 and 8.26), not surprisingly, creates the opposite effect: this posture is one of the easiest poses for recruiting the muscles of the urogenital region in isolation, but a pose in which it is almost impossible to isolate the muscles associated with ashwini mudra.
In ashwini mudra we strongly activate the pelvic diaphragm, the anus, and the gluteals. Mula bandha is more delicate. Here we mildly activate the pelvic diaphragm plus—more strongly—the overlying muscles of the urogenital triangle, which includes the muscles associated with the genitals and the urethra. Therefore, to understand mula bandha we have to examine the anatomical disposition of these muscles.
THE MUSCLES OF THE UROGENITAL TRIANGLE
Looking at a superficial dissection, we see that three pairs of muscles overlie the genitals. In both male (fig. 3.28) and female (fig. 3.29), the superficial transverse perineal muscles course laterally in the shared border of the urogenital and anal triangles, extending laterally from a heavy band of centrally located connective tissue—the central tendon of the perineum—to the ischial tuberosities. The bulbospongiosus muscles in the male encircle the base of the penis; in the female those same muscles encircle the vagina and urethra. The ischiocavernosus muscles in both the male and female lie superficial to the erectile tissues of the corpora cavernosa, which themselves course from the inferior pubic rami to the body of the penis in the male and to the clitoris in the female. In a slightly deeper plane of the urogenital diaphragm (in both male and female), the deep transverse perineal muscles spread out laterally in sheets that attach to the inferior pubic rami, and the urethral sphincters encircle the urethrae.
MULA BANDHA, THE ROOT LOCK
Unlike ashwini mudra, which is often a response to sharp and sudden increases in abdominopelvic pressure, mula bandha (the root lock) is a gentle contraction of the pelvic diaphragm and the muscles of the urogenital triangle. It does not counter intra-abdominal pressure so much as it seals urogenital energy within the body, controlling and restraining it during breathing exercises and meditation (again, this is a literary rather than a scientific use of the term “energy”). What actually happens is more easily sensed than described, so we’ll begin with a series of exercises.
First try sitting in a hard chair covered with a thin cushion. In a neutral position, neither perfectly upright or slumped, try to blow out but without letting any air escape. Try hard. Notice that the pelvic region contracts and lifts up involuntarily enough to counter the downward push from the chest and abdominal wall. Now try the mock blowing maneuver again, but this time keep the pelvic region relaxed, and notice that it feels like straining for a bowel movement. Try it one last time, but this time lift the entire anatomical perineum consciously, and you will quickly sense that these efforts bring both the pelvic diaphragm and the muscles of the urogenital region into play.
Next sit really straight, arching the lower back forward. Exhale, pressing in with the abdominal muscles, and notice that it is natural to find a focus for your attention at a point between the anus and genitals. You may sense a slight tension in the muscles of the genitals, but little or none in the anus, and certainly none in the gluteal muscles. This describes the root lock. You don’t have to make extreme efforts. The cushion on which you are sitting places enough pressure on the muscles of the urogenital triangle to focus your awareness on the lock.
Now try the same exercise in a slumped posture with the back rounded to the rear. This changes everything. It shifts your attention from the front of the anatomical perineum to the rear, and it elicits a mild ashwini mudra instead of mula bandha because you are tipping backward toward the plane of the anal triangle and away from the plane of the urogenital triangle. (The angle between these two planes is shown clearly in fig. 3.4). Sitting straight rocks you up and forward so that contact with the cushion favors the root lock. The lesson: sit straight if you wish to apply mula bandha.
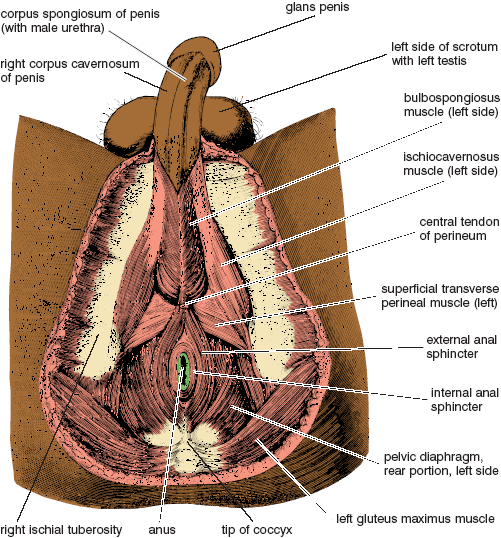
Figure 3.28. Male anatomical perineum. The anal portion of the pelvic diaphragm is shown below (in the anal triangle). The external genitals and their associated muscles are shown above (in the urogenital triangle), where they are superimposed over (and thus hide) the front portion of the pelvic diaphragm (from Sappey).
If this is still confusing, it will be helpful to first experience a gross version of the root lock. The best concentration exercise for this is to sit upright and try breathing in concert with slowly increasing and decreasing tension in the perineum. With the beginning of exhalation gradually tighten the muscles of the pelvic diaphragm and genitals, aiming for maximum contraction at the end of exhalation. As inhalation begins, slowly relax. Repeat the cycle for ten breaths several times a day. At first it may be difficult to tighten the muscles without also tightening the gluteal muscles, but if you are careful to sit straight it will become easy.
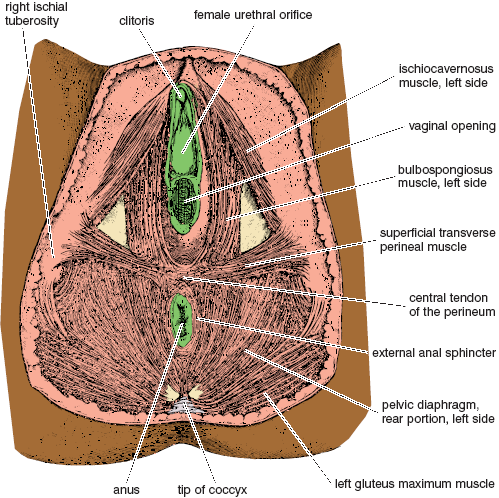
Figure 3.29. Female anatomical perineum. The anal portion of the pelvic diaphragm is shown below (in the anal triangle). The external genitals and their associated muscles are shown above (in the urogenital triangle), where they are superimposed over (and thus hide) the front portion of the pelvic diaphragm (from Morris).
With practice you will be able to sense the contraction of successive layers of muscles from the outside in. Starting superficially and with a minimal effort, you can feel activity in the ischiocavernosus, bulbospongiosus, and superficial transverse perineal muscles. And with a little more attention you can activate the deep transverse perineal muscles and the urethral sphincter. And with yet more effort you can activate the pelvic diaphragm.
The central tendon of the perineum, which as discussed previously is located at the dividing line between the anal and urogenital triangles, appears to be the key structure around which the more delicate versions of mula bandha are organized. This is an extremely tough fascial region into which the superficial and deep transverse perineal muscles insert. If you can learn to focus your attention on this tiny region while creating minimal physical contraction of the nearby muscles, you will be feeling the root lock. (Yoga teachers who speak of placing awareness on the perineum are referring to this region.) Concentrate on the sensation, and in time mula bandha will feel natural and comfortable. With experience you can hold the lock constantly, which is what yogis recommend for meditation.
A MODIFIED CAT STRETCH
In addition to the down-facing dog (figs. 6.17 and 8.26), which was just mentioned in the section on ashwini mudra, one of the best yoga postures for helping you come in contact with the delicacy and precision of the root lock is a modified cat pose. From a kneeling position, bring your chin to the floor, swing your elbows out, and bring the upper part of the chest as low as possible, arching your back deeply and mimicking a cat peering under a couch (fig. 3.30). Then tighten the perineal region generally. You will immediately notice that the exposed anus in this position brings the sensations toward the front of the diamond-shaped perineum rather than behind, and that even if you squeeze vigorously the gluteal muscles remain relaxed. After you have practiced this pose several times and gotten accustomed to its associated sensations, you can try to find the same feelings when you apply the root lock in sitting postures.
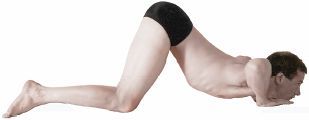
Figure 3.30. Modified cat stretch, for sensing mula bandha in preference to ashwini mudra.
Agni sara, or “fanning the fire,” is a breathing exercise, an abdominal exercise, and a powerful stimulus to abdominopelvic health. When it is done with full attention and for an adequate span of daily practice, it stokes the fire of the body like no other exercise. But before trying it we’ll first do a training exercise for active exhalations, and then we’ll work with a moderate practice—A and P breathing—that is accessible to everyone.
ACTIVE EXHALATION
During the course of relaxed, casual breathing, you make moderate efforts to inhale and you usually relax to exhale, but all of the exercises that follow make use of active exhalations, in some cases breathing out all the way down to your residual volume. To get an idea of what is involved, try the following exercise: Inhale moderately through the nose, purse the lips, and exhale as if you were trying to blow up a balloon in one breath. Try this several times. If you slowly breathe out as much air as possible through the resistance of the pursed lips, you’ll notice that exhalation is accompanied by a tightening of the muscles throughout the torso, including the abdominal muscles, the intercostal muscles in the chest, and the muscles in the floor of the pelvis. At first you will notice the abdominal muscles pressing the relaxed diaphragm up (and pushing the air out) with the chest in a relatively fixed position; then you’ll notice the chest being compressed inward; and finally, toward the end of exhalation, you will notice the contraction of the pelvic diaphragm. This sequence of events will also take place if you breathe out normally, but creating resistance through the pursed lips makes the muscular efforts much more obvious.
A AND P BREATHING
This preliminary exercise to agni sara, called akunchana prasarana, or A and P breathing for short, involves active exhalations and relaxed inhalations. The literal meaning of the phrase is apt: “squeezing and releasing.” Stand with the trunk pitched forward, the hands on the thighs just above the knees, the elbows extended, the feet about a foot and a half apart, and the knees slightly bent. Much of the weight of the torso is placed on the front of the thighs. Breathe in and out a few times normally, and observe that the posture and the angle of the body pulls the abdominal organs forward and creates a mild tension against the abdominal wall. Notice that countering the tension produced by the force of gravity requires that a mild effort be made even at the beginning of exhalation, and the greater the forward angle the greater the effect.
To do A and P breathing, assume the same posture as in the trial run, and press in slowly (squeezing) from all sides with the abdominal muscles as you exhale, all the while bolstering the effort with the chest. Your first impulse is to emphasize the upper abdomen. Try it several times, observing exactly where the various effects and sensations are felt. Notice that the effort in the upper abdomen is accompanied by a slight feeling of weakening in the lower abdomen. The lower region may not actually bulge out physically, but it feels as if it might. Now try to exhale so that the upper abdomen, the lower abdomen, and the sides are given equal emphasis, as though you are compressing a ball. Exhalation might take 6–7 seconds and inhalation 3–4. Inhalation is mostly passive (releasing) and manages itself naturally. Take 10–15 breaths in this manner.
Much of inhalation is passive in A and P breathing because the chest springs open and the abdominal wall springs forward of their own accord. The strong emphasis on exhalation means that you are breathing in and out a tidal volume which is the combination of your normal tidal volume for an upright posture plus part of your expiratory reserve. Your revised tidal volume for A and P breathing might be about 900 ml for each breath rather than the textbook tidal volume of 500 ml, and along with this, your new expiratory reserve volume would become about 600 ml rather than 1,000 ml (fig. 3.32, left-hand panel). In any case, A and P breathing boosts your energy by increasing blood oxygen and decreasing blood carbon dioxide. It is a simple exercise, but one that is both relaxing and invigorating.
THE CLASSIC AGNI SARA
A and P breathing can be done by anyone, but agni sara and its more complex variations are intense practices that require training and conditioning. Their effects on the body are powerful enough for them to be contraindicated by several medical conditions (see the end of this chapter). They should also be done only on an empty stomach and after evacuating the bowels.
Like A and P breathing, the classic agni sara is usually done standing with the torso at a 60–70° angle from upright, the feet apart, the knees slightly bent, the hands on the thighs just above the knees, the elbows extended, and the arms supporting the torso. And like A and P breathing, the practice focuses on exhalation. But instead of utilizing a mass contraction of abdominal muscles, agni sara requires a step-by-step muscular effort. To do the practice, focus your attention on the area just above the pubis, and press the abdomen in at that site before pressing in with the middle region of the abdomen. Then continue to exhale, gradually recruiting muscles higher in the abdominal wall and ending with the internal intercostal muscles of the rib cage—all the time holding tension below. Exhale as much as possible. Notice that exhalation not only presses the abdomen and chest in, it also presses the back to the rear (fig. 3.31). For inhalation reverse the process, relaxing the chest and upper abdomen first and lower abdomen last. If you watch yourself from the pubis to the sternum when you have nothing on, it will be easier to learn, but even then it may take several weeks of daily practice and concentration before you can do the exercise with confidence.
[Technical note: There’s no unambiguous language for indicating in a simple phrase the source of the movement involved in exhalation. Sometimes teachers say “push the abdomen in,” but muscles, of course, never push. Others say “pull the abdomen in,” but this sounds as though something other than the abdominal muscles themselves might be responsible, as we’ll soon see is the case for uddiyana bandha. Although “press the abdomen in” isn’t perfect, it’s at least general enough not to be misleading.]
The rectus abdominis muscles are not single muscles extending from the pubis to the sternum, but a series of short muscles that are isolated from one another by horizontal lines of connective tissue called tendinous inscriptions, which are responsible for the muscular segmentation and washboard look in the abdomen of a bodybuilder. The wave of abdominal contraction in agni sara is possible only because each segment is separately innervated and can be controlled individually.
In agni sara the modifications of the lung volumes and capacities are more extreme than in A and P breathing. Here exhalation combines your normal tidal exhalation (500 ml) with your entire expiratory reserve volume (1,000 ml), creating a tidal volume of 1,500 ml, an expiratory reserve volume of zero, and a functional residual capacity which is now equal to your residual capacity of 1,200 ml (fig. 3.32). As with A and P breathing, inhalation takes care of itself and is passive except for the last 500 ml. Inhalation ordinarily takes about half to three-fourths the time as exhalation and is accompanied by the gradual relaxation of the intercostal and abdominal muscles.
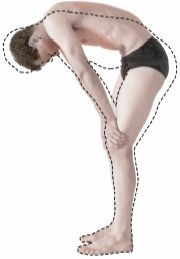
Figure 3.31. Agni sara. The halftone reveals the profile for full exhalation, and the dotted line reveals the profile for inhalation. Exhalation is taken all the way through the expiratory reserve volume (in other words, to the residual volume), but inhalation doesn’t extend into what would ordinarily be the inspiratory reserve volume.
For those who are interested in numbers, minute and alveolar ventilations are easily calculated (fig. 3.32). A reasonable practice is to breathe out and then in 4 times per minute, which would yield a minute ventilation of 6,000 ml (1,500 ml per breath times 4 breaths per minute), and an alveolar ventilation of 5,400 ml per minute (1,350 ml per breath times 4 breaths per minute). With practice and self-control you can slow down even more, to as little as two breaths per minute, yielding a minute ventilation of 3,000 ml and an alveolar ventilation of 2,700 ml per minute. You might be concerned that 2,700 ml per minute will not supply enough fresh air to the alveoli in comparison to the standard 4,200 ml per minute mentioned in chapter 2, but in that case we were mixing 350 ml of fresh air with a functional residual capacity of 2,200 ml, and here we are mixing 1,350 ml of fresh air in each breath with only 1,200 ml of residual volume. It’s plenty.
During agni sara the diaphragm remains generally passive. It is relaxed throughout most of exhalation, although it probably resists lengthening toward the very end of exhalation as it opposes the upward movement of the abdominal organs. And likewise, during inhalation the dome of the diaphragm moves downward passively as you breathe in what is ordinarily your expiratory reserve volume. If you have controlled the release into this phase of inhalation slowly, you’ll notice that it is not the diaphragm but the abdominal muscles that are in command, lengthening eccentrically to restrain the gravity-induced drop of the abdominal organs until you reach what would have been your normal tidal range. At that point they release more completely and allow the diaphragm to preside over an ordinary tidal inhalation of the last 500 ml.
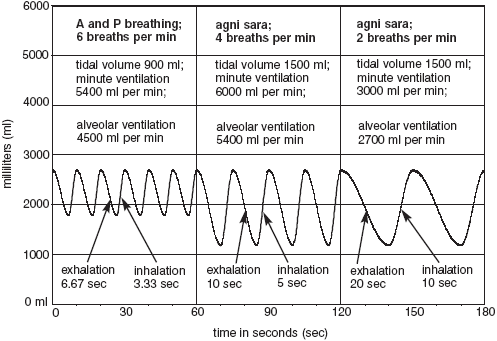
Figure 3.32. Simulated comparisons of agni sara with A and P breathing in a young man. Compare these three modes of breathing with normal breathing in fig. 2.14. Even though taking only two agni sara breaths per minute (above right) drops the alveolar ventilation precipitously (to 2700 ml per minute), exhaling all the way to the residual volume is adequate for maintaining the blood gases.
Although the chest does not at first glance seem to play a prominent role in agni sara, the internal intercostal muscles do become activated for compressing it inward during exhalation, especially in the last stages when you are approaching your residual volume. Then, as you begin to inhale, the chest springs open passively, restrained only by the abdominal muscles and internal intercostals. Since the emphasis of agni sara is on exhalation, the chest shows only a modest enlargement during the period of what would have been an ordinary tidal inhalation in normal breathing.
The airway is open in agni sara, and intra-abdominal pressure remains in approximate equilibrium with atmospheric pressure, so it is not necessary to apply mula bandha. And it is not only unnecessary to apply ashwini mudra—in the bent-forward position it is impractical. Beginners, however, may find it helpful to establish the root lock while they are learning to activate the wavelike recruitment of abdominal muscles from below. Focusing their attention on the front of the perineum may help them develop and refine the practice. After that they should stop paying special attention to the root lock. It is not a part of this practice.
We are not looking for speed in agni sara, but for control. A common mistake is to whoosh air out too quickly at the beginning of each exhalation. Try to make the rate approximately equal throughout so that you still have a third of your agni sara tidal volume left when you have a third of your time to go. Approach the end of exhalation by recruiting the highest of the abdominal muscles, and keep pressing. Your time for exhalation and inhalation will lengthen with practice, working up quickly to 6–10 seconds for exhalation and 3–5 seconds for inhalation; with a little more practice it is easy to manage three or even two breaths per minute. In the beginning it helps to set a clock on the floor and watch the second hand, but this will soon become a distraction. Discard the clock after a few days and concentrate on the sensations.
For an even more intense practice of agni sara, and for an occasional change of pace, you can exhale as usual, and then instead of releasing fully into inhalation, take a minimal chest inhalation and then immediately re-establish an even more powerful exhalation. Repeat this several times before inhaling as in the traditional agni sara discussed above. This exercise, which can only be repeated a few times before you have to inhale fully, dramatically increases the power of agni sara.
AGNI SARA IN OTHER POSITIONS
If you have a problem doing agni sara standing, you can try it in other postures. First you can kneel, with the body lifted up off the heels, the hands on the thighs, and the torso pitched forward (fig. 3.33). Or you can rest the buttocks on the heels and drop the hands or elbows either to the thighs or to the floor just in front of the knees. Or you can place the elbows on the knees and touch the abdomen with one hand to give yourself feedback and encouragement when you try to exhale and inhale in a wavelike motion. It is also comfortable to do agni sara in cat stretch variations, arching the back up as much as possible during exhalation (figs. 3.34a–b, halftone images). And for a potent combination of breathing practices, the cat stretch poses are also excellent for going back and forth between agni sara exhalations and empowered thoracic inhalations (chapter 2) that take you to the outermost limits of your inspiratory capacity for these postures (figs. 3.34a–b, superimposed dotted lines).
If these standard poses for agni sara are inconvenient for you, you can still do the practice in a chair or in a meditative sitting posture. It works best to sit up straight, arch the lumbar lordosis, and pitch yourself forward at a slight angle. This will enable you to feel the countering tension of the abdominal muscles in each region of the abdominal wall.
If you are chronically short of breath you will have a fine personal practice if you aim for 10–15 breaths per minute for only one minute. Every bit of extra exhalation induced by agni sara is a blessing. Even if your alveolar ventilation remains exactly the same as it is in ordinary relaxed breathing, it will be more efficient for bringing in oxygen and removing carbon dioxide from the blood, just as we saw for kapalabhati (chapter 2). If you have chronic obstructive pulmonary disease and do agni sara several times each day you will please and surprise yourself, your family, and your doctors.
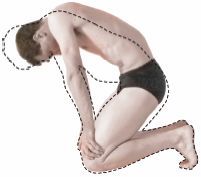
Figure 3.33. Agni sara kneeling. Again, the halftone reveals the profile for full exhalation, and the dotted line reveals the profile for inhalation. The tidal inhalation and exhalation combines an ordinary tidal volume with the entire expiratory reserve volume.
If you are in ordinary good health a meaningful practice of agni sara will require at least 10 minutes at the rate of 3–4 breaths per minute, and as you gradually increase your time you will achieve an enriched sense of well-being. If you get up early in the morning and do agni sara before doing hatha, it will give you a burst of energy and enthusiasm. And if you are unable for one reason or another to practice hatha yoga postures, agni sara is probably more important. Finally, if you really want to learn agni sara, you have to both stay within your capacity and at the same time explore your limits. You’ll not sense the power of this practice unless you do it 30–40 minutes a day for 10 days in a row.
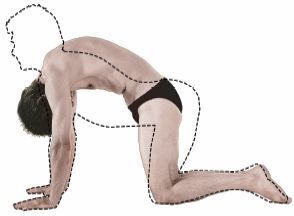
Figure 3.34a. Hands-and-knees pose. The maximum inhalation (dashed line) with head up and maximum lumbar lordosis is superimposed on the maximum exhalation with head down and the back arched toward the ceiling (halftone).

Figure 3.34b. Cat stretch. The maximum inhalation (dashed line) with the head and right foot up in combination with the maximum lumbar lordosis, is superimposed on the maximum exhalation with the head down and knee to nose (halftone).
AGNI SARA WITH OTHER HATHA YOGA PRACTICES
If you are an advanced student, you can use agni sara (or A and P breathing) to intensify the hatha yoga postures in which you are comfortable. You will have to breathe faster than usual, of course, because the postures will increase your needs for oxygen and carbon dioxide exchange. You will also have to modify the patterns of exhalation according to the demands of the posture. For example, in a deep standing forward bend you can both see and feel what is happening, but a standing backbend or spinal twist permits little obvious movement in the abdomen. That’s fine. Either way, it’s the attempt to press in from below that generates the surge of energy. And for all standing postures in which you are emphasizing an empowered thoracic inhalation (chapter 2), you can not only increase your inspiratory reserve volume by trying to inhale more deeply, you can use agni sara to exhale most or all of your expiratory reserve volume, thus inhaling and exhaling your vital capacity (the volume of which is specific to the particular posture) with every breath.
After you have worked successfully with agni sara, bellows breathing, and kapalabhati for some time, you can experiment with an agni sara type of movement during the exhalation phases of the bellows breath and kapalabhati. Exhalation will produce an upward-moving wave of contraction—a pushing in and up sensation, rather than a mass contraction of the abdominal muscles. You can feel this if you span your hand across your abdomen with the middle finger on the navel, the thumb and index fingers above, and the ring finger and little finger below. You will feel the little finger on the lower abdomen moving inward during exhalation, and little or no movement where the thumb is located on the upper abdomen. Using this technique for the bellows and kapalabhati creates a mild scooping-up sensation. It requires more control than the standard techniques for bellows and kapalabhati, so you will need to slow down—perhaps to as few as 60 breaths per minute. You will never be able to do it as fast as the standard technique, but it is still a powerful abdominopelvic exercise and is excellent for training the abdominal muscles for more advanced practices.
UDDIYANA BANDHA, THE ABDOMINAL LIFT
Mula bandha seals the anatomical perineum, and agni sara teaches us special skills for using the abdominal muscles. When you have become proficient in both, you are ready to learn the second great lock in hatha yoga: uddiyana bandha, or the abdominal lift. To do it you must exhale, hold your breath out (as it’s said in yoga), and create a vacuum in your chest that sucks your diaphragm and abdominal organs to a higher than usual position in the torso. This can happen only if the body is sealed above and below—above at the glottis and below at the perineum. Without these seals air would be drawn into the larynx and lungs above, and into the eliminatory and reproductive organs below. You hold the root lock reflexly and without having to think about it, but the glottis has to be held shut voluntarily.
UDDIYANA BANDHA
The best time to practice the abdominal lift is early in the morning, certainly before breakfast, and ideally after having evacuated the bowels. The same contraindications apply as in agni sara (see the end of this chapter). To begin, stand with your knees slightly bent and your hands braced against the thighs. As with agni sara, this stance lowers the abdominal organs downward and forward. Exhale to your maximum. Notice that you do this by pressing in first with the abdomen and then with the chest. Then do a mock inhalation with the chest, closing the glottis to restrain air from entering the lungs, and at the same time relax the abdomen. You should feel the chest lift. Holding the glottis closed for a few seconds, try harder to inhale, keeping the abdomen relaxed. The upper abdomen will form a deep concavity that extends up and underneath the rib cage. This is uddiyana bandha (fig. 3.35). If you get confused about how to prevent air from entering the lungs, forget about the abdominal lift for a week or so and simply practice trying to inhale after full exhalations while you are blocking your mouth and nose with your hands.
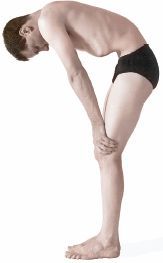
Figure 3.35. Uddiyana bandha: A maximum exhalation is followed by a mock inhalation with locked glottis and chin lock in combination with relaxed abdominal muscles.
To make holding the glottis shut feel more natural and comfortable, a third lock, jalandhara bandha (the chin lock), can be established by flexing the head forward so the chin is tucked into the suprasternal notch, the little concavity above the sternum at the pit of the throat. It is possible to do the abdominal lift without the chin lock, but its addition will make the closure of the glottis feel more secure, and many teachers consider it absolutely necessary. Fixing the eyes in a downward position also complements both uddiyana bandha and jalandhara bandha. Try looking up as you try them and you’ll quickly sense the efficacy of looking down.
Come out of uddiyana bandha in two stages. First, while still holding the glottis shut, ease the vacuum in the chest by relaxing the external intercostal muscles, which will lower the dome of the diaphragm and the abdominal organs to a lower position in the trunk. Then, as soon as the abdominal wall is eased forward, press inward strongly with the chest and abdomen until the pressure above and below the glottis is equalized. You have to compress inward just as forcefully as when you first exhaled for uddiyana bandha; if you don’t, air will rush in with a gasp when you open the glottis. As soon as the pressure is equalized, open the glottis and breathe in gently.
Where does the vacuum come from? In uddiyana bandha we are trying to inhale without inhaling, and this makes the thoracic cage larger, expanding it from side to side and from front to back. And since no air is allowed in, the air pressure inside the chest has to decrease, which in turn creates enough of a vacuum to pull the diaphragm up (provided it is relaxed) in proportion to the expansion of the rib cage. Coming down from uddiyana bandha, the side-to-side and front-to-back expansions of the chest are first relaxed and then compressed back into their starting positions of full exhalation, and the dome of the diaphragm and abdominal organs move inferiorly.
Uddiyana bandha is the only practice in hatha yoga that frankly stretches the respiratory diaphragm. It’s true that you get a mild stretch of the diaphragm when you exhale as much as possible in agni sara and for the exhalation stage of uddiyana bandha, both of which push the dome of the diaphragm (from below) to the highest possible position the abdominal muscles can accomplish. But uddiyana bandha goes beyond this because the vacuum in the chest that is superimposed on full exhalation pulls the diaphragm (from above) to an even higher position. We can surmise that regular practice of uddiyana bandha will stretch, and in time lengthen the diaphragm’s muscle and connective tissue fibers, as well as keep the zone of apposition (fig. 2.9) between the diaphragm and the chest wall healthy and slippery. You will be able to exhale more completely as you gradually lengthen the muscle fibers, and you will be able to breathe more comfortably and efficiently as you increase the diaphragm’s mobility.
PROBLEMS
Many people, including yoga teachers, surprisingly, seem to have a great deal of difficulty learning uddiyana bandha. It is partly a matter of poor body awareness in the torso, but the most constant factor is simply your history. Many youngsters grow up doing the abdominal lift in play, often combining it with other manipulations such as rolling the rectus abdominis muscles from side to side or up and down. In a typical group of children, almost half of them will be able to do uddiyana bandha after only a few seconds of instruction and demonstration, and in a beginning hatha class for adults, those who did uddiyana bandha in play as children will usually be able to learn the yoga version immediately.
If you’re having trouble, you are doing one of three things wrong. First, you may not be exhaling enough at the start. The less you exhale, the less convincing will be the lift. You have to exhale the entire expiratory reserve volume—only the residual volume of air should remain in the lungs. The second possibility is a corollary to the first. You may be letting in a little air on your mock inhalation. You have to try to inhale without doing so. That is the whole point of locking the airway at the glottis. The third, and usually the most intractable, problem is that you are not relaxing the abdomen during the mock inhalation. You must learn to distinguish between pressing in with the abdominal muscles, which we want only for the preliminary exhalation, and allowing the abdominal wall to be pulled in passively by the vacuum in the chest. Many students hold their abdominal muscles rigidly or even try to keep pushing in with them during the lifting phase of the practice, and this prevents the abdominal organs and abdominal wall from being sucked in and up. It is also common for students to relax their abdominal muscles momentarily but then get mixed up and try to assist the inward movement with an active contraction. It won’t work. You have to relax the abdominal muscles totally and keep them relaxed to do this exercise.

Figure 3.36. A modified cat stretch encourages keeping the abdominal muscles relaxed during the mock inhalation phase of uddiyana bandha.
ANOTHER MODIFIED CAT STRETCH
If you consistently have trouble relaxing the abdominal muscles for uddiyana bandha in a standing position, try it in a cat stretch, similar to the one we used for exploring mula bandha (fig. 3.30), except more relaxed. Rest on the knees and forearms and lower the forehead down against the crossed hands. Press the shoulders toward the floor and increase the lumbar arch as much as possible. This position pitches the abdominal and pelvic organs forward and toward the chest. Now all you have to do is exhale as much as possible (which rounds your back posteriorly) and hold your breath at the glottis. Now relax, allowing the lower back to arch forward again, and notice that in this position it is unnatural to hold the abdominal muscles firmly. Uddiyana bandha comes effortlessly as your chest cooperates with gravity in pulling the abdominal organs to a higher position in your torso (fig. 3.36). Finally, continuing to hold your breath and keeping the abdomen relaxed, slowly lift your head and shoulders. Come up on your hands, walk them toward your knees and onto your thighs ever so delicately, and carefully come into an upright kneeling position without tightening the abdomen. If you are successful you will be doing uddiyana bandha.
FIRE DHAUTI
Here is a simple exercise that some texts call agni sara, and others refer to as fire dhauti. Come into uddiyana bandha (standing), and continuing to hold your breath, alternately lower and again lift the abdominal organs by decreasing and increasing the size of the chest cage with the intercostal muscles. Each time the abdominal organs are lowered, the abdominal wall is pushed out, and each time the abdominal organs are again lifted into the typical uddiyana bandha position, the abdominal wall is pulled in. It’s a pumping action, and it is sometimes done fast, up to two times per second, but more frequently it is done about once per second.
Doing fire dhauti, keep in mind that you see and feel most of the action in the belly, but that the control of the maneuver depends on the chest as well as holding your breath after a full exhalation. The abdominal muscles themselves remain passive: they are pulled up passively by uddiyana bandha, and they are pressed back out by gravity and by the action of the chest. You keep holding the breath at the glottis, but the vacuum in the chest is diminished and even converted momentarily into a positive pressure as the diaphragm and abdominal organs are pressed inferiorly. You can do the pumping action, of course, only for the length of time that you can hold your breath. This practice is an excellent training exercise for those who are having trouble releasing the abdominal muscles in uddiyana bandha, because its vigorous up and down motion has the effect of freeing you from the habit of holding the abdominal muscles rigidly.
THE ABDOMINAL LIFT SUPERIMPOSED ON AGNI SARA
Agni sara pushes the abdominal organs from below, and uddiyana bandha lifts them from above. After mastering these two practices individually, advanced students will benefit from combining them. Start in the standard stance for agni sara and the abdominal lift, supporting the body with the hands resting on the thighs. Exhale completely by pressing in the abdominal muscles in a wave from the pubis to the rib cage. As soon as you have exhaled to the maximum, lower the chin to the top of the sternum, close the glottis, and do an abdominal lift. Relax the abdomen and diaphragm completely, and form as deep a concavity below your rib cage as you can manage. The moment you reach your limit of lifting, start lowering. Then as soon as you start the dropping action, initiate a gradual mass contraction of the abdominal muscles.
During the lowering phase you must develop just as much abdominal contraction as you felt before you initiated the lift. This is difficult to accomplish smoothly. The abdominal organs are like a baton that is being passed. The abdominal muscles press them toward the chest, which then grabs and lifts them as high as possible with the external intercostal muscles. In preparation for the releasing phase, the external intercostals lower the abdominal organs eccentrically back to the point at which the abdominal muscles retrieve them gracefully. As soon as the abdominal muscles and internal intercostal muscles team up and re-compress the chest, which equalizes the pressure on both sides of the glottis, you can open it knowing that air will not rush into the lungs. This is important. If you don’t quite equalize the pressure you will hear a slight click in your throat as the glottis opens. Finally, after opening the airway, release the chin lock and the abdominal muscles as though you were coming out of agni sara, first just below the rib cage, then in the middle of the abdomen, and last in the lower abdomen and perineum. The whole exercise should be done noiselessly and with infinite smoothness, so much so that an observer who is not familiar with the practice will not realize that you are doing an abdominal lift or restraining inhalation.
A practice of 2–3 cycles per minute is reasonable for those who are in good condition. For example, if you are doing a complete cycle in 30 seconds, or 2 breaths per minute, you can take about 15 seconds for exhalation, 5 seconds for the abdominal lift, and 10 seconds for inhalation. You should develop a rhythm that you can maintain without obvious effort; otherwise you are trying to do too much. You can do about 10 cycles per day for the first week, and increase by 10 each week as long as you are comfortable.
UDDIYANA BANDHA WITH OTHER POSTURES
If you are well-practiced in both uddiyana bandha and hatha yoga postures, you can combine the two to create a more aggressive practice. As with agni sara, when you are bending forward you will feel the effects as well as notice the movements externally, and when you are bending backward or twisting, you will feel the effects without seeing them. As in the case of combining agni sara with postures, this is not a practice for beginners, because the vacuum developed in the chest completely nullifies the intra-abdominal pressure we depend on to protect the back in stressful positions. You should be confident in both the abdominal lift and your hatha yoga postures before trying it.
Nauli, which means “churning,” is one of the most rewarding, if not the crown jewel, of the various abdominopelvic practices. To do it you must first do uddiyana bandha and then contract the rectus abdominis muscle, first on one side and then the other, creating a wavelike, side-to-side motion in the abdomen. The other abdominal muscles remain relaxed, leaving concavities lateral to the rectus abdominis on each side. To learn the exercise, most people first learn to isolate both rectus abdominis muscles at the same time after having established uddiyana bandha. Then, still holding uddiyana bandha, they learn to contract each rectus abdominis muscle individually, and finally they learn to coordinate the side-to-side motion for the final practice.
NAULI MADHYAMA
Uddiyana bandha creates a deep concavity in the abdomen because all of the abdominal muscles are relaxed. Looking at someone in profile, the abdominal wall has the appearance of an upside-down J, with the short limb of the J attached to the sternum, the arc of the J sucked up by uddiyana bandha, and the long limb of the J attached to the pubis. The rectus abdominis muscles, which run vertically on either side of the midline between the rib cage and the pubis, are included in this inverted J. Contracting them selectively—that is, superimposing their contraction onto uddiyana bandha—pulls the inverted J into a straight line, leaving the rest of the muscles relaxed (fig. 3.37a, middle image). This is nauli madhyama, the first step to learning nauli. It is another one of those practices children sometimes learn in play, and anyone who has done that can easily learn nauli after a month of so of trial and error.
Several exercises may be necessary for learning to isolate the rectus abdominis muscles. The most straightforward method is to apply uddiyana bandha in the standard position with the hands braced on the thighs. Then bring your attention to the lower abdomen and create in that region what teachers sometimes describe as a forward and downward push. Although muscles don’t push, and in this case are merely pulled taut, a “push” is what the untutored observer sees, and the image seems useful for many students.
The most common problem with trying to isolate the rectus muscles is that the external abdominal oblique, internal abdominal oblique, and transversus abdominis muscles also tend to become recruited. But the whole effort to pull the rectus muscles forward is meaningless unless you keep the rest of the abdominal muscles relaxed. If the nauli madhyama technique doesn’t work, don’t struggle, but try it once a day on an empty stomach or whenever you feel adventuresome or energetic.
Another trick is to apply uddiyana bandha when you are in a supine position: press your fingers into the abdominal wall lateral to the rectus abdominis muscles on each side, and then lift your head up an inch or so off the floor. As you start to make an effort to lift your head, you will feel the rectus abdominis muscles contract just before the rest of the superficial muscles. Adjust your effort so that you engage the rectus muscles while keeping the others relaxed. If you make too much effort and lift the shoulders along with the head, you will engage the abdominal muscles en masse, which defeats the purpose of the exercise. Lift the head up and down to explore this. Mechanical feedback also helps, for which there are three possibilities. You can give yourself some little punches laterally to remind your other muscles to stay relaxed, you can squeeze your hands against the rectus muscles from the side as you feel them become engaged, or you can roll the overlying skin up and out to encourage the rectus muscles to contract in isolation.
If all else fails, you may be able to learn how to isolate the rectus muscles by coming into the cat stretch with the deepest possible uddiyana bandha, and then arching your back up. The rectus abdominis muscles are the prime movers for creating the arched posterior curvature, while at the same time partially straightening out the inverted J, so they will be activated selectively. Then all you have to do is concentrate on keeping the rest of the abdominal muscles relaxed. Try supporting yourself with one hand so the other hand is free to feel the preferential contraction of the rectus muscles.
NAULI
If you can learn to superimpose the contraction of the rectus abdominis muscles onto uddiyana bandha in various positions, you will sooner or later be able to do so in a standing position with your hands on your thighs. And if you cultivate this until it is second nature you will be able to learn nauli in short order. Here’s how. Holding nauli madhyama, place both hands on the thighs just above the knees. Press diagonally in strong lunges first to one side and then the other to activate the individual rectus abdominis muscles. Do this one-two lunge at the rate of about 1–2 times per second. If you need to waggle the hips at the same time, that’s fine. It will look silly for a while, but after a month or so of practice you will be able to produce the rolling movement that is characteristic of nauli, and be able to do so without much hip motion or side-to-side lunging. Refining the practice, you can go ten times from right (fig. 3.37b) to left, and ten times from left (fig. 3.37c) to right on one round of holding your breath. You can start practicing for one minute a day and add a minute each week. As with uddiyana bandha, many teachers consider it important to hold the chin lock for this practice. In any case, if you build up to 20 minutes a day you will find out why nauli is valued so highly in hatha yoga.

Figure 3.37a. Nauli madhyama, with contraction of both rectus abdominis muscles superimposed on uddiyana bandha.
Figure 3.37b. Nauli right, with contraction of the right rectus abdominis muscle superimposed on uddiyana bandha.
Figure 3.37c. Nauli left, with contraction of left rectus abdominis muscle superimposed on uddiyana bandha.
For practices in the first half of the chapter, contraindications for leglifts, sit-up exercises, and the boat postures are obvious: lower back problems. And it ought not surprise anyone that the peacock, as well as other exercises that greatly increase intra-abdominal pressure, should be explored with caution, at least by anyone who is not already quite athletic. It is a myth, although a common one, that women in general should not do the peacock. For practices in the second half of the chapter, there are no contraindications for ashwini mudra and mula bandha, but agni sara, uddiyana bandha, and their derivatives are powerful exercises whose indiscriminate use is not recommended.
HIGH BLOOD PRESSURE
If you have high blood pressure, even the mildest of abdominopelvic exercises should be approached gingerly. Even if you are on medication that successfully lowers your blood pressure, all intense abdominopelvic exercises should be avoided. Holding your breath at the glottis after inhalation is always contraindicated. Holding your breath after exhalation, as in uddiyana bandha, is less dangerous but also inadvisable because we would expect it to quickly increase venus return, that is, the flow of blood back to the heart.
ULCERS
Intense abdominopelvic practices are all contraindicated for everyone with stomach and duodenal ulcers except in the case of practices recommended by a holistic physician who is willing to advise you.
HIATAL HERNIA
The esophagus passes through the respiratory diaphragm through the esophageal hiatus (fig. 2.7), and under certain conditions the upper part of the stomach may herniate through this region of the diaphragm into the thoracic cavity. This is called hiatal hernia. If you have occasional discomfort in that region after eating, or if you have acute discomfort just under the left side of the rib cage while trying the peacock, uddiyana bandha, or vigorous versions of the cobra, it may be that the differential between intra-abdominal pressure (which is higher) and intra-thoracic pressure (which is lower) is causing the problem. It is important to seek medical counsel from someone who is conversant with hatha yoga before continuing with any posture or exercise that causes such symptoms.
INGUINAL HERNIA
The inguinal canal, through which the testis passes around the time of birth on its way to the scrotum, is another region of weakness in which abdominal organs, or more commonly a little fatty tissue, usually from the greater omentum (fig. 2.9) can herniate out of the abdominal cavity. This condition—an inguinal hernia—can also occur in women, although it is less common than in men. If a little outpouching of soft tissue appears on one or both sides of the groin when you are upright, and if that outpouching disappears back into the abdominal cavity when you are lying down, it is almost certainly an inguinal hernia.
Inguinal hernias will become more pronounced in any standing posture and in all exercises such as the peacock that increase intra-abdominal pressure. Bicycling, walking, running, and sun salutations also commonly make inguinal hernias more prominent. But they are unpredictable: they can get worse quickly or remain about the same for months or years. If the condition is not repaired surgically, a support (truss) that presses against the hernia from the outside may be effective in keeping the contents of the abdomen out of the inguinal canal, but in the absence of such a device, strenuous upright postures and the peacock should be avoided.
MENSTRUATION AND PREGNANCY
No exercise involving breath retention should be practiced during menstruation or pregnancy, but the regular and enthusiastic practice of abdominopelvic exercises appears to be helpful in preventing premenstrual symptoms and cramping. During pregnancy, most practices in hatha yoga are contraindicated, especially those that increase intra-abdominal pressure but also those few that decrease it, such as uddiyana bandha. Ashwini mudra and mula bandha are fine and are even recommended during pregnancy, but agni sara is contraindicated because of its intensity. One caution for expert hatha yogis who have just given birth: the fascia that connects the two rectus abdominis muscles in the midline may have become weakened by pregnancy and childbirth, and women who were able to do the peacock easily before having children are sometimes unable to do so afterwards because the rectus abdominis muscles are now pulled uncomfortably apart in the effort to come into the posture.
Everyone knows that developing strength, improving aerobic capacity, and increasing flexibility is important for physical conditioning. The question of how to accomplish these goals is less certain, but yogis insist that these are the benefits of leglifts, the peacock, agni sara, uddiyana bandha, and nauli. Why that happens is still something of a mystery, but we can call on our experience to make some reasonable guesses. If you are hungry and tired, but feel great after doing twenty leglifts and ten minutes of agni sara instead of eating and taking a nap, something obviously worked—and anyone who has a little knowledge of anatomy and physiology can make intelligent guesses about what, where, and how: you increased your blood oxygen and decreased your blood carbon dioxide; you stimulated the adrenal glands to release epinephrine (adrenaline) and steroids; you stimulated the release of glucagon from the islets of Langerhans in the pancreas; and the liver released extra glucose into the general circulation, cutting your appetite and preparing you for getting on with your day.
We can also look at the physiology of any specific practice and comment on events that are certain to result. For example, we can note that any activity that increases intra-abdominal pressure while the airway is being kept open will force blood more efficiently than usual from the venous system in the abdominal region up into the chest. Quantities can be debated, measurements taken, and opinions stated regarding how and why that might be beneficial, but there can be no argument about the reality of the effects.
“It may take many months to acquire the control and stamina necessary to perform this exercise (agni sara) correctly. Do not become discouraged. Your efforts will be rewarded with excellent health.”
— Swami Rama, in Exercise Without Movement, p. 55.