“The first bipedalists were not semihuman creatures. They were animals opting to walk on their hind legs. It was a costly option for them to take up, and we are still paying the instalments. The mammalian spine evolved over a hundred million years and reached a high degree of efficiency, on the assumption that mammals are creatures with one leg at each corner and that they walk with their spine in a horizontal plane. Under those conditions the blueprint is one that would command the admiration of any professional engineer . . . . Such a mammal resembles a walking bridge.”
— Elaine Morgan, in The Scars of Evolution, p. 25.
Creatures with an upright two-legged posture appeared along the coastal regions of Africa 4–6 million years ago. How this came to be is still controversial, but the posture is one of the defining characteristics of the modern human form. Another is that we are able to stand erect with minimal muscular activity in our thighs, hips, and backs. By contrast, the stance and gait of a dog or cat, or of the occasional monkey who chooses to walk upright at times on two legs, is dictated by joints in the supporting extremities that are always bent. This enables them to pounce or run at a moment’s notice, but it also requires them to use muscular activity just to stand upright. The secret of our stance is simple—we can relax when we stand because we can lock our knees and balance on our hip joints without much muscular activity.
Most of us are only vaguely aware that we can balance our weight on top of the relaxed thighs, but everyone learns about knees in junior high school cafeteria lines when someone sneaks up behind you and buckles your knee as you are leaning on one leg. Your ensuing collapse shows you clearly that you were depending on the locked knee joint to hold you up and that your tormentor caught your relaxed muscles off guard.
“Locking the knees” is a phrase that has two implications: one is that the hamstrings will be relaxed, and the other is that additional extension will be stopped by ligaments. Instructors in dance, athletics, and the martial arts generally caution against this, arguing instead that the backs of the knees should never be thrust to the rear in a completely locked and hyper-extended stance. Although this thinking is widely accepted in the movement disciplines, and although it is certainly sound advice for all fields of study in which whole-body standing movements must flow freely, weary mountain climbers gratefully learn about a slow, choppy, “rest step,” in which they stand for 2–4 seconds or even longer on a locked knee joint—just bones and ligaments—to save muscular effort before lifting their opposite foot onward and upward. And assuming that you are not preparing to pounce on someone at a social gathering, locking one knee is hard to fault for standing and engaging in quiet conversation first on one leg and then the other. This is a uniquely human gesture—a natural consequence and indeed the culmination of the evolution of our upright posture. An all-encompassing condemnation of the practice is ill-advised if not downright foolish.
Hatha yoga directs our attention to the knees in many postures—the sitting boats (figs. 3.22a—b), the superfish leglift (fig. 3.19b), sitting forward bends generally (chapter 6), the celibate’s pose (fig. 8.25), and the fullest expressions of many inverted poses (chapters 8 and 9), just to mention a few—in which generating tension in the hamstrings or releasing tension in the quadriceps femoris muscles to permit frank bending of the knees would alter the fundamental nature of the posture. In such cases there is nothing inherently wrong with simply saying “lock the knees.” On the other hand, movement therapists are correct in noting that such a directive all too frequently gives students permission to absent themselves mentally from the posture. Rather than experimenting with the nuances of partially relaxing the hamstring muscles, and of alternating this with tightening both the quadriceps femoris muscles and hamstrings at the same time, students often take the lazy way out by simply locking their knees. They might remain unthinkingly in a sitting forward bend for several minutes using a combination of tight quadriceps femoris muscles and relaxed hamstrings, or they might hyperextend their knees in a standing forward bend and support the posture with no more than bony stops and ligaments. The result: they end up in a few minutes with a sense of vague discomfort in their knees. Therefore, throughout the rest of this book, I’ll acknowledge the current preferences in movement studies by referring not to locking but to extension of the knees, and I’ll suggest accompanying this at selected times with relaxed hamstrings—essentially locking the knees without using that troublesome phrase.
That we can stand with knees locked is obvious; sensing how our weight is balanced over the hip joints is more subtle. Feel the softness in your hips with your fingertips as you stand erect. Then bend forward 3—5° from the hips and notice that tension immediately gathers in the gluteal muscles to control your movement forward. Next, slowly come back up and feel the gluteals suddenly relax again just before your weight is balanced upright.
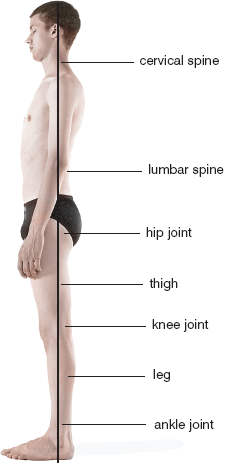
Our relatively relaxed upright posture is possible because a plumb line of gravity drops straight down the body from head to foot, passing through the cervical and lumbar spine, the axial center of the hip joint, and the locked knee joint, and far enough in front of the ankle joint to keep you from rolling over backward onto your heels (fig. 4.1). (Because the ankle joints do not lock, keeping your balance will require you to hold some tension in the calf muscles.) This architectural arrangement allows you to balance your weight gracefully from head to toe and accounts for why you can stand on your feet without much muscular effort.
The fact that we can remain in standing poses when we are relaxed, tensed, or anywhere in between often prompts spirited discussion among hatha yoga teachers. One instructor says to relax in standing postures; another says don’t for a second relax in standing postures. Both can be correct, and we’ll explore how and why later in this chapter. Putting first things first, however, we’ll begin with the skeleton. We’ll follow that with the general principles that underlie standing postures, looking first at a few simple exercises: the mountain pose, a side-to-side stretch, an overhead stretch, a twist, three backbends, six forward bends, and four side bends. Then we’ll study the more complex dynamics of triangle postures in detail. Last, we’ll look at two balancing postures: the eagle and the tree.
Figure 4.1. A plumb line of gravity drops perpendicular to the gravitational field of the earth from the crown of the head to the feet in a frontal plane of the body. This plane passes through the cervical spine, the lumbar spine, behind the axial center of the hip joints, in front of the axial center of the knee joints, and in front of the ankle joints. The disposition of this plumb line of gravity allows us to balance upright in a relaxed posture except for enough tension in the leg muscles (front and back) to keep the line perpendicular to earth’s gravitational field.
THE SKELETAL SYSTEM AND MOVEMENT
Every artist who wants to do figure drawing must first learn about the skeleton—the shape and placement of the skull, rib cage, pelvis, and scapula, as well as the rest of the bones of the extremities. Every curve, bump, indentation, and bulge in the body is superimposed on the underlying bones, and life-drawing instructors could hardly conceive of a better way to start their courses than to ask students to draw a skeleton covered with translucent plastic shrink-wrap—just skin and bones. Looking within such a model, students would see two distinct skeletal units: the appendicular skeleton and the axial skeleton. The former refers to the bones of the appendages (the upper and lower extremities), and the latter refers to the bones that lie in the central axis of the body—the skull, the vertebral column, and the rib cage, including the sternum. The appendicular skeleton, as the name suggests, is appended to the axial skeleton—the upper extremities are attached to the sternum at the sternoclavicular joints, and the lower extremities are attached to the sacrum at the sacroiliac joints. Taken together, the two units form the frame upon which the entire body is organized.
[Technical note: It is noteworthy and perhaps surprising to many that the hip joints, which are the sites for flexing, extending, and rotating the thighs, do not form axial-appendicular junctions. The reason is simple: both the femur and the pelvic bone are part of the appendicular skeleton, and it is the pelvic bone alone that articulates with the axial skeleton.]
We’ll discuss the skeletal system and movement in more detail, but first we need to review some common anatomical terms that we’ll be using routinely from this point on. “Anterior” refers to the front of the body; “posterior” refers to the back of the body; “lateral” refers to the side; “medial” means toward the midline; “superior” means above; “inferior” means below; “proximal” means closer to the torso; and “distal” means away from the torso. Sagittal planes lie from front to back, top to bottom; the one and only midsagittal plane is the sagittal plane that bisects the body in two right-left halves, and parasagittal planes include all sagittal planes that are lateral and parallel to the midsagittal plane. The coronal or frontal planes lie from side to side, top to bottom, such as a plane that runs through the ears, shoulders, torso, and lower extremities. The transverse or cross-sectional planes lie from side to side, front to back (fig. 4.2).
THE APPENDICULAR SKELETON
The appendicular skeleton for the lower extremities forms the foundation for standing postures. From top to bottom, it includes the pelvic bones, the femur, patella, tibia, fibula, and the bones of the ankles and feet (fig. 4.3). The pelvic bones and the sacrum comprise the pelvic bowl (figs. 2.8, 3.2, and 3.4), which is thus an axial-appendicular combination of three bones. The femur is the single bone in the long axis of the thigh, and the patella is the “kneecap.” The tibia and fibula are in the leg. The anterior border of the tibia—the shin—is familiar to everyone as the front surface of the leg that is so vulnerable to painful bumps and bruises. The fibula is located laterally, deep to the calf muscles. The tibia and fibula remain in a fixed position parallel to one another, the tibia medial to the fibula from top to bottom. The bones of the ankle and foot include the tarsals, metatarsals, and phalanges.
The appendicular skeleton for the upper extremities is used for manipulating objects in our environment and is often an important accessory for bracing difficult standing poses. The bones of the upper extremity include the clavicle (the collarbone), the scapula (the shoulderblade), the humerus, radius, ulna, and bones of the wrist and hand (fig. 4.3). The clavicle is the only bone of the upper extremity that forms a joint (the sternoclavicular joint) with the axial skeleton. It also happens to be the most commonly broken bone in the body. If you fall on the point of your shoulder, the dead weight of your upper body can snap the clavicle like a dry branch.

Figure 4.2. Planes of the body, and terms for orientation of body parts in space and relative to one another (Dodd).
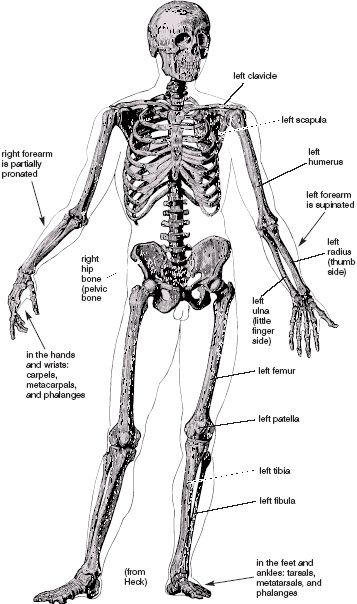
Figure 4.3. The appendicular skeleton is defined as all the bones of the upper and lower extremities, including the pelvic bones, scapulae, and clavicles.
The humerus is the single bone of the arm, and the radius and ulna are the two bones of the forearm. If you stand upright, palms facing forward in the “anatomical position,’ the radius and ulna are parallel, with the ulna on the medial side near the hips and the radius on the lateral side. This position for the forearm is called supination; its opposite is pronation. You supinate your right forearm when you drive a wood screw into a plank clockwise. If you rotate the same screw out of the plank, turning your right hand counter-clockwise, you are pronating the forearm. During pronation the radius and ulna shift to form a long, skinny X so that the distal part of the radius is rotated to an inside position, and the distal part of the ulna is rotated to an outside position. Here (fig. 4.3) the left forearm is shown supinated and the right forearm is shown partially pronated. The bones of the wrist and hand include the carpels, metacarpels, and phalanges.
THE AXIAL SKELETON
The axial skeleton forms the bony axis of the body (fig. 4.4). In addition to the vertebral column (the spine), it includes the skull, the rib cage, and the sternum, or breastbone. Looking at the vertebral column from its right side reveals that the spine forms a reversed double S, with one reversed S on top of the other (viewed from the left side, envision a plain S on top of the other). The top curve faces right, the next one left, the third one again right, and the bottom one again left (figs. 4.10a–b). This reversed double S represents the four curves of the vertebral column. From the top down, the first and third convexities face anteriorly, and the second and fourth convexities face posteriorly. These are also the sites of the four main regions of the vertebral column: cervical, thoracic, lumbar, and sacral (figs. 2.29a–e, 4.4, and 4.10). A curve facing anteriorly is a lordosis, and a curve facing posteriorly is a kyphosis. The curves alternate: cervical lordosis, thoracic kyphosis, lumbar lordosis, and sacral kyphosis. Each region contains a specific number of vertebrae: seven in the cervical region (C1-7), twelve in the thoracic region (T1-12), and five in the lumbar region (L1-5). The sacrum is a single fixed bone.
In the fetus the entire spine is curved posteriorly, as mimicked by the child’s pose (or fetal pose) in hatha yoga (fig. 6.18). When an infant begins to crawl, and later walk, secondary curvatures that are convex anteriorly—the cervical lordosis and lumbar lordosis—develop in the neck and lumbar regions, while the posterior convexities—the thoracic kyphosis and the sacral kyphosis—are retained in the adult. The four curvatures act together as a spring for cushioning the upper body from the impact of running and walking. In standing postures the curvatures are easy to keep in their optimal configuration, neither too straight nor too pronounced, but in cross-legged meditative sitting postures the lack of hip flexibility makes this more challenging.

Figure 4.4. The axial skeleton includes the vertebral column, skull, rib cage, and sternum.
Just as the spine of a book forms an axial hub around which pages turn, so does the human spine form the axial support around which the body moves. It forms the skeletal core of the torso, and it is the axial support for all hatha yoga postures. We cannot understand hatha yoga without understanding its structure and function. To begin, we’ll examine the individual bones of the spine—the vertebrae—and then look at how they join together to form the vertebral column as a whole.
TYPICAL VERTEBRAE
We’ll begin by looking a typical lumbar vertebra (L4) from above and from its left side. Viewing its superior surface from front to back (fig. 4.5a), anteriorly we see the upper surface of a cylinder, the vertebral body; posteriorly we see a vertebral arch that surrounds a space, the vertebral foramen, in which the spinal cord resides. Pointing backward from the rear of the vertebral arch is a bony projection, the spinous process. If you lie on your back and draw your knees up against your chest, you feel the spinous processes of the lumbar vertebrae against the floor. And because this is what everyone notices, laypeople often mistakenly refer to the tips of the spinous processes as “the spine.”
Still looking at the upper surface of L4, we see that the foundation for the vertebral arch is composed of two columnar segments of bone, the right and left pedicles, which project backward from the posterior border of the vertebral body. From there, flatter segments of bone, the right and left vertebral laminae, meet in the midline to complete the vertebral arch posteriorly and provide the origin for the midsagittal spinous process. When surgeons have to gain access to the spinal cord or to intervertebral disks in front of the spinal cord, they do a laminectomy to remove the posterior part of the vertebral arch, including the spinal process. Near the junction of the pedicles and the laminae, the superior articulating processes are seen facing the viewer, and robust transverse processes point laterally in a transverse plane, as their names imply. It is possible to feel the latter from behind in the lumbar region, but it requires a determined, knowing fingertip.
A lateral view of L4 from its left side (fig. 4.5b) shows two articulating protuberances: the left superior and inferior articulating processes. The bilateral superior articulating processes of L4 form synovial joints with the inferior articulating processes of L3, and the bilateral inferior articulating processes of L4 form synovial joints with the two superior articulating processes of L5. In this manner the articulating processes connect the vertebral arches to one another from the neck to the sacrum. The left transverse process is visible extending toward the viewer, and a side view of the spinous process juts to the rear. Looking from the left side of L4 also confirms the cylindrical shape of the vertebral body. In this view the vertebral foramen is hidden by the left side of the vertebral arch.
We saw in chapter 2 that the lumbar spine deeply indents the respiratory diaphragm, and that its front surface (L4 and L5) can be palpated through the abdominal wall in someone slender who has a normal or overly prominent lumbar lordosis—the abdominal organs just slip out of the way as you probe. These two views of L4 reveal this anterior-most surface of the lumbar spine, and if you ever have occasion to palpate it directly, the term “axial” will gain new meaning. The spine really does form the axis of the body.
Moving up the spinal column, the top view of the seventh thoracic vertebra (fig. 4.6) reveals a smaller vertebral body than we see in the lumbar region. And near the ends of the transverse processes we also see tiny facets (smooth articular regions) that represent sites for articulation with the ribs on each side (figs. 4.6a and 5.33). A side view from the left of the thoracic vertebrae (fig. 4.7b) reveals sharp spinous processes pointing downward rather than straight back, as well as vertebral bodies that are composed of shorter cylinders than those found in the lumbar region. This view also shows several other features: spaces for intervertebral disks; sites (from the left side) where the superior and inferior articulating processes meet; and spaces between the vertebral arches, the intervertebral foramina (again from the left side) through which spinal nerves T1—12 pass on their way to the chest wall.

Figure 4.5. Superior view (from above) of fourth lumbar vertebra (a) and a view from its left side (b). The heavy dotted line in “a” indicates at the level of a single vertebra the separation of the anterior functional unit from the posterior functional unit. Notice also in “a” how the parasagittal orientation of the superior and inferior articulating processes, along with an axis of rotation that is located near the base of the spinous process (large dot), will be expected to inhibit lumbar twisting (from Morris).
Further up the spinal column, the cervical vertebrae have yet smaller vertebral bodies than those found in the thoracic vertebrae, but their vertebral arches are wider than you might imagine (fig. 4.8). If you feel your neck from the side and press deeply, you can feel the underlying hardness of the transverse processes of the cervical vertebrae.
The top two cervical vertebrae are specialized for articulation with the skull. C1 sits just underneath the skull, and C2 provides the axis around which C1 plus the skull rotate when the head is turned. We’ll take a closer look at those two vertebrae and their articulations in chapter 7.

Figure 4.6. Superior view of the seventh thoracic vertebra (a) and a view from its left side (b). Notice how thoracic twisting will be permitted by the frontal orientation of the facets on the superior and inferior articular processes. Rotation of one vertebral body with respect to the next is also encouraged by an axis of rotation (large dot in “a”) in the center of the vertebral body (Sappey).
At the base of the vertebral column is the sacrum, composed of what were originally five vertebrae that became fused together into one bone during fetal development (fig. 4.9). It is pointed at its lower end and has an articular surface on each side that mates with the ilia for forming the sacroiliac joints. You can feel the relatively flat posterior surface of the sacrum against the floor in the corpse posture. And if you are able to palpate someone’s L5 vertebral body through their abdominal wall, you can also feel the promontory (the top front border) of the sacrum. Below this promontory, the sacral kyphosis rounds so much to the rear that you can’t feel its anterior surface. The coccyx (the “tail bone”) is attached to the tip of the sacrum (figs. 4.4 and 4.10).

Figure 4.7. Thoracic vertebral column, from an anterior view (a), lateral view (b), and posterior view (c). Notice in the middle thoracic region how the spinous processes point sharply downward (Sappey).
THE ANTERIOR FUNCTIONAL UNIT
The vertebral column is composed of two distinct functional units: an anterior functional unit composed of a stack of vertebral bodies and intervertebral disks that together form a flexible rod, and behind the anterior functional unit, a tubular posterior functional unit composed of a stack of vertebral arches and associated ligaments. We’ll look first at the rod.
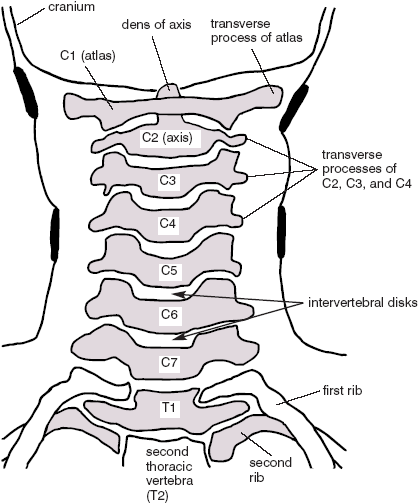
Figure 4.8. Skeletal structures of the neck drawn from two roentgenograms (X-rays). The images were taken from the front. Compare with the atlas and axis in fig. 7.2. Credits to Dr. Donald O. Broughton for the roentgenograms.
If we were to locate an isolated spine and saw off all the vertebral arches at the base of the pedicles, we would be left with a stack of vertebral bodies and intervertebral disks (fig. 4.10a). Each intervertebral disk forms a symphysis between adjacent vertebral bodies that allows a small amount of compression, expansion, bending in all directions, and twisting. The flexibility of the anterior functional unit, at least in isolation, is therefore restrained only by the integrity of the intervertebral disks and by anterior and posterior longitudinal ligaments that support the complex in front and back (figs. 4.12b and 4.13a–b).
Each intervertebral disk (fig. 4.11) has a semi-fluid core, the nucleus pulposus, which is surrounded by a tough but elastic connective tissue exterior, the annulus fibrosis. The nucleus pulposus comprises only about 15% of the total mass, but that’s enough liquid to allow the disk to act hydraulically—every time you shift the angle of one vertebral body with respect to its neighbor, the nucleus pulposus shifts accordingly, bulging out the elastic annulus fibrosis on one side, and every time you twist, the nucleus pulposus presses the annulus fibrosis outward all around. The tough fibroelastic connective tissue comprising the annulus fibrosis fuses each intervertebral disk to the vertebral body above and below. They even run continuously from the disk into the bone. That is why an intervertebral disk never “slips.” It can only rupture, exuding some of the gel-like nucleus pulposus through a weakened annulus fibrosis, or degenerate.
As with other connective tissues, intervertebral disks contain living cells which require nutrients for their survival and which produce metabolic waste products that have to be disposed of. But one thing is missing, at least after we have reached our mid-twenties, and that is blood vessels. The capillary beds that serviced the intervertebral disks during our youth are lost during the natural course of aging. So in older people, how do the living cells receive nourishment, and how are waste substances eliminated? The biomedical literature suggests that nutrients are “imbibed,” or absorbed, into the intervertebral disks from the vertebral bodies, which themselves are well supplied with blood, but little is known about this process except that healthy intervertebral disks contain 70-80% liquid and that the spine gets shorter during the day and longer during the night. Taken together, these two pieces of information suggest that when the intervertebral disks are compressed by gravity and muscular tension during the day, liquid is squeezed out, and that when tension is taken off the vertebral column at night, the vertebral bodies can spread apart, allowing the intervertebral disks to absorb nutrients. This would help explain why it has long been thought that one of the most effective treatments for acute back pain is bed rest, and why a thoughtful combination of exercise and relaxation is therapeutic for most chronic back ailments.

Figure 4.9. Anterolateral view (on the left) and posterolateral view of the sacrum (on the right), the latter also showing the sacral surface of the right sacroiliac joint. The sacrum is concave anteriorly and convex posteriorly, an architectural feature which is even more apparent in fig. 4.10a (Sappey).

Figure 4.10. Three views of the spinal column: a lateral view from the right side (a), an anterolateral view from right front (b), and a posterior view from behind (c). The middle image (b) is enough from the side that the four spinal curvatures start becoming apparent. The anterior and posterior functional units are shown separated from one another in the figure on the left (a). The tubular nature of the posterior functional unit, however, is apparent only in views of individual vertebrae from above (fig. 4.5) or from below (Sappey).
THE POSTERIOR FUNCTIONAL UNIT
If we were to locate another isolated spine and saw off most of the anterior functional unit from top to bottom, we would be left with the posterior functional unit—a tube made up of the stack of vertebral arches, all the restraining ligaments between the arches, and just enough of the posterior borders of the vertebral bodies and intervertebral disks to complete the tube anteriorly (figs. 4.5a and 4.10a). The interior of the posterior functional unit is the vertebral canal, which houses the spinal cord and spinal nerves.
Each vertebral arch forms small synovial joints with its neighbors through the agency of little facets, or flattened joint surfaces, that are located on adjacent superior and inferior articular processes. Like other synovial joints, these movable facet joints are characterized by joint surfaces covered with cartilage on their articular surfaces, synovial membranes and fluid, and joint capsules that envelop the entire complex. Two inferior articular processes, one on each pedicle, form facet joints with matching surfaces on the superior articular processes of the vertebra below. Although the orientations of the articular processes restrict twisting of the spine in the lumbar region (fig. 1.11), their orientations permit it in the cervical and thoracic regions. You hear and feel the facet joints moving when a skilled bodyworker cracks your back. And many young athletes can twist their spine when they get up in the morning, and hear a sequence of pops, indicating that facet joints are being released one after another.

Figure 4.11. The intervertebral disk, in a cross-section from above (left), and in a mid-sagittal section between two vertebral bodies (right). In the figure on the right, the nucleus pulposus is being squeezed anteriorly by a backbend (Sappey).
Just in front of the superior and inferior articular processes, and just to the rear and to each side of the intervertebral disks, are the intervertebral foramina, the openings in the vertebral column out of which the spinal nerves emerge (fig. 4.7b). In the lumbar region the locations of these foramina and their spinal nerves make them vulnerable to ruptured intervertebral disks, which may impinge against a spinal nerve and cause shooting pains down the thigh.
SPINAL STABILITY AND BENDING
The anterior and posterior functional units are described separately to clarify the concepts, but in fact they are bound together inextricably. The architectural arrangement that links them is propitious: it permits spinal movements and at the same time it insures spinal stability. For example, backward bending will compress the vertebral arches together posteriorly while spreading the front surfaces of the vertebral bodies apart anteriorly, and forward bending will pull the vertebral arches slightly apart while compressing the intervertebral disks in front. These movements, however, can be taken only so far because the entire complex is stabilized by ligaments (figs. 4.12–13). As just mentioned, the anterior and posterior longitudinal ligaments reinforce the flexible anterior functional unit, and the joint capsules for the facet joints help hold the vertebral arches together. In addition, there are yet more ligaments superimposed on the posterior functional unit—interspinous ligaments that run between adjacent spinous processes, a supraspinous ligament that connects the tips of the spinous processes, flat elastic ligaments known as ligamenta flava that connect adjacent laminae, and the cervical nuchal ligament, which is an elastic extension of the supraspinous ligament that reaches the head.
[Technical note: Quadrupeds such as dogs and cats have well-developed nuchal ligaments whose elasticity keeps their heads on axis without constant expenditure of muscular energy. Because of our upright posture, the significance of the nuchal ligament in humans is greatly reduced in comparison with that of quadrupeds, but it probably has a least a minor role in helping to keep the head pulled to the rear. It’s no substitute for muscular effort, however, as evidenced by drooping heads in a room full of sleepy meditators.]
THE SPINE AS A WHOLE
We’ve seen representative vertebrae at each segment of the spine, and we’ve seen how their linked front portions form the anterior functional unit and how their linked vertebral arches form the posterior functional unit. Then we looked at how the combination of anterior and posterior functional units along with their restraining ligaments permits and yet limits bending. Now we need to examine the spine as a whole within the body (fig. 4.4). The depth of the four curvatures can be evaluated from the side (figs. 4.10a–b). If they are too flat the spine will not have much spring-like action when you walk and run, but if the curvatures are too pronounced, especially in the lumbar region, the spine will be unstable. Excess curvatures are more common—an orthopedist would tell you that a “lordosis” is an excess anterior curvature in the lumbar region and that a “kyphosis” is an excess posterior curvature of the chest. And sometimes people have what is called a reverse curvature in the neck, one that is convex posteriorly instead of anteriorly.
From either the front or the back, the spine should look straight. If it doesn’t, it is usually because of an imbalance such as one leg being shorter than the other, which causes the pelvis and spine to be angled off to the side. This creates a side-to-side curvature known as scoliosis, a condition which always includes a right-left undulation of compensatory curvatures higher up in the spine that ultimately brings the head back in line with the body. These compensatory curvatures develop because our posture adjusts itself to maintain the plumb line of gravity from head to toe with the least possible muscular effort, even if it results in distortions and chronic aches and pains.

Figure 4.12. Views of the ligaments in the lumbar portion of the vertebral canal from inside looking out. On the left (a) is an image looking posteriorly toward the vertebral laminae, ligamenta flava, pedicles (cut frontally), and transverse processes. On the right (b) is an image looking anteriorly toward the posterior longitudinal ligament, the posterior surfaces of the vertebral bodies, intervertebral disks (indicated by dotted lines), and pedicles (again in frontal section; Morris).
THE DEEP BACK MUSCLES
We can’t make a posture with just bones, joints, and ligaments: something has to move them. An engineer designing a plan for putting the body into motion might suggest using three layers of rope-and-pulley systems. The innermost layer would consist of miniature systems of ropes and pulleys connecting the smallest adjacent skeletal segments, the intermediate layer would consist of larger systems connecting bigger segments, and the outermost layer would consist of the largest and longest systems connecting the segments of the skeleton which are the furthest apart. And indeed, we can see elements of such a plan within the human body. The smallest and shortest muscles of the spine act between adjacent vertebrae. The middle layer of muscles—the deep back muscles—operates between the torso and the lower extremities to hold us upright. To see them (fig. 4.14 and 5.5) you would have to remove the upper extremities, including the third and outermost layer of muscles that act from the torso to manipulate the scapulae and arms (figs. 8.8–14).

Figure 4.13. Side views (from the right) of the ligaments associated with the cervical portion of the vertebral column (a) and with the lumbar region (b). (from Morris).
The main component of the middle layer is the erector spinae, which runs between the neck and the pelvis on either side of the spinous processes. This muscle erects or extends the spine, as its name implies; it also restricts forward bending, aids side bending, and influences twisting of the torso in conjunction with the abdominal muscles. And in static postures such as sitting upright in meditative sitting postures, it acts as an extensile ligament, holding the spine straight with a mild isometric effort (chapter 10). Our main concern here is how the deep back muscles operate either to facilitate or restrict standing postures.
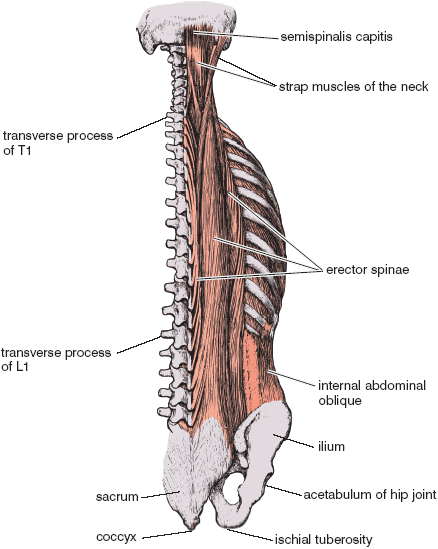
Figure 4.14. Deep muscles of the back and neck (right side). Upper and lower extremities have been removed in their entirety (from Morris).
The axial skeleton, the appendicular skeleton, and muscles throughout the body all contribute to determining our bilateral symmetry. For perfect symmetry, every right-left member of every pair of bones, skeletal muscles, joints, and ligaments must be identical on both sides of the body—right and left knee joints, hip joints, femurs, and clavicles; and right and left erector spinae muscles, quadriceps femori, hamstrings, adductors, and gluteals.
To check out the symmetry in your own posture, look at yourself frontally in a full-length mirror, preferably in the buff. Place your feet about twelve inches apart and let your hands hang relaxed. Look carefully. Do the right and left extremities appear to be of equal length? Is one shoulder higher than the other? Do you lean slightly to one side? Do both forearms hang loosely, or is one elbow more bent? Does the waistline make a sharper indentation on one side than the other, creating extra space between the body and elbow on one side? Is the crest of the ilium higher on one side than the other? Is one nipple higher than the other? If you draw an imaginary line from the umbilicus to the center of the sternum, is it perpendicular to the floor, or slightly off?
Look down at your feet. Are they comfortable in a perfectly symmetrical position, or would it feel more natural if one or the other were rotated laterally? Do the toes all spread out and down squarely, or do some of them seem to clench in? You are not trying to change anything; you are just making observations. Don’t despair if your body is not perfectly symmetrical; few are.
Most of us were born symmetrical, but our habitual activities have undermined our balance. Carrying a handbag on one shoulder, always lowering the chin to the same side against a telephone receiver, swimming freestyle and always turning the head in the same direction for breathing, and countless other right-left preferences create habitual tension on one side of the body that eventually results in muscular and skeletal misalignments and distortions.
So far we’ve been discussing only static anatomical symmetries and asymmetries. But these terms are also used in the context of movement. In that realm a symmetrical movement is one in which both sides of the body move at the same time and in the same way, while an asymmetrical movement is one in which each side of the body moves sequentially. As it happens, most of our everyday activities are accomplished asymmetrically. You don’t hop forward two feet at a time—you walk, swinging your right hand forward in concert with your left foot, and swinging your left hand forward in concert with your right foot. Likewise, a boxer hits a punching bag with one hand and then the other, not with both hands at the same time. And every karate master knows that the power of a punch with one hand depends on simultaneously pulling the opposite elbow to the rear. In swimming we see both possibilities—the butterfly, the breast stroke, and the beginner’s back stroke involve symmetrical movements; the freestyle and the back stroke crawl involve asymmetrical movements.
You can correct some right-left asymmetries with patience, persistence, and a well-thought-out practice plan. In fact, right-left balancing is an important quest in hatha yoga (“ha” is the Sanskrit word for “right,” and “tha” means “left”). And apart from its importance in hatha yoga postures, bodily symmetry is beneficial to our overall health and comfort.
The best approach for correcting right-left imbalances is to concentrate on asymmetrical postures and activities, working first with one side and then the other, and watching for differences between the two. If you spot an imbalance you can do the same posture three times, starting and ending on the more difficult side, and over time this will tend to correct the situation. Symmetrical postures, by contrast, are often not very effective for correcting right-left imbalances. Both sides may get stronger and more flexible, but they will remain different. In certain cases the differences can even become exaggerated because making an identical effort on both sides may favor the side that is more flexible, and this leaves the constricted side even more out of balance.
If right-left imbalances are best remedied with asymmetric postures, front-to-back imbalances are best remedied with symmetric postures. Let’s say you can’t bend forward and backward very far, or that you perceive that your backward bends are more convincing than your forward bends, and you can’t detect any difference in tightness when you compare the two sides of the body. The solution to this problem is to develop a personal program of symmetrical forward bends and backbends to redress the imbalance. But keep watching. These improvements are sooner or later likely to uncover asymmetrical limitations which until that time had been hidden: limitations to forward bending in the hip or hamstrings on one side, limitations in the hip flexors on one side for eccentric backward bending, or limitations to side bending on one side. Don’t complain. Start over. Enjoy.
In addition to correcting muscular and skeletal imbalances, standing postures as a whole form a complete and balanced practice that includes twisting, forward bending, side bending, backward bending, and balancing. A standing forward bend even serves as a mild inverted posture for those who are flexible enough to bend all the way down. Before studying specific postures, however, we must examine some fundamental principles.
DEVELOPING A STRONG FOUNDATION
Should you stand relaxed, or should you purposely hold some tension in the hips and thighs when you are doing standing postures? This was our opening question, and the answer is not the same for everyone. Through long experience, advanced students know exactly when and where it is safe to relax, so they can do whatever they want. Beginners, however, who are embarking on a course of standing postures should be told straight out to plant their feet firmly and to hold the muscles of the hips and thighs in a state of moderate tension. The many muscles that insert in joint capsules keep them taut and establish a strong base for the posture. This not only reinforces the joints, it brings awareness to them and to the surrounding muscles—and where there is awareness there is safety. Tightening the muscles of the hips and thighs limits the range of motion, it is true, but it prevents torn muscles and injuries to the knee joints, sacroiliac joints, hip joints, and the lower back. In addition to these immediate benefits, developing a strong base over a period of years builds up the connective tissues in both the joints and their capsules. And as the joints become stronger, it becomes safer to relax the body more generally and at the same time intensify the stretches. Experts take this all for granted; they protect themselves without realizing it and are often not aware that beginners unknowingly place themselves in danger.
SETTING PRIORITIES
For novices, standing postures are the best training ground for experiencing the principle of learning to establish priorities from the distal to the proximal parts of the limbs. This means you should construct standing poses from your feet to your hips to your torso, and from your hands to your shoulders to your torso, rather than the other way around. That’s desirable because your awareness of the body gets poorer and your ability to control the muscles diminishes as you move from distal to proximal, and if you first bend or twist the trunk and then manipulate the extremities, the latter movements take your attention away from the proximal structures of the body over which you have less awareness. By contrast, if you settle the distal portions of your limbs first, you can keep them stable with minimal effort while you place your attention on the central core of the body.
FOOT POSITION
The feet are the foundation for standing postures. This can be taken literally: small adjustments in how the feet are placed will affect your posture from head to toe. To see how this happens, stand with your feet together and parallel, draw lines straight down the front of your bare thighs with a marker, and imagine parasagittal planes through each of them. What we are going to see is that movements of the lines reflect rotation of the planes, and that rotation of the planes reflects rotation of the thighs. So keeping the knees straight, first rotate your feet so that the big toes remain together and the heels swing out 45° each (a 90° angle opening to the rear), and then rotate them in the opposite direction so that the heels are together and the toes are out (again a 90° angle, but now opening to the front). By definition, the thighs will have rotated medially in the first case and laterally in the second. We should note that in both situations the thighs account for only about two-thirds of the total rotation—30° at the hip and 15° at the ankle.
This experiment makes it clear that most of the rotation of the foot is translated to the thigh. If a foot slips out of position in a standing posture, it indicates weakness on that side, and to allow the weakness to remain indefinitely can only accentuate problems throughout the foundation of the body. The situation should be corrected, but don’t force matters. Instead of hurting yourself by stressing the weaker side, ease up on the healthier side and resolve to take as long as necessary to make long-term adjustments. In any case, watch your foot position constantly.
The best way to approach standing postures is to start simply, and the simplest standing stretches are those that do not require us to counteract gravity by tightening our lower extremities beyond what is needed to balance upright. This means that the torso is not bending backward, forward, or to the side. We’ll start with the mountain pose.
THE MOUNTAIN POSE
The mountain pose is the basic beginning standing posture (fig. 4.15), from which all others are derived. To begin, stand with the feet together and parallel, and the hands alongside the thighs with the forearms midway between supination and pronation (the thumbs toward the front). Create a firm base by pulling the hips tightly together in ashwini mudra and by keeping the thighs tight all around. The quadriceps femoris muscles keep the kneecaps lifted in front, the hamstring muscles keep tension on the ischial tuberosities and the base of the pelvis, and the adductor muscles keep the thighs squeezed together. Keep the knees extended, but not hyper-extended beyond 180°. Find a relaxed and neutral position for the shoulders, neither thrown back artificially nor slumped forward. Just stand smartly erect. This is the mountain pose. It will keep the abdomen taut without any special effort and produce diaphragmatic breathing.
[Technical note: Most students do not have to be worried about hyperextension of the knees provided they keep some tension in the hamstrings. The few individuals who can hyperextend their knees beyond 180° should be watchful not to lock them, but to maintain a balancing tension all around their thighs—especially between their hamstrings and their quadriceps femoris muscles—which keeps their lower extremities on axis. It should also be mentioned that some instructors, perhaps a minority, suggest keeping the knees “soft” for the mountain posture, by which they mean keeping them ever so slightly bent. What’s most important is awareness. Do whatever you want but be attentive to the results.]
THE SIDE-TO-SIDE STRETCH
Next we’ll look at a simple side-to-side standing stretch (fig. 4.16). Stand with your feet a comfortable distance apart and tighten the muscles of the hips and thighs to make a solid pelvic base. Raise the arms to shoulder height. Now stretch the hands out to the side, palms down, with the five fingers together and pointing away from the body. Observe the sensations in the upper extremities. At first you may tend to clench the muscles, trying to force the hands out, but that’s too extreme. Just search out regions, especially around the shoulders, which, when relaxed, will allow the fingers more leeway for reaching. You are still using muscular effort for the side stretch, but the muscles you are relaxing are now allowing others fuller sway. Gradually, delicate adjustments and readjustments will permit your fingertips to move further and further to the sides.
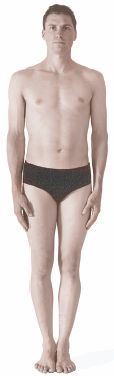
Figure 4.15. Mountain pose: the basic standing posture, from which all others are derived.
If you suspect that there is something mysterious about this, that some force other than your own muscular effort is drawing your fingertips out, a simple experiment will bring you back to reality. Stand in the same stretched posture and ask two people to pull your wrists gently from each side while you relax. As the stretch increases, the feeling is altogether different from the one in which you were making the effort yourself. Stretching once again in isolation will convince you that nothing but muscular effort is doing this work.
Like the mountain pose, the side-to-side stretch is excellent training for diaphragmatic breathing because the posture itself encourages it. The arm position holds the lower abdominal wall taut and the upper chest restricted, and this makes both abdominal and thoracic breathing inconvenient. You would have to make a contrived effort to allow the lower abdomen to relax and release for an abdominal inhalation, and you would have to make an unnatural effort to force the chest up and out for a thoracic inhalation. Students who tend to get confused when they try to breathe diaphragmatically in other positions learn to do it in this stretch in spite of their confusion. All the instructor has to do is point out what is happening.
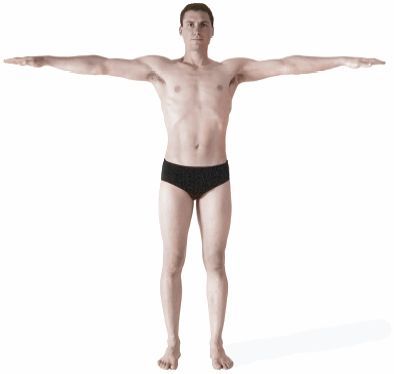
Figure 4.16. Side-to-side stretch.
Right-left imbalances also become obvious in the side-to-side stretch. If students watch themselves in strategically placed mirrors, they will be acutely aware if one shoulder is higher than the other, if extension is limited more on one side than the other, or if there are restrictions around the scapula, often on one side. And with awareness begins the process of correction.
THE OVERHEAD STRETCH
Next try a simple overhead stretch (fig. 4.17). Stand this time with your heels and toes together, and with your base again firmly supported by contracted hip and thigh muscles. Bring the hands comfortably overhead with the fingers interlocked, the palms pressed together, and the elbows extended. Stretch up and slowly pull the arms to the rear, lifting the knuckles toward the ceiling. You can feel some muscles pulling the arms backward, and others resisting. Now you have to watch the elbows. It is easy to keep them extended in the first position, but as the arms are pulled back, one of them may begin to reveal weakness or restriction in its range of movement, or one forearm may show weakness that permits the interlocked hands to angle slightly off toward the weaker side. Take care to keep the posture as symmetrical as possible.
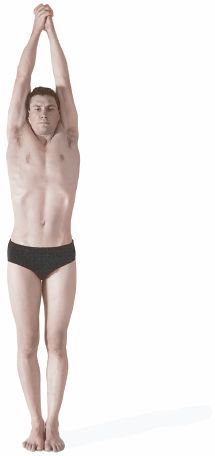
Figure 4.17. Overhead stretch, a simple and superb posture for learning to use the distal portions of the extremities to access proximal parts of the extremities and the core of the body.
As you lift with more focused attention, you will feel the effects of this stretch first in the shoulders, then in the chest, abdomen, back, and finally the pelvis. As in the side-to-side stretch, the posture requires selective relaxation. Many students find this difficult and will keep all their muscles clenched, but any excess tension in the neck, shoulders, or back will make it difficult to feel the effects all the way down to the pelvis. If you only feel the posture affecting the upper extremities, you need to make more conscious efforts to relax selectively.
In the overhead stretch the extensors of the upper extremities will all be in a state of moderate tension and the flexor muscles will be in a state of relaxed readiness, simply countering the extensors. The posture’s effectiveness will depend on how naturally this takes place. If the extensor muscles in the arm and shoulder are noticeably limited by their antagonists, you may not be able to straighten your forearms at the elbow joint. Or even if the forearms can be fully extended you may not be able to pull the arms backward. And if you feel pain in the arms and shoulders, you will not be able to direct much energy and attention to the trunk. But if you practice this stretch regularly, you will gradually notice that your efforts are affecting the central part of the body as well as the extremities.
The overhead stretch is also one of the best postures for learning how to work from distal to proximal because the proximal parts of the body are affected so clearly by each successively more distal segment. As with the side-to-side stretch and the mountain pose, the overhead stretch encourages diaphragmatic breathing. It doesn’t restrict abdominal breathing as much as the side-to-side stretch (at least not unless you bend backward in addition to stretching up), but it restricts thoracic breathing even more.
THE STANDING TWIST
The last and most complicated of these simple stretches, and the only one that is asymmetrical, is the simple standing twist. First, to understand the dynamics of the pose, try it while holding as little tension in the hips and thighs as possible. We’ll call this a relaxed standing twist. With the medial borders of the feet about twelve inches apart, twist to the right, leading with the hips, with the arms hanging. As you twist, the opposite hip projects backward and you dip forward almost imperceptibly, as though you were planning a twisted forward bend from the hips. This may not feel natural: in fact, it shouldn’t, because the healthy norm is to hold some tension in the hips and thighs when you twist. But this relaxed standing twist is a concentration exercise in doing just the opposite. In this manner you can get a feel for what not to do. Paradoxically, students who are not very body-oriented can do this exercise with little or no prompting, in contrast to the athlete or hatha yogi who finds it odd to relax and allow the opposite hip to move posteriorly.
Now twist again, but this time first plant the feet, hold the knees extended, and tense the gluteal muscles on the side opposite the direction of the twist. When you twist to the right and contract the left gluteus maximus, at least three things are noticeable: the left thigh becomes more extended, the left side of the hip is pulled down, and the torso straightens up. Now tense the quadriceps femoris muscles on the front of the thighs, paying special attention to the side toward which you are twisting. This complements the action of the opposite gluteus maximus. Last, tense the adductors on the medial sides of the thighs. The entire pelvis is now strongly supported by muscular activity (fig. 4.18). This is the correct feeling for a standing twist; it comes naturally to those who are in good musculoskeletal health but it feels artificial to those who are not.

Figure 4.18. Standing twist. In this and all other asymmetrical stretches, the text descriptions refer to what is seen in (and felt by) the model since that is ordinarily a student’s frame of reference in a class. All such postures should be done in both directions.
It is logical to examine standing backward bends next because they are easy, simple, symmetrical, and natural. For beginners they are simply an extension of standing up straight.
WHOLE-BODY BACKWARD BENDING
Whole-body backward bending, more than any other posture, demonstrates the principle of setting priorities from distal to proximal. Try this experiment: stand, lift your hands overhead, and clasp your hands and fingers together firmly. Press the palms together solidly, making sure that the hands do not angle to the right or left. Now extend the forearms at the elbows. Lock them firmly. With the heels and toes together, grip the floor gently with the feet. Tighten all the muscles of the thighs, lifting the kneecaps with the quadriceps femori, tensing the adductors medially and the hamstrings posteriorly, and squeezing the hips together. This stabilizes the knee joints and pelvis, creating a strong base. Pull your arms backward as far as possible and lift your hands toward the ceiling. If all of the priorities have been set in order, the lifting feeling in the posture can be felt progressively in the thorax, abdomen, and pelvis.
Now, with all the distal-to-proximal priorities established, you can place your attention on the totality of the posture. Bend backward in a whole-body arc, but without throwing your head back excessively. You will feel a whole-body bend as you access the core of the body. Hold your attention on the abdomen. Tissues are pulling on your torso from fingertips to toetips—fingers to hands, hands to forearms, forearms to arms, arms to shoulders, and shoulders to chest, abdomen, and pelvis; toes to feet, feet to legs, legs to thighs, and thighs to pelvis and vertebral column. Notice the whole-body tension, especially on the front side of the chest, abdomen, and thighs (fig. 4.19). Breathe evenly; do not come back so far that you have a desire to hold your breath at the glottis or that you hesitate to exhale. Within those limits, as soon as you are settled, pull back isometrically to exercise and strengthen the back muscles. With every breath, inhale deeply with thoracic inhalations that explore (within the limits of the posture) the fullness of your inspiratory capacity.
Numerous mechanisms protect you in a whole-body backward bend. Eccentric lengthening and finally isometric contraction of the iliopsoas muscles turn them into extensile ligaments, and these muscles, acting as short but powerful cables, resist excess extension at the hip joint. In the case of the iliacus they act between the femur and the pelvis, and in the case of the psoas they act between the femur and the lumbar region. They are not alone, of course. The spiraled ischiofemoral, pubofemoral, and iliofemoral ligaments back them up on each side, keeping the head of the femur pulled into congruence with the hip socket as you reach your limits of hip extension.
Tensing the quadriceps femoris muscles lifts the patellas and extends the knees, and this allows you to drop backward only so far. To come back further you would have to bend the knees and bring your lower body forward, but we do not want that here. In this standing whole-body backward bend we are thinking of beginning and intermediate students who should learn to protect their joints, muscles, ligaments, and tendons before trying more challenging postures.
The femoris quadriceps has another action that affects the backbend more subtly. As we saw in chapter 3, three of the four heads of this muscle take origin from the femur and do not have a direct effect on the pelvis, but the fourth, the rectus femoris (figs. 3.6, 3.9, and 8.8–9), attaches to the ilium at the anterior inferior iliac spine. The rectus femoris is a football-kicking muscle, for which it has two roles: acting as a hip flexor for helping the iliopsoas muscle initiate the kick, and then acting with the quadriceps femoris muscle as a whole for extending the leg at the knee joint and assisting completion of the kick. The rectus femoris acts isometrically, however, in a standing backward bend, helping the iliopsoas muscles stabilize the pelvis and spine, and helping the rest of the quadriceps femoris stabilize the knee. Without its tension the knees would bend and the top of the pelvis would tip backward, thus pitching the trunk to a more horizontal position and accentuating the lumbar portion of the backward bend, which is not our aim in this beginning posture.

Figure 4.19. Whole-body backward bend. Tension at the sites indicated limit and define the bend from top to bottom.
Lifting the hands overhead and pulling the arms back as much as possible protects the upper half of the body and provides lift and traction to the chest and abdomen. The rectus abdominis muscles resist this stretch in two ways: they provide further stability to the pelvis by way of their attachments to the pubic bones, and they support the role of the rectus femoris muscles in preventing acute bending in the lumbar region. What we want, and what our efforts give us from top to bottom, is a continuous arc of tension in muscles, tendons, and fasciae between the fingertips and toes. And that is why it can rightfully be called a whole-body backward bend.
It is important to keep your head upright in this posture and in an arc with the rest of the vertebral column because the head has more density than any other part of the body and is situated at the end of the most flexible part of the vertebral column. Allowing it to drop backward brings your attention to the neck and shifts your center of gravity to the rear so that you have to bend more in the lumbar region to keep your balance. Just draw the arms backward and keep the head between them if you can; otherwise, keep the head in a natural line with the rest of the spine. This precaution will also help prevent lightheadedness and fainting in those with low blood pressure.
The effects of gravity in this bend depend on the individual. Those who are strong and flexible will arc their bodies back and be aware of how gravity is affecting them from head to toe, but those who have a hard time standing up straight will be working against gravity just trying to pull themselves upright from a bent-forward position. Even so, it will still be useful for them to make the effort because it will improve their flexibility and help them balance their weight more efficiently in day-to-day life.
A RELAXED STANDING BACKBEND
When you are thoroughly confident with whole-body backward bends, you are ready to deepen the bend by exploring the nuances of relaxation in a standing backward bend. There are many poses that illustrate this principle, but for starters place your hands overhead without lifting them fully, and then bend backward without tensing the muscles of the thighs (fig. 4.20). Notice that this posture is entirely different from the last one. Relaxing the upper extremities allows more bending because the rectus abdominis muscles are under less tension, and relaxing the lower extremities takes tension off the iliopsoas and quadriceps femoris muscles, which in turn takes tension off the pelvis and the knees. The main place where stress and tension are felt is the lower back. For this reason, it is apt to call this a backbend rather than a backward bend.
A relaxed standing backbend such as this, with slightly bent knees and an arched-back lumbar region, places you more in the grip of gravity than a whole-body backward bend. But this gravitational assist is unwelcome unless you have a healthy lumber region as well as strong abdominal muscles and hip flexors. Even advanced students may find they are not comfortable holding this posture for a long time. So keep a watch on the lower back, and do not bend beyond your capacity to recover gracefully.
THE ROLE OF BREATHING IN STANDING BACKWARD BENDS
One of the secrets of successful standing backward bends is to maintain an even breathing pattern, but this cannot be taken for granted among beginners. Those who are not comfortable will tend to hold their breath after an inhalation, and this will obviously limit the time they can hold the posture. Teachers can spot at least three breathing patterns that should be avoided. Some students will close the glottis entirely but come out of the posture with an “aaagh.” Others will keep the glottis partially closed but make a soft grunting sound when they exhale and come up. Yet others will resist exhaling but without closing the glottis. Teachers may not notice this last pattern unless they are watching for it because it doesn’t make noise. But in any case, students who hold their breath or breathe aberrantly in standing backward bends speak their discomfort and anxiety clearly, at least to those who have educated eyes and ears. If students cannot inhale and exhale smoothly in the posture, it is better for them to limit the bend—breathing constantly, keeping the lungs open to the atmosphere, and consciously depending for security on strong and healthy pelvic and respiratory diaphragms, abdominal muscles, and hip flexors.

Figure 4.20. Relaxed standing backbend. This posture is advisable only for intermediate and advanced students because of the stress placed selectively on the lumbar region.
A simple experiment will show two distinct ways that breathing can work in standing backbends. Ask a class of beginning students to come into the whole-body backward bend with their hands clasped overhead and lifted. Then ask them to breathe gently and notice that their hands move forward during inhalation and to the rear during exhalation. After they have come in touch with this, ask them to notice when they feel the most discomfort, or if not discomfort, wariness. Most of them will say it is at the end of exhalation, when their hands drop to the rear. It so happens that this is the moment in the breathing cycle that corresponds to the least tension in the abdominal muscles and in the respiratory and pelvic diaphragms, which furnish the most important support for the posture in everyone who is keeping the airway open. Because the spine is most vulnerable when tension is released in these supporting muscles, many teachers wisely suggest an alternative: that students consciously reverse their natural breathing patterns in relation to the bend. Instead of letting inhalation restrict the bend and exhalation accentuate it, they will suggest that students inhale their maximum inspiratory capacity during the deepest part of the bend and then purposely ease forward during exhalation.
There are three big issues in forward bending: gravity, the site where the body is bending, and breathing. Gravity plays only a minor role in whole-body standing backward bends, but it becomes somewhat more important in relaxed standing backbends, and it becomes an overwhelmingly important issue in forward bending. The reason for the latter is obvious: the upper part of the body is tipped far off axis. With this in mind, our first concern is whether to bend forward from the waist or from the hips, and our second concern is how to use breathing to purposely further our aims.
If you watch people bending forward in daily life, you will notice that they nearly always bend from the waist. This is the more natural movement. You would look very odd indeed if you kept your back straight and bent forward from the hips to pick up an object from a coffee table. It is also easier to bend from the waist because there is less upper body weight above the waistline than above the hip joints. In hatha yoga we use both options. Bending forward from the hips is nearly always considered more desirable, but it is also more difficult, not only because there is more weight to control but also because by definition it requires a reasonable measure of hip flexibility, and this can’t be taken for granted.
Our next concern is how to support the bend. Do we support it within the torso itself, which we’ll call internal support, or do we support it with the help of the upper extremities, which we’ll call external support. If you brace a forward bend externally with your hands on your thighs, it’s natural to relax the torso, but if you slowly bend forward while allowing your hands to hang freely, your torso has to support itself internally all the way down, and under those circumstances it will be anything but relaxed. Every standing backbend, forward bend, and side bend should be considered with respect to these matters. As in backward bending, breathing is an important related issue: the more a posture is supported internally, the more it will have to be assisted by adjustments in the way you breathe.
FORWARD BENDS FROM THE WAIST
We’ll begin with two simple and easy exercises in which you can experience the difference between externally and internally supported bends. Lean forward, bend your knees slightly, and, bending forward from the waist, slide your hands down the front of the thighs, gripping all the way. Settle your hands in place just above the knees, lower your head forward, and observe your posture. Your back is slightly rounded and relaxed, which is possible because you are supporting the torso with the upper extremities rather than with the back muscles (fig. 4.21). Your breathing is also relaxed because your respiratory diaphragm, pelvic diaphragm, and abdominal muscles are not having to contribute much to the posture.
Next, carry this process one step further. Drop your hands just below the knees and grip your legs firmly. Now we’ll start to see big differences among students. If you are strong and flexible you will still be relaxed, but if you are stiffer you will start to feel some pulling in your erector spinae muscles. If that pulling is uncomfortable you will not be eager to go further down. So try to find a position that is just right, one that creates a little stretch but that minimizes discomfort. Next, sense the level of relaxation in your back, in your abdomen, and in your breathing, and then slowly release your hands without dropping further forward. The moment you start to release your hands, observe carefully and you will notice that you have automatically tightened up your lower back, your abdomen, and your respiratory and pelvic diaphragms (fig. 4.22). The difference between bracing the posture with your hands and releasing your hands without dropping down is the difference between an externally and an internally supported forward bend. If you are explaining and at the same time demonstrating this exercise to a class with the hands settled in place just above or just below the knees, your voice will be at ease before you release your hands, but the second you release them and yet hold the posture, your breathing and voice will become noticeably more labored.
Now that you can feel the differences between the two kinds of bends, stand in a relaxed position and roll forward slowly from the head, neck, upper back, lower back, and last of all from the hips. The hands can simply dangle. As you gradually pitch your upper body forward, you will sense tension gathering in your back and abdomen as well as in the respiratory and pelvic diaphragms. Work with this tension rather than struggling to resist it. Notice that the deep back muscles lengthen eccentrically and control your descent, but that purposely tightening the abdominal muscles and the respiratory and pelvic diaphragms provides the all-important increased intra-abdominal pressure that makes the movement safe. Come back up in reverse order, that is, beginning with the hips, and without too much delay. Muscles throughout the torso are already in a state of stretch and tension from supporting the posture internally, and they will lift you up naturally. Be aware of concentric shortening of muscles in the back as you lift up, but at the same time focus on the abdominopelvic unit as a whole, which is bounded by the abdominal muscles, the respiratory diaphragm, and the pelvic diaphragm. Activating this region will protect the lower back by spreading the vertebrae apart hydraulically, as described in chapter 3. Being attentive to the abdominopelvic unit will give you the sense of controlling the posture rather than the posture controlling you.
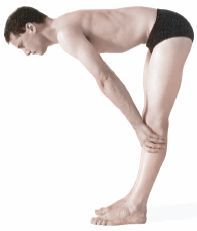
Figure 4.21. Externally supported forward bend. With the posture supported by the upper extremities, the back, abdomen, lower extremities, and respiratory and pelvic diaphragms can all remain relaxed.
It is better not to explore your limits at this stage. Just repeat the down and up movement several times without a lot of concern about stretching. Finally, roll down to wherever gravity carries you and explore the feelings—stiffness and discomfort if you are not accustomed to these stretches, a deep pull and comfortable tension if you are in good condition, or more complete relaxation if you are in excellent condition. Again, come up naturally.
FORWARD BENDS FROM THE HIPS
As you improve your hip flexibility, you will soon want to accomplish the more elegant forward bend from the hips. Let’s start with an internally supported bend for beginners. Stand in the mountain posture with your feet either together or 6–10 inches apart and parallel. Establish a strong base in the lower extremities, and be aware that the lumbar region of the back is convex anteriorly. You are going to try to keep that arch intact as you bend forward.
Now bend forward from the hips. Average beginners will be able to bend about 10–30°, but advanced students with excellent hip flexibility may be able to bend up to 90° or even more. As with forward bending from the waist, if you are not bracing the posture with your upper extremities, you will have to support it with your back muscles, abdominal muscles, and respiratory and pelvic diaphragms. Even more than before, pay attention to pressing in gently but purposely with the abdominal muscles. Be aware of when you reach your limit of hip flexibility, and bend from the waist from that point on. Let the arms hang or interlock the hands with the opposite forearms. Do not tug against the ankles or bounce your torso up and down.
Relax as much as you can and still maintain your posture. Even though you started with a strong foundation and kept it while you were bending from the hips, you had to relax to some extent when you started bending at the waist. Your kneecaps are no longer lifted, and the hamstrings are in a state of relative relaxation, although your nervous system is keeping them in a holding pattern of activity. Depending on your flexibility and conditioning, the deep back muscles may be fairly relaxed or they may be active, eccentrically lengthening as gravity slowly eases you down. If you are in excellent condition you will be relaxed as soon as you are settled; everyone else will still be resisting gravity with the back, hamstring muscles, and the triumvirate of abdominal muscles, pelvic diaphragm, and respiratory diaphragm.

Figure 4.22. Internally supported forward bend. With the upper extremities dangling, abdominal muscles, back muscles, and the respiratory and pelvic diaphragms must support the posture along with the muscles, bones, and joints of the lower extremities.
Stay in this posture, breathing evenly. The lumbar area is flexed forward as part of an arc of tension extending from the upper back to the heels. The tensions shift as you breathe. Since the crus of the diaphragm takes origin from the relatively stable lumbar vertebrae, and since the contents of the abdominal cavity are slightly compressed from the forward bend, each inhalation lifts the base of the thoracic cage, producing a slight lifting effect in the upper body and a slight increase in intra-abdominal pressure. Each exhalation then lowers you down slightly and relieves pressure from the diaphragm against the abdominal organs. Just feel that happening for about 30 seconds, and then gently roll up out of the posture while pressing in mildly with the abdominal muscles. Do not do any kind of intense maneuver such as lifting the head, then the upper back, and then straightening up from the hips; just roll up naturally.
This version of forward bending assumes that you are able to remain relatively relaxed in the posture. If you are struggling, all you’ll notice is marked intra-abdominal pressure, difficulty breathing, and a tense back, abdomen, and respiratory diaphragm. The posture is for healthy beginners, and is contraindicated for anyone with acute lower back pain. If you go into this posture with pain in the lower back, you are likely to come out with more.
After you are comfortable in the beginning internally supported forward bend from the hips, you are ready for the intermediate version. Start with the feet together. This time develop a firm base and keep it, with the feet solidly on the floor, the kneecaps lifted, and the hips strong. Hold tension in the thighs, not only in the quadriceps femori but in the hamstring muscles and adductors as well. Bend from the hips as before. Now, however, when you reach your limits of hip flexibility, keep a strong base as you continue to bend at the waist. Hold tension purposely in the hips, thighs, and abdominal muscles as you bend down. Let gravity pull you down, and notice that you are aware of more subtleties of the posture, especially around the pelvis, thighs, and knees, than in the previous version.
After 15–30 seconds, experiment with assisting gravity by pulling yourself down actively toward the end of exhalation using the hip flexors (iliopsoas muscles). The abdominal muscles will now operate above and beyond a general effort for pressing in; they will assist the hip flexors synergistically in drawing you forward. Hold this pose, breathing as evenly as possible (fig. 4.23). As in the earlier exercise, each inhalation will lift you up and each exhalation will lower you down. To come out of the posture ease yourself up a little bit at the hips and in the lower back, press in purposefully with the lower abdominal muscles, and then come up in reverse order, first lifting the head, then the upper back to create a good lumbar arch, and finally extending the trunk back up from the hips. It is important to keep tension on the hamstring muscles as you come up to prepare for the extra tension on them when you raise the upper part of the back.
This is an impressive posture. It places so much tension on the muscles of the abdomen, pelvis, and thighs that you will hardly notice the accompanying increase in intra-abdominal pressure and increased tension in the deep back muscles. Nevertheless, it’s all there—an experience of entering and exiting a forward bend from the hips that envelops you from head to toe.
More advanced students can take this posture one step further. Go into the forward bend exactly as in the intermediate posture, bending first from the hips and coming down with gravity, but then grasping the ankles or feet and assisting gravity with a combination of the abdominal muscles, hip flexors, and upper extremities (fig. 4.24). Once settled, this posture affects your breathing differently from the beginning and intermediate variations because now you are holding the trunk in place with the hands during inhalation. You’ll sense little or no movement, only an increase in tension during exhalation and a decrease in tension during inhalation. Finally, if you wish to come out of this posture with an arched back, you should ease off the stretch slightly before lifting the head and upper back, exactly as in the intermediate version.
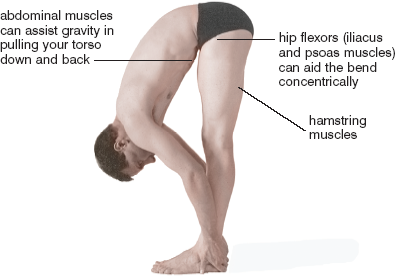
Figure 4.23. Intermediate forward bend. Unless you are holding on firmly, each inhalation lifts you up and each exhalation drops you down. Be sure to keep tension in the thighs, especially in the hamstrings. Never stand in a position like this with thighs relaxed and knees completely locked.
Standing forward bends separate everyone roughly into two groups. Those with good hip flexibility have a gratifying experience: if their hips are flexible enough to press the chest against the thighs with the knees straight, the torso is inverted and the back is only mildly bent. The posture is rewarding and relaxing for this group of students because the full inversion of the torso, which is now hanging passively from the hips, allows the spine to stretch, much as it would if you were hanging upside down. In most people, however, short hamstring muscles and poor hip and back flexibility prevent this, and the torso arcs out from the lower extremities in a big semicircle. Teachers who have always been flexible enough to bend fully at their hips often find their students’ situation incomprehensible.
MEDIAL AND LATERAL ROTATORS OF THE HIP
Up to this point we have dwelt only on the fundamentals of bending from the waist and from the hips. We’ll now turn to the more subtle aspects of how shifts in foot position affect forward bending. We saw earlier that rotating the feet out (toes out, heels in) rotates the thighs laterally, and that rotating the feet in (toes in, heels out) rotates the thighs medially. What is more, rotating the thighs laterally stretches their medial rotators, and rotating the thighs medially stretches their lateral rotators. And these shifts are all important to us in forward bending. We’ll soon see that both the medial and lateral rotators of the hips resist deep forward bending, at least in those who are not very flexible, so anything that stretches them even mildly at the start will limit performance of these postures.
The medial rotators of the hip joint are the gluteus medius and gluteus minimus, which lie beneath the gluteus maximus, take origin from the back of the ilium, and insert on the greater trochanter (figs. 3.8b, 3.10b, 8.9–10, 8.12, and 8.14) of the femur, which is located laterally, posteriorly, and inferiorly to the bulk of the muscle. This architectural arrangement enables these muscles to both rotate the thigh medially and lift it out to the side for abduction. Three experiments will clarify their roles. First, stand with your heels together (for adduction of the thighs), toes out (for lateral rotation of the thighs), and knees straight (so that our experience with the medial rotators will be superimposed on stretched hamstrings). Now bend forward and notice how far you can come down and where you feel the tension. It’s mostly in the hips, whose medial rotators will be rock-solid and resisting the bend from start to finish. Second, bring your feet parallel to one another, and you will immediately come further forward. Third, swing your heels out and toes in, and down you will go even more. What has happened is simple: when you rotated your thighs medially, you took tension off the gluteus medius and gluteus minimus, which were being stretched in the beginning by adduction and lateral rotation, and this permitted you to come further forward.
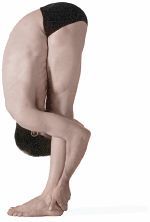
Figure 4.24. Advanced forward bend. With the chest pressed tightly against the thighs, inhalation cannot lift you up significantly; it merely increases tension in the torso.
The main antagonists to the gluteus medius and minimus muscles are two of the lateral rotators of the thigh: the adductor longus and adductor magnus (see figs. 3.8–9 and 8.13–14 for general treatment of adductors). These muscles take origin from the inferior pubic rami and insert posteriorly enough on the back of the femur to rotate the thigh laterally as well as pull it in for adduction. To test their actions, we need to start with them in a stretched position, so stand with your feet about 3–4 feet apart for abduction of the thighs, and with your toes in and heels out for medial rotation. Then bend forward and pinpoint the site where you feel the most tension, which will be in your inner thighs. Next, swing your toes out enough to make your feet parallel, and notice that you can come further forward. Finally, swing your toes even further out to create lateral rotation of the thighs, and this will lower you down even more. Again, what has happened is straightforward—the exact counterpart to the experiments with the gluteus medius and gluteus minimus: when you take tension off the adductor longus and adductor magnus muscles by rotating the thighs laterally, it permits you to come more deeply into the forward bend.
THE ANGLE POSTURE
An excellent elementary posture, the angle pose, is a forward bend from one hip that further illustrates how foot position can affect forward bending. With the feet a comfortable distance apart, rotate the right foot 90° to the right and the left foot slightly to the right (about 30°). Keep them both firmly planted. Swivel the hips around so you are facing directly over the right foot. Grasping the right wrist behind your back with the left hand to help pull the torso around, bend backward slightly, and then bend forward first from the hips (fig. 4.25) and then at the waist (fig. 4.26). Keep the forearms flattened against the back for this variation. As you come into the posture you will be bending primarily at the right hip joint, so this is where it is most natural to place your concentration. Unless you are unusually flexible, you will notice that there will be a slight twist in the spine. Come up and bend back again moderately before swiveling around and repeating on the other side. Because you do the posture in both directions it is excellent for working with right-to-left imbalances, first and again last on the less flexible side. If your forearms are flattened against the back, this pose will be especially easy and you will be able to relax more into it. The alternative posture (figs. 6.26a–b) of lifting the arms away from the back is more demanding and will create a more intense experience.

Figure 4.25. Angle posture, intermediate stage. Forearms here are shown flat against the back. Hips are swiveled to face the right foot.

Figure 4.26. Angle posture completed, with lumbar flexion added to flexion of the right hip joint.
Again returning to the importance of foot position, the angle posture is easiest if your rear foot faces straight out to the side, but when you rotate it somewhat medially, as suggested, or even more (up to 60°), it places increasing stretch on the lateral rotators of the thigh (the adductor longus and adductor magnus), and this starts to limit your forward bend. This is surprising: we might at first think that only the thigh which you are facing would limit a forward bend, since that’s what’s getting the hamstring stretch, but experimenting with different angles for the rear foot will make it plain that the rear lateral rotators can easily become the limiting elements to the bend.
The rear foot brings attention to the roles of the lateral rotators, but the front foot, the one you are facing, brings awareness to the medial rotators of the thigh (the gluteus medius and minimus) in addition to the obvious stretch in the hamstrings. The medial rotators are in a neutral position and are only moderately stretched any time the foot is pointed straight ahead, as is usual for this posture, and they will be relieved even of that tension if the foot is rotated medially 10–15°. For something really different, try rotating the front foot laterally, and you’ll quickly sense the role of these muscles as medial rotators, because they instantly tighten up and limit the bend. These experiments reveal that analyzing the angle posture only with respect to the hamstrings of the front thigh is fine for an introduction to the posture, but just the beginning for anyone who is interested in serious study.
In day-to-day life you bend forward to pick up objects, bend back moderately to stretch, and twist to look and reach. But except for cocking your head sideways, you do not often bend your spine to the side. We call this movement lateral flexion. It is unnatural in daily life and uncommon in hatha yoga, at least in comparison with other bends, but is usually just slipped in here and there during the course of more complex postures. Here we’ll look at it in its pure form so we can recognize it within more intricate poses.
[Technical note: The idea of a “pure” side bend is an oxymoron. There is no such thing because the vertebral column, in adapting to lateral flexion, actually rotates slightly both above and below the main region of the bend rather than generating a strictly lateral movement. The same thing can be seen in a mechanical model in which metal cylinders represent vertebral bodies, and interposed short cork cylinders represent intervertebral disks. In accommodating to a bend, the combination of metal and cork cylinders (which together model the anterior functional unit of the spine) reveals mirror image rotations on either side of the middle section of the bend.]
THE STANDING SIDE BEND WITH FEET TOGETHER
For a whole-body side bend, stand with your feet together, including both the heels and big toes. Lift your hands overhead as in the whole-body backward bend, with the fingers interlocked and the palms tightly together. Lock the forearms and then pull the arms backward until they are even with the ears.
Create a firm base with the lower extremities by tensing all the thigh muscles and squeezing the hips together as tightly as you can. Then lift and stretch the upper extremities, and at the same time bend to the side in a minimal arc (fig. 4.27). You should lift so strongly with both arms and hands that when you bend to the right, the right arm does not feel weak in comparison with the left, and when you bend to the left, the left arm does not feel weak in comparison with the right. You will feel a whole-body bend from your ankles to your fingertips, with stretch throughout the side opposite to which you are bending. Don’t relax anywhere; if you ease up on your effort even slightly, the emphasis changes from a whole-body bend to a side bend that is felt mostly in the lower thoracic region of the vertebral column. Notice as well that the posture changes character if you place your feet even a few inches apart.

Figure 4.27. Whole-body side bend, with priorities set by concentrating on lifting the hands as high as possible as in the overhead stretch (fig. 4.17) and maintaining equal strength in the two upper extremities. Assuming that both feet are planted firmly and that the lower extremities are the same length, no bending can occur at the hips. It’s all in the spine.
STANDING SIDE BENDS WITH FEET APART
Now we’ll turn to side bends that are comparable to externally and internally supported forward bends. The movements for side bending are more limited than for forward bending, but some of the principles are similar. To illustrate: with your feet a comfortable distance apart (about two feet) and parallel, bend straight to your right while grasping your right thigh. Keep the body true to a frontal plane: bending straight to the side implies that you are keeping the hips facing the front. By contrast, if you let the right hip drop to the rear as you bend, you will shift from a relatively pure side bend to a combination of a side bend, twist, and forward bend. Watching carefully, notice that part of the bend is taking place at the hip joint on the side to which you are bending, and that the rest is taking place in the spine. As with externally supported forward bends, settle your right hand in a position on the thigh that allows you to remain relaxed (fig. 4.28). You’ll not reach past your knee unless you are especially flexible. Then do the same experiments as for the forward bend—sequentially releasing and re-establishing your grip several times, noticing the effects on your abdominopelvic region in each case, and finally releasing your grip and coming up. Repeat on the other side.
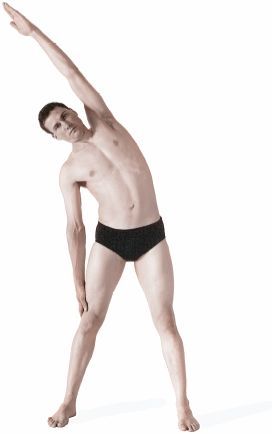
Figure 4.28. Side bend supported by the right upper extremity. As with externally supported forward bends, this is a comparatively relaxed posture. With each thigh abducted about 15°, only that much bending (by definition) is occurring at the hip; the rest is taking place in the spine.
Next, again starting from an upright position, make blades with your hands, palms facing the front, and bend to your right while keeping your right little finger near but not touching your right thigh. Now you will be supporting yourself internally all the way down, and because of that you will not need to make special preparations for coming up—your internal support system remains primed from start to finish. Come up and repeat on the other side.
Side bending is more complex than forward bending. For one thing side bending is asymmetric by definition, so to keep in balance you have to bend first to one side and then to the other. For another, forward bending involves flexion of both the spine and the hips, but side bending involves lateral flexion of the spine and abduction of the hip on the side toward which you are bending. Think this through: In a whole-body side bend with the feet together (in other words, with the thighs adducted), the pelvis can only remain perfectly in line with the thighs (fig. 4.27)—there is no such thing as a side bend at the hip except in proportion to how much the thighs are abducted (fig. 4.28). Even in the case of an extreme 70° side bend in someone who is quite flexible (fig. 4.29), no appreciable bending takes place at the hips when the feet are kept together.
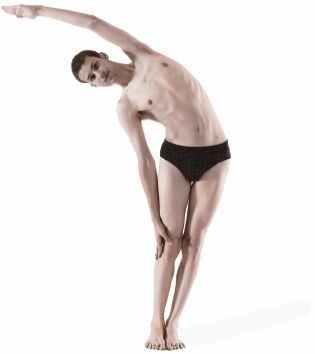
Figure 4.29. Advanced side bend, minimally supported by the right upper extremity, and a fairly relaxed posture for anyone this flexible. Nearly all of the side bend is in the spine.
To come in touch with the “side bending” movement permitted at the hip joint, locate the greater trochanters (figs. 3.5–7 and 8.13–14) with your fingers and press your thumbs in the grooves just above them on each side. Then, keeping your spine straight and standing on one foot, swing your opposite foot to the side, noticing that the groove just above the greater trochanter is the site where the bend hinges. Abduction of the thigh at this joint varies from as little as 20° to as much as 90° in a full side-to-side splits position.
SIDE BEND WITH ONE KNEE ON THE FLOOR
Here is an alternative side bend that curves the entire spine to its maximum in lateral flexion (about 20° each in the lumbar and thoracic regions, and 35–45° in the cervical region), and that also produces maximum abduction at the hip joint. Although this is not strictly a standing posture, it allows you to bend further than can be accomplished standing up. Assume a kneeling position. Keeping the left knee on the floor, stretch the right foot out to the side and slide the right hand down the right thigh and leg. At the same time stretch the left arm up and over the head, with the palm down, and bend to the right (fig. 4.30). Keep your right foot flat on the floor in the most comfortable position (probably rotated out about 45°), but don’t permit the hips to rotate out of the frontal plane. Come back up and repeat on the opposite side.
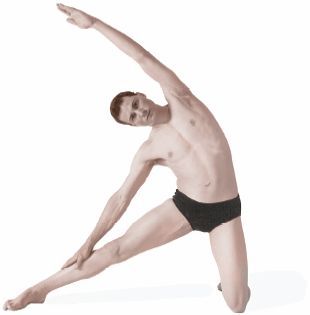
Figure 4.30. Kneeling side bend. Keep the hips in line with a frontal plane through the body, but allow the right foot to rotate to the most comfortable position.
The overall sense of this posture is one of relaxation, in contrast to the standing side bend with the feet together or to externally and internally supported standing options. For this pose you maintain only enough tension to keep the body grounded in its frontal plane. In most students the posture is restricted in the lumbar region, mainly by the rib cage (in this case, the eleventh rib) butting up against the ilium. You can feel this for yourself if you insert your fingers between the rib cage and the ilium as you bend. Laterally, you can feel the tip of the eleventh rib, and just in front of that you can feel the inferior edge of the tenth rib, but the twelfth rib ends posteriorly beneath the erector spinae muscle, and you will probably not be able to locate this one unless you are slender and lightly muscled.
WHAT MAKES POSTURES DIFFICULT?
The standing postures we have discussed so far illustrate the principles that underlie standing stretches, bends, and twists, but they are not generally demanding. As we have seen so far in this chapter, the simplest and safest thing anyone can do standing is to stretch without either twisting or bending, and this is why we started with the mountain posture, the side-to-side stretch, and the overhead stretch. Then came stretching and twisting at the same time, but still without bending.
Next in difficulty are the three bending postures (backward bending, forward bending, and side bending) in which we have to be concerned with two more complications: how and to what extent we counteract gravity, and how bending affects our breathing. First we discussed backward bending, the most elementary of the three, in which the hip joints don’t permit you to go back very far, in which gravity is not a major issue, and in which breathing helps you regulate your capacity for stretch. Next came forward bending, in which hip flexibility and the pull of gravity become all-important, and in which perhaps half the middle-aged students in a beginning class start asking themselves serious questions about the safety of their backs. Last came side bending, the least common movement in ordinary life and one in which the anatomical restrictions that protect you are not as well-honed and dependable as those for forward bending and backward bending.
We have focused on simple movements so far to illustrate fundamentals, but more demanding standing postures are also widely practiced. Apart from generally requiring more strength, aerobic capacity, and flexibility than the poses so far discussed, what specifically makes them challenging is that they usually involve complications—combining twisting with bending, doing twists and bends when some particular joint is in an unnatural position of stress, coming into a difficult internally supported stretch in which strength becomes a primary issue, and going from the final position of one difficult posture directly into another difficult posture. The triangle postures that follow illustrate all of these principles.
Imagine two sticks, their bottom ends planted into the ground about three feet apart and their upper ends inserted loosely into sockets on either side of a ball, sockets which will allow the ball to rotate and swivel from side to side. Then imagine a flexible rod fixed to the top of the ball that can twist and bend to the front, back, or side in all possible combinations. Last, imagine a bamboo pole that runs perpendicularly across the back of the rod near its upper end, forming a cross. The sticks are the lower extremities, and the ball with which they articulate is the pelvis. The sockets that permit swiveling on either side of the ball are the sockets of the hip joints. The flexible rod is the spine, with the head on top and the pelvis on the bottom, and the pole is a combination of the two upper extremities that will remain lifted straight out to each side in one line in the triangle postures. In the advanced classic triangle, the rod-and-ball combination is bent straight to the side so that one end of the bamboo pole touches the bottom end of the stick on the same side. In the revolving triangle, the rod-and-ball combination is bent forward and then twisted 180°, so that the end of the pole touches the bottom end of the opposite stick.
THE PRELIMINARY STANCE
In all of the triangle postures you will abduct the thighs, rotate the feet asymmetrically, and then complete the specific pose. And because the triangle postures place unusual asymmetric tensions on the hip joints and on the muscles of the thighs, we’ll look first at how we create internal resistance to simple standing twists with the thighs abducted. Start with the feet parallel and about two feet apart. As usual, tighten the thigh muscles all around. Then twist. This should be easy; nearly everyone can create a comfortable resistance to the twist if the feet are this close together. Now increase the distance to three feet, and a few people will start to get mildly uncomfortable in their hips and lower back. Finally, if we increase the distance to four feet, even good athletes may not find it reasonable to remain twisted for more than half a minute or so. The idea is to settle on your own personal stance, one that will allow you to keep the lower extremities comfortable and yet firm while twisting right and then left for a half minute each.
Next, with a stance established that allows you to keep the thigh muscles firm, turn the right foot fully to the right and the left foot about 30° to the right, that is, lacking 60° of being in line with the right foot. Assume this position, however, without swiveling the pelvis and permitting the right hip to move markedly to the rear. The right thigh will be rotated laterally and the left thigh will be rotated medially. The medial rotators (the gluteal medius and minimus) of the right hip will now be in a state of stretch and resisting lateral rotation. If you are not convinced of this, allow the right hip to rotate back medially by swinging your right toes in, and you will notice that this instantly relieves tension in the right gluteus medius and minimus. On the left side, the lateral rotators—the adductor longus and adductor magnus—will be in a state of stretch and poised for resisting more medial rotation. And if you are not convinced of that, just allow the left hip to rotate back laterally to a more neutral position and you will notice that this immediately relieves tension in the left inner thigh. Instructors, of course, never describe the preliminary stance in this much detail. They usually just say “try to keep your hips in line with your chest and facing the front.”
Notice that you can’t hold the preliminary stance properly unless the left gluteal muscles remain tensed. If you are flexible this tension will not be too noticeable, but if you are stiff and relatively inflexible, you will need to contract the gluteals strongly or the posture deteriorates. You should also firm up the quadriceps femoris muscles, first on the right and then on the left, which lifts the kneecaps. Then tighten the hamstring muscles, again first on the right and then on the left, to make sure that the knee joints do not come into an undesirable state of hyperextension. Don’t tighten the hamstring muscles enough to flex the knees, but take the effort up to that point. The only thing remaining is to check the placement of the toes, making sure you feel all of them solidly against the floor.
Finally, maintaining your stance, raise the arms and forearms until they and the shoulders are in a single line from right fingertips to left fingertips. The shoulders, arms, chest, and hips should all be facing the front. Don’t bend; just stretch the fingertips laterally. Repeat everything on the other side. This is the basic preliminary stance. We’ll now examine several different ways to complete the postures.
THE INTERNALLY SUPPORTED TRIANGLE FOR BEGINNERS
Stand with the feet parallel and 2–3 feet apart. Turn the right foot to the right 90°, and for this particular variation of the triangle keep the left foot facing straight to the front. Establish a solid base. Stretch the hands out to the sides and hold them at shoulder height with the palms facing forward. Bring the fingers together to make blades of the hands. To prepare for flexion of the trunk to the right, stretch out, reaching toward the right side and at the same time creating a feeling of lift in the torso. This will automatically create a priority for emphasizing the existing bend at the right hip in preference to the spine, and that is what we want.
Slowly flex the trunk to the right, being careful not to allow the right hip to swing to the rear any more than you have to. Letting that happen will enable you to bend more, but only at the expense of changing the side bend to a mixed side-and-forward bend. This is hard to avoid: just realize that any additional bending that you experience, at least over and above the initial sidebend that is defined by abduction of the right thigh, is in reality a forward bend. To complete this stage of the posture, bring the right hand toward the right thigh, knee, leg, ankle, or foot—whatever you can reach easily—keeping the palm facing forward and not making contact with the little finger (fig. 4.31). Move slowly; this will be an internally supported posture all the way down and up. Point the left hand straight up and twist your head to look up at it, but go only as far into the posture as is reasonable. The idea is to construct a personal posture that explores your comfortable limits while you are breathing evenly without pauses or jerks. If you are straining or feel you need to hold your breath, you have gone too far. Slowly come up and repeat on the other side.
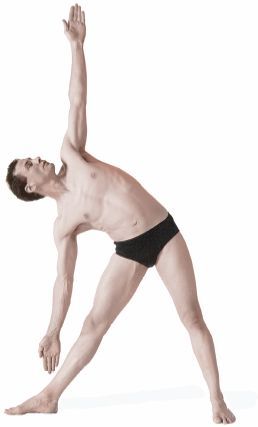
Figure 4.31. Internally supported triangle for beginners. Don’t drop down so far in this posture that it is no longer primarily a side bend. The pelvis should remain in line with a frontal plane through the body.
There are many things to notice about this posture. As in the preliminary stance, to keep from swiveling the hips while flexing to the right, beginning students have to keep the right quadriceps femoris muscle and the left gluteal muscles strongly engaged. Test this by allowing the hips to rotate slightly into more neutral positions, and then tighten these muscles, especially the left gluteals, to make the correction.
You initiate the move to the right with muscular activity on the right side of the body, and this stretches the skin, fascia, and muscles on the left. Then, as gravity carries you further to the right, the left side of the body resists that force and keeps you from tipping to the right too suddenly. To feel this, it is important to come into the posture supported internally by the abdominal muscles and the pelvic and respiratory diaphragms, and without resting your right hand on the right lower extremity. (If you do that, the left side of the torso will no longer need to restrain the movement to the right, and you will be doing the next posture—the externally supported triangle for beginners.)
The muscles and fasciae that are stretched on the side opposite the bend define your progress and stability in the internally supported triangle. If you are bending to the right, the left abdominal muscles, deep back muscles, and latissimus dorsi all lengthen eccentrically, keeping the beginner from lowering too fast into an unfamiliar position. With more experience these muscles yield to gravity, and the emphasis is now felt in the stretch of their connective tissues. The left adductor longus and magnus muscles are not stretched in this posture because the left foot is pointing straight to the front and the left thigh is not rotated medially. This is easily proven. If you come up momentarily and rotate the toes of the left foot in, and then return to the posture, you’ll feel a substantial increase in tension in those muscles.
In the internally supported triangle the diaphragm tends to lift the trunk during inhalation and lower it down during exhalation, and hence you can drop further into the posture at the end of each exhalation. Then, during each ensuing inhalation you will feel additional tension from gravity, which will be resisting the diaphragm’s tendency to lift you up. These effects will not be obvious unless you refrain from inhaling for a moment or two at the end of exhalation.
One of the lessons this posture teaches is the same one we explored with internally supported forward bending and side bending: you do not have to make any preparations to come out of it. Facing the palms forward and not touching the lower extremity forces you to evaluate your capacity constantly as you are flexing to the side. And since you are supporting yourself internally the whole time, you can come out of the posture without readjusting muscular tension, intra-abdominal pressure, or breathing.
Beginners will probably be consciously resisting their flexion reflexes on the side of the body that is being stretched, but experts move smoothly and unerringly into the finished posture with their flexion reflexes remaining well in the background. The muscles being stretched resist gravity without stress or strain, the connective tissues of the body limit the posture to a safe, predictable, and comfortable stance, and the action of the diaphragm works on those tissues when they are in a state of balance and equilibrium.
THE EXTERNALLY SUPPORTED TRIANGLE FOR BEGINNERS
To do an externally supported beginner’s triangle, keep the same stance, with the right foot still 90° to the right and the left foot straight forward. Stretch the arms and forearms out, face the palms down, and lower the right hand to the right thigh. Grip it firmly. Then bend, sliding the right hand down the thigh and leg, but gripping and re-gripping all the way. Raise the left hand and look up at it. It is easy to come into this posture because you are supporting the weight of the torso with the right upper extremity, and the natural reaction of the torso under these circumstances is to remain relaxed (fig. 4.32). As a result you are more confident in the posture and can move more deeply into it, increasing the commitment to side bending at the right hip joint. It should be mentioned that many modern schools of yoga recommend resting the lowermost hand on one or more blocks of wood, which accomplishes the same end.

Figure 4.32. Externally supported triangle for beginners. The right hip will usually have to move slightly to the rear, but adjust the hand position high enough on the leg to keep the hips facing the front as much as possible.
One important lesson of this posture, like that of externally supported forward and side bends, is learned coming out of it. Because you are supporting the posture all the way down with the arm, forearm, and hand, when you decide to come out of it you may be in trouble, like the cat that is able to climb a tree but unable to come back down. To come up you’ll have to release your hand, and when you do that you will have to support the weight of the upper half of your body using only the internal muscles of the torso, which may not be prepared for the effort. The solution is twofold: first, don’t go down very far until experience tells you that you can come back up gracefully; second, before you even attempt to come up, prepare yourself by tightening the muscles of the legs, thighs, and hips. This effort will naturally recruit more muscles in the pelvis and torso, and you will soon feel enough confidence to release your hand and come out of the posture.
THE CLASSIC TRIANGLE
As defined here, the classic, or standard, triangle is more of a balancing posture than the previous two because the left foot is turned 30° to the right (as in the preliminary stance) rather than pointing straight ahead. Stretch the arms out at shoulder height and face the palms down instead of to the front. Keep a sense of firmness in the lower extremities and a sense of stretch in the upper. Reach to the right and then bend, keeping a lifting sensation in the upper half of the body. As you go into the posture, twist your head around so that you are looking up at the outstretched thumb, and contact the floor (fig. 4.33), foot, or ankle with the right hand.
Keep a strong stance. Be aware that the gluteus medius and minimus remain under tension on the right side because the lateral rotation of the right thigh stretches the gluteals on that side. Tension should also be held willfully in the left inner thigh, the quadriceps femori on both sides, and the hamstrings, especially on the right side. The focus of the posture should be on the thighs, the hip joints, and the vertebral column. Just to experience what not to do in this regard, relax as much as you can without falling down and notice that this alters the dynamic of the posture completely—the hips will tend to swivel, the knee to which your bend is directed may become hyperextended and stressed, and the focus shifts away from the foundation of the body.
As you bend, keep the arms and forearms stretched out to form a single line, with the forearm of the upraised limb supinated and the fingers and thumb together in the same plane. If you cannot go very far, that’s fine, but try to find some position in which you can be relatively comfortable for 5–10 seconds. Remember, in the beginning you are not going to try to accomplish any semblance of a finished posture. Your primary objective is to learn to move into and out of the pose without hurting yourself and without being in a state of pain or anxiety. If you bend so far that you are not at peace, you have gone too far.
Come out of the posture as you came into it, but make sure your stance has not deteriorated before you do so. If the pose has become slovenly, the movement back to the upright position presents new hazards, and a different pattern of sensations and nerve impulses will emerge from the muscles and joints of the lower extremities. If you have allowed the arm to act as a strut to support the pose you have two choices: either relax and ease yourself back up as gently as possible, or prepare to come out of the posture more confidently by first firming up the muscles of your extremities and torso.
Intermediate students can work with the classic triangle with the feet wider apart, so that the lower extremities approach a 90° angle from one another. But if the feet are so wide apart that you cannot maintain good control of the muscles of the thighs, back off. The triangle is the worst posture in the world for getting compulsive about increasing abduction of the hip joints: with the left adductors stressed from medial rotation, increased abduction, and gravity, it’s too easy to pull a muscle in the groin.

Figure 4.33. Classic triangle. Bringing the right hand all the way to the floor will necessitate allowing the right hip to drop even further to the rear than in the case of the externally supported triangle for beginners, but at least try to keep in the spirit of a side bend rather than letting the hips swivel freely.
As you become stronger and more comfortable in the posture, you can intensify your efforts to bend, still being careful not to allow your base to deteriorate. By now you should have learned to use the postural muscles of the torso to control moving into the posture, using the hand as a guide, not as a stick for resting. An intermediate student may stay in the posture for 30—60 seconds before repeating on the other side.
In this posture the effects of breathing will be a little different from what we saw in the internally supported triangle for beginners. Since you will be maintaining your hand position, inhalation will no longer lift you up and exhalation will no longer drop you down. Nevertheless, as you bend toward your limit you will notice that each inhalation brings an increase in tension in the torso. Each exhalation then brings a release of tension, which gives you the option of slipping your hand down a little further. Gravity draws your head and chest downward and is sufficient to hold the upper half of the body in the lower position during the next inhalation. The tissues of the body gradually adjust to the increased tension and come into a new steady state. The complex unilateral dynamics of the classic triangle, as well as the manner in which this posture is affected by gravity and respiration, are what make it a more advanced posture than the internally supported triangle for beginners, in which there is no chance to get into a position from which you cannot gracefully rise.
After some practice it will be possible to come into the pose without compromising the dynamic aspects of maintaining it, and yet find 30–60 seconds of quiet and silence in the posture. An intermediate student should now take a little time to simply enjoy. You can come into a provisional stance, thinking mostly about maintaining your base. Then you can use breathing to ease your body more completely into the posture, observe it one-pointedly, and then slowly come up.
The manner in which you come out of the posture is important. If you have established the habit of maintaining your base even while you are in repose, you can just keep everything solid and come out of the posture as you came in. But if you have not maintained your base, coming out of the pose should be approached with care, especially if you have pulled yourself more fully into it with deep exhalations. If you have inadvertently relaxed the thigh and pelvic musculature, it may be hazardous to suddenly tighten everything up before rising because you will be stressing some of the deepest and least accessible muscles of the body when it is in an awkward position. So if you have relaxed those critical muscles, it will be better to simply rise out of the posture as gracefully as you can, or at the least, back off first into a position in which you are more comfortable, re-establish a firmer base, and then come out dynamically. Alternatively, if you are feeling too stressed, another possibility for exiting the posture safely is to bend the outstretched knee before coming up.
The feel of the advanced student’s triangle is yet more refined from that of the intermediate student’s triangle. It is the same posture, but you are now flexible and strong enough to go gently into it without much effort, placing your palm on the floor and looking directly up at the outstretched thumb. Because your thighs are more fully abducted, a greater proportion of the bend takes place in the hip joint. Now, as you breathe, your adjustments are almost all internal, and outside observers would not be mistaken if they thought that you looked comfortable. Each inhalation still brings a slight increase, and each exhalation a slight decrease in internal tension, but little of this results in changes in the position of the trunk or extremities.
THE REVOLVING TRIANGLE
The revolving triangle differs from the classic triangle in so many ways we could argue that it is completely unrelated. Ideally, the classic triangle is a modified side bend combined with hip abduction and torque-like stresses which act to minimize forward flexion and twisting. By contrast, the revolving triangle is an extremely complex posture which involves forward bending with the lower extremities in a partial splits position plus an additional twist of the trunk to the rear.
The first difference between the two triangles is in the placement of the feet. If you start with a bend to the right side (feet 2–3 feet apart for the beginner), the right foot is turned fully to the right (in this case laterally), and the left foot is turned to the right (in this case medially) about 60°, thus lacking only 30° of being parallel with the right foot. For beginners the 60° rotation of the left foot makes this posture even more wobbly than the classic triangle, in which the foot is rotated only 30°. And more than that, the extreme medial rotation of the left foot will increase tension in the adductors of the left thigh (recall: these are lateral rotators) even beyond that found in the classic triangle.
The next step is to twist to the right so that you are facing over your right thigh, much as you did for the angle posture. Everyone says “twist,” but for those with excellent mobility in their hips this is not so much of a twist as it is a swivel, one in which the pelvis rotates 90° (fig. 4.34), causing the thighs to move from a position of abduction to one in which the right thigh is flexed with respect to the torso and the left thigh is hyperextended. In this sense the revolving triangle is diametrically opposed to the classic triangle, in which you maintain the abducted hips more or less in line with the frontal plane of the trunk.
For the next stage of the revolving triangle, draw an imaginary line through the pelvis from side to side, that is, perpendicular to the body’s midsagittal plane, and slowly bend forward around that axis. Now we begin to see fundamental differences between beginning and advanced students. For advanced students it is easy to bend forward around that ideal axis (fig. 4.35), but those who are less flexible can come into the forward bend only by twisting their spines at the same time. Be watchful: either forward bending or twisting may be safe by themselves, but combining the two with your right thigh already flexed nearly to its maximum may not be within your reasonable capacity.
If you feel confident in continuing, you can move into the revolving triangle in one of two ways. In the first, bend forward from the hips with the arms stretched out to the sides. Proceed to your limit of forward bending, and as soon as that is reached, initiate a spinal twist so that you are facing the rear. Bring the left hand to the right leg or ankle, and swing the right hand upward in the same line with the left. Look up at the outstretched hand (fig. 4.36). The second and more common way of coming into the posture is to simply take the left hand to the right ankle in the most direct course possible, thus combining a forward bend with a spinal twist in one movement. This is more customary and natural, but the piecemeal method is more useful for precise exploration and analysis. After coming out of the posture in reverse order, repeat on the other side.
Flexible and not-so-flexible students will have completely different experiences working toward this final stage of the revolving triangle. Those who are especially flexible can twist enough so that their chest will be facing to the rear and their upper extremities will lie in one line, just like the bamboo pole in our introductory description of the triangles. But those who are stiff will not be able to go nearly that far. First, it will be impossible for them to bend forward all the way down to the right thigh; second, their spines will already be twisted maximally just to come moderately forward, so they will not have much chance of furthering the twist in order to face their chest to the rear; and third, because their chest is still more or less facing the floor, they will have no chance of bringing their upper extremities into one line when they reach the left hand to the right foot and extend the right hand up in the air.
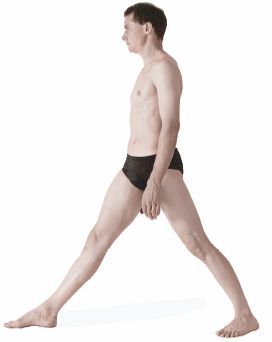
Figure 4.34. Revolving triangle, first position. This posture is identical to the beginning position for the angle posture except that the left foot is rotated about 60° to the right instead of 30°.
When we bend forward in the revolving triangle, almost every right-left member of paired muscles and ligaments on the two sides of the thigh and hip is stressed differently. As in any forward bend, the hamstrings are resisting stretch with a constant influx of nerve impulses, but much more so on the right side than the left. Likewise, the rectus femoris and iliopsoas muscles will be more active on the right than on the left, especially if you use them to pull yourself forward actively. The adductor longus and magnus will be placed under extreme tension on the left but not so much on the right.
The stretches for the calf muscles on the two sides are also reversed. With the left foot pulled around to a 60° angle and the left ankle flexed accordingly, the gastrocnemius and soleus muscles (the muscles that make up the bulk of the calf; figs. 3.10a–b, 7.6, 8.9–10, and 8.12) on the left side are stretched maximally, but on the right side, in which the ankle is extended, the calf muscles are not stretched in the least. Slight changes in the angle of the left foot alter the stretch on the calf muscles markedly; if the left foot is only at a 45° angle, the stretch on the left calf muscles is greatly moderated.
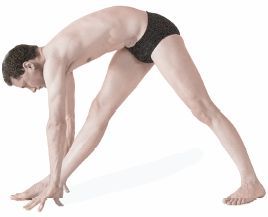
Figure 4.35. Revolving triangle, intermediate position. Again, this stage of the revolving triangle is similar to the angle pose except for reaching forward with the upper extremities.
As you bend forward, the ligaments of the hip joint are also affected differently on each side. As discussed in chapter 3, the ischiofemoral, iliofemoral, and pubofemoral ligaments form a taut spiral when the thigh is extended; when it is flexed, the spiral unwinds. So during the course of swiveling into the revolving triangle facing the right, which leaves the right thigh flexed and the left thigh extended, the spiral of these three ligaments is loosened on the right and tightened on the left. The resulting slack in the right hip joint is not cause for alarm—indeed, it would not be possible to come fully into the revolving triangle without the release of these ligaments—but it does caution us to watch the flexed hip joint carefully because that is the site where injuries are most likely to occur.
The all-important issue of hip flexibility is the main reason this posture is difficult. Beginning students who have gone to their limits in twisting just to get into a forward bend position over their front thigh can’t be expected to twist an additional 90° to swing their chest, shoulders, and arms into one line. This is not a posture for them to stay in for more than a few seconds. The pose is so complicated that just attempting to approximate it requires full concentration.
Intermediate students will be more comfortable. Their feet can and should be further apart. Experience will allow them to maintain strength in the hips and thighs, and the posture will feel energizing instead of frustrating. This will start to happen when it becomes possible to hold the upper extremities in line with the shoulders and with one another. As the lower hand reaches further down and the upper hand reaches further up, intermediate students are empowered to work harder and with more directed concentration—reaching, stretching, breathing evenly, and exploring the postural base. Finally, advanced students are able to find repose in this posture without struggle or stress.
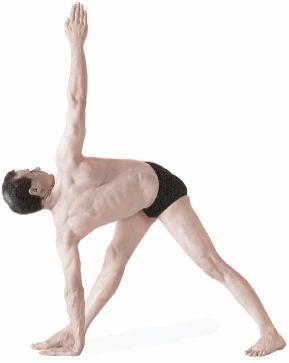
Figure 4.36. Revolving triangle. The additional twist of the torso needed to complete the final position makes this a challenging pose for everyone who is not strong and flexible.
POSTURAL SEQUENCES AND TRIANGLES
Coming into a single posture, supporting it internally, and returning the same way you went in is the safest way to explore standing postures, but many instructors teach sequences of triangles and related poses. These are fine for intermediate and advanced students who have had a lot of experience, but they present particular dangers to beginners. Going from one strenuous position directly to another will require you to revise your musculoskeletal priorities at the same time you are being challenged, sometimes maximally, and this may require too much simultaneous feeling, analysis, and decision-making for novices.
We’ll consider two examples, one easy and one hard. If you start in the classic triangle, you can confidently come into the forward bend position and work yourself into the revolving triangle. All you have to do is release the torque that is holding your hips facing the front, allow them to swivel around, and twist your torso to the rear, letting your arms follow naturally. It’s easy. Coming from the revolving back to the classic triangle is another matter. You can come out of the twisted position of the revolving triangle into a forward bend without difficulty, but pulling your hips back into a straight position from the swiveled position, and at the same time reversing your arm positions, will create extraordinary strains in the hips and spine—strains for which the beginner is ill-prepared. Beginning students should try this kind of exercise only by moving back and forth between partial positions. If you go only halfway into a revolving triangle, and then go back halfway into the regular triangle, you will gradually develop the skill and confidence to do more demanding sequences.
All standing postures are balancing postures—it’s just a matter of how much emphasis is placed on this property. But usually when we think of balancing postures in a standing position, we think of standing on one foot. Two such postures are the eagle and the tree.
THE EAGLE
In the eagle posture you stand on one foot as a sentinel, with one thigh, leg, and foot intertwined around the other. It’s easy for those who are strong, slender, and flexible, but most students find it difficult to wrap their extremities around one another even when they are not balancing on one foot. To give it a try, stand first on your left foot, bend your left knee and hip slightly, and if you are a man, place your genitals either forward or to the rear. Then swing your right thigh forward and pull it tightly around your left thigh. Last, wrap your right ankle tightly behind your left leg and interlock your right foot even further around to the medial side of your left leg. Sometimes this is referred to as “double-locking” the legs. To complete the beginner’s posture, swing your right elbow across to the near side of your left elbow, pull the forearms together, and interlock your wrists and hands (fig. 4.37). Fix your gaze, breathe evenly, and hold as long as is comfortable. Come out of the posture and repeat on the other side.
This is as much as most people will want to do. But to continue into a more advanced posture, bend your left knee and hip joints as much as possible consistent with keeping your back straight and upright (fig. 4.38). You miss the point of the posture if you bend your back and head forward. This version of the eagle should be approached with caution. If you hold it for more than a few seconds, it may create cardiovascular effects that can cause you to faint when you come out of the posture, especially if you do it after other strenuous postures or exercises. Develop your capacity to lower your weight and increase your time in the posture over a long period of time.
Figure 4.37. Eagle posture. Interlocking the upper and lower extremities are the main challenges of this balancing pose.
If you consistently have trouble with balancing in the eagle, try the posture only at the end of leisurely hatha yoga sessions. Students who have difficulty at the start of a class may be able to do the posture easily at the end. And the eagle will also be more difficult if you have just had a strenuous musculoskeletal workout which has left you in a momentarily weakened condition.
THE TREE
After the complexity and contrived nature of the triangles and the eagle, we’ll end this chapter with the most popular of all balancing postures—the tree—which is simply standing quietly on one foot. This pose speaks volumes not only for your state of physical balance, but also for your emotional and mental balance. Standing quietly on one foot is not as easy as it sounds.

Figure 4.38. Advanced eagle. Until you are certain of yourself, be wary of cardiovascular responses as you come out of this posture, especially if you remain in it more than 15–30 seconds.
Begin by standing on both feet, breathing evenly. As soon as you are calm and centered, lift one foot and place it on the opposite extremity. You can use one of several foot positions. In the beginning it is best to place one foot on the opposite ankle, but after a little experience, lifting the foot to the inner thigh (fig. 4.39) or into the half-bound lotus position (fig. 4.40) is more stable. At first the hands can be in the prayer position in the center of the sternum (fig. 4.39), but as you develop confidence they can be raised overhead, with the palms together and the fingers pointing away from the body. You can keep your eyes open and focused on a spot on the floor about six feet in front of you, or you can focus on some point in the distance. The room should be well lighted—for a real challenge, go to the opposite extreme and close your eyes.
You have to keep the knee extended in the tree posture, and you automatically create a solid pelvic base and root lock. And since both the hip and knee are extended, only the ankle is in a state of uncertainty. After you are able to stand quietly and confidently, you can start to examine how the muscles of your supporting toes, foot, and ankle balance the posture. You’ll notice that as your weight shifts you compensate with muscular effort to avoid losing your balance; with experience the shifts in position become less obvious.
Figure 4.39. Tree posture. A plumb line of gravity in this balancing posture has an axial center in a slightly tilted off-sagittal plane that runs through the navel.
Yogis tell us that the tree posture is both grounding and centering, and that it will generate a sense of deep calm and endless patience. The lower extremity is like the trunk of a tree; the arms overhead are like its branches; and if you stand in the posture for ten minutes or so daily, you will feel as if your toes are rooted in the earth.
A few hundred years ago, when everyone in agrarian societies walked and worked for hours at a time on their farms, there was little need to begin or end a day with standing yoga postures. But today most of us have sedentary jobs and are sorely in need of more exercise than we can get sitting at a desk. Standing postures, coupled with a moderate amount of aerobic exercise such as walking, running, or swimming, can fill the gap.
Figure 4.40. Tree posture, in a half-bound lotus. A plumb line of gravity comes closer to being in the mid-sagittal plane of the body than in the case of the previous posture because the right knee is not thrust out so far to the side.
Standing postures develop overall strength and flexibility, mildly stimulate the cardiovascular and respiratory systems, and accustom the nervous system to a range of body positions that are otherwise ignored. They flood the nervous system with information from all over the body, and they integrate the energy of the body from top to bottom and from inside out. They integrate the limbs with the torso, and they bring awareness to the respiratory and pelvic diaphragms as well as to the deep muscles of the abdomen, pelvis, and back. You can satisfy yourself of their special value by practicing them in the early morning for a few weeks, and then skipping them for a week, substituting sitting postures, lying-down postures, and inverted postures. When you reinstate them into your routine you’ll know what you were missing.
“Our distant ancestors departed from this time-honored mode of locomotion (quadrupedal) and converted themselves into walking towers, with a high centre of gravity and a narrow base . . . . Nature should still be displaying the sign: ‘Reconstruction in Progress, The Management regrets any inconvenience that may be caused.’”
— Elaine Morgan, in The Scars of Evolution, pp. 26–27.