“Disease, Debility, Doubt, Inadvertence, Sloth, Sensuality, Wrong Understanding, Non-attainment of the plane and Instability, these mental distractions are the impediments— Pain, dejection, unsteadiness of limbs, inspiration and expiration are the companions of the distractions— For their Prevention, the practice of one truth— The transparency of the mind comes from the development of friendship, compassion, joy, and neutrality regarding the spheres of pleasure, pain, virtue, and vice respectively—”
— Bengali Baba, in The Yogasutra of Patanjali, pp. 15–17.
The next three chapters bring us to the heart of hatha yoga—to postures that involve backbending, forward bending, and twisting. Of these three, backbending is the logical place to begin our discussion because it is relatively simple. But the two categories of backward bending and forward bending postures form a pair: the muscles that resist the bend in one category are the same muscles that pull us into the bend in the other category, and we need to see and understand them in reference to one another. To keep the comparisons in perspective this chapter will be about 90% backbending and 10% forward bending, and the next chapter will be about 90% forward bending and 10% backbending.
The plan here will be to first sum up the possibilities for forward and backward bending in the standing position, concentrating on limitations in the hip joints and lower back, and then to build on our discussion of the vertebral column by examining the spinal limitations to backbending in more detail. Next, we’ll look at the relationships between breathing and backbending, and finally we’ll turn to the myriad forms of backward bending in hatha yoga, beginning with the famous prone backbending postures—the cobra, locust, boat, and bow—and continuing with more specialized postures such as the fish, the wheel, and the camel. Two more backbending postures, the arch and the bridge, are traditionally part of the shoulder-stand series and will be deferred to chapter 9.
Some of the postures discussed in this chapter are only for those who are in excellent musculoskeletal health. A few guidelines are given in the course of the descriptions, but if in doubt about whether or not to proceed, take note of the specific contraindications at the end of the chapter.
THE ANATOMY OF FLEXION AND EXTENSION
To understand any function, envision being without it. For example, we can see at a glance how vertebral bending, both forward and backward, contributes to whole-body bending by examining how someone would bend if their spine were fused from the pelvis to the cranium. This is not an academic hypothesis. One who has had such surgery for severe osteoarthritis will bend forward only at the hip joints, just like a hinged stick—arms dangling, head, neck, and torso stuck out straight and stiff as a board. And yet this person may be comfortable and relaxed enough to practically take a nap. He may be able to bend forward up to 90° and hyperextend to the rear about 10°—entirely from the hips.
THE HIPS AND BACK IN COMBINATION
Hip flexibility in isolation is only of theoretical interest to us, at least for the moment, but the question of how hips and backs operate together for backward bending is eminently practical. Beginning with extremes, occasional circus performers—always women in images I’ve located—are able to extend their spines backward 180°, plastering their hips squarely against their upper backs. Images of 180° backbending can be seen in fig. 7.3 of Alter’s Science of Flexibility, as well as in a beautiful sequence of video frames 7–8 minutes into the tape of Cirque du Soleil’s Nouvelle Experience.
Maximum hip hyperextension appears to be about 45°, which is seen in occasional women who can drop down into the wheel posture and then scamper around on their hands and feet looking like daddy-long-leg spiders in a hurry. Both extremes—180° of back extension and 45° of hip hyperextension—are anomalous, and it is not advisable for anyone to attempt extending either the hips or the spine this much unless one’s profession requires it. Even highly flexible dancers, gymnasts, and hatha yogis rarely try to bend backward more than 90°, ordinarily combining 20° of extension at the hips with an additional 70° of extension in the lumbar region. In this case the right angle between their thighs and their chests is more than enough to permit them to touch their feet to their heads in advanced hatha yoga postures (fig. 5.12).

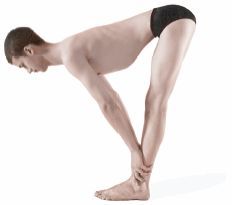
Figure 5.1. 120° flexion at the hips is a common maximum, and is enough for laying the chest down easily against the thighs when accompanied by moderate flexion of the spine.
Unlike the outermost limits for backbending, the outside limits for forward bending are all within a normal range for anyone with excellent general flexibility. Dancers, gymnasts, and hatha yogis, including both men and women, can often bend forward up to 120° at the hips with the lumbar lordosis arched and the knees straight (fig. 5.1). These same people may also be able to bend an additional 90° in the lumbar region, making a total of 210°. Since 180° is all that is required to lay the torso down against the thighs in a sitting forward bend (fig. 6.12), their full capacity for forward bending can’t be tested except by measuring hip and spinal flexibility separately.
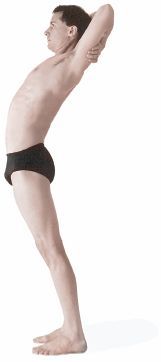
Figure 5.2. A relaxed standing backbend with straight knees includes about 20° of lumbar bending and 10° of hip hyperextension for a total of 30°of “backbending.”
Next, let’s consider the limits of backward and forward bending in someone more typical, say a thirty-year-old male beginning hatha yoga student who has always been athletic and in good musculoskeletal health, but who has never shown an interest in any kind of stretching. He won’t be able to bend backward very far, and what he can do is hard to appraise because he will invariably bend his knees and exaggerate his lumbar lordosis in preference to hyperextending the hips. Without a sharp eye it is difficult to differentiate among these three components.
To assess this young man’s capacity for hip versus spinal backward bending as best we can, first have him warm up with an hour of vigorous hatha so we can see him at his best. Then, to make sure his knees do not contribute to the bend, ask him to do a relaxed standing backbend with his knees extended. His chest will probably be off vertical by only 30°, which suggests a combination of about 20° of backbending in the lumbar region with about 10° of hyperextension in the hips (fig. 5.2).
Forward bending in this same student is easier to evaluate. You can ask him to bend forward from the hips while keeping his lower back maximally arched. Then, just before his lumbar lordosis begins to flatten you can estimate the angle between his torso and thighs, which is likely to be about 30°. This represents forward bending at the hips (fig. 5. 3). Then ask him to relax down and forward to his capacity. If he can bend forward a total of 90°, which allows him to reach down a little more than halfway between his knees and his ankles, it suggests that has achieved the additional 60° of forward bending in his lumbar spine (fig. 5.4).
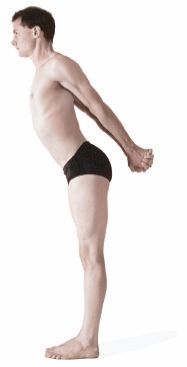
Figure 5.3. A moderately flexible young athlete can typically bend only about 30° at the hips while keeping a sharply defined lumbar lordosis (simulation).
CERVICAL, THORACIC, AND LUMBAR FLEXIBILITY
The spine’s flexibility varies from region to region. Starting with the neck, the cervical region is especially mobile. If you have normal flexibility, your head can extend backward on the first cervical vertebra about 20°, and you can flex forward at this same site about 10°. The rest of the cervical region can bend backward 60° and forward another 80°, in this case touching the chin to the sternum. We’ll look at these movements in detail, along with rotation, in chapter 7. Just below the seven cervical vertebrae, the thoracic region permits little forward or backward movement because the rib cage is too rigid. This means that most of the backbending in the torso takes place in the lumbar region between the bottom of the rib cage and the sacrum, that is, between T12 and S1. That’s where we’ll concentrate our attention.
Young people with good flexibility who have been practicing hatha yoga regularly (Table 5.1) might reveal a total of 60° of lumbar flexion for forward bending and 45° of lumbar extension for backbending. This is in addition to hip flexibility, which we’ll say is 90° for forward flexion and 15° for backward bending. The knees, of course, must be kept straight to get accurate measurements. Someone with hip flexibility this good will be able to do an intermediate level posterior stretch (fig. 6.15) and will be able to arch back comfortably to touch their feet in the camel (fig. 5.35). If we break this down we can estimate the approximate mobility for flexion and extension that would be permitted between individual pairs of adjacent vertebrae (table 5.1).
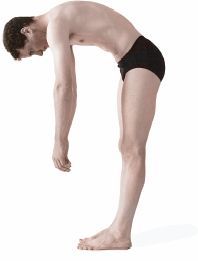
Figure 5.4. Limited hip flexibility prevents this young man from reaching further down. This simulation reveals a combination of about 30° of hip flexion with 60° of spinal flexion for a total of 90° of forward bending. Such a student can and should bend the knees slightly to find a more rewarding pose, one that at least allows him to grasp his ankles.
WHAT LIMITS BACKWARD BENDING?
In chapters 3 and 4 we discussed the muscles and ligaments that limit backward bending in the hips. These include the psoas and iliacus muscles (figs. 2.8, 3.7, and 8.13); the quadriceps femoris muscles (figs. 1.2, 3.9, 8.8, and 8.11), especially the rectus femoris component (figs. 3.9 and 8.8–9); the abdominal muscles (figs. 2.7, 2.9, 3.11–13, 8.8, 8.11, and 8.13), especially the rectus abdominis (figs. 3.11–13 and 8.11); and the spiraled ischiofemoral, iliofemoral, and pubofemoral ligaments (fig. 3.6).
Turning to the torso, the main structural limitations to backbending in the thoracic region are the rib cage (figs. 4.3–4) and the spinous processes (figs. 4.6b and 4.7b), which extend so far inferiorly in the thoracic region that they quickly butt up against one another during extension. And in the critical lumbar region the first line of resistance to backbending is muscular—intra-abdominal pressure generated by a combination of the respiratory diaphragm (figs. 2.6–9), the pelvic diaphragm (figs. 3.24–29), and the abdominal muscles (figs. 3.11–13, 8.8, 8.11, and 8.13). As far as major skeletal and ligamentous restrictions to lumbar bending is concerned, there are four: the physical limitations of the vertebral arches (figs. 4.5a, 4.6a, and 4.12–13), the anterior longitudinal ligament that runs along the front sides of the anterior functional unit (fig. 4.13), the intervertebral disks, whose nuclei pulposi are driven anteriorly within the intervertebral disks (fig. 4.11), and finally, the superior and inferior articular processes (figs. 4.5–6 and 4.13b), which become tightly interlocked during extension.
It’s anyone’s guess as to which of these structures yield to permit 180° backbends in circus performers. It is possible, although I have not personally checked this out in anyone, that unusually mobile sacroiliac joints (chapter 6) might account for some of the capability of laying the hips down against the shoulders. In any event, after the bend is an accomplished fact the heavy spinous processes characteristic of the lumbar region (figs. 4.5b, 4. 10a, and 4.13b) are probably butting up against one another.

Table 5.1. This chart estimates the degrees of flexion and extension permitted between individual vertebrae between T12 and the sacrum in someone who is moderately flexible. With 90° of additional flexion at the hip joints, the total forward bending permitted between T12 and the thighs is about 150°, which amounts to about 2.5 times as much forward bending as backward bending.
WHAT FACILITATES BACKBENDING?
What limits backbending is generally straightforward, but if you were to ask what assists backbending, the answer would have to be, “It depends.” In standing backbends, as well as in passive supine backbends, which we’ll cover later in this chapter, the answer is gravity. Standing, you simply lean your head and upper body to the rear, thrust your pelvis and abdomen forward, and let gravity carry you into the backbend. If you bend backward naturally, you also bend your knees, and that is why you have to extend the knees fully to evaluate backward bending in the hips and spine.

Figure 5.5. Deep back muscles exposed in successively deeper dissections following removal of the upper and lower extremities. The erector spinae are by definition the combination of the spinalis, longissimus, and iliocostalis (Sappey).
In prone backbending we are lifting one or more segments of the body against gravity. In this case the bend is accomplished by the deep back muscles (which lift you actively by extending the spine) or by the arms and shoulders (which can support a semi-relaxed prone backbend in any one of several ways). As we saw in chapter 4, the erector spinae muscles are responsible for extending the spine. They run from the pelvis to the cervical region and are composed of a complex of three muscles on each side—the iliocostalis, the longissimus, and the spinalis (fig. 5.5). Continuing into the neck are the splenius cervicis muscles, and to the back of the head, the splenius capitis (fig. 5.5). These latter muscles, which are also known as strap muscles from their characteristic appearance, run longitudinally. Deep to them are small, short muscles that run more or less obliquely between the spinous processes and the transverse processes—the semispinalis (fig. 8.14), multifidus, and rotatores muscles. Deeper yet are the interspinales muscles between adjacent spinous processes, and the intertransversarii muscles between adjacent transverse processes (shown in fig. 5.5 but not specifically labeled).
It is obvious that muscles and gravity play major roles in creating hatha yoga postures, but anyone who has stood, lain, or sat quietly in a pose for a few minutes knows that something else is superimposed upon its equipoise. That something is breathing. A formal statement of the matter might run as follows: Under most circumstances of normal breathing, inhalations will either lift you more fully into a posture or create more tension in the body, and exhalations will either relax you further into the posture or reduce tension. From the perspective of the first four chapters of this book, we can now examine this statement with respect to backbending.
In whole-body standing backbending (fig. 4.19) we saw that it was natural to allow exhalation to lower you maximally to the rear (relaxing you further into the posture). Inhalation then lifts you up and forward (creating more tension in the body). We also saw that you could reverse this pattern on purpose by pulling backward more vigorously into the posture during inhalation (taking you more fully into the posture), and then relaxing and easing off the posture during exhalation (thereby reducing tension). We’ll see variations on these principles in all the remaining postures in this chapter. In every case the diaphragm either restricts backbending, which we’ll call diaphragm-restricted backbending, or assists it, which we’ll call diaphragm-assisted backbending.
DIAPHRAGM-RESTRICTED BACKBENDING
When you are breathing naturally, inhalation restricts a standing backbend and exhalation assists it (fig. 4.19) because the diaphragm increases intra-abdominal pressure as it presses the abdominal organs inferiorly during inhalation. As we saw in chapter 3, it does this in cooperation with the abdominal muscles and the pelvic diaphragm: the increased intra-abdominal pressure restricts the bend by making the torso a taut, solid unit, thus protecting the critical lumbar region by spreading the vertebrae apart hydraulically and easing compression on all the intervertebral disks between the rib cage and the sacrum.
A simple experiment demonstrates diaphragm-restricted backbending. Stand up straight and interlock your hands behind your head, take a deep inhalation, and hold your breath while keeping the airway open. Then pull to the rear as hard as you can by tightening the muscles on the back of the body from head to heel (but don’t pull your head back beyond the natural arc created by the torso). If you have taken a deep breath and your respiratory diaphragm is healthy, you’ll feel the diaphragm stop the backward bend almost before it gets underway. Next, let just a little air out, and notice that your efforts to pull to the rear will be met with less resistance. Keep the airway open to make sure it is the respiratory diaphragm, acting in combination with the abdominal muscles, pelvic diaphragm, and the hydraulic nature of the abdominopelvic cavity, that is restricting and then easing the backbend. Increasing pneumatic pressure in the chest by closing the glottis would eliminate tension in the diaphragm and invalidate the experiment.
A propped backbending stretch will illustrate the same phenomenon. Stand with your back about two feet from a wall, and swing the hands overhead and backward to make contact. Adjust the distance so that you are in a comfortable backbend. Work the hands down the wall until you are just short of your comfortable limit of extension, but keep the knees straight. After you have relaxed and made yourself comfortable in the posture for 10–20 seconds, notice that each inhalation will diminish the bend in the lumbar region and straighten the body as a whole, and that each exhalation will allow your back to become more fully arched. More specifically, inhalation does two things: it pulls the thighs and legs slightly to the rear, and it lifts the chest and shoulders up and forward (fig. 5.6). It is easy to prejudice these results, however, and a fair test of diaphragm-restricted backbending requires that you keep constant tension in the upper extremities at all times and search out your most natural inclinations for bending and breathing. As we saw in chapter 4, you can easily reverse the results by purposely pressing more deeply into the bend during inhalation and then consciously easing off during exhalation.
DIAPHRAGM-ASSISTED BACKBENDING
You can feel the opposite phenomenon if you face the wall, bend forward from the hips, and support the bent-from-the-hips posture with your forearms. Keep the lumbar region arched forward, making the posture a backbend from the hip joints up (fig. 5.7). Breathe in the posture and watch carefully. The most natural result is that inhalation deepens the backbend and that exhalation eases it. Keep the abdominal muscles relaxed during inhalation. If you tense them the dome of the diaphragm can’t descend very far, and you will lose the sense of being able to assist the backbend with inhalation. If there is any question about the results, aid exhalation with the abdominal muscles, and this will immediately and markedly diminish the lumbar lordosis (chapters 2 and 3). As with the propped backbending stretch facing away from the wall (fig. 5.6), you have to keep all conditions constant except for respiration. You can always pull yourself down consciously during exhalation to increase the lumbar bend, but that misses the point. Here we want to examine the effects of inhalation and exhalation in relative isolation.
The mechanisms underlying diaphragm-assisted backbending are straightforward. First of all, the depth of the backbend has been defined initially by the position of the feet on the floor and the forearms against the wall. This means that the abdominal muscles do not have to be tensed to keep you from falling, and it also means that intra-abdominal pressure will not be as pronounced as in a free-standing, internally supported backbend (fig. 4.19) or in the propped standing backbend (fig. 5.6). What is more, since the rib cage is relatively immobilized by the arm position, the crura of the diaphragm can only pull forward on the lumbar lordosis during inhalation to deepen the backbend. It’s a three-part situation: the static body position defines the extent of the backbend in the first place, decreased abdominal tension and pressure allows the diaphragm to deepen it, and an immobilized rib cage requires the diaphragm to deepen it.
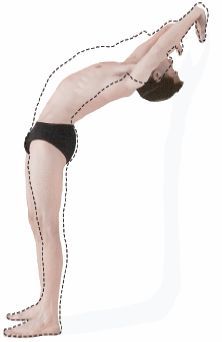
Figure 5.6. Diaphragm-restricted backbend. Inhalation pulls the legs and thighs slightly to the rear, lifts the chest and shoulders up and forward, and increases intra-abdominal pressure, all of which combined straighten the body as a whole and diminish the backbend.
One more variable determines whether the diaphragm assists or restricts backbending in general, and that is how much the lumbar region is arched forward on the start. If students are stiff and wary, the arch will not be pronounced, the abdominal muscles will be tensed, and inhalation will create more stability, thus restricting the bend. That is what we usually see in beginning classes. With stronger and more flexible students, inhalations are more likely to increase the backbend, deepening it in proportion to how readily they can release intra-abdominal pressure and allow the iliopsoas, rectus femoris, and rectus abdominis muscles to lengthen. As we experiment with the prone backbending postures that follow, keep all possibilities in mind: notice that the descending dome of the diaphragm will either maintain restrictions in the torso and create diaphragm-restricted backbending, or, depending on the student’s flexibility and on the positions of the upper and lower extremities, the diaphragm will force the front of the body forward during inhalation and deepen the bend.
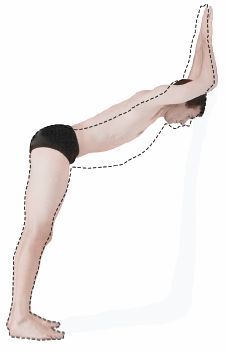
Figure 5.7. Diaphragm-assisted backbend. In this forward bend from the hips, inhalation increases the depth of the lumbar lordosis provided the abdominal muscles are kept relaxed. The relaxed position against the wall permits the abdominal muscles to come forward and allows inhalation to occur freely, in contrast to the case of diaphragm-restricted backbending that is illustrated in fig. 5.6.
Of the many forms of backbending postures, the prone backbends—the cobra, locust, boat, and bow—are the most widely practiced in hatha yoga. In contrast to standing backbends, in which gravity assists your movement into the postures and resists your efforts to come up, in the prone backbends you lift parts of the body away from the floor against the pull of gravity and then return to your starting position with the aid of gravity. Prone backbends are harder than standing backbends because you are trying to overcome the resistance of connective tissues and skeletal muscles on the front side of the body while simultaneously opposing the force of gravity, but they are easier because coming out of the postures does not have to involve anything more than dropping slowly to the floor.
The cobra posture is named for the manner in which the magnificent king cobra lifts its head and flattens out its hood in preparation for striking its prey. It is probably the most well-known prone backbending pose in hatha yoga. Considered along with all its variations, it is worth the attention of everyone from beginners to the most advanced students.
Every variation of the cobra and its close relatives begins from a prone position and ends with the neck and back extended. In contrast to the caution we exercised in extending the head and neck in standing backbends, we have no reason to restrict that movement here, and we can work confidently with the cervical region without being concerned about losing our concentration on the rest of the posture or getting lightheaded from cardiovascular responses. Other characteristics of the postures vary. Depending on the specific exercise, from the top down, you can start either with the forehead or the chin on the floor, the deep back muscles either active or relaxed, the hip and thigh muscles firm or relaxed, the knees extended, relaxed, or flexed, and the feet together or apart.
THE CLASSIC BEGINNING COBRA
To introduce the series of cobra postures, we’ll begin with the classic beginning pose even though it is not the easiest one. Start with the hands alongside the chest, with the palms down, the fingertips in line with the nipples, the heels and toes together, and the elbows close to the body. In this posture arch the neck enough to the rear to place the forehead against the floor, thus creating a reverse cervical curvature (fig. 5.8). If that position is uncomfortable, you can start with the nose or chin against the floor. On an inhalation, slowly lift the forehead, brush the nose and chin against the floor, and lift the head, neck, and chest slowly, vertebra by vertebra. Lift mainly with the back and neck muscles, using the hands only as guides. As you extend the spine, try to create a lengthening feeling. You should be at ease; if you are straining you have come up too far. Try to remain in the posture, breathing evenly, for 10–20 seconds, and then come back down in reverse order, ending with the forehead against the floor. This is the classic beginning cobra (fig. 5.9). If you are a novice, you may do little more than raise your head, and it might appear as if this involves only the neck muscles. But even this slight movement will engage the deep back muscles from the head to the pelvis, and over time you will slowly develop the strength and flexibility to come up further.
To relax you can turn your head to one side and rest. If that is too stressful for your neck, you can place a large soft pillow under your chest and head, which permits your head to be twisted more moderately. Or another alternative is to twist a little more insistently and at the same time press the side of the head firmly against the floor with isometric contraction of the neck muscles, which will stimulate the Golgi tendon organs and cause reflex relaxation of the associated muscles. In any case, turn in the other direction after the next variation, and then alternate sides each time you do another.
Teachers often tell students to place their heels and toes together but to stay relaxed while coming up into the pose. That can be confusing because anyone who tries to do this will find that holding the heels and toes together in itself requires muscular activity. It is best to explain at the outset that the classic cobra should be done with no more than moderate tension in the lower extremities, and that the act of holding the heels and toes together serves this purpose. Students should also pay close attention to their breathing; they will notice that each inhalation lifts their upper body and creates more pull in their lower back and hips.

Figure 5.8. Classic cobra, starting position.
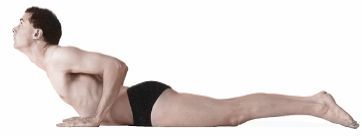
Figure 5.9. In the classic cobra posture, the upper extremities serve mainly as guides, and the head and shoulders are lifted using the deep back muscles as prime movers. The muscles of the hips and thighs then act as synergists for moderately bracing the pelvis.
THE COBRA WITH TIGHT LOWER EXTREMITIES
Now try a variation of the cobra with the lower extremities fixed solidly. With the chin against the floor, place the hands in the standard position. Then, keeping the feet together, tighten all the muscles from the hips to the ankles and lift up as high as you can with the back muscles, leading with the head and looking up. With the sacrum and pelvis stabilized by the tension in the lower extremities, you will be using only the erector spinae muscles to create the initial lift. As soon as you are up, each inhalation will lift the torso even more, and each exhalation will lower it down; both movements result from the action of the diaphragm. Inhale and exhale maximally if you are confused. The respiratory motion is more apparent here than with the classic cobra because the lower extremities are held more firmly in position. Except for the hand position, this posture is identical to the cobra variation we did in chapter 2 (fig. 2.10). There the movements of the upper body were discussed in terms of lifting the base of the rib cage in diaphragmatic breathing. The same thing happens here except that now we’re calling it a diaphragm-assisted backbend.
A RELAXED COBRA WITH MILD TRACTION IN THE BACK
If your lower back is tender the classic cobra will be uncomfortable, and the most natural way to protect and strengthen the region will be to tighten everything from the waist down as in the previous variation. But there is an alternative—you can push up mildly into the cobra with the arms in a modified crocodile position. Instead of using the deep back muscles to extend the spine, which pulls the vertebrae closer together and compresses the intervertebral disks, we’ll push up with the arms to lift the shoulders, place traction on the lumbar region, and remove tension on the intervertebral disks.
Start this posture with the hands on top of one another just underneath the forehead and with the elbows spraddled out to the side, or place the hands flat on the floor with the thumbs and index fingers making a diamond-shaped figure, the tips of the thumbs under the chin. Then, keeping the elbows, forearms, and hands planted against the floor, lift the head actively, push up with your arms, and create a gentle isometric pull with the arms as though you were wanting to pull yourself forward. At the same time observe that the leg, thigh, hip, and back muscles all remain relaxed. You are not going anywhere with the isometric lift and pull with the arms; you are only creating a mild traction in the back that encourages relaxation.
This exercise protects the lower back just as effectively as keeping the hips and thighs firm because the back and lower extremities automatically stay relaxed as you lift up. The oddity of protecting yourself with both mechanisms at the same time will be obvious if you come into the posture and then tighten muscles generally from the waist down.
Notice how this posture affects your breathing. The tension on the chest from the arms and shoulders keeps it immobilized, in contrast to the diaphragm-assisted lift in the classic cobra and the previous variation. Most of the respiratory movement is felt as abdominal breathing exactly as in the stretched crocodile posture (fig. 2.23): the lower back lifts with each inhalation as the dome of the diaphragm descends, and the lower back drops toward the floor with each exhalation as the dome of the diaphragm rises.
CREATING TRACTION WITH THE HANDS AND ARMS
For this variation start with the hands alongside the chest, the heels and toes together, and the chin rather than the forehead on the floor. Then, instead of creating traction with the elbows and forearms, create it by pressing the heels of the hands toward the feet isometrically. This is similar to creating traction by pulling from the elbows, but the action is more difficult to control. You started this posture with just enough tension in the lower extremities to hold the feet together. Now try to let that melt away. Also try to minimize your tendency to push the torso up with the hands, even though that is hard to avoid while you are creating tension for pulling forward. This is a demanding whole-body concentration exercise. Notice how your breathing differs from that in the previous variation. The chest is not restricted—the diaphragm both flares the chest wall from its lower border and lifts the upper body, creating diaphragmatic rather than abdominal breathing.
RAISING UP AND DOWN WITH BREATHING
For this variation, start with your chin on the floor, the hands in the standard position alongside the chest, the heels and toes together, and the hips squeezed together. Then inhale while lifting your head and shoulders, and exhale back down until your chin touches the floor, breathing at the rate of about four breaths every ten seconds. You can experiment with keeping the hips somewhat relaxed, but it is more natural to keep them firm so that inhalations lift you higher. This exercise differs from the classic cobra in that it involves constant movement. You come all the way up and all the way down using a combination of the diaphragm and the back muscles, while in the cobra you hold the position as much as possible with the back muscles alone and allow the diaphragm to bob you up and down from there. A nice variation on this exercise is to turn your head to one side or the other with each inhalation: inhale, up (right); exhale, down (center); inhale, up (left); exhale, down (center); and continuing with a natural cadence for 10–20 breaths. During each successive inhalation, twist more insistently, lift more insistently, and expand your inspiratory capacity as much as possible with empowered thoracic breathing. This is a powerful and yet natural and comfortable exercise.
THE DIAPHRAGMATIC REAR LIFT
The next several variations of the cobra depend on reviewing the diaphragmatic rear lift (fig. 2.11). Summarizing from chapter 2, come into the standard preparatory posture for the classic cobra except that now the chin instead of the forehead is against the floor. Relax the entire body, especially below the chest, and then breathe deeply while keeping the chest and chin against the floor. Provided the deep back muscles, hips, and thighs are all free of tension, inhalation will arch the back and lift the hips, and exhalation will allow the lumbar region to flatten and drop the hips back down. At first, breathe quickly, almost as in the bellows exercise, and then slow your respiration down to observe the finer changes in tension and movement. In chapter 2 this exercise illustrated the connections of the diaphragm. Here it illustrates how lifting the hips (instead of the base of the rib cage) with the diaphragm creates another variation of diaphragm-assisted backbending.
ANOTHER COBRA WITH RELAXED LOWER EXTREMITIES
This next variation involves doing the cobra with the lower extremities completely relaxed, which is a posture that will challenge the concentration of even advanced students. Start with your chin on the floor and let your feet fall slightly apart into the position in which you will be most relaxed (heels in and toes out, or vice versa). Then slowly lift the head and chest, monitoring muscles in the lower half of the body to make sure they do not contribute to the lifting effort. This is easy enough at first, but it starts to feel unnatural as you rise more fully into the posture. Come up as far as you can, hold, and then come down slowly. Keep checking to make sure you do not feel a wave of relaxation on your way down, indicating that you tensed up as you lifted into the posture.
It’s the gluteal muscles that are the most difficult to hold back in this pose. When you lift up into the cobra, you ordinarily support the effort of the deep back muscles by bracing the pelvis with the gluteus maximus muscles, and this insures that the erector spinae and other deep back muscles will lift only the upper part of the body. But if you relax from the waist down, the erector spinae muscles have two roles instead of one. They still lift the upper half of the body by way of their insertions on the chest, but now they also pull on the ilium and sacrum from above, deepening the lumbar lordosis and rotating the coccyx to the rear for an anterior pelvic tilt. If you have ever had back problems, this exercise will at once make you aware of your vulnerability, so do it only if you remain comfortable from start to finish.
Not surprisingly, the diaphragm contributes importantly to this posture; it acts in perfect cooperation with the erector spinae muscles by lifting both ends of the torso at the same time, thus assisting the backbend both from above and below. As we saw in chapter 2, this happens because the costal portion of the diaphragm lifts the rib cage and because the right and left crura lift the relaxed hips.
THE COBRA WITH REVERSE BREATHING
For an even more difficult concentration exercise, lie prone with your hands alongside your chest in the standard position, and come in and out of the cobra posture while reversing the natural coordination of diaphragmatic inhalations with the concentric shortening of the back muscles. Do this as follows: First, keep the chin on the floor while inhaling. Then exhale while tightening the hips and thighs (which holds them against the floor), and at the same time raise the head and shoulders. Next, inhale and relax the hips completely (which causes the hips to rise) as you lower the head and shoulders. Putting it differently: raise the head and chest during exhalation, and lower them during inhalation; tighten the hips and keep them down during exhalation, and relax them and permit them to rise freely during inhalation. This is disorienting until you master it. The exercise will work best if you take about one breath every four seconds.
After several exhalations up and inhalations down, try breathing more slowly. Relax completely during a deep but leisurely inhalation, and allow the crus of the diaphragm to deepen the lumbar lordosis from below. As exhalation begins, tighten the gluteals so the back muscles can lift the upper part of the body concentrically from a strong base without any help from the diaphragm. Then, during the next inhalation the chest will drop slowly to the floor, and the diaphragm will again lift the lower spine and hips as the back muscles and lower extremities relax. This is a difficult exercise, but after you have mastered it, along with the other variations of the cobra, you will have experienced all the possible combinations of breathing in relation to lifting up and down in the cobra. This posture helps place all the more natural possibilities in perspective. And apart from its value as a training tool, once you have succeeded in learning to do the sequence smoothly and rhythmically, the exercise is very soothing.
THE SUPPORTED INTERMEDIATE COBRA
Here is a good way to prepare for the advanced cobra. Lying prone with the chin on the floor, stretch the hands overhead with the arms and forearms parallel and the palms down. Keeping the elbows extended and the heels and big toes together, lift the head as high as possible, and pull one hand and then the other back toward the head in small increments. This will lift the upper half of the body. The back is passive; it is not doing the work of lifting you. One arm braces while the other pushes the body up, inch by inch. When you are up, find a relatively relaxed position with your weight resting on a combination of the hands, the lower border of the rib cage, and the pelvis. Or you can suspend the weight of your chest and abdomen between the hands and pelvis if that feels comfortable (fig. 5.10). Keeping the elbows extended is a feature of this posture alone. We’ll dispense with doing that when we come to the full expression of the advanced cobra.
Most beginners make two mistakes in this exercise. One is to hang passively between their arms. Don’t do that. Lift the chest and pull the scapulae down and laterally. With experience, you can find a position in which you are keeping the pelvis, or possibly the pelvis and the rib cage in combination, against the floor without hanging passively. The other common error is to let your attention stray from the forearm extensors, which permits the elbows to become slightly flexed.
Everyone will have a different limit to how far they can lift up and at the same time keep the pelvis on the floor. It will depend, obviously, on how much passive extension their lumbar spines can accommodate. Some will end up with their shoulders lifted up off the floor only a few inches; others may have enough flexibility to face the ceiling (fig. 5.11). If you are inflexible, notice that you feel vulnerable with the back muscles relaxed. Find a position in which you can feel some of that vulnerability and yet remain still without pain or anxiety. As in other variations of the cobra, take deep empowered thoracic inhalations.
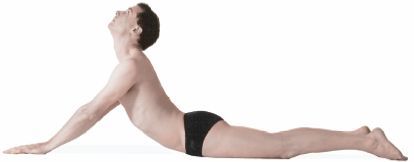
Figure 5.10. Supported intermediate cobra. In this pose the hands are pulled back incrementally (always keeping the elbows extended) until the pelvis is almost lifted off the floor. The head is pulled backward and the scapulae are pulled down and laterally (see chapter 8 for details of scapular movements), being careful not to hang the chest passively between the shoulders.
As soon as you are accustomed to the relaxed posture, pull the head back further and engage the back muscles isometrically. Now the inner feeling of the posture changes. The engaged back muscles make it feel safer even though your position has not shifted. Then, as soon as you have accommodated to this new feeling, bend the knees carefully, drawing the heels toward the head while keeping the elbows fully extended. Don’t hurt your knees. This is an unusual position for them. It is fairly safe for the back because you have engaged the erector spinae muscles, but lifting the feet increases the intensity of the posture, so be watchful. You also have to concentrate on keeping the elbows straight because neurologic interconnections between motor neurons for flexors and extensors are such that the act of flexing the knees reflexly inhibits the motor neurons that innervate the extensors of the forearm (chapter 1), especially if the movement causes the slightest pain in the back or knee joints. Hold the posture for 10–20 seconds if you can do so confidently. Then slowly lower the feet back to the floor and slide the hands forward to the beginning position.
If you are not very flexible the lumbar region is bent to its maximum, especially when the feet are raised, and you will notice that breathing does not create marked external effects on the posture. Inhalation increases (and exhalation decreases) internal tension, but we do not see much accentuation or flattening of the lumbar region. In company with this, it may feel appropriate to breathe cautiously if you are at your limit. And even if you are flexible and comfortable, breathing deeply in this posture is not easy because the rib cage is constrained by the arm position. Nevertheless, if you would like to expand your inspiratory capacity (chapter 2), inhale thoracically as much as the posture permits.
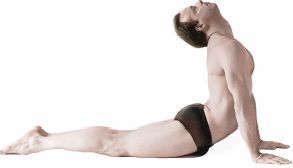
Figure 5.11. Supported cobra facing the ceiling. Flexible students can bend their spines enough (about 70° in this case) to face the ceiling and yet keep their thighs on the floor.
THE ADVANCED COBRA
To do the advanced cobra, start from the same beginning position as the classic cobra, with the forehead on the floor and the fingertips in line with the nipples. Next, brush your nose and chin along the floor and slowly start lifting the head and chest with the back muscles. Then, keeping the back muscles engaged, slowly start to straighten the elbows until you have extended the back and neck to their limits. The extent to which the elbows are straightened will be a reflection of how much the spine is extended, as well as a reflection of the lengths of the arms and forearms. Beginners will not be able to come up very far, and it will be rare for even advanced students to straighten their elbows completely. It’s not necessary anyway. The idea of this posture is to keep everything active. The deep back muscles, specifically, should be monitored constantly to make sure they are supporting the lift and not relaxing as the forearms extensors start contributing to the posture.
Keeping the back muscles active sounds like it ought to be easy, but for those whose spines are inflexible these muscles will be working against the antagonistic actions of the iliacus and psoas muscles, which maintain the first line of protection for restricting the bend, as well as the abdominal muscles, which stay tight to maintain the intra-abdominal pressure that is so important for minimizing strain on the intervertebral disks. It is a natural temptation to simply relax and support the posture entirely with the upper extremities. Don’t do it. That’s more like the next posture, the upward-facing dog.
As you progress in your practice of the advanced cobra, you will gradually become confident and flexible enough to allow the iliopsoas muscles and the abdominal muscles to lengthen eccentrically and even relax without releasing tension in the back muscles, and when that happens the back muscles will contribute to extension more effectively. The last step, after acclimating to the posture in its essential form, is to draw the feet toward the head (fig. 5.12).
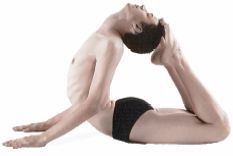
Figure 5.12. In the advanced cobra, highly flexible students can bend their lumbar spines 90° and touch their feet to their head. For most students spinal and hip inflexibility (along with resistant hip flexors and abdominal muscles) limit coming fully into this pose.
As with the supported intermediate cobra, it is most important to keep the chest lifted and the shoulders pulled down and back. Nothing will violate this posture as certainly as allowing the chest to hang passively between the arms. And if you take the option of bending the knees and pulling the feet toward the head, be careful of stressing the ligaments that surround the knee joint.
Breathing issues in the advanced cobra are similar to those for the supported posture. The diaphragm will contribute to keeping the pose stable and restrict the bend for those who are less flexible, and it will deepen the backbend for those who find themselves flexible enough to come convincingly into the posture. In general, the advanced pose will not be very rewarding for anyone who is not flexible enough to sense that the diaphragm is either deepening the bend or creating tension for doing so, as well as getting out of the way of empowered thoracic breathing.
THE UPWARD-FACING DOG POSTURES
The upward-facing dog is not a cobra posture, but it begins in the same way and then goes one or two steps beyond. It is like a suspension bridge. The arms and forearms support the posture from above, the knees or feet support it from below, and the chest, abdomen, pelvis, and thighs are suspended between. Four variations are presented here, and in each one you support your weight differently.
To prepare for the upward-facing dog, start with the chin on the floor, the hands alongside the chest a little lower than for the cobra, the feet together, and the toes extended. Slowly lift the head and then the shoulders, keeping the muscles of the lower extremities engaged. As soon as you reach your limit of lifting with the back muscles, extend the elbows slowly, lifting your body even higher until your weight is supported by the arms, knees, and the tops of the feet. It is important to do this without relaxing the back muscles (fig. 5.13). The pose should be active front and back. Those who are especially flexible will have to keep the abdominal muscles engaged to avoid dropping the pelvis to the floor; those who are not flexible will not have this difficulty because their abdominal muscles are already tense. As in the advanced cobra, lift the head, neck, and chest. Don’t allow the chest to hang passively between the shoulders. Come down in reverse order, taking a long time to merge the releasing of forearm extension into supporting the posture entirely with the deep back muscles.
Now try the same exercise with the toes flexed instead of extended. Keeping your knees on the floor and supporting yourself on the balls of the feet at the same time makes this a tighter posture because now the gastrocnemius muscles in the back of the calf are stretched. This places additional tension on the quadriceps femoris muscles, which (among their other roles) are antagonists to the gastrocnemius muscles; the tension in the quadriceps femoris is in turn translated to the front of the pelvis by way of the rectus femoris. The tension from the rectus femoris then restricts how far the pelvis can drop toward the floor. It’s easy to prove. If you go back and forth between the two postures you’ll feel immediately how the two alternative toe positions affect the pelvis—toes flexed and curled under, the pelvis is lifted; toes extended back, the pelvis drops.
In the full upward-facing dog, the knees are extended and you are supporting yourself between the hands and feet instead of between the hands and knees. This is a whole-body commitment requiring a lot more muscular tension in the quadriceps femoris muscles than the simpler posture. You can support your weight on your feet either with the toes flexed (fig. 5.14) or with the toes extended to the rear. Try both positions. Neither one is stressful if your feet are comfortable.
Breathing mechanics in the upward-facing dog are different from any other posture because the body is suspended in mid-air. You can easily rock back and forth or move from side to side like a suspension bridge in the wind, and this freedom of movement allows for deep thoracic inhalations and yet permits the diaphragm to deepen the backbend even in students who are not very flexible.
THE OPEN-AIR COBRA
This exercise requires good strength and athletic ability, healthy knees, and a prop made up of two cushioned planks; one (cushioned on top) is several feet off the floor, and another (cushioned on its underneath side) is slightly higher and situated to the rear of the first. The front plank will support the body at the level of the mid-thighs, and the rear plank will prevent the knees from flexing and the feet from flying up. Such a contraption is often found in health clubs. You will climb into the apparatus and lie in a prone position. The thighs will be supported from below by the front plank and the calves will be anchored in place from above by the rear plank. First, you allow the torso to hang down, flexed forward from the hips. From this position, you straighten the body and raise your head and shoulders as high as you can. The body from the thighs up will be suspended in mid-air as soon as you lift away from the floor.
This exercise is an excellent example of the manner in which gravity operates in relation to muscular activity. Little effort is required to initiate the movement for swinging the torso up the first 45°. Then, as the body comes toward the horizontal position you start getting more exercise. This feels similar to the classic cobra posture, except that it is more difficult because you are lifting the body from the fulcrum of the thighs instead of the pelvis. Then, as you arch up from that site you can begin to look right and left like a real cobra appraising its environment. Coming yet higher, the iliopsoas and abdominal muscles finally become the main line of resistance to the concentric activity of the back and neck muscles.
COBRAS FOR THOSE WITH RESTRICTED MOBILITY
The vertebral columns in older people sometimes become bent forward structurally, reverting to the fetal state of a single posterior curvature. The main problems with this, apart from not being able to stand up straight, are that the intervertebral disks have lost their fluidity, the joint capsules have become restricted, extraneous and movement-restricting deposits of bone have accumulated near joints, and muscles have become rigid. Those who have this condition are rarely able to lie comfortably on the floor in a prone position. But if they lie on cushions that support the body in a slightly flexed position and if the height of the cushions is adjusted carefully, all the simple variations of the cobra are feasible and will have beneficial effects throughout the body.
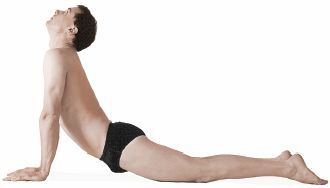
Figure 5.13. Upward-facing dog with knees down and toes extended. Come into this first of four dog postures systematically, and never hang between relaxed shoulders.
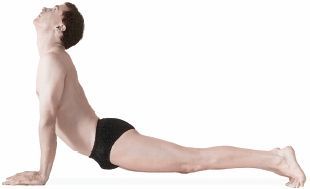
Figure 5.14. Upward-facing dog with knees up and toes flexed. Whole-body tension is required except in those who are so inflexible that their body structure keeps their thighs off the floor. The pose is like a suspension bridge.
ASHWINI MUDRA AND MULA BANDHA IN THE COBRAS
Ashwini mudra (chapter 3) is more natural in the upward-facing dog than in any other hatha yoga posture. The urogenital triangle is exposed, the genitals are isolated from the floor, the muscles of the urogenital triangle are relaxed, the gluteal muscles are engaged, and the pelvic diaphragm is automatically pulled in. Mula bandha (chapter 3), on the other hand, is natural in all of the postures in which the pelvis is resting against the floor, which means all the postures just covered with the exception of the upward-facing dog. Anyone who is confused about distinguishing between ashwini mudra and mula bandha can go back and forth between the upward-facing dog and an easy-does-it version of the classic cobra (in this case with the heels and toes together but with the gluteal muscles relaxed), and their confusion will vanish.
The locust posture is named for the manner in which grasshoppers (locusts) move their rear ends up and down. The locust postures complement the cobras, lifting the lower part of the body rather than the upper, but they are more difficult because it is less natural and more strenuous to lift the lower extremities from a prone position than it is to lift the head and shoulders.
We can test the relative difficulty of one of the locust postures with a simple experiment. Lie prone with the chin on the floor and the backs of the relaxed hands against the floor alongside the thighs. To imitate the cobra, lift the head and shoulders. Look around. Breathe. Enjoy. This exploratory gesture could hardly be more natural. Notice that it doesn’t take much effort to lift up, that it is easy to breathe evenly, that the upper extremities are not involved, and that the movement doesn’t threaten the lower back. By contrast, to imitate the locust we’ll need three times as many directions and cautions. Starting in the same position, point the toes, extend the knees by tightening the quadriceps femoris muscles, and exhale. Keeping the pelvis braced, lift the thighs without bending the knees. Don’t hold your breath, and be careful not to strain the lower back. What a difference! While almost anyone new to hatha yoga can do the first exercise with aplomb, the second is so difficult and unfamiliar that new students have to be guided from beginning to end.
THE HALF LOCUST
The easiest locust posture involves lifting only one thigh at a time instead of both of them simultaneously. This is only about a tenth rather than half as hard as the full locust because one extremity stabilizes the pelvis while the other one is lifted, and this has the effect of eliminating most of the tension in the lower back. To begin, lie prone with the chin on the floor, the arms alongside the chest, the elbows fully extended, and the backs of the fists against the floor near the thighs. Point the toes of one foot, extend the knee, and lift the thigh as high as possible, but do this without strongly pressing the opposite thigh against the floor (fig. 5.15). Breathe evenly for ten seconds, come down slowly, and repeat on the other side.
The half locust is a good road map for the full posture because we see similar patterns of muscular activity, but it is easier to isolate and analyze the various sensations when one thigh is braced against the floor. To create the lift, the gluteus maximus and the hamstring muscles hyperextend the thigh against the resistance of the abdominal muscles, the iliopsoas muscle, and the quadriceps femoris. The hamstring muscles don’t insert directly on the thigh. They insert on the back of the tibia, but in this case they act only on the pelvis because their tendency to flex the leg at the knee joint is prevented by strong isometric contraction of the quadriceps femoris muscle, which keeps the knee joint extended. It is as if you have attached a rope to the most distant of two boards that are hinged end-to-end; the far board is the tibia, and the near board is the femur. You want to lift the two boards as a unit to keep them aligned, but the rope goes only to the distant board. So another set of supporting lines has to run on the front (locking) side of the hinge to prevent the boards from folding up. The hamstring muscles are the ropes; the quadriceps femoris muscles are the supporting lines.
The half locust posture is worth more attention than it usually gets. In a slightly different form it is commonly prescribed by physiatrists and physical therapists for the recovery period that follows acute lower back pain. If you are on the mend from such a condition, and if you are able to lie in the prone position without pain, you can rapidly alternate what might be called thigh lifts—extending the knees and raising them (one at a time) an inch off the floor at the rate of about four lifts per second. If you repeat the exercise twenty to thirty times several times a day, it will strengthen the back muscles from a position that does not strain the lower back.
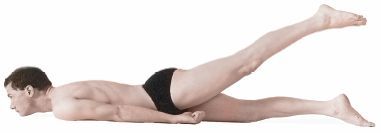
Figure 5.15. Half locust. This posture, which should be done without pressing the upper extremities and the opposite thigh strongly against the floor, is excellent for leisurely analysis of complex muscular and joint actions.
THE SUPPORTED HALF LOCUST
A more athletic posture supports the lifted thigh with the opposite leg and foot. Lie in the same prone position with the chin on the floor. Place the right fist alongside the right thigh, with the back side of the hand against the floor, and place the left hand, palm down, near the chest. Twist your head to the left and bend the right knee, flexing the right leg 90°. Then, using an any-which-way-you-can attitude—in other words, the easiest way possible—swing the left thigh up and support it on the right foot just above the left knee. Nearly everyone will have to lift their pelvis off the floor to get the left thigh high enough, and that is the purpose of twisting the head to the left and of having the left hand near the chest to help you balance. Try not to end up with the entire body angled too far off to the right, however. Use your breath naturally to support coming into the posture, taking a sharp inhalation on the lift, and then breathing cautiously but evenly while the foot is supporting the thigh. Even though you came into the posture with a swinging movement, try to come down slowly by sliding the right foot down the left leg. Repeat on the other side.
You can refine this exercise to make it both more difficult and more elegant if you come up slowly instead of with a swinging movement. Concentrate on breathing evenly throughout the effort and on keeping the pelvis square with the floor. Settle into the posture by slowly relaxing the abdominal muscles and hip flexors, which increases extension of the back. Finally, if you are flexible enough, deepen the backbend with your breathing, supporting the full posture both with the diaphragm and with deep thoracic inhalations (fig. 5.16).
THE SIMPLE FULL LOCUST
As soon as your are comfortable with the half locust you can begin to practice the full locust. The basic posture, which we’ll call the simple full locust, is a difficult pose, but we place it first to give an idea of the posture in its pure form. The last three variations form a logical sequence which we’ll call the beginning, intermediate, and advanced locusts.
To do the simple full locust, place the chin on the floor, the arms alongside the thighs, the forearms pronated, and the backs of the fists against the floor. If you want to make the posture more difficult, supinate the forearms and face the backs of the fists up. In either case point the toes to the rear, tighten the gluteal muscles, and last, keeping the knees extended, hyperextend both thighs, allowing them to become comfortably abducted at the same time. Do not try to aid the effort for hyperextension of the thighs with the arms at this stage. That will come later. If you are a beginner you may not have enough strength to make any external movement at all, or you may barely be able to take some of the weight off the thighs, but you will feel the effects in the lumbar, lumbosacral, sacroiliac, and hip joints, and you will still benefit from the effort.
When you raise the thighs in the simple full locust, you are trying to hyperextend them with the gluteus maximus muscles acting as prime movers, and doing this with both thighs at the same time makes this posture a great deal more difficult than the half locust: you are lifting twice as much weight, the pelvis is reacting to the muscular tension instead of stabilizing the posture for lifting just one side, and the lumbar lordosis is accentuated in one of the most unnatural positions imaginable. To make this seem a little easier you can take the option of allowing the knees to bend slightly, which will have two effects: it will permit the hamstring muscles to be more effective in aiding extension of the thighs, and it will facilitate their roles as antagonists to the quadriceps femoris muscles. The reason for allowing the thighs to become abducted brings us back to the hips; the gluteus medius and gluteus minimus (figs. 3.8b, 3.10a–b, 8.9, 8.12, and 8.14) are abductors, and holding the thighs adducted keeps these muscles in a stretched position and generally impedes hip hyperextension. The simple full locust is a challenging posture if your measure of success is external movement, but if you practice it daily you will soon be able to lift up more convincingly.
THE BEGINNER’S FULL LOCUST
The next variation, the beginner’s full locust, is the easiest in the series. Keeping the elbows straight, place the fists under the thighs, pronating the forearms so that the backs of the fists are against the floor, and pull the arms and forearms under the chest and abdomen. Again, keeping the heels, toes, and knees together, try to lift the thighs while holding the knees fairly straight (fig. 5.17). This variation will affect a higher position in the lumbar region than the first posture, and your attention will be drawn to the genitals rather than the anus, favoring activation of mula bandha over ashwini mudra.
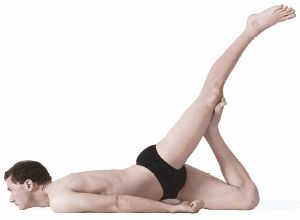
Figure 5.16. Supported half locust. Beginning students can learn this posture by first turning the head in the same direction as the thigh that will be raised, then swinging the thigh up and catching it with the opposite foot; refinements to provide for more grace and elegance can come later.
The beginner’s full locust is easier than the simple version because the fists provide a fulcrum that allows you to lift the thighs into extension from a partially flexed position. In the simple version of the full locust in which you are trying to lift your thighs from an extended to a hyperextended position, most of your effort goes into the isometric effort of pressing the pelvis more firmly against the floor. For unathletic beginners this is the end of the posture. But they should still experience both—the simple full locust to feel the essence of the basic pose, and the beginner’s full locust to feel a sense of accomplishment.
THE INTERMEDIATE FULL LOCUST
You need to develop more strength in your shoulders, arms, and forearms for the intermediate variation of the locust. It is exactly like the previous posture except that you use the arms, forearms, and interlocked hands to press against the floor, and this helps you lift up much further. It requires a whole-body effort involving all the muscles on the anterior sides of the arms and shoulders, plus the deep back muscles, the gluteal muscles, and the hamstrings. The intensity of the commitment needed to raise the knees just a few inches off the floor is likely to surprise even a good athlete. But lift as high as possible and hold (fig. 5.18). Many benefits are gained just by increasing the isometric tension in your personal end position.
Even though this posture requires a whole-body effort, you feel it most significantly in the lower back. You can check this in someone else by placing your hands on either side of their vertebral column as they initiate the lift. In everyone, you will feel the muscles in the lower half of the back bulge strongly to the rear, and in those who are able to lift their knees six inches or more off the floor, you will notice the bulge spreading throughout the back as more and more of the erector spinae is recruited into the effort.

Figure 5.17. This beginner’s full locust is easier than the simple full locust (not illustrated) because the position of the fists under the upper portions of the thighs permits them to act as a fulcrum for lifting the thighs. This posture also favors holding mula bandha over ashwini mudra (which is more in character for the simple full locust).
One of several unique characteristics of the locust posture is the extent to which the pelvis is braced. All of your efforts to lift are countered by numerous muscles acting as antagonists from the anterior side of the body: the rectus femoris pulls on the anterior inferior spine of the ilium; the psoas pulls on the lumbar spine; and the iliacus pulls on the pelvis. All of these muscles and their synergists act together from underneath to brace the body between the knees and the lumbar spine. And with this foundation stabilized, the gluteus maximus muscles, hamstrings, and erector spinae operate together to lift the pelvis and lower spine as a unit. The gluteus maximus muscles will first shorten concentrically and then act isometrically to place tension on the iliotibial tracts, which run between the ilia and the proximal portions of the tibias and fibulas (figs. 3.8–9 and 8.12). The actions of the gluteus maximus muscles are supported synergistically by the hamstrings, which, like the gluteus maximi, pull between the pelvis (in this case the ischial tuberosities) and the legs.
By themselves the gluteus maximus muscles and their synergists would not take you far, as in the case of the simple and beginner’s full locust, but when the arms and forearms are strong enough to help drive you up, the muscles on the back side of the body are able to act more efficiently. This is a powerful posture but one of the most unnatural postures in hatha yoga, and since much of the tension for raising the thighs is brought to bear on the lower back, it is for intermediate and advanced students only.
The whole-body muscular efforts needed to maintain the intermediate full locust are intense, and since the abdominal muscles and the respiratory and pelvic diaphragms have to support the effort from beginning to end, inhalations will not be very deep, and the externally visible effects of breathing will be negligible.
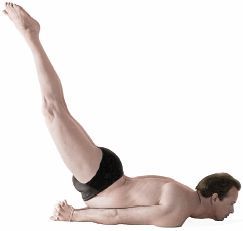
Figure 5.18. This intermediate full locust is manageable only by intermediate and advanced students; those who are not both strong and flexible will not be able to lift this far off the floor. In any case, what differentiates the posture from the beginner’s full locust is the way the pose is supported using the upper extremities.
ADVANCED FULL LOCUST
The advanced full locust is one of the most demanding postures in hatha yoga. To do it, those who are able to lift themselves up moderately in the intermediate practice now roll all the way up in one dynamic movement, balancing their weight overhead so the posture can be maintained without much muscular effort. This is only for athletes who are confident of their strength, flexibility, and the soundness of their spines. Those who can do it always seem to be at a loss for words when they try to explain what they do—speaking vaguely about concentration, breath, flexibility, and intention. It’s a whole-body effort. If any link is weak the posture cannot be done.
To press up into this posture, nearly everyone has to lock the elbows and then interlock the hands underneath the body in some way. You can interlock the little fingers and keep the rest of the fingers and palms against the floor. Or you can clasp the fingers together as in fig. 5.18, starting the position with the hands cupped around the genitals. In either case, lift up into the intermediate position using the arms and back muscles. And then, without hesitating, inhale, bend the knees, press the arms and forearms against floor more forcefully, and in one fluid movement lift into the final posture with the feet straight up. Ideally, this is a balancing position. Once you are in it you will need to keep only moderate isometric tension in the back muscles, you will not have to keep pressing so vigorously with the arms, and you can flatten the backs of the hands against the floor. Flexibility for backbending really pays off here, the more the better, and the easier it will be to balance without holding a lot of tension in the deep back muscles. You can either keep your feet pointing straight up or lower them toward the head (fig. 5.19), which makes it even easier to balance.
Breathing is one of the most important elements of the advanced locust, and most students will find it necessary to take a deep inhalation to assist the action of coming up into the pose. After that there are two schools of thought. One is to exhale as you come up and keep the airway open according to the general rule for hatha yoga postures. This is the best approach because the pose is executed and supported by a combination of the upper extremities, the deep back muscles, and intra-abdominal pressure—not by intrathoracic pressure (chapter 3). But if you can’t quite do that you can close the glottis to lift up and then breathe freely once you are balanced.
If you do not have enough flexibility in the back and neck to remain comfortably balanced after you are in the posture, you can place the palms flat against the floor, bend the elbows slightly, and support the lower part of the chest (and thus the whole body) with the arms and elbows. This will enable you to build up time in the pose.
The advanced locust places the neck in more extreme, and forced, hyperextension than any other posture, and to prepare for this students will find it desirable not only to work with backbending postures in general, but also with special postures that extend the neck to its maximum. The cobra postures (figs. 5.9–12), the upward-facing dogs (figs. 5.13–14), and the scorpion (fig. 8.31b) are all excellent for this purpose.
Although the advanced locust has to be treated as a dynamic whole, try to do it slowly. Many students have been hurt by falling out of the posture when they have tried to toss themselves up into the full pose before they have developed sufficient strength and control. If you are almost able to do the advanced locust, you will soon be able to master it by developing just a little more lumbar flexibility in combination with more strength in the arms and back.
The prone boats curve up at each end like gondolas, lifting both ends of the body at the same time, and in this manner they combine elements of both the cobra and the locust. We discussed a simple prone boat in chapter 1 to illustrate movements of the body in a gravitational field. And since these postures work against the pull of gravity as well as against muscular and connective tissue restraints, they can be difficult and discouraging to many beginning students, who often cannot even begin to lift up into them. To add insult to injury, instructors may tell students to come up into the postures and relax! We’ll remedy this by starting with an easy version. After a few weeks of regular practice, all of them become easy.
In the first version of the prone boat, lie with your chin against the floor, the heels and toes together, the arms along the sides of the body, and the back of the hands against the floor. Point the toes to the rear, tighten the quadriceps femoris muscles to extend the knee joints, and simultaneously lift the head, neck, chest, shoulders, thighs, and hips (fig. 5.20). If you have plenty of strength, lift the hands as well (fig. 1.15). Breathe evenly, and notice how the respiratory diaphragm lifts both the chest and the lower extremities with each inhalation and lowers them down slightly with each exhalation.
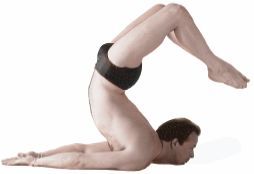
Figure 5.19. The advanced full locust is easier in certain respects than the intermediate version because here one is balancing rather than supporting the pose with muscular effort. No one should try this posture, however, who is not confident in their athletic prowess and 90° flexibility for backbending.
In the second version, which is a little harder than the first, again lie with your chin against the floor, with the heels and toes still together, but now stretch the arms out perpendicular to the body, palms down. Make blades of the hands, stretch the fingers, point the toes, extend the knees, and simultaneously lift all four extremities.
The third and most difficult version of the boat (fig. 5.21) is the same as the second except that the hands are stretched overhead with the elbows extended. Beginners usually resist this if you ask them to do it first, but if you start by leading them through the first and second versions they may be surprised to find that they have generated enough energy and enthusiasm to try the third. And rather than telling students to relax in the posture, instructors can suggest that they imagine they are lengthening the body in addition to lifting at both ends. This somehow enables them to raise up more efficiently and to feel more at ease.

Figure 5.20. In this easiest version of the prone boat (with oars coasting in the water), muscles are held firm on the back side of the body. Superimposed on that effort, the respiratory diaphragm lifts both the upper body and the lower extremities concentrically during each inhalation and drops them eccentrically during each exhalation, making this is a whole-body, diaphragm-assisted backward bend.

Figure 5.21. This third version of the prone boat is the most difficult one, and few students will be able to lift up this far, but if students start with the first two versions as preparatory poses, this one becomes easier.
As with the cobra postures, many older people who are chronically bent forward can benefit from a propped-up prone boat by placing supporting cushions under the torso. If the cushions are chosen and adjusted perfectly, their heads, arms, and feet will be in a comfortable beginning position. They can then lift up at both ends and be rewarded with a beneficial exercise.
When an advanced student has come into the bow posture, it resembles a drawn bow: the torso and thighs are the bow, and the taut upper extremities and the legs are the string, which is drawn toward the ceiling at the junction of the hands and the ankles. The beginner’s posture is not so elegant. Most of its length is flattened down against the floor, and the pose is acutely hinged at the knee joints.
THE BEGINNER’S BOW
To begin, lie prone, flex the knees, and grasp the ankles. Try to lift yourself into a bow, not by backbending with the deep back muscles, which remain relaxed in the beginning posture, but by attempting to extend the legs at the knee joints with the quadriceps femoris muscles. An attempt to straighten the knee joints is little more than an attempt, since you are holding onto the ankles, but it does lift the thighs and extend the knees moderately (fig. 5.22).
It seems extraordinary that the quadriceps femoris muscles (figs. 3.9, 8.8, and 8.11) are the foremost actors for creating this posture, but that is the case. At first they are in a state of mild stretch because the knees are flexed. Then, shortening these muscles concentrically against the resistance of the arms and forearms creates tension that begins to pull the body into an arc. The quadriceps muscles are performing three roles simultaneously: extending the knee joints from a flexed position, lifting the thighs, and creating tension that draws the bow. The tensions on the knee joints can be daunting for a beginner, and many students do well just to grab their ankles. If that is the case, they may not lift up at all but merely contract the quadriceps muscles isometrically. That’s fine. Just doing this every day will gradually strengthen the muscles and toughen the connective tissue capsules of the knee joints enough to eventually permit coming up further into the posture.
THE INTERMEDIATE AND ADVANCED BOWS
Intermediate students will approach the bow with a different emphasis. They may use the quadriceps femoris muscles to lift the knees in the beginning, but they aid this movement by engaging the deep back muscles (the erector spinae) to create an internal arch. Then, as they come higher they will use the gluteal muscles in the hips to provide even more lift. And as the gluteus maximus muscles shorten concentrically for extending the hips, they lift the pelvis away from the floor and indirectly aid extension of the knee joint.
As advanced students lift into the posture, the lumbar region becomes fully extended and the hips become hyperextended. Such students will be dividing their attention among at least five tasks after they bend their knees and grasp their ankles: paying attention to stretch and tension of the quadriceps; maintaining a strong connection between the ankles and shoulders; watching the knee joints, which are receiving an unconventional stress; overseeing the complex muscular interactions between the quadriceps femoris muscles on one hand and the gluteal muscles that lift the thighs during extension of the hip joints on the other; and breathing, which is rocking the upper half of the body up with each inhalation and dropping it forward with each exhalation (fig. 5.23). Once these conditions are established, advanced students can take the final option of drawing the feet toward the head.
The nervous system orchestrates all of this complex musculoskeletal activity. In beginners, the quadriceps femoris muscles, deep back muscles, and gluteals do not receive clear messages to lift strongly into the posture. Instead, they are inhibited by numerous pain pathways that take origin from the joints (especially the knees), and from the front side of the body generally. Such reflex input should not be overridden by the power of will. Even advanced students who are able to lift up more strongly may find that discomfort in the sacroiliac, hip, and knee joints limits the posture. Experts honor these signals mindfully. Then, as soon as there is no longer any hint of pain, the only limitations to the posture are muscle strength and connective tissue constraints. Advanced students, having practiced the bow thousands of times over a period of years, know exactly how much tension can be placed safely on each joint and how to come down from the posture without harm.
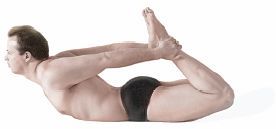
Figure 5.22. In this beginner’s version of the bow posture, the main concentration is on lifting the body using the quadriceps femoris muscles (knee extensors on the front of the thighs).
Studying the bow posture in detail leads us first and most obviously to the knees. When the knee joint is extended (fig. 5.24) it is almost invulnerable to injury because all of its component parts fit together perfectly and protect the joint from torques and impacts from all directions. The flexed knee joint is another matter. Its internal and external supporting ligaments have to become loose to permit flexion, and any tension superimposed on the flexed joint, whether from extension, twisting, or even additional flexion, can make the joint vulnerable to injury.
Standing postures, even with the knees flexed, are rarely a problem. The knee joint is the largest and strongest joint in the body, and toting our weight around from place to place is its forte. Under ordinary circumstances it can support tremendous muscular stresses—hopping up and down a flight of stairs on one foot, running down a mountain, and for those who are prepared, jumping to the ground from heights of five feet or more. All of these activities require only moderate flexion, and the knee joint is made to order for them. The problem comes with yoga backward bending postures that flex the knee under unnatural circumstances.
The bow posture is a case in point. The beginning pose must start with a flexed knee joint which is then forced into extension from an awkward and unfamiliar prone posture. Indeed, it is hard to imagine a more unnatural or demanding role for this joint than to use it as the primary tool for lifting into the bow. The intermediate and advanced postures are not so much of a problem because they make more efficient use of the erector spinae muscles, the hamstrings, and the respiratory and pelvic diaphragms for coming up into the posture. They use knee extension merely to aid the lift, and they do so from a less completely flexed position than in the beginner’s bow.
The two advanced cobra poses stress the knees in an entirely different way. We come into these postures with the knees straight, which does not stress them at all, but once the rest of the body is settled we can take the additional option of bending the knees and pulling the feet toward the head. This increases tension on the quadriceps femoris muscles at the same time the joint ligaments start to become lax. Unfamiliar and disquieting sensations warn us promptly to be wary, and only after much experience will students not have misgivings about completing this last refinement of the cobra. To understand how the strongest joint in the body can be so vulnerable to injury, we must examine the anatomical components of the knee that often create problems. We’ll begin with the menisci.
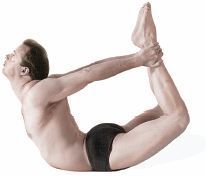
Figure 5.23. In this advanced bow (the string of the bow is drawn to the rear at the junction of the hands and the ankles), the lumbar region is extended 90° and the hips are hyperextended. The quadriceps femoris muscles are not nearly so important as in the beginner’s bow; they can help initiate coming up as an option, but they are not important as prime movers for the final pose.
THE MENISCI
The two bones that stand in end-to-end apposition to one another in the knee joints, the tibia and the femur, can withstand the repetitive shocks of walking and running because they are well cushioned. The lower ends of the femurs (femoral condyles) and the upper ends of the tibias (tibial condyles) are covered with thick layers of articular hyaline cartilage that have a slippery surface for permitting flexion and extension. In addition, donut-shaped wafers of fibrocartilage called the medial and lateral menisci (or medial and lateral semilunar cartilages), cushion the mating surfaces of the condyles (fig. 5.25). Torn menisci are difficult to treat because they have lost their blood supply by the time we reach our mid-20s, and if they are damaged after that time, usually in dance or athletics, they are essentially irreparable. This is why “torn cartilages” are greeted so apprehensively by adult athletes.
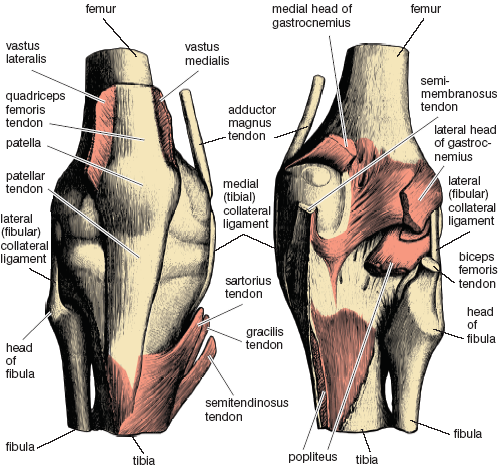
Figure 5.24. On the left is an anterior view of a superficial dissection of the right extended knee joint, and on the right is a posterior view (from Sappey).
The menisci move freely during the course of flexion. This is not ordinarily a problem because we assume that they will come back into their home position when the knee joint is subsequently extended. But that does not always happen, and if it doesn’t the menisci can get crushed by the opposing condyles. This might happen when you kick a ball or start to get up from a squatting position, and if you ever encounter unusual resistance to extension under such circumstances, carefully sit down and massage the knee before you try to straighten it. If you crush the menisci the only remedy may be trimming them surgically, if not removing them outright.
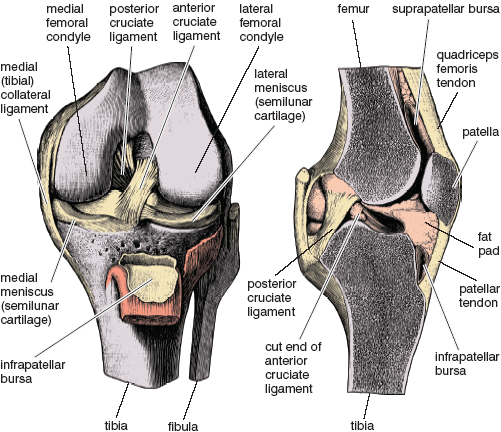
Figure 5.25. On the left is an anterior view of a deep dissection of the flexed left knee joint, and on the right is a sagittal cut through the extended knee joint (from Sappey).
THE CRUCIATE LIGAMENTS
The femur and tibia meet together in a hinge, and two internal ligaments, the anterior and posterior cruciate ligaments (fig. 5.25), keep the bones in alignment. Viewed from the side, the cruciate ligaments form an X. The anterior cruciate ligament runs from the back of the femur to the front of the tibia and constrains anterior displacement of the tibia in relation to the femur, while the posterior cruciate ligament runs from the front of the femur to the back of the tibia and constrains posterior displacement of the tibia.
The cruciate ligaments, especially the anterior cruciate ligament, are commonly stretched or torn in knee injuries, and even though they do not lose their blood supply entirely, as do the menisci, they are still so poorly vascularized that they do not easily heal. Many professional football careers have been brought to an abrupt end by an anterior cruciate injury. Envision a linebacker in a crouched position, clipped from behind by an opponent who throws his full weight against the top of the unsuspecting tibia. This will certainly tear the anterior cruciate ligament. It would be surprising, to say the least, to hear of anyone injuring a cruciate ligament doing advanced hatha yoga postures, but someone with an old injury might find that certain postures bear watching.
THE MEDIAL AND LATERAL COLLATERAL LIGAMENTS
The other two commonly injured ligaments in the knee are the medial and lateral collateral ligaments (fig. 5.24–25), which are important accessory ligaments on the medial and lateral aspects of the joint capsules. These are frequently injured by weekend athletes playing sports in which the body is wrenched and twisted in a direction at cross-purposes to foot position. It might be touch football, racquetball, or any sport in which your consciousness is directed away from your foundation. The collateral ligaments are often sprained under such conditions, meaning that some of their connective tissue fibers have been torn away from their bony attachments. Such injuries are slow to heal. If someone says they have a “trick knee,” it is often after a long history of collateral ligament sprains. As with cruciate ligament injuries, yoga postures are less likely to create new injuries than to irritate old ones.
THE PATELLA AND BURSAE
The main role of the patella, or kneecap (figs. 5.24–25), is to make extension of the knee joint more efficient. It is a sesamoid bone, that is, a bone that is inserted in a tendon, in this case between the quadriceps femoris tendon and the patellar tendon (fig. 5.24). During flexion it slides down the intercondylar notch, a deep vertical gutter between the femoral condyles (the articular end of the femur); during extension it acts like a pulley on the front of the knee. The patella is important in any activity in which the knee is supporting the weight of the body in a partially flexed position. You can imagine how useful it is in a standing lunge (fig. 1.2), or when you are rising up from a half squat with a barbell on your shoulders. In these activities your entire body is supported by the quadriceps femoris muscles, quadriceps tendons, patellas, and patellar tendons.
The up and down movement of the patella is made possible by the suprapatellar bursa, a lubricant-filled sack that is situated between the patella and the underlying tissues (fig. 5.25). Bursae are common accessories to many joints whose attaching tendons move in relation to their underlying tissues. If adhesions resulting from disease, injury, or inactivity develop within a bursa, the tendon can no longer slip back and forth easily. And this, in the case of the suprapatellar bursa, is one of the commonest causes of a “stiff knee” following traumatic injury. A circular problem may develop—you can’t flex the knee because of the injury, the bursa develops adhesions, and the adhesions further inhibit mobility. Again, the practical concern in hatha yoga is with old injuries. If they flare up, students so affected should be cautioned not to do any postures that stress the knees until the problem is resolved.
MINOR KNEE PROBLEMS
What can be done to prevent and resolve minor knee problems? The answer is simple—regular and prolonged muscular tension applied to the extended knee joint. Under those circumstances all parts of the joint fit together perfectly, allowing it to withstand intense isometric contraction of the surrounding muscles. If you have knee pain which is not due to serious internal injuries, the following series of standing postures can be highly therapeutic.
Keep the feet parallel and as widely separated as possible while holding the thigh muscles firmly, especially the adductors. Extending the knees fully is fine provided you do not hyperextend them beyond 180°, and provided you hold tension in the hamstrings as well as the quadriceps femoris muscles. Holding a firm base with isometric tension is the whole point of this series. Twist right, then left, then face the front; in each direction bend forward and backward, holding each position for 2–7 breaths (about 5–30 seconds). That’s six combinations. Hold the arms in various positions—elbows grasped behind the back (fig. 7.17a–f); arms and forearms stretched laterally; hands in a prayer position behind the back; arms overhead with forearms behind the head and catching the elbows; hands interlocked behind the back and pulled to the rear; arms in a cow-face position first one way and then the other; and hands on the hips (fig. 7.18a-g). That makes six times eight which equals forty-eight poses.
Start modestly, doing the postures only five minutes a day, and then gradually increase your commitment. If you spend fifteen minutes a day on this series, you cannot help but strengthen the muscles that insert around the knee and place a healthy stress on the capsule of the knee joint, as well as on its associated tendons and ligaments. And this works wonders. After a few months of regular practice, the connective tissues of the joint will have gained enough strength and integrity, at least in the absence of serious medical problems, to withstand not only reasonable stresses on the knees in flexed positions, but also the stresses of sitting in cross-legged meditative postures.
The standing and prone backbends play an obvious role in hatha yoga. But what is a supine backbend? How can one do such a thing? Oddly enough, this is indeed possible, and several of the most important traditional backbending postures in hatha yoga, including the fish, the wheel, and the bridge, either start or end in a supine or semi-supine position. In addition to that, in more recent times postures that support the back with a bolster or a ball have become regular fixtures in many practice plans, especially those with a therapeutic orientation.
Like the prone backbending postures, we can divide supine backbending postures into two categories, active and passive, depending on whether you lift yourself internally into a backbend or lie supine on a prop that allows you to relax. The simplest active supine backbending posture is to lie on your back and lift the abdomen toward the ceiling. We can call this a lumbar lift, and that’s where we’ll start.
THE LUMBAR LIFT AND LUMBAR PRESS
To do the lumbar lift, lie in the corpse posture, relax your abdomen, and arch the lower back forward by tightening the deep back muscles. The effect of this is to drag the rear of the pelvis and coccyx along the floor toward the shoulders, and thus increase the lumbar lordosis. This posture, however, is not entirely stable: you can’t maintain it except by continuing to pull on the hips from above. To create a posture that you can observe at your leisure, heave your hips up away from the floor while holding your weight momentarily between your heels and shoulders, and at the same time tug the hips forcibly toward the head using the deep back muscles. Then maintaining that tension with the back muscles, drop the hips back to the floor. If you do this two or three times in succession, readjusting each time to a deeper backbend, you will create a stable lumbar arch.
Once you are acclimated to it, you will notice that this posture is a good illustration of how inhalations either take you further into a posture or increase internal tension, and how exhalations either relax you toward a neutral position or decrease internal tension. If you keep the abdominal wall relaxed after you have lifted up, a deep abdominal inhalation pushes the abdomen further out and merely increases intra-abdominal pressure; if you hold moderate tension in the abdominal wall after you have lifted up, a full diaphragmatic inhalation increases internal tension, accentuates the lumbar lordosis, and takes you further into the posture (fig. 5.26). Each exhalation, by contrast, either decreases intra-abdominal pressure in the case of abdominal breathing, or relaxes you down slightly toward a neutral position in the case of diaphragmatic breathing.
When you are breathing diaphragmatically the lumbar lift becomes another diaphragm-assisted backbend, and except that it is supine, the posture is comparable to a prone diaphragmatic rear lift. In both cases it is impossible to create the lifting effect with inhalation unless the gluteal muscles are relaxed, and that is why it helps to pull your hips forcefully into a higher settled position. After feeling the effects of breathing in the new posture, you can come out of it by thrusting your hips back inferiorly to flatten your back toward the floor. Then relax in the corpse posture and notice that the diaphragm is no longer affecting the spine.
The opposite and complementary posture to the lumbar lift might be called a lumbar press, and this is another challenging exercise in concentration and awareness. Again start in the corpse posture, but this time exhale while you flatten your back against the floor (fig. 5.27) using the abdominal muscles (figs. 3.11–13, 8.8, 8.11, and 8.13), as discussed in chapter 3. Then keep the back immobile as you inhale, and notice the adjustments you must make internally to accomplish that. Each inhalation tends to pull the lumbar lordosis forward, and that has to be prevented with extra intra-abdominal pressure and tension from the rectus abdominis muscles, even though this pressure and tension restrains inhalation. It’s a balancing act. Exhalation is also a balancing act because it tends to create a slight release, and if you are not watchful the lower back will start to return to its slightly arched neutral position. So in the end both inhalation and exhalation have to be monitored constantly to keep the back pressed against the floor. Another complicating factor is that most students concentrate on the press so intently that they forget their extremities, and this will usually mean tensing them. Try not to let that happen. This is a breathing and concentration exercise for the lower back and abdomen.

Figure 5.26. Lumbar lift. A full diaphragmatic inhalation superimposed on having first dragged the pelvis toward the shoulders and having relaxed the gluteal muscles is illustrated here. The pose is a diaphragm-assisted backbend (arrow).
The lumbar press is more delicate than, but otherwise similar to, the preparatory position for the basic supine double leglift (fig. 3.17). There we were preparing for a tremendous amount of tension on the lumbar lordosis from the hip flexors, and we had to make a no-holds-barred effort to keep the lumbar region flat against the floor. Here we are looking at something more refined. We are lying supine with the lower back pressed to the floor and exploring an exercise without movement, holding the lower back flat against the floor during both inhalation and exhalation.
The lumbar lift is obviously contraindicated for anyone with lower back problems, but the lumbar press is a different matter. Anyone who can master that posture will have a potent weapon for dealing with low back problems. The exercise will strengthen the abdominal muscles along with the pelvic and respiratory diaphragms, and one can gradually learn to use breathing to bring conscious awareness to the abdominopelvic region. Coupled with mild prone backbending postures that strengthen the back muscles, the lumbar press is a powerful means to lumbar health.
THE FISH
Most fish regulate their buoyancy with swim bladders into which oxygen is secreted from the blood (which helps them rise toward the surface), and from which oxygen is absorbed into the blood (which helps them descend). Human beings do something similar: if they barely have enough body fat to enable them to float, they can regulate their buoyancy in the water by the amount of air in their lungs. And so it is that one of the most effective ways to stay afloat is to settle into the classic yogic fish posture (fig. 5.28) with the feet folded into the lotus position, the lumbar region deeply arched, the head and neck extended, and the anterior surface of the chest just above the surface of the water. Under these circumstances the body will rise and fall in the water with each inhalation and exhalation.

Figure 5.27. The lumbar press is a demanding breathing and concentration exercise for the back and lower abdomen in which the tendency of the diaphragm to pull the lumbar region forward is fully countermanded by intra-abdominal pressure that strongly presses the lower back against the floor (arrow) and that restrains inhalation.
Although the fish is a backbending posture, we also placed it in chapter 3 because an advanced abdominal exercise—the superfish leglift (fig. 3.19b)—can be derived from the pose. We’ll analyze the simplest beginning fish here, and cover other variations of the posture with the shoulderstand, with which it is traditionally paired as a counterstretch (fig. 9.19). To start, lie supine with the hands under the hips (palms up or down as you choose), knees extended, and feet together. Lift up on the forearms, arching your back, head, and neck, and then place a little of your weight on the back of the head, just enough to touch the floor. Extend the spine as much as possible as you support the posture with the forearms (fig. 3.19a).
Respiratory responses in the fish posture depend on the extent of your lumbar arch and on how active you choose to be in the posture. In students who are not very flexible, the costal insertion of the diaphragm cannot move the base of the rib cage because its bottom rim is already open, and the crural insertion cannot lift the lumbar lordosis because that region is already arched to its maximum. The only thing that can obviously move is the abdominal wall, which moves anteriorly with each inhalation and posteriorly with each exhalation. Advanced students who are more flexible and able to arch up more convincingly will have an altogether different experience. They will be doing diaphragm-assisted backbending, and their relaxed posture in combination with a favorable arm position also permits them to enlarge their upper chests for empowered thoracic breathing more convincingly here than in any other posture.
THE WHEEL
The wheel is one of the most dynamic whole-body postures in hatha yoga. Its Sanskrit name, chakrasana, implies that it activates the body from head to toe. In its fullest circular expression, with the hands touching the heels, it is the backbend of backbends.
The conventional way to come into the wheel is to lie supine with the feet flat on the floor and as close to the hips as possible. Place the palms near the shoulders with the fingers pointing down. Then lift the pelvis and push the hands against the floor, straightening the elbows to complete the posture. Let the head hang passively. If you have limited strength but plenty of flexibility (fig. 5.29) you can easily come up, and if you have lots of strength but limited flexibility you can push yourself up into some semblance of the posture with brute force. If you are limited in both realms the posture will be challenging, and all you may be able to do is push against the floor isometrically.

Figure 5.28. This classic fish posture with the feet in the lotus position is rewarding only for advanced students. Others will enjoy the more elementary posture with the feet outstretched (fig. 3.19a).
Given average spinal flexibility, the key to the posture is efficient use of the triceps brachii muscles. But the problem is that when the shoulders are against the floor, the extreme position of the upper extremities (with the wrists extended 90° and the elbows fully flexed) challenges the ability of the triceps brachii muscles to extend the forearms. If students find themselves struggling just to lift their hips, they will probably find that extending their elbows to complete the posture is impossible. And even if they can push themselves partway up, the iliopsoas and the rectus femoris muscles, acting as extensile ligaments, will start to limit them and prevent the requisite hyperextension of the hips. These problems are not insurmountable, and the usual remedy is to keep trying every day, gradually increasing strength and improving the backward bending capacity of the spine and hips. You can also lift up on your fingertips and the balls of the feet to make it easier. Sooner or later everything comes together and it becomes possible to partially extend the elbows, and when that happens the triceps brachii muscles will be more efficient in lifting you up. How the posture appears at that point will depend on the amount of backward bending in the spine and hips. With moderate flexibility the posture resembles an arch bridge, and with excellent flexibility it becomes chakrasana.
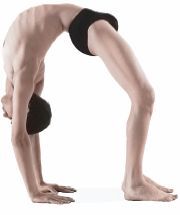
Figure 5.29. The wheel posture requires a combination of sacroiliac nutation (see chapter six), moderate hip hyperextension, 90° of lumbar extension, and enough strength in the arms (especially the triceps brachii) to push up into the posture. Alternatively, those who are especially flexible can drop into the pose from a standing position.
We know that the diaphragm generally limits backbending in those who are not flexible, and this is especially true of the wheel, where the need for muscular effort overwhelms the ability to deepen the backbend with inhalations. Advanced students who are lifted up in the posture don’t have that problem. They can easily adjust their breathing so that inhalations arch them up more powerfully.
If you are an advanced student or gymnast who can drop backward into the wheel from a standing posture, you will find this an excellent study in re-ordering priorities. Instead of establishing a solid base and moving your attention and efforts from distal to proximal (chapter 4), you lean backward from a standing position, exhale, and drop into a provisional back-bend with your focus on the lower back. Then you alter the positions of the upper and lower extremities, moving them closer together to bring the core of the body under tension.
As you lower yourself into the posture, the quadriceps femori come into their own, resisting all the way. The pectoral muscles also come under increased tension and impart that tension to the chest. All of this happens fast, but you are able to do it because you have prepared for a long time and are confident that the abdominal muscles, the respiratory and pelvic diaphragms, and the psoas, iliacus and rectus femoris muscles will have enough strength to protect the lumbar region.
Advanced students will always exhale as they drop into the wheel from a standing position. Intermediate students often do not have that much confidence, and if they are uncertain of themselves they tend to hold their breath as they drop back, knowing consciously or unconsciously that this will protect the back. As they stiffly lower their hands to the floor, often with a plop, it is obvious that they are going beyond their reasonable capacity. Such students should concentrate on coming into the wheel from the supine posture until they are more flexible and confident.
Both intermediate and advanced students will find that they need to be watchful of their knees, especially if they wish to lift from the wheel back into a standing posture. The quadriceps femoris muscles are already exerting a lot of tension on the knee joints in a flexed position, and that tension will increase during the forward-thrusting maneuver to stand up.
PASSIVE SUPINE BACKBENDING
The deep muscles that ordinarily hold the spine erect also keep it compressed, and it is only when you are lying down that they can relax and allow the vertebral bodies to spread apart (chapter 4). Any reclining position can accomplish this aim to some extent, but it is especially useful to relax in a passive supine backbend in which you lie on a bolster that permits your spine to extend without muscular involvement.
In hatha yoga classes we can accomplish this by lying passively on a ball placed underneath the spine anywhere between the pelvis and the head. This will open and release the facet joints of the superior and inferior articulating processes, and you can relax and let gravity do the work of stretching the spine, with the ball acting as a fulcrum all the way up and down the vertebral column. The idea is to relax muscles from the knees to the head on both the front and back sides of the body. It is a good idea to be wary of doing these exercises too much in the beginning. They are deceptively simple. They increase back and neck mobility, and they stretch you out more than you realize. It is easy to do too much and not know it until the next day.
You can experiment with different types and sizes of balls, but standard 81/2 inch playground balls (sometimes called foursquare balls or action balls) that contain 1—2 pounds of air pressure per square inch work well. This size and type of ball is excellent if you are in good to average condition. It is relatively soft, it does not press too sharply against the spinous processes and back muscles in any one place, and it’s big enough to give most people a good stretch. Basketballs, volleyballs, and soccer balls are too hard for the average person. Softer plastic balls can be found for those who find the standard playground ball too hard. But don’t try these exercises at all if you have acute back pain or a recent history of chronic back problems.
First place the ball under the pelvis with the knees extended, and roll from side to side to mobilize and stimulate the sacroiliac joints, applying pressure to different regions of the pelvic bowl and noticing whether or not you can relax (fig. 5.30). If you can’t, it means that you are having to protect yourself for some reason, and you may want to use a smaller and softer ball or place some pillows under the hips and shoulders to lessen the stretch. Then, after working with the pelvis and sacroiliac joints, roll the body down an inch at a time so the ball makes contact with L5, then L4, and on toward the mid-lumbar region, continuing to roll from side to side in each new position. Take your time and explore the sensations. You may feel some discomfort posteriorly as well as muscular resistance in the thighs, muscular resistance that pulls downward on the front of the pelvis. This tension (on both right and left sides) comes from the rectus femoris muscle, which pulls inferiorly on the anterior inferior iliac spine (of the pelvis), and from the sartorius muscle, which, as the longest muscle in the body, pulls inferiorly on the anterior superior iliac spine all the way from the medial border of the tibia. Notice that breathing has little impact on the posture: your lumbar region is already arched so deeply that the crura of the diaphragm cannot further increase the lordosis.
You will have different sensations when the ball is under the mid-lumbar region (in comparison with the pelvis) because this segment of the spine permits a lot of backbending. If you have any lower back tenderness, your weight on the ball at this site will expose it quickly, but if you are entirely comfortable you will soon feel relaxation spreading down the body. First the shoulders relax and the upper chest sinks toward the floor; then the abdominal muscles start to relax, which allows your breathing to become slow and smooth; then the hip flexors (the psoas and iliacus muscles) begin to relax, along with the quadriceps femori, the adductors, and the hamstring muscles. As that happens the relaxation deepens and the back conforms more and more to the curvature of the ball (fig. 5.31).
When you roll the ball to the lumbar-thoracic junction, the lumbar lordosis becomes less pronounced but is capable of more mobility, and deep inhalations will accentuate its arch. Now it becomes more difficult to roll from side to side, but stretching the arms overhead adds to the stretch in the chest and opens the rib cage. This creates a perfect moment to take deep thoracic inhalations and expand your inspiratory capacity. The work in this region will now start to affect the neck because the head drops back passively, and the neck will have to be strong and flexible to support its dead weight. If you are uncomfortable you can place one or more pillows under your head to temper the stretch and tension.
As you roll the ball under the middle and upper thoracic region you can gradually lower the hips to the floor and slowly feel resistance melt away (fig. 5.32). As soon as that happens the lumbar region will become passive and will not be affected by your breathing, and you will notice that the exercise mostly affects the neck and rib cage. As you relax with the ball under the chest, you may feel small adjustments taking place at tiny facet joints located between the ribs and the vertebral bodies, and between the ribs and the transverse processes (figs. 4.6a, 4.7a-b, and 5.33). This can be helpful if a rib has become dislocated at the site of these joints by a sudden unusual movement when the spine is in a bent position. Someone who understands the anatomy of the joints between the ribs and the spine can work the head of the rib back into its correct position and bring relief, but passive supine backbending on a ball can also alleviate minor dislocations.

Figure 5.30. Passive supine backbend with an 8 1/2 inch playground ball under the pelvis and rolled slightly to one side. Here we are stimulating and mobilizing the sacroiliac joints.
With the ball under the neck you should try to relax from the lower chest down. At first you may experience some pulling sensations in the upper chest that are difficult to release, but after you have worked with the various postures in the shoulderstand series (chapter 9) and your neck has become strong and flexible, this posture becomes so comfortable that you can easily fall asleep in it. Do be watchful of this. It is easy to develop a stiff neck if you stop paying attention to what you are doing.
After you have gotten used to placing your weight straight back symmetrically, you can roll the head and neck from side to side against the ball, mashing down against it actively, working your way down the transverse processes of the vertebrae between Ci and C7. This is both stimulating and relaxing, and it is an intense but effective remedy for stiffness. It can be done softly against a spongy ball by someone who is delicate, more vigorously against a playground ball by the average person, and even more aggressively against a soccer ball, volley ball, or basketball by bodybuilders.
A camel’s back is about seven feet off the ground. Fortunately for its rider, a camel can kneel, so one does not have to embark and disembark to and from that height, and that is where this kneeling hatha yoga posture gets its name. Only intermediate and advanced students should try the full version, and even they should do the following test exercises if they have not done the posture before.

Figure 5.31. A ball placed directly under the lumbar region is supremely relaxing if the lower back is healthy, but if the subject is unable to relax the abdomen and thighs, this is evidence for current or incipient lower back problems.

Figure 5.32. A ball placed under the mid-chest region permits the pelvis to drop to the floor, and mobilizes the facet joints between the ribs and thoracic vertebral bodies, and between the ribs and the thoracic transverse processes (see figs. 4.6-7 and 5.33).
Kneel with your thighs at right angles to the floor with your weight placed on your knees and the bottom surfaces of your flexed toes. Next, place the hands on the hips, fingers down. Stretch the pelvis forward. Keeping enough tension in the quadriceps femoris and iliopsoas muscles to keep you from falling backward, lower your head to the rear and extend the spine backward until you are at the limit of the quadriceps and iliopsoas muscles’ ability to hold the position comfortably. Watch your breath: if you have to restrain it at the glottis to protect your spine, you have gone too far.
At this point look and reach back with only one hand, swinging the other arm forward for balance. Do this first on one side and then on the other (fig. 5.34), making a mental note of how difficult it would be to place both hands against the heels or ankles at the same time. Now try the same exercise with your toes pointed to the rear. It is quite a bit harder. Because the heels are closer to the floor you have to reach back further than you do with the toes flexed, and reaching back further will require more stretch and strength of the quadriceps femoris muscles, which are already being worked and perhaps overworked just to support the posture. Finally, if you are comfortable in the test exercises and confident that you can do the full posture and come out of it gracefully, flex your toes again, reach back, and either touch your heels momentarily with your middle fingers or rest your hands on your ankles. You can easily come out of either position by pushing up asymmetrically from one side. Come up, then come back down into the posture and push up from the other side first. It will be harder on the thighs to come up symmetrically, lifting up and away from both ankles at the same time. When you can finally come in and out of this posture gracefully, either one side at a time, or from both side symmetrically, start all over and work with the pose with the toes extended (fig. 5.35).
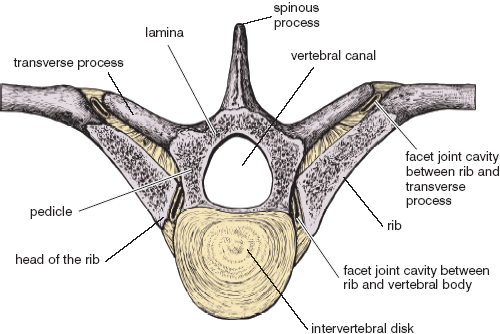
Figure 5.33. A cross-section through a mid-thoracic vertebra and two ribs. The viewpoint is from above, and it portrays an intervertebral disk along with the vertebral arch, pedicles, laminae, and vertebral canal. Four synovial facet joint cavities are also apparent, two between the heads of the ribs and the vertebral body, and two more between the ribs and the transverse processes (from Morris). See also figs. 4.6a and 4.7a-b.
The camel posture might be considered a modification of a standing backbend, except that it is more advanced because you can’t come into it halfway. You’re either in it or you’re not. In a standing backbend you can arch back to within your reasonable capacity, stay there for a while, and then come up, but the only way you can do the camel is to reach back for your heels or ankles, and keep on reaching until you make contact. There is another less demanding alternative if you are a beginner, and that is to support the lower back with your hands and arch back as far as your capacity permits. Over time, you will develop enough confidence to reach for one heel.
The camel generally places the body in an unusual combination of joint positions—hyperextension of the hips, stress on the knees from tension in the quadriceps femori, extension of the ankles, and extension of the spine. You have to focus your attention from head to toe, and at the same time you have to intuit how far to reach back in order to touch your ankles. Just as important, you should come out of the posture the same way you came in, but now you are pulling up and forward with the already-stretched quadriceps femoris muscles, which are now at a mechanical disadvantage. Even though it may be difficult to pull yourself up and forward with those muscles, it’s not a good idea to simply collapse down because that places even more stress on the knees.
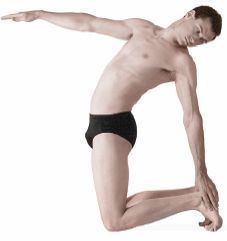
Figure 5.34. Beginner’s training pose for the camel. Reaching back toward the heel (toes flexed) with one hand while the other is reaching forward for balance is easy for healthy beginners.
By most standards of hatha yoga, the cobra exercises given through and including the section on raising up and down with breathing are mild, meaning that anyone in average condition can do them. The rest of the cobras, however, as well as many of the other backbending postures that follow, including most of the locusts, boats, bows, the lumbar lift, the fish, the wheel, passive supine backbending, and the camel, may be overly stressful for anyone with a history of chronic back pain, or even worse, for anyone with acute back pain. Therefore be conservative, and consider those postures contraindicated for such conditions.
Any posture that increases intra-abdominal but not intrathoracic pressure may exacerbate hiatal hernia, and many of the more challenging backbending postures create these exact pressure differentials. If you sometimes have pain in the upper abdomen on the left side, especially after eating, re-read the discussion on hiatal hernia in chapter 3 so you can form your own judgment about doing the backward bending postures. And if you are still uncertain, seek medical advice.
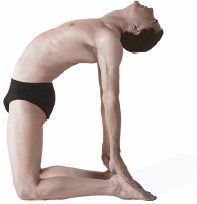
Figure 5.35. Camel posture. Build up to it cautiously and systematically from the half-camel, first with the feet and toes flexed and finally with them extended, always making sure you can come out of the posture gracefully.
Backbending, forward bending, twisting, inverted, and standing postures each have individual and group personalities. Among these, backbending postures are the most exhilarating and invigorating. As yoga postures they stimulate the sympathetic nervous system and prepare you for activity. In ordinary life activities, mild backbending relieves the tedium of sitting hunched over a desk, the stress from manipulating objects in the environment, and the habit of too much resting and reclining. In backbending you extend yourself, literally and figuratively, by lifting your posture, raising your spirits, and preparing yourself for action.
“Attachment follows the experience of pleasure— Aversion follows the experience of pain— Clinging-to-life is the sentiment which causes its own potency to flow equally even in the wise— Their operations are to be got rid of by meditation—”
— Bengali Baba, in The Yogasutra of Patanjali, pp. 34–35.