“As a result of practicing asana, you begin to understand your own body language. The body develops its own sensitivity and knows whether the food you eat is “right” or not. Your internal clock regulates your schedule precisely, and your body lets you know if you’re exercising too much, if you’re sleeping too much, and so forth.”
— Pandit Rajmani Tigunait, in Inner Quest, p. 68.
“Can you touch your toes?” Flexibility is equated first and foremost with “flex-ability,” and flexing forward—reaching for your toes—is its universal standard. It is what a hatha yoga teacher first sees, what a high school track coach on the alert for hamstring injuries is aware of, and it is the first thing personal trainers check when they measure your flexibility in health clubs. For testing purposes it means forward bending with the knees straight; if the knees are bent most people can fold forward almost completely.
Whether we are bending our knees or keeping them straight, we make vastly more use of forward bending than backbending. It is common enough to face an object, reach forward, and pick it up, but few can reach backward from an upright posture into the wheel, and even those who are able to do so would never reach over backward to retrieve something from the floor. We also spend hours every day in sitting forward bends—in front of computer screens, in car seats, in movie theaters, or on couches—generally with our backs rounded to the rear and our hips flexed. Everything considered, forward bending is more deeply ingrained in our bodies and nervous systems than any other posture.
In chapter 5 we saw that backward bending takes place mostly in the vertebral column, and that forward bending includes hip and ankle flexion as well as spinal bending. And because we can bend forward generously at the hips, we see many more forward bending than backbending postures in hatha yoga. They are included in one form or another in practically every chapter of this book.
We’ll start by looking at the anatomy of all the sites where forward bending can take place, from head to toe. Then we’ll focus on several forward bending postures in detail: the posterior stretch and its variations, the down-facing dog, and the child’s pose. And finally, because forward bending relies so heavily on sacroiliac and hip flexibility, we’ll turn to the various postures and exercises that encourage movement in the sacroiliac joints and that open the hip joints and make them more accommodating.
FORWARD BENDING: HEAD, NECK, AND CHEST
We saw in chapter 5 that the seven cervical vertebrae permit about 90° of forward flexion. In an upright posture, you can initiate a forward bend of the head with the tiniest nudge from the sternocleidomastoid muscles (fig. 8.11), which have a dual origin on the sternum and the clavicle and run from there up and back to the heavy bony protuberance (the mastoid process) just underneath the ear. After initiating the bend with these muscles, gravity carries the head further forward, controlled (as should by now be familiar) by eccentric lengthening of extensor muscles on the back side of the neck, as well as by tension in the elastic tissue in the ligamenta flava and the ligamentum nuchae (chapter 4).
As soon as the head comes forward, you can rest in that position and explore how the tissues respond. That is enough. It would be unnatural to make an extra effort to flex the neck while you are focused primarily on bending in the lower back and hip joints. Our main concern with the neck is that it be comfortable. Pain in one part of the body often has effects elsewhere, and neck pain doesn’t have to be very serious before it stops your desire to do anything else.
The articulations of the ribs with the twelve thoracic vertebrae posteriorly (chapter 4) and with the costal cartilages and sternum anteriorly (figs. 2.5 and 4.3–4) creates a hollow basket, a fixed unit that cannot easily accommodate either forward, side, or backward bending. Forcing the thoracic vertebrae and the rib cage into such curves would only break ribs, disarticulate costal cartilages, and collapse the chest. Only about 10° total of forward to backward bending can take place within the normal thorax of an average twenty-year-old, which means that the front-to-back mobility of the upper part of the torso depends almost entirely on spinal flexibility in the lumbar region, sacroiliac mobility, and hip flexibility.
LUMBAR AND LUMBOSACRAL FORWARD BENDING
In chapter 5 we saw that most forward bending in the spine from T1 and below takes place in the six intervertebral disks in the lumbar area between the twelfth thoracic vertebra and the sacrum. Up to 90° of forward bending is occasionally seen here, but 30–80° is more common. A moderately flexible young athlete might reveal 40° of flexibility in the lumbar region plus 75° of flexibility in the hips, and just be able to grasp his toes with his outstretched fingers (fig. 6.1).
Students who have good spinal flexibility might be able to bend forward more than 50° in the lumbar area, but they will not ordinarily choose to do so in hatha yoga postures. It is more convenient for them to bend forward at the hip joints, where cartilage slips against cartilage in synovial fluid, than to perturb the six intervertebral disks between T12 and S1. For the average person hip flexibility does not permit this, and such people usually try to compensate by trying to bend forward more in the lower back. Yoga teachers know that this is a formula for trouble, and that is why they always say “bend from the hips.”
THE DEEP BACK MUSCLES
It takes only one glance at a class of novices attempting sitting forward bends to see why it is not a good idea to force such postures: the resistance of the deep back muscles compresses the vertebral column, stresses the intervertebral disks, and strains ligaments from the sacrum to the head. So if this is the case, what do we want from the spine and deep back muscles? The answer is strength and adaptability: deep back muscles that can relax completely in the corpse posture, play their rightful role as extensile ligaments for maintaining an upright posture, and still act strongly as agents for bending and twisting.
Figure 6.1. This forward bend illustrates 75° of hip flexion and 40° of lumbar flexion in a moderately flexible young athlete (simulation).
SACROILIAC NUTATION AND COUNTERNUTATION
Even though the sacroiliac joints are synovial joints, their opposing surfaces usually fit together tightly enough for every movement of the pelvis to affect the sacrum (and therefore the spine as a whole), and for every movement of the sacrum to affect the pelvis. This view—that the sacroiliac joints are essentially immobile—has practical value, and it was in fact the only view until the 1930s, but it is an oversimplification: the synovial structure of the healthy sacroiliac joint is now known to provide its groove-and-rail architecture (figs. 3.3 and 6.2b) with the capacity for a small amount of slippage—movements that have been called nutation and counternutation by the French orthopedist I.A. Kapandji.
Even though nutation and counternutation are often minimal, these movements are important for doing backward bending, forward bending, and seated meditation postures with the niceties and refinements that expert hatha yogis take for granted. The difficulty is that few hatha yogis (or for that matter exercise specialists of any variety) have encountered discussion of how the movements function in posture, athletics, and day-to-day life. To understand how and why nutation and counternutation are important to us, we must look at their scope and nature in detail.
NUTATION AND COUNTERNUTATION
Nutation and counternutation are not complicated concepts as long as one understands three points: The first is that the sacrum rotates roughly in a sagittal (front-to-back) plane within the pelvic bowl. Nutation rotates the promontory (the top front border) of the sacrum anteriorly (toward the front of the body) and it rotates the coccyx posteriorly (toward the back of the body); counternutation rotates the promontory of the sacrum posteriorly and the coccyx anteriorly. It is important not to confuse these specialized sacroiliac rotations with anterior and posterior pelvic tilts, which are movements of the pelvis as a whole. Nutation and counternutation are sacroiliac rail-and-groove slippages of the sacrum between the pelvic bones (fig. 6.2a), not tilts of the entire pelvic bowl.
The second point to understand is that the planes in which the sacroiliac joints lie are not parallel to one another. If they were—if the joints were situated in exact parasagittal planes (parallel to the midsagittal plane of the body)—the sacrum could rotate without disturbing the configuration of the pelvis as whole. That doesn’t and indeed can’t happen because the sacrum has a broad wedge-like shape with the leading face of the wedge pointing to the rear. And since the mating surfaces of the sacroiliac joints always remain in close apposition, nutation pulls the ilia closer together (that is, toward the midline) as the promontory of the sacrum rotates forward, and counternutation forces the ilia laterally (that is, away from the midline) as the promontory of the sacrum rotates to the rear (fig 6.2a).

Figure 6.2a. The gross movements of the pelvis and sacrum that are involved in sacroiliac nutation are indicated by arrows. The promontory of the sacrum is thrust forward (*), the iliac crests are shifted medially (**), and the ischial tuberosities are spread apart (***). For counternutation, the shifts are in the opposite direction: the iliac crests move laterally, the sacral promontory moves posteriorly, and the ischia move medially (from Kapandji, with permission).
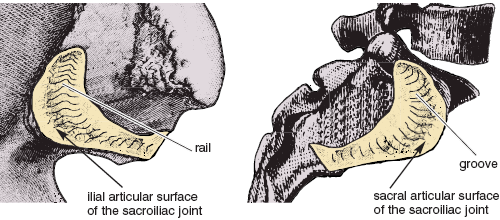
Figure 6.2b. Enlargement of fig. 3.3 showing the matching rail (on the left) and groove (on the right) architecture of an idealized sacroiliac joint. Such a joint might permit up to 10° of slippage (essentially a rotation) between full nutation and full counternutation. The pelvic bone (left) has been disarticulated from the sacrum (right) and flipped horizontally to reveal the articular surfaces and to suggest how a healthy sacroiliac joint could permit this much movement (Sappey).
Finally, remember from chapter 3 that each pelvic bone (one on each side) is composed of the fused ilium, ischium, and pubis, with the ilia on top at the waistline, the pubic components in front above the genitals, and the ischia with their tuberosities below and behind (figs. 3.2–4). When the ilia are pulled toward the midline during nutation, the ischia and ischial tuberosities have to swing laterally, and when the ilia are spread apart by counternutation, the ischial tuberosities rock back toward one another. We should note that even though nutation and counternutation were named in recognition of the movements of the sacrum alone (nutation means nodding forward, in this case nodding forward of the promontory of the sacrum), the accompanying movements of the pelvic bones are equally important (fig. 6.2a).
The way these movements are orchestrated during childbirth further clarifies their function. Again, according to Kapandji, during the early stages of labor counternutation draws the promontory of the sacrum to the rear and spreads the ilia, making more space for the baby’s head as it approaches the birth canal. Then, as the head enters the vagina, nutation draws the coccyx to the rear and spreads the ischia, opening the base of the body and easing delivery.
NUTATION AND COUNTERNUTATION IN HATHA YOGA
Four fundamental movements illustrate how the concepts of nutation and counternutation apply to hatha yoga. First, to create maximum nutation, stand with the thighs abducted (feet perhaps 3 feet apart) and come into a forward bend purely from the hips. To avoid forward bending in the spine, most people should reach out to a desktop or wall (fig. 5.7, except with the thighs abducted). Get settled into a comfortable position in which you can monitor your pelvis and vertebral column, and then try to thrust your coccyx even more posteriorly and the promontory of the sacrum even more anteriorly. If your sacroiliac joints permit, you will feel some peculiar shifts within the pelvis, shifts which flexible students report as “spreading the sitting bones” or “feeling the thighs come apart.” Such descriptions are not metaphors; these movements actually happen during the course of nutation. You may be able to feel them in yourself, and you can certainly appraise them in a highly flexible partner, either by placing your thumbs against the insides of their ischial tuberosities from behind, or by lying down on the floor and placing your hands against the inside of their upper thighs. You may not be able to feel the movements of your partner’s sacrum, but the movements of the ischial tuberosities and of the femurs are unforgettable. Easing up on the posture will produce counternutation and pull the ischia and upper thighs back together.
Next, consider relaxed standing lumbar backbends (figs. 4.20 and 5.2), which provide yet another example of nutation. As you bend lackadaisically to the rear you can easily imagine that the ilia are pulled backward and medially in relation to the upper part of the sacrum. The top of the sacrum moves backward as well, but its promontory is squeezed forward relative to the ilia. The coccyx, by contrast, moves to the rear in relation to the pelvic bowl, and the ischial tuberosities spread apart. These conditions all define nutation—the nodding forward of the promontory of the sacrum. It may seem counter-intuitive that nutation accompanies a relaxed standing backbend, but that is what happens.
Third, in contrast to forward bending from the hips and relaxed lumbar backbends, easy standing forward bends from the waist result in counternutation. Here the ilia are first pulled forward and laterally in relation to the upper part of the sacrum, which means that the sacral promontory moves backward (again relative to the pelvic bowl). And as the ilia are spread apart, the coccyx moves forward and the ischial tuberosities come closer together.
Fourth, recall from chapter 5 that most hatha yoga teachers ask students to squeeze their hips together and create whole-body backward bends rather than relaxed lumbar bends. Squeezing the hips together, along with keeping plenty of eccentric tension in the iliacus and rectus femoris muscles, maintains the attitude of counternutation by holding the ischia close together and by keeping the promontory of the sacrum pulled to the rear rather than allowing it to be squeezed forward. Yoga teachers intuitively recognize that it’s a sharper, safer posture, especially for beginners.
Reiterating: to avoid getting confused, the reader must constantly remember that nutation and counternutation describe movements of the sacrum and pelvic bones purely in relation to one another, and that these movements may or may not be the opposite of pelvic bowl movements during the course of backbending and forward bending. For backbends in general as well as forward bends in general, movements of the pelvic bowl as an entity are exactly what one would figure out logically: the upper rim of the pelvis tilts backward during backbending (a posterior pelvic tilt) and forward during forward bending (an anterior pelvic tilt). Just don’t forget that such pelvic tilts are entirely separate from the shifts between nutation and counternutation.
It is difficult to feel and measure the movements of the ilia during nutation and counternutation, but the medial and lateral excursions of the ischial tuberosities and thighs provide us with windows that allow us to evaluate the other components of these specialized movements. Assuming that you have some sacroiliac mobility, place your middle fingers tightly against the medial borders of your ischial tuberosities, and ask someone to measure the distance between your fingernails during a relaxed standing backbend. What they’ll find is that this span measures about 2 inches in the male and 3 1/2 inches in the female, which represents maximum nutation (ilia in, ischia out; fig. 6.2a). It is important to stay relaxed for the measurement, however, because if you tighten your hips, the gluteal muscles will pull your fingers closer together and skew the measurement to the low side.
Next come all the way forward (bending from the waist), keeping your fingers tightly in position. Now a flexible young man might show 1 1/2 inches across the same span between the fingernails (a decrease of 1/2 inch), and a flexible young woman might show 2 1/2 inches across the same span (a decrease of 1 inch). This represents maximum counternutation (ilia out, ischia in; fig. 6.2a).
Now you know, or can at least imagine, why yoga teachers ask you to bend forward from the hips (fig. 6.10–11). In contrast to what happens in a forward bend from the waist, the first thing you will accomplish, or at least try to accomplish, is nutation. If you have sufficient sacroiliac mobility, this takes place automatically even before you bend at the hips. And the opposite is true of whole-body backbends. For such bends, the safest attitude, especially for beginners, is full counternutation (fig. 4.19). The nutation that is established as a priority in relaxed lumbar backbends (fig. 4.20) is best reserved for experts who are fully confident in their lower backs and who need full nutation for coming into extreme backbending positions such as the advanced cobra (fig. 5.12) or the wheel (fig.5.29).
FORWARD BENDING AT THE HIP JOINTS
If your ability to bend forward were to be tested casually or even objectively with devices that measure how far forward you can reach in a sitting forward bend, little or no distinction would be made between how much of that flexibility is in the hips and how much is in the lower back.
[Technical note: Under these circumstances, no consideration would be given to the possible role of sacroiliac movements. That’s just as well, because whether nutation or counternutation is more significant will depend on the person: nutation will be more prominent in those who have good hip flexibility, and counternutation will be more characteristic of those who have to bend mostly from the waist. Sacroiliac movements take care of themselves naturally and will therefore be ignored in the following discussion.]
If you are unusually flexible and can lay your chest down against your thighs while keeping the knees straight, we can estimate that the first stage of the bend will be about 120° of flexion at the hip joints and that the second stage will be about 60° of flexion in the back. The fact that someone who is this flexible can bend twice as much in the hips as in the lumbar spine gives some idea of how important hip flexibility is to forward bending in general, and it also accounts for why yoga teachers place so much emphasis on it: they know how useful hip flexibility is to them personally. Here we’ll focus on its main impediments—hamstrings and adductors—for those who are not so flexible.
THE HAMSTRING MUSCLES
The hamstring muscles include the biceps femoris, the semimembranosus, and the semitendinosus muscles, and except for the short head of the biceps femoris, which takes origin from the femur, they all take origin from the ischial tuberosities and run from there along the rear of the thighs all the way to the bones of the leg—the tibia and fibula (figs. 3.10b, 8.9–10, and 8.12).
Because the hamstring muscles bypass the distal end of the femur, flexing the knee joint brings their insertions closer to their origins and releases tension throughout the backs of the thighs during any forward bend. Extending the knees in a forward bend, on the other hand, stretches the hamstrings and generates tension that pulls on the underside of the pelvis. This in turn makes it difficult to rotate the top of the pelvis forward (in an anterior pelvic tilt) and remove tension from the flexed-forward lumbar region.
A simulation of these effects in a flexible young man will clarify the role of the hamstrings in forward bending. First he should lie supine with one knee straight and the other knee flexed, and then he should draw the bent knee toward the chest without pulling it so far that the pelvis is lifted away from the floor. Keeping the knee flexed relieves hamstring tension so effectively that the hip can now be flexed through a range of about 150° from its supine starting position, creating a 30° angle with the floor (fig. 6.3). Then as he extends the knee, the hamstring muscles will first be pulled taut and then force a partial extension of the thigh to a less acute angle, perhaps to a nearly straight up 80° (fig. 6.4). This means that when his knees are extended the hamstrings limit hip flexion by 50°.
THE ADDUCTOR MUSCLES
Some of the adductor muscles of the thigh (figs. 2.8, 3.8–9, and 8.13–14) have a hamstring character. That is, in addition to drawing the thighs together they pull them posteriorly. And since some segments of the adductors (chapter 4) take origin on the inferior pubic rami near the ischial tuberosities (chapter 3), it is obvious that they will limit forward bending exactly as the hamstrings do—by exerting tension on the underside of the pelvis and creating a posterior pelvic tilt. It is also plain that the adductors will be stretched the least when the thighs are together and the most when the feet are wide apart. Therefore, with the thighs adducted, the limitations to hip flexibility are mostly from the hamstrings (figs. 3.10b, 8.9–10, and 8.12). Abducted, any additional restriction to forward bending can only be from the adductors. How this operates depends on the person. As shown here, the adductors limit hip flexion the most in those who start with less hip flexibility (figs. 6.5–6).
FORWARD BENDING AT THE ANKLES AND IN THE FEET
If you have average flexibility in the ankles, you will be able to flex (dorsiflex) the foot no more than 20–30° and extend (plantarflex) the foot no more than 30–50°. But you need to flex the ankle 45° to drop the heels to the floor in hatha yoga postures such as the down-facing dog (figs. 6.17 and 8.26), as well as to sit in a squat (especially with the feet parallel) without lifting the heels (fig. 6.7). Mobility for extending the ankle is also needed for postures such as the upward-facing dog (fig. 5.13) and for sitting comfortably on the heels with the toes pointed to the rear. The pained facial expressions in a room filled with beginning hatha students trying to sit in such a posture reflects how rarely it is used in Western societies.
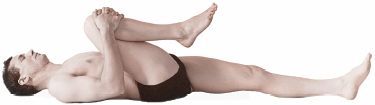
Figure 6.3. Hip flexion of up to about 150° is permitted when tension on the hamstring muscles is released by flexing the knee.
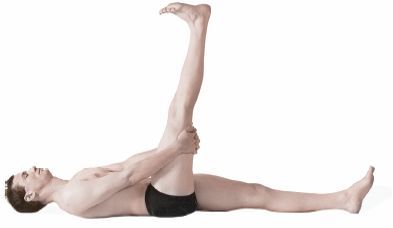
Figure 6.4. When the knee is held fully extended, the hamstrings limit most people to less than 90° of hip flexion, in this case a simulated 80°.
Flexion and extension at the ankle takes place at the talocrural joint, which is located between the distal ends of the tibia and fibula on one hand and one of the tarsal bones of the foot, the talus, on the other (fig. 6.8). The distal ends of the tibia and fibula form a hemi-cylinder (a cavity shaped roughly like half a cylinder) which articulates with the pulley-shaped upper surface of the talus. The rest of the bones of the foot permit little movement except for the metatarsals and phalanges, which become important when the feet and toes are flexed (that is, when the feet are dorsiflexed and the toes are curled toward the head) and when they are extended (that is, when the feet are plantarflexed and the toes are pointed away from the body).
As in all joints, movements of the ankle are limited by muscular tension, ligaments, and bone, and it is tension in the soleus and gastrocnemius muscles (figs. 3.10, 7.6, 8.9–10, and 8.12) on the back of the leg that first prevents you from pressing the heels to the floor in an attitude of flexion (that is, dorsiflexion) in the down-facing dog. Extension (that is, plantarflexion) is more likely to be checked by ligaments and bone, although tension in the flexors, which are situated on the anterior sides of the bones in the legs, will curb extension in everyone whose ankle flexibility is severely limited. Over time, extension of the ankle joint takes care of itself with the practice of postures such as the upward-facing dog with the toes extended (fig. 5.13). Developing the capacity for flexion is more difficult because the gastrocnemius and soleus muscles, as well as the ankle joints, have developed lifelong habits for functioning within limited lengths and ranges of motion. Besides the down-facing dog, possibly the best practice for correcting an incapacity for flexion is simply to sit in a squat for 2–3 minutes several times a day. At first you can squat with your feet well apart and your toes angled out widely enough to permit your heels to reach the floor (fig. 6.9), and after you have acclimated to that you can gradually bring your feet closer together and parallel.
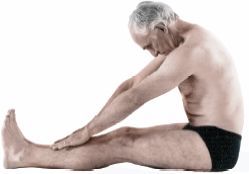
Figure 6.5. With the thighs adducted, the hamstring muscles permit about 80° of hip flexion.
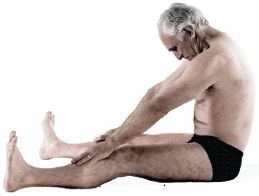
Figure 6.6. With the thighs abducted, the increased tension on the adductors (some of which have a hamstring character) can further limit hip flexion, in this case to about 60°.

Figure 6.7. Excellent ankle flexibility for flexion is required for squatting flat on the floor with the feet together and parallel.

Figure 6.8. The 28 bones and 25 joints associated with each foot and ankle support the weight of the body and accomodate to uneven surfaces for walking and running. The talocrural joint is the one which we are constantly aware of in hatha yoga because that is where we experience the flexion and extension of the ankle needed (and frequently lacking) for so many postures (Sappey).
Contraindications to forward bending are obvious. Don’t do any forward bending postures if you have acute back pain; instead, get yourself under the care of a professional, who by tradition will probably tell you to go to bed and rest. But there are many grey areas that indicate caution rather than contraindication. Muscular tension sometimes edges over into mild discomfort or pain, and even if you have come into a posture carefully you may still experience sensations that you do not know how to interpret. Explore these carefully and try to analyze their nature and source. Try to discover if they include pain, stretch, or a combination of the two, and then try to localize the specific sites of the sensations. The idea is to learn where the forward bend is being limited so you can attend more specifically to that site. You may decide to limit yourself to being watchful, or you may decide to plan a program for working with the region more actively.
LOW BACK PAIN IN GENERAL
The causes of low back pain are legion, and attempting to consider them in detail is beyond the scope of this book. Nevertheless, a few comments on locating the pertinent anatomical hot spots are appropriate. Looking from above down, lumbar and lumbosacral pain appear just above the pelvis and close to the midline posteriorly. If pain just lateral to this region is found only on one side, it may be due to stress and weakness in one of the quadratus lumborum muscles, which are interposed between the psoas muscles on one hand and the erector spinae and abdominal muscles on the other, and which strengthen the all-important connections between the ilia and the rib cage (figs. 2.7, 3.7, 5.5, and 8.14). Alternatively, and possibly a little lower and more precisely localized, tension on the iliolumbar ligaments, which run between the fourth and fifth lumbar vertebrae to the pelvis (fig. 3.4), may manifest as a slight pulling which extends from the lowest two lumbar vertebrae laterally to the crests of the ilia on both sides. These important ligaments stabilize the lumbar region in relation to the pelvis and augment stabilization of the sacroiliac joint. One or more of the iliolumbar ligaments is occasionally stressed, generally on one side of the body, and is a common source of low back pain. If you experience some relief from digging your thumbs into the grooves just medial to the crest of the ilium on each side, especially while you are doing a standing backbend, you are probably alleviating strain on these ligaments.
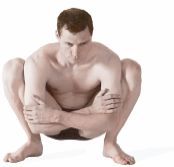
Figure 6.9. Squatting with the feet well apart and angled out is one of the best methods to gradually develop ankle flexibility for flexion.
Foreshortened hamstrings, adductors, and hip flexors are often contributing elements to low back pain. Because our ordinary activities do not keep these muscles stretched and flexible, they can gradually become shorter, occasioning chronic tension, injury, and subsequent muscle spasm in the deep back muscles and hips, not to mention a general resistance to forward bending. A long-term course of stretching and strengthening, with emphasis on the latter, is indicated.
SACROILIAC SPRAIN
Continuing inferiorly, malfunctional sacroiliac joints are also frequently associated with low back pain. Their architecture varies, not only from person to person, but from one side of the body to the other. Only one characteristic is constant—reciprocal mating surfaces that match one another (figs. 3.3 and 6.2b). An indentation on one surface of the joint always matches a tubercle (bulge) on the other, and a ridge on one side always matches a groove on the other. If the matching surfaces are smooth, movement will be free, but if they are irregular, with many peaks and valleys, movement will be limited, and over a long period of time we would not be surprised to see that fibrotic connections have formed that bind the opposing surfaces together. If that process is not interrupted with daily exercise, stretching, and hatha yoga postures that are designed to encourage nutation and counternutation, ankylosis (that is, partial or complete fusion) of the joints may develop—and if that happens, as mentioned earlier, any dislocation can produce extreme pain and trauma.
Pain from dislocations of the sacroiliac joint appears lower and slightly more lateral to sites that are exhibiting lumbar, lumbosacral, and iliolumbar ligament pain, usually more on one side than the other. If the surrounding muscles do not keep the joint protected when it is under stress, the fibrous tissue that binds the sacrum to one or the other side of the ilium can be torn, with repercussions that can last for many years if the injury is not diagnosed and properly treated. This condition, called sacroiliac sprain, may be so painful that the surrounding muscles immobilize the joint. Then, as such a sprain heals, the offended joint often becomes locked while the one on the opposite side compensates with too much mobility. If that happens you can try to restrain movement on the side that is overly mobile and promote movement on the side that is locked, and if you get to work on the condition before the joint becomes completely fused, you may be able to gradually regain mobility and balance. Asymmetric standing postures are ideal, as is the pigeon, which we’ll cover later in this chapter. You can work with these postures three times, favoring the tight side first and last, so long as you keep in mind that any program trying to deal with anything more than minor problems should be approved by a professional.
SCIATICA
There is one more thing to consider—the sciatic nerve (fig. 3.10a)—that is loosely associated (at least by the general public) with lower back problems. Most nerves course alongside and among the flexor muscles of joints, so that folding the joint releases tension on the nerve. But the sciatic nerve, which passes posteriorly through the hip on the extensor side, is a glaring exception: hip flexion places it under more rather than less tension. This is ordinarily not a problem, but when muscles deep in the hip are injured, scar tissue forms during the healing process and frequently restricts movement of the sciatic nerve somewhere along its course through the muscles supporting the hip joint. This usually happens in the region of the piriformis muscle (figs. 3.8b, 3.10a, and 8.12). The result is sciatica—pain that radiates down the back of the thigh. If, after a seemingly minor injury, you get a dull persistent pain in one hip and thigh when you are forward bending, or even just walking or sitting, it is probably sciatica. It can last for days, weeks, or even years, but assuming the source of the problem is in the hips, it can usually be treated successfully by manual medicine and bodywork, often in combination with a program of stretching.
LOW BACKS: LIVING AND LEARNING
Working with all lower back problems that do not go away with a few days of rest and recuperation is likely to require commitment to a long-term program. To be on the safe side, drop false expectations and think in terms of 5–20 years of consistent, patient effort. Here are your specific aims: relief from and healing of low back pain in the short run, strengthening the back and abdominal muscles in the intermediate span of time when you are likely to be afflicted with chronic stiffness, gradually increasing flexibility in the long run, and above all, professional care from beginning to end. Surgery? Maybe, but do your own research and get a second and even third opinion. And no matter what, get attention from someone who is truly interested in working with these problems in a three-way partnership: the professional, the patient’s interest and enthusiasm, and the aggravated back.
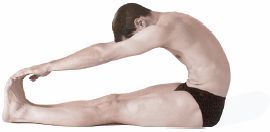
If a traditional hatha yoga instructor were to teach a student only five postures, they would probably be the headstand, the shoulderstand, the sitting half spinal twist, the cobra, and the posterior stretch—the definitive forward bend. The posterior stretch can be initiated properly only after full nutation of the sacroiliac joints; after accomplishing that, its essence can be known only if the pose is hinged primarily at the hip joints and completed with a minimum amount of spinal flexion. Although we’ll discuss posterior stretches for students with a wide range of skills, the plain truth is that the full experience of this posture is denied everyone who lacks good sacroiliac and hip flexibility.
To do the posterior stretch, you start in a sitting position with the back straight, the knees extended, and the heels and toes together (fig. 6.10). Stretch the hands overhead and thrust the sacral promontory forward through the action of the psoas muscles in order to emphasize nutation. Then, keeping the promontory of the sacrum forward, the ilia closer together, and ischia apart, fold forward slowly from the hips. As soon as you have reached your limits of hip flexion (fig. 6.11), bend forward in the lumbar region with the aid of gravity. This movement should not be passive; it should be accompanied by actively lengthening and stretching the torso. Finally, as you flatten your chest down against your thighs (fig. 6.12), the sacroiliac joints slip back into a neutral position between nutation and counternutation. In the final posture, the knees are straight, and the ankles, feet, and toes are all flexed, completing a literal posterior stretch from head to toe.
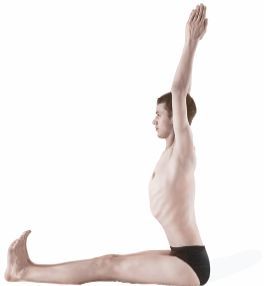
Figure 6.10. Beginning position for posterior stretch for advanced students. Notice that the model starts with his hips flexed about 100° (10° beyond vertical) merely by reaching straight up with his hands.
BEGINNING FORWARD BENDING
The above instructions are fine for a select few, but preposterous for the average person. In the first place, when they are sitting on the floor in the starting position, inflexible beginning students begin the pose with their sacroiliac joints in full counternutation instead of nutation. They probably won’t be aware of this, but they will be acutely aware and frustrated that they are already bent forward at their hips to their limit just trying to sit up straight. They also won’t be very appreciative of the instructor who softly intones “let gravity gently carry you forward” when gravity is pulling them nowhere but backward.
Still, an alternative is needed for those who are not flexible enough to roll forward into the classic posture, and the best is a natural sequel to one of the sit-up exercises in chapter 3. Sit flat on the floor with the knees extended, the head forward, and the back rounded. For now, at least, forget about sacroiliac movements. Place each fist in the opposite armpit, and slowly pull forward using the hip flexors (the iliacus and psoas muscles). Locate the pulling sensation from these muscles deep in the pelvis. This is easy since they are doing nearly all the work. It is also important to keep the knees fully extended and the thighs in place by tensing the quadriceps femori. We want those muscles to stabilize the thighs and knees, thus enabling the iliopsoas muscles to act only on the pelvis to pull the torso forward. (If the quadriceps femoris and iliopsoas muscles were to act in the other direction to lift the legs and thighs, we would end up in one of the boat postures, as discussed in chapter 3, rather than a sitting forward bend.) When you have flexed forward at the hips as far as you can, hold the bend to your comfortable capacity (fig. 6.13). This posture is excellent for beginners, not only because everyone can do it, but also because it brings attention to the places where the posture is being limited: the lower back, the pelvis, and the hip joints. It is safe as well as rewarding.
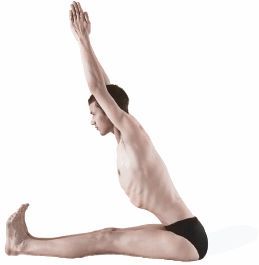
Figure 6.11. An intermediate position for the posterior stretch in which the hips are flexed about 130°. The model has now “bent forward from the hips” about 30° (from 100° to 130°). Even so, the lumbar lordosis has already started to flatten in comparison with the full lumbar arch shown in fig. 6.10, which is evidence for having already begun the process of bending forward “at the waist.”
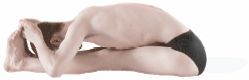
Figure 6.12. The completed posterior stretch, with knees straight and the chest flattened down against the thighs.
The hip flexors pull you forward concentrically in this exercise, but they also eccentrically resist dropping to the rear if you slowly roll part way back while keeping the head forward and the lumbar region flexed (fig. 6.14). Do not lower yourself so far to the rear that you don’t have enough strength to lift up gracefully. Go back and forth between the two positions (all the way forward and moderately to the rear) 5–10 times to become familiar with the sensations. If you wish you can always roll all the way down and combine the exercise with yoga sit-ups. Just make sure that you can come back up without having to hold your breath and throw yourself up from the supine position.
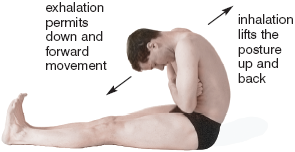
Figure 6.13. The hip flexors (iliacus and psoas muscles) and the rectus femoris muscles are the prime movers for pulling forward concentrically, while the quadriceps femoris muscles as a whole keep the knees extended.
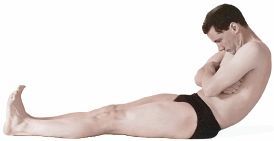
Figure 6.14. Leaning slowly to the rear with the fists still in the armpits, the hip flexors and rectus femoris muscles lengthen eccentrically to restrain the movement. Then, as you come back up and again pull forward, the same muscles shorten concentrically.
The next stage might be called a posterior stretch modified for beginners. To do it, rest your hands on your thighs and draw the toes toward the head. Reach forward with the hands, flexing the neck, and bend forward by flexing the lumbar region and the hips at the same time, concentrating on using the hip flexors exactly as in the exercise in which the fists were in the armpits. Create moderate tension in the quadriceps femori to brace the knees against the floor. Then, after sliding the hands down the lower extremities, settle into a comfortable position holding on to the legs, ankles, or whatever you can reach without pulling or tugging. Remain in the posture for 1–5 minutes. If you are not comfortable it means you have ensconced yourself into a pose that is beyond your reasonable capacity. In any case, to come out of this beginning posture, slowly roll up, releasing first in the more vulnerable hips and lumbar spine, and then in the rest of the body. As in the previous posture, don’t be overly concerned with sacroiliac movements.
THE INTERMEDIATE POSTERIOR STRETCH
Once you have achieved a little hip flexibility and are familiar with the operation of the hip flexors, you can try a real posterior stretch. Sitting on the floor with the knees extended, the feet together, and the hands stretched overhead, try to bend forward leading with the promontory of the sacrum so as to start, at least, with your full capacity for sacroiliac mutation. What you are doing is trying to keep the lumbar lordosis intact as long as possible. This may be difficult because if your hamstrings and adductors are too short, they will keep the top of the pelvic bowl tilted to the rear in a posterior pelvic tilt. The hamstrings and adductors are not an impediment to the previous exercises for beginners, in which you were purposely rounding the back to the rear, but here they prevent those who are inflexible from even sitting up straight, much less flexing forward at the hips. There is no quick remedy for this state of affairs, and you will probably have to work with the hamstrings and adductors for a long time before you see much difference in your forward bending.
Stretching your hands overhead as high as possible in the starting position will bring you an immediate understanding of your limits in this posture. If you have good hip flexibility, you will feel the back arch forward in the lumbar region and create an anterior pelvic tilt merely by stretching up. In this case, your torso might be at a right angle from the floor, defining a 90° forward bend from the hips. It is more likely, however, that you do not have that much hip flexibility, and just trying to come into the initial stretched-up posture will stretch your hamstrings to their limits. In any case, to complete the posture as gracefully as you can, maintain as much lift as possible with the upper extremities, keeping the knees extended and the feet together, and bend forward slowly, allowing gravity to help the back become rounded.
As soon as you reach your limit of bending with the upper extremities stretched out and forward, drop the hands to the thighs, knees, ankles, or feet, and remain in that position for a minute or two. Relax. Most students will try to tug on their feet or legs with their hands to pull themselves down, but this should be discouraged. Only when you have achieved good hip flexibility is it advisable to pull on the feet with the hands (fig. 6.15), and even then the object should be lengthening and stretching the back, not forcibly flexing the lumbar spine. Sitting on a cushion will also help because it will take some of the tension off the hamstrings and permit the pelvis to rotate forward at the hip joints without depending so much on spinal flexion.
To come out of the posture intermediate students should think first of lengthening the back, firming up the lower half of the body, and then stretching forward from a feeling of strength in the abdomen and lower back. From there they can lift the arms, raise the head, and unfold at the hips. Coming up this way adds to the tension in the lumbar region and hips; this is inadvisable for beginners but should work for experienced students. If there is any doubt, forego the elegance and release the pose initially in the hip joints and lower back as recommended for beginners.
THE LATERAL ROTATORS OF THE THIGH
After the intermediate levels of the posterior stretch have been experienced, it will be helpful to explore the muscles that impede your progress more systematically. We’ll start with certain of the lateral rotators of the thigh that also act as abductors in sitting positions. Coming into the posterior stretch with your heels and toes together, you may notice a sense of lateral pulling deep in the hip. This comes from stretching four paired muscles: the piriformis, the obturator internus, and the superior and inferior gemelli (figs. 3.8b, 3.10b, and 8.12), all of which are lateral rotators of the thighs.
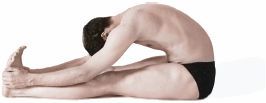
Figure 6.15. The intermediate student working on the posterior stretch should still concentrate on internal work with the hip flexors and rectus abdominis muscles rather than trying to pull forceably into the posture with the upper extremities.
To pin down for certain the extent to which these four paired muscles are limiting your forward bending, sit on the floor with your knees extended and your feet far enough apart for the big toes to barely touch when the thighs are rotated medially as much as possible. Then bend forward, taking note of exactly how far you can come into the posture and of how much lateral pulling this produces in the hip. Then come up a little, swing the toes out (which rotates the thighs laterally), and again bend forward. This relieves the tension, allows you to come further forward, and demonstrates how much the lateral rotators were limiting your bend.
The piriformis, obturator internus, and gemelli muscles are located beneath the superficial gluteal muscles. Even though they are deep, it is easy to envision their roles if you understand that their origins are located on the anterior side of the sacrum, and that they pass across the hip to insert on the lateral side of the femur from behind. In an upright posture they function to rotate the thigh laterally, but in a sitting position with the thighs flexed 90° they become abductors as well. Therefore, they are stretched the most when the thighs are adducted, rotated medially, and flexed. Don’t confuse the actions of these muscles with the other lateral rotators of the thighs, the adductor longus and adductor magnus (see figs. 3.8–9 and 8.13–14 for general treatment of adductors). As we saw in chapter 4 those muscles are stretched most effectively when the thighs are abducted (rather than adducted), rotated medially, and flexed. To understand how the two sets of lateral rotators differ in limiting forward bending, go back and forth between the standing test with thighs abducted (chapter 4) and the sitting test just described with thighs adducted.
Because most of us are not perfectly symmetrical, the piriformis, obturator internus, and gemellis are often under more stress on one side than the other, and sooner or later this results in shorter muscles on the stressed side. If right and left footprints are asymmetrical, this is suggestive of such imbalances: left footprints that angle out to the side more than right footprints indicates tighter left lateral rotators. The posterior stretch will also reveal muscular imbalances because the disparity will leave the foot on the easy side upright and the foot on the problematic side dropped to the side. For example, if the right foot is rotated out and the left foot is upright in the posterior stretch, it means that the lateral rotators of the right thigh are under more tension than those on the left. The diagnosis is clear, the remedy obvious: asymmetric postures of all kinds that attend more insistently to the tighter side.
THE HAMSTRINGS
If the lateral rotators of the thigh are not under too much stress, the hamstrings are the muscles most likely to limit the posterior stretch since they extend all the way from the ischial tuberosities to the tibia. If you feel stretch in the tendons on either side of the knee joint and in the muscles on the back sides of the thighs when you bend forward, you are feeling the hamstrings (figs. 3.10b, 8.9–10, and 8.12). To test this, bend the knees slightly; what releases can only be the hamstring muscles and the adductor muscles that have a hamstring-like character.
THE PSOAS, ILIACUS, AND RECTUS FEMORIS
The psoas and iliacus muscles are classically thought of as hip flexors, as when they flex the thighs in leglifts from a stabilized pelvic bowl (chapter 3). But when the thighs are fixed against the floor in the posterior stretch, the origins and insertions of these muscles are reversed, with origins on the femurs and insertions on the ilia (in the case of the iliacus) and the lumbar spine (in the case of the psoas). Those muscles are responsible, along with the rectus femori (figs. 3.9 and 8.8–9), for pulling the torso forward at the hips in the sitting forward bend.
The iliacus, psoas, and rectus femoris muscles all act synergistically to create forward bending at the hips, but they act at different sites on the torso. The action of the iliacus is the most straightforward. From the stabilized femur it pulls on the inside of the ilium, tilting the top of the pelvic bowl to flex the pelvis forward on the thighs at the hip joint. We can think of the iliacus muscles as pure pelvic bone flexors in this posture. And since they pull forward exclusively on the ilia, they also create a tendency for counternutation (fig. 6.2a, movements opposite to the arrows). Ultimately, however, since the spine is attached to the pelvis at the sacroiliac joints, the vertebral column (and thus the rest of the body) follows the forward movement of the pelvic bones.
The action of the psoas muscles is more complicated. Because they attach to the lumbar vertebral bodies they pull forward only on the spine, and since the spine includes the sacrum they pull its promontory forward. In contrast to the actions of the iliacus muscles, the psoas muscles pull the sacrum forward between the two ilia (independently of the pelvis as a whole), and in so doing they create nutation, leaving the ilia behind where they will be drawn medially, spreading the ischial tuberosities apart, and opening the base of the pelvis (fig. 6.2a, arrows). (Recall that this situation is opposite from what we saw in a standing forward bend from the waist, which created counternutation instead of nutation.) The movements of the ilia are difficult to feel, but the psoas-induced lateral movement of the ischial tuberosities in those who have good sacroiliac flexibility are easily discernable. All you have to do is place one finger under each sitting bone and bend forward from the hips. If you place the strongest possible emphasis on keeping the lumbar region arched forward as you initiate the bend, you will feel the ischial tuberosities spread apart laterally.
The action of the rectus femoris is similar to that of the iliacus. When the knees are fully extended and the thighs are fixed against the floor, the only thing this muscle can do is pull forward on the anterior inferior iliac spine, making it, like the iliacus, another pelvic bone flexor. The main difference is that the iliacus acts from the upper part of the femur and the rectus femoris acts from the extended knee joints.
THE ABDOMINAL MUSCLES
Even if you can bend forward 100–120° at the hips, you will still have to bend forward in the lumbar region between T12 and S1 (chapter 4) to complete the posterior stretch. Gravity can assist flexion of this region if you are limber enough, but the main aids to completing the posterior stretch are the abdominal muscles, especially the two rectus abdominis muscles (figs. 3.11–13 and 8.11). These run between the chest and the pelvic bones, not between the chest and the thighs, so they act purely between the pelvis and the rib cage to flex the lumbar region forward (fig. 6.15). Therefore, they complete the forward bend without having the slightest effect on hip flexion.
To translate this discussion into experience, assume the preparatory position for the posterior stretch with the spine perpendicular to the floor and the knees extended, but with the upper extremities relaxed and the hands resting in a neutral position. Slowly come forward, bending as much as possible from the hips. Starting from below, notice three patterns of muscular tension on each side of the body: first, a line of tension in the rectus femoris muscle running along the front of the thigh between the patella and the pelvic bone; second, another line of tension within the iliacus muscle running from deep within the upper thigh to deep within the pelvis; and third, a line of tension within the psoas muscle running between the upper part of the thigh and the lumbar vertebrae.
Now try two more experiments that are designed to show you exactly what is happening in the thighs. First try to bend further, but now keep the thighs relaxed and notice that pulling forward will tend to bend the knees ever so slightly. This is because the stretched hamstring muscles are pulling between the ischial tuberosities and the far side of the knee joints, causing the knees to buckle. To see the contrast, again re-establish tension in the quadriceps femoris muscles on the front side of the thigh. The four heads of the quadriceps, operating together, keep the knees fully extended while the rectus femoris head of the quadriceps again pulls on the pelvis from the front.
With the pelvis and knees once more stabilized from below, most of the remaining impetus for pulling down and forward is provided by the abdominal muscles. You can feel how these operate by lifting up slightly and poking your fingers deep into the abdomen, first in the region of the vertical bands of the rectus abdominis muscles, and then on the sides of the abdomen. As you make the specific effort to pull forward the rectus abdominis muscles push the fingers out strongly, while the other three layers of abdominal muscles (which are located more laterally and posteriorly) push the fingers out less vigorously.
COMPLETING THE POSTERIOR STRETCH
Let’s say you are an advanced intermediate student who is flexible enough to come most of the way into the posterior stretch using the iliopsoas, rectus femoris, and abdominal muscles. You have had enough experience to know your weaknesses and vulnerabilities, and you have analyzed the posture enough to know approximately how much you are bending at each site. For example, if you bend 90° at the hips and 70° in the lower back, you will have 20° to go to make a 180° bend. That’s not so much, and you should now be able to complete the posture by pulling yourself down the rest of the way with your upper extremities—interlocking the fingers around the feet and flexing the hips an additional 20° to pull yourself the rest of the way down. Hold for as long as you are comfortable.
When the most flexible students complete the posterior stretch with the upper extremities, they will gain an additional 30° of bending at the hips, or 120° total at that site. But this would fold them a total of 190°, which is neither necessary or even possible. What actually happens is that as they come forward, their backs become less rather than more rounded to the rear, and they settle into a final 180° bend by easing off 10° in the lumbar region (fig. 6.12). Pulling forward with the hands is not advised for those who do not have good hip flexibility because when they try to complete the posture with their upper extremities, they will increase rather than decrease the lumbar portion of the forward bend, and this can strain the back.
Coming out of the posture, beginners should exit by gently unrolling from the top down; intermediate students can begin to explore coming out with a little more authority; and advanced students will feel confident enough to reach forward from their most extreme bend and lift up from the hips.
THE PLANK POSTURE
After coming out of the posterior stretch, students at all levels can counterbalance that pose with the plank posture. Sit with your feet outstretched in front of you, bring the heels and toes together, place the hands on the floor behind you with the fingers pointed toward the feet (not illustrated), and lift the pelvis until your body comes into one plane from head to foot. Alternatively, for increased stretch in the forearm flexors, you can point your fingers to the rear (fig. 6.16). The plank posture is accomplished with the same muscles that were stretched in the posterior stretch—the deep back muscles, the gluteals, and the hamstrings—and holding them in an isometric position, as you must in this posture, brings a welcome relief from the posterior stretch.
After the posterior stretch, the down-facing dog is possibly the most fundamental and widely taught forward bending posture in hatha yoga, but it is completely different from the posterior stretch in its structure and mood. It’s a pure nutation and hip flexion stretch, or at least it should be, not a lumbar bend, and it’s a more active posture because it requires use of both upper and lower extremities.
In its ideal form the down-facing dog assumes the shape of an upside-down V, with only the hands and feet touching the floor. The hips are flexed sharply, the ankles are flexed 45°, and the lumbar lordosis is kept intact. The posture is related to a standing forward bend initiated from the hips, but it is safer and more effective because leverage from gravity will not strain the back, as can happen in the standing position.
To do the down-facing dog assume a hands-and-knees position with the arms, forearms, and thighs perpendicular to the floor, the fingers pointing forward, and the toes flexed. Lift the hips into a V (often called a piked position) while keeping the lower back arched and attending to nutation of the sacroiliac joints as a first priority. The upper two-thirds of the body from the pelvis up contains one plane of the V, and the thighs and legs contain the other, joined to one another at a 60–90° angle at the hips (fig. 6.17). This represents 90–120° of hip flexion. The heels should be on or reaching for the floor. It may not be possible for beginners to assume this position, and instead of looking like an upside-down V, the posture will more likely resemble a croquet hoop, with the arms and forearms constrained to an obtuse angle from the torso, the lumbar region rounded to the rear, the hips flexed only 45–60° instead of 90–120°, and the heels lifted off the floor. Such students can make the pose more attractive by bending their knees to take tension off the hamstring muscles. That’s fine. Doing this will permit more hip flexion, keep the lumbar region flatter, and anchor the pelvis more effectively in sacroiliac nutation (fig. 8.27).
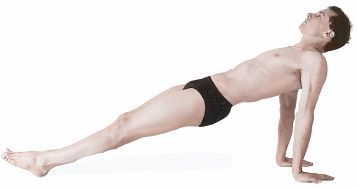
Figure 6.16. The plank posture complements forward bending poses because it holds the deep back muscles, gluteals, and hamstrings (all just previously stretched by forward bending) in a state of isometric contraction in a straight, safe position.
[Technical note: Recall that the amount of hip flexion by definition refers not to the angle between the pelvis and the thighs (which is a measure of the angle displayed by the V in the advanced student’s down-facing dog), but to the total excursion of the thighs (from the anatomical position) relative to the pelvis. That’s why 110° of hip flexion reveals a 70° angle between the torso and the thighs in the expert’s down-facing dog (fig. 8.26).]
In intermediate students the lower back is probably flat rather than arched forward, and the arms come more in line with the shoulders. The heels may still be off the floor but the piked position begins to appear, with perhaps a 100° angle between the two planes, which represents 80° of hip flexion.
In an ordinary standing or sitting forward bend, beginners usually round the back at the expense of the hip joints. In the down-facing dog, however, they can lift their heels, which takes tension off the calf muscles (the gastrocnemius and soleus) and allows them to arch the back. They can then focus on trying to achieve more hip flexion.
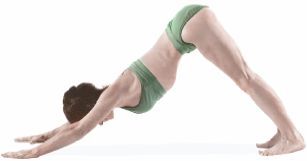
Figure 6.17. This simulation of an intermediate level down-facing dog (the heels are still slightly off the floor) should be taken as something to work toward by the beginner, who will probably have to be content with a hoop-shaped dog posture until developing better hip and ankle flexibility (see fig. 8.26 for the advanced pose).
To understand why lifting the heels helps you flex the hips, we have to look at the design of the lower extremities as a whole. First, because the gastrocnemius muscles take origin from the femur just above the knee joint and insert (along with the soleus muscles) on the heels (figs. 7.6 and 8.10), they have two actions: extension of the ankles and flexion of the knees. Second, the hamstrings, which are the primary limiting elements to hip flexion, also have two actions: extension of the thighs and flexion of the knees. And since the gastrocnemius and hamstring muscles share one of these functions—flexion of the knees—it follows that if you lift the heels and bring the insertions of the gastrocnemius muscles closer to their origins (thus reducing tension on them), this will allow you to stretch the hamstrings in relative isolation. And that is exactly what happens when you lift your heels in the down-facing dog. If you try it you can instantly feel the lumbar lordosis become more pronounced and allow increased flexion at the hips. Then as you lower the heels to the floor you can feel tension increase both in the gastrocnemius muscles and in the hamstrings, which in turn causes the lumbar region to flatten or even become rounded to the rear.
To put these principles into practice, students should lift up on the balls of the feet as they come into the piked position, arch the lower back forward to establish both nutation of the sacroiliac joints and a convincing lumbar lordosis, and then try to press the heels toward the floor while keeping the back arched. If this is difficult they can bend one knee and press the opposite heel to the floor, making an asymmetrical posture in which they stretch one side at a time and incidentally take pressure off the lumbar region and the opposite hip.
The down-facing dog is supported equally by the upper and lower extremities, but a common beginners’ error is to compromise the spirit of this principle and leave the arms and shoulders relaxed. The extended knees automatically keep the lower half of the body in one plane, but the scapulae, which connect the arms to the torso, are held in place almost entirely with muscular attachments (chapter 8), and for the down-facing dog to be properly supported, these muscles have to remain engaged at all times. As you extend the arms and actively flex your hip joints into the piked position, the scapulae should be pulled down and laterally; otherwise, they will be drawn in and up, causing the posture to degenerate. Instructors correct this error by telling students not to let their chests hang passively between their arms.
In the down-facing dog, tension should also be maintained in the hands. The fingers should be spread out with the middle fingers parallel, and pressure should be exerted against the floor with the entire hand. This activates flexors of the wrists and hands when they are in a moderately stretched and extended position. Special attention should be paid to tension in the thumbs, index fingers, and the medial aspects of the arms and forearms. Holding the arms and shoulders correctly will also create a more substantial stretch in the pectoral muscles on the anterior surface of the chest.
Students who are having difficulty with the down-facing dog because of stiff hips and ankles can try some preparatory stretches. They can stand with the feet 2–3 feet apart, slide the hands down the thighs and legs, bend the knees, plant the hands on the floor, and walk the hands forward until the body is in the shape of a hoop. From that point they can explore in any one of several directions to create stretches that prepare for the full posture: they can walk the feet further apart to create an adductor stretch; they can walk the feet closer together to focus on the hamstrings; and they can bend one knee at a time while pressing the opposite foot toward the floor to stretch the gastrocnemius and soleus muscles.
We’ll end this section with the simple child’s pose—simple that is, if you are as flexible as a child, for the posture requires the entire body to be folded in on itself in the fetal position. You can come into the pose from a hands-and-knees position, with the feet and toes extended, by first sitting back on your heels, thus lowering the thighs tightly down against the calf muscles, and then flexing the torso down against the thighs, resting your forehead on the floor in front of your knees. Ordinarily, you will lay your upper extremities alongside the legs, with the palms up and the fingers lightly flexed (fig. 6.18), but if you have need of a milder posture that does not fold you so completely into flexion, you can place your hands alongside your head. The posture is relaxing and refreshing, and so long as you do not fall asleep, you may hold it for as long as you like. The child’s pose is often done between other forward bending postures because it stretches the spine from end to end in a non-threatening manner.

Figure 6.18. The full expression of the child’s pose is sometimes a challenge, but one that is easily remedied by placing the hands in a more neutral position alongside the head and by the use of props such as a small pillow under the ankles, another one between the legs and the thighs, one or two thick pillows between the thighs and the torso (especially helpful for stiff backs), and yet another small pillow under the forehead.
Those who have good flexibility in the spine and healthy hip and knee joints will not have trouble with the child’s pose, but some people will be in discomfort. The remedies are simple—one or more pillows between the torso and the thighs for a stiff back, another pillow between the thighs and the legs for tight knee joints, a small pillow just underneath the ankles for feet that resist full extension, and a cushion for the forehead. With one or more of these props the child’s pose can be adapted to almost anyone and still yield its benefits. If it is done with care the posture can also be a welcome palliative for those with chronic back stiffness because it places the lumbar region under mild traction.
Breathing in forward bending postures will be experienced differently by those who are relatively stiff than by those who are stronger and more flexible. Advanced students have many options, but those who are inflexible in the hip joints have to tense the abdominal muscles just to maintain the posture, and this creates many repercussions.
BREATHING IN THE POSTERIOR STRETCH
In the posterior stretch for beginners, the abdominal organs are compressed by the forward bend, and if you are holding lightly onto your thighs, legs, or ankles with your elbows slightly flexed, each inhalation will lift your torso as the dome of the diaphragm descends. Each exhalation then lowers your torso back forward and down.
If you are an intermediate student and are committed earnestly to the posture, you will probably be holding tightly onto the lower extremities with your hands to maintain a deep forward stretch that is close to your limits, and under those circumstances it is harder for the diaphragm to lift you up during inhalation. There is increased tension during inhalation as the diaphragm presses down against the abdominal organs and a release of that tension during exhalation, but you are still not in the full posterior stretch, and you are still at the mercy of a pneumatic system that tends to lift you up and down. Under those conditions this bent-forward posture with incomplete hip flexion can never be perfectly stable or satisfying.
Finally, if you are able to complete the posture by flattening your torso down against your thighs and holding it firmly in place with your upper extremities, you will have yet a third experience. The fixed and flattened torso prevents the posture from lifting and lowering during inhalation and exhalation, and the resulting sense of stability and silence is the reward for your efforts.
As soon as you are coming close to this third experience, you can use breathing to increase your capacity. Come into the forward bend with the knees extended. Relax the shoulders and arms, and rest the hands on the ankles or feet. Breathe in and out normally, and confirm that inhalation is lifting you up and creating more tension in the trunk. Now, in one easy sequence, breathe out to your full capacity (as in agni sara), and at the end of exhalation pull your torso forward with the rectus femoris, iliacus, psoas, and rectus abdominis muscles. Then grip a lower site firmly and hold the posture, inhaling and exhaling several times until your body has adjusted to the new stretch. You are not pulling yourself into position with the upper extremities. Instead, you are using the hands only to hold yourself in a position established by the muscles of the torso and the proximal muscles of the lower extremities. Repeat this sequence several times. If you start with reasonably good hip flexibility, you will be amazed at how much you can draw yourself forward.
No matter what your flexibility, if you pull yourself firmly enough into a forward bend with your hands so that your breathing cannot lift you out of the posture, you will notice that tension from inhalations, especially from deep inhalations, spreads throughout the body and is redirected into stretching the calf muscles, hamstrings, and the deep back muscles, as well as joints and muscles throughout the upper extremities. During exhalation the diaphragm permits a release that lulls the stretched muscles into submission. Hatha yoga teachers are speaking literally when they tell you to let the breath stretch the body.
BREATHING IN THE DOWN-FACING DOG
Breathing in the down-facing dog is different from that observed in any of the other forward bending postures. Since this pose is semi-inverted, the diaphragm presses the abdominal organs toward the ceiling during each inhalation in addition to drawing air into the lungs, and during each exhalation the diaphragm eccentrically resists the fall of the abdominal organs toward the floor. And finally, the weight of the abdominal organs against the underside of the diaphragm causes you to exhale more completely. This illustrates a pattern of breathing that we’ll see in a more extreme form in the headstand and shoulderstand.
Since beginners will be forming a relaxed hoop in this posture rather than a V with a taut abdomen, their bellies will remain relaxed and they will be breathing abdominally. Respiration simply pooches the abdomen out during inhalation and relaxes it during exhalation, so this mode of breathing has little effect on the posture.
Intermediate and advanced students who do the down-facing dog more elegantly have a different experience. They press enthusiastically into an upside-down V, concentrating on maintaining the deepest possible lumbar lordosis. The arch in the spine creates a backbending posture superimposed on 90–120° of hip flexion, and when these students are at the same time working consciously with the breath, the result is diaphragm-assisted back-bending (chapter 5). To experience this, come into the posture keeping the lumbar lordosis intact, lifting high up on your toes if that is necessary, and take long, deep inhalations while at the same time committing yourself to coming more completely into the posture—that is, accentuating the acuteness of the angle between the pelvis and the thighs. You will immediately sense that the diaphragm is a powerful influence for assisting this effort.
BREATHING IN THE CHILD’S POSE
This is an easy one. Because the body is folded upon itself in the child’s pose, inhalation increases tension throughout the torso, and exhalation decreases it. Both inhalation and exhalation are active. In addition to drawing air into the lungs, inhalation has to press against the abdominal organs, which are incompressible (chapter 3), and that is why you feel a sense of increased tension. Exhalation is also active, or it should be, because you are breathing evenly, and even breathing requires that you not exhale with a whoosh. The point is easily proven if you take a deep inhalation and then suddenly relax your respiration; the air rushes out, and you realize that you normally resist this.
Sacroiliac flexibility has until now been overlooked by those who write manuals on exercise and flexibility, and the terms nutation and counternutation are rarely encountered. This is not surprising since the sacroiliac movements are limited to only 5–10° (except during the end stages of pregnancy), and these are overshadowed by the grosser movements of the spine and pelvis as a whole.
Even though the range of sacroiliac movements is narrow, however, healthy and mobile sacroiliac joints make for safer, sharper postures. Indeed, the proper execution and full expression of backward bending, forward bending, and seated meditation postures presupposes the ability to establish nutation and counternutation at will. And because the concepts are unfamiliar and complex, some reiteration and review is in order. First recall where the movements take place. They’re not spinal movements (as happen at intervertebral disks and other joints in the spine), and they’re not movements at the hip joints (as happen at the acetabula between the pelvic bones and the femurs). Rather, they are literally the only movements permitted between the axial skeleton and the appendicular skeleton for the lower extremities (fig. 6.2a, arrows for nutation, and imagine their opposites for counternutation). And they are subtle: think of movements within the pelvis itself. If you want to understand the concepts, you will have to both think the movements through intellectually and appraise them experientially, and you also have to do this while envisioning them not only in isolation but within larger bending gestures that involve the spine and the hip joints. These are not minor challenges.
NUTATION IN FORWARD BENDS
For both intermediate and advanced students, establishing nutation as a first priority in forward bends can be summed up easily: while maintaining the arched-forward lordosis in the lumbar region and while keeping the iliacus components of the iliopsoas complex relaxed, create a selective pull in the psoas muscles. You will sense little external movement, but the psoas muscles pull sharply forward on the lumbar region, and this in turn pulls the promontory of the sacrum forward, which favors nutation. The ilia are left behind and pulled medially by default as a result of keeping the iliacus muscles relaxed. Although not ordinarily verbalized in this way, this is what hatha yoga teachers want you to do. It is the preferred beginning step for forward bending, whether standing or sitting. Only after this subtle maneuver is accomplished should you bend forward at the hips and then in the spine. As you bend forward at the latter sites, the sacroiliac joints will readjust themselves, moving to a more neutral position between nutation and counternutation.
The down-facing dog works especially well for evaluating and sensing sacroiliac movements in advanced students (fig. 6.17, and even more in fig. 8.26), because experts have enough hip flexibility to settle into the posture with an arched-forward back. From this position, they can go back and forth between counternutation (pulling the ischia together, tightening the abdominal muscles, and pressing the promontory of the sacrum to the rear in relation to the ilia) and nutation (sharply pulling the lumbar lordosis and sacral promontory forward with the psoas muscles, relaxing the abdominal muscles, and allowing the ischia to be drawn apart). It is useful for the advanced student to keep the thighs moderately abducted for the posture, because as described earlier, an observer can monitor the movements of the upper thighs by feel: they shift medially during counternutation and laterally during nutation. Keep in mind, however, that the down-facing dog does not work well for those who are not flexible because the hoop-shaped dog posture favors pulling the ilia laterally and forward, thus creating a priority for counternutation. The remedy is simple: place the hands on a chair or table so there is plenty of leeway to keep a prominent lumbar lordosis.
One of the most useful forward bending postures for stressing nutation, as well as a posture that is accessible to beginning and intermediate students, is the one presented to illustrate diaphragm-assisted backbending (fig. 5.7). This pose, which was already mentioned in the section on anatomy, combines three elements: a forward bend at the hips, a backbend in the upper half of the body, and full nutation of the sacroiliac joints. (As in the case of the down-facing dog, it is helpful to come into the pose with abducted thighs.) Be careful to keep the abdominal muscles relaxed; if you don’t, they will drive the lumbar lordosis to the rear and compromise your effort. With that caveat, this is one of the best postures for getting into the most extreme nutation you can manage. You can select a hand position on the wall that permits full relaxation of the abdominal muscles, your most expressive lumbar lordosis, and a specific effort with the psoas muscles that rotates the promontory of the sacrum forward, the coccyx up and back, and the ischia apart—all with minimal alteration to the appearance of the posture.
We also see good potential for nutation in many other postures that contain elements of forward bending from the hips. For those who are flexible enough to keep a deep lumbar lordosis during the course of forward bends, such postures include the superfish leglift (fig. 3.19b) and the straight-backed boat (fig. 3.22b). And for those who are less flexible, simple and useful postures include cat stretches with maximum lumbar lordotic curvatures (figs. 3.30, 3.34a—b with the dashed lines, and 3.36), sitting on your heels or on a bench in the adamantine posture (fig. 10.9), and any seated meditation posture in which you can demonstrate a deep lumbar lordosis, whether you accomplish this by virtue of excellent native hip flexibility or a supporting cushion (chapter 10). In the cat stretches and sitting postures, even beginners can learn to relax the abdominal muscles, pitch the lumbar region and the promontory of the sacrum forward with a selective contraction of the psoas muscles, permit the ilia to come closer together, and spread the ischia. And one more added benefit is that these simple postures permit you to alternate full nutation with full counternutation: pushing the lumbar region maximally forward favors nutation, and pushing it maximally to the rear favors counternutation.
NUTATION IN BACKBENDS
If you have a healthy back, you can do relaxed symmetrical backbending postures to encourage nutation. These include all the gravitationally-aided backbending poses, beginning with the relaxed standing lumbar bend (just mentioned in the section on anatomy as well as in chapter 4), in which nutation accentuates the lumbar lordosis, squeezes the promontory of the sacrum forward between the ilia, and spreads the ischial tuberosities (fig. 4.20). Or try this: stand with the thighs comfortably abducted and place your hands astride the ilia with the thumbs against and directly behind the top of the sacrum. Relax and bend backward to produce maximum nutation. You may not be altogether certain of feeling the top of the sacrum moving forward in relation to the ilia as you bend backward, but as you slowly shift forward from the extremity of the backbend and move into counternutation, you’ll feel a dramatic shift of the ilia as they move forward and laterally on either side of the sacrum. It almost feels like a gear shifting in the manual transmission of an automobile.
Another excellent posture favoring nutation is the propped, diaphragm-restricted backbend leaning against a wall (fig. 5.6), except that here you modify the posture by aiming for a diaphragm-assisted backbend. You do this by bending the knees, working your hands somewhat further down the wall, and relaxing the abdomen so as to permit the diaphragm to accentuate the bend. This creates full nutation by squeezing the promontory of the sacrum forward in relation to the ilia.
Next, try the variation of the upward-facing dog in which the feet and toes are extended (the tops of the feet facing down) and the knees are left on the floor (fig. 5.13). In this posture gravity does the work of dropping the pelvis, with the promontory of the sacrum leading the way and creating nutation. If you move slowly, you can also get the same feeling with the toes flexed, resting on the balls of the feet, knees, and hands.
Next, try lying supine with an 8 1/2 inch playground ball under the lumbar region (fig. 5.31). If you can relax the abdominal muscles and allow gravity to lower the upper back and pelvis toward the floor, this posture will encourage nutation; otherwise you will protect your back with an attitude of counternutation (resistant abdominal and iliacus muscles, straighter body, squeezed-together hips, and spread-apart ilia).
Finally, for those who are flexible enough, push up into the wheel posture from a supine position (fig. 5.29), and allow nutation to take place as a first priority, with the promontory of the sacrum squeezed forward and the ischia pulled apart. The abdomen and hip flexors, especially the iliacus muscles, must be relaxed, for only under those circumstances will full nutation complement maximum spinal and hip extension. And as it happens, the preference for counternutation, or even sacroiliac joints that are frozen in that attitude, is a common impediment to pushing up into the wheel for many students.
[Technical note: The most advanced students, such as dancers and gymnasts who are extraordinarily flexible, may be able to do this posture one better—keeping the sacroiliac joints in an attitude of partial counternutation. The most flexible students, in fact, may feel this is desirable for protecting themselves, given that full nutation may take place too readily for their comfort. We can see a continuum of possibilities for the wheel posture: inflexible beginning students who show little or no sacroiliac movement; intermediate students who can come partially into the wheel by pushing to their limits of nutation; advanced students with excellent sacroiliac mobility who feel comfortable in the posture with full nutation; and last, those who have more sacroiliac flexibility for nutation than they feel comfortable using.]
COUNTERNUTATION IN VARIOUS POSTURES
Nutation is natural in upward-facing dogs in which you support the posture between the knees and the hands, but counternutation is more natural when the upward-facing dog is supported between the feet and the hands. For the latter, squeeze the hips together while keeping the toes either flexed (fig. 5.14) or extended. The main object here is to engage the abdominal, gluteal, and deep back muscles strongly enough to initiate coming into the posture with a relatively straight body and the fullest possible counternutation. You can feel it: the ilia are pulled forward in relation to the sacrum by the iliacus muscles, and that movement is supported by squeezing the hips together along with the ischia. Once this posture is established, lower the pelvis carefully so as not to release the counternutation. The abdominal muscles (along with the respiratory and pelvic diaphragms) will act synergistically with the iliacus muscles to support counternutation: they will resist lowering of the pelvis eccentrically but powerfully; and because in combination they maintain a high intra-abdominal pressure throughout the breathing cycle, they will also assist in keeping the lumbar spine straight and keeping the promontory of the sacrum well to the rear in relation to the ilia. Again, you can feel all of these tendencies if you have a clear concept of the anatomy.
The most common postures that support counternutation are standing and sitting forward bends from the waist. All you have to do is flex the spine forward (as opposed to flexing the hips), and this will encourage counternutation. Health-club crunch exercises (fig. 3.1), the fire exercise (fig. 3.16), yoga sit-ups (figs. 3.2la–b), the round-bottom boat (fig. 3.22a), the phase of standard cat stretches that push the lower back toward the ceiling with the abdominal muscles (figs. 3.34a–b, halftones), a relaxed and externally supported standing forward bend for beginners (fig. 4.21), and the beginner’s forward bend with the fists in the armpits (fig. 6.13) all foster counternutation—keeping the ischia together, the ilia apart, and the promontory of the sacrum to the rear. And these postures are all safe and easy.
The other supremely important standing postures that support counternutation were mentioned earlier: standing whole-body backbends (as contrasted to lumbar backbends) in which the hips and ischia are squeezed together and the main priority is keeping the promontory of the sacrum to the rear and the ilia spread apart (fig. 4.19). It’s another posture for those who require maximum lumbar protection, particularly when the maximum bend is accompanied by deep empowered thoracic inhalations.
In general, counternutation is preferred by those who are uncertain of themselves. They keep the hips squeezed together, the pelvis tucked under in a posterior pelvic tilt, and maintain tense abdominal muscles, all of which are classic postural adjustments for everyone who has a stiff back. If this describes you, don’t fight the reality: go with it. This is the work you need to do. After a year or so of conditioning, you may feel inclined to pursue more postures that release counternutation and favor nutation.
ASYMMETRIC POSTURES AND THERAPEUTIC APPROACHES
If one sacroiliac joint is more restricted than the other, you can use asymmetric postures to free up the joint on the tight side. But you need to be careful, because it is easy to make a mistake and work selectively on the wrong side. So to be certain of your diagnosis, first go back and forth for 20–30 minutes between postures that favor extreme nutation and others that favor extreme counternutation. Then watch and wait for 24 hours. If you have sacroiliac discomfort only on one side in the form of a vague ache in the region of the sacroiliac joint, it probably means that the sacroiliac joint on that side is more restricted than it is on the other. Do make sure, however, that you are not feeling symptoms discussed earlier in this chapter—unilateral iliolumbar ligament strain, lower back pain on one side, or sciatica.
As soon as you know which sacroiliac joint is more restricted, keep working mostly on symmetric postures, but think of adding some that are asymmetric. The preliminary pigeon, as well as folding forward from that posture (figs. 6.25a–b), are excellent, and will tend to open up the sacroiliac joint associated with the front knee. Do them three times, first and last for the tight side. The best and simplest asymmetric standing posture that selectively affects one sacroiliac joint is the first stage of the angle posture in which you are initiating a bend from one hip (figs. 4.25 and 6.26a). If the right side is tight, come forward facing the right foot only to the extent that you can maintain a full lumbar lordosis, and then pull selectively and insistently with the right psoas muscle to encourage full nutation in the right sacroiliac joint. Don’t come any further forward, as this is likely to release the nutation. As usual, face the right foot, then the left, then the right once more. It is best to work with simple postures that can be analyzed without doubt. Asymmetric standing postures such as triangles, side bends, and lunges, as well as asymmetric sitting postures and twists, are all so complex that it is better to work with them in each direction equally. Unless you are certain of what you are doing, you might end up favoring the wrong side.
Good hip flexibility is the most important single requirement for at least half the postures in hatha yoga—sitting and standing forward bends, lunges, triangles, sitting spinal twists, many variations of the inverted postures, and meditative sitting postures. So it is not surprising that we treat this topic over and over, and that we pick this chapter on forward bending to do so definitively. We’ll look at it here mostly in supine, sitting, and standing postures, with the thighs both abducted and adducted and with the knees both flexed and extended. Later, we’ll discuss the topic in twisting postures (chapter 7), inverted postures (chapters 8 and 9), and meditative sitting postures (chapter 10).
The problem with talking about hip flexibility is that most people do not ordinarily trouble themselves to define it precisely. If students can’t bend forward in the posterior stretch because of tight hamstrings, or if they cannot abduct their thighs very far because of tight adductors, or if they cannot extend their hips because of tight hip flexors, or if their sacroiliac joints are frozen, is it appropriate for hatha teachers to call these problems of hip flexibility? They usually do. But in one sense poor hip flexibility is the result, not the cause of these situations, just as hip inflexibility can be the result of excess weight in the abdomen in those who are obese.
To see hip flexibility in its purest form, we would have to look at someone who is both slender and devoid of functional hamstrings, adductors, hip flexors, and hip extensors—in short, someone whose range of motion at the hips is limited only by ligaments and bony constraints within the hip joint itself. But even if we could find such a model, it would not help us plan a useful hatha yoga practice because we are mainly interested in hip joint mobility in those whose extremities are intact. We’ll therefore discuss hip flexibility in the broadest possible terms, concerning ourselves with the final result and considering all possible limitations to mobility. Our objectives are twofold—working guardedly to improve mobility of the hip joint itself, and doing stretches to increase the lengths of the muscles that form the first line of resistance.
Any time we work with the hip joint, as well as with most other synovial joints, we must be sensitive to when limitations in movement are caused by muscle, when they are caused by ligaments, and when they are caused by bony stops. If movements are being abnormally restricted by muscles, we can work consistently to lengthen them. When a normal range of motion is restricted by ligaments or bony stops, we should be wary of attacking these restrictions aggressively, realizing that overstretching ligaments can cause their associated joints to become destabilized, and understanding that bony stops are built into our body plan. When we practice also affects these matters. If you wake up after eight hours in bed, muscles will create the most restrictions, but after an hour of hatha yoga, especially in the evening, the muscles are not as assertive, and you may have more awareness of bony constraints and of ligaments that now require more tender treatment.
In the following discussion we’ll work from safe and simple to challenging and complex. Supine hip-opening stretches are first because in that position the lower back is stabilized against the floor. Inverted postures are next (although these are not covered in detail until chapters 8 and 9), because we can explore hip flexibility more delicately when the hip joints are bearing only the weight of the inverted lower extremities. Then come the sitting postures in which we have to divide our attention among several tasks—stabilizing the lower back and pelvis, stretching the hamstrings and adductors, and maintaining awareness of ligamentous and bony constraints within and immediately surrounding the hip joint. Postures such as the pigeon are yet more challenging because gravity places the weight of the body directly on the muscles and ligaments of the hip when they are in already-stretched positions. Standing postures are the most challenging for three reasons: first, they require the hip joints to be held in set positions defined by the position of the feet; second, the weight of the head, neck, upper extremities, and torso is brought to bear on the hip joints, often when they are in extreme positions; and finally, tension on the hips from turning, twisting, and lunging adds to the stresses imposed by gravity.
SIMPLE SUPINE HIP OPENING
The simplest and most fundamental hip opening postures are those that work in moderation to free up the ligaments, joint capsules, and synovial surfaces of the hip joint while muscular restrictions are minimized. And since it is obviously not feasible to minimize those restrictions by detaching our hip and thigh muscles from their insertions, we do the next best thing and flex the knees. The following six stretches and movements can be done in the early morning even while you are still lying in bed, and if you try them after an hour’s session of hatha yoga they have an even deeper action.
First, lie on your back and draw the knees toward the chest with the hands, keeping the thighs adducted (fig. 6.19a). This is the first and easiest position: The hamstrings are not stretched because the flexed knees bring their insertions on the tibia and fibula closer to their origins on the pelvis (figs. 3.10b and 6.3); the adductor muscles on the insides of the thighs (figs. 2.8, 3.8–9, and 8.13–14) are not stretched because the thighs are together; and finally, if you are slender the abdomen will not get in your way. As soon as you are satisfied that muscle, fat, and other tissues of the thigh and groin are not limiting the stretch, you can be certain that you are working with limitations in and around the hip joint itself.
The first thing you notice about this stretch is that pulling your knees tightly against the chest can go only so far without prying the pelvis up and away from the floor. This is a lever action, accomplished by the two femurs in combination, whose necks, at least in students who are not restricted by soft tissues, pry against the thin cartilaginous rims of the acetabula (the sockets of the hip joints). You can see this even more clearly if you lift one knee at a time and pull it diagonally across the body—the upper rim of the acetabulum is not horizontal but lies at an angle, and pulling the femur diagonally accesses this cartilaginous rim directly and pries the same side of the pelvis away from the floor.
You can make the first exercise more effective by resisting the lifting effect on the pelvis isometrically. You do this by trying to roll the pelvis back down against the floor, pressing the sacrum toward the floor using the deep back muscles at the same time you are pulling on the long end of the lever (the knees) with the hands.
For the second position, pull the knees slightly apart, with the hands still grasping them from the outside. The thighs are slightly abducted, although not enough in most people to stretch the adductors. Now the neck of the femur will be in contact with the rim of the acetabulum in a slightly different region, lateral to the first point of contact, and the shaft of the femur may also be butting up against the anterior superior iliac spine on the front of the ilium (figs. 3.2–6 and 6.19b). Again, you can intensify the stretch by pulling the pelvis toward the floor with the deep back muscles.
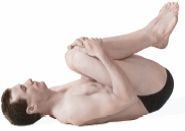
Figure 6.19a. First of six supine hip-opening poses: With the knees together, pull them toward the chest with interlocked hands and fingers, at the same time prying the pelvis away from the floor.

Figure 6.19b. Second: With the knees apart, pull on them from the sides with the hands, providing a slight stretch for the adductors.
Third, grasp the knees from the inside, abducting the thighs even further to the side. Depending on your body type and flexibility, the shafts of the femurs may now be lateral to the anterior superior iliac spines, enabling you to pull the knees closer to the floor (fig. 6.19c).
Fourth, grab the ankles and pull them toward you, and at the same time dig the elbows into the thigh muscles, pressing them out and increasing abduction. The soles of the feet will probably be together in this position (fig. 6.19d). If you are feeling stretch in the inner thighs, you are feeling the adductors, and if you are not, the primary limitation to the movement is still the hip joint.
Fifth, catch the lateral sides of the feet and pull them closer to the chest, and at the same time dig the elbows into the calf muscles, pressing the knees even further to the sides (fig. 6.19e). This stretches the adductors maximally and aligns the femur in such a way that its shaft has the potential for dropping down laterally to the lateral border of the ilium. If you are flexible enough, someone may even be able to push your knees all the way to the floor.
Sixth, hold onto the soles of the feet from the inside so that the legs are perpendicular to the floor, and cautiously pull the knees straight down (fig. 6. 19f). The thighs will not be abducted as much as in the previous position, but the necks of the femurs can still clear the ilia. Here again, this is easier if you have a partner to help you. In any of the last two or three positions in which the neck of the femur is not prying directly against the rim of the hip socket or the front of the ilium, you may still get stopped by tenderness in the groin. Don’t force the issue if that is the case, because numerous delicate tissues run through this region.
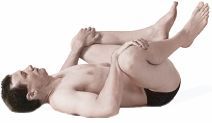
Figure 6.19c. Third: Grasp the knees from the inside and pull them down and laterally for more stretch of the adductors.
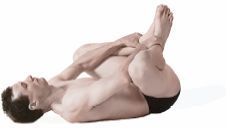
Figure 6.19d. Fourth: Grasp the ankles and pull the feet toward the head, pressing the elbows sharply against the thigh muscles. This tends to lift the shoulders, and you may want to have a pillow to support your head.
CIRCUMDUCTION
The hip joint is a ball-and-socket joint that accommodates “rotation” during the course of any combination of six movements—flexion and extension, abduction and adduction, and lateral and medial rotation. Even though in a literal sense all of these motions rotate the head of the femur in the acetabulum, by convention only the last two are termed anatomical rotation. These of course can be superimposed on any of the others. For example, if you sit down and spread your thighs apart keeping the knees straight, and then turn your toes out, you will be superimposing lateral rotation on flexed and adducted thighs; turning the toes in from the same position is medial rotation. “Hip-opening” in hatha yoga means developing a full range of motion for all of these movements plus one more—circumduction—that sequentially combines flexion, abduction, extension, and adduction.
You can circumduct the thigh in any position in which the floor or some other object is not in the way. We’ll look at it in a standing position to explore the principle and then in supine postures to see how various muscles restrict the movement. If you balance on your left foot, extend the right knee, and swing the right foot around in a circular motion, you will be circumducting the thigh. You can start with adduction, continue forward for flexion, swing the foot out for abduction, to the rear for extension, and back into home position with adduction. If you project an imaginary tracing on the floor with your foot, you’ll notice that the movement is kidney-shaped rather than circular. There are two reasons for this: the leg you are using to support your weight gets in the way of the one that you are swinging around, and you can flex the thigh forward further than you can extend it to the rear. Try this exercise with both lower extremities and notice if the excursion is different on the two sides.
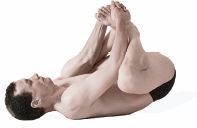
Figure 6.19e. Fifth: Grasp the lateral aspects of the feet and pull them toward the head, pressing the elbows sharply against the calf muscles. This provides the fullest stretch for the adductors in this series.
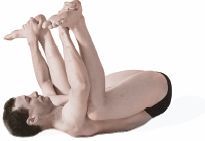
Figure 6.19f. Sixth: Grasp the soles of the feet from their medial borders and pull the knees toward the floor on either side of the chest. Be careful, because the arms can pull more powerfully than is temperate for the hip joints.
As you swing your right thigh in front of the left thigh and leg, you can first feel the right hip joint and the left thigh limiting how far you can pull the right thigh to the left and forward. Then as you flex the thigh straight forward the right hamstrings limit the movement. Swinging on around to the side, the right adductors (or the right hip joint in those who are especially flexible) start resisting. Continuing to the rear, the right hip flexors limit extension, and finally, just before you bump into the left thigh, the right hip joint again stops you.
We have already taken note of the straightforward effects of knee extension and flexion on hip flexion (figs. 6.3–4), and we have seen how important this is to forward bending with the thighs adducted, as in the posterior stretch (fig. 6.12). Now we’ll look at how flexing the knee assists circumduction of the thigh in general and abduction of the thigh in particular. You can do this only when you are lying supine with the hips near the edge of a table or firm bed, because you want to be able to hyperextend the thighs beyond the lower edge. The first thing to do is repeat in the supine position what you just did standing, extending the knee and projecting the tracing for circumduction on the opposite wall rather than on the floor. Then, with this as a basis for comparison, bend one knee and project the same kind of tracing on the wall from an imaginary line running down your thigh.
You will notice immediately that you get a much bigger projection when your knee is bent. Swinging the thigh around in the same direction as before, it does not make much difference at first whether the knee is bent or extended. But as soon as you have the thigh flexed straight to the front, knee flexion enlarges that segment of the projection considerably over what is apparent with the knee extended. Moving on around, as you abduct the thigh straight to the side, you get only marginally more thigh abduction with the knee flexed than extended. Finally, everything is reversed as you try to bring the thigh to the rear. Knee flexion at that point stops thigh hyperextension cold because the rectus femoris muscle comes under extreme tension and keeps the thigh lifted. Be careful at that stage not to hurt your knee.
Next, to examine how this works in a dynamic movement, improvise freely, circumducting the thigh with varying combinations of knee flexion and extension, always sweeping the thigh in as wide a “circle” as possible. These are all valuable exercises for hip opening in their own right even though they are not practical for a class. They work best at the end of a firm bed.
As you play with the different options and combinations for knee flexion and thigh abduction, you can begin to understand how the hamstrings, adductors, and hip flexors in combination affect circumduction of the thigh, and you will be encouraged to see that lengthening these muscles even a little can improve hip flexibility. Circumduction of the thigh also clarifies for us how hip flexibility is limited by the inherent structure of the joint itself, and once you become aware of the limits imposed by the individual muscles, you can begin deeper work. As an experiment, do a series of hip-opening postures, both the simple ones outlined at the beginning of this section and some of the more demanding ones described later, then try a balanced hatha yoga practice for an hour, and come back to the same hip-opening exercises at the end. After you are warmed up, you will not only be more flexible, you will be conscious of more bony and ligamentous constraints.
A SUPINE HALF LOTUS HIP-OPENER
The next exercise—a supine half lotus hip-opener—does two things: it improves hip flexibility, and it stretches the adductors and deep back muscles. And because the back is stabilized against the floor, it is safe as well as effective. It is less rewarding early in the morning than after you are thoroughly warmed up, but once you get acclimated to it the pose will become a favorite. Lie supine and draw the heels toward the hips, keeping the feet on the floor. Then bring the left ankle to the near side of the right knee, resting the ankle against the thigh and pressing the left knee away from the body. Pass the left hand into the triangle formed by the two thighs and the left leg, lift the right foot off the floor, and grasp the right shin with the left hand just below the knee. Pull the left foot down closer to the pelvis with the right hand, place the right forearm above the left ankle, and interlock the fingers around the right shin just below the knee (fig. 6.20).
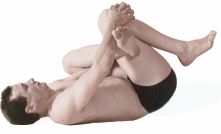
Figure 6.20. To do this supine half-lotus hip-opener, proceed as directed in text, or modify it as needed, for example by permitting the right ankle to rest above the right wrist instead of below, or by grasping the back side of the right thigh instead of the right shin.
If you are not flexible enough to get into this position, you can keep the right wrist below the left ankle, or you can grasp the thigh instead of interlocking the fingers around the knee. Do it any way you can. Rock from side to side as far as possible without falling. Then draw imaginary circles on the ceiling with the right knee. Go as far to the left as possible without toppling over, and pull on your right knee, deeply stretching the adductor muscles on the left side that attach posteriorly along the inferior pubic rami. Then go as far to the right as possible, again without toppling over, and pull, feeling the stretch higher in the back. In this position, the right thigh is flexed straight toward the chest, so the right adductors are not being placed under much tension, but the left adductors are stretched by the modified half lotus combination of flexion, abduction, and lateral rotation. Repeat on the other side.
GOLGI TENDON ORGAN STIMULATION
The following exercise lengthens the hamstrings and reaffirms the principles of working with feedback circuits between tendons and their muscles (chapter 1). It is safe for beginners because the back and pelvis are stabilized against the floor. Locate a length of cloth or a belt that can be thrown over one foot and grabbed with the hands. Then do a standing forward bend to test the initial length of the hamstrings. Next, lie down with the buttocks against a wall, the feet facing the ceiling, and the thighs flexed 90° from the trunk. Keep the knees extended and the feet together, and toss the cloth or belt across the sole of one foot.
Keeping one leg against the wall, draw the other foot away from the wall by tugging on the belt with the opposite hand. Keep both knees extended. With the other hand, first locate the ischial tuberosity on the side you are working with, and feel the hamstring tendons that lead distally, up and away (toward the ceiling) from that point of origin. Second, locate the cordlike hamstring tendons that connect the bellies of the hamstring muscles to their insertions on the tibia and fibula. These tendons can be felt just proximal to the medial and lateral sides of the knee joints. Once the tendons are all located, hold the cloth or belt firmly and press the thigh toward the wall isometrically, bringing the hamstring muscles into a strong state of contraction. Then, keeping that tension on the hamstring muscles, deeply palpate their musculotendinous junctions with your free hand, first near their origins and then near their insertions. Repeat the exercise on the other side. To complete the experiment, stand up, again try the forward bend, and notice how much further you can come down.
Vigorously palpating Golgi tendon organs of the hamstring muscles when the hamstrings are in a state of isometric contraction relaxes the muscles, and we can see the evidence moments later when they accommodate to a greater length under conditions of passive stretch. For example, if we guess that the hamstring muscle fibers had been receiving 30 nerve impulses per second before the isometric endeavor and massage, they might receive only 20 nerve impulses per second in the same stretch after the treatment, releasing some of their tension and enabling us to bend forward more gracefully. Even more to the point, the diminution in motor neuronal input seems to last for as long as a day or two, supporting the usual advice to do hatha yoga postures every day.
HIP OPENING IN INVERTED POSTURES
When the body is inverted, hip-opening is both safe and effective because the hip joints are not bearing the weight of the body as a whole. In either the headstand (chapter 8) or the shoulderstand (chapter 9), you can stretch the hamstrings on one side at a time by pulling one foot overhead, and you can stretch the adductors by allowing gravity to abduct the thighs. From the shoulderstand you can come into the plow or half plow to stretch the hamstrings on both sides, and you can do that while abducting the thighs maximally to stretch the adductors. You can also fold one foot into a half lotus position and lower the other foot overhead toward the floor to stretch the hamstrings on one side. Finally, you can work within the hip joint by folding up the knees and hips in any number of ways that reduce muscular tension.
FORWARD BENDING WITH ONE FOOT TUCKED IN
Sitting forward bends with one foot tucked in are among the most useful hip flexibility stretches for beginners and intermediate students. They do not place as much stress on the lower back and sacroiliac joints as the posterior stretch, and they are asymmetrical postures that are helpful for working with right-left imbalances.
To begin, sit on the floor, stretch one leg out in front of you, and pull the other foot in toward the perineum. The thighs will be at about a 90° angle from one another, and you will be facing about halfway between the two. Next, to work with this posture conventionally, twist the spine 45° to face the outstretched leg and come forward without lifting your hands overhead or making an attempt to bend initially from the hips. Let the hands rest, depending on your flexibility, on the outstretched thigh, leg, or foot (fig. 6.2la). Remain in the posture for about half a minute and then slowly unroll, first at the hips and then in the lumbar region. Finally, lift the head and neck. Repeat on the other side.
This forward bend toward one foot is useful for several reasons. First, with one knee flexed, it is stretching the hamstrings on only one side. Second, even though it is stretching the adductors to some extent on both sides, it creates more stretch on the side to which you are reaching because the knee on that side is extended. This is one of the best possible postures for working with the adductors on one side at a time. Finally, the forward bend with the pelvis angled 45° creates different and generally fewer stresses on the hip joint and lower back than the posterior stretch, making this posture safer and less discouraging for beginners.
After getting accustomed to this pose, try a variation. Again come into the preliminary position with the right knee extended, but instead of reaching out directly toward the right foot, press your left forearm against your left knee. In most students, this will pry the right hip off the floor, and that’s fine. Now reach out and slide the right hand against the floor halfway between the two thighs, approximating a 30–45° angle from the outstretched leg. Keep reaching toward your limit even though it lifts your right hip even more. The idea is to stretch the adductors on the right more than the previous posture. Then try reaching out closer to the right foot, perhaps 10–20° off axis from the right leg, in order to increase tension even more in the right adductors (fig. 6.21b). These variations are mainly for beginners and intermediate students. Those who are already flexible will not find them very interesting because their adductors can easily accommodate to all of the stretches.
Finally, after exploring the poses in which you are reaching out at an angle, come back to the original posture and reach straight toward the right foot. You will find that you are able to come further forward (fig. 6.21c). The hamstrings are still resisting almost as much as before, but the stretches off axis from the extended knee have relaxed and lengthened the adductors on that side, and the increase in how far you can now reach is a rough measure of how much they were contributing to your limitations—over and above restrictions from the hamstrings—in the initial posture.
These are all elementary stretches, and in keeping with the spirit of meeting the needs of novices, they should all be explored by simply rolling forward naturally, working from distal to proximal, coming into the stretch first with the upper extremities, head, chest, lumbar region, and hips, and then releasing in the opposite direction one step at a time from the hips to the upper extremities. Since these are asymmetric postures, you should repeat the series on the other side. After a warm-up, you can take the option of moving briskly back and forth from one side to the other to determine if one side is tighter, and then concentrate your attention accordingly.
When students are comfortable with these postures, they can start thinking about re-ordering their priorities by reaching up first with the hands and bending from the hips, then the spine, and then the head and neck. Only advanced students with good flexibility should try the final step of catching the outstretched foot to pull themselves fully into the pose, however, because we see the same problem here as in the posterior stretch: advanced students come into the posture by releasing rather than increasing tension on their spines, and beginners who pull forward with their hands may strain their lumbar region. Coming out of the pose, beginners should roll up and out as always (even if they came into the posture bending from the hips), intermediate students should release slightly in the hips and lower back before reaching forward, out, and up, and advanced students can do whatever they want, including reaching out and then up as a first priority.
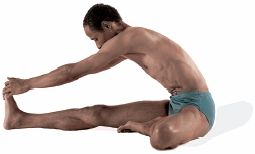
Figure 6.21a. With the left foot placed against the right thigh, come forward in an initial trial to feel and evaluate hamstring tightness.
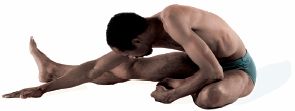
Figure 6.21b. Pressing the left forearm against the left knee, reach out at various angles (in this case 20°) to stretch the adductors on the right side.
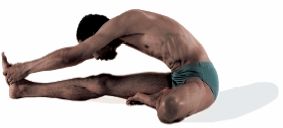
Figure 6.21c. Notice the improvement. This is due to having lengthened the adductors, some of which have a hamstring character and which limit the forward bend for the same reasons as the true hamstrings.
Another variation of this series of postures that may be of more interest to intermediate and advanced students is to place the pulled-in foot high up on the opposite thigh before undertaking the forward bends. This variation is not recommended for those who have poor hip flexibility or for anyone with chronic low back pain, since it places peculiar and unanticipated stresses on the lower back.
FORWARD BENDING WITH THIGHS ABDUCTED
Forward bending with the thighs abducted stretches both hamstrings and adductors. In its usual form it is a symmetrical posture for intermediate and advanced students who have already achieved good hip flexibility. Start with the knees straight and the thighs abducted. Then initiate a forward bend leading first with the promontory of the sacrum to achieve your personal maximum for nutation. Then bend from the hips, or try to do so, before bending additionally in the lumbar spine. Those who have good sacroiliac flexibility will feel their ischial tuberosities spread apart and will be able to flex the pelvis forward while keeping a prominent lumbar arch (fig. 6.22), but as in the case of the posterior stretch, those who are inflexible are likely to be at their limits of sacroiliac nutation and hip flexibility merely trying to sit up straight.
In this posture tight adductors add to the problem of tight hamstrings for two reasons. First, spreading the thighs apart places the adductors under tension even before you start to bend forward. Second, because some of the adductors take origin posteriorly along the inferior pubic rami, they will pull forward on the underside of the pelvis just as surely as the hamstrings. Compared with the posterior stretch, the additional difficulty you have coming forward is due to the adductors, and if you are not very flexible you are likely to be struggling. If you can’t separate the thighs more than 90°, it means that both the hamstrings and the adductors are limiting the stretch. The simplicity of the problem makes this perhaps one of the most maddening postures in hatha yoga for stiff novices.
Those who have good sacroiliac and hip flexibility have a completely different experience. They may even be able to bend all the way to the floor, keeping the back straight and even keeping the lumbar region arched forward. This 180° bend from the hips can happen only because full sacroiliac nutation in combination with extreme abduction gets the thighs out of the way quite literally, and permits the front of the pelvis to drop down between them. This, in fact, has to happen in the most extreme cases of abduction, in which the thighs are spread straight out to the sides. What happens at the level of bones and joints under those circumstances is that the pelvis rotates forward and allows the anterior borders of the ilia to drop down between the necks of the femurs just as we saw with some of the hip-opening stretches (figs. 6.l9e–f). The only difference is that here, those who are especially flexible are able to both abduct and to flex their hips fully when their knees are extended.
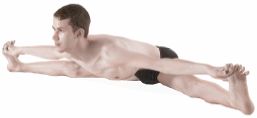
Figure 6.22. In this advanced forward bend with hip joints abducted, the thighs literally get out of the way of the pelvis, which can drop all the way forward to the floor in the most flexible students.
The extreme abduction in this posture, in combination with the pitched-forward pelvis, reveals one more feature. In comparison with the posterior stretch, it actually takes tension off the hamstrings because the sacroiliac joints slip to the extreme of nutation, spreading the ischial tuberosities laterally and positioning them closer to the insertions of the hamstrings, which are located out to the side in this posture. This means that those who have a lot of sacroiliac mobility will not be limited by either the hamstrings or the adductors in this stretch and will be working on limitations within the hip joint itself.
It is even more important to be attentive to foot position in this posture than in the posterior stretch, because with the feet spread so far apart, you may not notice that one foot is angling out more than the other. The cause of this is right-left imbalances in the medial and lateral rotators of the thighs, and these cannot be corrected except by paying attention to detail over a long period of time. If you are relatively inflexible, you should find the foot position that interferes the least with your attempts to bend, so long as you keep both feet at the same angle, but if you are more flexible you should analyze carefully which foot position gives you the most useful stretch. Many instructors who are watchful of such matters will suggest that you try to keep both feet perfectly upright.
CHURNING
An alternative for those who cannot come very far forward in the previous posture is to work with it asymmetrically and dynamically, combining the pose with a mild spinal twist. From the starting position reach with your right hand toward your left foot (or thigh, knee, or leg) while at the same time swinging your left hand to the floor in back of you and giving yourself a little push from behind to aid the forward bend. Then come up partially and reverse the position, reaching with your left hand toward your right foot and pushing yourself forward from behind with your right hand. Exhale each time you come forward, and inhale each time you come up.
This dynamic churning exercise is more rewarding for beginners than the previous pose because the emphasis on movement allows them to feel as if they are accomplishing something. It’s also helpful because the asymmetry of the movement allows them to work with extra concentration on the side that is showing more restrictions.
THREE MORE VARIATIONS WITH ABDUCTED THIGHS
Three more variations of sitting forward bends with the thighs abducted are commonly taught. For the first one simply face the left foot and bend forward. If the thighs are spread to a 90° angle in the first place, this will require a 45° twist in the spine in comparison with bending straight forward toward the floor. Repeat on the other side.
For the second and more demanding variation (fig. 6.23a), tuck the left foot in toward the perineum, and while remaining upright, twist left. Follow this with a side bend to the right, at the same time reaching overhead with the left hand toward the right foot. This superimposes lateral flexion to the right onto a spinal twist to the left. Again, repeat on the other side.
The last variation is similar to the second one except that both knees are extended. With the thighs abducted, sit straight, twist enough to the right—45° if the thighs are at a 90° angle from one another—to face the right foot, and do a side bend toward the left foot. Repeat on the other side. Like the previous pose, this posture is more fitting for advanced students who can reach overhead with the free hand, grasp the toes, and pull further into the side bend (fig. 6.23b). This should done carefully, especially if you do the posture after you are warmed up, because so much of your attention is placed on whole-body twisting and bending followed by pulling with the free hand that you may not notice you have just dislocated your hip. One time a friend of mine got carried away doing a demonstration and did exactly that. So be watchful. If you feel something give, come back delicately to a neutral position and stop doing all postures for a day or so to evaluate what has happened.
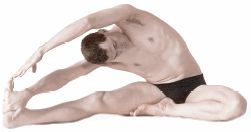
Figure 6.23a. To come into this twisted side bend, tuck the left foot in, twist left, bend to the right, and reach overhead with the left hand toward the right foot. This superimposes lateral flexion to the right onto a spinal twist to the left.
These last two postures are among the few side bends that are possible from a sitting position. Even so, they are not pure side bends because they are superimposed on sitting spinal twists. This makes them less natural and more complex than standing side bends (chapter 4), in which the thighs are extended and in line with the torso, and in which a relatively simple lateral flexion of the spine is possible.
SITTING TWISTS
Sitting spinal twists, which we’ll discuss in the next chapter, create stretches and stresses in the hip joint not found in any other type of posture. Every sitting spinal twist in which you lift one knee and pull it toward the opposite side of the body opens the hip joint, and does so without many encumbrances from muscular attachments, and, as we have seen repeatedly, when the muscles are not limiting hip flexibility we are down to bare bones, joints, and ligaments.
THE KNEELING ADDUCTOR STRETCH
To create the purest passive stretch of the adductors, especially for students who are not very flexible, warm up for at least half an hour, and then kneel down on a well-padded carpet with each knee on a small sheet of cardboard. Drop the head and chest, and settle onto the forearms with the forehead resting against the crossed hands. Slowly slide the knees apart, letting the feet move to whatever position is most comfortable as the body weight abducts the flexed thighs, possibly to an angle of about 120° from one another. Stay for a while in a position that permits the most abduction.
Next, slowly move the torso forward. This may permit you to slide the knees further apart (fig. 6.24). Then slide the knees somewhat closer together and lower the hips to the rear for more flexion. Try to relax. As you flex the hips and take your weight to the rear, you will be stretching different parts of the adductors than when you bring your weight forward, and anyone who is not very flexible will find that moving to the rear is an intense stretch that should be approached with caution. Last, you can try coming all the way forward, but be careful of this if you have lower back problems because the pose creates an acute backbend that places a lot of stress on this region.
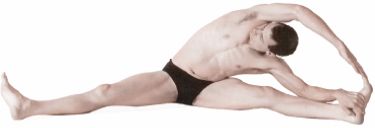
Figure 6.23b. For this twisted side bend, abduct the thighs, twist right, bend left, and again reach overhead with the free hand toward the opposite foot.
These exercises are among the most effective stretches available for the adductors, and working with them five minutes a day as a part of a balanced practice will soon show results in all postures that depend on adductor flexibility, including all forward bends, all standing postures with the feet wide apart, and all cross-legged sitting postures.
THE PIGEON POSTURE
The pigeon has a large, puffed-out chest, which we mimic in the pigeon posture. It is a superb advanced backbending pose in its completed form, but a preliminary version can be done by nearly everyone. We place it here because both versions work with hip flexibility on the right and left sides simultaneously, producing extension of the hip joint for the thigh directed to the rear and flexion of the thigh facing the front.
To come into the preliminary pigeon, start in a hands-and-knees position, pull the right knee forward to flex the right hip joint, and thrust the left foot back to extend the left hip joint. Allow the right foot to end up wherever it naturally falls, which will usually be near the genitals. Keep the elbows extended and the shoulders pressing the hands against the floor. Pull the head up and back, thrust the chest forward, and feel the essence of the pose (fig. 6.25a). If you feel any discomfort in the right hip joint or groin, stop right there. This is as far as you should go. Later on, after you have gotten accustomed to the basic position, you can lower your weight all the way down so that you are lying on the right thigh, which flexes the right hip joint completely and lessens hyperextension of the left hip joint (fig. 6.25b). Neither the hamstrings nor the adductors are being stretched, but you may feel the effects in the hip joint itself. Or, because all of your body weight is pressing against the forward thigh, you may feel tightness in the groin on that side.
When you are comfortable with the preliminary pigeon, you can try the advanced posture. Gradually swing the front foot out so the leg is perpendicular to the long axis of the thigh and torso. Don’t rush. As you bring your leg around to about a 45° angle, you may start to notice tension in your knee joint and a deep pulling sensation in your hip joint on that same side. Inexperienced students should never lower their weight down against the front thigh in this position because it places too much stress on the knee. Intermediate students can moderate the tension on the front knee by working with the classic pigeon posture—lifting up on the fingertips, pulling the head and shoulders up and back, thrusting out the chest as much as possible, and taking empowered thoracic inhalations to increase their inspiratory capacity. Advanced students complete this posture by grasping the sole of the rear foot and placing it against the top of the head (fig. 6.25c).
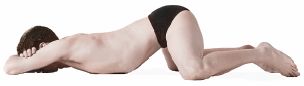
Figure 6.24. This kneeling adductor stretch should be done with caution, especially by those who are not very flexible.
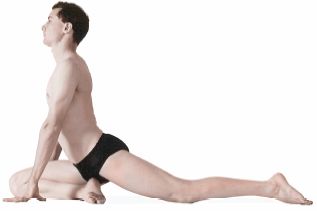
Figure 6.25a. This preliminary pigeon, allowing the front foot to come to a neutral position, is comfortable for everyone who has healthy knees. The right thigh is flexed, the left thigh is hyperextended, and the back and neck are fully extended.

Figure 6.25b. Folding into a forward bend from the previous posture is a comfortable and richly rewarding posture for many students. The pose increases flexion of the right thigh and lessens hyperextension of the left thigh.
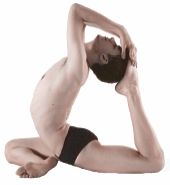
Figure 6.25c. The advanced pigeon, with the front leg approaching a 90° angle from the front thigh, and featuring a 90° lumbar backbend, should be approached with respect and caution.
HIP FLEXIBILITY STANDING
Improving hip flexibility in standing forward bends requires a different mind-set from working with hip flexibility in supine, inverted, or sitting positions. Standing postures present special problems because we place the feet in positions that often depart radically from the norms of ankle, knee, and hip movements needed for walking and running. Any time we plant the feet and then come into a standing posture with a twist, bend, lunge, or some combination of these three, we place stress on the hip joints and their supporting muscles. The problem is that we do not ordinarily readjust the feet to make the posture easier, which indeed would miss the point; instead, we work with the posture by increasing the tension in muscles around the hips and knees. To this end, many instructors recommend standing on non-slip rubber mats to keep the feet firmly in place and immobile. Beginners are well-advised to begin with moderate foot positions to minimize stress, which allows them to explore standing postures in their mildest form before working with more demanding versions. To illustrate we’ll do two experiments, one for the hamstrings and one for the adductors.
We’ll begin with an adaptation of the angle posture (figs. 4.25–26 and 6.26a–b) to stretch the hamstrings. Stand with the feet about three feet apart. Then rotate the right foot 90° to the right and the left foot 30° to the right. Given this foot position, the torso will most naturally face about 45° to the right, and the hip joints and the muscles that restrain them will be relatively comfortable. To continue, swivel to face the right foot as squarely as possible, and notice that this movement alone creates intense tension in the left quadriceps femoris. Counter that by tightening the left gluteals. The left thigh is now hyperextended, causing the head of the femur to be driven into tight apposition with the acetabulum. If you keep standing up straight, hyperextension of the left thigh forces the lumbar region into a deeper lordosis. There is little or no tension on the right hamstrings because the right lower extremity is still in a neutral position.
Then, facing the right foot, establish full nutation of the right sacroiliac joint by tightening the right psoas muscle, and then slowly fold forward, first from the hips (fig. 6.26a) and then in the lumbar region. As you come down, the right hamstrings come under more tension (fig. 6.26b). Keep the muscles of both thighs active to make the posture feel more secure, and notice that this also makes you feel more confident in coming forward. Come up and repeat on the other side.
This posture involves a swivel and a forward bend at one hip joint which is intensified by the weight of the upper body. The resulting stretch is more demanding than hamstring and hip stretches in supine, inverted and sitting postures because now you have to be attentive to the body as a whole—and this is one of the easiest and least complex of the standing postures. Most others, especially the triangles and lunges, place even more stress and tension on the hip joints.
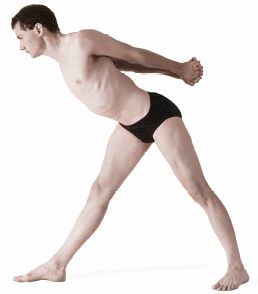
Figure 6.26a. Coming into this intermediate stage of the angle posture provides one with a golden opportunity for the study of muscle and joint mechanics. First, swiveling to face the right foot before starting to bend forward at the right hip creates intense tension in the left quadriceps femoris muscle, which should be countered by tightening the left gluteals. Second, hyperextension of the left thigh (still standing straight) forces the lumbar region into a deep lordosis, which should be maintained even as you start to bend forward. It is at this point (third) that a sharp asymmetric effort is made with the right psoas muscle (the above posture) to maintain the lumbar lordosis, maximize nutation of the right sacroiliac joint, and bend at the right hip. This is a magnificent asymmetric pose in its own right and is worth extended study. Repeat on the other side.
To stretch the adductors, try standing on a non-slip surface with the thighs abducted almost as far apart as possible, still, however, being somewhat conservative. Keep the feet parallel, and make sure the back and pelvis are in a comfortable upright position. Then bend forward slightly, keeping the lower back arched, and notice that you may be able to abduct the thighs even further. The idea is to refine this posture to find a revised maximum but fairly comfortable limit for abduction. Then bend in tiny increments, first coming forward from the hips to stretch the hamstring muscles and adductors that originate from the rear, and then straightening up and bending backward to stretch those segments of the adductors that originate more anteriorly on the inferior pubic rami. Notice that the stretches become intense in both directions. It is important to be careful even with these small shifts in position for two reasons: because the exercise was started with near-maximum abduction, and because the feet are planted and the weight of the entire upper body is brought to bear on the hip joints and adductors. The directions are telling: bend forward slightly; move in tiny increments; stretches become intense in both directions. Such comments would not be necessary if you were working with hip flexibility and adductors in supine, inverted, or sitting postures.
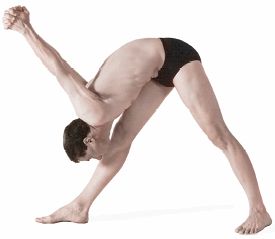
Figure 6.26b. Folding forward in the angle pose places intense stretch on the hamstring muscles of the front thigh, stretch which should be countered by holding those muscles in an isometric state of contraction along with moderate tension in the rest of the muscles of both lower extremities. This pose provides an excellent example of the inadvisability of holding an intense posture in which the knee joint is fully extended (chapter 4) without keeping tension in the muscles that support the joint antagonistically.
NONATTACHMENT
Those who are flexible in the hips and those who are not are like ships passing in the night. Anyone with good hip flexibility can press the chest against the thighs in a standing forward bend (with the knees straight) and allow the lumbar region to be stretched passively by gravity. They are relaxed and comfortable, and they feel a sense of inversion. In sitting postures it is easy for them to press the chest to the thighs (again with the knees straight) in the posterior stretch or to lower the abdomen, chest, and head all the way to the floor with the thighs abducted. By contrast, those whose hips are not flexible are practically a different species. As they try to lower into a standing forward bend at the hips, their backs are crunched over rather than stretched passively by gravity, and they get little or no sense of inversion. And as far as doing a credible sitting forward bend with the thighs abducted is concerned, they might as well try flying.
Even if it is not possible for you to flatten your chest against your thighs while keeping your knees straight, be comforted. This is of little consequence, at least by itself. Hatha yoga is a science of mind as well as body, and beneficent changes in the mind-body continuum are available even to those who are stiff and past their youth. For achievement of health and peace of mind, consistent practice is more important than accomplishing some arbitrary standard of flexibility, and if you work consistently with a balanced set of postures, progress will be realized on many fronts, some of them unexpected. All you need is commitment plus a playful sense of observation and experimentation. Such an attitude also cultivates vairagya—nonattachment—and if that accompanies your quest, you will, by definition, be successful.
Forward bending postures are generally more subdued than back-bending, twisting, and inverted postures. They tend to quiet rather than stimulate the somatic nervous system and the sympathetic limb of the autonomic nervous system (chapters 2 and 10). On the other hand, as soon as students are able to flex forward enough in the spine and the hips to compress the abdomen, forward bending postures seem to have mildly invigorating effects on the abdominal organs, possibly stimulating the enteric nervous system (chapter 10), and thereby enhancing digestion and assimilation of foodstuffs from the bowel, as well as relieving constipation. Finally, because forward bending postures are so important for hip flexibility, they are among the most important training postures for meditation.
“If you want to learn about meditation, you first need to know something about concentration. According to yoga, concentration means focusing the mind on one object. An undisciplined mind—the kind most of us have—tends to shift continually from one object to another. Steadying the mind by focusing it on one object helps you to gradually overcome this ever-wandering habit of the mind. After prolonged practice, the mind is able to focus on one object for longer and longer intervals. When the mind remains concentrated on one object for a period of twelve breaths, this is called meditation. Thus, meditation can be defined as the uninterrupted flow of concentration.”
— Pandit Rajmani Tigunait, in Inner Quest, p. 71.