“This sadhana is not something esoteric or mysterious. It is simply a way of awakening knowledge about ourselves. And when we have learned how to know ourselves, we will also know the world around us and the supreme reality as well. . . . Through Vedanta you can gain the knowledge about yourself and your relationship with the universe; through these practices you can gain experiential knowledge about these same things.”
— Tapasvi Baba, from a lecture given at the Himalayan Institute in Honesdale, PA on July 17, 2000 (translated by D.C. Rao).
Imagine what it would be like if we couldn’t twist. We couldn’t swing a bat or a golf club. We couldn’t greet someone standing next to us without turning our entire body. We couldn’t even twist the lid from a jar. We would walk like marionettes and dance like robots. Twisting is needed for every activity that involves moving to the side and front simultaneously. Lean diagonally across a table—you twist. Throw a ball—you twist. Scratch your left foot with your right hand—you twist. Not only that, every inquiry about anything not directly in your line of sight requires twisting. It might be something as simple as looking around a room to determine where to go and what to do next, or it could be something as complex as twisting the head, neck, and trunk around 135° in an automobile seat to confirm that no one is alongside and slightly behind you before you change lanes.
Anatomically, all asymmetric whole-body activities, even those that principally involve flexion and extension, contain elements of twisting. Take walking. As you stride forward with one foot the opposite hand comes forward—right foot left hand, left foot right hand, right foot left hand, left foot right hand. This creates a moderate whole-body twist, and a slight twist in the gait not only balances the body, it calms the nervous system. If you are skeptical, try it the other way—right foot and right hand forward at the same time, clunk; then left foot and left hand forward at the same time, clunk. It’s jarring.
In hatha yoga we have many twisting postures to pick from, including all asymmetrical postures that are not pure sidebends. In this chapter we’ll examine a few of them in detail, including basic spinal twists, various combinations of flexion, extension, lateral flexion, and twisting of the head and neck, and certain standing postures that combine twisting with backbending and forward bending. We’ll start with an analysis of the fundamentals of twisting, then look at the anatomy of twisting from head to toe, and complete the chapter by looking at supine, standing, inverted, and sitting twists.
Forward and backward bending postures, as well as flexion and extension in general, always take place in relation to earth’s gravitational field, but twisting is fundamentally different because you can twist the body or some part of the body without altering its relationship to gravity. For example, you can twist your head as far as possible right and left, but unless you combine this with flexion, extension, or lateral flexion, the relationship of the head to earth’s gravity is unchanged.
Bends and twists not only differ in nature, they differ in how they come about. Any movement that involves bending—whether whole-body bending, or flexion and extension of a limb—gets its impetus either from interactions with gravity or from a force like that created when children in swing sets kick their feet forward and then backward to get themselves going, or like that created when you push off from the end of a swimming pool. All the twisting motions with which we are concerned here, however, are initiated by torque. It is torque that starts someone spinning around on a rotating chair, and it is torque that the rotators of the hip use for rotating the long axis of the thigh with respect to the pelvis.
[Technical note: To be accurate, it has to be admitted that nearly all movements at joints use torque, whether bending your elbow, kicking a football, or grasping a pencil. That is why I was careful not to say that linear movements are used for pushing off from the end of a swimming pool. That would have been incorrect; torque is used there as well to extend the hips, knees, and ankles. The difference is that for those movements the axial center of rotation is in each specific joint, whereas in this chapter our main concern is with forces that operate to create twist on the long axis of the body or limb from the perimeter of an imaginary circle that surrounds the axis of the affected body part.]
Bending and twisting differ in at least three more ways. First, forward and backward bending are often symmetrical, but twisting can never be: it always pulls structures on the right and left sides of the body in opposite directions. Second, forward and backward bending need not increase axial tension in the body, but twisting, unless it is utterly unresisted, always compresses structures that lie in the axis of the twist. Last, while forward and backward bending are comparatively simple expressions of flexion and extension, there are several different kinds of twists: rotations of synovial joints, more constrained spinal rotations, and whole-body swivels that combine both of the above.
TORQUE
Simplistically, and for purely practical purposes, we can state that torque is any mechanical force that can produce a rotation. It is initiated by muscular effort, but like any other force, that effort does not have to produce a visible result. It is like a push. You can push against a sapling and bend it, or you can push against a tree trunk to no avail. And so it is that a torque can either actuate a twist or it can be an isometric effort that attempts a twist but fails—trying to twist a locked doorknob, trying unsuccessfully to escape having both shoulders pinned to the floor in a wrestling match, or tugging on the rope of a frozen lawnmower engine. In hatha yoga the muscular effort to come into a spinal twist creates torque throughout the body, actuated in some regions, in others not.
SYNOVIAL ROTATIONS IN THE EXTREMITIES
The simplest kind of twisting involves free and easy rotation at synovial joints, in which the slippery cartilaginous mating surfaces of bones offer little or no resistance to movement. We see this when we “twist” a screw into a board, alternately pronating and supinating the forearm. As shown earlier (figs. 2.8 and 4.3), these rotations take place because two pivot joints, the proximal radio-ulnar joint at the elbow and the distal radio-ulnar joint at the wrist, permit the ulna and radius to come into an X configuration for pronation and into a parallel configuration for supination. Other familiar examples of synovial rotations are the rotary movements of the femur in the ball-and-socket hip joint and the rotary movements of the humerus in the glenoid cavity of the shoulder joint (fig. 1.13).
SPINAL ROTATION
The second kind of rotation, and the one that the hatha yogi first thinks of as a twist, is rotation of the spine. Whether standing, sitting, supine, or inverted, spinal twists involve the entire torso, but they all start with axial rotations between adjacent vertebrae. Taken together, such rotations—24 of them in all between C1 and the sacrum—add up to a lot of movement, even though this takes place against the resistance of intervertebral disks, facet joints between the vertebral arches, the rib cage, and muscles and ligaments from the head to the pelvis. We rarely do complete spinal twists in everyday life, but they are one of the five fundamental gestures in hatha yoga.
STANDING SWIVELS
Another kind of twist might better be called a swivel. It involves rotating the pelvis and thighs around so that the torso faces to one side, and it invariably begins in a standing position with the thighs at least partially abducted. The swivel can be limited to the lower extremities, but more commonly it is a whole-body twist in which the hips, shoulders, and torso are all rotated in the same direction, usually at the same time. Swiveling is a combination of spinal and synovial twisting—a spinal twist superimposed on synovial rotation of the hip joints. In sports we often see these movements taken to their extremes, as when skiers negotiate a steep drop with short, side-to-side excursions while keeping their shoulders perpendicular to the fall line of the downhill slope. And in everyday life, any time you face the torso in a direction other than straight ahead but do not shift the feet, you swivel at the hips. In hatha yoga practically any standing posture that involves planting the feet and then turning the rest of the body is a swivel—a spinal twist combined with medial rotation of one thigh and lateral rotation of the other.
For practical purposes, how a posture feels to us is our major concern, so from this point on, if it feels like a twist we’ll call it a twist, whether it is a free and easy synovial rotation, a constrained spinal rotation, a swivel, a torque that goes nowhere, or a torque that produces a movement everyone recognizes as some kind—any kind—of a twist.
STABILITY IN TWISTING
Try to imagine how difficult it would be architecturally to design a joint that is stable enough to twist as well as permit flexion and extension. You would need to include both ligaments and bony stops to limit extension. That’s easy enough. But to permit that same joint to twist as well, you would have to include a complex of muscles to activate the twisting, and you would have to superimpose any number of specialized ligaments and muscles on the joint to keep the twisting within reasonable bounds.
This is not a small order, and as a general rule, wherever extensive flexion and extension take place, we see that twisting is limited. In the lumbar region of the spine, which is the site of most spinal forward and backward bending, little twisting is permitted, but in the chest, where backbending and forward bending are limited, we see excellent potential for twisting. And in the extremities, the fingers and toes permit flexion and extension but little twisting. Only in the cervical region of the spine, in the hips and shoulders, and in the flexed knees will we see extensive flexion and extension as well as the additional potential for rotation, and those regions are as stable as they are only because of robust muscular support and numerous restraining ligaments. Even so they are all hot spots for dislocations and other injuries.
ASYMMETRY AND TWISTING
Whole-body twisting is always accomplished by pairs of obliquely oriented muscles, one on the right side of the body and one on the left. The muscle on one side shortens concentrically, creating the twist, while the muscle on the other side lengthens, resisting the twist. The external and internal abdominal oblique muscles in the abdominal wall are a case in point. As you twist to the right, the right external and the left internal abdominal obliques shorten concentrically, and the right internal and left external abdominal obliques lengthen against resistance. On the other hand, vertical muscles such as the right and left rectus abdominis, as well as horizontal muscles such as portions of the right and left transversus abdominis, remain the same length during a twist and simply come under isometric tension equally on both sides.
All ligaments that run obliquely on the two sides of the body are also brought under asymmetrical tensions by twisting. If you bend your knees and twist the torso to the right, as you do when you ski to the left while your shoulders are facing downhill, excessive lateral rotation of the left leg will be checked by the collateral ligaments of the left knee, and excessive medial rotation of the right leg will be checked by the cruciate ligaments of the right knee. Skiing to the right, of course, mirrors these tensions. By contrast, if you stand in a symmetrical knock-kneed position with the toes facing in and heels out, the ligaments are stressed symmetrically rather than asymmetrically. Excessive medial rotation of both legs is checked equally by the cruciate ligaments on both sides. Or if you stand with the feet wide apart, heels in and toes out, excessive lateral rotation of both legs is checked equally by the collateral ligaments of both sides.
Ordinary activities such as walking keeps the two sides balanced, but when you twist you usually favor one side—always holding a book to one side and twisting the neck in the same direction, or always coming up on the same side for air when you are swimming freestyle. Or if you consistently hold the top of the handle of a snow shovel with the right hand and throw the snow to the left, you will develop more strength, stamina, and flexibility for twisting to the left.
Twisting habitually to the same side during the course of daily activities distorts the body’s bilateral symmetry, and such biases sooner or later produce asymmetries in its structure. For this reason twisting postures should always be done in both directions, and to correct imbalances they should be done three times—twice on the less flexible side.
COMPRESSION
To get the most water out of a washcloth you don’t roll it up and bend it—you roll it up and twist it, and this squeezes and compresses the water out of the cloth from top to bottom. By the same token, in twisting postures all structures that lie in the axis of the twist (an imaginary line around which the rotation takes place) are squeezed and compressed. We have seen that throughout the body, oblique muscles create twists, while vertical and horizontal muscles resist them isometrically. Every time you do a spinal twist or even establish the torque to create one, the obliquely and vertically oriented muscles of the back and abdomen compress the spine and torso axially, and when that happens the compression is transferred to the spine and torso as a whole. We also see this phenomenon in the extremities. Every rotation of the arm, forearm, thigh, or ankle creates axial compression in the long axis of the extremity, the amount of which is in direct proportion to the intensity of the effort.
You can feel this compression from head to toe in a whole-body twist and swivel. Stand with your feet 2–3 feet apart and combine a twist of the head, neck and torso with a swivel in the hips and resistance in the knees, ankles, and feet. The muscular effort tightens joints and ligaments everywhere from head to toe. The body feels like a tightly wound spring. Twist in the other direction for balance, and each time you release the posture, notice the release of axial compression.
THE SKULL, THE ATLAS, AND THE AXIS
The cervical region between the head and the chest is one of the few in which flexion, extension, and twisting can all occur at the same time. Flexion, extension, and lateral flexion take place between the head and the first cervical vertebra (C1) at bilateral synovial joints (no intervertebral disk is present here); rotation takes place at a synovial joint between C1 and C2 (again, there is no intervertebral disk at this site); and all four movements, singly or in combination, take place in the rest of the cervical region from C2 to T1, the segment of the cervical spine which contains joints with typical intervertebral disks and synovial articular processes (figs. 4.8, 4.10, and 4.13a). We’ll start our discussion at the top and work down.
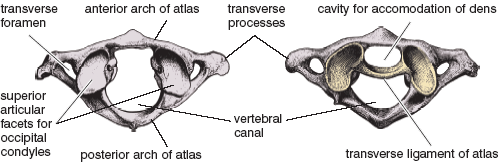
Of the seven cervical vertebrae, the top two have been given special names that reflect their anatomical and functional relationships. The top one (C1) is the atlas (figs. 7.1–2), named for Atlas, the Greek god whose shoulders supported the world. In this case the atlas is a ring of bone which supports the skull, and its relationship with the cranium permits side-to-side and back-and-forth movements but little rotation. The second cervical vertebra (C2), the axis, has a tooth-like protuberance called the odontoid process, or the dens, which extends up from the vertebral body and provides the axis around which the atlas together with the cranium can rotate (figs. 4.8, 4.10, and 7.2).
Figure 7.1. Superior views of the atlas (left) and of the atlas with its transverse ligament (right). The transverse ligament helps delimit the region within which the dens of the axis rotates. The foramina in the transverse processes accomodate the vertebral arteries. The combination of the two superior articular facets for the occipital condyles can be likened to the concavity of a spoon subserving flexion, extension, and lateral flexion of the cranium on the atlas, but not rotation (Sappey).
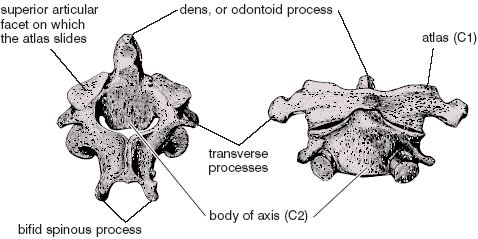
Figure 7.2. On the left is a posterosuperior view (from behind and above) of the axis (C2), and on the right is an anterior view (from the front) of the atlas (C1) and axis in combination. The atlas in combination with the cranium rotates around the dens (odontoid process) of the axis. Notice how much wider the atlas is than the axis and compare this image with the drawings made from the roentgenograms in fig. 4.8 (Sappey).
Even though the cranium and the atlas together can rotate around the axis, the cranium cannot rotate on the atlas because of the shape of the matching articulating surfaces. If you can find a spoon whose converse mirror image matches that of an egg, you can slip the egg back and forth and from side to side, but you cannot turn it around and around. The cranium sits on the atlas in much the same way; it slips on the atlas in only two directions, from front to back and from side to side. The articulating surfaces at the base of the skull—the occipital condyles—lie on either side of the foramen magnum, which is the hole that accommodates the spinal cord where it emerges from the base of the brain. The cranial surfaces of the occipital condyles (the egg) slip back and forth (flexion and extension) and from side to side (lateral flexion) on matching articulating surfaces on the upper surface of the atlas (the spoon).
FLEXION AND EXTENSION
The articulating surfaces between the head and the atlas allow slippage in the form of 10° of flexion, 20° of extension, and 15° of right and left lateral flexion. To get a sense of the articulation between the skull and the atlas, nod your head back and forth without bringing the rest of the cervical vertebrae into the motion. Just be aware of a sliding feeling, with a little more motion permitted backward than forward. Envision the axis of rotation extending from ear to ear. As you move your forehead forward the chin is tucked, and as you move your forehead backward the chin is jutted forward. This is the feeling of flexion and extension between the cranium and the atlas. Then after exploring that motion, bend the neck backward and forward to your limits. The contrast is clear. You can feel the cranium sliding on top of the neck in the first motion, and you can feel the entire cervical region bending in the second.
LATERAL FLEXION
Next explore lateral flexion at the same articulations. Keeping your head balanced upright, slowly tilt your forehead to the right and your chin to the left, and then repeat in the opposite direction, envisioning the axis of rotation extending between the mouth and the back of the head. Again, don’t bend the rest of the neck. To the extent that you can feel the chin and the forehead move in opposite directions, you will be feeling the side-to-side slipping of the cranium on the upper surface of the atlas. If you concentrate on carrying this particular movement to its maximum, it feels extensive—at least 15° in each direction. Again, for contrast, as soon as you have reached the limit of movement between the atlas and the head, flex the head and neck as far as possible laterally. This gives you a different sensation, like the movement of the head in a Jack-in-the-Box.
THE MOVEMENT OF THE ATLAS AROUND THE AXIS
Now we can return to our more immediate interest in twisting as we explore the rotation of the atlas (plus the skull) around the odontoid process of the axis (figs. 4.8 and 7.2). Do the following experiment. Sit quietly with the spine and head upright. Without dipping the head either forward, backward, or to the side, slowly turn it to one side and then the other through a total excursion of 60–90°. In other words turn 30–45° to the right and 30–45° to the left. Try to relax. Turn slowly, then a little more quickly, then again slowly. This is the movement of the atlas around the odontoid process. You can envision it if you make a circle with the thumb and index finger of one hand, insert the thumb of the other hand (representing the odontoid process) against the back of the circle, and rotate the circle through an excursion of 60°, in other words 30° each way.
Next, for contrast, turn the head as far as possible in each direction. If you have fairly good flexibility you can turn about 90° each way. The first portion of the twist is 30–45° of rotation between the atlas and the axis, and the remainder of the 45–60° represents twist in the rest of the neck.
To return to the delicate twisting that takes place only between the atlas and the axis, notice what happens as you move past the symmetric central balancing position with the head facing straight ahead. Something takes place—a change of speed, first a slowing down, then a speeding up as you pass center, a movement so subtle that you will not feel it unless you are relaxed. What is happening is that a cam action is lifting your head slightly as you pass center. It’s as if a motorized toy car were approaching a little hill. You can feel your head rise as you approach the hill, and a gathering resistance that peaks at the top and then diminishes as you cross over. Find the little hill, park exactly on top, and then move slightly to one side and then the other. If you watch carefully you will notice that the high point is not perfectly on line in the midsagittal plane of the body but is usually somewhat to the left or right of center, and that you habitually adjust your body posture so that your head rests on the side that keeps you facing relatively straight to the front.
THE RELATIONSHIP BETWEEN THE AXIS AND THE ATLAS
To understand why this happens we need to look more carefully at the relationship between the axis and the atlas. As we discussed in chapter 4, each individual vertebra is composed of a vertebral body and a vertebral arch. The exception to this is the atlas, which is simply a ring of bone (figs. 7.1–2). In the embryo what had originally been the body of the atlas became incorporated into the axis, bestowing on the axis the equivalent of two fused-together vertebral bodies, the top portion of which is the odontoid process that stands up from the rest of the vertebra (fig. 7.2). It is around this process that the atlas rotates, and it is from this function that the axis was named (figs. 4.8 and 7.2).
The reason you feel the rising-on-center sensation as you twist is that the lateral joint surfaces between C1 and C2 are not in perfect apposition unless the head is turned slightly to one side or the other. Accordingly, rotation off that center is accompanied by a slight vertical descent of the head; keeping the head directly on the high point once you have located it is an interesting exercise in balancing and concentration. Enthusiasts for working with right-left balance might suggest that shifting the head to the side on which it does not usually rest will gradually bring the rising-on-center sensation into the midsagittal plane of the body and make the joint more symmetrical. It’s an interesting idea, although speculative.
MOVEMENTS OF THE HEAD AND NECK
Below the axis, from C2 to T1, typical intervertebral disks separate the vertebral bodies of the spine. This limits movements between any two adjoining vertebrae (figs. 4.10 and 4.13a), but this segment of the spine still provides us with mobility far above and beyond what we saw between the skull and C2—a total of about 90° of additional rotation, 80° of additional flexion, 50° of additional extension, and 40° of additional lateral flexion on each side.
If you concentrate, it is possible to isolate the movements between C2 and T1 from those between the skull and C1. Thrust the chin forward and at the same time flex the entire neck forward and down. Then after coming back to a neutral position, pull the chin backward and at the same time extend the neck to the rear and down. Last, initiate lateral flexion to the right and left from the base of the neck rather than head first. In all of these cases you can avoid, at least to some extent, the smaller motions between the skull and C1. By contrast, twisting selectively between C2 and T1 without first rotating between C1 and C2 is more difficult. Only if you tighten the strap muscles of the neck generally (fig. 5.5), and do so with some determination, can you initiate a twist from the base of the neck and avoid the rotation between C1 and C2.
HATHA YOGA NECK EXERCISES
We ordinarily move the head and neck in highly stereotyped patterns, and because these movements are common and natural in day-to-day life they are also the safest. Hatha yoga neck exercises are another matter. They are done in isolation and are usually taken further than the moderate flexion, extension, and twisting found in our usual activities. In hatha yoga exercises we flex the chin all the way to the sternum, extend the head back as far as possible, flex the ear toward the shoulder laterally, and rotate as far as possible right and left (fig. 7.3). We must explore the cervical region in detail to understand these and other possible neck movements, and then we must augment our knowledge with practice, experimentation, and observation. Take your time and be conservative. No movement that causes neck pain should be repeated injudiciously, and in the event of injury, practice should be stopped until the problem is resolved.
FLEXION
Flexion is the most natural movement of the neck—it happens any time you look down. To do it as an exercise just lower the head forward as far as possible and let it rest in that position. After a few weeks of practice you may be able to pull the chin all the way to the sternum, hold it there isometrically, and be confident that the extensor muscles in combination with the restraining ligaments of the spine will maintain the vertebrae in a state of healthy alignment. Do not aim for a chin lock (chapter 3), in which you try to place the chin into the suprasternal notch. Just lay it down against the front of the sternum. If you flex forward a total of 90°, the first 10° of movement is between the cranium and the atlas, and the balance takes place between C1 and T1.
EXTENSION
Extension of the neck is also a natural movement—it happens any time you look up. To do it as an exercise extend your head to the rear and hold in that position for a few seconds. The first thing you’ll notice is that extension is stopped by restraining ligaments and bony stops long before the back of the head can reach the upper back. Even so, you can reach the end of a relaxed excursion to the rear and then pull further back vigorously against the bony and ligamentous stops so long as you increase your capacity gradually. If you can bend the head backward a total of 60°, the first 20° will be from the slipping motion between the cranium and the atlas, and the last 40° will be from the incremental vertebra-to-vertebra shifts between C1 and T1. After you have explored extension in isolation, go slowly back and forth between full flexion and full extension.
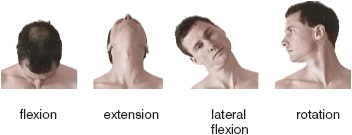
Figure 7.3. Neck movements: flexion, extension, lateral flexion, and rotation.
LATERAL FLEXION
Most people both have and use a considerable range of motion for flexion and extension, but it is rare for anyone to cock their head to the side more than 30–40°. About 15° of lateral flexion occurs at the synovial joint between the cranium and the atlas, and the rest takes place between Cl and T1. Lateral flexion is rarely done in isolation but is commonly found in combination with rotation. Try it. Bend the head toward the left shoulder, and notice that it is natural to combine that movement with a slight twist either to the right or left that rotates the nose up or down. Notice how far you can safely take this movement, and compare it with plain lateral flexion. You will quickly become aware that combining the two is what you are accustomed to, as when you flex your head laterally to the right and look slightly down to scan titles on bookshelves. A pure lateral flexion is a curious movement, and when you do it with some insistence you will sense deep bone-to-bone restrictions on the side to which you are bending. Explore lateral flexion to the right and left separately, and then go back and forth between the two.
TWISTING
Twisting in the neck could hardly be more natural, and can be safely taken to its limit, at least by anyone who is practicing hatha yoga regularly. Possibilities for minor variations abound. If you twist as though you were looking for a pencil in a drawer at waist level and to your right, you will notice that this twisting movement includes lateral flexion to the right. And if you twist as though you were looking for an object on a shelf to your right at shoulder level, the movement includes lateral flexion to the left. Finally, if you twist as though you were looking for an object above you and to your right, the movement includes lateral flexion to the left, extension, and twisting.
Now, minimizing flexion, extension, and lateral flexion, try a pure twist of the head to the right and then to the left. In other words keep your head level and envision an axis of rotation that runs from the top of the head straight down through the spine. A moderate twist is a fine exercise, but if you continue until you come to your limit and then keep pulling, you will come in touch with a clear sense of axial compression. And if you move slowly you can also feel tension gather in the various structures of the neck that finally stop the twist—first muscles, then restraining ligaments, and finally skeletal stops. If you can twist a total of 90° in each direction, the first 45° of the movement is the rotation at the synovial joint between C1 and C2, and the rest is between C2 and Tl. Pay attention to all the sensations that accompany the full twist, and explore new limits as you become confident that you will not hurt yourself. You will be startled to find how robust the neck is and how vigorously you can pull into a fuller twist if you increase your capacity gradually. And if you keep pulling isometrically when you reach the limit of the twist, you will increase both muscular strength and the hardiness of the ligamentous and skeletal structures. After working with each side separately, go sequentially from side to side.
OTHER MOVEMENTS IN THE NECK
Many other neck movements can be explored. One of the best is to twist the head 30°, 45°, or 60° to one side, and from that position, to swing it back and forth linearly—right front to left rear, and left front to right rear. A less natural movement, and one that should be approached more respectfully, is to take the head and neck through the same linear movements without first twisting. Going forward at an angle feels safe enough, but going backward you will encounter the same sort of unusual restrictions that you experienced going to the extremes of lateral flexion.
Neck rolls, in which you swing the head around slowly in a motion that is similar to circumduction of the thigh or arm, are questionable exercises, and this is easy to demonstrate. Let’s say you are looking down in your lap and suddenly your attention is called to a bat in the upper right corner of the room. You don’t have to think. Your head will move quickly and safely in a straight line to face the object of your concern, and muscles and restraining ligaments will protect you from going too far. By contrast, if you connect the two points with a fast neck roll instead of a linear motion, you will immediately see why such movements deserve to be treated with caution. Instead of moving linearly from a neutral position, you are circling your head around in a highly artificial movement. Even though most people are unconsciously wary of going anywhere close to their limit, these movements can still cause injuries in those who are doing them for the first time, and it is for this reason that many hatha yoga teachers say they should not be taught at all. In any event, if you are determined to do them, at least move slowly and well short of your limits.
If you watch your back in a mirror while you stand and twist, you will see a surprising amount of twisting taking place in the thoracic region: 30–40° of rotation in each direction between Tl and L1 in an average young adult. The design of the anterior and posterior functional units of the vertebral column (chapter 4) permits these movements. To summarize: the anterior functional unit of the spine is a flexible rod composed of the stack of vertebral bodies and intervertebral disks, and the posterior functional unit is a tube (enclosing the vertebral canal) that is composed of the stack of verterbral arches, superior and inferior articulating processes, and various restraining ligaments. In general, the anterior functional unit permits twisting and bending, and the posterior functional unit restricts twisting and bending.
The thoracic region of the spine permits a lot of twisting for three reasons. First, it contains twelve vertebrae and intervertebral disks—half the vertebral column—and this means that there are twelve sites for rotation (fig. 4.7). Second, the axis of rotation for twisting in the chest runs approximately down the center of the anterior functional unit (fig. 4.6a, large dot), permitting the hydraulic system of each intervertebral disk (fig. 4.11) to work perfectly, compressing its nucleus pulposus axially, stretching the elastic fibers of its annulus fibrosus evenly all around its perimeter, and causing the disk to bulge moderately on all sides. The elastic fibers in the annulus fibrosus that are oriented obliquely will be either stretched or released depending on their orientation and the direction of the twist, and those that are oriented vertically and horizontally will be stretched evenly all around.
A third reason twisting takes place easily in the thoracic region is that the synovial joints for the superior and inferior articulating processes of each thoracic vertebra are oriented in a frontal plane, one roughly parallel to the back surface of the chest, and this orientation allows the joints to slip efficiently with respect to their neighbors above and below (figs. 4.6–7).
The large number of vertebrae and intervertebral disks, the ideal axis of rotation, and the ideal orientation of the articular processes—all of these facilitate thoracic twisting. And the numbers add up. With twelve possible sites for rotation, we need only an average of 3° between adjacent vertebrae to make a total of 36°, and this means that twisting here requires only slight adjustments between adjacent vertebrae and their joints. In fact, the articular processes in this region can be displaced from one another so readily that it is not the spine but the rib cage that is the main limit to twisting. Were it not for restrictions there, this part of the spine could probably rotate 120° in each direction.
Like the articular processes, the ribs are also roughly oriented in a transverse plane, and only a slight shearing effect between adjacent ribs is needed to allow a small amount of spinal rotation between adjacent vertebral bodies. And this is what accounts for the 30–40° of rotation that we actually experience in the chest. Beyond 40°, the rib cage becomes the main impediment to twisting because the ribs connect to the sternum in front by way of the costal cartilages, creating a stabilized cage that can rotate only so far.
Just as the design of the chest permits extensive twisting, so does the design of the lumbar region prevent it. There are two main obstacles. First, in this region the axis of rotation runs down the spine through the bases of the spinous processes in the posterior functional unit (fig. 4.5a, large dot) rather than through the center of the anterior functional unit. This by itself would make twisting almost impossible—it would require lateral displacement of one vertebral body in relation to its neighbors above and below. The same forces of torque that act to rotate one vertebral body in relation to its adjacent vertebral body in the thoracic region can act in the lumbar region only to sheer the lumbar disks from side to side. Second, the superior and inferior articulating processes on the vertebral arches start shifting from a frontal to a sagittal orientation in the lower thoracic region, and in the lumbar region, this shift has become an accomplished fact; it stops rotation between adjacent vertebrae almost completely (figs. 4.5 and 4.13b). According to the textbooks, these two mechanisms taken together limit twisting to an average of about 1° between adjacent vertebrae or a total of 5° between L1 and the sacrum.
TWISTING IN THE TORSO—THE BIG PICTURE
Flexible young students who are twisting in a standing posture with their thighs adducted, their feet parallel, and their knees extended might end up with their shoulders 70° off axis from their feet. The twist would consist of about 35° of rotation between the feet and pelvis, 5° between the pelvis and the chest, and 30° between L1 and the shoulders, and 45° of rotation between the shoulders and the head, for a total of 115° between the feet and the head (fig. 7.4). Come into such a posture and notice the sensations as you pull into as much of a twist as possible. If you are attentive, you can feel the oblique muscles in the back and abdomen creating the torque that rotates the thoracic region and tries but fails to rotate the lumbar region.
Figure 7.4. This standing twist exhibits approximately: 35° of rotation between the feet and the pelvis, 5° of rotation between the pelvis and the chest, 30° of rotation between the chest and shoulders, and 45° of rotation between the shoulders and the head. This makes 115° total rotation between the feet and the head. The model might reflexly gain 10° more between the feet and the head by looking to her far right instead of back toward the camera.
In a whole-body standing twist it is the internal and external abdominal obliques and the deepest of the obliquely running back muscles (figs. 3.11–13, 5.5, 8.8, 8.11, and 8.13–14) that initiate the torque. Some of the latter promote twisting over as little as one or two segments of the spine and others create a twisting effect between three or more. By contrast, the rectus abdominis muscles and the long segments of the erector spinae resist the twist and increase the sense of axial compression that is the hallmark of spinal twisting.
By definition, the torque for twisting in the lower extremities begins at the sacroiliac joints, but externally visible rotations are not observable except in the hip joints, the flexed knees, and the ankles. We’ll begin our discussion at the source and work down.
TORQUE IN THE SACROILIAC JOINTS
Whole-body twists impart severe torque to the sacroiliac joints, and if we had to depend only on ligaments to keep them stable, we might be in trouble. Fortunately, the surrounding muscles provide additional protection, especially if they are kept in a state of moderate tension. The gluteus maximus muscle (figs. 3.8, 3.10, and 8.9–10) serves in such a role. This muscle takes origin from the sacrum, the coccyx, and the ilium, and it inserts into the iliotibial tract (figs. 3.8–9, 8.8, and 8.12), as well as directly on the femur (fig. 3.10b). You can feel how these muscles support the sacroiliac region during twisting postures if you stand with the feet parallel, 2–3 feet apart, and twist gently to the right keeping the gluteal muscles relaxed. Observe the sensations and dynamics carefully. Then tighten the gluteus maximus on the left side, and observe how its contraction resists the twist by tugging on the left rear side of the sacrum and ilium, keeping them both pulled slightly to the rear and protecting the pelvic bowl from excess stress. Even so, if you were to stand for 3–5 minutes in such a posture, you might come in touch with a vague ache in the left sacroiliac joint. Repeat the exercise on the other side for balance.
Now stand with the feet together rather than 2–3 feet apart and again twist to the right. When you resist the twist in this case, you will feel the left hip tighten up even more solidly than before because you are stretching and activating the left gluteus medius and gluteus minimus muscles as well as the gluteus maximus. These are medial rotators and abductors of the thigh (figs. 3.8, 3.10a–b, 8.9–10, 8.12, and 8.14, with details in chapter 4), and when you twist to the right with the thighs adducted, the left thigh is swiveled into a lateral rotation that automatically places these muscles under increased tension. Along with the gluteus maximus muscles they create a field of muscular activity that supports the entire pelvis, including the sacroiliac joints.
The sacroiliac joints can be overly stressed if good judgment is not used in some of the standing and sitting spinal twists. This is particularly true if you are thoroughly warmed up and the ligaments and muscles that normally inhibit sacroiliac twisting have become lax. If you are hurting yourself, the tip-off is pain at the lateral edge of the sacrum on one side, and if you continue twisting in the face of discomfort, the joint becomes vulnerable to more serious injury.
TWISTING AT THE HIP JOINTS
To examine twisting at the hip joints, stand with the knees extended and the medial edges of the feet parallel and about two feet apart. Then tighten all the muscles of the lower extremities and twist the body to the right from the waist down, keeping the abdomen, chest, and shoulders in the same plane with the pelvis. Below the hip joints you will feel a combination of torque and twist in the ankles, legs, knees, and thighs, especially on the left side. Keep the feet flat on the floor, and this will diminish their tendency to slip. Repeat on the other side.
When the muscles of the thighs and legs are tensed while keeping the legs extended, the ankles and knees permit only a small amount of rotation, but most people will be able to twist at least 45° at the hips, using a combination of medial rotation of one thigh and lateral rotation of the other. And a few rare students can rotate their hips almost 90° from their feet, with only a small proportion of this twist in their ankles and knees (fig. 7.5.) In either case, you will observe only moderate effects of the twist in the right hip joint, but on the left side, the hyperextension that results from swiveling to the right produces a pronounced pull on the tightly wound spiral of the pubofemoral, ischiofemoral, and iliofemoral ligaments (fig. 3.6).
Feel the gluteal muscles on the left side with your fingers as you twist to the right. As discussed in chapter 4, the more vigorously a healthy person twists, the more these muscles resist, and to give maximum support to twisting postures we need tension not only in the gluteal muscles on the side opposite the direction of the twist, but also in the quadriceps femoris on the same side and in the adductors and hamstrings on both sides. Beginners will find that their enthusiasm for working with challenging twisting postures will be in direct proportion to their ability to support them with muscular tension.
TWISTING AT THE KNEES
Until now, our discussion of the knee joints has focused on their actions as hinge joints that permit flexion and extension. In chapter 5, we saw that extension places the ligaments of the knee under tension and holds all components of the joint together, and we saw that flexion permits the ligaments to become lax. In this chapter we’ll explore the one movement not yet mentioned—rotation of the flexed knees.
If you are sitting in a chair with the thighs fixed and parallel to the floor, and with the legs perpendicular to the floor, you will be flexing the knees 90°. If you have good flexibility, you can rotate your feet out laterally from this position about 40°, and you can rotate them medially about 30°. You see the movements of the foot, but almost all of the rotation is happening at the knees. If you try the same experiment sitting on a high bench with the knees flexed at a 30° rather than a 90° angle, you’ll notice that the amount of knee rotation is diminished to about 30° of lateral rotation and about 20° of medial rotation. And of course, if you return to a standing position and extend the knees, rotation is stopped completely. To make these comparisons fairly, of course, you have to keep the thighs stabilized or you will add hip rotation to knee rotation and confuse the two.
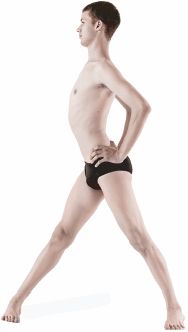
Figure 7.5. This twist, which started with the thighs adducted and the feet parallel, reveals almost 90° of rotation of the pelvis relative to the feet. This is unusual; most people cannot swivel their hips much beyond 45° with their thighs abducted and feet parallel.
The muscles that rotate the flexed knees are the hamstrings (figs. 3.10b, 7.6, 8.9–10, and 8.12) and a small muscle on the back of the knee joint, the popliteus. Two of the hamstrings, the semitendinosus and semimembranosus muscles, insert on the medial side of the tibia, and are thus medial rotators of the flexed knee; the biceps femoris inserts laterally on the head of the fibula, and is thus a lateral rotator of the flexed knee. To experience this sit upright with your knees flexed 90°. Then grasp the tendons of the semimembranosus and semitendinosus muscles on the medial side of the knee joint, rotate the knee medially as strongly as possible, and feel the tendons get tighter. You can do the same thing with the biceps femoris if you rotate the leg laterally as strongly as possible.
The popliteus muscle is visible posteriorly (figs. 5.24, 7.6, and 8.14); it takes origin from the lateral surface of the femur, runs inferiorly and medially, and inserts on the lateral surface of the tibia. Its anatomical disposition therefore allows it to do double duty as a medial rotator of the tibia and a lateral rotator of the femur. The former is what you notice when you rotate your feet in while you are sitting on a chair, and the latter is what you notice when the muscle torques the thigh laterally from a fixed foot position. This is the more common situation in sports because you frequently rotate the thigh (and with the thigh the rest of the body) with one foot planted on the ground, as when you recover from serving a tennis ball.
Because the knee joints are among the few that permit flexion and extension as well as twisting, and because they are vulnerable to injury when they are flexed, everyone should use caution in approaching hatha yoga postures that involve a combination of flexion at the knees and whole-body twisting. And except for the simplest lunging postures, sun salutations, and squatting on the floor in a symmetrical pose, almost every posture in hatha yoga in which the knees are flexed involves either rotation or torque in the knee joint.
THE ANKLES AND FEET
An astounding number of bones (28) and joints (25) are associated with each foot and ankle (fig. 6.8), and in combination their architecture enables us to support the weight of the body, propel us forward, and accommodate to surface irregularities on the ground. And because most of the basic movements in the foot-ankle complex involve stresses from both torque and rotation, they are included in this chapter.
In chapter 4 we saw how foot position in standing postures affects the hip joints. With the knees extended, what we referred to as rotating the foot out stretches the medial rotators of the hip, and what we called rotating the foot in stretches the lateral rotators of the hip. Later, in chapter 6 we turned to the ankles and saw that 30–50° of extension (plantar flexion) takes place when we lift up on the balls of the feet, and that 45° of flexion (dorsiflexion) is needed for pressing the heels to the floor in the down-facing dog.
Twisting (that is, true axial rotation) at the ankle joint is so minimal that it is usually not even listed in elementary texts, but careful studies have shown that those with average flexibility at this site can rotate the foot medially about 7° and laterally about 10°. To experience these rotations, stand with the knees extended and the heels and toes together. Place the hands just above the knees to brace them and hold them together, and tighten all the muscles around the thighs. Then twist to the right keeping the feet flat on the floor. This is critical: the slightest lifting of the heels or the edges of the feet brings other movements into the picture. Under these carefully controlled circumstances you have rotated the right foot medially and the left foot laterally, both at the ankle joints. These axial rotations at the ankles may be minimal, but they are seen in many standing postures, and are therefore an important practical concern.

Figure 7.6. Posterior views of the right foot, ankle, leg, knee joint, and lower portion of the thigh. A superficial dissection is illustrated on the left, and a deeper dissection (following the removal of the bulk of the two heads of the gastrocnemius muscle and the hamstrings) is illustrated on the right. When the knee is bent and the thigh is stabilized, the popliteus muscle rotates the leg medially, but when the foot is stabilized, the popliteus muscle rotates the thigh laterally. In the instance of the right thigh shown above, the popliteus muscle has the effect of rotating the body as a whole around to the right (Sappey).
[Technical note: This is a different use of the word rotation for the feet and ankles than we have used previously. The circumstances just above refer to axial rotation within the ankle joint, not swinging the feet in or out. To keep terminology within reach of lay audiences, “rotation of the feet in and out,” or “rotation of the feet medially and laterally,” which is the same thing, will always refer to the movements of the feet as a whole unless axial rotation within the ankle joint is specifically indicated.]
To explore rotation of the feet as a whole, stand with the knees extended, the heels together, and the medial borders of the feet at a 90° angle from one another. Under these circumstances each foot will be rotated out (laterally) 45°. Most people can go a little further, perhaps to 70° for each foot (fig. 7.7). Now bring the medial borders of the feet parallel and next to one another. The feet are now rotated to a neutral position. Next, bending the knees as necessary, bring the big toes together and spraddle the heels out 90° from one another to rotate the feet in (medially) 45° (fig. 7.8). And finally, abduct the thighs widely, bend the knees deeply, and try to bring the feet into a straight line. This is a moderately difficult balancing posture in which you have rotated each foot out (laterally) 90° (fig. 7.9).
[Technical note: Always keep in mind that “rotation of the feet,” as defined in this book, is to a large extent reflective of rotation of the thighs when the knees are extended, or rotation of the legs when the knees are flexed. Don’t get confused: the terminology is logical. If you are looking at and thinking of the thighs, say rotating the thighs. If you are looking at and thinking of the legs, say rotating the legs. And if you are looking at and thinking of the feet, say rotating the feet, even though you are aware that most of that we call rotating of the feet actually reflects rotation of the legs or thighs. Just say what you see, and everyone will know what you are talking about: it could hardly be more simple.]
Supine twists, especially the easy ones, are welcome both at the beginning and end of a hatha yoga class because they are relaxing, energizing, and do not require much effort. Along with simple hip-opening postures (chapter 6), they are a good barometer both of stiffness at the start of a hatha yoga session and of improvements in flexibility at the end.
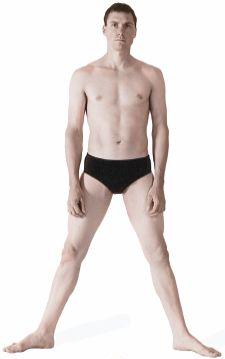
Figure 7.7. The feet here are rotated “out” (that is laterally) about 70°.
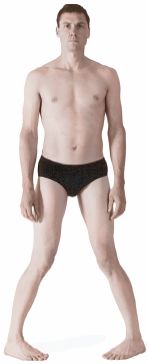
Figure 7.8. The feet here are rotated “in” (that is medially) about 45°.
SIMPLE SUPINE TWISTING
For the first of three simple supine twists, lie on your back, draw the heels toward the hips, and stretch your hands out to the sides. Then lower the knees about 45° to one side, keeping the feet, legs, and thighs together, and holding the soles of the feet relatively flat against the floor (fig. 7.10). The ilium on the side opposite the twist will be lifted slightly off the floor. This is a subtle concentration exercise that generates a twist in the hip joints and creates a moderate torque in the sacroiliac joints and lumbar region—all without creating a twist in the chest. Mild muscular tension in the lower extremities is required to keep the soles of the feet against the floor and to prevent the knees from dropping too far to the side. Repeat on the other side.
Next create a more obvious twist by lowering both knees all the way to the floor, this time facing the soles of the feet toward the opposite wall (fig. 7.11). Try to remain relaxed, but keep both knees together and both shoulders against the floor. This is a completely different posture from the first one because now the thighs are only slightly swiveled with respect to the pelvis. You will feel this twist in the sacroiliac joints, the lumbar region, and the chest—a torque in the sacroiliac joints and the lumbar region that may get your attention if you remain in the posture for more than a minute or two, and a twist in the chest that may yield little clicks and readjustments in the facet joints of the thoracic spine and ribs. If you feel the lower back with the palm of the hand, you will be able to confirm that it remains in nearly the same plane with the pelvis and that most of the twist takes place in the chest (fig. 7.11). If you can’t settle into this posture without lifting the opposite shoulder off the floor, place one or more pillows under the knees.
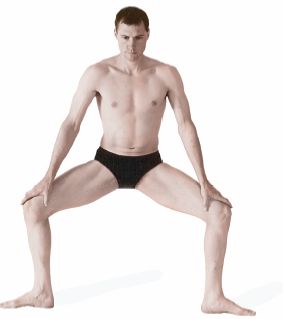
Figure 7.9. Here the feet are rotated out, or laterally, about 90°.
Finally, twist to one side after drawing the knees closer to the chest. To keep the shoulders down in this posture, it is helpful to spread the arms and forearms straight out to the sides. You will also have to use muscular effort to keep the knees near the chest, which incidentally makes this pose a forward bend as well as a twist. Notice that the posture brings the pelvis to a full right angle with respect to the floor (fig. 7.12) and leaves the thighs in a neutral unswiveled position with respect to the pelvis. Tension is completely removed from the sacroiliac joints and largely gone from the lumbar region, and you will feel most of the twist high in the chest. If as a result it is difficult to keep the opposite shoulder against the floor, prop pillows under the knees to diminish the twist. It is best to keep the head in a neutral position for all three of these postures: twisting it in the opposite direction distracts your attention from analysis of more interesting effects in the rest of the body. Repeat on the other side.
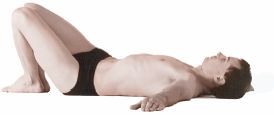
Figure 7.10. This twist, keeping the feet flat on the floor, is a subtle concentration exercise that affects only the hip joints, sacroiliac joints, and lumbar spine.
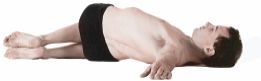
Figure 7.11. Dropping the knees all the way to the floor and keeping the feet together creates effects in the sacroiliac joints, lumbar region, and chest.
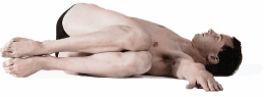
Figure 7.12. Twisting with the knees kept close to the chest removes all tension from the hips and sacroiliac joints, and most of the tension from the lumbar region. This pose primarily twists the chest.
A RELAXED SUPINE TWIST
The three previous postures require at least some muscular activity. To contrast them with a relaxed supine twist, place the hands flat on the floor and straight out to the sides, draw the heels toward the hips, cross the right knee over the left, and twist the lower part of the body to the right so that the knees are lowered toward the floor (fig. 7.13). There is little or no tendency for the opposite shoulder to lift off the floor in this mild posture, but it still may be tricky to relax in it from head to toe, especially at the beginning of a hatha yoga session. Adjust the amount of flexion in the knees and hip joints (determined by how far away from the hips you place your feet) so you can relax as much as possible; the more flexion the greater the twist, but the greater the twist the more challenging it will be to relax.
The main characteristic of this pose is that you can analyze the sensations of passive stretch at your leisure. The posture pries the left thigh in the direction of the twist, pulls the head of the left femur slightly away from its socket, and lifts the left side of the pelvis off the floor. As a result, the pose places torque on the lumbar region and on the left sacroiliac joint. Repeat the posture, crossing the left knee over the right and twisting down to the left. If you try this relaxed twist at the beginning and then at the end of a session of hatha yoga postures, the experience will be markedly different. In the beginning you may feel slight pain in some of the ligaments of the hip and sacroiliac joints, making it difficult to relax from the waist down, but when you are warmed up the situation will have improved. And as your musculoskeletal health improves you will gradually find yourself able to relax more completely.
THE SUPINE TWIST, FULL RESISTANCE
This posture takes the above relaxed supine twist to the other extreme. Lie on your back and again cross the right knee over the left, but now interlock the ankles as well, the right under the left. And instead of twisting to the right as you did before, twist to the left. With the hands outstretched, and with the upper extremities stabilizing the torso, strongly press the right shoulder to the floor and twist the knees as much to the left as possible (fig. 7.14). For this to feel comfortable you will have to create internal muscular resistance to the twist, just as we tightened the muscles of the lower extremities to create a healthy musculoskeletal framework for standing postures (chapter 4). The need for creating muscular resistance in this posture is even more obvious. It’s like wringing out a washcloth. The muscles that are creating the twist have to be matched from the shoulders to the feet by their antagonists, all of them in a state of isometric activity, some creating the twist, others resisting. It’s unthinkable to relax the antagonists in this posture. Slowly release the pose and repeat on the other side.
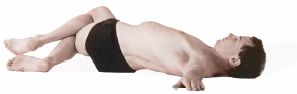
Figure 7.13. This relaxed supine twist is very complex, and it may challenge the ability of beginners to relax, especially at the start of a session of hatha yoga.
THE DOUBLE LEGLIFT SUPINE TWIST
The double leglift supine twist is an intense abdominal and back exercise in addition to a twist. To do it start from a supine position with the upper extremities extended straight out to the sides, palms down. From there exhale, press the lower back to the floor, and taking care to keep the knees extended fully, lift the thighs perpendicular to the floor in a double leglift (fig. 3.17). Then slowly allow gravity to carry the flexed thighs and extended legs to one side while you turn your head in the opposite direction. Try to keep the soles of the feet within an inch or so of the same plane, bracing the posture with the upper extremities and keeping both shoulders against the floor. As always, repeat on the other side.
This is an advanced posture, and you have to have excellent flexibility as well as abdominal and back strength to do it comfortably. Just coming into the initial position with the thighs perpendicular to the floor requires 90° of hip flexibility and that’s before you even think of adding the twist. Those who can complete the posture will end up with their pelvis about 15° short of being perpendicular to the floor, so if the shoulders are kept flat, the posture will require 75° of twist between the shoulders and the pelvis. If we allot 5° of twist to the lumbar region, this means 70° of twist in the thoracic segment of the vertebral column, or 25° more than the average of 45°.
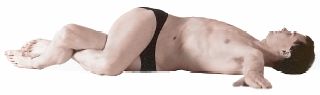
Figure 7.14. A double-locked-leg twist is best done against full muscular resistance.
If the arm and shoulder opposite the direction of the twist are lifted off the floor, or if you can’t lower the legs to the floor while keeping them flexed 90°, there are several ways to moderate the posture. You can keep the knees extended and lower over only to the point at which you can comfortably come back up, exhaling as you go to the side and inhaling as you come back up (fig. 7.15). This requires strong muscular activity in the abdominal wall and creates intense sensations in the hip joints, sacroiliac joints, and lower back. Or you can keep the lower back straight and the knees extended, but flex the thighs less than 90° rather than trying to keep them perpendicular to the torso. As before, if you can’t lower the feet all the way to the floor, lower them only part way down. Simplest of all, flex the hips 120° and the knees 90° (fig. 7.16), and then twist to one side with the knees together until they touch the floor. Either relax in the pose, or keep breathing and immediately raise back up in a continuous movement before slowly twisting to the other side.
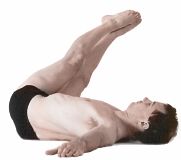
Figure 7.15. The double leglift supine twist, done according to the specifications in the text, is a valuable study in the dynamics of the musculoskeletal architecture of the body, and will challenge even the strongest and most flexible athlete. Swinging the lower extremities over 45° as shown here is more reasonable for most students.
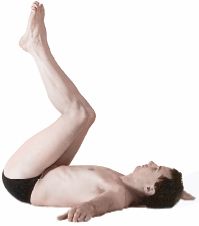
Figure 7.16. For those who do not have enough flexibility to do the full double leglift supine twist, dropping the lower extremities to the floor from this easy preparatory position is still useful. For the best exercise, go from side to side coming to within an inch or two of the floor in a continuous movement, and relax and rest in this upright position instead of resting with the legs all the way to the floor on one side.
If you can easily do the full posture with the knees straight and the hips flexed 90°, you can sharpen it further by keeping the feet together, which requires pushing the upper foot out so it remains in line with the foot that is closest to the floor. To the extent that the feet remain in line with one another, the pelvis will approach being perpendicular to the floor, and if you keep the shoulders against the floor, the final posture will require 90° of twist between the shoulders and the pelvis instead of the 75° mentioned earlier.
All of the double leglift supine twists can be approached in two ways—as movements or as postures. As far as building strength is concerned, you can get the most benefits by going back and forth from one side to the other continuously, without quite touching the floor and without pausing to relax. On the other hand, you can come all the way down to the floor in a relaxed or semi-relaxed hatha yoga posture. In any case, all of these exercises and postures are useful for exploring twisting in the thoracic spine because the hips are not swiveled when the thighs are against the floor and because the pelvis and shoulders are stabilized. As you come into the twist, you can flex the thighs and knees to suit yourself in order to place the lumbar and thoracic spine under as much tension as they can accommodate in the relaxed posture.
In chapter 4 we saw that standing in unfamiliar and unconventional postures can be challenging when the force of gravity comes to bear on the joints of the lower extremities. Such challenges are magnified when twisting is added to the equation. You may do fine with standing backbends and forward bends, but add a twist to the posture and suddenly problems emerge front and center.
The extent to which a standing twist is challenging depends on a number of issues: on how the feet are positioned (rotating the feet in or out places torque on the ankles); on whether or not the knees are flexed (bending the knees places extra tension on its collateral and cruciate ligaments); on the extent to which the thighs are abducted (abducted thighs places extra tension on the adductors); on whether or not the thighs are rotated (rotating the thighs laterally or medially places extra tension on the medial or lateral rotators respectively); on whether or not the shoulders are in line with the pelvis (rotating the shoulders in either direction with respect to the pelvis will twist the thoracic spine and place torque on the lumbar region and sacroiliac joints); and on whether or not the head is in the same frontal plane as the torso (twisting the neck tends to take your attention away from the rest of the body).
Because standing twists present so many challenges, there are four basic rules that should always be honored: establish a solid foundation from the waist down; be aware of and make adjustments for aspects of the posture that are unnatural; appraise how easily you can get into the posture; and look at whether or not there are potential difficulties connected with your exit. Then act on your knowledge by practicing within your capacity. Soon you will be able to do difficult postures comfortably, and this in turn will improve your general strength and flexibility.
STANDING TWISTS AND BENDS
The simplest standing twists combined with bending are the ones discussed in chapter 5 in relation to strengthening the knee joints: you twist in one direction and bend forward and backward from that position; you twist in the other direction and again bend forward and backward; and facing the front you again bend forward and backward. These six bends, done repetitively with the upper extremities in different positions, are excellent whole-body twisting and toning exercises. Using them as a warm-up is also a good preparation for more formal standing postures such as the triangles and the warrior poses.
Here we’ll look at the exercises in detail, using the simplest position for the upper extremities, which is grasping the elbows or forearms behind the back. Stand with the feet parallel and as far apart as is comfortable. Keep the kneecaps lifted, the hamstrings strong posteriorly, the adductor muscles firm on the medial aspects of the thighs, and the hips firm. This creates a solid foundation for the postures from which you can be aware of your limits. How far apart you adjust your feet is the single most important feature of the stance. They should be placed as far apart as you can manage and at the same time maintain strength and control in your foundation when you twist and bend. If the feet are too close together you will not feel as if you are getting much exercise from the waist down, and if they are too far apart you can’t gather enough strength in the hips and thighs to stabilize the posture. The other general policy is to bend to please yourself. Intermediate and advanced students usually prefer to bend from the hips, but beginners and those who have poor hip and sacroiliac flexibility will find it more natural to bend from the waist. If you have any low back problems, work with extreme caution. Few movements are as hazardous for bad backs as bending the spine after having twisted it.
Twist right and slowly bend forward. Notice that gravity helps you in part, but that you have to make an effort to keep from dropping straight to the front. Try to find an easy point of equilibrium among muscles, ligaments, and joints that are under stress as gravity pulls you forward. Observe that keeping yourself twisted requires that you hold the posture isometrically (fig. 7.17a). Take 3–7 breaths. Slowly come back up, stay twisted, and bend backward, keeping the head in line with the torso rather than thrown excessively to the rear. Be aware of the muscles that are holding you isometrically in this asymmetric twisted backbend (fig. 7.17b). Create a feeling of lift in the backbend, try to squeeze the hips together, and again take 3–7 breaths. Keep the knees straight. Slowly come to an upright position, twist in the other direction, and repeat the forward bend (fig. 7.17c) and backbend (fig. 7.l7d) on the other side. Come up again, face straight to the front and again bend forward (fig. 7.17e) and backward (fig. 7.17f). Squeeze the hips together to create as much counternutation as possible in all the backbends. In the forward bends, those who have good hip and sacroiliac flexibility will bend from the hips and at least start their bends with nutation; everyone else—namely those who can’t bend easily from the hips—will keep their sacroiliac joints in counternutation throughout the series.
Turning to the side in these postures will create a whole-body swivel that includes a pronounced torque in the feet, ankles, legs, knee joints, and thighs, as well as a torque plus a twist in the hip joints, torso, and neck. You have to keep the feet parallel to get these results; if you allow them to rotate in the direction of the twist, the entire body swivels around at the hips and you will get little twisting of the vertebral column. The purpose of these exercises is to effect the twist mostly in the hips and chest. Average students in good health may rotate a total of 80° between the feet and the shoulders, including about 5° of axial rotation in the ankles, 40° of swiveling in the hips, 5° of twist in the lumbar spine, and another 30° in the chest.
Beginning, intermediate, and advanced students will all have different reactions to the gravitational field. Beginners and those who are especially stiff will quickly butt up against their limits. They may come forward only a little, and their “backbends” may involve little more than standing up straight. Intermediate students, after a week or so of practice, may come into an uneasy equilibrium with gravity and still not be entirely comfortable in the full forward and backward bends. Advanced students can actively pull themselves down and back, or in the case of the twists, down and around, and back and around, beyond the point at which gravity alone would take them. As they do this they will protect themselves either by firming up their antagonistic muscles or by releasing tension in a manner that the body recognizes as safe.
As your musculoskeletal health improves, you will feel like pulling more deeply into each position. And as you intensify each movement, you will be strengthening all of the muscles involved in creating the postures, not only the agonists but all their synergists and antagonists. You will be aiding gravity with your musculoskeletal efforts, but at the same time you will be stimulating reflexes that relax the muscles that are antagonists to the prime movers, and this in turn allows you to come further into each position.
In addition to catching the forearms or elbows behind your back, you can do these exercises with six more arm positions, all of them subtly different from one another in the way they affect the twists and bends. These are: with the arms and forearms stretched laterally (fig. 7.18a); with the arms overhead, forearms behind the head, and hands catching the elbows (fig. 7.18b); with the hands, palms together, in a prayer position behind the back (fig. 7.18c); with the hands interlocked behind the back and pulled to the rear (fig. 7.18d); with the upper extremities in the cow-face position with one hand behind the back reaching from below and the other catching it from overhead (this one should be done twice, once on each side; fig. 7.18e); and with the hands astride the ilia, bending from the hips instead of the waist for a change of pace (figs. 7.l8f–g). Repeat the series of six bends for each hand position.
TWISTING IN THE TRIANGLE POSTURES
In chapter 4 we discussed the triangle postures in detail, but did not stress the fact that all of them include elements of twisting. Focusing on this aspect in the classic triangle, come into the preliminary stance with the thighs abducted and the feet parallel, and envision a frontal plane running through the body from ear to ear, shoulder to shoulder, hip to hip, head to toe. Then rotate the right foot 90° to the right and the left foot 30° to the right, come into a side bend to the right while keeping the spine relatively straight (fig. 4.33), and notice where the plane becomes distorted. It remains true through the shoulders, chest, and abdomen, but because the right gluteal region is pulled slightly to the rear, the former frontal plane reveals a moderate kinking through the pelvis. It also reveals a slight deviation in the left lower extremity, depending on how much the left foot is rotated to the right. The plane shifts almost 90° in the right lower extremity because the right foot is pointed straight to the right, and it shifts 90° in the head and neck because you are looking straight up at your left hand. All in all, this adds up to a lot of twisting.
We saw in chapter 4 that most of our efforts in the triangle involve resisting the tendency to twist the pelvis. But even though students are routinely cautioned to keep their hips facing the front, this is an unrealistic expectation in the triangle except perhaps for ballet dancers and gymnasts. Average intermediate students can accomplish the 90° rotation of the foot on the side toward which they are bending, but only by allowing the opposite side of the pelvis to rotate slightly forward. It’s a mistake to make this too much of an issue, and the usual injunction—try to keep the hips facing the front as much as possible—is a reasonable middle ground.
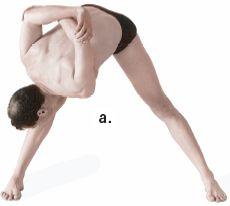
Figure 7.17a. First of six standing twists and bends with hands grasped behind the back. Starting with the feet parallel and comfortably apart (see discussion), twist right and bend forward to within your reasonable capacity, just a simple gesture toward a twisted bend if you are frail, bending with the aid of gravity for the average person, and supplementing gravity with the abdominal activity for those who are confident. Keep the thighs strongly engaged.
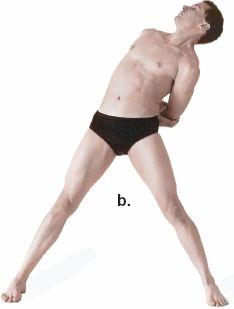
Figure 7.17b. For the second position, come up, stay twisted to the right, and bend backward, which may not mean much more than standing straight for some, pulling mildly to the rear for the average person, and pulling strongly to the rear for those who are confident. Keep the thighs willfully engaged and keep breathing. In all of the backbending positions, try to keep the hips squeezed together in an attitude of ashwini mudra (chapter 3).
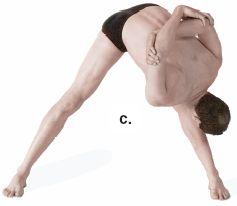
Figure 7.17c. For the third position, come up, twist to the left, and bend forward as in fig. 7.17a except in the opposite direction. (The order in which direction to go first can be switched on alternate days, as in going to the right first on even days of the month and going to the left first on odd days of the month.)
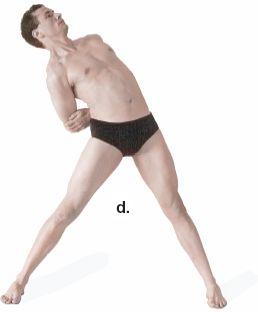
Figure 7.17d. Come up, stay twisted to the left, and bend backward, with muscles engaged from head to toe. It’s fine to keep the knees straight so long as they are not hyperextended beyond 180° and so long as the thighs (especially the hamstring muscles) are kept in a state of strong isometric contraction. Experienced students can of course use their own judgement about how and where to relax in standing poses (see chapter 4).
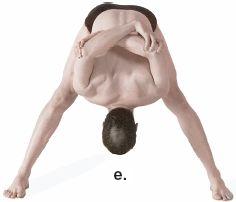
Figure 7.17e. Come up, face the front, and bend forward, again keeping the muscles in the thighs engaged. Notice that gravity pulls you straight forward and that it is not necessary to keep pulling yourself around to the side as in the twisted poses. Strong students can still aid gravity with muscular activity.
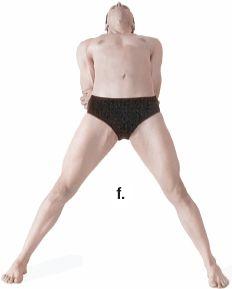
Figure 7.17f. Come up and bend backward to your capacity, merely standing straight for some, pulling mildly to the rear for average students, and pulling strongly to the rear for those with more experience, but always keeping muscles in a state of at least mild isometric tension from head to toe. Be aware of the alternatives of breathing in backbends (chapters 4 and 5; figs. 4.19, 5.6, and 5.7.)
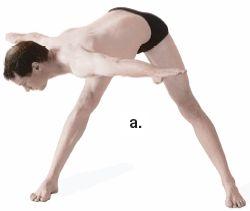
Figure 7.18a. Second of seven arm and forearm positions (the first was illustrated in fig. 7.17a–f) each demonstrating a different stage of the twist-and-bend sequence of six postures. For this one, keep the upper extremities straight out to the side in one line with the shoulders (don’t lift the hands up as in making wings as though to fly). Keep the fingers together and palms down.
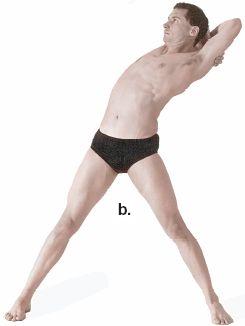
Figure 7.18b. Grasp the forearms or shoulders behind the head for the third series of six bends. Watch the extra weight overhead that has to be managed in the three forward bending positions. With this series in particular, beginners and those who have less musculoskeletal confidence will want to start with six small bending gestures rather than immediately exploring their limits. With more experience, one can always ratchet up commitment to the full postures.
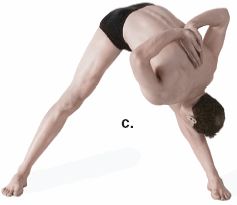
Figure 7.18c. For the fourth series of six bends, place the hands in a prayer position behind the back, or work toward that position by touching the third and fourth fingers of one hand to the third and fourth fingers of the opposite hand, and then gradually lifting the paired hands higher to approximate the palms as much as possible. Never hurry this process, as doing so can cause repetitive stress injuries.
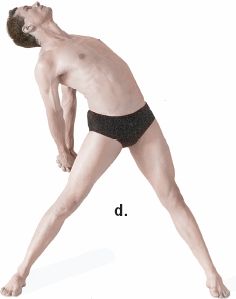
Figure 7.18d. For the fifth series of six bends, interlock the fingers behind the back, press the palms together, and pull the hands strongly to the rear. For an easier option, keep the forearms flattened against the back instead of pulling them to the rear.
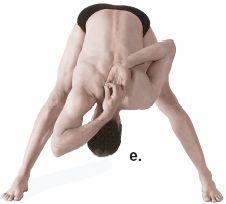
Figure 7.18e. For the sixth and seventh series, use a cow-face hand position. Repeat using the alternate arm position, doing 12 postures instead of the usual 6. Keep the top elbow well behind the head instead of letting it drop into an easy position facing forward.
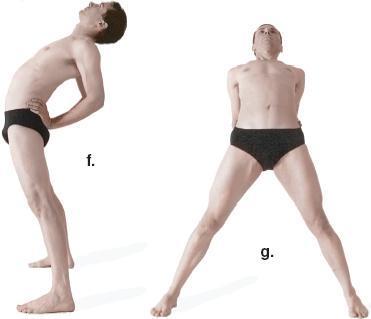
Figure 7.18f–g. For the eighth series, place the hands on the hips and dig the thumbs into the groove between the pelvis and the spine. In the three forward bending positions, bend only from the hips, not at the waist. Two views are shown here (sixth position, eighth series).
The revolving triangle (fig. 4.36) contains even more extensive rotations than the classic triangle. In the first stage, turn the right foot 90° to the right and the left foot 60° to the right, and then swivel the trunk around to face the right foot. Ideally, you are not twisting the spine very much in this position. Instead, the whole-body swivel causes the left thigh to end up hyperextended and the right thigh to end up flexed, both depending on how far the thighs were abducted initially. Beginners are properly advised to gradually accustom themselves to spreading their feet further apart in order not to end up in awkward positions that are beyond their capacity.
If you do not have enough flexibility to swivel the pelvis until it is perpendicular to the right lower extremity, you will have to accomplish the rest of the twist in the spine. Even so, whichever way you do it, you will still twist a frontal plane running through the shoulders 90° to the right thigh and leg. To complete the posture you add a 90° forward bend and an additional 90° twist of the spine so the shoulders end up facing the rear. To top it off you twist your neck an additional 90° to look up at your right hand. What had originally been a frontal plane through the body would twist 90° and then bend 90° to become horizontal in the pelvis. Then the plane would twist another 90° to be vertical through the shoulders, and finally it would twist the last 90° in the neck—making a 270° twist altogether.
TWISTING IN THE LUNGING POSTURES
When fencers lunge they thrust the body down and forward in one swift movement, and the lunging postures imitate this thrust. They all involve 90° of flexion of the thigh and knee on one side and full extension of the thigh and knee on the other. The torso can either be twisted or bent, and the upper extremities can be lifted overhead or stretched in other directions. As a group, athletes are attracted to these postures because they are helpful for developing muscular strength, moderate aerobic capacity, and a full range of motion for flexion and extension, which happen to be the basic movements needed for most limit-pushing athletic endeavors. Since these postures require some athletic prowess, it is wise to be conservative about plunging directly into them. They are relatively natural poses, however, in comparison with the standing twists and triangles, and once you are acclimated to them they are among the best all-around postures for energizing and strengthening the body as a whole. As asymmetric standing postures they are also ideal for working with right-left imbalances.
TWISTING IN THE STANDING WARRIORS
The standing warrior postures are named for their wide-bodied, powerful-looking stances. They speak for themselves. Although the two postures shown here are not ordinarily classified with twists, careful analysis reveals some twisting in both of them. In relation to a frontal plane in the anatomical position, the first posture (warrior II in Iyengar’s classification) exhibits a 20–30° twist in the pelvis, a 20–30° countertwist in the upper body, and a 90° twist in the neck; the second posture (warrior I in Iyengar’s classification) exhibits a 90° twist in the pelvis.
To come into the warrior II posture, stand with the feet 3–4 feet apart, and swivel the pelvis 20–30° to the right. This is accomplished automatically by turning the right foot 90° to the right and the left foot 10° to the right. The right side of the pelvis will move slightly posterior in relation to the left as you adjust the feet, so this will give you a different feeling from the triangle, in which you try to keep the hips in line and facing the front. Stretch the arms and forearms out so they are in line with the shoulders and the lower extremities. Since the pelvis is swiveled 20–30° to the right, the arms and shoulders will end up twisted 20–30° back to the left. Then lower your weight, flexing the right knee and hip while hyperextending the left hip and at the same time stretching the hands out in front and back, palms down, and making blades of the hands and fingers. Keep the arms, forearms, and shoulders in a single line, and look toward the right hand (fig. 7.19).
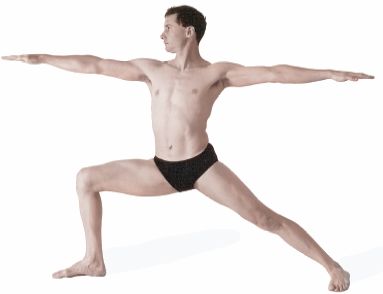
Figure 7.19. The standing warrior II is a fairly natural pose in which several kinds of twists make themselves apparent: about 25° in the pelvis, a 25° countertwist in the upper body, and a 90° twist in the neck. Aim in the final posture to keep the front leg perpendicular to the floor as a first priority, so as not to thrust the knee beyond the ankle. Then widen your stance and drop your weight (as strength and flexibility permit) until the front thigh is parallel to the floor. Keep the upper body upright, leaned neither forward nor backward. Beginners should compromise by not dropping their weight so far and adjusting their foot position so the leg is still perpendicular to the floor and the thigh angles up toward the pelvis.
There are three musts in this posture: keep all the muscles of the extremities firm; keep the torso straight and perpendicular to the floor rather than leaned forward; and don’t flex the front knee more than 90°. To complete the posture in its ideal form, the right leg should be perpendicular and the right thigh parallel to the floor. As your capacity for lowering your weight improves, you will have to widen your stance so that the right knee does not push out too far. Hold the feet as flat as possible, being careful not to raise the lateral edge of the left foot. Repeat in the opposite direction.
This is a good posture for beginners and those in poor physical condition because it can be modified to meet everyone’s personal needs. All you have to do to make it easier is start with a narrower stance, swivel as in the full posture, and lower your weight until the leg is perpendicular to the floor. Go back and forth from one side to the other, and over a period of weeks or months gradually widen your stance. As soon as you reach the point at which your front thigh is parallel to the floor (and the front leg perpendicular, as usual), and as soon as you can do this in both directions while keeping the torso erect, you have arrived at the full posture.
As you come into the posture, hyperextension of the left hip joint tightens its spiral of iliofemoral, pubofemoral, and ischiofemoral ligaments (fig. 3.6) at the same time that flexion of the right hip unwinds its same three ligaments and allows the head of the femur the freedom needed to rotate in the acetabulum. Doing the posture in the opposite direction will reverse these situations, tightening the spiral in the right hip joint and loosening it on the left.
This is an elementary but at the same time complex pose. The twist is accomplished by swivelling at the hip joints in one direction and twisting the chest back in the other direction. With the shoulders facing the side, and with the head facing the outreaching hand, the neck will also have to be twisted 90°. Finally, because the pelvis is at a 20–30° angle from the shoulders, the hyperextended rear thigh forces it into a forward tilt that creates a moderate sidebending posture. To ease the tension with respect to the rear thigh, beginning students often minimize side bending by leaning forward instead of keeping their torso upright. This looks unseemly, however: it is better to compromise the posture with a narrower stance and less flexion of the front leg and thigh. When students do not try to lower their weight into the full posture prematurely, the demands on the pelvis for side bending will not be so urgent, they can remain upright without difficulty, and the posture becomes relatively easy.
The standing warrior II pose strengthens and stretches muscles throughout the lower extremities, especially the hip flexors and knee extensors. Facing the right, the right quadriceps femoris muscles and the left psoas and iliacus muscles are stretched to whatever limits you are exploring as they lengthen eccentrically, support the posture, and lower your weight. Everything is reversed when you face the left.
The next variation of the standing warrior (warrior I) is more demanding. Begin as in the previous posture, but in this one turn the rear foot in about 20° instead of 10°, lift the hands overhead with the palms together, and pull them to the rear. Swivel the hips around so the head, chest, and abdomen face the front thigh squarely. When this is accomplished, the pelvis will be rotated all the way around and will approach a 90° angle with respect to the thighs (figs. 1.2 and 7.20). Repeat on the other side.
Because the pelvis now faces the front, and because the rear leg and thigh are perpendicular to the torso, the rear thigh is more acutely hyperextended than in the previous posture. And since you are still keeping the torso upright, the only way you can adapt to the extra hip hyperextension is with a lumbar backbend. Therefore, as you come into the pose you should create a whole-body feeling by strongly lifting the hands overhead and pulling them to the rear, thus lifting the rib cage and chest, drawing the shoulders back and down, and taking excess tension off the lower back. To make the spirit of spinal extension complete, you can also extend the neck enough to look toward the ceiling (fig. 1.2). As with the previous posture, beginning students can also make this one easier by narrowing their stance and not lowering so far toward the ideal position. Everyone should breathe deeply, expanding the chest as much as possible and inhaling their full inspiratory capacity.
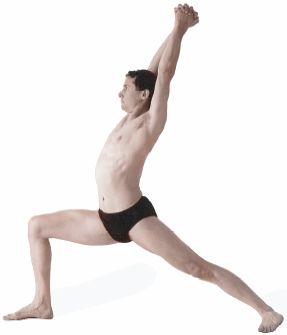
Figure 7.20. The standing warrior I is more demanding than the warrior II pose, because you swivel the pelvis (insofar as possible) 90° to face the front knee, and because hyperextension of the rear thigh produces the need for a sharp backbend. For an even more demanding posture, extend the head and neck to the rear and face the ceiling (fig. 1.2). As in the case of the the warrior II pose, beginners should compromise by keeping the leg perpendicular to the floor and by not dropping their weight so far.
THE EXTENDED LATERAL ANGLE POSTURES
The extended lateral angle postures are more difficult than the warrior postures because they are lunges combined with both twisting and bending, and because it is hard to find comfortable intermediate positions that are less demanding than the full posture. Beginners can make triangles easier by simply coming part way down, and in the warrior postures they can stand with the front thigh and knee only partially flexed, but in the extended lateral angle postures they will either have to counteract gravity with internal muscular activity or come deeply enough into the postures to brace themselves with the upper extremities.
For the simplest posture, stand with the feet a comfortable distance apart, turn the left foot 90° to the left, and keep the right foot pointing straight ahead. Then keeping the pelvis and chest facing as much to the front as possible, flex the left knee and bend to the left, either bracing the left forearm against the left knee (fig. 7.21), or for the full posture, placing the left hand against the floor (fig. 7.22). Try to adjust the width of your stance to make the left leg perpendicular to the floor and the left thigh parallel to the floor. This is a lot easier if you are bracing the posture with your forearm. As in the triangle, the right side of the pelvis will probably come slightly forward. Bring the right upper extremity overhead to come into a straight line with the right thigh and leg. Repeat on the other side.
Except for the bent knee and the fact that the opposite upper extremity is pointing to the side instead of straight up, this posture is similar to the triangle. With the elbow braced against the knee the posture is easy; with the hand all the way to the floor it is demanding.
The revolving lateral angle posture is as unlike the lateral angle posture as the revolving triangle is unlike the triangle. It is another twisting posture, in which, like the revolving triangle, you will twist all the way around and face the rear for the final position. To come into the posture stand with the feet 3–4 feet apart, rotate the left foot 90° to the left, and point the right foot straight ahead. Next, instead of keeping the pelvis facing the front, rotate it around as much as possible, creating a 90° swivel, and bend forward while at the same time continuing the twist in the torso for another 90°. You will end up, as in the revolving triangle, with a 270° twist in the frontal plane of the body. As with the lateral angle posture, you can either brace the opposite elbow on the knee or place the hand on the floor to create a more demanding pose (fig. 7.23). Repeat on the other side.
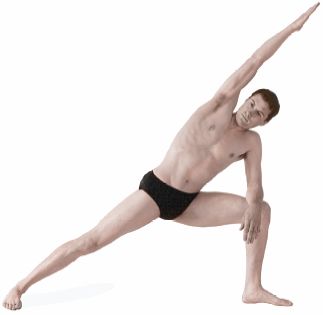
Figure 7.21. Supporting this easy extended lateral angle posture with the left arm makes it possible even for novices to spread their stance enough to bring the left leg perpendicular and the left thigh parallel to the floor.
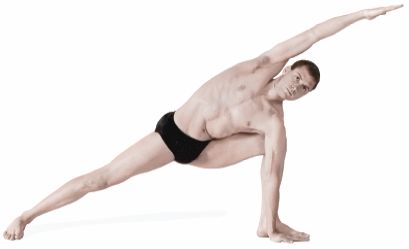
Figure 7.22. The extended lateral angle posture requires good athletic strength and flexibility, and should be approached conservatively, gradually widening the stance and dropping the weight to bring the front thigh parallel to the floor.
Twisting in variations of the headstand (chapter 8) and shoulderstand (chapter 9) complements twisting in standing postures because the lower extremities are free to move around in space rather than remaining fixed in positions defined by the placement of the feet on the floor. In the classic shoulderstand that is supported by the upper extremities, you can expedite the twist by pushing on the back more firmly with one hand than the other (fig. 9.7). A sharper posture, provided you are capable of remaining straight, is to twist the body in an internally supported shoulderstand (figs. 9.1 and 9.6b) while keeping the upper extremities alongside the torso, thus twisting the trunk between the hands. And to create intermediate level poses, you can accompany twisting in the shoulderstand with additional stretches of the lower extremities such as twisting in one direction in the shoulderstand and taking the opposite foot overhead toward the floor in the same direction (leaving the other thigh and leg fully extended), coming into a twisted half or full plow after twisting in the shoulderstand, coming into a twisted half lotus one-legged plow (fig. 9.8), or coming into twisted knee-to-the-opposite ear poses (figs. 9.9–10). Other related postures such as variations of the threading-the-needle pose (figs. 9.17a–b) are especially helpful for working with the full spinal twist, which we’ll discuss in the next section.
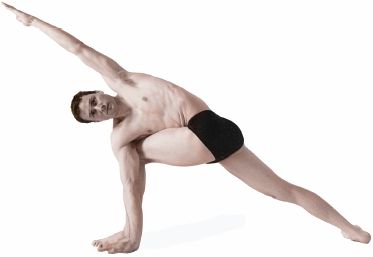
Figure 7.23. The revolving extended lateral angle pose is a complex posture that in the end produces a 270° twist in the frontal plane of the body. As in the case of the extended lateral angle pose, one can legitimately compromise this posture by supporting it with the elbow resting on the thigh rather than on the floor.
In the headstand, twisting the body with the lower extremities straight overhead is both comfortable and rewarding. The easiest way to do this is to abduct the thighs (fig. 8.33) and then swing them around into a position in which one is flexed and the other is extended. Then you continue in that same direction, pulling the feet as far as possible through an arc as you twist the body between the hip joints and the neck. Then come back to a neutral position with the thighs abducted and swing the feet around in the other direction.
All sitting spinal twists, by definition, have two features: they are always upright, and the hips are always flexed. And because many of these postures take tension off the hamstrings and adductors, and yet flex the hips, they generally produce more intense stretches in the hip joints, pelvis, and spine than supine, standing, and inverted twists. This often makes it difficult to complete sitting spinal twists comfortably and attractively, but it also enables us to work deeply with native hip flexibility that is limited by that joint and its restraining ligaments rather than by muscles.
FOUR SIMPLE TWISTS
For the simplest and purest sitting twist, sit cross-legged on the floor, thrust the lumbar region forward, and establish full nutation of the sacroiliac joints. To aid those efforts pull on the knees frankly with the hands, which of course tenses the arms and shoulders. Next pull the shoulders down but at the same time create an axial extension of the torso. After getting settled, relax the upper extremities but without allowing the posture to deteriorate. Then, keeping your head level and your gaze parallel to the floor, twist the spine, including the neck, as far as possible.
Twisting left in this simple posture, you can place the left hand behind you on the floor and the right hand on the left knee to help pull the shoulders around (fig. 7.24), or you can place the hands in any comfortable position. What is important is that the simplicity of the twist allows you to hold the spine straight, retain a full lumbar lordosis, and keep the sacroiliac joints in full nutation. Repeat in the other direction, then reverse the positions of the feet, and twist in both directions again, making four possibilities.
Even though it is simple, this posture should not be overlooked, especially in a beginning class. It may be the only sitting twist in which many students can remain both fully upright and comfortable. Folding in the lower extremities in a simple cross-legged position, especially when lifted up by a supporting cushion that raises the pelvis slightly away from the floor, places the least tension on the adductors and hamstrings of any sitting twist, permitting the pelvis to remain oriented perpendicular to the floor and allowing students to twist while still remaining upright. If they feel their back with their hands they can confirm that little or no twisting is taking place in the lumbar region, and if they watch themselves in a mirror they’ll see that nearly all the twisting is in the chest and neck. They will also notice that the twist is maintained internally: some of the muscles in the torso are creating the twist while others are resisting it.
Another simple twist, the second one in this series, is to sit as nearly upright as possible with the feet stretched straight out in front of you, heels and toes together. From that position, twist right and place the right hand on the floor behind you and the left hand to the right side of the right thigh. Keep the torso pushed upright with the right hand while twisting, and then pull yourself further into the twist with the left hand (fig. 7.25). Keep both knees extended and the hamstrings relaxed. Repeat on the other side.
This posture is more challenging than the cross-legged twist because it mixes a sitting spinal twist (with the hips flexed, by definition) with fully extended knees. Accordingly, it favors sacroiliac counternutation, places tension on the hamstring muscles, and tends to tuck the pelvis (creating a posterior pelvic tilt), which of course rounds the lower back. If you prefer a pure spinal twist without spinal flexion you can simply move your right hand further to the rear, arch the lumbar region forward, and reestablish the twist with the torso leaned to the rear. If you are keeping a convincing lumbar lordosis, the hamstrings are still under tension, especially on the left side (if you are twisting right) and that tension tends to buckle the left knee, so it is important to be particular about keeping it extended with the aid of tension in the quadriceps femoris. Keep the head on axis with the body rather than pulling it forward or dropping it backward so the cervical region receives a pure twist.

Figure 7.24. This simple cross-legged sitting twist, the first of four, should never be overlooked, because it is one of the few twists that does not depend on relatively flexible hips, and is one of the few twists that nearly all beginners can do easily. Pull with the hand on the knee, and push the posture straighter using the hand that is bracing the posture from behind.
The third twist in this series is even more difficult, at least for those who have poor hip flexibility, and that is to remain upright for a sitting spinal twist while abducting the thighs with the knees extended. To try this posture, spread your feet apart, aiming for a 90° angle between the abducted thighs, and twist the head, neck, and shoulders to the right, again bracing your back with the right hand on the floor behind you and aiding the twist as best you can with the left (fig. 7.26). Repeat on the other side.
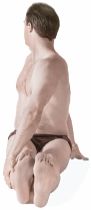
Figure 7.25. The twist starting from knees extended and thighs adducted (number two) next accustoms the student to limitations dictated by the hamstrings. Again, pull with the front hand and push from behind to keep the pose as upright as possible. For most beginning students, this pose mixes a sitting spinal twist (thighs always flexed, by definition) with at least some lumbar flexion and sacroiliac counternutation.
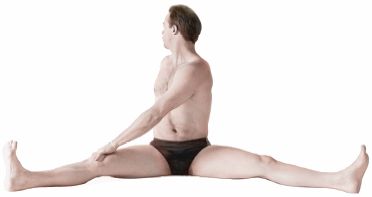
Figure 7.26. The twist with knees extended and thighs abducted (third in this series) next illustrates limitations dictated by the adductors as well as the hamstrings. Beginners should adjust the amount of abduction to make the pose easier or lean back to maintain a lumbar lordosis. The back should not be rounded excessively to the rear.
If the thighs are abducted to their limits in this third posture, twisting in one direction creates intense stretch not only in the hamstrings, but also in the adductors on the opposite side. Both sets of muscles will be tugging on the base of the pelvis, making this the most demanding of the sitting twists described so far. To find the ideal amount of abduction for improving hip flexibility, mildly stretching both the adductors and hamstrings, and yet still working productively on the spinal twist, go back and forth between partial and full abduction several times, twisting to one side and then the other. The idea is to strike a reasonable compromise that does not degrade the lumbar curvature too much and give in totally to sacroiliac counternutation. Sitting on a support will also allow a more graceful twist.
The fourth and last set of twists in this series folds both legs in the same direction and is especially useful for relieving the stress of other sitting twists. Pull the left foot in toward the groin and swing the right foot around to the right. The left foot ends up against the right thigh. Twist to the left, placing your left hand behind you on the floor and your right hand on your left knee. Twist further, aiding the gesture with both hands. Notice that you naturally lean back as you come further into the twist, thus straightening the spine and permitting more sacroiliac nutation (fig. 7.27a). Then come up and twist to the right with the aid of the right hand on the floor and the left hand on the left knee. Twisting in the same direction in which the legs are pointing will require most novices to lean markedly forward, thus flexing the lumbar spine, although that requirement is not apparent in this illustration (fig. 7.27b).

Figure 7.27. Twists with the feet both folded in the same direction (fourth in this series) provide a welcome relief to students frustrated with other sitting twists. Twisting in the opposite direction of the legs (a) is easy and results in leaning slightly to the rear, which straightens the spine. Twisting in the same direction (b) requires leaning forward and some spinal flexion in everyone who is not gifted with excellent hip flexibility (obviously that does not apply to this model).
Twist your neck in this fourth posture to please yourself, either rotating it in the same direction as the rest of the twist or keeping it in a neutral position perpendicular to the shoulders. If your hip flexibility is poor, you can moderate the posture by sitting up on a cushion, helping you to create a more pure spinal twist without flexing the spine and placing so much tension on the hip joints. The posture should be repeated, as always, on the other side, making a total of four possibilities, two with the feet facing to the right and two more with the feet facing the left.
HALF SPINAL TWISTS
The next six postures (figs. 7.28–32 for five of the six; the first one is not illustrated) are loosely called spinal twists, but technically they are half spinal twists. The simplest and easiest (not illustrated here) is a leaned-back twist for those who have serious problems with hip flexibility. To come into the posture sit flat on the floor with thighs adducted and knees extended. Raise the left knee and place the left foot on the floor on the left (medial) side of the right knee, or perhaps a little closer to the groin. Twist left moderately, hook the right forearm around the left knee, and brace the posture with the left hand far enough behind you on the floor to enable you to lean backward with your elbow extended and keep the lumbar spine arched forward. As soon as you are in a comfortable position, twist a little more to the left and readjust the placement of the left hand against the floor to increase the twist and yet sharpen the lumbar curve. Look as far to the left as you can and repeat the pose on the other side.
This posture has much to offer. Because the adductors are not being stretched at all, and because you are leaning well to the rear, the hamstring muscles are not creating much tension on the base of the pelvis, and you can concentrate all of your awareness on sacroiliac nutation and twisting the spine. It’s also an excellent introduction to using the upper extremities for prying yourself around in the classic half spinal twist.
The classic half spinal twist (fig. 7.30) is a complex posture, but it is also one that can be approached in stages (figs. 7.28-30) that are useful for beginners. For the least demanding version, start from a cross-legged easy posture (fig. 10.10a) with the right foot drawn into position first (ending up with the left leg in front of the right), and raise the left knee, leaving the left foot flat on the floor in front of the right leg. Twist the body provisionally to the left, looking as far to the rear as you can while keeping the head and neck on axis with the thoracic spine. Place the left hand behind the hips and support the body with the forearm extended. To complete the easy version of this posture, hook your right forearm around the left knee and pull it in against the chest and abdomen (fig. 7.28), push more insistently with the left hand, and sit up as straight as possible. Both ischial tuberosities should be on the floor. Those who are inflexible can work with this posture for a month or so before going to the next stage. Repeat on the other side.
For the next stage, continuing from before, lift the left foot and place it flat on the floor on the right side of the right knee. This is now starting to be a more complex posture, especially for beginners, because they usually have to lean forward, losing their starting position of maximum nutation along with their lumbar lordosis. Even so, they should continue within their limitations, pulling the left knee more vigorously to the chest (still with the right forearm) and twisting to the left as much as possible (fig. 7.29). As in the case of the first stage (fig. 7.28), if this is as far as you can go without creating stress and strain, work with this pose for an additional month or two before proceeding. Repeat on the other side.
Assuming you wish to go on to the classic version of the half spinal twist, pry yourself around further into the twist by bringing the back side of the right arm to the left side of the left knee and then reach down to grasp the right foot (which is easiest), the right knee (fig. 7.30), or if you are flexible enough, the left foot. This twist is even more complex than the previous version (fig. 7.29). Only if you are unusually flexible will this be a respectable half spinal twist. For most people cranking the body around with the shoulder changes the posture from a spinal twist to something that combines hip prying and triceps brachii massage with three movements of the spine—forward flexion, lateral flexion, and twisting. This is not without virtue, but the posture is no longer a pure spinal twist. There is nothing wrong with it so long as everyone realizes what is happening, but it is important to understand that the pose will never look and feel complete until hip flexibility is sufficient to obviate the need to bend forward in the lumbar region. As with the other sitting twists, elevating the buttocks with a pillow eases the posture for those who are not flexible enough to feel comfortable flat on the floor. Repeat on the other side.
All sitting half spinal twists that begin from a cross-legged position can also be done with one leg extended. Most of these are more demanding than the cross-legged versions because the hamstring muscles that insert on the extended leg will now be pulled taut, tugging on the ischial tuberosity on that same side and making it even more difficult to sit straight than in the classic half spinal twist shown in fig. 7.30. The most common variation of this twist differs only slightly in knee, shoulder, arm, and hand position from the half spinal twist which introduced this series. For this one (number five in the series) sit straight with the right leg stretched forward and the left knee upright, but instead of placing the left foot on the floor on the medial side of the right thigh, lift the left foot and bring it all the way across to the right (lateral) side of the right thigh. Now instead of hooking the left knee with the right forearm, as in the case of the introductory pose, twist more fully to the left and bring the back of the right arm against the left thigh and catch either the right knee or the left foot with the right hand to accentuate the twist. The left hand again braces the posture from behind (fig. 7.31). This posture is identical to the leaned-back twist (the one that introduced the half spinal twists) except that here you are sitting straighter and starting with the pulled-in foot on the lateral rather than the medial side of the opposite knee, which insures that the back of your arm will be more effective in pressing the upright thigh against your torso As before, sit on a pillow to moderate the posture if you are not flexible enough to feel graceful in it, and as always, repeat on the other side.
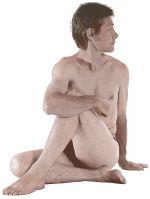
Figure 7.28. To study the important half spinal twists, it is helpful for novices to proceed in stages. After pulling in the right heel in toward the upper left thigh, place the left foot in front of the right leg and pull the left knee toward the chest with the right hand and forearm. Except for the prying effect on the left hip joint, this is a pure sitting twist and is an excellent pose for beginners. They need not go to the next stage until they are ready. Repeat on the other side.
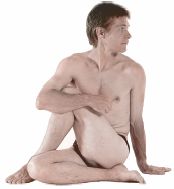
Figure 7.29. Next, lift the left foot and place it on the right side of the right thigh. Pull both feet in as close as possible, the right heel toward the groin and the left foot toward the lateral aspect of the right hip. Once the feet are in position, again pull the left knee closer to the chest with the forearm, and notice that this pose is more demanding of flexibility than the first one shown in fig. 7.28. Again, one need not go further. Repeat on the other side.
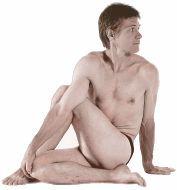
Figure 7.30. Last, for the standard half spinal twist, place the back of the right arm in front of the left knee to increase the prying effect on the left hip joint. Grasp the right foot, the right knee (as shown here), or the left foot with the right hand. For many students, this is a complex and difficult posture that combines a hip pry and forward bending with a spinal twist. Repeat on the other side.
If you have sufficient flexibility in your hips, spine, and shoulders, you can pull yourself into more complete twists by catching your hands together behind the back. You can start cross-legged or with one leg outstretched, but in either case you will have to pull the upright thigh and leg in closely enough to place the foot flat on the floor on the lateral side of the opposite knee. Try it first cross-legged (number six in this series). Draw the left heel in and place the right ankle to the left (lateral) side of the left knee. Twist to the right and pull the right knee close to the chest. Then, twisting even more to the right, anchor the back of the left arm and shoulder against the right knee, reach with the left hand between the right thigh and leg (from the front) to catch the right hand, which is reaching around from behind. Clasp the wrists or fingers together (fig. 7.32). Unless you are quite flexible you will probably have to lean forward to some extent. In any case, interlocking the hands requires excellent flexibility in the right hip joint. Otherwise you will have to lift the right hip off the floor and try to balance on the left hip. That is not an unthinkable compromise in spinal twists in which you are able to brace the right hand against the floor, but it won’t work here because the right hand is interlocked with the left and no longer available to keep your balance.
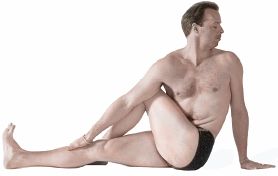
Figure 7.31. Another variety of the half spinal twist keeps one knee extended, which again brings the hamstring muscles of that side to your attention. This pose requires some spinal flexion of all but the most flexible students. You can push strongly with the rear hand to improve hamstring flexibility.
This posture is excellent for working with hip flexibility, but it should be approached with respect. If you have to bend forward excessively, lift the hip off the floor, and struggle to get your hands interlocked, you may let your attention lapse from the posture as a whole and overlook vulnerabilities that leave you exposed to injury.
BREATHING ISSUES
In chapter 2 we discussed the four modes of breathing: abdominal, diaphragmatic, thoracic, and paradoxical. Twisting the torso constricts abdominal breathing because it makes the lower abdominal wall taut and prevents its expansion. Under ordinary circumstances this facilitates diaphragmatic breathing, in which the descent of the dome of the diaphragm lifts the rib cage, but that also is limited because thoracic twisting keeps the upper abdomen taut as well, which in turn limits flaring of the base of the rib cage. The twist in the thorax even limits the ability to lift the chest for thoracic breathing. So where does this leave us? If you come into a simple cross-legged spinal twist, you can feel restrictions in breathing everywhere, but at the same time you will notice small respiratory movements throughout the torso: some in the lower abdomen (abdominal, or abdomino-diaphragmatic breathing), some flaring of the rib cage (diaphragmatic, or thoraco-diaphragmatic breathing), and some lifting of the rib cage (thoracic breathing). The one mode of breathing you’ll not see is paradoxical breathing, and this makes spinal twists a special blessing for anyone trying to break that habit.
In the more complex twisting postures, the relationship of the thigh to the torso adds another complication. If your posture presses the thigh against the lower abdomen, abdominal breathing is restricted. And if the thigh is pressed strongly against both the abdomen and the chest, you can only breathe by lifting the chest for thoracic breathing. Finally, this pressure on the abdominal wall frequently causes a slowing of inhalation and short bursts of exhalation. These adjustments in breathing cannot be helped; the postures demand them. They can only be watched and minimized.
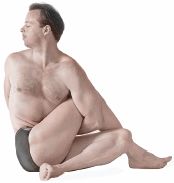
Figure 7.32. The fullest expression of the half spinal twist requires interlocking your hands together behind your back. This posture can be attempted by intermediate level students, but it will not be very rewarding until you have enough hip flexibility to sit upright without having to push the posture straight with the rear hand. Like all versions of the half spinal twists, this one improves hip flexibility but appears awkward until good progress toward that end has been made.
THE FULL SPINAL TWIST
When you are able to do the half spinal twist, catching the hands gracefully and comfortably behind your back, and at the same time sitting straight and keeping the ischial tuberosities flat on the floor, you will be able to approach the quintessential sitting spinal twist—matsyendrasana, the famous spinal twist done from the full lotus position. Few people who grow up sitting in chairs will have enough flexibility to get into it, and even for them years of preparation may be needed. The more demanding variations of the half spinal twist are obvious requirements, as are the half lotus, the full lotus, and any or all of the dozens of exercises that increase hip flexibility (chapter 6).
If you can do the lotus posture (fig. 10.15) comfortably, and if you can sit straight in the half spinal twist without resorting to forward and lateral flexion, you can begin to work with another preparatory posture—the spinal twist in the half lotus. Start with the left foot pulled up to the top of the right thigh so the heel is pressed into the abdomen. Then raise the right knee and draw the right foot in toward the perineum (holding the foot flat on the floor in front of the pelvis), all the while keeping the back straight. Raising the right knee is probably what you will not be able to do. Here is where working with a half lotus modification of the trapezius stretch in chapter 9 (fig. 9.17b) will help.
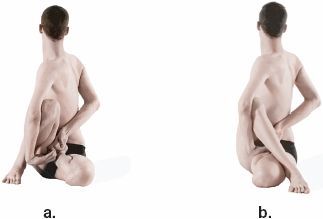
Figure 7.33. The full spinal twist (b) and its most immediate preparatory posture (a) are among the most difficult poses in hatha yoga. To do the preparatory pose, come into the half lotus (left foot pulled to the top of the right thigh) and then lift the right knee and pull the right foot in toward the perineum (a). To come into the full spinal twist, go from the preliminary pose and place the right foot on the floor on the left side of the left knee. Twist to the right, looking back, and catch the hands, interlocking the fingers behind the back (b).
When you are able to come into this position convincingly, twist right from the hips to the head, keeping the right thigh near the torso, bringing the left elbow against the lateral side of the right knee, and catching the hands together near the left foot (fig. 7.33a). Work equally on both sides, or favor the side which is more problematic. You should work with this posture until you are able to remain comfortable in it while you are keeping the spine straight.
Only when you are comfortable in the full lotus and can do the spinal twist in the half lotus is it time to try the full posture. Again place the left foot on top of the right thigh, but now swing the right foot over the left knee and plant it on the floor lateral to the left thigh and pulled in as much as possible. Twist to the right, looking back. You can use one of two hand positions depending on your flexibility: simply dropping them where they fall naturally, or reaching with the left hand between the right leg and thigh to catch the right hand behind the back (fig. 7.33b). As with all twisting postures, repeat on the other side.
Twisting postures in hatha yoga complement forward and backward bending by exercising muscles in more complex ways than is accomplished by the symmetrical movements of flexion and extension alone, and in some cases they exercise muscles that are highly specialized for twisting. Beyond that, the axial compression of the spine and other structures of the torso improves nutrition to the intervertebral disks and squeezes blood out of the internal organs of the abdomen and pelvis, thus improving circulation in the great supportive systems of the body. For these reasons, twisting postures are essential for a complete practice and must always be included in any balanced program of hatha yoga.
“Vedanta is like a blueprint for a house. It is knowledge about the house, but you cannot live in the blueprint. You have to build the house using bricks and mortar. And that is tantra. So Vedanta gives you knowledge about the supreme reality; tantra enables you to experience that supreme reality in yourself.”
— Tapasvi Baba, July 17, 2000 (translated by D.C. Rao).