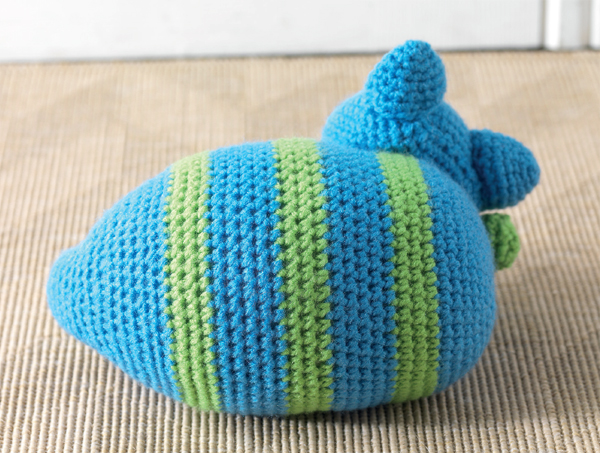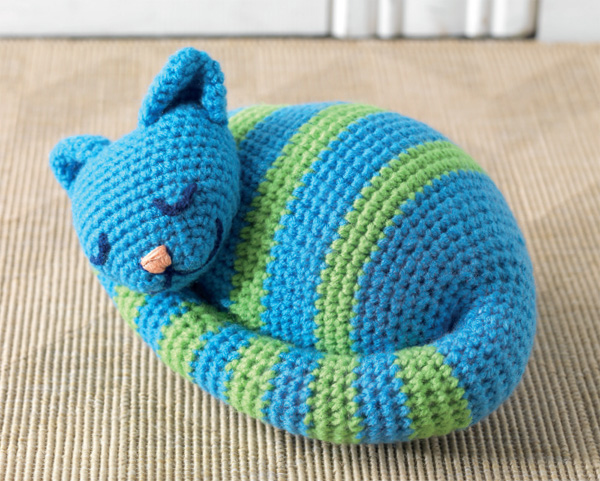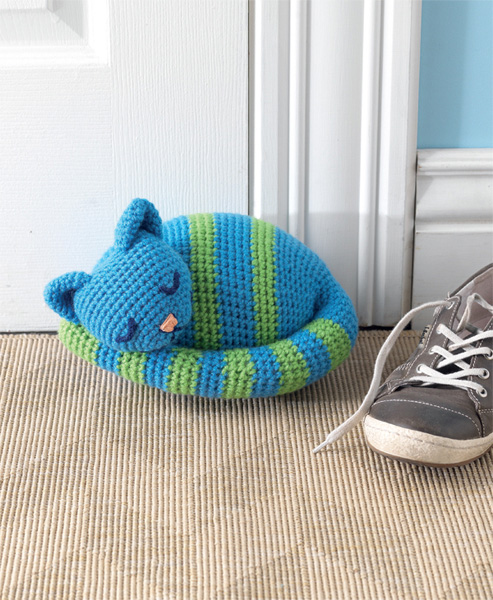
It doesn’t get any cuter than this sweet little amigurumi kitty. Filled with glass beads, she makes a charming doorstop, but stuffed with fiberfill she’d make a purrrfect plush toy, too.
DESIGNED BY BRENDA K. B. ANDERSON
9" (23 cm) long × 6" (15 cm) deep × 5" (12.5) tall.
Worsted weight (#4 Medium).
Shown here: Red Heart Super Saver Solid (100% acrylic; 364 yd [333 m]/7 oz [198 g]), in #0885 Delft Blue (MC) and #0672 Spring Green (CC), ½ skein each.
Size G/6 (4 mm), or size needed to obtain gauge.
Steel hook size US 6 (1.6 mm), eyes, and mouth (see notes on page 50).
Removable stitch marker; tapestry needle; polyester fiberfill stuffing; flat glass gems (see notes below) or other heavy stuffing material, between 2 and 3 lbs; 1 nylon stocking (see notes below); 1 twist tie (optional—see notes below); sewing pins; DMC embroidery floss, #820 Dk. Royal Blue, 2 yd (1.82 m), for eyes and mouth; DMC embroidery floss, #3824 Lt. Apricot, 1 yard (0.91 m), for nose; embroidery needle.
6 rnds in sc stitch = 3" (7.5 cm) in diameter using size G/6 (4 mm) hook.
Note: Stitches should not be loose, but tight enough to create a sturdy fabric that can be stuffed firmly.
Working in joined rounds
Changing color
Stuffing
Sc2tog (single crochet two together)
Insert hook in next stitch, yarn over and pull up loop (2 loops on hook), insert hook in next stitch, yarn over and pull up loop (3 loops on hook), yarn over and draw through all 3 loops on hook.
Satin Stitch (embroidery)
See Techniques.
With MC and larger hook, make an adjustable loop,
RND 1: 6 Sc into ring, join with sl st in first sc, (pull yarn tail to close loop)—6 sts, do not turn.
RND 2: Ch 1, (start in same st as the join, now and throughout body) 2 sc into each st around, join with sl st in first sc—12 sts, do not turn.
RND 3: Ch 1, [1 sc in next st, 2 sc in next st] 6 times, join with sl st in first sc—18 sts, do not turn.
RND 4: Ch 1, [1 sc in each of next 2 sts, 2 sc in next st] 6 times, join with sl st in first sc—24 sts, do not turn.
RND 5: Ch 1, [1 sc in each of next 3 sts, 2 sc in next st] 6 times, join with sl st in first sc—30 sts, do not turn.
RND 6: Ch 1, [1 sc in each of next 4 sts, 2 sc in next st] 6 times, join with sl st in first sc—36 sts, do not turn.
RND 7: Ch 1, [1 sc in each of next 6 sts, 2 sc in next st, 1 sc in each of next 5 sts] 3 times, join with sl st in first sc—39 sts, do not turn.
RND 8: Ch 1, [1 sc in each of next 12 sts, 2 sc in next st] 3 times, join with sl st in first sc—42 sts, do not turn.
RND 9: Ch 1, [1 sc in next 2 sts, 2 sc in next st, 1 sc in next 11 sts] 3 times, join with sl st in first sc—45 sts, do not turn.
RND 10: Ch 1, [1 sc in each of next 10 sts, 2 sc in next st, 1 sc in each of next 4 sts] 3 times, join with sl st in first sc—48 sts, do not turn.
RND 11: Ch 1, [1 sc in each of next 7 sts, 2 sc in next st, 1 sc in each of next 8 sts] 3 times, join with sl st in first sc—51 sts, do not turn.
RND 12: Ch 1, [1 sc in each of next 13 sts, 2 sc in next st, 1 sc in each of next 3 sts] 3 times, join with sl st in first sc changing to CC on last yo—54 sts, do not turn.
RNDS 13–15 AND 21–23: Ch 1, 1 sc in each st, join with sl st in first sc changing to MC on last yo of Rnd 15 (23), do not turn.
RNDS 16–20 AND 24–28: Ch 1, 1 sc in each st, join with sl st in first sc changing to CC on last yo of Rnd 20 (28), do not turn.
RNDS 29–31: Ch 1, 1 sc in each st, join with sl st in first sc changing to MC on last yo of Rnd 31, do not turn.
RND 32: Ch 1, [1 sc in each of next 13 sts, sc2tog, 1 sc in each of next 3 sts] 3 times, join with sl st in first sc—51 sts, do not turn.
RND 33: Ch 1, [1 sc in each of next 7 sts, sc2tog, 1 sc in each of next 8 sts] 3 times, join with sl st in first sc—48 sts, do not turn.
RND 34: Ch 1, [1 sc in each of next 10 sts, sc2tog, 1 sc in each of next 4 sts] 3 times, join with sl st in first sc—45 sts, do not turn.
RND 35: Ch 1, [1 sc in each of next 2 sts, sc2tog, 1 sc in each of next 11 sts] 3 times, join with sl st in first sc—42 sts, do not turn.
RND 36: Ch 1, [1 sc in each of next 12 sts, sc2tog] 3 times, join with sl st in first sc—39 sts, do not turn.
RND 37: Ch 1, [1 sc in each of next 6 sts, sc2tog, 1 sc in each of next 5 sts] 3 times, join with sl st in first sc—36 sts, do not turn, do not fasten off. Set aside.
Fill the toe of stocking with as much heavy filling as will fit inside the body (leaving a little room for a bit of fiberfill around all sides). Cut the stocking with enough extra length to tie into a knot. Either use a twist tie or loosely knot the end of the nylon stocking, so that you can reopen the stocking to adjust the amount of filling as your work progresses. Place some fiberfill in the end of body and then place the filled stocking into the body. Using fiberfill, pad around all sides of the stocking, making it as smooth as possible. Continue constructing Kitty’s body, adjusting the filling as needed.
RND 38: Ch 1, [1 sc in each of next 2 sts, sc2tog, 1 sc in each of next 2 sts] 6 times, join with sl st in first sc—30 sts, do not turn.
RND 39: Ch 1, [1 sc in each of next 3 sts, sc2tog] 6 times, join with sl st in first sc—24 sts, do not turn, do not fasten off.
Permanently tie the end of stocking. Stuff the body and tail firmly with fiberfill as work progresses.
RND 40: Ch 1, [1 sc in next st, sc2tog, 1 sc in next st] 6 times, join with sl st in first sc—18 sts, do not turn.
RNDS 41–50: Ch 1, 1 sc in each st, join with sl st in first sc changing to CC on last yo of Rnd 50, do not turn.
RND 51: Ch 1, 1 sc in each of next 16 sts, sc2tog, join with sl st in first sc—17 sts, do not turn.
RNDS 52 AND 53: Ch 1, 1 sc in each st, join with sl st in first sc changing to MC on last yo of Rnd 53, do not turn.
RNDS 54–56: Ch 1, 1 sc in each st, join with sl st in first sc changing to CC on last yo of Rnd 56, do not turn.
RND 57: Ch 1, 1 sc in each of next 15 sts, sc2tog, join with sl st in first sc—16 sts, do not turn.
RNDS 58 AND 59: Ch 1, 1 sc in each st, join with sl st in first sc changing to MC on last yo of Rnd 59, do not turn.
RNDS 60–62: Ch 1, 1 sc in each st, join with sl st in first sc changing to CC on last yo of Rnd 62, do not turn.
RND 63: Ch 1, 1 sc in each of next 14 sts, sc2tog, join with sl st in first sc—15 sts, do not turn.
RNDS 64 AND 65: Ch 1, 1 sc in each st, join with sl st in first sc changing to MC on last yo of Rnd 65, do not turn.
RNDS 66–68: Ch 1, 1 sc in each st, join with sl st in first sc changing to CC on last yo of Rnd 68.
RND 69: Ch 1, 1 sc in each of next 13 sts, sc2tog, join with sl st in first sc—14 sts, do not turn.
RNDS 70 AND 71: Ch 1, 1 sc in each st, join with sl st in first sc changing to MC on last yo of Rnd 71, do not turn.
RNDS 72–74: Ch 1, 1 sc in each st, join with sl st in first sc changing to CC on last yo of Rnd 74, do not turn.
RND 75: Ch 1, 1 sc in each of next 12 sts, sc2tog, join with sl st in first sc—13 sts, do not turn.
RNDS 76–77: Ch 1, 1 sc in each st, join with sl st in first sc changing to MC on last yo of Rnd 77, do not turn.
RNDS 78–80: Ch 1, 1 sc in each st, join with sl st in first sc changing to CC on last yo of Rnd 80, do not turn.
RND 81: Ch 1, 1 sc in each of next 11 sts, sc2tog, join with sl st in first sc—12 sts, do not turn.
RNDS 82–92: Ch 1, 1 sc in each st, join with sl st in first sc, do not turn.
RND 93: Ch 1, sc2tog 6 times, join with sl st in first sc—6 sts.
Fasten off, leaving 12" (30.5 cm) tail. Thread yarn tail through front loop of 6 rem sts and pull tight to close hole. Weave in ends and set aside.
COLOR TIP
Nontraditional kitty colors make this little creature extra cute. Have fun adding purrrsonality with your own color choices—school or sports team colors, purrrhaps?
With MC and larger hook, ch 7.
RND 1: In 2nd ch from hook, 1 sc in bottom bump in each of next 6 chs—6 sc, place marker to indicate beg of rnds moving marker up each rnd. (Note: The first ch from hook is a t-ch—do not work this st on the next rnd.)
RND 2: Cont around to other side of foundation chain, rotate work clockwise 180 degrees, 2 sc in first st, 1 sc in each of next 4 sts, 2 sc in next st, rotating work clockwise 180 degrees, skip t-ch from Rnd 1, 2 sc in next st, 1 sc in each of next 4 sts, 2 sc in last—16 sts.
RND 3: [2 sc in next st, 1 sc in each of next 6 sts, 2 sc in next st] twice—20 sts, sc in next st, move marker after this st to mark new beg of next rnd.
RND 4: [2 sc in next st, 1 sc in each of next 8 sts, 2 sc in next st] twice—24 sts.
RND 5: [2 sc in next st, 1 sc in each of next 10 sts, 2 sc in next st] twice—28 sts.
RND 6: [2 sc in next st, 1 sc in each of next 12 sts, 2 sc in next st] twice—32 sts, sc in next st, move marker after this st to mark new beg of next rnd.
RND 7: [2 sc in next st, 1 sc in each of next 14 sts, 2 sc in next st] twice—36 sts.
RNDS 8–15: 1 sc in each st around, sc in each of next 2 sts, move marker after these 2 sts to mark new beg of next rnd.
RND 16: [Sc2tog, 1 sc in each of next 14 sts, sc2tog] twice—32 sts.
RND 17: [Sc2tog, 1 sc in each of next 12 sts, sc2tog] twice—28 sts.
RND 18: [Sc2tog, 1 sc in each of next 10 sts, sc2tog] twice—24 sts.
Fasten off, leaving 12" (30.5 cm) tail. Stuff head with fiberfill. Sew opening at top of head closed through front loops only. Weave in ends and set aside.
(worked in spiral)
With MC and larger hook, make an adjustable loop.
RND 1: 6 Sc in loop, pull yarn tail to close loop—6 sts, place marker to indicate beg of rnds moving marker up each rnd.
RND 2: [1 sc in next st, 2 sc in next st] 3 times—9 sts.
RND 3: [1 sc in each of next 2 sts, 2 sc in next st] 3 times—12 sts.
RND 4: [1 sc in next st, 2 sc in next st, 1 sc in each of next 2 sts] 3 times—15 sts.
RND 5: [2 sc in next st, 1 sc in each of next 4 sts] 3 times—18 sts.
RND 6: [1 sc in each of next 3 sts, 2 sc in next st, 1 sc in each of next 2 sts] 3 times—21 sts.
RND 7: [1 sc in each of next 2 sts, 2 sc in next st, 1 sc in each of next 4 sts] 3 times—24 sts.
Fasten off, leaving 12" (30.5 cm) tail.
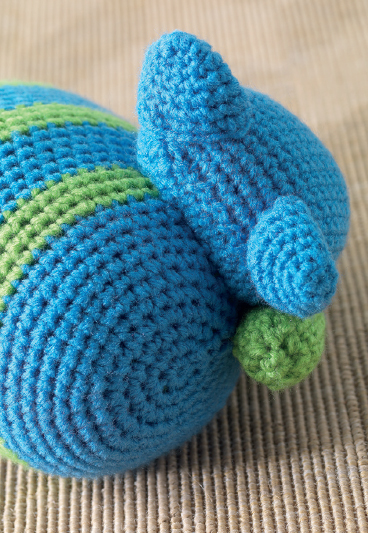
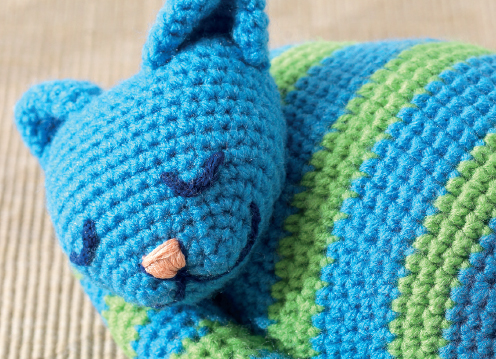
Fold ear flat and stitch the two layers together at bottom edge. Pin ears to top of head using photo as guide. The bottom edge of each ear should be shaped into a C where it meets the head. Stitch ears to head using MC. Set aside.
(Make 2.)
Using steel hook and blue embroidery floss, ch 11.
ROW 1: Working in bottom of chs, sl 1 st in 2nd ch from hook, and in each ch across—10 sts.
Fasten off, leaving 6" (15 cm) tail.
Using embroidery needle and tail ends, stitch each eye to face using photo as guide.
Using steel hook and blue embroidery floss, ch 15.
ROW 1: Working in bottom of chs, sl 1 st in 2nd ch from hook and in next ch, ch 12.
Fasten off, leaving 6" (15 cm) tail.
Using embroidery needle and tail ends, stitch mouth to face using photo as guide. The slip-stitch section of the mouth should point upward to the bottom of the nose.
Using embroidery needle and apricot embroidery floss, satin stitch (with vertical stitches) a triangular nose in place just above the mouth. Add a few horizontal satin stitches across the top of nose. Using blue embroidery floss, embroider a couple of straight stitches along the sides of the nose to give the nose extra definition.
Pin tail by wrapping around side toward top of body, and stitch in place. Pin head in place just above the tail, angled slightly (see photo), and stitch in place. Weave in ends.