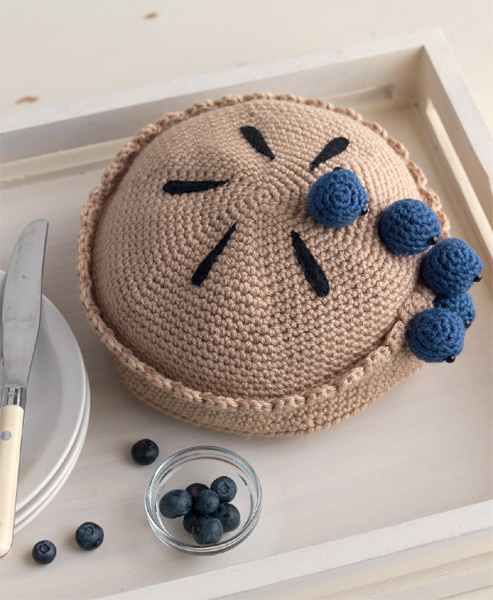
This plush pie is too cute to eat! Display this confection on a pretty cake plate for a fun accent to your décor, or share it with a little one for the play kitchen.
DESIGNED BY ANA PAULA RIMOLI
8" (20.5 cm) in diameter.
Worsted weight (#4 Medium).
Shown here: Patons Canadiana Solid (100% acrylic, 205 yd [187 m/3.5 oz [100 g]), in #10010 Flax (MC), 2 skeins, and #10145 Dark Water Blue (CC), 1 skein.
Sizes F/5 (3.5 mm) and G/6 (4 mm) or sizes to obtain gauge.
Stitch marker; 6mm plastic eyes with safety backings; black acrylic craft felt, 1 sheet, 9" × 12" (23 × 30.5 cm); black embroidery floss; embroidery needle; fiberfill or stuffing of your choice; tapestry needle.
9½ sts × 10½ rows = 2" (5 cm) in sc stitch using larger hook. Take time to check your gauge.

With MC and larger hook, ch 2.
RND 1: 6 Sc in 2nd ch from hook, place marker to indicate beg of rnd, moving marker up each rnd.
RND 2: 2 Sc in every sc around—12 sc.
RND 3: [Sc in next sc, 2 sc in next sc] 6 times—18 sc.
RND 4: [Sc in next 2 sc, 2 sc in next sc] 6 times—24 sc.
RND 5: [Sc in next 3 sc, 2 sc in next sc] 6 times—30 sc.
RND 6: [Sc in next 4 sc, 2 sc in next sc] 6 times—36 sc.
RND 7: [Sc in next 5 sc, 2 sc in next sc] 6 times—42 sc.
RND 8: [Sc in next 6 sc, 2 sc in next sc] 6 times—48 sc.
RND 9: [Sc in next 7 sc, 2 sc in next sc] 6 times—54 sc.
RND 10: [Sc in next 8 sc, 2 sc in next sc] 6 times—60 sc.
RND 11: [Sc in next 9 sc, 2 sc in next sc] 6 times—66 sc.
RND 12: [Sc in next 10 sc, 2 sc in next sc] 6 times—72 sc.
RND 13: [Sc in next 11 sc, 2 sc in next sc] 6 times—78 sc.
RND 14: [Sc in next 12 sc, 2 sc in next sc] 6 times—84 sc.
RND 15: [Sc in next 13 sc, 2 sc in next sc] 6 times—90 sc.
RND 16: [Sc in next 14 sc, 2 sc in next sc] 6 times—96 sc.
RND 17: [Sc in next 15 sc, 2 sc in next sc] 6 times—102 sc.
RND 18: [Sc in next 16 sc, 2 sc in next sc] 6 times—108 sc.
RNDS 19 AND 20: Sc in each sc around.
RND 21: [Sc in next 17 sc, 2 sc in next sc] 6 times—114 sc.
RND 22: Working through back loops only, [sc 17, sc2tog] 6 times—108 sc.
RNDS 23–27: Sc in each sc around, join with sl st in beg sc of last rnd, fasten off, weave in ends.
With MC and larger hook, ch 2, place marker to indicate beg of rnd, moving marker up each rnd.
RND 1: 6 Sc in second ch from hook, place marker to indicate beg of rnd, moving marker up each rnd.
RNDS 2–12: Rep Rnds 2–12 of bottom—72 sc.
RNDS 13 AND 14: Sc in each sc around.
RNDS 15–18: Rep Rnds 13–16 of bottom—96 sc.
RNDS 19–21: Sc in each sc around.
RNDS 22 AND 23: Rep Rnds 17 and 18 of bottom—108 sc.
RND 24: Sc in each sc around.
RND 25: Sc in each sc around, join with sl st in beg sc, do not fasten off, do not turn.
RND 26: (Ch 3, 2 dc) in same sp as joining, skip sc, sl st in next sc, *3 dc in next sc, skip sc, sl st in next sc; rep from * around, fasten off, weave in ends.
(Make 5.)
With CC and smaller hook, ch 2.
RND 1: 5 Sc in 2nd ch from hook, place marker to indicate beg of rnd, moving marker up each rnd.
RND 2: 2 Sc in every sc around—10 sc.
RND 3: [Sc in next sc, 2 sc in next sc] 5 times—15 sc.
RNDS 4–7: Sc in each sc around.
RND 8: [Sc in next sc, sc2tog] 5 times—10 sc.
Stuff with fiberfill.
RND 9: Sc2tog around—5 sc, fasten off leaving 6" (15 cm) tail for closing ball, weave in ends.
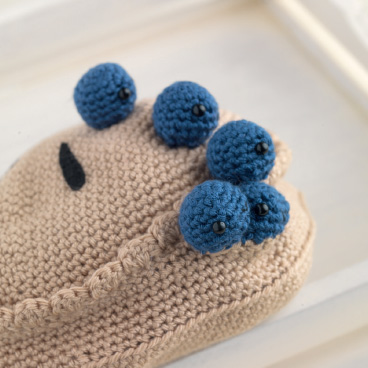
Blueberries
Attach 2 plastic eyes with safety backings and embroider floss between eyes with a V stitch for smile (see diagram).

Berry Face

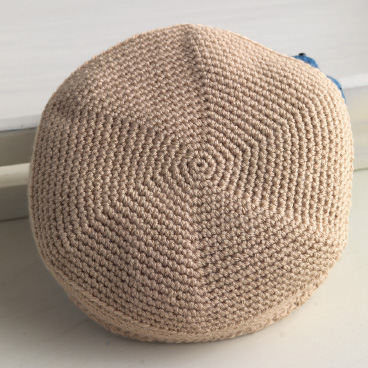
Top of Pie
Cut 5
(1½" × ¼")
Top
Cut 5 petal-shaped pieces from felt using template, and sew to top (see photo).
Assembly
Stuff bottom and align with top. Sew edges together right under the scallop edging (so the “crust” stays outside of the pie). Leave a slight opening. Sew 2 or 3 blueberries over opening (see photo). Sew remaining berries to the top.