Anyone browsing through a shotgun catalog today can be overwhelmed by the options available, from different grip shapes to buttstock designs, recoil pads, fore-ends, barrels, ribs, and sighting devices. On double guns, you might be offered one trigger or two and a safety that is automatic or manual. Barrels come in different lengths, with different chokes and ribs.
For the beginning shotgunner or one who is looking for an everyday, all-around gun, we can define some basics. Then, by the time you reach the point of moving on to a more expensive gun and its myriad options, you will have an idea of what you like and what you don’t.
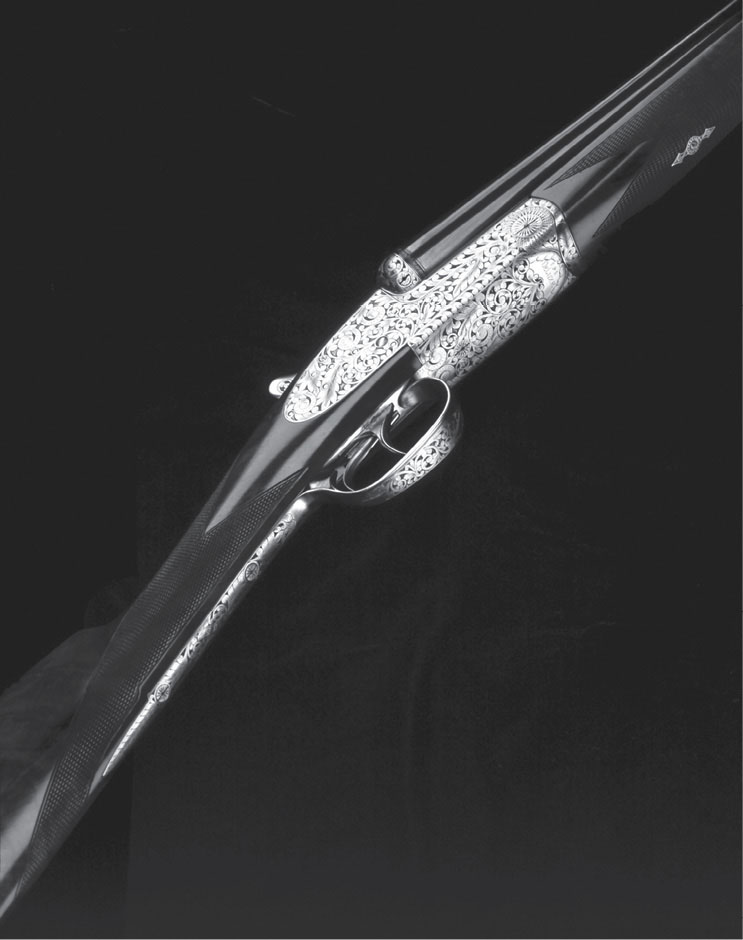
No single feature of a shotgun is so important as the trigger, in determining whether you will shoot well or badly. A gun with a poor trigger not only can give you a bad afternoon, it can upset your shooting for weeks or months to come. High-level competitors dread an encounter with a poor trigger, knowing the possible long-term effects, and many refuse ever to shoot any gun but their own for this reason.
To the uninitiated, the trigger may seem inconsequential — like discussing the operation of a car’s accelerator. But, in fact, it is the critical link between the shooter’s brain and the gun’s mechanism. In shooting at a moving object, whether it is a wild bird or a clay pigeon, you are dealing in split-second, subconscious calculations and instinctive movement. When your brain decides that this micro-second is the point at which the shot should be fired, the signal from the brain to the finger and from the finger on the trigger to the gun’s firing mechanism must be seamless and as close to instant as possible. A bad trigger, one with an unduly heavy, rough, uneven, or inconsistent pull, is an obstacle to this Zen-like flow of intent.
So, exactly what is a good trigger pull on a shotgun? Unlike rifle shooting, where the trigger is gently squeezed, a shotgun trigger is given what is sometimes described as a controlled slap. Weight of pull is measured in pounds, and the ideal is half the weight of the gun or slightly more. Thus, a seven-pound gun should have a trigger pull of about 31⁄2 pounds. If it is a double-trigger gun, the rear trigger should be about a quarter-pound heavier than the front.
Pull weight is critical because, if you have a seven-pound gun with a nine-pound pull, the effort to trip the trigger can pull the gun off the path of the target. Such a heavy trigger is a terrible distraction, one that will cause you to slow or stop your swing and miss the target.
Just as important as weight is the quality of the pull. There should be no discernible creep or grating movement before the hammer trips. One famous description of the perfect feel is that it is like a glass rod breaking.
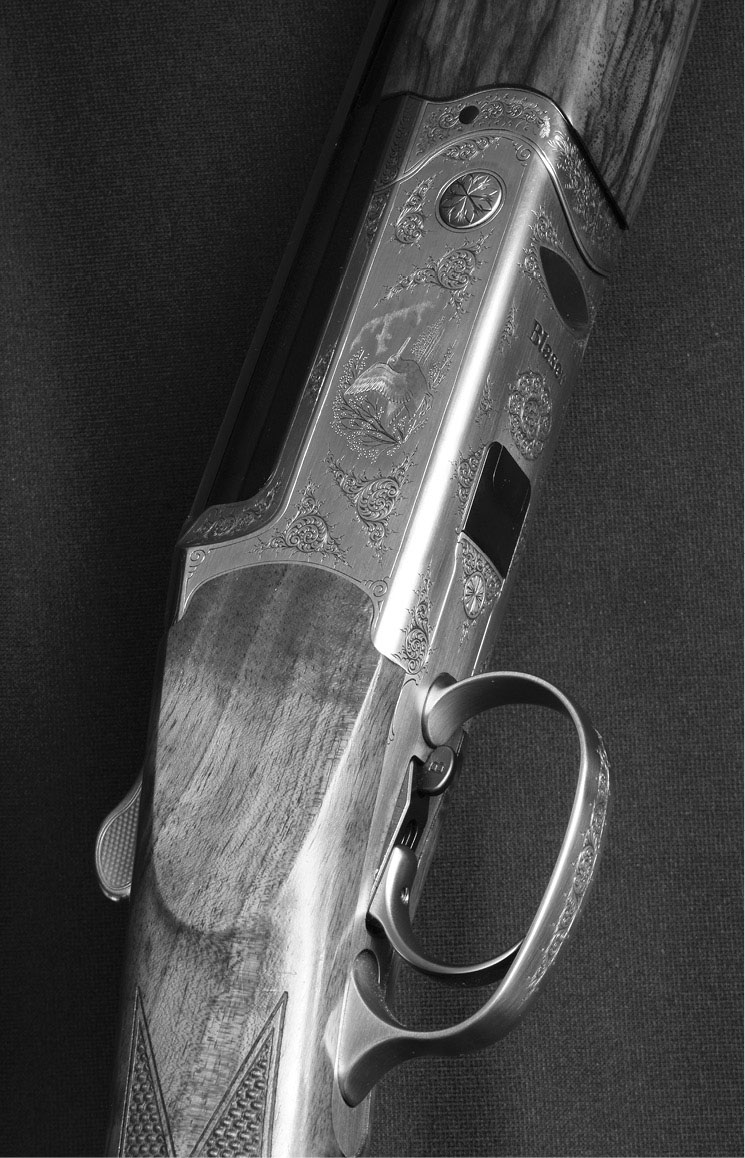
Double guns can have one trigger or two: singles, pumps, and semi-autos, obviously, only one. The finest triggers found today are on over/under competition guns and, of these, the trigger of Blaser’s F3 shotgun is widely regarded as the very best available. Individual shotgun features can rarely be discussed in isolation; the overall quality of Blaser’s firing mechanism is dependent on its unique striker design and fast lock time (the fraction of a second between the pulling of the trigger and firing of the shotshell). You might think this would be of interest only to competitors at the highest levels, but it affects everyone who shoots a shotgun and wants to hit their targets consistently.
When you move from an adequate trigger to a very fine one, like the Blaser F3, you rarely say, “This is so much better!” Instead, when you return to your old trigger you think, “Omigosh, this is awful!” Using a really good trigger spoils you for all the rest.
This is not to say that the triggers on a century-old Holland & Holland game gun cannot be adjusted to near perfection, because they can. Such an operation, however, requires the attention of a highly skilled gun maker. It is also not to say that you cannot become accustomed to a mediocre trigger and do reasonably well with it. Certainly, you can, but tolerating a truly poor trigger handicaps you.
With modern competition guns, trigger groups are often self-contained modules that can be adjusted only by a factory-trained technician using special tools and magnifiers to set the contact point between trigger and sear. Having a detachable trigger group such as that found on the renowned Perazzi competition over/unders is an advantage, because it allows you to keep a spare trigger, ready to install should something go amiss in the midst of a match.
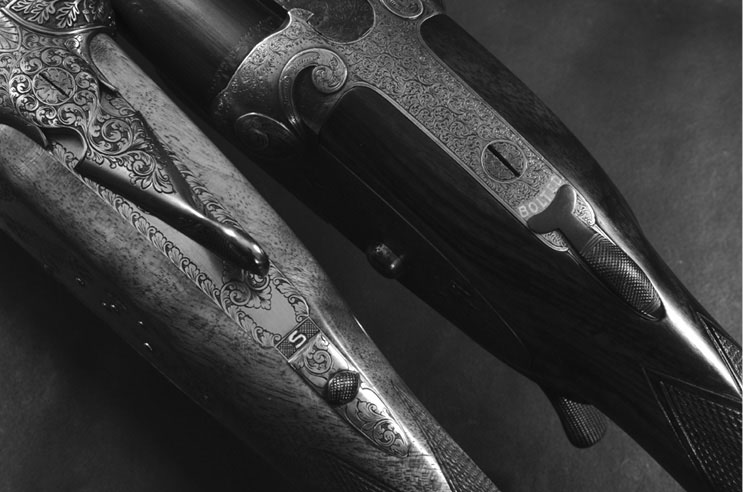
Double triggers are traditional on double shotguns and have several advantages. First, they give two independent mechanisms — in effect, two guns in one. If one malfunctions, you still have the other. Second, they allow an instant choice of left or right barrel (top or bottom, on an over/under), and that gives you an instant choice of choke and load. Double triggers are also vastly simpler than single triggers and, therefore, less prone to problems. They can be finely adjusted and are extremely reliable.
Many people consider double triggers old-fashioned or the mark of a less expensive gun. Neither is true any more than it is true to say that a standard transmission is the mark of a cheap car. Just as many drivers of expensive cars prefer a stick shift for the additional control, so do many excellent shots — including the best game shots — prefer double triggers.
Single triggers aren’t actually that much newer than double triggers. They have been attempted in some form or other for several hundred years, but only when they were perfected in the 1890s did they begin to gain adherents. There are two types of single triggers, selective and non-selective.
As the name suggests, a selective trigger allows you to choose which barrel to shoot first, while a non-selective trigger simply fires the two barrels in the same order every time. A non-selective trigger is usually set up to perform right to left in the case of a standard side-by-side game gun, where the right barrel generally has the more open choke, following the assumption that flushing game is, obviously, closer for the first shot than it would be for a second shot after a miss.
The great obstacle to developing a usable single trigger, which was not understood until the 1890s, was that there is an unconscious, involuntary second pull that occurs right after the trigger is deliberately pulled the first time. No one knows exactly why this occurs, but it does. Designers had to find a way to absorb that involuntary pull without it firing the second barrel. Various methods were employed, including “three-pull” mechanism triggers that used a pendulum or spring-loaded device to absorb the involuntary pull before positioning the trigger for the second deliberate pull.
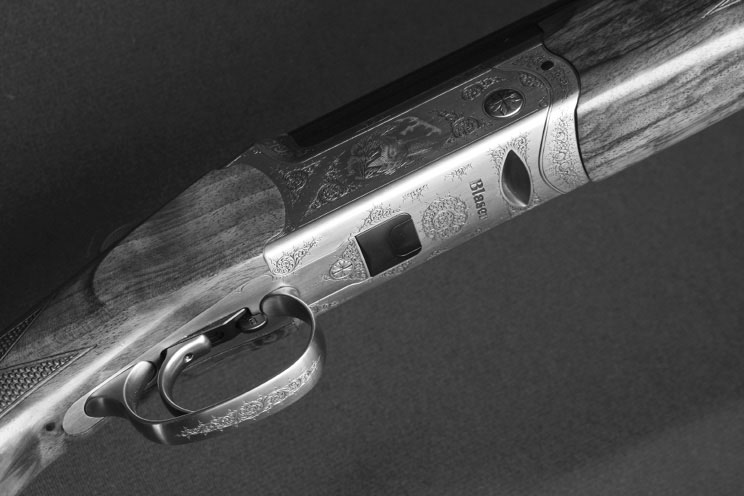
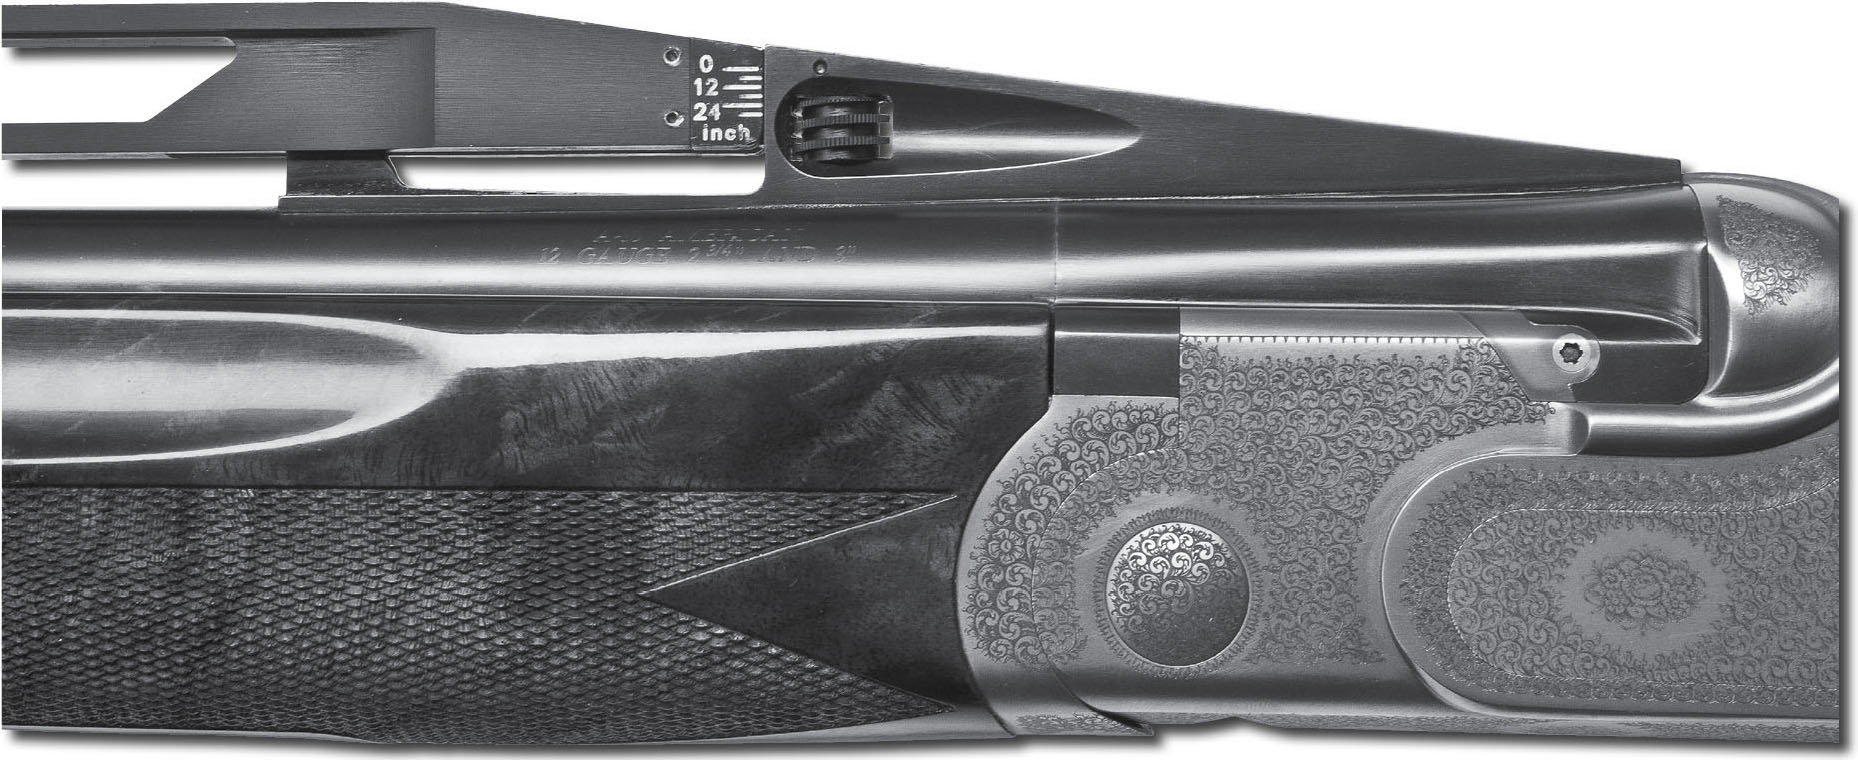
The Blaser F3’s single-trigger mechanism is one of, if not the best competition triggers in the world. The barrel selector is inside the trigger guard forward of the trigger (plainly seen as the little oval tab just behind the front of the trigger guard bow in the left-hand photo). Positioned as it is, it is readily accessible, yet out of the way. The trigger on the F3 can also be moved back and forth, accommodating minor length of pull adjustments.
Another consideration with single triggers is the means of setting the trigger to fire the second barrel. Some “inertia” systems rely on recoil, which means that, if your first cartridge misfires, you have no second shot, because there hasn’t been any recoil — the required inertia — to reset the mechanism to fire the second barrel. Other systems set the trigger for the second barrel mechanically. Regardless, it should be plain that such triggers are complicated in their design and functionality, and this complexity is increased if you add a selective feature that allows you to choose which barrel to fire first.
This complexity can spill over into other vital functions, such as the safety. Many selective trigger mechanisms combine the selector in the sliding safety catch on the tang, and the two positions are marked “O” and “U” (or “R” and “L,” in a side-by-side) or indicated by one red dot (for the lower barrel) and two (for the upper) to fire first. Unfortunately, in the act of sliding the safety forward, the catch can inadvertently be switched to the other barrel, sometimes even left in between the two, in which case the gun may not fire at all. For this reason, many competition guns include a feature for locking the selector in position by means of a set screw. In a departure from these commonly encountered designs, the Blaser F3 has its selection lever in the trigger guard, forward of the trigger itself, where it is easily accessible, but protected from accidental movement.
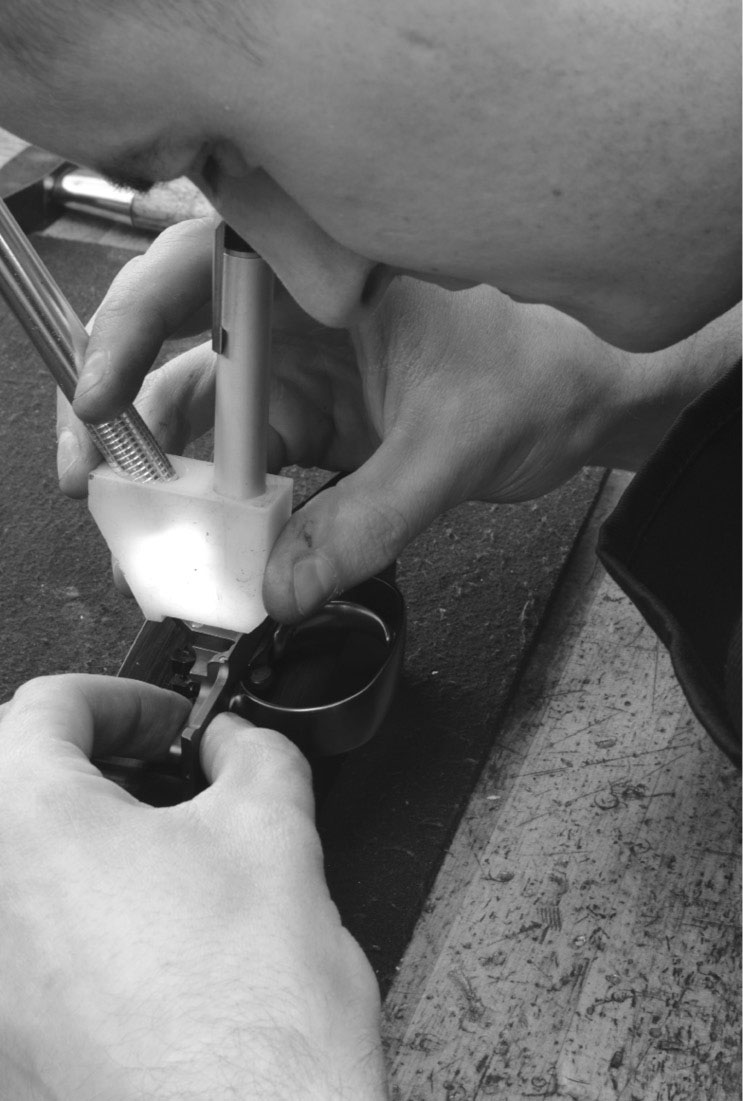
Blaser gunsmith Andre Gorjup adjusting the trigger let-off on an F3, using a magnifying and measuring device that adjusts to thousands of an inch.

The Blaser F3 trigger is a finely machined and intricate mechanism, whose principles can be traced to the first successful single triggers patented in the 1890s.
Here we come to a question that sparks debates at any shooting club. It is argued that a selective single trigger gives the same instant choice of barrel as double triggers do. The question is, is it really possible, in the heat of the moment and facing an unexpected situation, to do just that? In theory, the answer is unequivocally “Yes.” In practice, it is an unequivocal “Unlikely.”
After more than a century of regular use of selective single triggers, a few truths have emerged. In the traditional English game gun configuration of barrels and triggers, a side-by-side’s right barrel is the more open choke and is fired with the forward, or right-hand, trigger. This favors right-handed people, who are in the majority.
Perhaps because our hands and eyes are horizontal and defined by left and right, shooters have no difficulty, when assessing a situation such as a bird that appears suddenly, discerning whether to use the right or left barrel (open or tight choke) and connecting that decision with the appropriate trigger. It is intuitive, spontaneous, instant. However, if you transfer the moment of decision from “Which trigger?” to “Which barrel selector position?” a step is added that derails the process. It isn’t so bad if the selector is on a side-by-side; push it left, it selects the left barrel and vice versa. Still, it’s an instant’s delay, and having selected the barrel, you then have to push the safety forward in order to shoot. Overall, though, it is not bad.
With an over/under, there is no such intuitive connection. Nor is there a traditional configuration with over/unders in which the bottom barrel is always one choke or the other. You always find yourself moving a tiny mechanism left or right, choosing between up or down. For this reason, the vast majority of shooters with over/unders having selective single triggers set them to fire the bottom barrel first and leave it at that.
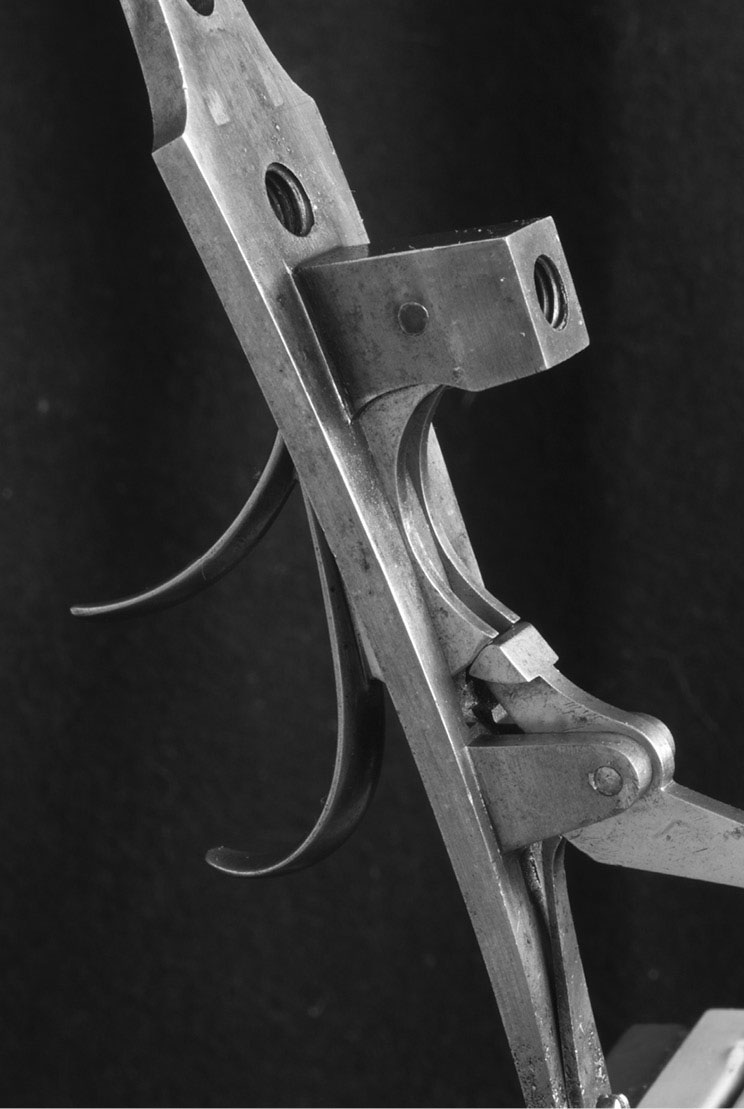
A two-trigger mechanism on an English double, circa 1890. Double triggers are simple, sturdy, and foolproof. The safety mechanism, which locks the triggers, can be clearly seen.
In this era of nearly universal interchangeable choke tubes, the problem, rather than being simplified, is magnified in its complexity, because the shooter must remember which choke he has in which barrel and then decide which he wants to use, and then remember which way the selector needs to be pointed in order to shoot that barrel. By this time, of course, that pheasant is in the next county, cackling all the way. In the old fixed-choke, two-trigger approach, it was simple: Long bird, back trigger; short bird, right trigger.
For some reason, double triggers are one of two shotgun features (the other being the automatic safety), that drive American gun writers to paroxysms of fury. Both have been described as “instruments of the devil” by such luminaries as Jack O’Connor. O’Connor hated double triggers, with a passion. More than once he wrote about acquiring a fine European side-by-side and having its double triggers replaced by a single trigger.
Some Americans insist they cannot use double triggers and go on at great length about the difficulties, usually blaming their problem on the fact that they did not grow up with them. I tend to view these claims with a skeptical eye. I never laid eyes on a double-triggered gun until I was in my late teens, but I took to it with no problem and have been shooting single- and double-triggered guns interchangeably ever since. The late Michael McIntosh, who knew as much about shotgun triggers as any writer in America, equally had no difficulty using one or the other, back and forth, occasionally switching several times in the course of a day.
In the same vein, some people (often the same ones!) say they cannot shoot a side-by-side, because it does not have the single sighting plane of an over/under or pump. The “single sighting plane” dodge, as I’ve said, was a brilliant marketing ploy originated by John M. Browning, when he introduced the Superposed over/under and wanted to seduce Americans away from their side-by-side Parkers and Ithacas. Seductive it may be, but it does not stand up to scrutiny.
First of all, every gun, regardless of the number of barrels or their configuration, has a single plane down which you look. Second, when you look down the barrels of a side-by-side, you don’t see two barrels the way they are illustrated in cartoons. What you see, predominantly, are the rib and bead; reflected light turns the barrels into ill-defined ghosts. Finally, in shooting, you are not looking primarily at the barrels — you should be looking at the target! If you do look at the barrels, you will slow your swing and pull the trigger for a miss. The barrels should only be seen out of the figurative corner of your eye, with your attention concentrated almost laser-like on your moving target.
But I digress. As I said, rarely can one feature of a shotgun be discussed in isolation. Regardless whether they originate in a valid complaint, these are real considerations with triggers, and gun designers have gone to great lengths to address them.
For example, a separate but related concern with triggers is the dreaded flinch, a malady to which trap shooters, especially, are prone and go to great lengths to avoid. A flinch is caused by recoil, muzzle blast, or a combination of the two and manifests itself in several ways. Riflemen who suffer from a flinch jerk the trigger; some even turn and look away at the moment of firing. Shotgunners find themselves either unable to pull the trigger or involuntarily freezing for an instant before doing so. Invariably, both result in a miss.

A Galazan A-10 American, in its competition guise, has a quite steep, hand-filling pistol grip.
Trap shooters are prone to flinching because of the sheer number of rounds they fire in a day, multiplied by months and years and tens of thousands of rounds. The effect of recoil is cumulative, and even if you are firing the lightest loads possible, as trap shooters do, there is a long-term effect.
One answer is the “release” trigger. Instead of pulling the trigger to fire the gun, you pull the trigger and then release it to fire. For many trap shooters, the release trigger has been a salvation. Obviously, such devices can only be used on competition guns, and guns with release triggers should be outfitted with loud warning stickers.
Double triggers, too, have their share of variations. Val Browning, son of John M., designed a “double-single” trigger mechanism, in which there were two triggers. Instead of moving from one to the other, however, both triggers fire both barrels, but in reverse order. If you want to fire “right-left,” you pull the front trigger. If you want “left-right,” you pull the other. For a while, this was offered as an option on various European side-by-sides.
Another bizarre variation was a gun in which the front and rear triggers could be pulled in the normal order to fire right-left, but, if the rear trigger was pulled first, it fired both barrels simultaneously. This was intended for French market gunners and was often installed on guns in which the two barrels were aligned to put their patterns adjacent to each other. This spreads the shot wider than does conventional barrel regulation (“regulation” refers to how close to the same point of impact two barrels in a double-barrel gun will shoot), in which the patterns overlay one another. The wider pattern was useful for shooting at a flock of ducks rising from the water, or pigeons out of a grain field.
Such was the world of European gun making that a skilled gun maker (such as Ignacio Ugartechea, who made the gun just described), could modify triggers to perform in any way the customer wanted. If you buy a used gun and find it always doubles with the back trigger, it could well be intentional!
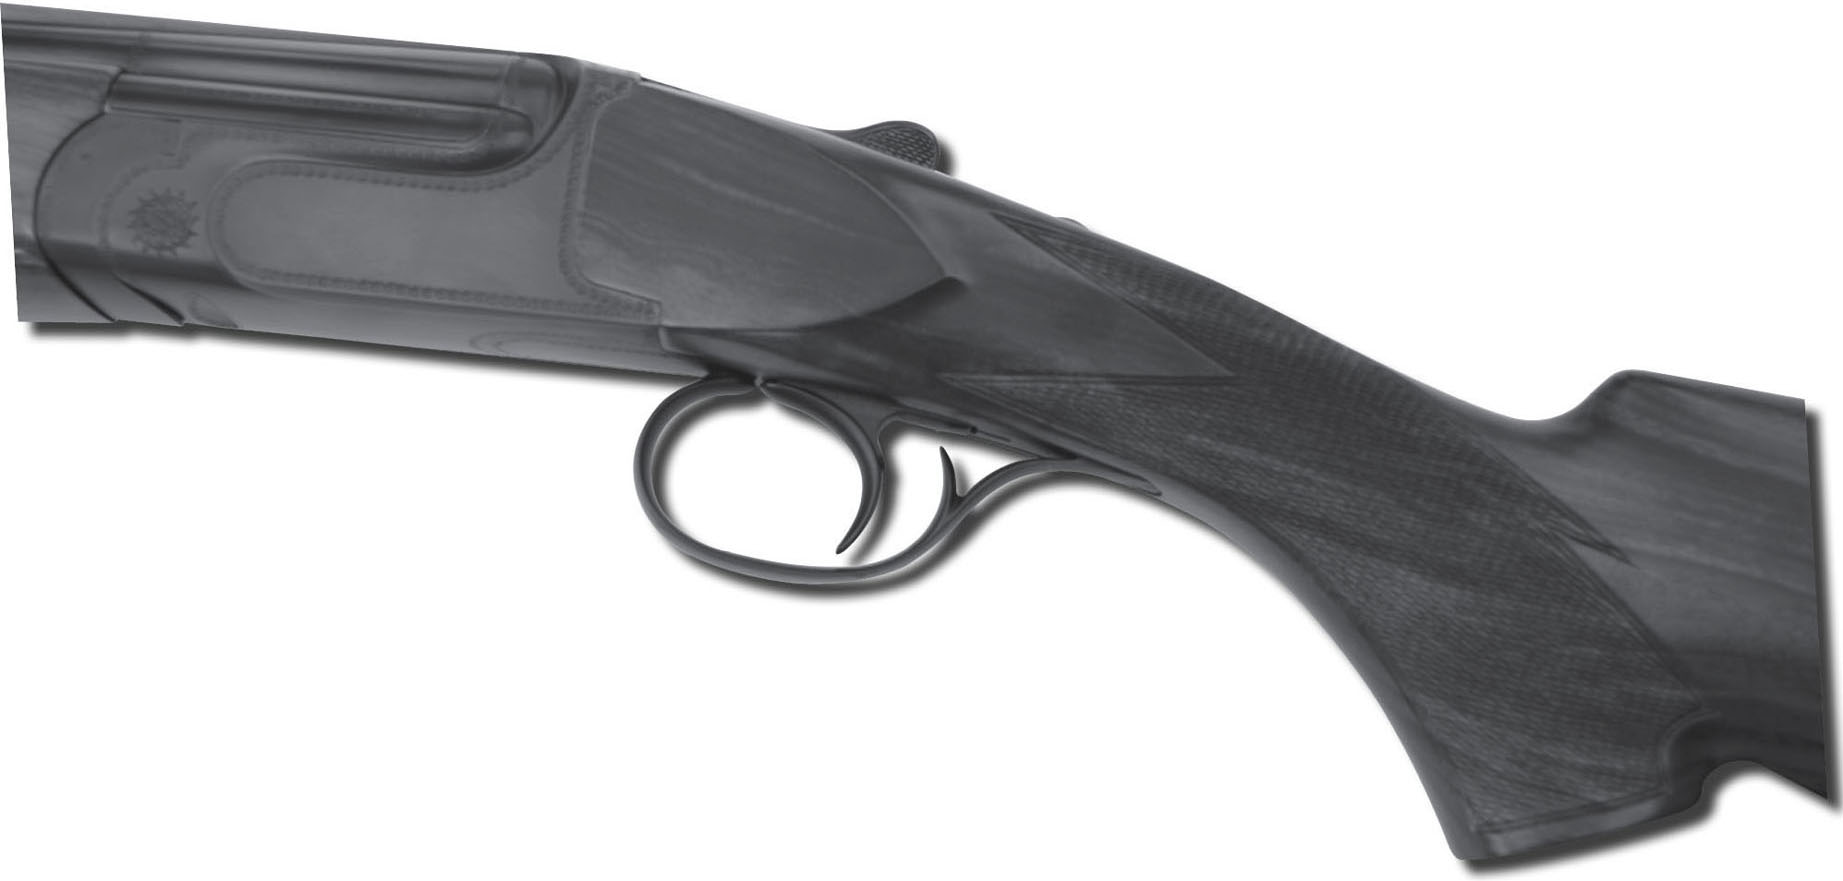
The grip, or “wrist,” is the part of the stock directly behind the trigger guard that you clasp with your trigger hand. Shotguns are available with three different grip styles: straight (English), pistol, and semi-pistol or rounded (Prince of Wales).
A deluxe side-by-side by AYA, one of Spain’s finest gun makers, with the traditional straight, or English, grip. Such a gun is both graceful and fast.
A more gradual pistol grip, such as the one found on this 28-gauge Perazzi MX28B game gun, is faster for a field gun.
The straight grip is found on all types of shotguns, but is typically associated with the English game gun. It is generally preferred for guns with two triggers, and the usual explanation for this is that you slide your hand back in order to pull the rear trigger. This sounds logical, but isn’t true. When using a double-trigger gun, only your trigger finger moves to pull the second trigger. What the straight grip does is keep your trigger hand more closely aligned with the barrels and your lead hand on the forearm, making it more natural to point instinctively at your target. Because straight grips are slimmer, you do not hold them as tightly as you would a pistol grip.
Pistol grips are found on all competition guns, and many competitors prefer them because they can clasp them very firmly. They also position the trigger hand slightly lower. Because of the depth of the fore-end on over/unders, pump guns and semi-autos, the forward hand is also positioned lower, so, on such guns, a pistol grip better aligns the two hands.
The semi-pistol grip lies in between the two, having a more gradual curve than the pistol grip. It is usually rounded off and appears without a grip cap. This design of this grip dates to the days of hammer guns, but it became popular again around 1900, because the Prince of Wales liked it. It is also known as the “King George V” grip. Oddly enough, in Germany and Austria today, the term “Prince of Wales” is being applied to the standard, sharply curved pistol grip. The perils of arcane terminology!
Which grip you favor is almost entirely a matter of personal preference, with very little relevance to utility or efficiency. Many admirers of straight grips (this author among them), insist they are faster to bring into position when a bird flushes unexpectedly. They give a gun more graceful lines, and that translates into graceful handling. A straight grip also saves an ounce or two of weight.
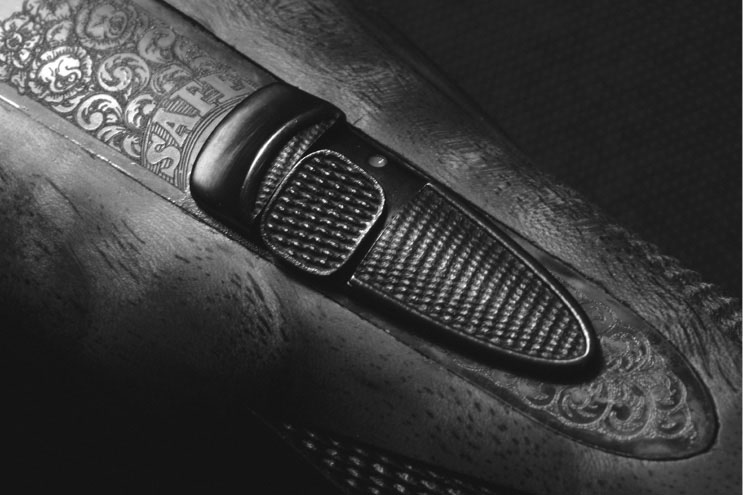
The safety is the mechanism on a shotgun that locks the trigger, tumbler, or striker from inadvertently tripping and firing the gun. Some guns have only a trigger-block safety. Others have a secondary safety that catches the tumbler if it is jarred off the sear without the trigger having been pulled.
Safeties have been made in so many shapes, sizes, and configurations that there is not enough space in one book to cover them all. Between 1870 and 1890, the heyday of hammerless gun development in England, gun makers and inventors filed 108 patents for different safety designs. The one that emerged triumphant was the trigger-blocking safety that has the catch mounted on the top strap, just behind the toplever. There, it is easily pushed to the “Off” position by the thumb of the trigger hand, as the gun is mounted to the shoulder. This is the position found on virtually every side-by-side and over/under double gun produced today, as well as the vast majority of those made since 1880.
Guns with external hammers do not typically have a safety; the hammers’ half-cock position is the normal, safe carry position. Pump guns and semi-autos usually have a button safety that moves from side to side, located either at the front or rear of the trigger guard. A button at the rear of the guard, pushed by the trigger finger, is almost as convenient as a tang safety.
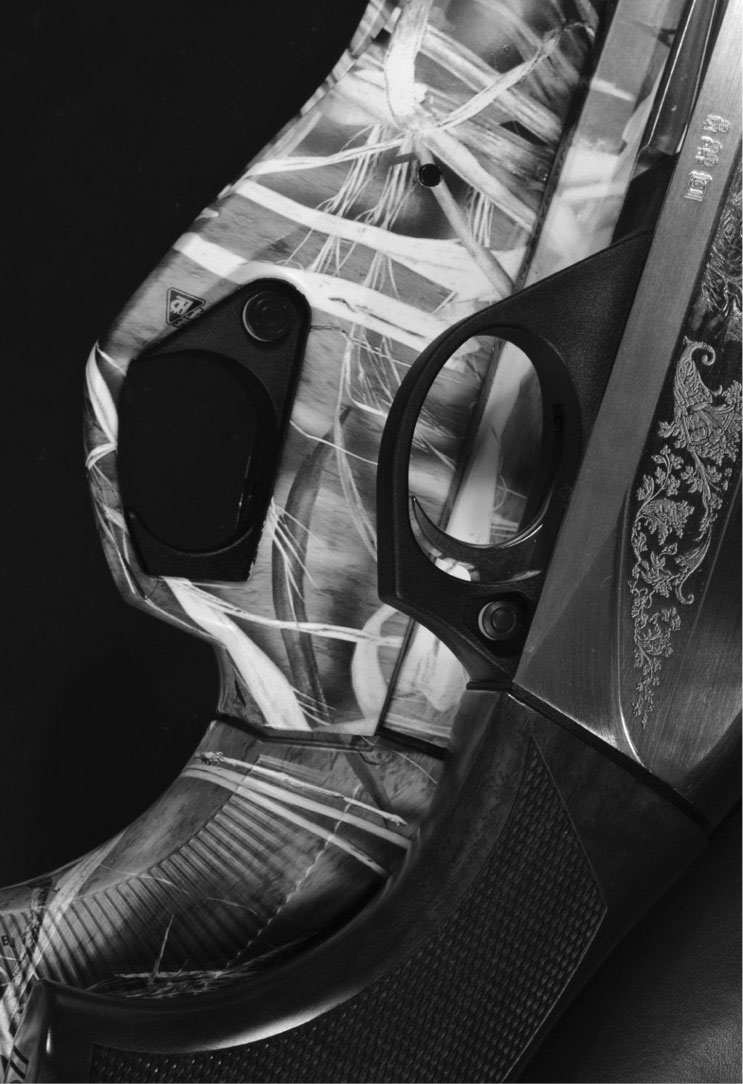
On pumps and semi-autos, safety catches are usually either behind the trigger or ahead of it. These Benelli semi-autos employ both, and both work very well.
The tang safety is almost universal with doubles of all types. It has been around a long time: the Woodward (right) was made, in 1881, in London, and the Grulla (left), in Spain, in 2002.
Before going further, we should state very clearly that any safety device is fallible. Just because the safety is on doesn’t mean a gun can be handled in an unsafe manner. Having said that, safeties do have an important role to play in shooting, and the unconscious, instinctive, automatic use of a gun’s safety is an important skill for any shotgunner to acquire. The only time the safety on a shotgun should be off is when the gun is at the shoulder, about to fire.
One important difference found on English guns compared to modern American guns is the “automatic” safety. With such a safety, the catch is automatically pushed to “On” as the toplever is moved to open the gun. This is done by a cam on the lever spindle pushing a rod that moves the safety back.
The automatic safety became a standard feature of English guns, during the era of driven shooting and its multiple guns and loaders. During heavy action, with guns being opened, loaded, closed, and passed back and forth between loader and shooter, having the gun automatically on safe when it was opened meant that the triggers were blocked when the gun was closed, eliminating, or at least reducing, the possibility of an accidental discharge upon closing. As shooting is taught in English shooting schools to this day, the safety is pushed off with the thumb as the gun is being mounted to the shoulder and never at any other time. With practice, this becomes so instinctive that any other action is foreign and disconcerting.
Although normally ascribed to the English, the practice was once common in America. In The Old Man and the Boy, Robert Ruark’s younger self is taught to handle his first gun exactly in this way by the Old Man, complete with a demonstration and lecture.
The Galazan A-10 American safety catch incorporates the barrel selector in its mechanism and functionality. This is the most common approach on the majority of modern over/under shotguns.
Automatic safeties are found on all the old American doubles, though Ithaca came up with a wrinkle to this that accommodated both preferences, with a three-position safety. When pushed forward to “Off,” it was returned to “On” automatically. When pulled to the rear, the safety was off and stayed off, until the shooter chose otherwise. Today’s Ruger Red Label over/under, the gun that made doubles affordable for the masses, has an automatic safety, but it’s easily disabled if you don’t like it.
Like double triggers, the automatic safety has become an object of hatred by some American shotgunners, who remonstrate against it long and loud. Silly, really, because, if you don’t like it, you can always have a gunsmith disconnect it and use the safety manually (the reverse is not true).
Early on, I mentioned secondary safeties. These are found only on sidelock shotguns (though not all), and a few high-quality boxlocks. The L.C. Smith, the classic American sidelock, did not have a secondary safety. The question is not really how effective these are, but how relatively unsafe guns without them might be. The Anson & Deeley boxlock, one of the most widely produced mechanisms in industrial history (not just gun history), does not have a secondary safety, and it is not considered an issue.
Traditionally, single-barrel trap guns are unequipped with any safety at all, simply because they are never loaded until you are about to shoot and are carried open at all other times. Newer trap guns intended to serve a multitude of uses often have the facility of locking the safety into the “Off” position. This is to ensure you never inadvertently call “pull” with the safety on and lose the bird.
The legendary American Ithaca double had a unique safety catch with three positions, allowing the shooter to use it as either an automatic or manual safety.
Shotgun safeties definitely have a place, and using the safety, no matter where it is placed, should become second nature for every shotgunner. As well, whenever the gun is unloaded, every shooter should get into the habit of carrying a double gun broken, a pump gun with the slide back and the action open, and a semi-auto with the action locked open. This shows people, even at a distance, that the gun cannot be fired. Carrying a gun — any gun — with the safety off, while walking through brush or long grass and moving in on a bird dog’s point, is certifiably dangerous.
Safety warnings on even the most innocuous of products have become so pervasive in modern society that people either ignore them or forget them within minutes. But, with shotguns, the safety and the use thereof is an integral part of using the gun properly. Like Robert Ruark and the Old Man, their use should be taught early, insisted upon always, and transgressions punished without mercy. A safety should never be regarded as an absolute safeguard, but it should always be on when the gun is loaded and not about to be fired. Period. End of story.
“Choke” is the constriction at the shotgun muzzle that regulates how much the pellets spread to form a pattern downrange. It can best be likened to the nozzle of a hose, adjusted to give a wide or narrow spray. Also as it is with a hose, when the spray is widened, the range becomes shorter; when the stream of water is concentrated, it shoots farther, but covers a smaller area, and it becomes more difficult to hit anything.
Although choke was first patented by William Rochester Pape, in England, in 1866, the concept originated well before that time, informally and in various countries. Constriction did not work well with muzzleloaders, but, with the advent of breechloading, it became feasible. Gun makers began applying it in the 1870s. In England, the greatest proponent was W.W. Greener, and, in America, Fred Kimble.

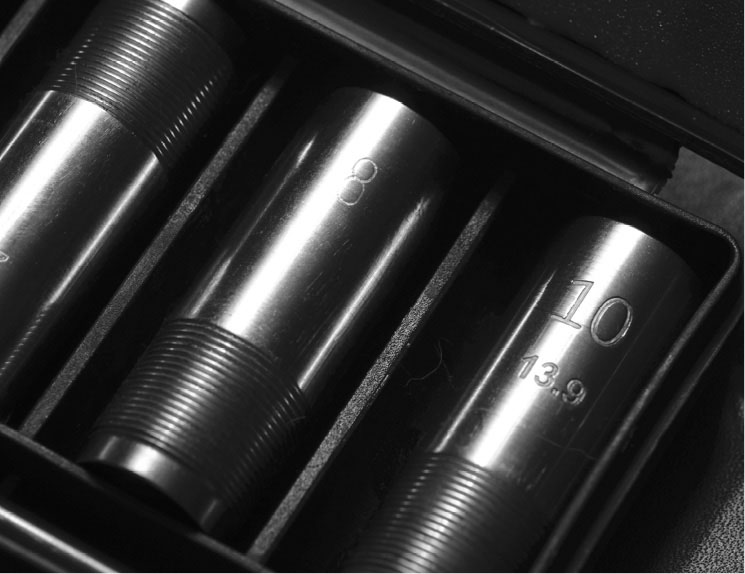
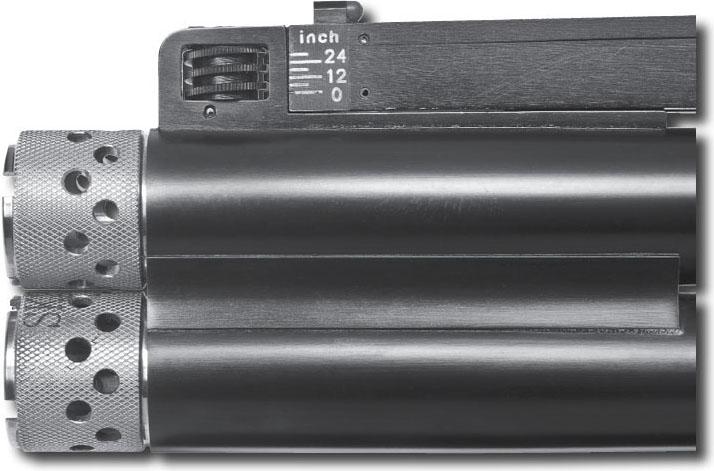
This is a two-barrel set for a modern trap gun, specifically, this one a Browning Cynergy. There is an “un-single” for 16-yard trap and over/under barrels for doubles trap. Choke tubes are interchangeable. Note the barrel porting, to reduce recoil and muzzle jump. Such systems invariably increase muzzle blast and can be annoying to nearby shooters, as well as damaging to hearing.
At first, there was only one degree of constriction, “Choke,” or what we would now term “Full.” Later, gun makers began to vary the amount of constriction, applying different labels to different degrees, defined by the percentage of pellets in the pattern.
A barrel with no constriction at all is referred to as “straight cylinder,” or simply “Cylinder” (Cyl.). A fully choked barrel is Full (F). In between, there are degrees of choke. In the United Kingdom, these are denominated in fractions (1⁄4, 1⁄2, 3⁄4) and, in America, Improved Cylinder (IC), and Modified (Mod. or M). In recent years, there have been variations and subdivisions, including Skeet No. 1, Skeet No. 2, Light Modified, Improved Modified, and Extra Full. Although this seems hideously complicated and confusing, it can be simplified very easily, and all considerations of degrees of choke rendered irrelevant, by simply hitting what you shoot at.
Degrees of choke are defined by pattern percentages, measured by firing a shot at 40 yards, drawing a 30-inch circle around the greatest concentration of shot, and counting the pellet holes. Full choke requires a 70-percent pattern, Modified 60-percent, and Improved Cylinder 50-percent. So, for example, if an ounce of No. 71⁄2 shot contains 345 pellets, then 241 need to go into the 30-inch circle for the choke to qualify as Full.
Perazzi now gives its choke tubes numbers, rather than designating them IC, Mod., or Full. Some find this a confusing approach to identification, but it is really quite a simplistic system, one that provides general pattern percentages, rather than the “guarantee” of a pattern percentage some shooters think they need for a choke to be what it says it is.
The exception to this system is the .410, whose patterns are measured at 25 yards using a 20-inch circle, according to the Hodgdon Shotshell Data Manual; other authorities say 30 yards.
Choke is the most overrated and least understood facet of the modern shotgun. Partly, this stems from terminology, especially the use of the word “improved,” as in “Improved Cylinder” or “Improved Modified.” The implication is clearly that a tighter choke is a better choke, and this is simply not true in the vast majority of cases.
Over the years, the use of different chokes has led to a number of conventions. For example, IC is associated with brush guns and is normally chambered in a shorter barrel. Full choke is associated with waterfowl and used in longer barrels. With side-by-side doubles, the conventional combinations are IC/M or M/F. In the former case, the barrels are likely to be 26 inches long, in the latter, 28 inches. For right-handed shooters and side-by-side guns, the right barrel is normally the more open choke, the left the tighter choke.
In the early years, there were only “Choke” and “no choke,” but the latter was not so marked. Thus, a gun from 1890 might be marked on one barrel “Choke,” with no indication on the other as to what the constriction is. That gun, in modern terminology, would be Full and Cylinder, since before choke was invented there was only the unrestricted cylinder for and, so, no need to mark it in any way.
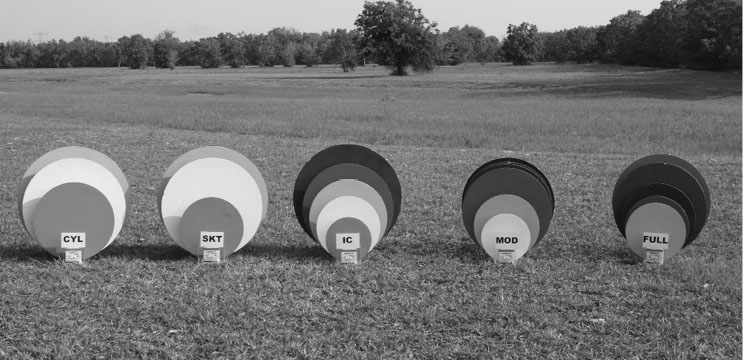
A graphic demonstration of the shape a shot charge assumes at different distances in various degrees of choke.
The shape of a shot pattern as seen from behind. It shows how the pattern deteriorates from its widest and most even distribution, as distance increases. A Modified constriction pattern is the most even and, so, the most useful over a wide range of distance.
Photos these two pages by Gil and Vicki Ash.
Experimenters found early that too much constriction was far worse than none at all, since it resulted in patchy, erratic patterns. Choke is measured in thousandths of an inch, the bore diameter at the muzzle compared to bore diameter nine inches from the muzzle. Full choke ranges from 40⁄1,000 to 45⁄1,000 of constriction, whereas IC is seven to 10⁄1,000, and the various Modifieds running 15⁄1,000 to 25⁄1,000. These figures apply only to 12-gauge; in smaller gauges, fewer thousandths of an inch are required to gain the same effect, since what counts is relative, not absolute, measurement. In a 28-gauge barrel, Full is 22⁄1,000 (London Proof House standard).
Gil and Vicki Ash, shooting instructors from Houston, have done extensive work studying shot patterns and creating models that give an excellent visual demonstration of how shot patterns evolve at different distances from the various degrees of choke. From the look of it, Modified may be the best all-around choke at varying distances, while Improved Cylinder is the most useful overall.
Because bore diameter can vary considerably, simply measuring the diameter at the muzzle will not tell you what choke you have. For example, the nominal diameter for 12-gauge is .729-inch, but it can run as low as .720 or as high as .740. It’s all relative. For this reason, the old wives’ tale about fitting a dime into the muzzle of a gun to check choke tells you, as Jack O’Connor wryly put it, only two things: “You have a dime, and you have a gun.” The pocket choke gauges are better, but not absolute.
If one were looking for a rule of thumb for the average shotgunner who wants to know what choke to use, it would be this: less choke is better than more choke, 90 percent of the time. In game shooting, Full has extremely limited applications. The vast majority of game birds brought to bag are shot at ranges less than 40 yards, and most of those at less than 30. Tales abound of miraculous kills at 60, 70, and 80 yards, but most of those exist only in the telling, not in the doing. For every opportunity you get to shoot at a bird at those ranges (considerations of ethical sportsmanship aside), a Full choke gun will cost you many misses at closer ranges and, if you do happen to nail a bird squarely with a Full choke gun at 20 yards, there will be nothing left to eat.
The only applications of Full choke are for trap shooting (and, even then, only for the better shots), some of the more extreme sporting clays targets, box-pigeon shooting, and for pass-shooting at ducks and geese. Tales of needing a Full choke and heavy loads for wild pheasants flushing at 70 or 80 yards in the Dakotas, are hogwash, pure and unadulterated, under almost any realistic condition you can name. Like ultra-high-powered rifle scopes and yarns about shooting game at a thousand yards, stories about long-range shotgunning originate mostly in the imagination.
The Cutts Compensator was an early form of exchangeable choke device, offered as a factory option on some guns or as an aftermarket addition for others. The Cutts worked well, but was cumbersome and added nothing to the gun’s appearance. Also, it worked only on single-barrel guns.
The shotgun is a 15- to 45-yard proposition at best, for the vast majority of shotgunners and the vast majority of birds, and chokes should be chosen for their application to those ranges. Cylinder is a very useful choke (almost abandoned, until recent years), IC a close second, and Modified very probably the best all-around choke of all, as measured in terms of its effectiveness over a range of distances. Modified gives you a very good pattern from 20 yards to 40, whereas Full is good at 45. Improved Cylinder starts to fall off quickly after 30 yards.
This line of thought can lead us into a morass of qualifications, and anyone seriously interested in studying what degrees of choke actually produce at genuine tested ranges, is referred to the work of Gil and Vicki Ash, of Houston. The Ashes are shooting instructors and experimenters of a high order, and their work on choke patterns is a revelation. Their most significant finding, after firing thousands of rounds at pattern sheets at distances from 10 yards to 50, is that regardless of choke — regardless! — there is a 12-inch diameter core pattern of shot that extends the entire distance. In other words, if your pattern is dead-on at 40 yards, it doesn’t much matter whether you are using Full choke, Cylinder, or anything in between.
Because there are so many variables in wingshooting, few of us ever make such a perfect shot. Where choke then becomes helpful is in turning the near misses into hits. Gil and Vicki Ash created three-dimensional renderings of the evolving shape of shotgun patterns, fired from guns with different chokes, over different distances. Some of these three-dimensional renderings are shown in the accompanying photographs. A glance tells you that Modified may well be the most useful choke of all, followed closely by Improved Cylinder, with Full a distant last for most applications.
Using one of the “all or nothing” choked English doubles from a century ago gives the best object lesson. Your obedient correspondent is, and always will be, I fear, a terribly streaky shot, both good streaks and bad, dotting an average career. In November 2008, though, I struck a vein of purest gold, while hunting wild pheasants in South Dakota.
We hunted them in grass, in conservation reserve plots, along the edges of corn and cane fields and through patches of woods. I was armed with an E.M. Reilly boxlock, dating from around 1888, with 30-inch Damascus barrels choked, in modern parlance, Cylinder and Full. During four days of shooting, I put together a string in which I killed 13 pheasants with 15 shots. The limit is three cock-birds per day; the thirteenth bird was knocked down, but not found. Significantly, that was the second bird of my only double and the only one hit with the left (Full choke) barrel. The 12 dead birds in the bag were all killed with the right (Cylinder) barrel, using B&P 1-ounce loads of No. 7 shot.
One such experience is hardly proof, but I have hunted with the same people in South and North Dakota, sometimes two or three times in a season, every year since, and we have all noticed the same trend: Those in our party with light loads of small shot and open chokes consistently collect more pheasants, while those using tight chokes and heavy loads of large shot collect fewer. There are several factors involved here, obviously, but the degree of choke is undoubtedly an important one.
• • •
In the London fine-gun trade, a client could order a gun and specify the exact chokes required in each barrel, down to and including shot size and his favorite load from Eley or from the gun maker’s own proprietary ammunition. The gun would be finely tuned by the finisher or barrel regulator at the shooting range, adjusted one pass of the file at a time, until the barrels shot precisely where they were supposed to and delivered beautiful, even patterns of the exact percentage demanded. Also, because each gun was made to order and the client knew what constrictions had been specified, some London gun makers would not mark the choke on the barrels.
Holland & Holland follows that unmarked practice to this day with its bespoke guns, although not with guns made for stock sale. James Woodward & Sons, one of London’s handful of very best makers, was renowned for returning barrels to their barrel maker if they missed the desired pattern by even one pellet on average, or if the pattern was in the least bit patchy or inconsistent.
In the heyday of box-pigeon shooting, clients could also specify what percentage of their pattern they wanted above and below a horizontal line on the pattern board at 40 yards. This practice is still followed today by makers of over/under competition guns. Adjustable ribs, available on the best competition guns, allow shooters to make their own such alterations.
In the white-heat competitive world of London gun making and live-pigeon shooting, with thousands of pounds and invaluable corporate reputations on the line, gun makers were not content to simply adopt a choke design and follow it. Variations appeared, some better, some not. One common variation was the “tulip” choke or, as it was called in America, the “jug” choke. In this design, the barrel walls are reamed out to a greater diameter four or five inches from the muzzle, then narrowed back down at the muzzle. This results in a muzzle diameter not much narrower than the bore itself. While this could appear to be little more than an Improved Cylinder choke, it might actually deliver much tighter patterns. Indeed, tulip chokes were touted as delivering a superior pattern over a longer distance.
Measuring such a choke requires a bore gauge, not just a pocket choke gauge. Even then, the results can be very misleading if you do not measure the bore every inch or so from the muzzle to about six inches down. I have an H.J. Hussey pigeon gun from 1904 that has such chokes; by modern standards, they would be judged to be both Light Modified, but the left barrel delivers a noticeably tighter pattern than the right. The gun can be used effectively for everything from skeet to handicap trap.
Some American gun makers have applied the principle of the tulip choke to the entire barrel, boring them out to .740 or more the entire length, before tightening them at the muzzle. This is reputed to reduce recoil, as well as improve patterns.
• • •
For years, the great knock against single-barrel guns was that they did not offer a choice of chokes. Gun makers tried to get around this by offering replacement barrels in different lengths and chokes, which works only in a very general way. It certainly does not offer an instant choice. So inventors began working on adjustable chokes, devices that could be attached to the muzzle and tightened or opened up. The Poly-Choke, popular in the 1960s, was an adjustable device, while the Cutts Compensator was a set of detachable chokes.
The Cutts and the Poly-Choke were offered as factory options by some gun makers. Their great drawback was that they added weight to the end of the barrel and they looked, frankly, ugly as sin. The bulbous growth on the end of the barrel distracted the eye. Still, the inventors were on to something. The answer, obvious today but a breakthrough back then, was the detachable screw-in choke that left the muzzle looking clean and uncluttered. Not only that, these devices could be used in double guns, especially the increasingly popular over/under.
With the arrival of interchangeable choke tubes, the over/under achieved a level of versatility no other gun can even dream of. Today, interchangeable choke tubes have become all-pervasive, even on low-priced shotguns. On the surface, this would seem to be a benefit for both shooters and manufacturers, since a shooter can now decide exactly what choke he wants in which barrel and even make changes between stands on a sporting clays range. As for the manufacturers, every barrel can now be exactly alike in terms of choke, which is a significant cost savings on the production line. At the same time, they can offer choke tubes in a mind-boggling array of constrictions with exotic names, creating a substantial secondary market.
There are, however, two things to keep in mind. First, regardless how a choke tube is designated (Cyl., IC, M, IM, etc.), there is no guarantee it will deliver the promised pattern in your particular gun. As well, different tubes in your gun may center the pattern in a different place, and even these results will vary, sometimes significantly, from one shot load to another. Only testing on a pattern sheet can tell you, but few shooters ever do this.
Some shooters fixate on percentages and loudly condemn a tube marked Full that delivers only a 68-percent pattern with a particular load, instead of the “required” 70-percent. To forestall this, some manufacturers (notably Perazzi) no longer mark their choke tubes with the traditional designations, instead simply giving them a number (No. 1, No. 2, No. 3, and so on, up to No. 10), and listing approximate pattern percentages that can be expected. This is definitely a step forward, if one must use choke tubes, in that it recognizes there are no absolutes, especially with the enormous variety of shotshells available today.
Barrels in production at CSMC, in Connecticut. Longer barrels are once again popular in the smaller gauges.
The second consideration to keep in mind is that the very choice of choke tubes that seems like such a benefit can, in fact, be a trap. Stand with some shooters waiting their turn at a sporting clays stand and listen to the conversation.“What choke do you think? What was he using? Would this be better?” The buzz of battery-operated choke wrenches pervades the air. The shooter who then misses his first bird, for whatever reason, starts to second-guess his choice of choke. His confidence is undermined, and that is deadly to good shooting. Even when hunting game birds, shooters will change chokes after a pass through some grass because two birds flushed far out, then, with the Full tube in place, encounter a bird that goes up from under their feet.
Having many different chokes available tempts us to overanalyze situations. Having encountered birds a certain way in a field one day, the shooter sets up his gun to meet that situation next time he’s there. The chances of any of it ever recurring exactly the same way, of course, are nil. Compare this with the old days, when a shooter had one gun, say, a Winchester pump, with a 28-inch barrel choked Modified. Long experience told him what that gun would and would not do. He knew the shots that were too long, and he also knew when to let a flushing bird get a little farther out, so that he could utilize the pattern effectively and not mangle tomorrow’s dinner. This required little thought, long experience having made it unconscious habit. Because there was no choice, the gunner made do with what he had, concentrating on simply making the shot. There was no self-doubt, no second-guessing.
Confidence and instinctive reaction are no small things, when it comes to shotgunning. Faith in one’s gun, one’s swing, and one’s instinct are essential elements of consistent good shooting.
The rib is the narrow piece of steel that runs between the barrels of a side-by-side double, along the top barrel of an over/under, or atop any single barrel.
In a side-by-side, the original purpose was to fasten the barrels together and prevent moisture and grime from getting in between them. Gradually, gun makers discovered that the rib could be an aid to sighting and different styles could be selling points for their guns. On an over/under or single-barrel gun, this is the rib’s only real function.
The bead is a small globe of ivory, brass, or silver set into the rib or directly into the barrel at the muzzle. It is not a sighting device in the normal sense of the word, since a good shooter could do without it quite easily. However, a bead gives the barrel a finished look. Everyone uses them.
Today, both ribs and beads have become as elaborate as the designers’ fevered imaginations can make them, and the gaudier ones are used as sighting devices by trap and sporting clays shooters. For the game shot, however, the simpler and less obtrusive the better, for both rib and bead.
Ribs on ultra-modern competition guns, like this Galazan A-10 trap gun, are elaborate and fully adjustable.
Photo by John Giammatteo.
Initially, the rib on a side-by-side followed the curve of the barrels, and the top surface of the rib was concave and polished blue. If this caught the light at all, it did so as a narrow “V,” leading the eyes naturally to the muzzle and beyond, to where the eyes then picked up the target. Pigeon shooters, the earliest competitive gunners, found that a wide rib, cross-hatched to prevent reflection, served them better.
Gradually, certain conventions grew to be ribs appropriate for different purposes. The Churchill rib, for example, is quite high, tapering inwards toward the top and also from breech to muzzle. According to Robert Churchill, its originator, such a rib gave his 25-inch barreled guns the optical illusion of extra length.
A client ordering a gun from one of the Spanish custom gun makers might have the option of a concave, flat, knurled, ventilated, or Churchill rib, applied to any gun or barrel length he might choose. The ventilated rib is now seen as the mark of a higher quality gun, at least on those made in the U.S. The Winchester Model 21, in its higher grades, had a ventilated rib rather than a solid one. On those, the utilitarian rib that connects the barrels had a ventilated rib mounted atop it.
The business end of a Galazan A-10 trap gun, complete with a high adjustable rib, interchangeable choke tubes, and a bright red bead.
Photo by John Giammatteo.
As is their wont, trap shooters have often carried ribs to ridiculous extremes. Some of today’s high ribs look like step ladders and are adjustable to get exactly the right angle between eyes and barrel, so as to put the pattern where the shooter wants it. In between the original swamped rib of a century ago, which demurely followed the barrels’ contour, and today’s modern high competition rib lies every variation imaginable.
Similarly, beads have become outlandish. First came the additional mid-rib bead, located halfway down the barrel. Viewed by the shooter, the two beads, ideally, form a figure-eight, showing the gun is correctly aligned and not canted. This can be helpful for anyone who pre-mounts their gun before shooting, as trap shooters do. After this, came ever more elaborate front beads. Today, it is possible to buy beads that consist of a four-inch piece of orange or green fiber optic plastic, glowing like a demented firefly. These beads are as interchangeable as choke tubes. For some competitors they work, for others they do not. Most good competition shooters want nothing distracting on the muzzle, which, alas, most of these elaborate beads are.
Like all gadgets that are billed as a panacea for your shooting ills, elaborate beads and exaggerated ribs should be viewed with a jaundiced eye, experimented with judiciously, and not be expected to perform miracles. A poor shooter is a poor shooter, regardless what bead and rib his gun is wearing — and he is often a poorer shooter because of the bead and rib.