Chapter 3
What Do I Need to Get Started?
What saves toil, yet builds soil?
Needs no haste, uses waste?
Is rich, yet cheap?
My compost heap!
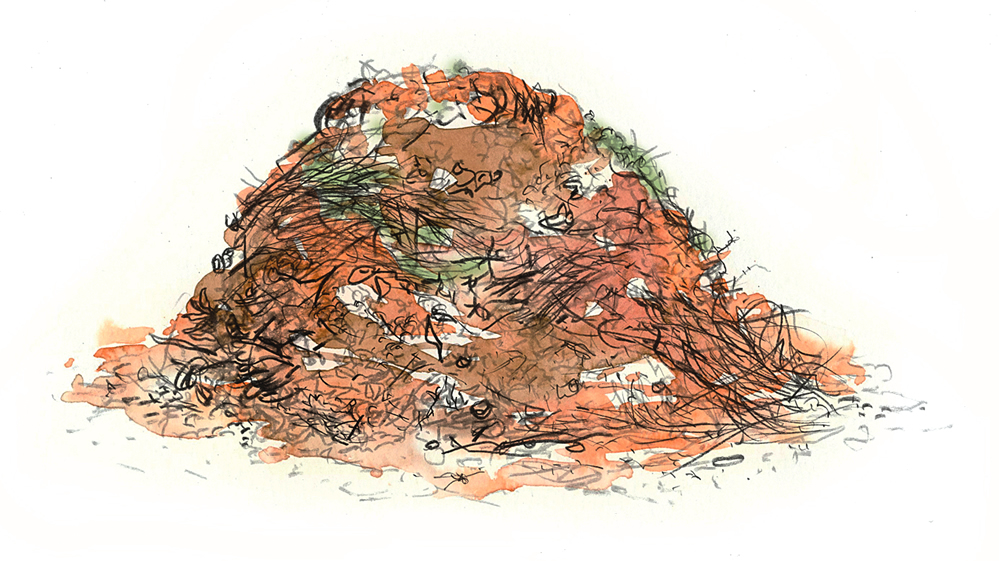
Composting is basically a very simple operation. The easiest and least expensive way to make compost is to pile up the raw ingredients right on the ground. For a simple compost pile, the only requirements are a supply of composting ingredients, gardening gloves, a pitchfork for mixing and turning (and even that is optional), and perhaps a pair of pruners to cut up larger weeds and plant parts. This no-frills system works perfectly fine for many backyard gardeners; in a few short months, the pile will decompose into usable compost. Its edges may look messy, since the simple pile isn’t contained, so choose an out-of-the-way location for it.
To create a neater-looking pile, many gardeners choose to contain their compost by building their own composting bin or by purchasing one of the many commercially available styles.

Pick the Right Spot

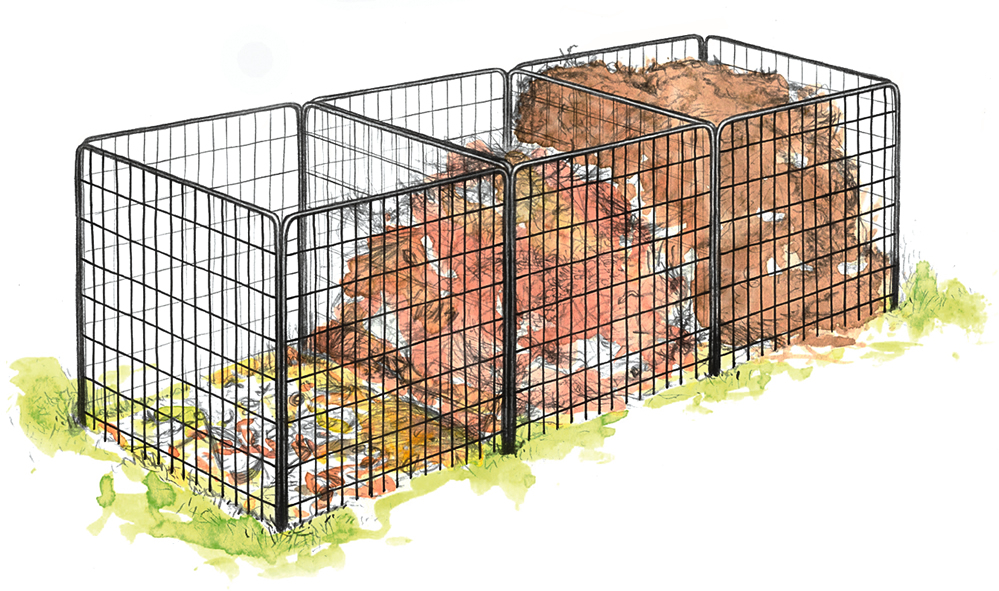
1. Piles and Simple Surrounds
Compost piles may not always be tidy to look at, but they work just fine. Turning the pile to stir up the ingredients is also relatively easy, since there are no walls or other obstacles to work around. A garden fork or pitchfork is the best tool for turning the ingredients in a compost pile.
Given a suitable out-of-sight area—especially one that offers space for three or four piles—the simplest compost piles are a great way to make large amounts of compost with a minimum of fuss or cash outlay. Another advantage of simple piles it that they can be built anywhere. For example, build one next to the vegetable garden and start another somewhere else in the yard to eliminate the need to carry weeds and prunings from one part of the property to another.
A compact pile is best for optimum composting action. It takes a little practice to learn to stack and turn materials while keeping them more or less in place (this is one reason that bins are so popular instead). Try to keep the top of the pile as wide as possible. Also try to create a slight depression in the center top of the pile, so it will catch rain or water from a hose to trickle down to moisten its ingredients.
Problems arise with simple compost piles when animals discover them. (The ingredients in a compost pile may not appeal much to humans, but animals relish kitchen scraps and will dig to find them!) If pesky critters become a problem, a simple surround made of poultry wire may be effective. Or consider erecting a compost bin.
Useful Composting Tools
A Simple Surround
To make a simple, inexpensive surround that will keep out large animals, start with a 10-foot-long piece of 4-foot-tall, 12- or 14-gauge welded steel wire fencing. A similar length of concrete-reinforcing wire or hardware cloth also makes a fine compost surround. The 10-foot-long piece will make a 3-foot-wide surround, and its open mesh will allow plenty of air to circulate in the pile. (Use 12½ feet to make a 4-foot-wide bin.)
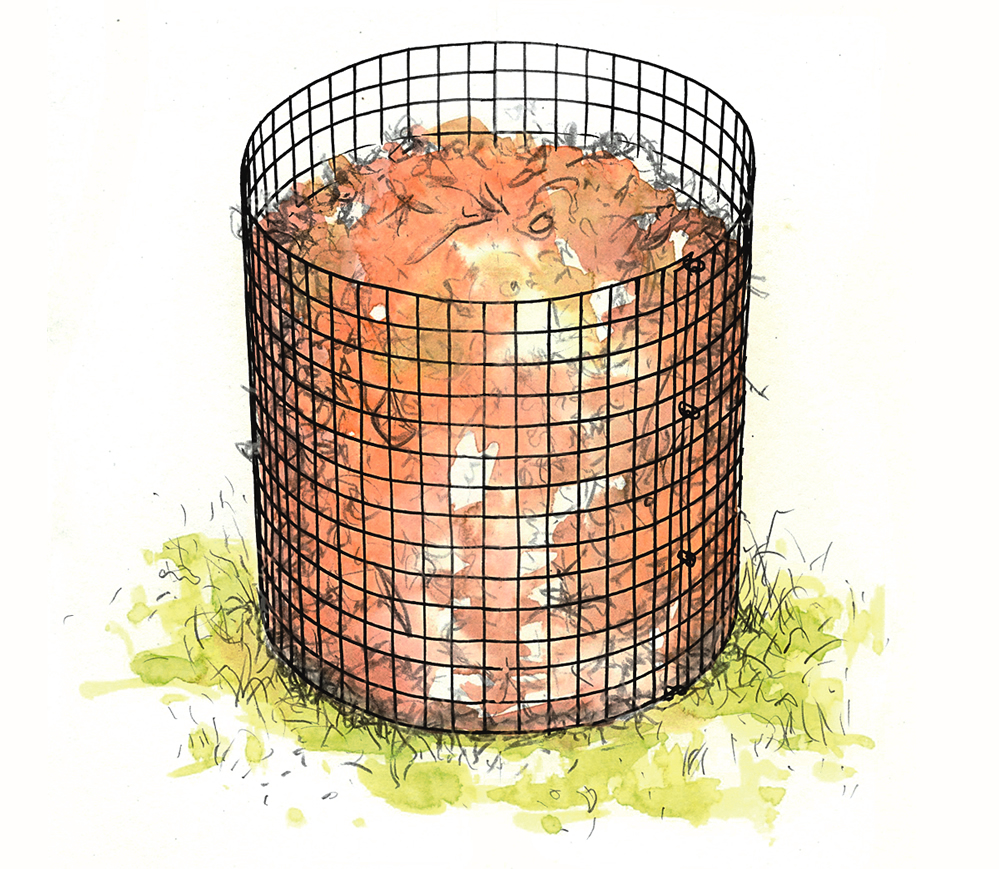
Stand the wire up and bend it into a cylinder. Fasten the ends together with wire or plastic ties. (Cut off any stubs of wire to prevent scratches when working with the wire.) Drive two 4-foot tomato stakes into the ground on opposite sides of the surround and fasten the fencing to the stakes with ties. This type of surround can be left in place as long as required and is also easy to remove whenever it’s necessary to turn the pile, to dig out finished compost, or to create a new pile.
2. Compost Bins
Composting inside some sort of an enclosure—generally referred to as a bin—helps keep composting materials under control and looking tidy. For best results, plan on at least two bins; three are even better. That’s because making compost continuously in a single compost bin can be frustrating and difficult: At some point, to let composting happen, it’s necessary to stop adding materials to the pile, and that leaves no place to put new kitchen scraps, weeds, or other compostables.
Using two or three bins makes it possible to have piles at more than one stage of decomposition. In a three-bin system, start by putting fresh compostables into the first bin until it is full, and then leave the ingredients in that bin to compost. Then begin putting fresh compostables into the second bin. When the second bin is full, begin adding materials to the third bin. By that time, material in the first bin should be finished composting—or nearly so—and can be taken out and used in the garden. If only two bins are available, keep one bin for compost in the final stages and use the other bin for new materials, continually transferring the decomposing materials from the bottom of the newer bin to the older bin that’s almost ready. Or, if both bins become full, lift or empty them to create a simple mixed compost pile, and set the empty bins in a new location to start filling them again.
If a single bin is the only option because of cost or space, fill it by layering yard and kitchen waste, then carefully lift the bin off that pile and start a new pile in the bin with new materials.
Keep in mind that compost bins actually have a fairly passive role in the whole composting process. They don’t actually make the compost, no matter what the ads may say. They just hold the pile together, keep it tidy or out of sight, and help protect it from animals and weather.
Bins to Build
Compost bins don’t have to be fancy to work. There are many highly effective variations that are simple to build and can be installed by gardeners who have no construction skills whatsoever. In neighborhoods where houses are close together, aesthetics are likely to be very important. Consider screening the compost bin with sections of fencing, shrubs, vines, or potted annuals or perennials to hide it from neighboring properties.
Use the bin-construction ideas below to get started.
Wire Cage Bin
Similar to a simple hardware cloth surround, a wire cage bin is built in a square shape with corner posts. Start by driving 4-foot-tall tomato stakes or metal fence posts 1 to 1½ feet into the ground to form a 4-foot square. Wrap 16 feet of wire fencing (or hardware cloth) around the stakes and fasten it to the four corner posts using wire or other fasteners. Connect the ends to finish the square and create a closed bin, or secure the fourth side with removable ties or bungee cords so that side can swing open.
To make a wire cage with a true door, use 12 feet of fencing or hardware cloth and fasten it around three sides of the bin. Attach a 4-foot length of fencing separately to both front posts to make a door that can be completely removed. For a sturdier door that is easy to move out of the way, make a simple wood frame that’s the same size as the bin opening and staple or otherwise attach fencing to the frame. For extra strength, attach pieces of wood across the center of the door, vertically and horizontally or diagonally.
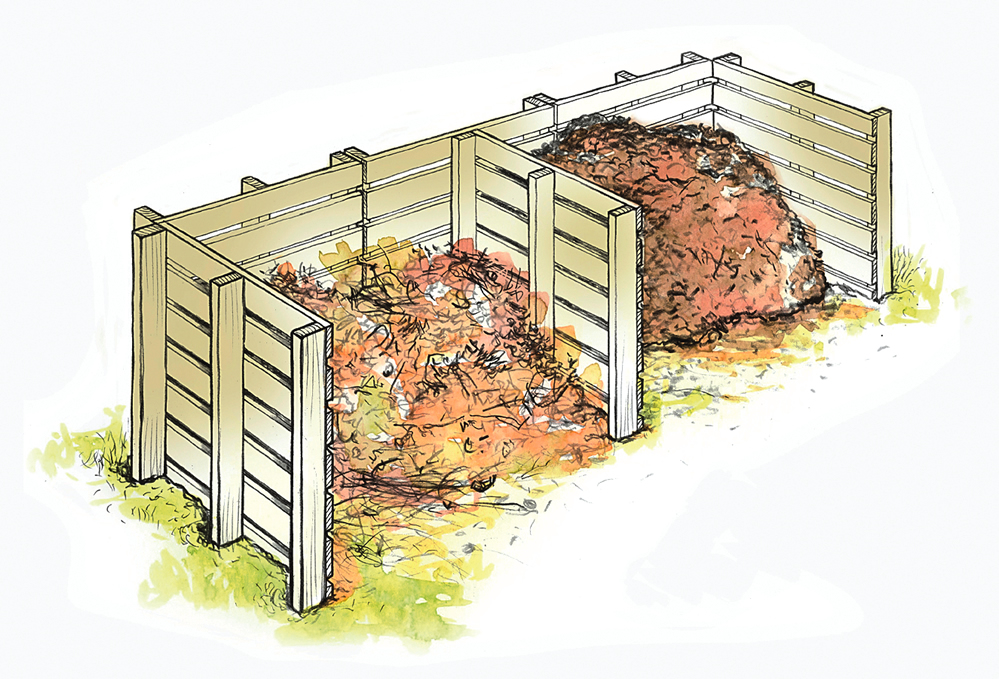
Simple Pallet Bin
The wooden pallets used for shipping everything from equipment to furniture are ideal for constructing simple compost bins. Just set the pallets in place and wire, screw, nail, or bungee-cord the corners securely together, then fill with composting ingredients.
The smallest and simplest option takes only three pallets. Set them in a squarish U shape, leaving the front open for access to compost. Use a fourth pallet as a door, if desired. Either just set the door in place, loosely wiring it along one side to make a hinge, or use bungee cords to secure it.
Pallets can also be arranged to make side-by-side bins. It takes five pallets to create a two-bin composter and seven pallets to make a classic three-bin composter. Use an additional two or three pallets as front doors for the bins, if desired.
Cinder Block Bin
A compost bin constructed of stacked cinder blocks is easy to build and durable enough to last for years (with no mortar required). Using work gloves, stack cinder blocks three or four high to form three walls in a U shape, staggering the joints and stepping the sides down to a single cinder block at the front opening. Stack blocks for divider walls in the center to create separate bins, or make one large area to accommodate a number of piles. For an average-size compost bin, start with 35 to 50 cinder blocks. (Brick bins are built in the same manner and are more attractive, but cost more.)
To allow for air circulation in the compost pile, make sure to stack blocks so their openings are on the sides or stagger the blocks to leave spaces of 1 inch or more between them to create vents. A concrete floor under the bin is a nice addition, but make sure it is slanted slightly to allow water to drain away. In areas where winters are cold, consider recessing the bin into a slope that has good southern exposure. This will help to protect the back and sides from the cold. Heat speeds composting, provided that compost ingredients stay moist. On a sloping site, recessed bins can also be built running down the slope.

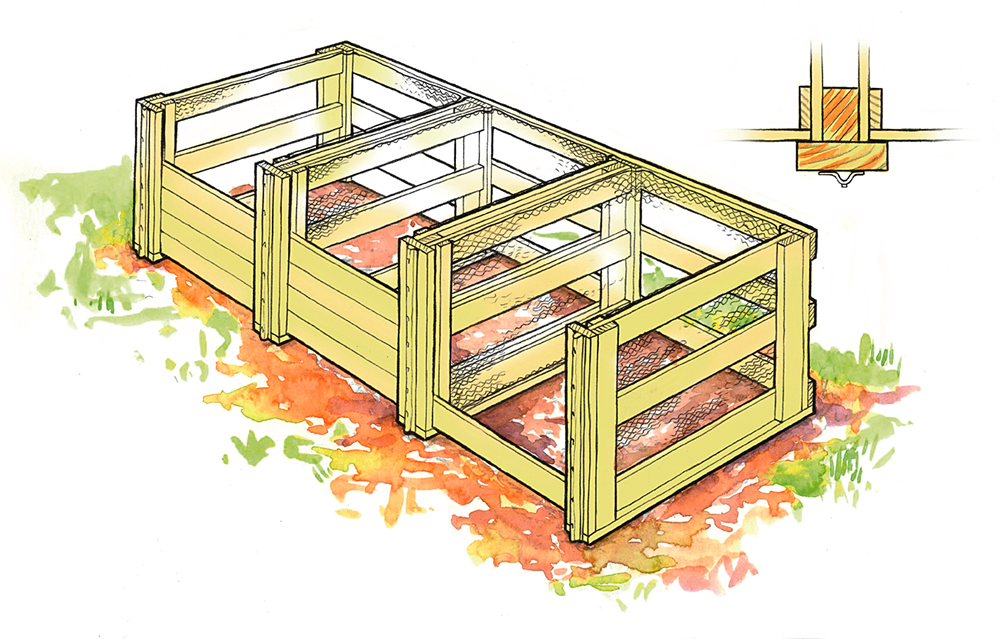
Wood and Wire Bin
If the compost bin will be visible in the yard or if woodworking is a personal hobby or interest, a combination wood and wire bin is a great weekend project. This style of bin features sturdy wooden-frame walls and a poultry-wire wrap inside each bin that allows for good air movement. For a single bin, create three wall frames, about 4 feet tall by 4 feet wide. Attach walls together in a U-shape with screws. Ambitious woodworkers can also create a groove using simple T-shaped uprights to allow for removable front planks.
3. Bins and Tumblers to Buy
Manufactured compost bins are readily available at garden centers, big-box stores, and on the Internet. They come in a variety of materials and colors and are effective for producing compost (and concealing it, if that’s an issue in the backyard). Many designs come ready-to-use or are easily assembled and can help to reduce unwanted animal visits.
Commercial bins made of recycled plastic support our nationwide recycling efforts and generally won’t warp or discolor like wood does. Bins made of dark-colored plastic catch and hold the sun’s heat, making them good choices for those who live in frigid climates. A few models have insulated walls, extra ventilation, sliding access doors, hinged lids, and other features that may be worth paying more for. But recognize that one single factor dictates the wide price range of available models: the thickness of the plastic. Inexpensive bins with thin plastic walls are easy to break, even with normal use. Thin, inexpensive plastic parts also may not click, snap, or otherwise fit together or operate as designed. Among retail bins, quality costs money. Consider these factors when selecting commercial compost bins and tumblers.
Capacity. Choose a bin size appropriate to the amount of materials available for composting on an ongoing basis. Bigger isn’t better, if only small quantities of composting materials are available. If planning a larger system, keep in mind that one bin may not be enough to accommodate collecting the materials, composting, and holding finished compost.
Ease of assembly. Read the fine print or ask how a bin is assembled. Some of the more complex bins are shipped or sold flat, in pieces, and may have components to assemble.
Ease of use. If the bin has a loading door or lid, it should open and close easily and stay open on its own. The opening should also be wide enough to accommodate the insertion of bulky materials. If the unit has a sliding door for removing finished compost, be sure a shovel will fit through the opening.
An Internet search will yield a wealth of different models. The WIBO compost bin (www.exaco.com/wibo_composter.htm) is a good basic value, ranging from about $99 to $160. Models that accommodate 110 or 160 gallons are available and feature plastic that stands up to cold weather and a variety of other design details that make for sturdy construction.
The AeroQuick line of compost bins by Juwel of Austria (www.exaco.com/AeroQuick.shtml) is also excellent. These bins are constructed of 5 mm polypropylene copolymer resin (with up to 40 percent recycled material), making them extremely sturdy. They have nicely ventilated side walls, come in three sizes (77, 110, or 187 gallons of capacity), and cost from $140 to $270.
Work-Free Compost
Compost Tumblers
Compost tumblers—also called barrel, drum, or ball composters—are available at most garden centers and from mail-order garden suppliers. These devices offer many of the benefits of hot composting, while reducing the effort of turning and the need to touch the partially composted materials. Compost tumblers can also work quickly: Used according to the manufacturer’s instructions, in ideal conditions, they can produce finished compost in as little as 2 weeks. In normal conditions with fluctuating temperatures, composting may take a few weeks, as long as the ratio of materials and the moisture level are suitable.As with bins, it’s best to have at least two tumblers making compost. Fill one tumbler partially full, then turn the drum daily to let the materials fall and mix together. Allow the first tumbler to decompose all its content, then use the compost in the garden. Use the second tumbler for new kitchen and yard waste. Tumblers are designed for outdoor use, but they can be used in a garage or other semi-indoor area, and many have wheels and handles making them portable, so they can be moved indoors and outdoors even when full.
Commercial Tumblers
There are many good commercial tumblers available. Some are mounted on elevated frames, which may include gear-driven turning mechanisms or ball bearings to make tumbling even easier. Another type resembles a large ball, which is sealed and rolled around on the ground to tumble the contents. When considering a tumbler on an elevated frame, check to see that there’s enough room beneath the drum to park a wheelbarrow or garden cart. This will make unloading the finished compost easy. A large door for filling and unloading is also a good feature, as are deflectors and fins inside the tumbler to help keep its contents tumbling, rather than sliding, when the drum is turned. Buy the most sturdy and well-made unit affordable.
Tumblers: The Next Generation