Flow control structures enable developers to apply logical processes and make decisions about what code is executed. Most modern programming languages provide a similar set of flow control structures:
- The
ifstatements execute code blocks when a Boolean condition istrue. - The
whileloops execute blocks of code while a Boolean condition remainstrue. - The
forloops execute blocks of code a specific number of times.
It's said that virtually any programming control flow requirement can be implemented with a while statement alone. However, the other various control structures allow programmers to create control flow that's more concise and clearly expresses the intent of the logical program flow.
Indeed, Swift provides a rich and powerful set of control structures, which you'll learn about in this section.
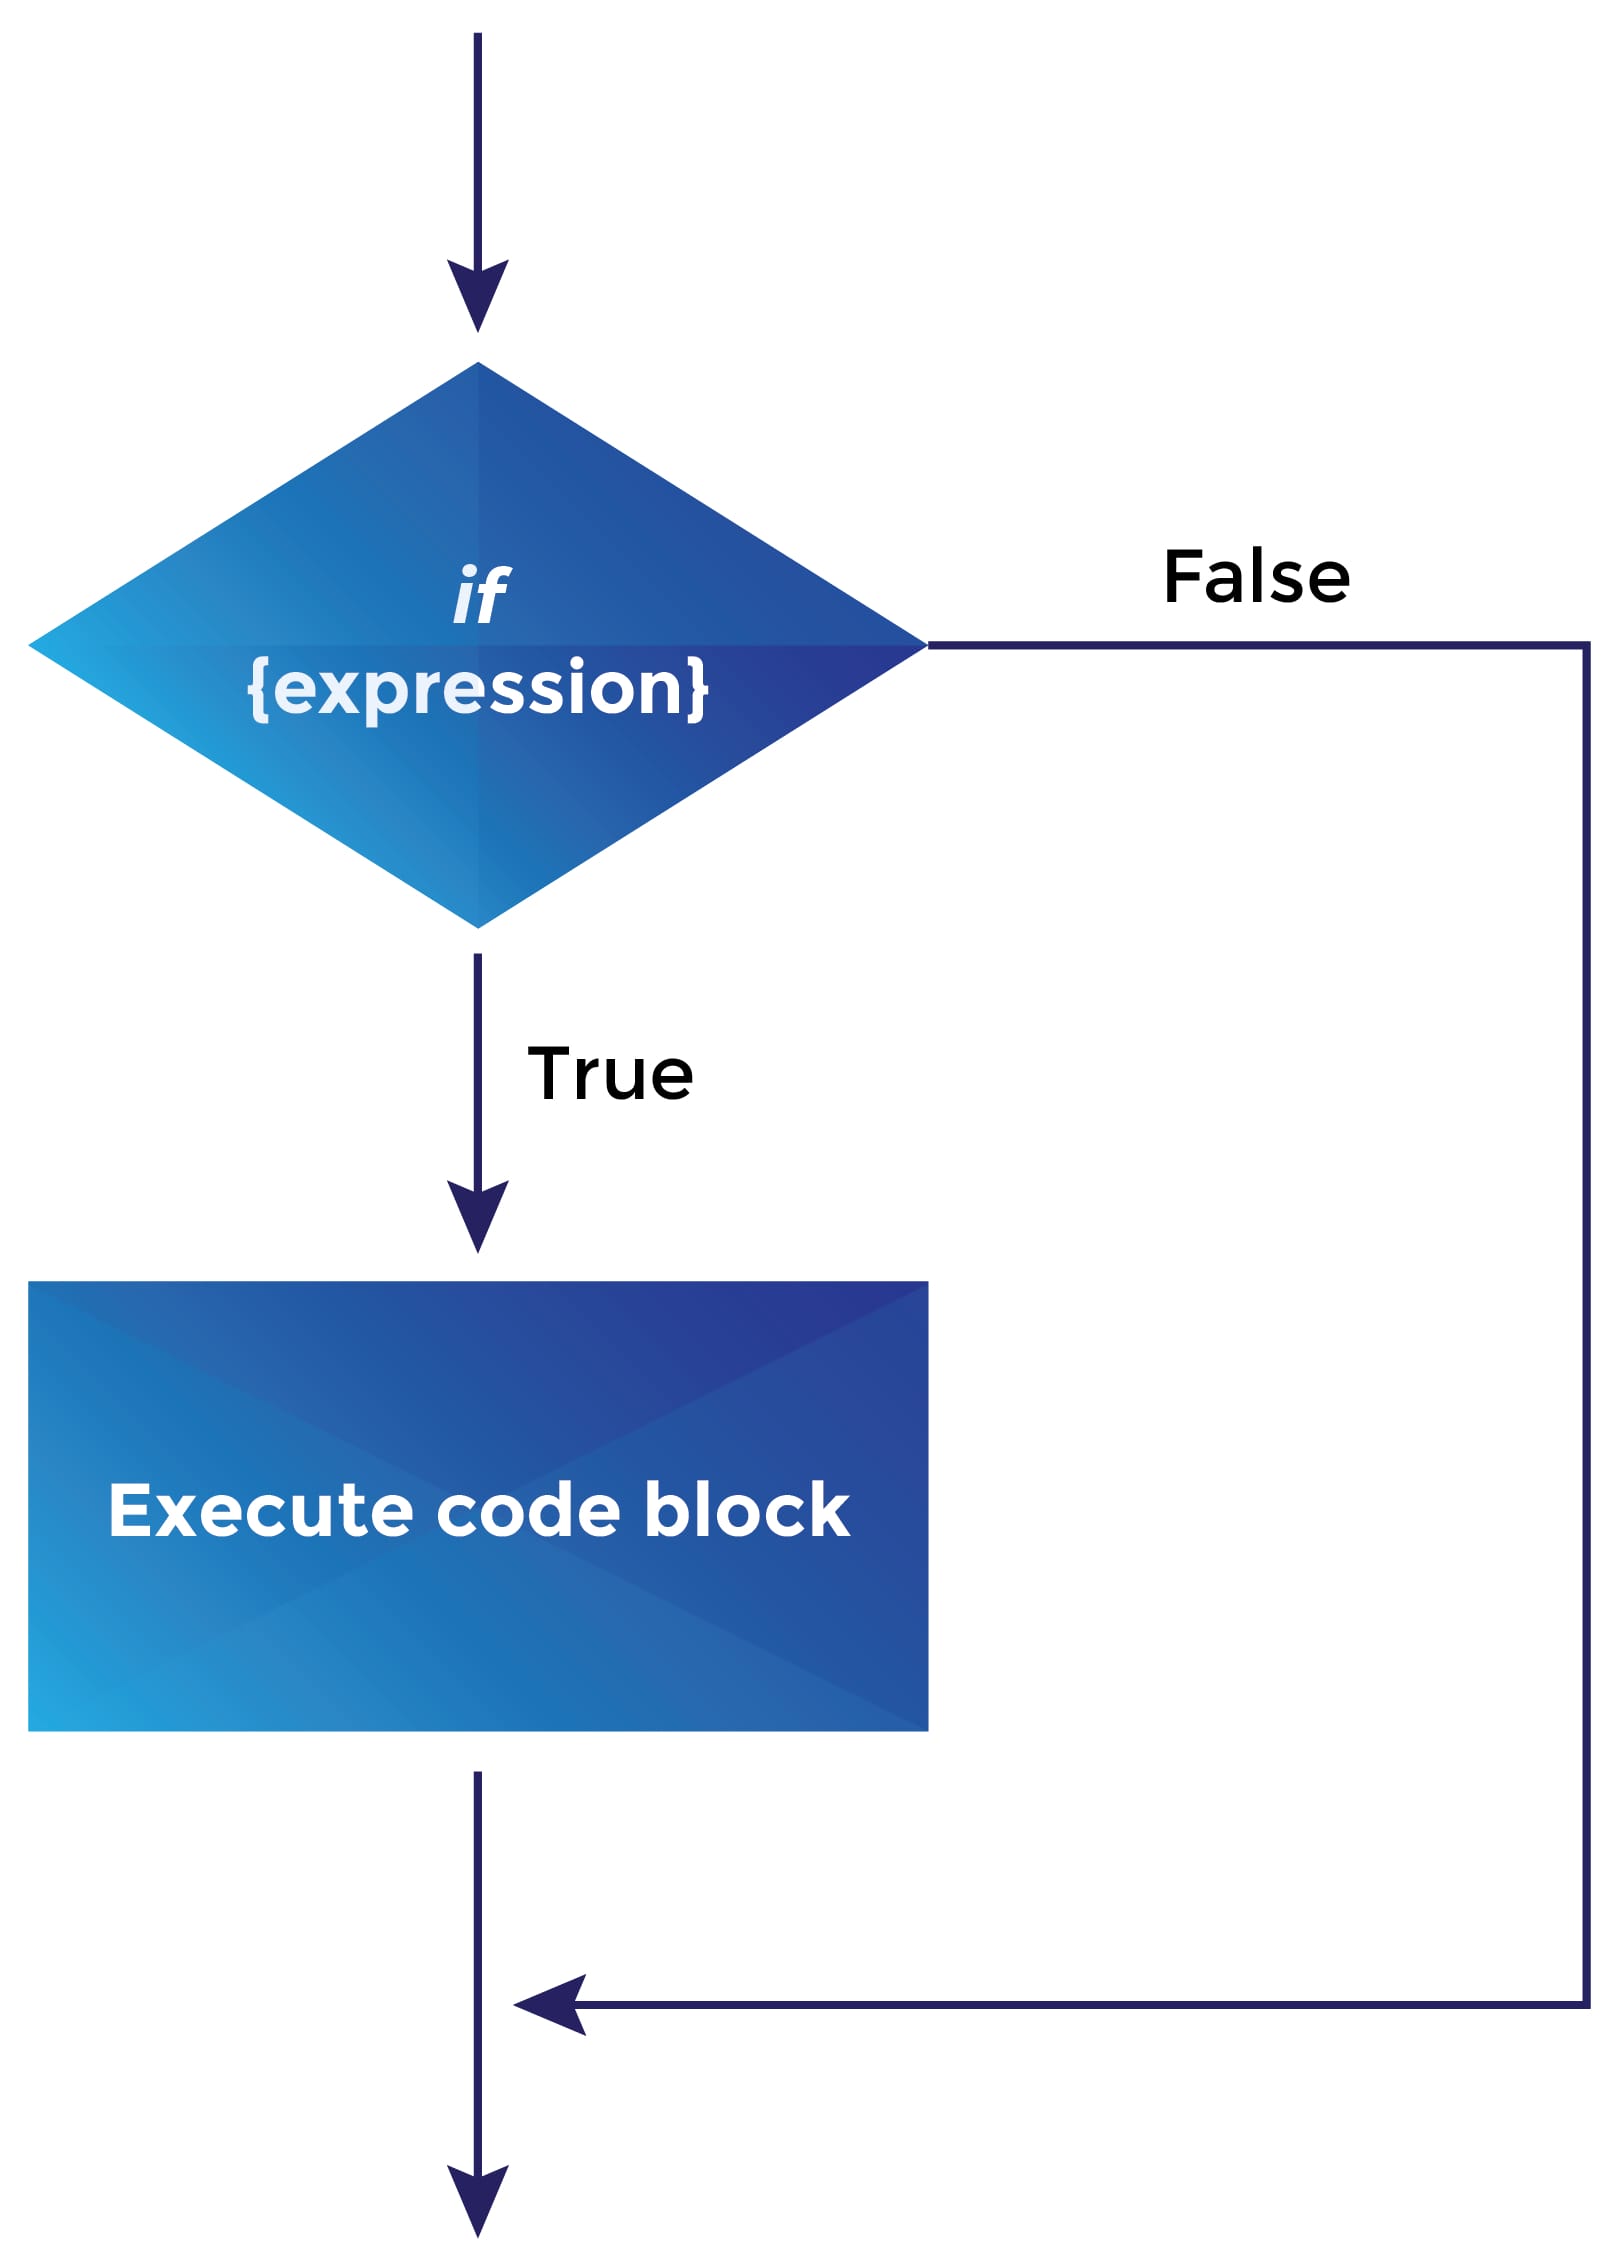
The most basic flow control statement in programming is the if statement, which executes a block of code if some Boolean expression is true. The preceding diagram is the flow chart of the if statement. The syntax for the Swift if statement is as follows:
if {condition-list} {
   {statements}
} else {
   {statements}
}
The following code example implements an if statement:
Let age = 18
if age >= 18 {
   print("person can vote")
}
A {condition-list} can be one or more expressions that each return a Bool data type. Any of the following are valid for a Swift {condition}:
- A variable of Bool type
- Use of a comparison operator which returns a Bool type (for example, ==, >, >=, and so on)
- The Bool constants
trueandfalse - Calling a function that returns a Bool data type
Swift has several rules regarding the if statement that may be different from other programming languages you're familiar with:
- Parentheses aren't added around the {boolean expression}, as they are in most C-inspired languages
- The {statements} must be enclosed in curly braces—even if there is only a single statement.
- Swift allows multiple {conditions} in a comma-separated list. All conditions in the condition list must be satisfied for the code block to be executed.
The Swift if statement can accept multiple, independent {condition} clauses, in a comma-delimited fashion.
In the following code sample, the code block is executed only when the isCar and isNew values are both true:
let isCar = true
let isNew = true

if isCar, isNew {
    print("new car")
}
Note
Swift also supports the use of logical operators when writing the condition portion of an if statement. For example, in the previous code, the following would be the equivalent in Swift:
if isCar && isNew {
  print('new car")
}
However, condition lists are required when using the if statement to unwrap optional values as part of a condition, which you'll learn about in the next section.
You'll use the if statement to unwrap optional values frequently. In fact, the if construction will probably be the most frequent way you'll access values stored in optionals!
We covered optionals in the previous lesson.
Unwrapping a variable with the if statement is done by embedding an assignment into a new variable within the if statement condition list, for example:
let price:Double? = 5.99
if let p = price, p > 5.0 {
    print(p)
}
In this case, the original variable, price, is an optional. In the first clause of the condition list, we ask the compiler to check for a value within the optional price, and if there is one, assign it to the new constant p. Then, the second clause of the condition list tests whether the unwrapped value is greater than 5.0, and if so, the code block is executed.
If the optional price had been nil, the comparison clause would not have been executed, and the code block would not have executed. Program flow would have continued after the if block.
Incidentally, when using the if statement to unwrap a variable, it can be unwrapped into a mutable variable if required. For example, the following code sample extracts the optional value into the variable p, which is then modified before the print statement:
let price:Double? = 5.99
if var p = price {
    p += 1
    print(p)
}Have a look at the following diagram. It illustrates how the switch statement works:
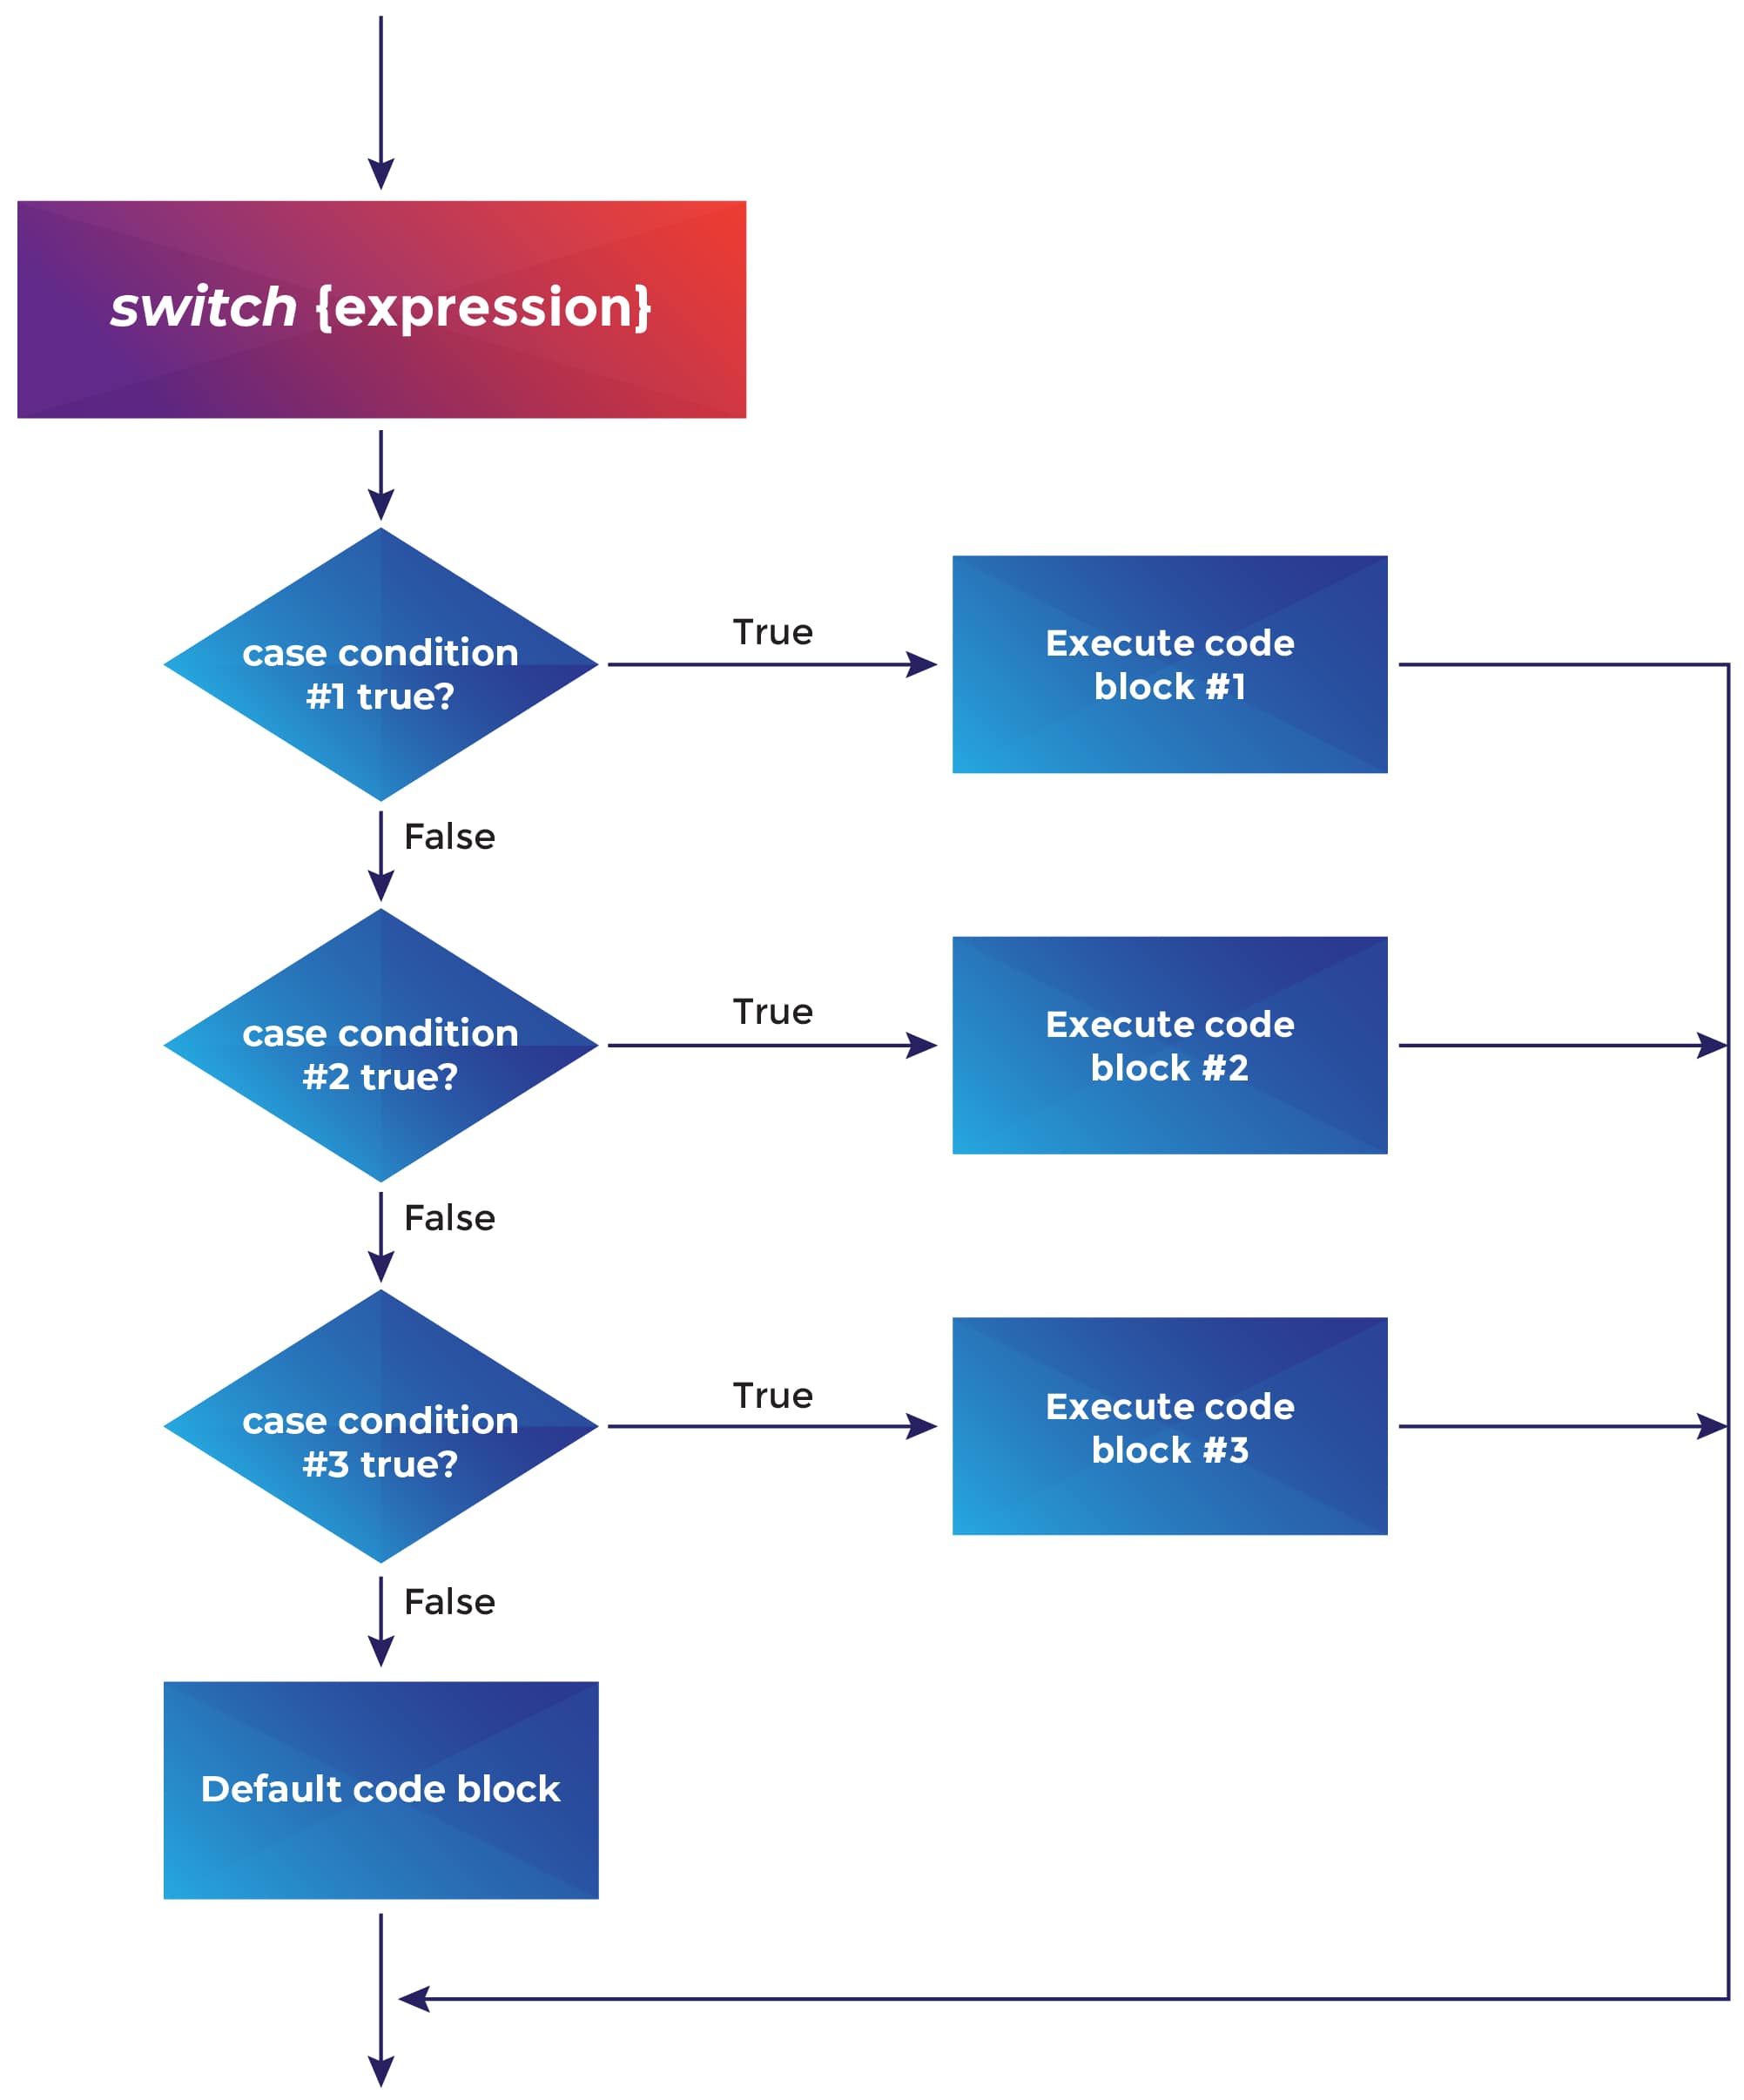
A switch statement is a powerful and flexible branching structure that most developers will use very often in their programs. Swift's switch has powerful, flexible features that we'll cover in detail next.
Creating a program that needs to execute different code blocks depending on the same {Boolean expression} is a common requirement, and can be implemented with the if statement as follows:
if personAge < 1 {
    print("baby")
} else if personAge < 3 {
    print("toddler")
} else if personAge < 5 {
    print("preschooler")
} else if personAge < 13 {
    print("gradeschooler")
} else if personAge < 18 {
    print("teen")
} else {
    print("adult")
}
The preceding code implements the requirement to print a child's life stage depending on their current age, but repeating the condition for each case quickly becomes repetitive and can be more prone to coding errors than a more concise switch statement.
The previous code fragment can be easily rewritten with a switch/case statement as follows:
switch personAge {
   case 0..<1: print("baby")
   case 1..<3: print("toddler")
   case 3..<5: print("preschooler")
   case 5..<13: print("gradeschooler")
   case 13..<18: print("teen")
   default: print("adult")
}
A switch statement evaluates a single control expression, personAge, in this case, and then executes the lines of code contained within the first matching case block.
Using the switch control structure to implement this logic results in code that's more concise and easier to read and maintain.
There are a few syntax rules to note when using the Swift switch statement:
- The cases within a
switchstatement must be exhaustive. In the example above, the special default case is included to mean "When no other case is matched, do this…." - If a default case is included, it must be the last case before the
switchstatement's closing brace. - If the
switchstatement's control expression matches more than one case expression, Swift will execute only the statements included with the first matching case. - A case must include at least one line of code. If you don't intend to execute any code when a case is matched, add a single
breakkeyword to inform the compiler you intend for no code to be executed when the case is true. - By default, Swift's
switchstatement does not support fallthrough to code in other cases. Fallthrough is supported via thefallthroughkeyword.
The switch statement goes much further, and has many powerful extensions, which we'll review next.
As mentioned above, if a case is matched that should run no code, simply include a break statement.
The following example will print baby for ages < 1, adult for ages > 17, and print nothing for ages 1-17:
switch personAge {
   case 0..<1: print("baby")
   case 1..<18: break
   default: print("adult")
}If a matched case should execute statements declared for the case that directly follows it, use the fallthrough keyword.
The following example will group all school age (ages 3-17) people with the teen category:
switch personAge {
   case 0..<1: print("baby")
   case 1..<3: print("toddler")
   case 3..<5: fallthrough
   case 5..<13: fallthrough
   case 13..<18: print("teen")
   default: print("adult")
}Unlike many other programming languages, Swift does not limit switch statements to scalar data types. The expression provided to a switch statement can be a variable holding a scalar (discrete) set of values—as the previous examples have been—but can also be floating-point, string, enumerations, or any type for which you can write a valid matching expression for each case pattern.
The following example is a valid switch statement using a Double data type as input:
switch temperature {
   case -29.0..<(-7.0): print("bitter cold")
   case -7.0..<12.0: print("cold")
   case 12.0..<20: print("warm")
   case 20..<40.0: print("hot")
   default: print("deadly")
}
Switch can also be used to match non-numeric values, such as String values:
let quarterName = "Second Quarter"
var quarterNum: Int?

switch quarterName {
   case "First Quarter": quarterNum = 1
   case "Second Quarter": quarterNum = 2
   case "Third Quarter": quarterNum = 3
   default: quarterNum = 4
}A single case within a switch statement can match multiple patterns, as shown here:
let monthName = "February"
var quarterNum: Int?

switch monthName {
   case "January", "February", "March": quarterNum = 1
   case "April", "May", "June": quarterNum = 2
   case "July", "August", "September": quarterNum = 3
   default: quarterNum = 4
}Swift provides the flexibility to add evaluation logic within a case statement. This flexibility allows a case to be matched only when specific conditions are true.
The following switch statement branches on the relationship between two variables, temperature and humidity:
let temperature = 21.5
let humidity = 22.0

switch (temperature, humidity) {
   case let (t,h) where t > h: print("humidity lower")
   case let (t,h) where t < h: print("humidity higher")
   default: "humidity and temperature are the same"
}
Swift allows the flexibility for cases to use where in some case expressions but not in others, for example:
let responseCode = 501

switch(responseCode) {
   case 200: print("ok")
   case let code where code >= 500: print("server error")
   default: print("Request failed for another reason")
}The switch statement can branch depending on whether a Swift optional is nil, and then evaluate the value contained in a non-nil optional:
let responseCode:Int?
let error:Error?
// make a web service call, which will set responseCode or error to non-nil
switch (error, responseCode) {
  case (.none, .some(let code)) where code == 200: print("success")
  case (.some(let err), .none): print(err.localizedDescription)
  default: print("something else happened")
}
As you can see already, the switch statement in Swift is highly flexible and can meet a vast array of use cases! In general, whenever you include multiple code branches based on the value of a single variable (or related set of variables), consider using the switch statement rather than constructing a series of nested if/else statements.
The switch statement is essentially a more structured and readable way to implement a nested if statement. It's common to refactor a nested if to a case statement to make the code more readable and maintainable. Let's do this now.
Use an Xcode playground to convert a code with if statements to an equivalent code with switch statements.
- Launch Xcode, create a new playground, and save it to your desktop with the name
CaseRefactor.playground. - Add the following code, which uses a nested if statement to determine the country code given a country name:
let countryName = "United States" var countryCode = "" if countryName == "United Kingdom" { countryCode = "GB" } else if countryName == "Mexico" { countryCode = "MX" } else if countryName == "Canada" { countryCode = "CA" } else if countryName == "Spain" { countryCode = "ES" } else if countryName == "United States" { countryCode = "US" } else { countryCode = "??" } print("Country named '\(countryName)' has code \(countryCode)") - Next, let's employ an enumeration, which we learned in the last lesson, to encapsulate the country names into a more maintainable data structure. Add the following code underneath the
printstatement:enum Countries:String { case uk = "United Kingdom" case mx = "Mexico" case ca = "Canada" case es = "Spain" case us = "United States" case unknown = "" } - Add a
switchstatement, which accomplishes the same logic as the nestedif—but in a more readable and structured way. Also note that because acasestatement is required to be exhaustive, it would be a compiler error to forget to add countries included in the enumeration to thecasestatement:switch Countries(rawValue: countryName) ?? .unknown { case .uk: countryCode = "GB" case .mx: countryCode = "MX" case .ca: countryCode = "CA" case .es: countryCode = "ES" case .us: countryCode = "US" case .unknown: countryCode = "??" } - To make the conversion complete, add the original print statement below the switch statement:
print("Country named '\(countryName)' has code \(countryCode)")