The most important thing to consider when buying a bike—new or used—is fit. The best bike on the planet will be your worst nightmare if it doesn’t fit you. After an hour in the saddle you’ll be cramped, uncomfortable, and probably annoyed, too. Because you’ve ridden a bunch of bikes already (right?!), you should have an idea of what feels “right” and what’s not going to work.
Getting your bike to fit right can be a complicated project, but don’t feel like you’ve got to nail your bike’s position down to the millimeter, or right off the bat. Some riders spend a few months finding their position by trial and error. Some just hop on and go without problems. Others obsess over all the different measurements—saddle height, handlebar height and width, and crank length—and adjust what they feel is “off.”
This chapter will give you a great starting point for fitting a road, cyclocross, mountain, or touring bike. It’s worth taking the time to do it right, too, because changing parts—stems, handlebars, and saddles—can be expensive and time consuming. Keep in mind, too, that everybody’s body is different, so what works for most people might not necessarily work for you. So trust yourself; listen to your body.
Whether you’re riding to school or work, hopping logs on your mountain bike, or trying out a race, you need to be comfortable—not only for enjoyment, but also for your health. So, if something’s aching, tingling, or going numb, don’t just tough it out. Fix it!
A CAUTIONARY TALE
The first time I competed in the Colorado state cycling championships, I got a flat tire. I pulled over, waited for the support car to bring me a wheel, and then started chasing the leading group. I hunched over my handlebars and pedaled furiously, but I was alone, without any help. I realized, after a tough ten miles, I wasn’t going to catch up with the rest of the gang.
Sitting upright, I rode easily toward the finish, but there was a problem: I couldn’t feel my junk. I loved biking, but this was not a price I was willing to pay. I had the evening to ponder my predicament. Needless to say, I did not sleep well that night.
Luckily the numbness eventually went away, and by morning all had returned to normal. (Phew!)
I later found out the problem was my bike’s “fit,” or the way I had the saddle, stem, and handlebars set up on the frame. Luckily, I happened to live near one of the world’s foremost experts on bike fit, Dr. Andy Pruitt. Proper bike fit keeps you healthy, comfortable, and performing your best, and nobody has done more for the science of fit than Dr. Pruitt. I scheduled an appointment.
THE SADDLE
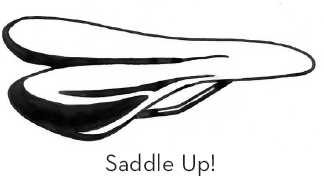 Cyclists call their seat a saddle. Maybe it’s because the first bicycle seats were unpadded leather, just like horse saddles. What’s more important than why we call them saddles is how much more comfortable they are today than they were twenty-five years ago. They’re only comfy, though, if they’re positioned properly, so let’s cover some basic anatomy, and then work on getting your saddle right where it needs to be.
LOVE YOUR BUTT
One of the most common complaints in cycling is what is oh-so-technically known as a “pain in the butt.” Your butt does some very important things, so you’d better keep it happy. Turns out it has a few important neighbors, too.
There are a bunch of nerves and blood vessels supplying oxygen and sensation to your equipment down there, and they run through the area on which you sit when cycling. If your weight rests too far forward, rather than sitting on the two pointy “sit bones” under your butt, you can decrease the blood supply or compress a nerve—and that means numb junk. Girls can experience tingling, burning, or numbness. Boys can, too, but they can also damage veins and arteries, which can lead to other more serious problems. In stark terms, that’s your basic nightmare scenario. Bike fit is starting to sound important, right?
Cop Comfort
Maybe you’ve seen your friendly neighborhood police officer pedaling his or her bike while on patrol. It seems like the best assignment you could get as a cop. Bike police have also been instrumental in helping design better, more comfortable saddles. They spend hours on the bike, every day, so who better to help? Several brands have designed saddles using the data gleaned from bike cops. Who knew?
Spending a few extra bucks on a saddle is well worth it. The more comfortable you are, the longer you’ll be able to ride (and faster, too). Really good shops often have several models you can borrow and ride for a bit, before making a decision to buy. Tell the staff what kind of riding you’ll be doing, too, because different models work better for different types of cycling. If your shop can’t loan you a saddle, then ride your friends’ bikes and see what feels good. Whatever you do, don’t just buy what looks cool—get what fits and what feels right.
DETERMINING YOUR SADDLE HEIGHT
Saddle height is the most obvious element of bike fit. Raise your saddle and your legs get straighter while pedaling; lower it and your legs are more bent at the bottom of their pedal stroke.
Here’s a way to get a pretty good idea of your ideal saddle height for road, ’cross, touring, commuting, and mountain biking. (For trials, jumping, and BMX, your saddle height is more a matter of personal preference, so these rules don’t apply.)
For starters, you’ll need a friend, your cycling shorts (or the shorts you ride in), a straight edge (a ruler, carpenter’s square, or even a large book), measuring tape, a pencil, and a calculator (unless you’re a math genius).
Wear your shorts and stand barefoot against a wall, facing out, with your feet normally spaced—not too wide and not together. Put your ruler (or substitute) firmly against your crotch with medium pressure, touching the wall behind you. Have your friend mark where the ruler contacts the wall.
Now, take the measurement from your crotch to the floor in centimeters and multiply it by .883. A French cycling coach in the ’70s and ’80s arrived at .883 as the appropriate multiplier to determine most riders’ saddle heights. Current medical professionals like Dr. Pruitt have verified its applicability to most cyclists. So if your measurement is 90 centimeters, you’d take multiple 90 by .883 to get 79.5 centimeters. (If you did that in your head, then congratulations! You have a bright future counting cards in Vegas.) This number is your saddle height, measuring from the center of your bottom-bracket axle to the top of your saddle, staying in line with your seat tube. If you ever borrow a bike, get a new one, or rent one, you can use this number to set the saddle height at the right position—no guessing and way less trial and error. This is an old-school method (newer methods employ a protractor-like device to measure the angle of your knee while on the bike), but it should get you pretty close to your ideal height. As with any fit advice or formulas, your comfort trumps everything. If something hurts, then make adjustments!
TRICKS OF THE TRADE
A Quick Cure for Knee Pain
Knee pain is a common cycling complaint. As a very rough rule, pain in the front of the knee is generally from too low of a saddle, while pain in the back of the knee is associated with too high of a saddle. If your knees hurt, raise or lower your saddle a few millimeters (depending on where the pain is), and see if it helps.
SADDLE POSITIONING: NOT TOO FORE, NOT TOO AFT
Now that you’re sitting at the right height, we need to slide your saddle forward or backward—fore or aft, in bike-geek speak. Finding the sweet spot helps you pedal more efficiently, but also reduces pressure on your hands and protects your back.
Get a piece of string and tie something relatively heavy, like a wrench or a big nut, to the end of it. Get comfortable on your bike, in your most “natural” riding position, and then hold the end of the string against the front of your kneecap. Position your leg so your bike’s crankarm (the aluminum bar connecting the pedal to the frame’s bottom bracket) is parallel to the ground (your foot will be in the three o’clock position when viewed from the right).
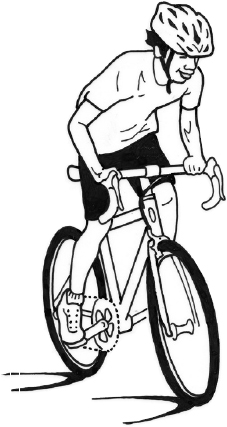 Once your leg hits “three,” have a buddy eyeball you from the side to confirm that your crank is parallel to the ground. Your string, with your heavy object hanging below your foot, should just touch the end of your crankarm. If your string is not touching the tip of the crankarm, loosen the bolts on your seatpost’s clamp to allow you to slide your saddle forward or backward to get your string in the right spot.
Your saddle should now be properly adjusted! It should also be “flat,” and not tipped up or down. If you’re having to tip your saddle up or down, it can be an indication of other fit problems.
HANDLEBAR POSITION
There’s no set formula for bike fit, particularly when it comes to handlebar position. Between the handlebars and the stem, there are a million different combinations. You can buy stems and bars in lots of different heights and widths, so you should be able to get comfortable with the help of a shop, or just by trial and error.
When you’re starting out, don’t try to look like the Tour de France guys—their bodies have spent years adapting to racing, so they can do things you and I can’t. The main issues here are comfort and bike handling, so don’t settle for a position that doesn’t feel right or makes it hard to control your bike.
TRICKS OF THE TRADE
How to Fit a Helmet
Don’t overlook proper fit for your helmet either. An ill-fitting helmet won’t protect your head and face in a crash, so make sure you’ve got the right size and it’s adjusted to fit you.
First, try on a few helmets—like shoes, each model has a slightly different shape, so go with one that’s comfortable. Once on, leave the helmet’s chin strap unbuckled and shake your head side-to-side. The helmet shouldn’t slide around, fly off your noggin, or slip too far forward or back. If it has an adjustable band within the helmet, make sure it’s comfortably snug. Now buckle the chin strap so it gently contacts your chin.
The front of your helmet should sit just above your eyebrows and not have any pressure points. Be sure to replace your helmet every three to four years. Consult the owner’s manual to make sure you’re set up correctly—and enjoy!
There are a bunch of ways to determine handlebar position, but roughly speaking you want to have a gentle forward bend at the waist and a comfortable bend in the elbows when sitting on the saddle and resting your hands in your preferred riding position (usually atop the brakes on a road or ’cross bike; on the grips on a mountain bike). Typically you’re more upright on a mountain bike and bent a bit more forward on a road bike.
The following method is a bit old-school—meaning it was developed for wool-clad road cyclists—but it still works. If you’re fitting your mountain bike, keep in mind that your bars will be higher and a couple centimeters closer to you than this method indicates. BMX is a whole different ball game—because you sit so much lower on your saddle—so, for BMX fit, let comfort and bike handling guide you, more than any set formula.
Put your elbow against the tip (or “nose”) of the saddle, then reach your arm toward the handlebars. The tips of your fingers should almost reach the part of the stem where the handlebars connect. Your bars should be just about level or slightly below the tip of your saddle on a road bike and closer to level on a mountain bike. Start with these ideas as a guide, see how it feels, and I bet you’ll be close to your “ideal” position.
FEET AND CLEATS
We’ve talked about your butt, your hands, and even your “junk.” Your feet are feeling left out right about now.
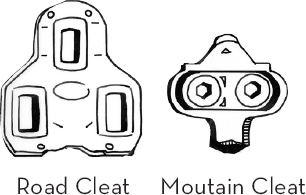 Why are feet important? Because pedaling a bike is such a repetitive motion. If your pedal, cleat, or shoe position is out of whack, it can lead to knee pain, back problems, or other issues.
Lots of people start cycling with plain street shoes and “toe clips,” or the straps that cover the top of your feet and connect you to the pedals. These are fine for riding to and from school or work, or if you’re just starting out in cycling, but if you’ll be riding a lot, cycling shoes with cleats and “clipless” pedals are the way to go—they’re more efficient and they’re safer, too.
Besides a good saddle, putting a little extra money into cycling-specific shoes is probably the smartest thing you can do for your comfort. Cycling shoes come predrilled for cleats, which fit into your pedals (much like a ski boot fits into a ski binding). Most types of pedals require their own proprietary cleats. Almost all of the popular pedal brands are strong, lightweight, and are great options, so don’t stress about what kind to get, just make sure you have the proper cleats.
“You don’t need to spend $300,” explains Pruitt. “One-hundred dollar shoes are fine, but make it a cycling-specific shoe. Low-end mountain bike shoes are great.”
Once you have your shoes, you’ll need to mount and position your cleats on the soles. Hop up on a table and let your legs hang off the end, as if you’re sitting on a dock, dangling your feet in the water. Notice how your feet hang. Are they turned way out (duck-footed)? Turned in (pigeontoed)? Some riders are even pigeon-toed on one side and duck-footed on the other, which makes things even more interesting!
Keep your natural foot position in mind when bolting the cleats onto the bottom of your shoes. Start by positioning the cleat so that the axle of the pedal runs beneath the ball of your foot. Depending on the position of your feet—do they turn in or out, or are they neutral?—you can rotate your cleat a millimeter or two to allow for the most natural pedaling position. Once you start riding, you’ll be able to feel whether your cleats are aligned or not. During your first few rides you can take an Allen wrench along so you can make adjustments along the way.
Still not comfortable? Some of us have one leg longer than the other, or long legs with a short upper body, or tight hamstrings, and so on. These peculiarities sometimes make getting comfortable on the bike more difficult. If you’ve tinkered with your position and you’re still uncomfortable, then visit your bike shop and ask about getting a professional fit. The person doing it should measure your legs and eyeball the rest of your body for anything that you might’ve missed. If the person doesn’t go over your riding style and give your bod a good check, then use another shop. Stick with it, and don’t settle for anything less than total comfort!
Fit Means Bike Fun
By Dr. Andy Pruitt and Rob Coppolillo
“Young riders gotta have fun, and being uncomfortable isn’t fun,” says Pruitt. Our goal here, until you make it to the Tour de France and start earning the big bucks, is that you have a good time. If you’re smiling, then you’ll ride more, and riding more will make you a better cyclist. That’s our formula for success.
When starting out, “Get a bike you can grow into,” Pruitt advises. And if you’re buying a used bike, “Remember, you are buying somebody else’s position. Most folks don’t take care of their bikes for resale.”
What Pruitt means by this is that certain adjustments on a bike are impossible if the previous owner didn’t plan for it. For example, raising the handlebars by moving the stem higher on the fork’s steerer tube won’t work if the owner cut the steerer tube down so it’s flush with the top of the stem. Professionals often do this to save weight, but keep in mind that if you’re buying a bike and need to raise the bars, you’ll need to have some steerer tube showing above the stem. Many bikes don’t have that.
If you’re buying new, then make sure you buy what works and not what’s cool. And most important, “Fit the bike to the rider, not the rider to the bike,” explains Dr. Pruitt. Bicycle frames all have slightly different dimensions, so make sure you get one that will accommodate your own particular needs. Again, a good bike shop will help.
When purchasing your bike, new or used, Pruitt says, “Buy a bike to grow with. Start with it a little big.” There are several ways to do this, he explains—by buying the next-larger frame size and by leaving the steerer tube a bit long.
“Too often as a kid grows,” he says, “they just raise the saddle without raising their handlebar position. Eventually their fit is off, and compromises in fit become handling issues.” Leaving the steerer long will allow you to raise your handlebars as you grow taller while preserving your bike’s handling.
With a little planning, you can get yourself onto a bike that will fit perfectly. Make a smart purchase, and then spend an afternoon fine-tuning your position. You’ll feel better, ride faster, and your bike will handle like a dream.
We’ll get to a more thorough discussion of fit in the next chapter, but in the meantime, here are some things to keep in mind:
 Raising the saddle/seat post is easy, but adding height to the stem and handlebars requires at least a new stem, if not length on the fork’s steerer tube (the part that comes up and out of the front, into your bike’s frame). Make sure you can get the handlebars in a comfortable position.
 If you’re still growing, err on the side of buying your bike slightly big, so you’ll grow into it.
 Consider women’s brake levers for road and ’cross bikes; they’re easier to reach for almost everybody but fully grown men.
 Saddles are like shoes—go with what fits your body, not what looks cool.
