Making Your House Energy Efficient
Energy-Saving Measures That Cost Least
The most effective way to save money on fuel bills is to use less fuel. At one time this philosophy was taken as a matter of course in America. Heavy shutters helped homeowners keep their houses warm in winter, cool in summer. Shrubbery was planted with an eye to protecting the home from weather and not used merely for decoration. Chimneys ran through the center of the house rather than along the exterior. Homes were compact, not sprawling, and designed to draw family members together not only for conversation but also to share body heat. In many farm homes even animal heat was used occasionally by sharing living quarters with a goat or cow, or by housing large animals in a space alongside or beneath the family's living quarters. The need to save fuel influenced customs and manners too. Bundling, the practice of permitting unmarried couples to occupy the same bed without undressing, allowed courtships to proceed with a minimal cost in firewood.
With the advent of the energy crisis, many old practices are being revived. These techniques, when combined with modern insulation and weather stripping, allow us to immunize our homes against the vagaries of the weather to a degree unimagined by our ancestors.
Sources and resources
Books and pamphlets
Davis, Joseph C., and Walker, Claxton. Wage the Energy War at Home. White Plains, N.Y.: Emerson, 1978.
Energy-Efficient Windows. Washington, D.C.: U.S. Department of Energy, 1994.
Guide to Making Energy-Smart Purchases. Washington, D.C.: U.S. Department of Energy, 1994.
Residential Solar Heating Collectors. Washington, D.C.: U.S. Department of Energy, 1994.
Tomorrow's Energy Today. Washington, D.C.: U.S. Department of Energy, 1994.
Thermographs of your house will show you where heat is being lost and how great the loss is. Bright yellow areas are locations of greatest heat loss, while red, light blue, and dark blue indicate progressively less loss. Typically, the poorly insulated roof shows up as a major source of leakage. Thermographs are taken at night to avoid misleading effects due to daylight, and a professional firm must be hired to take them because of the high cost (many thousands of dollars) of the special infrared scanner that is used. If you are planning to have new insulation and weather stripping installed in your home, ask the contractor if he will provide a thermograph. Some companies use before-and-after thermographs as a diagnostic tool and may include them free of cost.
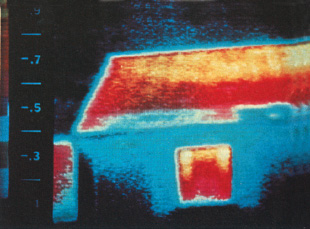
Where heat leaks out and cold leaks in

Reducing Air Infiltration
Every house has gaps and cracks through which outdoor air can enter and indoor air escape. In most houses air exchange takes place at a rate of one to two changes in an hour. Inevitably, this turnover of air causes a substantial loss of heated air in wintertime.
Caulking and weather stripping are the basic means for reducing this loss. Properly applied, they can lessen the air exchange rate by 50 percent and cut fuel bills by 5 to 20 percent, depending on how leaky your house is.
Caulking is used to seal construction cracks in the body of the house, such as those between window frame and siding. The usual way to apply caulking is with a caulking gun loaded with a cartridge of caulking compound. When the trigger is pressed, a continuous bead of compound is squeezed out, like toothpaste from a tube. The compound is also sold in a ropelike strip that can be pressed into place. Caulking is not a modern development. In pioneer days homesteaders would plug leaky cabins with such materials as moss, mud, clay, and pitch-impregnated rope. Today's caulking compounds are superior. They are easier to apply, last longer, and insulate better. Oil-based compounds are still very common. Others include acrylic latex types that permit cleanup with water before they set. Butyl compounds are more flexible and stick to more materials.
Weather stripping is used to seal gaps between moving parts, such as those between a window sash and frame, and at door closures. To minimize wear, match the weather stripping to the motion of the parts. For compressive contact, as in a door closing, use felt or foam. For a sliding motion select a tough plastic or metal strip. Whatever type you buy, be sure it is thick enough to fill the gap. Foam stripping is available with a wood backing or with a self-stick adhesive backing. Where considerable compression is likely, as in a front door closure gap, use an open-cell foam, such as urethane. For light compression use a closed-cell type, such as vinyl. Adhesive-backed weather stripping bonds best when the temperature is above 50°F. During cold weather warm the surface to which the stripping is to be applied with a heat lamp or hair dryer. In some cases inexpensive felt stripping can be used for sliding as well as compressive contact. Where sliding motion is involved, the felt must be mounted carefully so that contact pressure is adequate but not excessive, since friction shortens the felt's useful working life. Felt stripping is usually held in place by tacks or staples. Wherever possible, with any type of stripping, make a trial fit with a short length before doing the complete job. Check that the seal is snug enough to block drafts but not so tight that the window cannot open or the door catch fail to hold.
Caulking

Before caulking, clean away any crumbling old caulking, flaking paint, and dirt with either a putty knife or the point of a can opener.
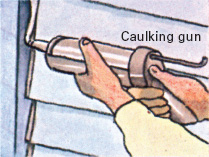
Apply caulking in continuous bead, working it into cracks. To flow freely, caulking must be warm. In winter keep it indoors until you use it.
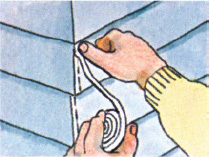
Rope-type caulking is less messy than cartridge caulking and does not require a gun to apply. Press caulking firmly into cracks.
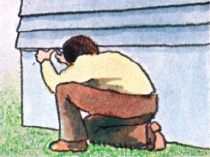
Stuff large gaps more than ½ in. wide with oakum, fiberglass insulation, or other insect-proof material before sealing with caulking.
Weather stripping
Windows can be sealed against the weather in a number of ways. The most effective method is to tack specially designed strips of spring metal in the channel between sash and jamb. You can also nail rolled vinyl along sash border. Adhesive-foam strip can also be attached along border; it is simple to install but should not be used where window sash rubs against window frame.

Doors as well as windows can be weatherproofed by various methods. Adhesive-backed foam along the jamb is easy to install but wears out quickly. Longer lasting is a strip of foam rubber with wood backing nailed to fit snugly against the door when closed. More durable yet is a strip of spring metal.

Maximum toughness is a requirement for weather stripping put in between door and threshold. A sweep nailed to the door bottom works well if there is no carpet or rug to interfere with it. More troublesome to attach are channels of metal with vinyl inserts that you can screw either to the threshold or to the door bottom to seal space between door and threshold. Unless the threshold is worn out or absent entirely, it is preferable to attach a channel to the door bottom.

Keeping Heat In (And Cold Out)
One of the most effective ways to save energy in the home is by adding insulation. The concept is simple: keep the flow of heat through walls, ceilings, floors, and roofs to a minimum. As the chart shows, different materials have a wide range of insulating abilities. Among traditional building materials, only wood—and that in thicknesses found in log cabins—is an effective insulator. The chart also indicates that stone masonry is a particularly poor insulator; a castle may be magnificent to look at, but it is a chilly place in which to live.
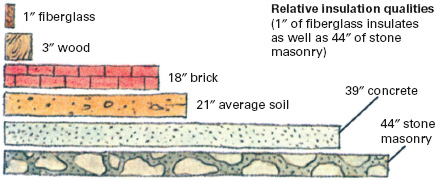
Because heat rises, the attic and roof are the first targets for insulation. Next in importance are walls and windows, then crawl spaces and basements. Insulating materials are rated in terms of their R value: the higher the R value, the more insulation they give. Typically, R-30 insulation might be used for an attic and R-20 insulation for the outside walls. However, the optimum values for your house can depart significantly from these. When selecting insulation, a key point to be aware of is that doubling the amount of insulation (using R-60, for example, instead of R-30) will not double fuel savings. More likely you will achieve barely enough savings to compensate for the cost of the added insulation.
When putting in insulation, it is important to install a vapor barrier to prevent moisture from condensing in the insulation. Blankets (rolls of insulation) and batts (precut lengths of blanket) often come with a vapor barrier already attached in the form of a waterproof layer of plastic or aluminum foil. Always install the barrier so that it faces toward the interior of the house. In older homes a vapor barrier can be created by applying two coats of paint to the inside of walls to be insulated, and sealing penetrations. If there is wallpaper, remove it before painting.
Floors and walls
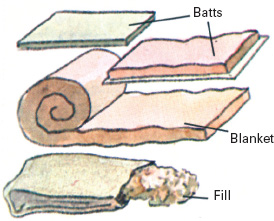
Insulation comes in different forms for different purposes. Batts and blankets fit well between joists and studs; loose fill and pumped-in foam are used for areas more difficult to reach.
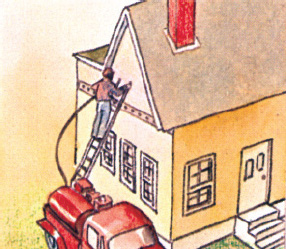
Finished homes with wood-frame walls can be insulated with loose fill or foam that is blown or pumped in through holes drilled into outside walls. This job is best handled by professionals.
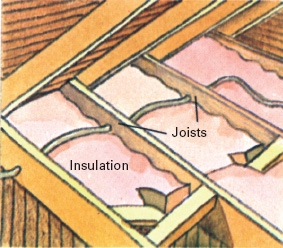
To insulate attic floor, select batts or blankets so that they fit snugly between attic joists. Place batts with vapor barrier face down. Be sure not to cover any attic vents or light fixtures.
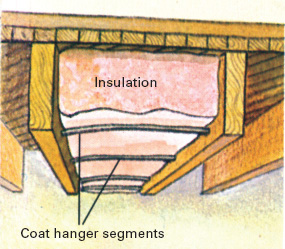
Floors over cold cellars are worth insulating. Press batts or blankets between joists, vapor barrier facing up, and secure with wire mesh or pieces of coat hanger cut to fit between joists.
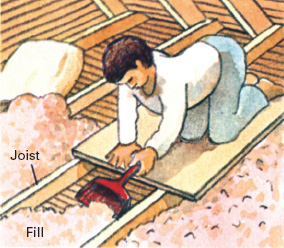
Loose fill works well on attic floors. Use a board or garden rake to spread it evenly. If joists are boarded over, hire a contractor to drill holes into boards and blow fill into spaces between joists.
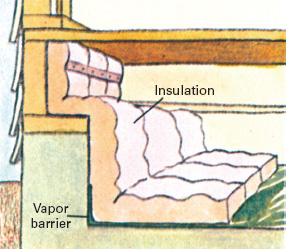
Crawl spaces can be insulated with batts or blankets. Note: Because of possible frost heaving, always provide proper perimeter drainage.
Window
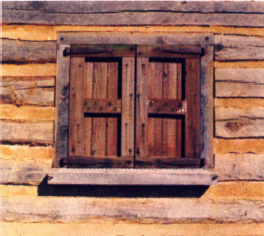
Shutters are a traditional means for containing house heat. Leave them open during daylight hours so that sunlight can get in; close them at night to keep heat from radiating out through windows. Slatted shutters are used in summer for shade.
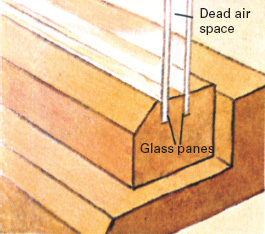
Double-pane windows (and storm windows fitted over existing windows) reduce heat loss by creating a layer of dead air between the panes that acts like insulation. For maximum benefit, windows should fit tightly and joints should be fully weatherproofed.
Pipes, ducts, and heaters
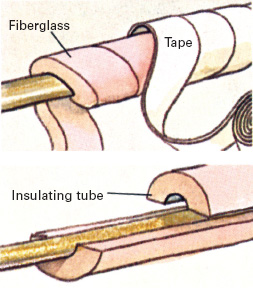
Hot-water pipes to distant faucets often waste heat. Wrap pipes with ½-in.-thick fiberglass and seal with plastic tape or else install ready-to-use foam-type insulating tubes with self-sealing aluminum backing. Insulation also protects pipes from freezing. If used on cold-water pipes, it will keep water cool in summer and stop pipes from sweating.
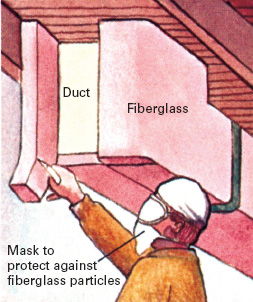
Exposed heating and air-conditioning ducts in unused cellars or attic spaces raise fuel bills unnecessarily. To cut down on the waste, first seal joints and other leaky spots with aluminum-foil tape or silicone caulk. Then cover ducts with 2 in. of blanket-type fiberglass or similar insulation.
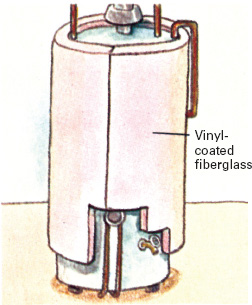
Hot-water heaters can waste fuel the year round. Special insulating material of 2-in.-thick fiberglass with a vinyl outer coating should be used. Wrap entire heater in material except for bottom and controls. Complete water-heater insulation kits are available that can be slipped on, then trimmed to size.
Heat-Saving Vestibules
For years vestibules have been looked on solely as repositories for umbrellas, galoshes, dirty boots, old toys, and snow-covered children's togs. Lately, they have been rediscovered as the heat-conserving structural devices they were originally meant to be, and many owners of homes that lack vestibules are having them installed or building them onto their houses themselves.
A vestibule saves heat and increases the comfort of your house in two ways. First, it acts like an oversize storm door to provide a barrier between the front door and the outside. Second, it serves as an air lock, cutting to a minimum the transfer of cold air indoors as you enter or leave the house. And the same qualities that make a vestibule an efficient heat saver in winter also conserve energy in the summer, when the air conditioner is on. As an added bonus, a well-designed vestibule is an attractive addition to any home.
If you are thinking of adding on a vestibule, design it to blend in with the overall look of the house. The vestibule should have room for a bench and enough space for coats, overshoes, and other such items. Otherwise it need not be large—in fact, the smaller it is, the more efficiently it functions as an air lock.
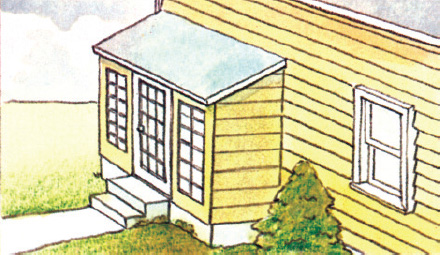
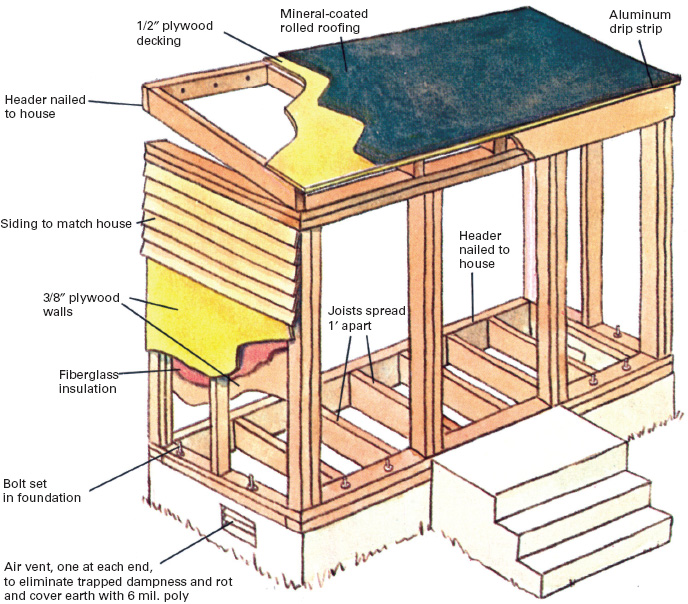
This version of a vestibule uses 2 × 4's for structural members. Inside dimensions are 40 in. by 84 in. Prefabricated door and window units will save time and work. You can use a conventional storm door with a small window on each side or a fenestrated door with matching stationary windows, as in the picture. Door is hung on studs made of doubled 2 × 4's.
A solid masonry foundation extending below the frost line is essential. The depth of the frost line for your area can be obtained from a local weather bureau. In many localities you can simply dig a trench the width of the vestibule wall and fill it with concrete. The foundation should protrude at least 8 in. above the ground. Install wiring before putting in inside wall.
Protecting Your Home With Trees and Earth
Winter winds, like a forced-air cooling system, can cause substantial heat loss from a house. The loss is due to various effects: lowered air pressure, conduction, and evaporative cooling. These combine to produce a temperature drop called the windchill factor. The chart at right shows how large the factor can be. For example, if during January the average outdoor temperature in your area is 10°F, an average wind speed during the same period of 10 miles per hour will make it seem like –9°F—a net difference of 19 degrees. If your house stands fully unprotected from the wind, the drop of 19 degrees that it is therefore subjected to might be virtually eliminated if you can find a way to block the wind. As an estimate of how much fuel such a step might save, check your fuel bills for January and for a month in which the average outdoor temperature was 19 degrees above January's temperature. The difference between these costs would be the saving for January. Such savings can range up to 30 percent in a year.
Various methods exist for keeping wind away from a house. One of the most esthetically pleasing is a strategic placement of trees and shrubbery to block the wind. Planted near the house, trees can also shade it in summer and save on air-conditioning costs. Walls, trellises, and parapets can also be built onto or near the house to deflect air currents. When planning a new structure, consider the shape of the land—slopes and hills strongly affect the way the wind blows.
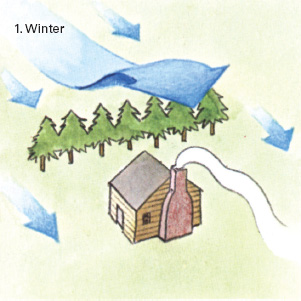
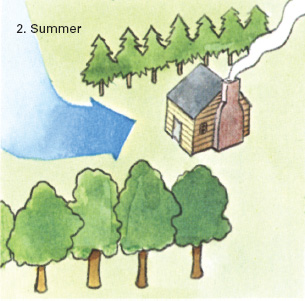
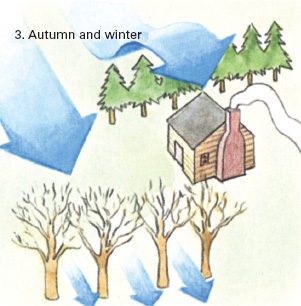
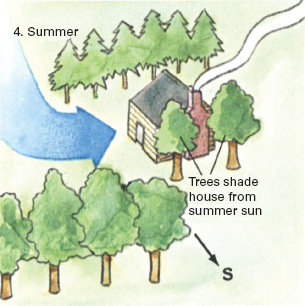
Trees and shrubs can be planted in a variety of ways to redirect the wind. If the cold winds of winter arrive mostly from one direction, a single line of evergreen trees will do a good job of blocking them (Fig. 1); more rows at other angles to the house may be needed if the wind is variable. In the summer, however, these same trees may interfere with cooling breezes. One solution (Fig. 2) would be to plant a row of deciduous trees (trees that shed their leaves in autumn) to deflect summer winds onto the house. Once autumn arrives and the leaves have fallen (Fig. 3), the evergreens will function as before to protect the house. Deciduous trees are also valuable as shade trees (Fig. 4) to keep the rays of the hot summer sun off the house. Their advantage over evergreens is that sunlight will be able to get through during the winter to warm the house.
A thoughtful, step-by-step approach to planting windbreaks is advisable. Wind patterns can vary considerably during the year. In many cases, not until the windbreak is in place can you be sure what its net effect will be. Phone or write your state energy office or local utility company for further information. Local agricultural extension offices can help and may provide you with lists of additional resources.
Windchill
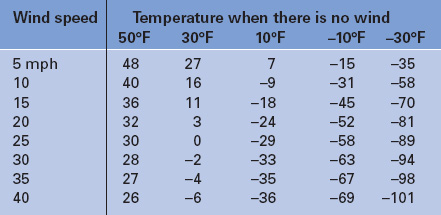
When the wind blows at speeds listed in left-hand column, your body—and outside walls of your house—will react as if the temperature were as given in the remaining columns.
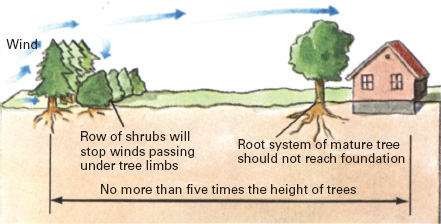
Shrubbery windbreaks are most effective when planted no farther from the house than five times the height of the windbreak (150 ft., for example, for a windbreak with 30-ft.-high trees). The trees should be far enough away from foundations and sewer pipes to prevent root damage. The distance can be inferred from tree size; root systems of mature trees usually extend about as far as the trees' branches.
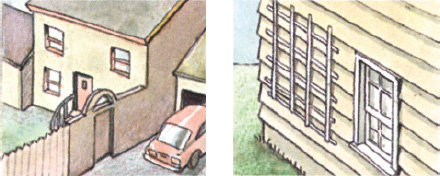
Structures that impede air flow past the house, such as fences, walls, and parapets, can also serve as windbreaks. Even a trellis— which is normally used to support vines—or a similar wind-spoiling attachment serves this purpose.
Underground Houses
Houses that are built into the earth or beneath it are virtually immune to fuel shortages. This is because very little fuel is necessary to keep them heated comfortably above the surrounding temperature of the earth in which they are buried, a temperature that stays remarkably close to 55°F the year round.
This impressive fuel-saving advantage is offset, however, by the desire of most people for open space and sunlight rather than the cavelike atmosphere of an underground dwelling. Moreover, since subsurface structures are surrounded by tons of earth, some individuals worry that the walls may collapse or that escape may be difficult in case of fire or other emergency.
Many underground houses have been built in this country. Those that have been are often only partly buried. This type of design can still achieve major fuel savings if the layout of the house permits the residents to live aboveground during the warm months of the year and belowground during the cold months. Even if a house is embedded more deeply in the earth, its design can still achieve a degree of airiness by incorporating skylights, sunken courtyards, and aboveground panels that deflect the sun's rays down light shafts. Another variant is to build the house into the side of a hill. That way one or more walls can be left exposed to let in sunlight and provide views of the countryside.
There are a number of special problems associated with underground structures. Erosion of the earth that covers the house must be kept in check. Usually this can be done by planting grass or shrubs that stabilize the soil. The shrubs should have short roots so they will not penetrate the walls or ceiling. An underground building must have enough strength to sustain the heavy load of earth pressing down on the dwelling. To achieve extra strength, underground houses are often built in the shape of a circle or octagon, designs that achieve a relatively even distribution of load. Roofs reinforced with steel beams and heavy concrete walls are also used.
Extra effort has to be made to keep belowground homes dry. Even with a waterproof vapor barrier around the structure that blocks moisture from the earth, the house must cope with condensation that accumulates inside. Surface houses have enough openings to let interior dampness quickly evaporate. Underground houses, however, need special ducts and blowers to keep them dehumidified. The problem is similar to the one many homeowners experience with their basements; but while a small portable dehumidifier will handle the moisture problem in the average basement, a much larger system is needed to control the humidity in an underground home.
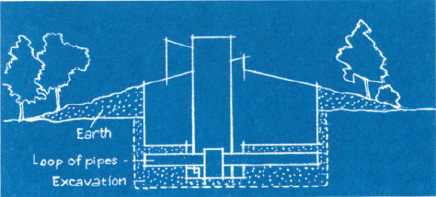
This New England structure is essentially a two-story house buried halfway in the earth. A sunken courtyard-greenhouse, like a solar collector, supplements the fossil-fuel heating system. In winter, heat is extracted by a heat pump from a deeply buried air pipe; in summer, cool air is pumped inside the same way.
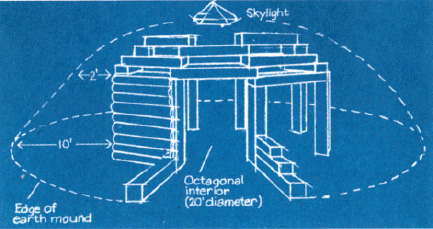
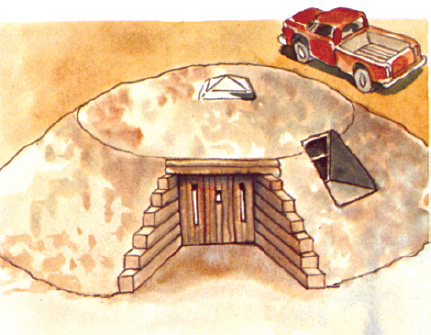
Traditional Navaho hogan is the basis for the design of this octagonal log-supported home in the Southwest. The logs rest on footings of stone and form the roof as well. The structure is covered by a mixture of earth and pumice. A vapor barrier of asphalt paint and stucco protects the logs from moisture.
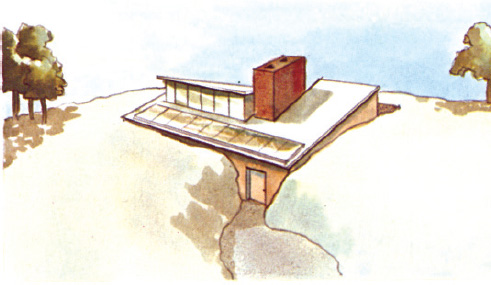
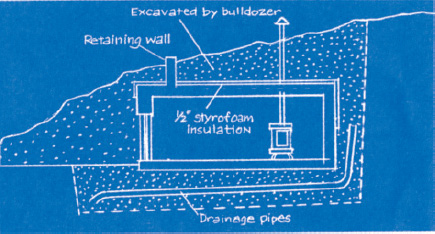
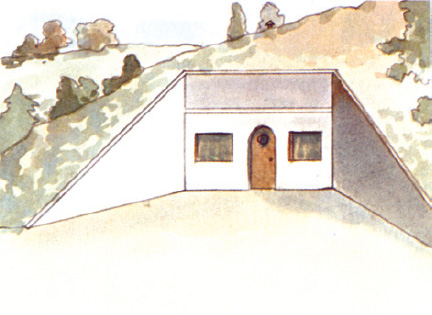
Built into the side of a hill, this Midwest home is nearly impervious to the effects of wind, storms, and tornadoes. An asphalt coating waterproofs the concrete roof and walls, which support more than 1 million lb. of earth. Drainage tiles below footings channel away water that collects there as a result of soil seepage.