Raising Livestock
Animals Pay Their Way With Meat, Milk, Eggs, And Heavy Work Too
Vast grazing lands, fertile soil for feed grains, and the demand for protein have helped make meat, milk, and eggs mainstays of the American diet. Our hunger for beef financed the railroads that opened the West to intensive settlement. Our love of pork and lard made the fast-growing hog the traditional “mortgage lifter” for on-the-move farmers.
To keep pace with America's demand for meat and dairy products, farmers have worked to find new ways to make animals grow bigger, gain weight faster, and produce more abundantly. But their advances have not been without some drawbacks. Animals that are scientifically fed for fast growth simply do not have the flavor of ones on a varied diet. Growth-stimulating hormones and medicated feed may have long-term side effects that are as yet unknown. And in spite of record-high productivity, meat, milk, and eggs are becoming increasingly expensive.
But you need not remain bound by the limits—and costs—of mass production. If you like animals, have a little extra space (a few square feet is all it takes to raise rabbits), and can put in a little time daily, you can have cream-rich milk, fresh eggs every day, and full-flavored, chemical-free meat that you have produced yourself. You can also learn to keep costs to a minimum—by feeding discarded greens, stalks, and bumper crops that would otherwise go to waste or by turning unused land into pasture.
Do not let anyone tell you that raising animals is easy. It may take only a few minutes a day, but you can never skip a day. Nonetheless, there is an abundance of rewards, not the least of which is the satisfaction of watching animals prosper.
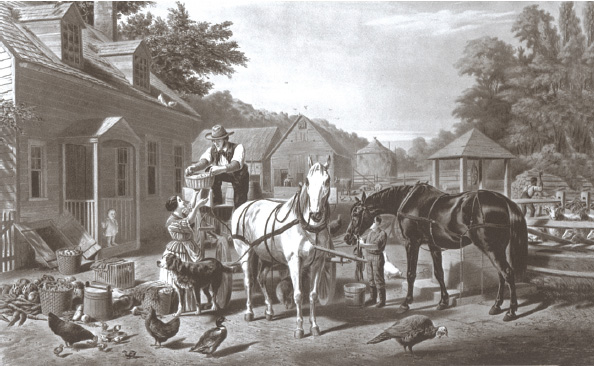
Self-sufficient life-style of 19th-century farm families was based on the use of animals for heavy work as well as for food.
An Ounce of Cleanliness Is Worth a Pound of Cure
Cleanliness is the single biggest contributor to livestock health. Feeding and shelter requirements vary from one farm animal to another, but all require good sanitation to stay in top condition. Begin with good planning. Be sure the feeding and watering equipment is protected from contamination and that the shelter is easy to clean. If you have a pasture, it should be free of boggy areas, poisonous weeds, and dangerous debris. Use fencing and traps to protect your animals from rodents, and guard against flies by installing screens. Daily care is important too. Wash equipment after each use, keep bedding dry, and check animals daily for early signs of trouble.
Once or twice each year thoroughly scrub and disinfect your animals′ shelter. Haul all the old bedding to the compost heap and replace it with some that is clean, new, and dry. Take all movable equipment outside, wash it thoroughly, and let it dry in the sun—sunlight is an excellent disinfectant. Scrub the inside of the house with a stiff bristled brush to remove caked dirt, then go over everything again with a disinfectant formulated for use with livestock. Follow the directions that come with the disinfectant and allow adequate drying time before letting the animals back into the house. The same sanitary procedures should be followed in the event of an outbreak of disease or before bringing a new animal into the shelter—for instance, if you are putting a new feeder pig into the pen used by last year's feeder.
Try to keep strange animals away from your livestock. If you buy a new animal, keep it quarantined until you are sure it is healthy. If you take an animal to a livestock show, isolate it for awhile when you return before reintroducing it into the herd. Some farmers go so far as to pen new animals with a member of the established herd to be sure the new ones are not symptom-free disease carriers. If they are, only a single animal need be lost, not the entire herd. Many chicken raisers slaughter their entire flocks and start with a new batch of chicks instead of trying to introduce a few new birds at a time. Remember: a clean environment is the best way to guarantee healthy, profitable, attractive livestock.
Keeping Records of Productivity
Good records are essential if you want to know whether your animals are paying their way and how the cost of raising them stacks up against going to the supermarket. Keep track of all expenses, including veterinary bills, and write down exactly how much feed you provide each day. If possible, record the amount fed to individual animals. Keep track of productivity too. Note how many offspring each animal produces, whether the offspring survive to maturity, and how fast they gain weight. If you have dairy animals, weigh their milk at each milking. Count the number of eggs laid by each of your chickens, ducks, or geese and the percentage of the eggs hatched. Maintaining records is not a time-consuming chore. The most convenient system is to keep a looseleaf notebook or box of file cards near your animals′ shelter. Carefully kept records will tell you which animals are producing efficiently and which should be culled. They will also increase the worth of any animals you choose to sell and help you decide which offspring will make the most valuable additions to your stock.
Learn Before You Leap
Before buying animals, learn as much as you can about keeping them. Books, breeders′ magazines, and government pamphlets are helpful, but do not expect to become an expert just by reading. Talk to your county agent and other knowledgeable people. Attend shows and exhibits to learn what distinguishes good specimens. Check costs of feed, equipment, fencing, and building materials. And be certain there is a veterinarian available who will be able to treat your animals. If you are interested in selling produce, find out what markets are available, what laws restrict its sale (the sale of milk is particularly strictly regulated), and what price it is likely to bring. You might also want to make sure that there is someone in the area to slaughter your livestock—or to help you learn to do the job yourself.
Before you commit yourself to purchasing any animals, check at town hall to determine whether they are permitted in your area. Be sure that you have ample space as well as clean, sanitary shelter. If you plan to range-feed, make sure your pasture is of sufficiently high quality. It can take years to develop top-quality grazing land, and if yours is not, you will have to buy hay. Before the animals arrive you should have on hand all necessary equipment, such as feed pans, milk pails, watering troughs, halters, and grain storage bins. You should also be prepared to store what your animals produce. Milk and eggs must be refrigerated, and meat must be salted, smoked, or kept frozen until you are ready to eat it.
Sources and resources
Books and pamphlets
Poultry
Bartlett, Tom. Ducks and Geese: A Guide to Management. North Pomfret, Vt.: Trafalgar Square, 1991.
Mercia, Leonard S. Raising Poultry the Modern Way. Charlotte, Vt.: Garden Way Publishing, 1990.
Raising Geese. Washington, D.C.: U.S. Department of Agriculture, 1983.
Rabbits
Attfield, Harlan D. Raising Rabbits. Arlington, Va.: Volunteers in Technical Assistance, 1977.
Bennett, Bob. Raising Rabbits Successfully. Charlotte, Vt.: Williamson Publishing, 1984.
Hogs
Baker, James K., and Elwood M. Juergenson. Approved Practices in Swine Production. Danville, Ill.: Interstate Printers and Publishers, 1979.
Beynon, Neville. Pigs: A Guide to Management. North Pomfret, Vt.: Trafalgar Square, 1994.
Sheep
Simmons, Paula. Raising Sheep the Modern Way. Charlotte, Vt.: Garden Way Publishing, 1989.
Goats
Belanger, Jerome. Raising Milk Goats the Modern Way. Charlotte, Vt.: Garden Way Publishing, 1990.
Dunn, Peter. Goatkeeper's Veterinary Book. Alexandria Bay, N.Y.: Diamond Farm Books, 1994.
Jaudas, Ulrich. The New Goat Handbook. Waltonville, Ill.: Barton, 1989.
Luttmann, Gail. Raising Milk Goats Successfully. Charlotte, Vt.: Williamson Publishing Co., 1986.
Mackenzie, David. Goat Husbandry. Winchester, Mass.: Faber & Faber, 1993.
Cows
Etgen, William M., et al. Dairy Cattle: Feeding and Management. New York: John Wiley & Sons, 1987.
Juergenson, Elwood M., and W.P. Mortenson. Approved Practices in Dairying. Danville, Ill: Interstate Printers and Publishers, 1977.
Van Loon, Dirk. The Family Cow. Charlotte, Vt.: Garden Way Publishing, 1975.
Horses
Evans, J. Warren, and others. The Horse. San Francisco: W.H. Freeman and Company, 1995.
Lorch, Janet. From Foal to Full Grown. North Pomfret, Vt.: Trafalgar Square, 1993.
Telleen, Maurice. The Draft Horse Primer. Waverly, Iowa: Draft Horse Journal, 1993.
Periodicals
Country Journal. Cowles Enthusiast Media, 4 High Ridge Park, Stamford, Conn. 06905.
Harrowsmith. Camden East, Ontario KOK 1JO, Canada.
Sharon and Kenny Eastwood, 4-H Club Animal Raisers
Milk, Pork Chops, And Blue Ribbons
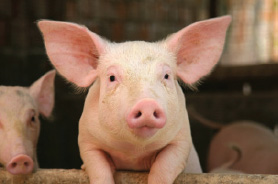
Pigs are one of the prize-winning animals the Eastwood kids raise at their local 4-H club.
The Eastwood kids—Kenny, 10, Carol, 13, and Sharon, 15—go to school, help out around the house, and also raise prize-winning animals at their local 4-H club in suburban Brewster, New York.
Kenny: “If you want to give a pig a bath, you've got to get more than one person. One person holds and the other one scrubs. You've got to be careful that the pigs don't get back into the pig house—if they roll over in the straw or in manure, then you have to start all over again. When you have more than one pig, it's really hard. While you're washing one, the others try to bite the hose.
“Giving pigs a bath—that's what you do when you get ready for a show. I got a pig trophy for bringing my pig to the Putnam County Fair, and then I got a herdsman trophy for having a clean pig and pen. It's really fun bringing the pigs to fairs. When you get ribbons and stuff, you really feel happy.
“It takes about an hour a day to take care of the pigs. I'm not afraid that they're too big for me. The only thing to watch out for is sometimes when you're climbing over the fence to the pen, they nibble your toes. But they don't try to eat you alive or anything like that.
“I help take care of chickens too, but really like pigs better. When you butcher chickens, you get just one thing: chicken. But with a pig you get ham and bacon and pork chops.”
Sharon: “We started out with one goat and then someone gave us another and pretty soon we had six. They're French Alpine goats, and their milk is very good and thick. We all drink it. We don't really do anything special to it before drinking it except to strain it to get all the dirt out. And also, you have to have your goats tested for tuberculosis.
“Goats are really not that hard to take care of. If they want food or water, they'll really let you know it. My sister and I have to go out and feed them in winter, give them water and hay. In the summer we stake them out on ropes and it's a lot easier. Milking takes about 10 to 20 minutes between us to do. We get 3 ½ to 4 quarts of milk from each goat. It's just delicious.
“We belong to the Rockridge 4-H Club, and we've learned a lot about goats there, and my sister Carol belongs to a special 4-H dairy goat club. We've just started showing our goats. We never did that before. You have to brush them and clip them and really clean them up because cleanliness is one of the things they're judged on. We've gotten a couple of blue ribbons already, which really makes it worth the work.”
Chickens: Best Bets For the Small Farmer
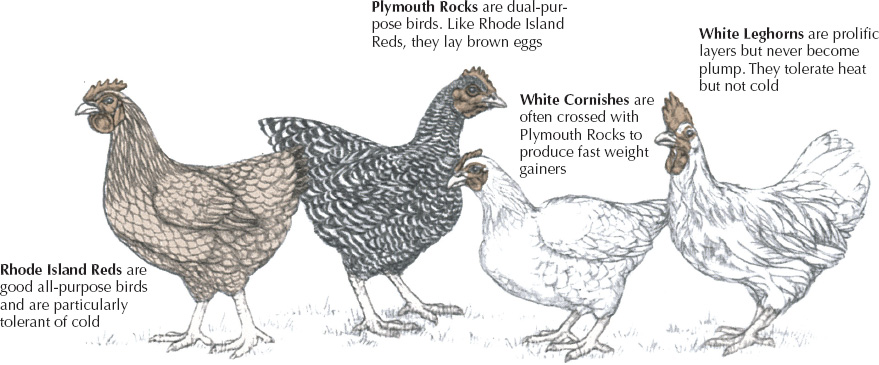
Which breed of chicken you raise will depend on whether you want meat or eggs. Some dual-purpose breeds can provide both.
Most chickens are bred to produce either eggs or meat but not both. The best egg producers remain thin no matter how much they eat, while meat types become plump quickly but lay fewer eggs. There are a number of dual-purpose breeds and hybrids, however, that provide plenty of eggs as well as meaty carcasses.
You can buy chickens at almost any stage of their development, from day-old chicks to old hens who are no longer very productive. (You can even buy fertilized eggs, but they are unlikely to hatch successfully for a beginner.) If possible, obtain your birds from a local hatchery or breeder. However, buying chicks through the mail is very common and may be the only way you can get them. Purchasing started pullets—females about four months old that have just begun to lay—is an easy way for a novice to start a flock. Pullet eggs are small, but the birds will soon be laying full-sized eggs.
Day-old chicks are cheaper but require extra attention and special equipment until they are grown. They are available either sexed (that is, differentiated as to sex) or unsexed. If you are interested in egg production only, buy all females, since a rooster is not necessary unless you want fertilized eggs.
The number of birds you need depends upon the number of eggs you want. A good layer will produce an egg almost every day but none during the annual molt (shedding of feathers). If you want a dozen eggs a day, you will need about 15 birds. This allows for decreased productivity and for any deaths. If you buy unsexed chicks, buy twice that number plus a few more to allow for higher mortality among the younger birds. Butcher the males for meat when they become full grown at about 5 to 6 pounds live weight.
Try to obtain birds that have been vaccinated against pullorum, typhoid, and any other disease that might be prevalent in your area. If the birds have not been vaccinated, have a veterinarian do the job. It is also advisable to buy chickens that have been debeaked to prevent pecking later in life. Most hatcheries routinely vaccinate and debeak all birds.
Whatever type of bird you decide to raise, be sure to make arrangements well in advance. Start by checking with your county agent; he will be able to advise you on what breeds are popular in your area and what diseases are prevalent. Send in your order early.
Troubleshooting
| Symptoms | Treatment |
| Cannibalism (pecking) | Increase feed and space. Keep bedding (pecking) dry and let birds scratch in it |
| Egg eating | Increase feed and calcium. Darken nest boxes. Gather eggs often |
| Lice | Dust birds and coop with louse powder |
| Change of habit, listlessness | Isolate sick bird. Call veterinarian. If bird dies, bury deeply or burn |
Feeding Your Poultry
The quality, quantity, taste, and appearance of a chicken's meat and eggs depend on proper feeding and watering. Fresh water must be available at all times and must be kept from freezing in winter. Each bird will drink as much as two cups a day, particularly while laying, since an egg is almost entirely water.
Mash purchased from a feed supply store is the most commonly used chicken feed. It is a blend of many components: finely ground grains, such as wheat, corn, and oats; extra protein from such sources as soybean meal, fish meal, and dried milk; calcium from ground oyster shells and bone meal; and vitamin and mineral supplements. There are a variety of special mixes, such as high-protein mash for chicks and high-calcium mash for laying hens. There are also all-purpose mashes containing plenty of everything, but these are generally more expensive. On the average, each bird will eat 4 to 5 ounces of mash per day but will require more food during peak production periods or in cold weather.
You can save money by feeding your chickens with homegrown scratch (unground grain) and food scraps in addition to commercial mash. Most chicken raisers consider it wasteful to scatter scratch on the ground, where it gets dirty and is not eaten. Instead, load the feeder at one end with scratch and the other end with mash, or sprinkle the scratch on top of the mash. When scratch is used for feed, it is necessary to provide the birds with grit—bits of pebble and sand—that collects in their gizzards and helps them digest the grain.
Extra protein and calcium must also be provided when feeding scratch. (Protein should make up 20 percent of a chicken's total diet, but most scratch grains are only 10 percent protein.) Birds that can range freely get protein from bugs in the ground. Table scraps and dried milk are other good sources or you can use mash with an extra-high protein content. To supplement calcium in the diet, feed the chickens ground egg or oyster shells, but be sure to grind the eggshells thoroughly. Otherwise the birds may develop a taste for them and eat their own eggs. (Egg eating can also mean the birds lack calcium.)
Birds also like and benefit from very fresh greens, such as grass clippings and vegetable tops. Feed only as much of these greens as the birds will eat quickly—in about 15 minutes. Remember, scraps can affect the taste of eggs and meat. Do not feed anything with a strong flavor.
Most chicken raisers keep food available to the birds at all times but fill the feeders no more than halfway so that the feed is not scattered and wasted. Mash and grains may be stored in airtight, rodent-proof containers, such as plastic garbage pails. Do not store more than a month's supply of mash, since it quickly becomes stale.
A Shelter Planned for Comfort and Minimum Care
Whether you are converting an unused shack or starting with a new building, you will want a chicken house that is warm, dry, draft free, and easy to clean. It should have at least 2 square feet of floor space per bird. A dirt floor—the cheapest and simplest type—is adequate for a small flock. Concrete is easier to clean and gives more protection against rodents but is expensive. If the floor is wooden, it should be raised at least 1 foot off the ground (build it on cinder blocks) as a protection against rats as well as to reduce dampness.
Cover the floor with a litter of wood shavings, shredded sugarcane stalks, or other cheap, absorbent material. Start with about 6 inches. Whenever the litter becomes dirty, shovel away any particularly wet spots and add a new layer of absorbent material. The litter absorbs moisture and provides heat and natural antibiotics as it decomposes. It should be completely replaced at least once or twice a year. Add the dirty litter to the compost heap—it makes excellent fertilizer—then clean and disinfect the coop before spreading new litter.
Insulation in the ceiling and walls will moderate the temperature and help to keep it near 55°F, the level at which chickens are most comfortable and productive. Adequate ventilation is needed to cool the coop, dry the litter, and disperse odors. It can be provided by slots high in the walls, double-hung windows open at the top, or windows that tilt inward at the top. The windows should face away from the wind but in a direction where they can let in the winter sun.
You may want to let your birds out of their house during the day to range free on your land (be sure they are all safely inside at night), but they will be better protected against dangerous dogs, foxes, weasels, and rats in a wire-enclosed run. The run should have a wire-mesh covering or a fence high enough to keep the birds inside. (The smaller the breed, the higher the birds can flutter.) Birds allowed out-of-doors are less likely to develop boredom-induced problems, such as egg eating and pecking. They will also be supplied with plenty of free vitamin D from the sun.

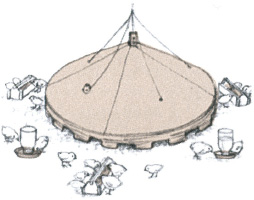
Chick brooder is needed to raise day-old chicks. The brooder should be draft free and very warm. Start with a temperature of 95°F, then reduce it 5°F each week for six to eight weeks. In warm weather a cardboard box with a lightbulb hung above it can be used as a brooder. Chicks will scatter evenly throughout the brooder if the heat is comfortable. Dip the chicks' beaks into water until they learn to drink.
Eggs and Meat
Most small flocks are kept primarily for their eggs, with meat as a valuable by-product. Eggs are less likely to crack or get dirty if they are gathered frequently—at least once a day or even twice a day if possible. Avoid washing the shells, since water removes the protective layer that slows evaporation and protects against disease. If you must wash an egg, use warm water (cold water will be drawn through the shell and into the egg), and eat the egg promptly. A fresh high-quality egg has a thick white and a yolk that remains at the center when hard-boiled. As the egg ages, water evaporates, the air pocket enlarges, and the albumen (white) breaks down.
When a hen is two or three years old, its laying rate falls off and it should be butchered. Be sure it has not had antibiotics for a week or two (check the instructions on the medicine) and that it has not eaten for 24 hours before it is killed. To kill the bird, hold legs and wings firmly with one hand while you chop off the head with the other. Then hang the carcass upside down by the feet for 10 minutes to let the blood drain. To loosen the feathers for plucking, scald the carcass briefly in 150°F to 190°F water. Start the butchering by slitting the neck skin open, cutting off the neck, and pulling out the windpipe and gullet. Eviscerate as shown below, and finish by thoroughly washing the carcass.
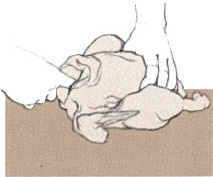
1. Insert finger to pry lungs and organs loose.
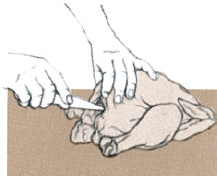
2. Cut around vent, being careful not to cut into it.
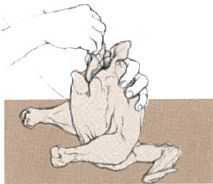
3. Carefully pull out vent and attached intestines.
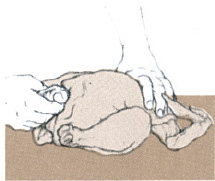
4. Pull out entrails. Do not rupture gall bladder.
For Food Without Fuss Try Geese and Ducks
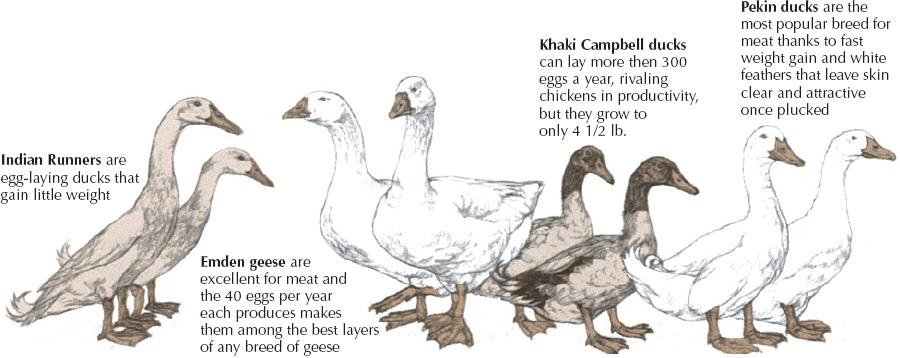
Choose the right breed: a small laying type of duck for eggs, a heavy breed of duck or a goose for rich, flavorful meat.
Geese and ducks are extremely hardy and will forage for most of the food they need. They are also amusing pets and, in the case of geese, make excellent lookouts that squawk loudly whenever a stranger approaches. To start a small flock, raise day-old birds to maturity or buy young birds—ducks about seven months old or geese about two years old—that are ready to start breeding.
One male and six females is a good number of ducks to start with. Geese tend to be monogamous, so it is best to buy a pair. Buy the birds a month before breeding season (early spring) to give them time to adjust. By midsummer there should be plenty of fertile eggs.
Incubation. A goose can hatch only 12 of the 20 or so eggs it lays, while domesticated ducks (except the Muscovy breed) rarely sit on their eggs at all. Since machine incubation is difficult, use broody hens (ones that want to sit on eggs) as foster mothers. Dust the hen and nest with louse powder and put five eggs under the bird. Keep water and food nearby so that it will not need to leave its nest for more than a few minutes. The hen will turn the eggs daily if they are not too heavy; if this does not happen, turn them yourself to keep the yolks from settling. Mark one side of each egg with a grease pencil so that you can tell which need to be turned. Sprinkle the eggs with water every few days to maintain the high humidity that a duck or goose provides naturally with its wet feathers. About five days after incubation begins, hold each egg up to a bright light in a dark room and look for the dark spot inside, which means the egg is fertilized. Hatching takes 28 days for ducks, 30 days for geese.
Brooding. Newborn birds must be kept warm and dry until they grow protective feathers at about four weeks of age. For birds raised by their natural mothers, this is no problem, but if the young are raised by a hen, take special precautions. First, as each bird emerges, remove it to a warm brooder until all are born. Otherwise, the hen may think the job is finished and leave the rest of the eggs before they hatch. Then confine the hen and babies in a small area for the first few days.
If you are using a brooder like the one shown on page 185, provide 1 square foot of floor space per bird and keep it at 85°F. As the birds grow, gradually increase the floor space and reduce the temperature by 5°F a week for four weeks. Give starter feed and plenty of water to the newborns. If it is warm and dry outside, two-week-old goslings can be let out to eat some grass. After four weeks begin to shift the little ducklings and goslings entirely to range feeding.
Feed. At least 1 acre of range is needed for 20 mature birds. To prevent overgrazing, divide the area into three sections and shift the birds from one to the other as the supply of grass dwindles. Carefully fence any young trees on the range area, since geese love to eat their tender bark. You can supplement foraging with pellet feed placed in covered self-feeders right on the range. Supply laying birds with ground oyster shells to provide calcium, and provide plenty of fresh drinking water at all times or the birds will choke on their food. Water troughs must be deep enough that a duck can submerge its bill (to clear its nostrils) and a goose its entire head.
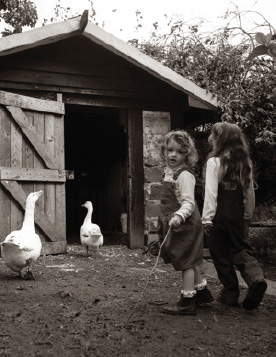
A simple shed with 5 to 6 sq. ft. of floor space per bird is all that ducks or geese need for shelter. Good ventilation and sanitation are necessities, and litter should be spread and tended as for chickens. The birds enjoy a place to swim, but a pond or other open body of water is not needed to raise them successfully.
Eggs, Meat, and Down
Duck eggs are larger than chicken eggs and have a stronger taste but can be treated and used just the same way. Butchering too is the same, but be prepared to spend much more time plucking, especially with geese, since the feathers of waterfowl are harder to remove. If you are not planning to save the down, paraffin can be used to help remove the pin feathers. Melt the wax, pour it over the partially plucked bird, and then plunge the carcass into cold water to harden the wax. Many of the pin feathers will come out as you peel off the hardened wax. Ducks are ready to be butchered at 8 pounds live weight and geese at 12 pounds live weight.
Feathers and down tend to blow about, so do not pluck a bird in a drafty area or in a spot where you might mind finding feathers later. To save the down, stuff it loosely into pillowcases and hang them to dry. Down is the warmest insulator for its weight that is known. Once dry, it can be used as stuffing for soft pillows, comforters, and sleeping bags. You can even make your own feather bed.
Troubleshooting
| Symptoms | Treatment |
| Droopiness, change in habit, diarrhea | Call veterinarian for diagnosis. Isolate bird. Improve sanitation |
| Slow weight gain | Check for worms and use dewormer if necessary. Improve sanitation |
| Lice, ticks, mites | Use appropriate insecticide. Follow directions carefully |
Rabbits: Good Protein In a Limited Space
Rabbits are excellent animals to raise for meat. Not only are they delicious, prolific, and hardy, but they are also inexpensive to feed. In fact, they yield more high-protein meat per dollar of feed than any other animal.
Food. Specially prepared rabbit pellets provide the best diet. These can be supplemented with tender hay, fresh grass clippings, and vegetable tops—but greens should be fed sparingly to a rabbit that is less than six months old. Root vegetables, apples, pears, and fruit tree leaves are also favorites. Water is essential (change it at least once a day). Many raisers also provide a salt lick.
Mating. Medium-weight types, such as the New Zealand, are ready to breed at about six months old. Signs to look for in the female are restlessness, attempts to join other rabbits, and a tendency to rub its head against the cage. Once a doe has reached maturity, it is fertile almost continuously, with infertile periods lasting only a few days. Simply place the female in the male's cage; mating should take place immediately. If it does not, bring the doe back to its own cage, wait a few days, and then try again. Never bring the male to the female; fearing an intruder, the female may attack.
Birth. Ten days after mating, check for pregnancy by feeling the area just above the pelvis. Try to locate the small marble-shaped embryos. If you feel nothing, check again a week later and rebreed if necessary.
A Basic Wire-Mesh Hutch
Birth—called kindling—occurs 31 days after conception. Five days before the young are due, put the nesting box—with a good supply of straw in the bottom—in the doe's hutch. The young will probably be born at night. Leave them alone for a day or two until the doe is calm. Then distract the mother with some food and look inside the nest to see if there are any dead or deformed babies that must be removed. Start feeding the doe a special high-protein nursing diet as soon as the young are born, and make sure that the family is not disturbed. Otherwise the doe may kill the young. The rabbits will suckle for about eight weeks.
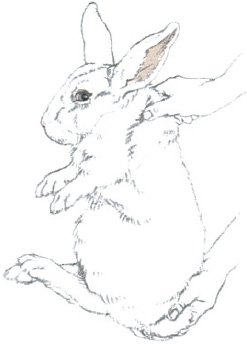
New Zealand White, the most popular rabbit for mea is a medium-weight breed of about 5 lb. Buy the best animals you can afford, sinc the quality of future litters will depend upon them. Be sure they are alert, bright-eyed, and clean, with dry ears and nose and no sores on the feet. Start with rabbits six months old. To pick up a rabbit, grip it as shown. Never hold it by the ears.
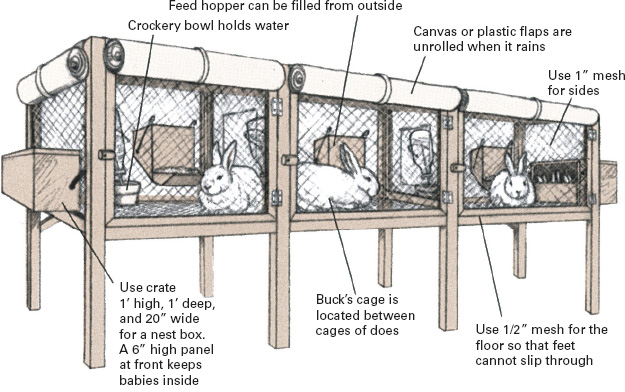
Housing can be very basic, since cold is no real problem for rabbits. A hutch should, however, provide protection against drafts, rain, and intense heat, and each rabbit should have its own cage. Individual cages can be hung in a garage or empty shed. Or build an outdoor hutch of lumber and 1 in. wire mesh or hardware cloth. Individual cages should be about 3 ft. wide by 3 ft. deep by 2 ft. high with mesh sides and floors. Set them up at a convenient height for feeding and cleaning. If the cages are not in the shade, they need to have a double roof to help keep them cool. For easy cleaning, place trays beneath the cages to catch droppings. Clean the trays regularly, and scrub and disinfect the cages between litters.
Butchering a Fryer
When the rabbits are 8 to 12 weeks old, they are ready to be butchered as fryers. They should be about 4 pounds live weight and will weigh only about half as much after they are fully skinned and dressed.
For one day before butchering, do not feed the rabbit. To kill it, administer a sharp blow directly behind its ears. Use a heavy pipe or piece of wood, and hold the animal upside down by its feet or place it on a table to deliver the blow. Next, immediately hang the animal by its feet, cut off the head just behind the ears, and let the blood drain out. Cut off the feet, then follow the steps below to skin and dress the carcass. After dressing, immediately chill the meat, including the liver, heart, and kidneys, all of which are edible. Discard the other entrails or feed them to other animals.
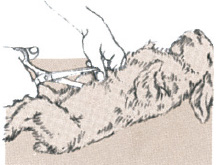
1. Slit skin along back legs and center of belly.

2. Pull skin down toward the animal's front legs.
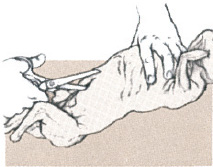
3. Slit carcass, being careful not to cut into anus.
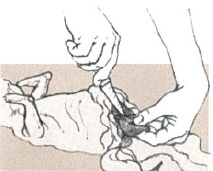
4. Carefully remove insides. Do not cut into gall bladder.
Troubleshooting
| Symptoms | Treatment |
| Refusal to eat | Check water. Call veterinarian if refusal persists |
| Runny nose, sneezing, diarrhea | Destroy sick animal or isolate it and call veterinarian |
| Sore hind feet | Keep floor of cage scrupulously clean and dry |
Porkfor the Year From a Single Hog
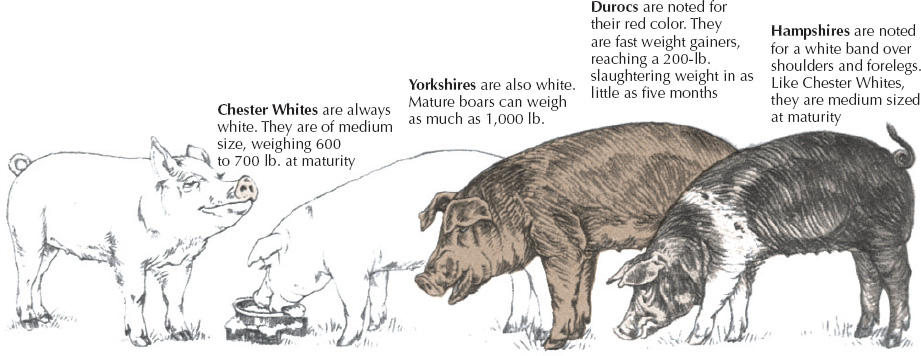
Crossbred hogs—combining the best qualities of such pure breeds as these—tend to be the most vigorous and are thrifty to raise.
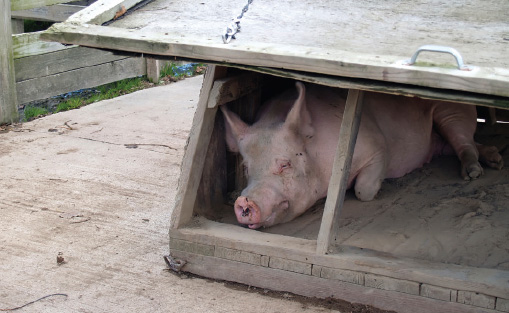
Pigs are the most intelligent of barnyard animals. They can be taught to perform as many tricks as a dog and even seem to be able to puzzle out answers independently— for example, the way to open a complicated gate latch. For anyone with a good source of leftover produce, pigs can be profitable as well as amusing animals to raise. They will eat almost any type of food, including table scraps, restaurant garbage, an unexpected bumper crop of vegetables, a summertime oversupply of goat's milk, or alfalfa and grain from the pasture.
Owning a sow and raising the two or three litters of 10 or so piglets produced each year is likely to provide too much pork for even a large family. Instead, buy a just-weaned pig, called a shoat, in the early spring and fatten it during the summer. When, in the fall, it reaches 220 pounds, it will be ready for butchering into 150 pounds of edible cuts. Your larder will be full and you will be free from the daily chores of animal tending.
Breeding for leanness
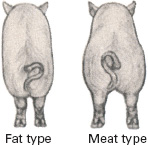
Modern hogs are bred to be lean and meaty, not fat like the ones popular 50 years ago when lard brought high prices. You can recognize a meat-type hog from its wide, straight stance; its long, lean, muscular physique; and its thick shoulders and hams (upper back legs).
In choosing a shoat, health and vigor are more important than breed. Buy from a reliable breeder who maintains a clean, healthy herd. Make arrangements with him well in advance, for his litters may be in great demand. When the time comes, pick the biggest and best of the litter. Look for an animal that is long, lean, and bright-eyed. Never accept a runt, even if it is offered at a greatly reduced price. It will take too much extra feed to fatten, since a runt needs extra food throughout its life.
The shoat should be six to eight weeks old at the time of purchase. A good rule to follow is to select one that weighs between 30 and 40 pounds; if it weighs less, it is either too young or a runt. If your shoat was not free to range for its food, it should have received an iron shot, since pigs born in confinement are anemic. It also should have been inoculated against hog cholera and any disease prevalent in your area (check with your county agent). If it is a male, be sure it has been castrated.
Troubleshooting
| Symptoms | Treatment |
| Lice, mites | Apply disinfectant according to directions. Improve sanitation |
| Slow weight gain | Check for worms. Deworm regularly. Improve sanitation |
| Joint pain, skin blotches | Consult veterinarian. Move pig to new pen or pasture |
Summertime Fattening
A pig must eat 3 pounds of feed to gain a pound of weight, or a total of 600 to 700 pounds to reach slaughtering weight. Commercial feeds provide the right balance of vitamins, minerals, proteins, and carbohydrates, but so do many less expensive substitutes.
One partial substitute is pasture. Up to six pigs can forage on 1 acre of such high-quality pasture as clover, grass, and alfalfa. Alfalfa, a legume, is especially valuable because it provides the precise amount of protein— 16 percent—required in a pig's diet. In addition to eating plants, pigs on a range will get valuable minerals and trace elements when they root through and ingest the dirt in the field. Divide the pasture into three or more areas and rotate the animals from one to another to minimize the buildup of parasites harmful to pigs.
Range feeding must be supplemented with a small amount of coarsely ground grains, usually 2 to 4 pounds per animal depending upon the quality of the pasture. Traditionally, corn has been the most commonly used grain supplement, but oats, barley, and rye are also good. Despite their reputation, pigs will eat only as much food as they need, not enough to make themselves sick. This simplifies feeding, since the grain can be put into self-feeding hoppers set inside the grazing area.
If acreage is too scarce for foraging, raise the pig in a pen. Supplement grain or commercial feed with table scraps, garbage, and garden or orchard wastes, such as vegetable tops, stalks, and rinds. Discarded food from restaurants and school cafeterias can make an excellent feed supplement if it is properly prepared.
To process discarded garbage, sort through and remove inedible items. Also pick out all chicken bones (they will splinter and choke the pig) and pork scraps (a seemingly healthy pig can carry germs to which your animal is susceptible). Cook the remaining garbage at 212°F for 30 minutes to kill dangerous bacteria. If you must feed pork scraps, thorough boiling is especially important. Otherwise you risk the spread of trichinosis, a parasitic disease that is dangerous to humans. (The parasites live in the pig's intestines and muscles but are killed when heated to 137°F. Use a meat thermometer, and cook the pork slowly until the thermometer reads 170°F for small roasts, 185°F for thick roasts.)
If you have a goat or cow, its milk will provide an excellent source of supplemental protein. Up to 1 ½ gallons of milk per day may be fed. To provide trace minerals, let the pig root through clumps of dirt or sod that you have carried to the pen. Be sure that the dirt does not come from a field fertilized with hog manure (it can contain harmful bacteria) or sprayed with chemicals. Provide plenty of fresh, clean water for your pig.
A-frame on skids is a popular hog shelter. Windows or doors are put at front and rear to provide maximum cooling and ventilation, since overheated pigs gain weight slowly. Skids permit the house to be moved to different parts of the pasture or pen.
Housing Should Be Cool and Sturdy
In summer almost any unused shed will make a good home for a pig, or you can build a simple A-frame, either permanently sited or movable like the one shown above. As protection from the sun's heat, the structure should be set under a tree or have a double roof with several inches of space between the two levels. Good ventilation will also help to keep the house cool.
To keep a 220-pound hog confined, strong fencing is essential. A wire fence usually proves the most practical for a range. Set the posts at least 3 feet deep to make the fence strong enough so that the animal cannot knock it over. A strand of barbed or electrified wire placed 3 inches above the ground may be needed to keep the hog from burrowing under the mesh.
If you are raising your pig in a pen, provide as much outdoor space as possible; the absolute minimum for a single pig is 100 square feet. Fence the pen with closely spaced boards so that the shoat cannot catch its head between them. The boards must also be strong enough to keep a grown hog inside. Nail all boards to the inside of the posts so that the pig cannot push them loose, and bury the bottom board several inches deep in the ground to keep the pig from burrowing underneath.
A hog has very few sweat glands to keep it cool and will appreciate a wallow in its pen or range area. Use a garden hose to make a big, muddy area or fit the hose with a spray nozzle to provide a light shower.
Careful Butchering Is Key to Quality Meat
The hog must be kept quiet and in a pen by itself for at least three days before slaughtering. Bruises, overheating, and excitement will damage the meat's flavor and texture and cause unnecessary spoilage during the butchering. For the last day before butchering, withhold food, but provide as much water as the pig will consume.
Sticking is the best method of killing. The animal can be shot or stunned first to make the job easier, but experts warn that this hampers efficient bleeding. Hang the freshly killed animal head downward, and collect the blood for use in sausage, as a protein supplement for other animals, or as fertilizer.
Once all the blood is drained, remove the hog's body hair as quickly as possible. To loosen the hair, immerse the entire hog in 145°F water for several minutes. An old bathtub set on concrete blocks and with a fire underneath is an easy way to heat the 30 to 40 gallons of water necessary for this task. After scalding, hoist the carcass onto a table where two or more people with special bell-shaped hog scrapers can scrape off the hair. Finally, rehang the carcass and butcher as shown below.
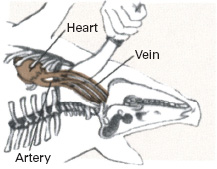
To stick a hog, hang it head down or flip it on its back. Insert knife under breastbone between ribs. Move knife up and down to sever main artery that comes out of heart. Do not damage heart, which must keep pumping to ensure proper bleeding.
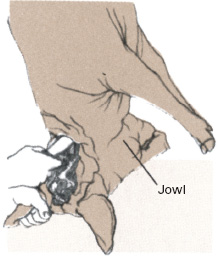
1. Remove head (except for jowl) by cutting from back of neck toward jawbone.

2. Slit carcass open by cutting upward from throat, downward from hams.
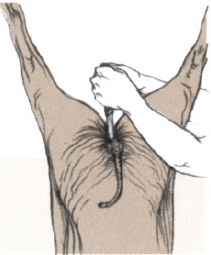
3. Cut circle around anus to begin removal of bung (lower end of intestine).
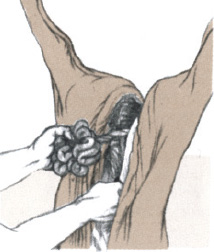
4. Pull bung away from body cavity. Bung must not be cut, torn, or punctured.
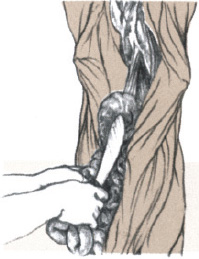
5. Use hand or knife to sever fibers joining entrails to body. Do not cut gall bladder.
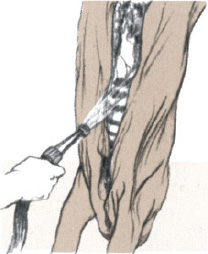
6. Pull entrails out and place in cold water. Hose out body cavity with cold water.
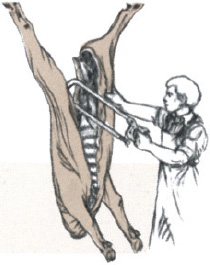
7. Slit backbone, pull out lard, and hang carcass for 24 hours at 34°F to 40°F.
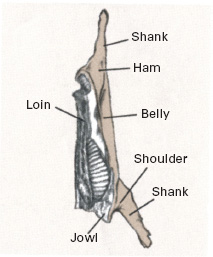
8. Cut carcass into parts. Use innards and blood for sausage and scrapple.
Sheep: Gentle Providers Of Meat and Fleece
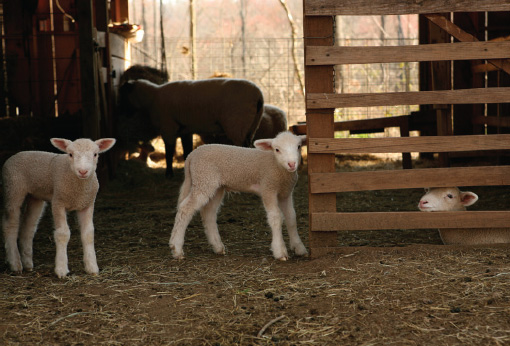
For homespun yarn, homegrown meat, lustrous shearling skins, and the companionship of a few amiable yet profitable animals, consider raising sheep. Their moderate size and gentle disposition make them easy to handle, their shelter needs are minimal, and they can graze for most of their food.
To start a small flock, buy grade (nonpurebred) ewes, but find out as much as you can about their background. If you can find a ewe that is a twin and born of a mother that is also one of twins, that animal is likely to bear many twins to build your flock. When purchasing a ram, pick the best purebred you can afford. The good qualities will gradually improve the overall excellence of the entire flock.
When shopping for sheep, go to a reliable breeder and select alert animals that are close to two years old (the age they begin to breed). Make sure they are free of any indication of disease, particularly sore feet, teats, or udders, and that they have no sign of worms. Color is another consideration. Sheep raisers have traditionally sought animals with pure white fleece that can be dyed a variety of colors. But many modern handspinners enjoy working with the fibers from their black and brown ewes.
Pasturage, Hay, and Grain
Sheep, like cows and goats, are ruminants whose stomachs have special bacteria that break down grass into digestible food. Unlike nonruminant animals that derive little food value from grass, sheep can get all the nutrients they need from good-quality pasturage.
A sheep pasture must be well fenced, as much to keep out predators as to keep the sheep inside. Build a 4-foot-high fence of medium-weight wire field fencing attached to heavy wooden posts. Set the posts at least 3 feet deep in the ground and no more than 15 feet apart. Install a strand of barbed wire at the bottom and another one or two strands at the top to protect sheep from dogs and other enemies. Barbed wire, however, will not prevent sheep from wandering through a broken fence. Their thick wool coats protect them against the barbs—and against electric shock as well if the fence is electrified. As a result, you must check the fencing regularly and repair any weak spots or holes through which the sheep can pass.
One acre of good-quality pastureland containing about half tender grass and half legumes will feed four sheep for most of the summer. To be sure that the animals do not overgraze and ruin the pasture, rotate the grazing area. Use at least three separate sections, and move the sheep from one to another when they have cropped the tops off the plants. The older, tougher parts—which the sheep dislike—will send up new shoots, so the pasture will regenerate. Another precaution that helps to keep the pastureland in good condition is to exclude the sheep in the very early spring before the new growth has had a chance to become well established.
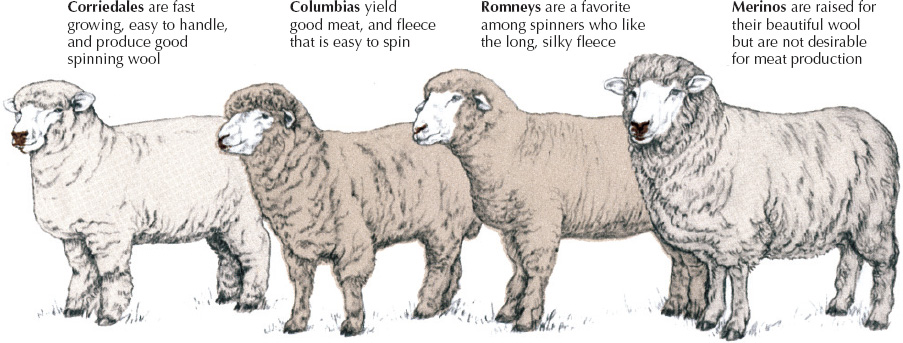
When choosing a sheep, look for such traits as hardiness, fast growth, ability to forage, quiet disposition, and spinnable fleece.
When good pasture is not available or when extra demands are placed on a sheep's body during pregnancy and nursing, its diet must be supplemented with grain. In the spring, when the ewes are being prepared for breeding, begin giving them whole grains, such as oats, corn, and wheat. Feed them each 1 pound of grain per day. A mother nursing twins requires 1 ½ to 2 pounds of grain per day. During winter provide each sheep with 1 pound of grain per day along with all the top-quality hay it will eat. The hay should be tender and green with plenty of legumes, and it should never be moldy. Put it in a hayrack, where it will stay fresh and not be scattered on the ground and wasted.
For good health and fast growth, feeding must be managed carefully. If a grain supplement is being used, measure it out carefully and give half the daily amount in the morning and half in the afternoon. Keep the feeding times constant, and make any change in diet extremely gradual, especially when changing from winter hay to summer pasture. Sheep unaccustomed to grass can develop bloat (excess gas in the stomach), which is painful and can cause death.
Whether they are grazing or being fed hay and grain, the sheep need salt (in the form of a salt lick). Medication for internal worms, a major danger to sheep, as well as extra minerals can also be supplied in the lick. Plenty of fresh water is also vital.

Teeth indicate age of sheep. When an animal is about one year old, it gets its first two adult teeth. It will add two more permanent teeth each year until there are eight in all. In old age, tops of adult teeth wear down to leave short, narrow bases with spaces between them.
Troubleshooting
| Symptoms | Treatment |
| Weight loss | Check for worms, deworm regularly |
| Limping, inflamed feet | Check hooves and trim semiannually, avoid wet pasture, use footbath |
| External worms, ticks, mites | Dip, dust, or spray, especially after shearing |
| Change in habits, weakness | Consult veterinarian for diagnosis and proper medication |
Shed must have ample space because sheep dislike crowding.
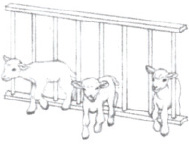
Lambs need a creep, an area only they can enter. To set up one install a fence diagonally across one corner of the shelter. The fence palings should be 9 in. apart—enough space for lambs, but not sheep, to get through. Use heat lamp to warm creep.
Housing a Small Flock
Sheep thrive in cold weather and, as a result, their housing requirements are minimal. A three-sided shed is adequate in most climates unless there is to be a midwinter lambing. In that case, you will need a warm place for the lambs. The shelter should be roomy enough to provide at least 12 square feet of space per animal and preferably 15 square feet or more. A wide door is another essential so that pregnant ewes will not be crowded as they enter and leave the building. Good ventilation will keep the shed cool and minimize dampness.
The floor can be dirt or concrete but not wood, and it should be covered with about 1 foot of litter. Sheep manure is normally dry and can be allowed to accumulate in the litter, where it will warm the floor. Remove the dirty litter once a year, and clean and disinfect the floor and building. If damp spots develop before the year is up, they must be removed and fresh litter added. Similarly, if the litter becomes wet and smelly, it should be changed.
At lambing time a few additions to the sheep shed are necessary. A fenced-off stall should be provided for each ewe—most sheep raisers keep a supply of gatelike panels that can be set in place at lambing time to create temporary stalls. A lamb creep—a small area with a barrier that permits the lambs but not the sheep to enter—is also needed to protect the lambs' special feed.
The Breeding Season
Since most breeds of sheep mate just once each year, managing the breeding season is not difficult. The season begins in the fall. A few weeks before, check the ewes for worms, sore feet, and other problems. At the same time put them on a high-protein diet to bolster their health and improve their chances of bearing twins.
Lambing time is 148 days after mating. In the normal birth, feet come out first, followed by the head resting between the legs. A number of complications can arise, including breech birth (tail first delivery) and other positions that cause the lamb to get stuck in the birth canal. Until you accumulate enough experience to recognize signs of trouble, it is wise to seek the help of someone who is knowledgeable—either a veterinarian or a neighbor who has raised sheep for some time.
Be prepared to take good care of the lambs as soon as they are born. Wipe the lamb dry—particularly around the nose so that it can breathe—and put it in a small, warm box until its mother can tend it. Make sure that each lamb gets some of the ewe's first milk, called colostrum, which contains vital antibodies and vitamins. Occasionally a ewe will not feed its lamb. If this should happen, you will have to bottle-feed it every two to four hours for the first few days. After that, bottle-feed the lamb twice a day until it is two months old; at that time it can be weaned. Use special sheep's milk replacer (from a feed supply store) rather than cow's milk, which has too little fat. You can also get another ewe to adopt the lamb. Disguise the lamb's smell by washing it in warm water and rubbing it with the afterbirth from the adoptive mother's own lamb. Or rub it with something tasty, such as molasses.
Keep each ewe and its lambs together in a separate stall for the first few days after birth or until they learn to recognize each other. Before the young are two weeks old, vaccinate them for tetanus and castrate any males that are to be used for meat. You may also want to remove, or dock, their tails to prevent dirt from collecting. A suckling lamb whose diet is supplemented with grain will gain about 5 pounds per week and is ready for sale at 40 pounds. Or a lamb can be gradually switched to grazing and fattened until it reaches about 100 pounds. Lambs are usually shipped live to market, but one or two might be butchered like pigs for home use.
Shearing
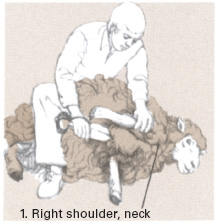
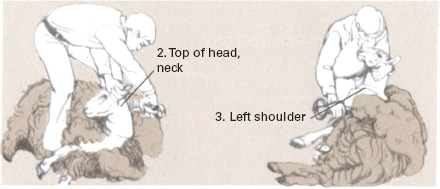
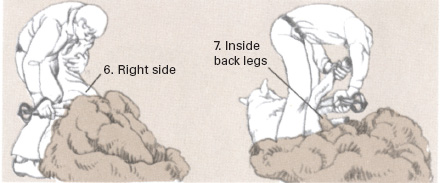
Shear sheep every spring. A good shearer will cut close to the skin and remove the entire fleece in one piece. Second cuts—made by going back over previously clipped areas—are not desirable. Use your knees to hold sheep in position and to keep the animal calm. Proceed to shear, following order shown in illustrations starting at left. Either electric or hand shears can be used.

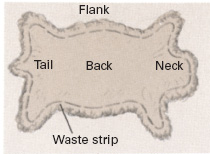
Cleanest fibers are at the fleece's center—which was on sheep's back before shearing. Outermost 3 in. around edge of fleece comes from sheep's tail, legs, and belly. This strip is usually too dirty and matted to spin and must be cut off and thrown away.
Dairying on a Scale That Fits a Family
The easy-to-handle size, quick wit, excellent foraging ability, and moderate production level (3 to 4 quarts per day) of goats make them ideal dairy animals for a family or small farm. Their milk is fully comparable in flavor and nutritive value to cow's milk and, in fact, in some ways is superior. It is naturally homogenized—the fat particles are so small that they do not separate from the rest of the milk—and as a result is easier to digest. In addition, it is less likely than cow's milk to provoke an allergic reaction.
The most important consideration in buying a dairy goat is milk production. Several breeds of goat are available, all of them satisfactory producers, but it is not necessary to purchase a purebred to get good productivity. The surest course is to buy a milking doe (a female already producing milk) with a good production record. If you are buying a goatling (young female), the productivity of its mother and sisters will provide an indication of how much milk you can expect. Young kids, though inexpensive, are usually not a good choice for beginners, who do not have the expertise to raise them and who will probably have to purchase most of their feed—with no return of milk until the young goats give birth to kids.
A goat's appearance is indicative of good productivity. Look for an animal with a large well-rounded udder with smooth elastic skin and no lumps; a straight back and broad rib cage, which show that the doe can consume large quantities of feed for conversion into milk; and a long trim body, which indicates that the doe will convert most of its feed into milk, not body fat. But avoid does with any signs of disease or lameness. Bright eyes and a sleek coat are good signs of health. You should be sure the animal you buy has been tested for brucellosis and tuberculosis. Although both diseases are rare among goats in the United States, they are dangerous, since they can be transmitted to humans through milk. Annual testing of milkers is essential.
Before you buy a milking doe, make sure you know how to milk it correctly. If you fail to empty the udder completely at each milking, milk production will slacken and can even stop completely. Once this happens, the doe will give no more milk until it bears another kid. Many first-time goat owners buy a bred doe that has not yet borne a kid so that they can become accustomed to caring for the animal before having to milk it.
Bucks (male goats) are not usually kept by people interested in producing only a small quantity of milk. Bucks have a strong smell that can easily taint the flavor of the doe's milk and must therefore have separate quarters. Since it is easy enough to take a doe to a neighbor's buck for breeding, most small farmers avoid the added bother and expense of keeping a buck.
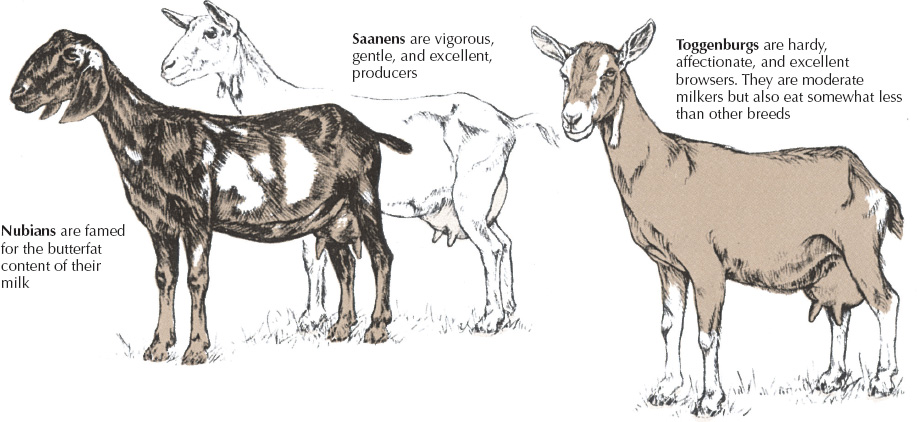
Grade (mixed breed) goats can produce as much milk as purebreds and are much cheaper. But purebreds can be a good buy if there is a demand for purebred kids.
Feed According to Productivity
Good-quality forage will satisfy almost all the nutritional needs of dry (nonmilking) does. Unlike pasture for cows and sheep (which, like goats, are ruminants), a goat's pasture should include a variety of leaves, branches, weeds, and tough grasses to supply essential vitamins, minerals, and trace elements. Legumes are also needed, since they provide necessary protein. When pasturage is unavailable, feed well-cured hay. Goats will not eat hay off the ground; so place it in a rack or manger, or hang it in bundles from the walls.
Unlike a dry doe, a milking doe needs the additional protein of a mixed-grain supplement in its diet. Between 2 and 4 pounds of grain per day—in two evenly spaced feedings—is an average amount of grain to feed, although top producers need more than poor ones. A combination of corn, oats, and wheat bran with some soybean oil meal or cottonseed oil meal (for even more protein) is the most common supplement. Molasses is often added to this combination for extra moisture, sweetness, and vitamins. If a good-quality, fresh premixed feed is not available, buy a calf starter or horse grain mixture.
Overfeeding of grain is dangerous, since it can lead to less efficient digestion of roughage and in extreme cases cause bloat—a serious buildup of gases that can cause death. To prevent overeating, feed the grain only after the goats have eaten plenty of grass or hay. Place the goats in separate stalls or lock them in separate feeding slots in front of a common manger to be sure that each gets only its own ration. A goat's stomach can also be disturbed by changes in its diet, so feed your animals at the same time each day and make any dietary changes very gradually. This is especially important when changing from wintertime hay to spring pasturage.
Plenty of fresh, clean water is important to any milk-producing animal. The more a goat drinks, the more feed will be converted into milk instead of body fat. If you do not have an automatic waterer, change the water twice each day when you feed grain.
Troubleshooting
| Symptoms | Treatment |
| Listlessness, weight loss | Test for worms, and deworm if necessary. Rotate pasture grazing |
| Pain, distended stomach, heavy breathing | Call veterinarian immediately to treat bloat. Massage stomach. Keep goat moving if possible |
| Flakes or clots in milk, hot udder | Have veterinarian treat for mastitis, an udder disease. Isolate goat, milk it last, and disinfect hands |
The Goat Barn
Quarters for one or two milking does can be fairly simple, but their sleeping area should be draft free and well bedded. Goats do not mind cold weather, but they cannot withstand drafts on their skin. Overheating can be almost as bad; a goat that has been kept unnaturally warm for an extended period of time is likely to get sick if it is accidentally exposed to the cold.
Provide access from the barn to a fenced-in outdoor area for browsing and exercise. The fence must be at least 4 feet high—though even this may not be high enough for an unusually agile goat. If you cannot provide a fenced area, you can tether your goats, but tethering should be a last resort. It not only limits access to food and confines the goat close to its own droppings, but by inhibiting exercise it reduces milk production and increases the danger of disease.
Whether tethered or fenced, goats should be pastured on well-drained ground to avoid foot rot. They should also have access to shade and to temporary shelter in case of wind and rain. If possible, include a large boulder or other object for the goat to climb on within the exercise area. Rocks are especially valuable because they help keep the goat's feet trimmed.
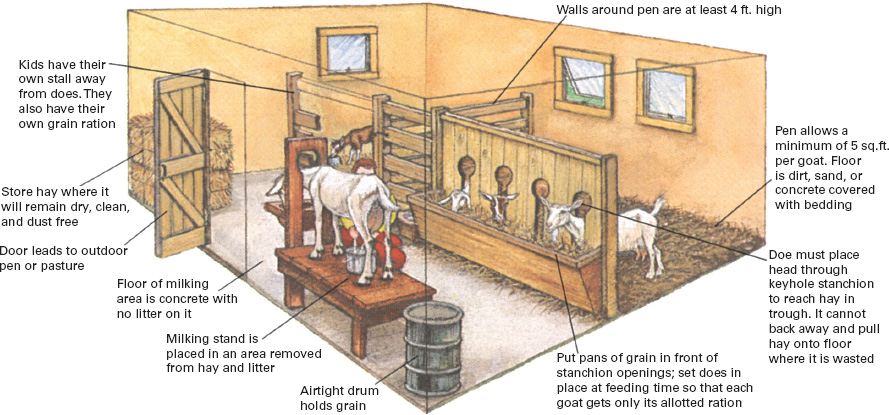
Ideal goat shelter provides a well-ventilated but draft-free stall and an easy-to-clean, dust-free space for milking.
Breeding and Milking
When does reach 18 months, they should be bred once each year to ensure a continuing supply of milk. They can mate as young as six months old, but waiting until they are fully developed guards against permanent stunting that the double burden of pregnancy and continuing maturation can cause. The breeding season for goats begins in the fall and lasts through early spring. During these months a doe will come into a two-day-long heat every 21 days until pregnant. Arrange well in advance for the services of a neighbor's buck. Then when you notice signs of heat—restlessness, tail twitching, bleating—take your doe to be serviced. At the end of five months watch for signs such as bleating, reduced feeding, engorged udder, and white vaginal discharge that mean the young are about to be born.
Newborn kids (goats often bear twins) must receive colostrum, the doe's antibody-rich first milk. After that they should be separated from their mother and fed from a pan or bottle. Give them ½ to 1/3 pint of milk three times daily for the first two weeks. Then gradually reduce the amount of milk and substitute grain and fresh green hay.
A doe freshens (begins producing milk) after giving birth. Rebreed the goat six months after freshening. You can continue to milk for three months longer, but then allow the doe to dry off by stopping the daily milkings. Otherwise its strength may be overtaxed. Establish a familiar milking routine by spacing milkings as evenly as possible. A 12-hour interval is ideal but not vital. At milking time keep the atmosphere calm and allow the doe to settle down, then lift or walk it onto the milking stand. Put the doe's head in the stanchion, where a bucket of grain should be waiting. Next, wipe the udder with a warm, moist cloth. This cleans the area and stimulates secretion of a hormone that relaxes the muscles holding the milk in place. Milk each teat alternately, using the technique shown below. When the flow subsides, stop and gently massage the udder from top to bottom to stimulate the flow; then begin milking again.
The technique of milking, step by step
For good-tasting milk, cleanliness is essential. Even a minute quantity of dry goat manure or dust will damage the milk's flavor if it should fall into the milk bucket. To prevent this, milk in an area that is easy to clean, has few ridges or niches to collect dust, and is separated from the feeding and bedding areas. Keep the hairs around the goat's udder clipped short to minimize the spread of dust that the doe may be carrying, and keep the doe's coat free of dirt by frequent brushing. The person who is doing the milking and the equipment that is used must be scrupulously clean. Clothes should be clean and hands well washed. (For more information on dairy hygiene, see Making Your Own Dairy Products, pp.232–241).

Milk by pressing gently upward against udder, then closing successive fingers; when flow decreases, massage udder.
Protein by the Gallon, Courtesy of Old Bossy
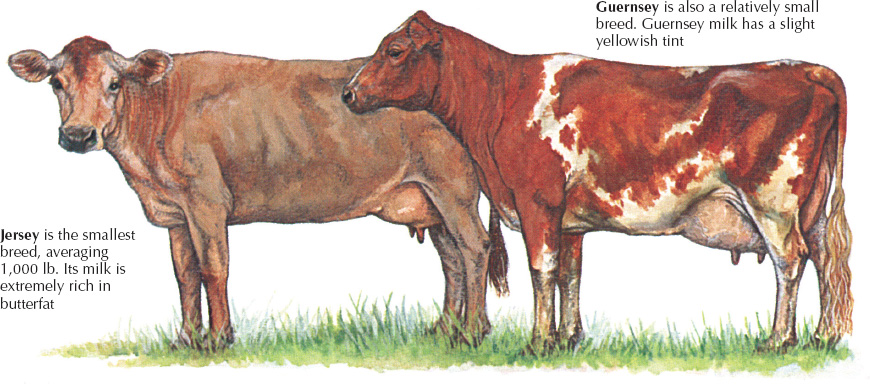
For a family cow avoid a glut of milk by choosing a modest producer—its feed requirements will probably be modest too.
The dairy cow was a nutritional mainstay of the 19th-century homestead, helping to fatten pigs and hens and feed the family. It can perform the same functions for modern homesteaders, exurbanites, and first-time farmers provided it is given the care and attention it needs.
A cow is a major responsibility. It is a big animal—often over 1,200 pounds—and requires relatively large quantities of food. Before obtaining one, be sure that you have at least 2 acres of high-quality, well-drained pasture, a well-ventilated, roomy shed, and a place to store several tons of hay and straw. Also, find out if artificial insemination is locally available; your cow will not continue to produce milk unless bred once a year.
The cow you choose should be gentle, accustomed to hand milking, and have several good years of milking ahead of it. A bred heifer—a cow carrying its first calf—is often an economical choice for a beginner. Since it cannot be milked until after the calf is born, the novice has a chance to adjust to other cow-tending chores. Another good choice is a four- or five-year-old cow in its second or third year of milking. If you have a source of feed and some experience nurturing young animals, you might try buying a three-day-old calf and raising it to maturity, but this is a demanding job.
The cow you buy should have a trim body, clear eyes, and a smooth, elastic udder. The udder should not be lumpy, but protruding veins are typical of a good producer. Try to see the cow milked several times and watch out for any signs of trouble, such as stringy milk or clots and blood in the milk. Some breeders will show you milk production records for their cows, while others will give only a general estimate. In either case buy from a reliable breeder with a reputation for standing behind his promises. He should have proof that his cow is free from tuberculosis and brucellosis, diseases that are rare today but are dangerous because they can infect humans. The breeder should also guarantee in writing that the animal he sells you is able to bear calves.
Troubleshooting
| Symptoms | Treatment |
| Distended stomach, pain | Call veterinarian immediately to treat bloat. Keep cow moving |
| Clot or blood in milk, swollen udder | Discard milk. Consult veterinarian to treat mastitis. Improve sanitation. Disinfect hands after milking |
| Swollen feet, pain in legs (foot rot) | Clean foot thoroughly. Apply copper sulfate as powder or salve. Keep bedding and pens dry and clean |
Feeding the Dairy Cow
Cows, like sheep and goats, are ruminants and can absorb nutrients from pasture grasses and leaves. Their pasture should also contain legumes, such as clover, alfalfa, or lespedeza, since grasses and leaves alone do not provide adequate protein and high-energy sugars for prolonged milk production. To get maximum food value from any plant, the cow must eat it when it is tender and green. Most dairy farmers turn their cows onto a pasture when the grass is 5 ½ to 6 inches tall. After the plants are eaten, but before the land is overgrazed, the cows are moved to a new pasture so that the first area can rejuvenate itself. By rotating pastures, the cows are assured a steady supply of nutritious roughage.
During winter months cows must be fed hay. Like fresh pasturage, hay should be tender and green. It is best when cut just as it blooms. From 2 to 3 pounds of top-quality hay per 100 pounds of body weight will meet a cow's daily nutritional needs. When fed excellent hay or pasturage alone, most cows will produce 10 quarts per day during peak production months. This amount, which represents 60 to 70 percent of maximum capacity, should be more than enough for the average family. To boost productivity or to supplement average-quality hay or pasturage, feed a mixture of grain and highprotein meal. Ground corn, oats, barley, and wheat bran are the most popular grains. High-protein meal is the pulp left over after the oil has been extracted from cottonseed, linseed, soybeans, or peanuts. Feed stores sell these supplements already mixed in proper proportion for lactating cows. They also sell high-protein mixtures specially designed to be diluted with your own grain. Feed the high-protein mixture twice daily—it is usually fed during milking—in measured amounts, and make any changes in diet very gradually. Otherwise the cow may develop bloat, a dangerous stomach disorder.
Up to a point the more grain and meal you feed a cow, the more milk it will produce. Beyond that point the extra grain is wasted. To achieve maximum production, gradually increase the grain ration until the increase no longer results in higher productivity. Then cut the ration back slightly. Conversely, when grain rations are cut—or when pasture quality deteriorates—milk production will fall. A rule of thumb is to feed 1 pound of grain for every 3 pounds of milk the cow produces. When fed about half this grain ration, together with good-quality pasture, most cows produce 90 percent of their top capacity.
Besides good feed, the other essentials to top milk production are free access to salt and plenty of water. For best results provide a salt lick and water in the pasture as well as in the cow's stall. Change the water at least twice a day or else install a self-watering device.
Breeding and Milking
A cow must freshen, or bear a calf, in order to produce milk. Heifers (young females) can be bred when they are as young as 10 months old, but it is best to wait until they are 1 ½ years old or weigh at least 600 pounds.
Today most breeding is done by artificial insemination. Your county agent will help you find a professional inseminator. Arrange well in advance for his services, since the cow will be fertile for only 12 hours after the onset of heat. Signs to watch for are restlessness, bellowing, a swollen vulva, and reduced milk flow. When 21 days have passed after the cow is serviced, watch again for signs of heat. If they reappear, the cow is not settled (pregnant) and must be serviced again.
Carrying a calf while producing 10 or more quarts of milk a day is a tremendous drain on a cow's system. Watch your pasturage carefully to be sure that it is tender, green, and rich in legumes. If the crop shows signs of browning off (as is likely to happen during a hot summer) or if the cow is losing weight, provide some high-energy food supplement. Avoid overfeeding, however, especially during the last months of pregnancy, since this too can cause illness. To keep from overtaxing the cow and to protect future milk production, stop milking two months before the calf is due; the cow will go dry for the remainder of its pregnancy.
The calf will be born 280 days after settling. Bellowing and restlessness are signs that freshening is imminent. Once actual labor begins, check its progress periodically but avoid disturbing the cow. If labor lasts for more than a few hours, call a veterinarian for help.
When the calf is born, be sure it begins to suckle and gets colostrum, the cow's first milk that is rich in vitamins and disease-fighting antibodies. The cow will produce colostrum—which humans should not drink—for five days after freshening. After the first two or three days separate the calf and mother. The calf's new quarters must be clean, dry, and draft free. Cold temperatures are not harmful, but dampness, drafts, and sudden exposure to cold can cause pneumonia. Teach the calf to drink from a bucket by pulling its mouth down to the pail when it is hungry. The calf should receive a daily ration of 1 quart of milk for every 20 pounds of body weight. Provide the milk in three or four equally spaced feedings. When a milk-fed calf is about eight weeks of age, it is ready to be sold as veal.
Begin milking as soon as the calf is removed from its mother. Cleanliness is essential. Keep the milking area free from dirt and sanitize all milking utensils. Pay attention to the cow too. Clip long hairs near its udder and brush the cow daily to remove dirt. (See Making Your Own Dairy Products, pp.232–241, for additional information on dairy hygiene.) It is important to maintain a relaxed atmosphere during milking: milk at the same times each day and avoid disturbances.
At milking time lead the cow to its stanchion, where a pail of grain should be waiting. Wipe the udder with a warm, wet cloth, then start to milk as you would a goat. The cow's teats are much larger and will require more strength to milk, but the basic action is the same. The first milk from each of the cow's four teats should be collected in a strip cup, a special cup with a filter on the top. If strings, clots, or blood spots appear on the filter, discard the milk and call a veterinarian.
After testing the milk proceed to milk two of the teats, holding one in each hand and squeezing them alternately. Eventually, their milk flow will slacken. When this happens, change teats and milk the other pair. (It makes no difference which two teats you milk together.) As you empty the second pair, more milk is secreted from the udder into the first pair. Work back and forth, milking one pair and then the other until they do not refill. Then rub the udder with one hand as you strip the teats with the other. To strip, close the thumb and fore-finger tightly around the top of the teat, then continue to squeeze as you pull your hand down its length.
Milking Shed and Pens for Cow and Calf
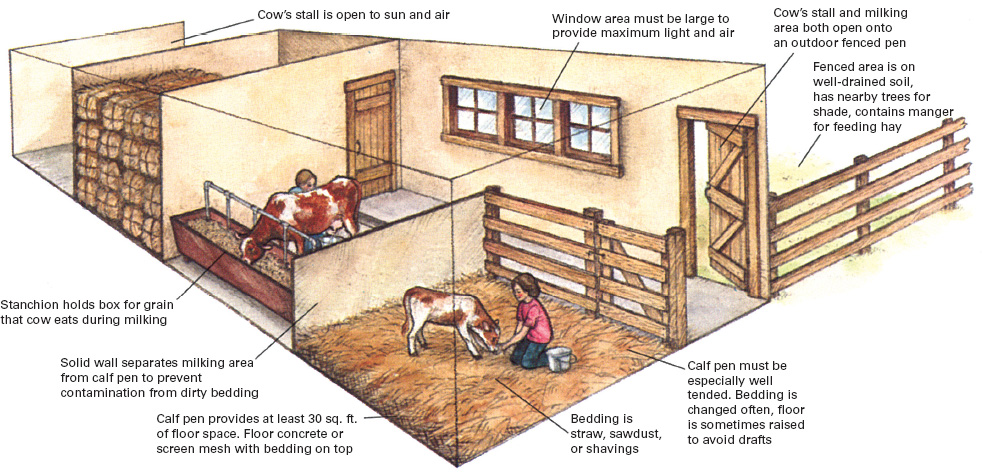
Simple three-sided shed provides the healthiest environment for a cow. With the open front facing away from prevailing winds—usually toward the east or south—the shed ensures plenty of ventilation and allows warm, drying sunlight to reach all the way inside. Rotting, manure-laden bedding on a dirt floor supplies enough heat to keep a cow comfortable in climates as cold as North Dakota's.
The milking area needs careful planning. While a cow can be milked almost anywhere, a well-planned, easy-to-clean area close to the cow's sleeping shed will make the job easier and more sanitary. Floors should be concrete, sloping toward a drain or gutter. Running water is helpful for hosing down walls and floors. There should be ample room to store grain for feeding at milking time.
The same building might contain a calf pen or a spot where a temporary one can be constructed from movable panels when necessary. A lean-to on the cow's shed provides a place to store straw or other bedding material as well as hay, which must be kept dry to protect its nutritive value.
Strong and Spirited, The Working Horse Will Pull Its Weight
For a small amount of acreage a horse can be an efficient substitute for a tractor. While the horse is slower, it is also much cheaper to buy, fuel, and repair. It does less damage to the soil, and it can work in areas too wet and hilly for a wheeled vehicle. Purebred draft horses are the ideal types for farm work. Used at one time to carry medieval knights in full armor, these horses have the size and strength necessary for long hours of strenuous labor. Buying a purebred Belgian, Percheron, or Clydesdale is an expensive proposition, however; a more economical alternative would be to purchase a crossbreed. One such cross would be a draft horse sire with a utility-type mare; such crossbreeds have the size—about 1,200 pounds—and steadiness for farm work, though they are not as powerful as drafters. The mule, a cross between a horse and an ass, is another good draft animal. Riding horses are too light for extensive plowing, but if properly taught, some can do light pulling.
Whatever horse you purchase, it should be trained for the work you expect it to do. As a beginner, you will almost certainly be unable to train the animal properly, and you can easily damage its personality by trying. A 7 to 10-year-old gelding or mare would be ideal, but an older horse is better than one that is too young and playful for hard work. Never buy stallions because they are too unpredictable for a novice to handle.
Buying from a reliable breeder is essential, but it is no substitute for close inspection. Examine the horse's stall for any signs of kicking or biting the walls. Watch as the horse is harnessed to be sure it is not head-shy or dangerous to approach. Before it has had a chance to warm up, look for indications of stiffness, such as shifting of weight from one front leg to the other or failure to rest its weight equally on both front feet. Next, see the animal doing the work you will be asking of it and make sure it neither balks nor is too frisky to handle the job. Its gait while working can provide clues to soundness. Shortened stride, nodding of hip or head, unusually high or low carriage of head, and unevenness of gait may mean the horse is lame. After watching the animal work, listen to its breathing to be sure it is not winded. Finally, examine the horse as it cools down; look for any signs of stiffness and for unusual lumps or knobs on the legs.
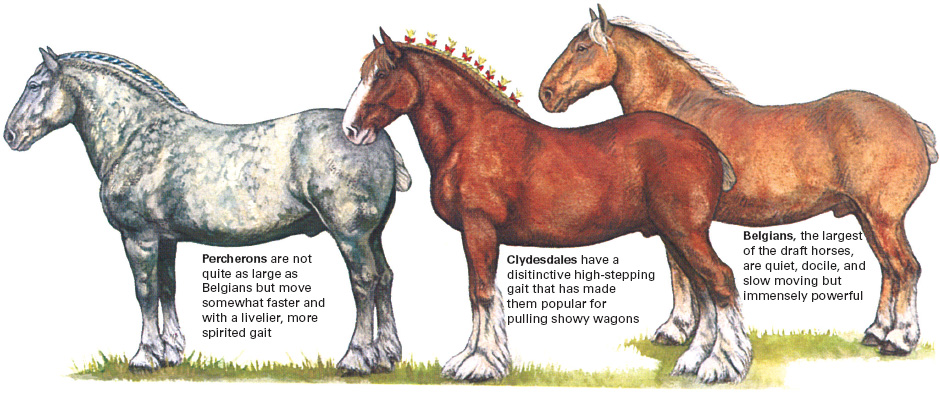
Horses have filled so many different roles throughout history that there is amazing diversity among breeds. Drafters such as these, weighing 2,200 lb. and standing 17 hands to the top of the shoulder (a hand equals 4 in.), have provided pulling power for centuries.
Feed According to Work Performed
A top-quality, well-fertilized pasture can provide the nutrients an idle horse needs. Provide per horse 2 to 3 acres of grasses combined with high-protein alfalfa, clover, or birds'-foot trefoil. Since horses are destructive of turf, protect the pasture by practicing rotation and by closing off the land whenever it is wet or soggy. When pasturage is unavailable, feed 8 to 12 pounds per day of fresh, green, leafy legume hay.
A working horse—whether used for riding or pulling—needs more energy than can be provided by pasturage and hay alone. Oats are the best grain supplement to feed. They are high in protein, contain plenty of bulky roughage, and are unlikely to cake in the horse's stomach. Wheat bran is another high-protein, bulky feed. Corn is relatively high in carbohydrates but is not high enough in protein. If the grain is dusty, mix it with molasses to reduce dustiness, improve flavor, and provide extra energy. The exact amount of grain to feed depends upon the size of the horse, strenuousness and duration of work, and the quality of pasturage. An underfed horse will lose weight, but overfeeding on rich pasturage or grain can cause founder (laminitis), a painful inflammation of the lining of the hoof wall. For light work a daily supplement of 1/3 pound of grain per 100 pounds of horse is sufficient. This can be raised as high as 1 ¼ pounds of grain per 100 pounds of live weight during heavy work.
Troubleshooting
| Symptoms | Treatment |
| Upset stomach (colic) | Call veterinarian immediately. Keep horse standing. Improve feed |
| Sore feet (founder) | Consult veterinarian. Be careful not to overfeed or feed while hot |
| Hoof odor | Consult veterinarian. Treat with salve |
| Teeth worn to sharp edge | Have veterinarian file teeth so feeding is not disrupted |
Horses have delicate stomachs and must be fed carefully. Eating and drinking while overheated from exercise—like overeating—can cause laminitis and colic. For best health, feed a horse at the same times each day—morning and evening for light work; morning, noon, and night for strenuous work. Make changes gradually, and avoid turning a horse suddenly into a lush pasture.
Fresh water should be available at all times—in the pasture as well as in the horse's stall. Change the water twice a day if you do not have an automatic waterer. A salt lick is also essential. Many owners provide one containing trace minerals especially balanced for horses.
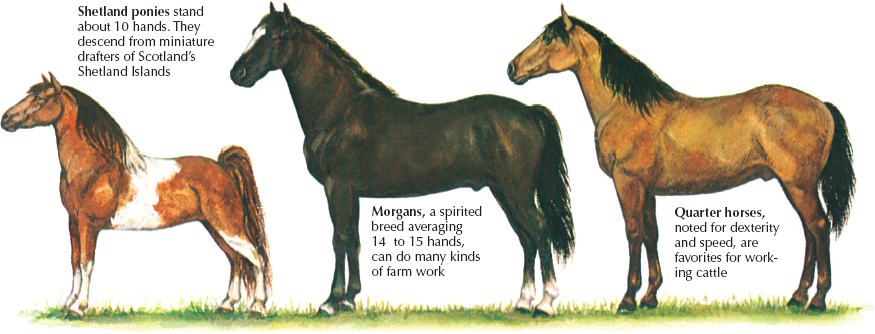
Speed, agility, steadiness, and spirit are among the qualities that have been cultivated in horses of various breeds. Nonpurebreds, too, exhibit marked differences in personality and aptitude. Know which traits are important to you before you buy a horse.
Stabling Your Horses
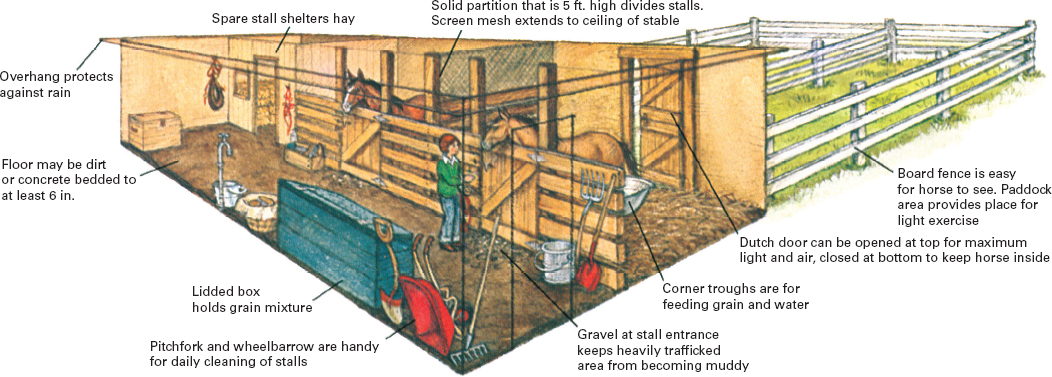
Stall measuring 12 ft. by 12 ft. is ideal for a horse. A dirt floor is best; although it is more difficult to maintain than concrete, it is easier on a horse's feet. Make the floor several inches higher than the surrounding ground and rake it periodically to keep it level. From time to time dig out the dirt and replace it with a clean new layer. If you own more than one horse, each will need its own stall, with floor to ceiling partitions between stalls.
The horse should have access to a paddock or pasture. The more time it spends there, the better its muscle condition will be. The best pasture fences are of boards or the traditional post and rail (see Fences, pp.70–73); both styles are safe, secure, and highly visible. An electrified wire can be run along the top to discourage an especially spirited animal. If you use wire fencing instead, choose a small mesh size so that the horse's hooves cannot get caught, and tie rags to the top so the horse can see the fence. Avoid barbed wire, since it can damage your animal. Set windows high in wall and screen them against flies and other insects.
Checking teeth and conformation
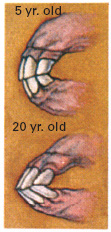
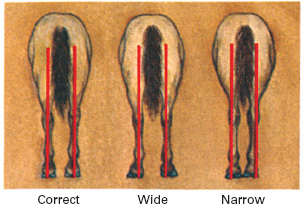
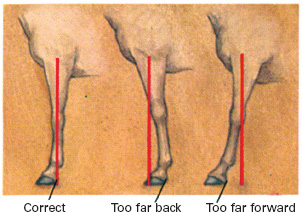
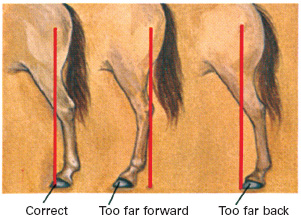
Placement of legs beneath body, slope of shoulders, and slant of ankles are all aspects of a horse's conformation that affect leverage and, therefore, pulling power. Teeth give a genera idea of a horse's age. In a young horse they are nearly vertical; in a 20-year-old horse they slant forward.
Hardworking Drafters Need Considerate Care
Whether you intend to hitch your horse to a plow or show it in a ring, daily grooming is essential to good health as well as appearance. A good brushing before every workout prevents painful hard-to-cure skin injuries caused by dirt matted beneath the harness, saddle, or other tack. Another brushing is necessary after a hard day's work to remove the sweat and dust that will have accumulated in the horse's coat.
For proper grooming you will need a currycomb, a stiff-bristled brush, and a brush or comb for the mane and tail. The currycomb is used first. Rub it in a circular motion over the horse's neck and sides to remove dirt caked on the surface. Avoid using it near bony, sensitive areas, such as the legs, where a bump from its metal or rubber ridges would be extremely painful. After currying, brush the coat to remove embedded dirt and distribute the natural oils. Press the brush firmly enough against the horse's body so that the bristles penetrate the coat but not so hard that you hurt the tender skin beneath. Always brush in the direction of the coat hairs. Pay special attention to the lower legs and ankles—they get extremely dirty and yet are very sensitive. As a result, they need slow, gentle treatment.
Wipe the horse's face and then the area beneath its tail with a clean cloth wrung out in warm water. A bit of mild soap can be added to the water for washing the tail area if it is particularly dirty, but be sure to rinse the soap off thoroughly. Sponges are sometimes used instead of a cloth, but they are more likely to spread disease because they are difficult to sterilize. Gently comb or brush the mane and tail. When doing the tail, stand beside the horse, not behind where you can get kicked.
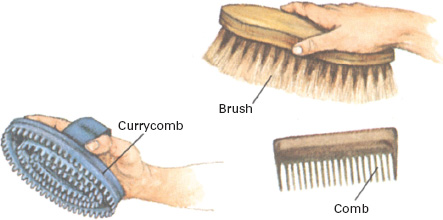
Special implements will help you to groom your horse's coat and to comb out its mane and tail.
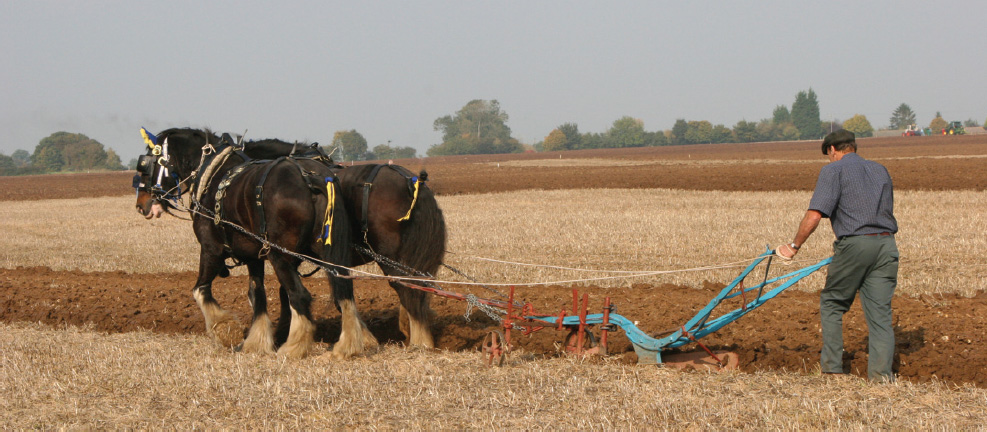
An acre per horse per day is an old rule of thumb that tells how much land a team of horses can be expected to plow. Few farm chores are harder. By way of comparison, a single horse can harrow, cultivate, plant, or mow as much as 7 to 10 acres in a day.
If the horse is confined in a paddock or stall, its hooves should be cleaned daily to remove any manure, debris, or stones embedded between the shoe and the frog (the sensitive pad at the back of the foot). At the same time check to be sure the shoes have not worked loose and that the hoof walls are not overgrown. Hooves should be trimmed and reshod every six to eight weeks. Like fingernails, they grow slowly—¼ inch to ½ inch per month—but the toe grows faster than the heel. If the toe becomes too long, the horse's weight will be forced back toward the heel and its stance changed in a way that can damage its legs and feet. On an unshod horse an overgrown hoof can break off unevenly, causing a cracked hoof. A farrier will cut and file the hoof walls to just the right length and shape them before fitting a new set of horseshoes. Never try to do this job yourself. Proper shoeing can only be learned by years of training with an expert. Poor shoeing can permanently injure the horse.
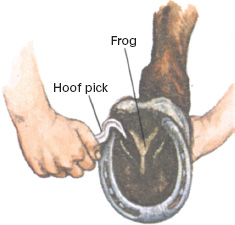
Clean hooves regularly. To lift horse's foot, face toward rear of horse, run hand down its leg to ankle, and lift. (A horse will usually lift its foot.) Starting near hoof wall, run the hoof pick from heel toward toe to remove accumulated dirt. Check hoof wall for dryness and apply salve if it is needed.
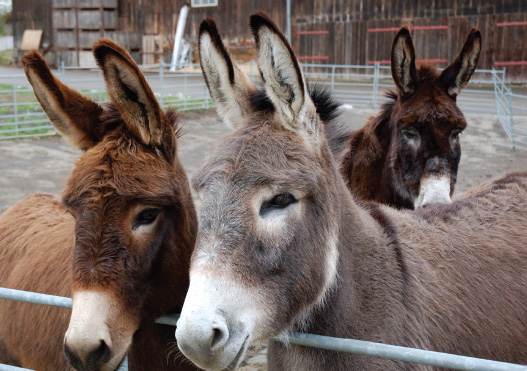
A mule is the sterile offspring of a jack (a male ass) and a mare. Mules have more endurance than horses and are noted for being tough, strong, and surefooted. A female ass, or jennet, bred to a stallion produces a hinny. Jacks weighing 1,100 lb. and standing 15 to 16 hands tall can be bred to average-sized mares to produce mules strong enough for drafting. If they are to breed with mares, the jacks must be separated early from other asses and raised exclusively with young horses until thoroughly trained.
Hitching a Team
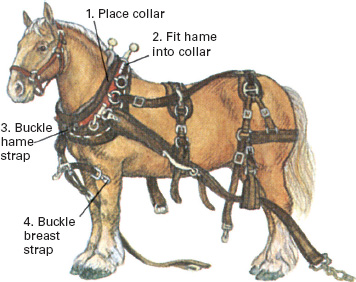
1. Start by putting collar on horse. Fit hame into collar, spread out harness, and buckle straps.
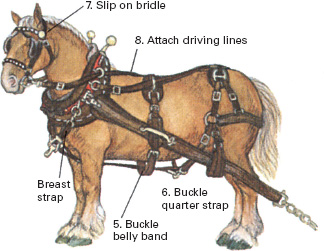
2. Buckle harness straps under horse's belly, then put on bridle and driving lines.
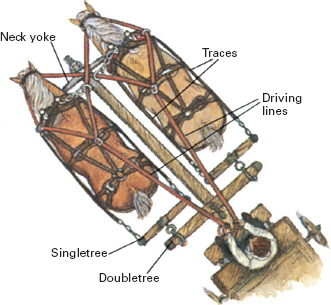
3. Arrange driving lines on a team as shown. For safety keep lines in top condition.
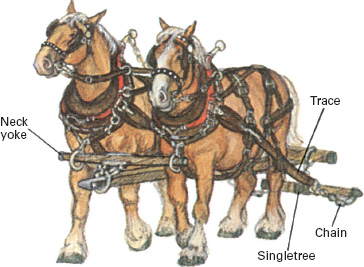
4. To hitch wagon, clip breast straps to neck yoke and attach chains to the singletrees.
Pulling and Plowing
The only sure way to learn to use a team for plowing is to be taught by someone with experience. Horses must be handled firmly and consistently; even a well-trained team can be ruined by a poor driver. Use the command words that your horses were trained to obey. In America standard commands are “whoa” (stop), “get up” (go), “gee” (turn right), and “haw” (turn left). Learn to maintain steady control of the reins; keep them taut, but never pull so hard that you damage a horse's mouth.
Be careful and considerate of your animals. Talk kindly and quietly to them so that they learn to recognize and trust your voice. During breaks in work loosen their collars so they can relax too. Never leave a hitched horse unattended. If you must tie it up temporarily, use the bridle, not the harness straps, and be sure it is tied securely to something immovable. A team that has been idle during the winter needs to get back into condition gradually. Start with small amounts of light work and build up gradually to such heavier jobs as plowing. Keep your equipment in top condition and do not let anyone inexperienced drive your team. With care you will avoid injuring either yourself or your valuable horses.
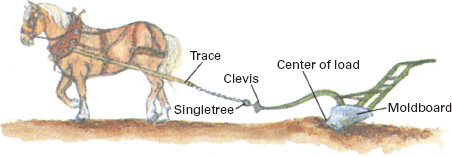
Hitch singletree to clevis. Note alignment of trace, clevis, and center of load on moldboard.
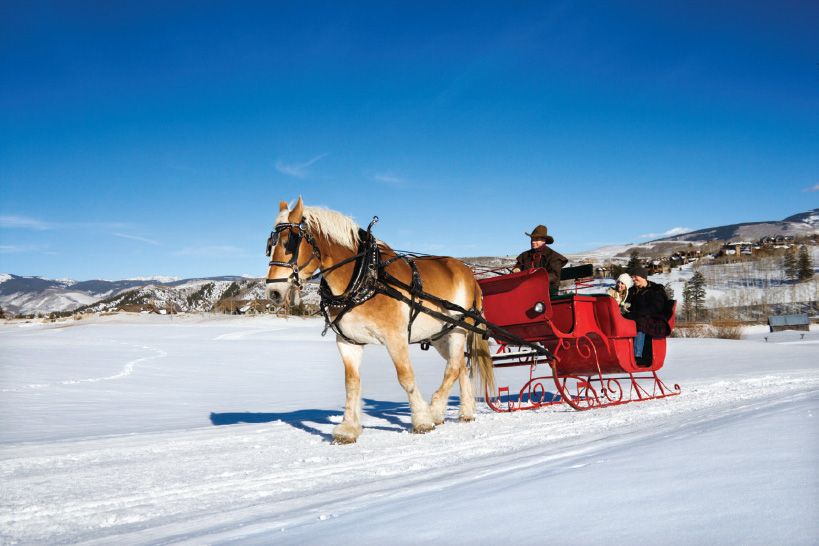
Draft horses can also be trained to pull a sleigh in the wintertime.
