Baking Bread
First Master the Basics And the Rest Is Easy
Nothing smells quite so good as the aroma of bread baking in the oven. And the incomparable taste and texture of a loaf of wholesome, homemade, preservative-free bread is well worth the effort, especially since breadmaking is not nearly as time-consuming as many people believe. Measuring, mixing, kneading, and shaping can be accomplished in 30 minutes or less. Rising takes longer; but this is a process that occurs by itself, leaving you free to handle other chores or simply to sit back, relax, and contemplate the warm, fresh bread you will soon be enjoying.
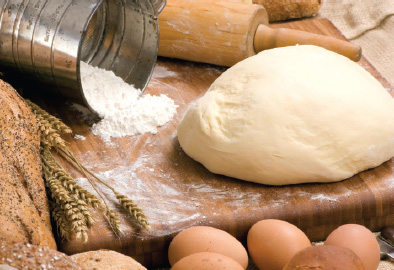
Tools and ingredients for making bread are simple. Start with a basic bread recipe and then experiment by using different grains, nut, seeds, fruit, etc.
Ingredients and Supplies: What Goes Into a Loaf of Bread and Why
Bread is a simple food. Few ingredients and little equipment are required to make it. The basic components of bread are yeast and flour: yeast to make the dough rise, flour to provide substance and structure.
Yeast. When yeast, a plant with millions of living cells, is placed in warm water and is fed sugar and flour, it grows and multiplies, giving off the carbon dioxide gas that makes dough rise. Yeast adds vitamins, gives bread its airy texture, and contributes to aroma and flavor.
You can buy yeast in two forms: active dry and compressed. Active dry yeast is granulated and will remain fresh for months without refrigeration. Before it is used, it is generally dissolved in warm (110°F) water or milk. However, it is sometimes added directly to the other dry ingredients and then mixed with the water or milk at a somewhat higher temperature—120°F to 130°F.
Compressed yeast in cake form is more perishable: it should be refrigerated or frozen immediately. Refrigerated, it will keep about 10 to 14 days. Frozen, it can be stored for much longer periods. When you are ready to make bread, thaw the yeast at room temperature and use it immediately by dissolving it in water or milk that has been warmed to no more than 95°F
You can also make your own yeast as old-time homesteaders did. Mix together 1 cup of cooked mashed potatoes, ¼ cup sugar, 2 teaspoons salt, and 1 cup of warm water (105°F to 115°F). Pour the mixture into a 1-quart glass jar, cover with a cloth, and leave in a warm place (80°F to 85°F) for two days or until it ferments and bubbles up. One cup of this mixture is equivalent to one package of active dry yeast or one cake of compressed yeast. Every time you use a cupful, replenish the starter by stirring in ¾ cup of flour and ¾ cup of potato water, water, or milk. Allow to ferment for a day or so and return, covered, to the refrigerator. It is best to use the starter once a week. If you do not, stir it down after three or four weeks, discard half of it, and replenish the balance with flour and one of the liquids.
Flour. The gas emitted by the growing yeast must have a framework that will hold it. This structure is provided by the flour, more strictly by gluten, a sticky combination of proteins that is developed by stirring and kneading moistened flour. The gluten traps the minute pockets of gas given off by the yeast, causing the bread to rise. Hard-wheat flour, also known as bread flour, is the richest in gluten and produces loaves of greater volume than other flours. Neighborhood bakeries sometimes sell hard-wheat flour, or you may be able to purchase it from a health food store. So-called all-purpose flour is widely available and is satisfactory for both yeast and quick breads. Buy it unbleached—it gives the bread a better texture. Rye, whole wheat, and buckwheat flour are low in gluten and must be combined with all-purpose flour. Used alone, they produce heavy, compact breads.
Other ingredients. In addition to yeast and flour, salt, sweetener, shortening, and eggs are often used in bread recipes. Salt adds flavor and controls the yeast action. Sweeteners add flavor, help in browning, and provide food for the yeast. White cane sugar is the type most often used, but brown sugar, honey, and molasses can be substituted in many recipes. Shortening, generally butter or lard, provides additional flavor, makes bread more tender, improves keeping quality, and helps form a brown crust. Eggs give yeast breads color, texture, and flavor. However, dough that has been enriched with shortening or eggs takes longer to rise.
Special equipment. Several bread pans and, perhaps, a heavy-duty mixer are the only special implements you will need. The size of the pan is important, so be sure to use the one specified in the recipe. If the pan is too large, the dough will rise properly but will not expand over the top of the pan to make a dramatic-looking loaf. If the pan is too small, the dough will rise too high and slide over the sides of the pan. As a rule of thumb, the dough should fill two-thirds of the pan.
Some experienced bakers prefer dark-colored bread pans to help absorb heat and give a browner crust. Special black steel pans are best, but aluminum pans are satisfactory. Darken aluminum pans before using them by heating them in a 350°F oven for five hours. Pans of heat-resistant glass are also popular.
Basic White: Template for Breadmaking
The instructions for making basic white bread can be used as a guide for almost all other yeast breads. Master it and you will be on the way to mastering the entire art of breadmaking from the simplest recipes to the most complex. You will need two 9- by 5- by 3-inch bread pans plus the following ingredients:
2 cups milk
1 tbsp. salt
2 tbsp. butter
1 package active dry yeast flour
½ cup warm water (105°F-115°F)
2 tbsp. sugar
6-7 cups unsifted hard-wheat or all-purpose flour
Making the dough. Heat the milk, salt, and butter in a saucepan until bubbles appear around the edges of the pan. Remove from the heat and let cool to about 110°F.
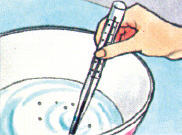
Sprinkle the yeast over the warm water in a large mixing bowl. Make sure the water is not more than 115°F: higher temperatures will kill the yeast. To test the temperature touch a drop of water to your wrist; it should feel only slightly warm. Now add the sugar, stir well, and set aside for 5 to 10 minutes to “proof” the yeast; that is, to test it to see if it is alive (if it is, small bubbles will appear on the surface). Once the yeast is proofed, stir in the mixture of milk, salt, and butter.
Add 3 cups of flour. Stir to mix, then beat with a wooden spoon until smooth—about two minutes. Gradually add more flour, mixing it in with your hands until the dough tends to leave the sides of the bowl. The secret of making bread is to use as little flour as possible and still be able to handle the dough; any flour beyond this amount will tend to make the bread heavy and tough. Remember that the amount of flour given in a bread recipe can only be an approximation, since flours vary greatly in their ability to absorb moisture, differing from one locale to another and from batch to batch. Experience will help you judge the correct amount.
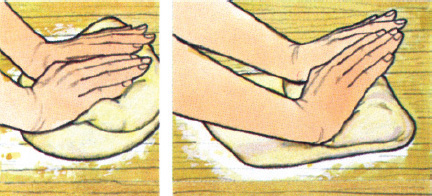
Kneading the dough. The purpose of kneading is to distribute the yeast cells throughout the dough and to develop the gluten in the flour, which traps the gas produced by the yeast, causing the bread to rise. Turn out the dough onto a lightly floured board, marble slab, or countertop. Sprinkle the dough lightly with flour. As shown in the illustration at bottom left, knead by folding the dough toward you, then push down with the heels of your hands. Fold the dough over again, give it a quarter turn, and repeat the kneading; try to develop a rhythmic motion. Continue kneading and turning for 10 minutes or until the dough is smooth and elastic. To test the dough to see if it has been kneaded sufficiently, press two fingers into it about ½ in. deep; the dough should spring back. Form the dough into a ball.
First rising. Grease a large mixing bowl with about 1 tbsp. of softened butter. Place the ball of dough into the bowl and roll the dough around to cover it with butter. This will keep the surface from drying out and cracking as the dough rises. Cover with a kitchen towel or plastic wrap, and let rise in a warm, draft-free place (80°F to 85°F) for 1 to 1 ½ hours or until doubled in bulk. If the room is cold, put the dough in a bowl, cover, and place the bowl in a pilot-lighted oven, or on a rack over a pan of hot water, or near (not on) a radiator. If you have a wood stove, the warming oven over the range is ideal for rising.
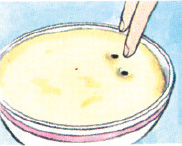
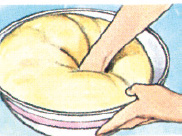
To test if the dough has risen sufficiently, make an indentation by pressing two fingers into the dough about ½ in. deep. If dough does not spring back, it is ready. If the dough has risen a little too much, it will not be seriously affected; however, excessive rising can change the texture and flavor of the finished product.
Punch the dough down with your fist to deflate it. Turn it out on a lightly floured board, then knead well about two minutes. Cut the dough in half with a sharp knife and shape each half into a smooth ball. Cover with a towel and let rest about five minutes.
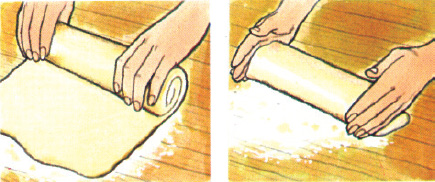
Shaping the dough. Use a rolling pin to shape each ball of dough into a 9- by 12-in. rectangle, then roll the dough up tightly from the short sides (above left). Next, press the ends together to seal them, and fold the ends so that they are underneath the rolls (above right). Lift the loaves carefully and place them in the greased pans with their seam sides down.
Second rising. Brush the top of each loaf with ½ tbsp. melted butter. Cover pans with a towel. Let rise as before in a warm, draft-free place until the dough has doubled in volume or when a finger pressed lightly near the edge leaves a dent. The purpose of the second rising is to give the dough a finer grain. This rising will take less time than the first rising; ¾ to 1 ¼ hours is typical.
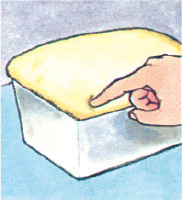
In case of an interruption. If at any time during the first or second rising you cannot complete the breadmaking, punch the dough down as you did after the first rising, and place it in a buttered bowl. Set a clean plate on top of the dough, weight it down with a brick or other heavy object, and place the bowl in a refrigerator. The cold plus the weight will bring the action of the yeast almost to a halt.
Baking the bread. For glazed loaves, gently beat one egg yolk with 1 tbsp. of milk. Lightly brush the top of each loaf with this mixture just before putting the bread in the oven.
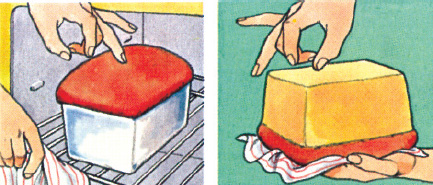
Bake the loaves 40 to 50 minutes on the lower rack of an oven that has been preheated to 400°F. Place the bread pans so that their tops are as close to the center of the oven as possible. In order to permit adequate circulation of hot air, however, the pans should not touch each other or the sides of the oven. To check if the bread is ready, tap the top of a loaf with your middle finger (left). If it is done, the bread will sound hollow. To test further, take a potholder in each hand, turn the loaf out of the pan, and tap the bottom of the bread with your finger (right); it should sound hollow. If it is soft on the bottom, return the loaf to the pan, bake an additional 5 to 10 minutes, and test again.
Remove the pans from the oven, turn the loaves on their sides on a rack, and place in a draft-free location. For easy slicing, the bread should cool completely—about two to three hours. To store the bread, put it in plastic bags and tie securely or keep it in a bread box or freezer. Bread will keep at least a month in the freezer. If you use only a small amount of bread at a time, slice the loaf before freezing and remove slices from the freezer as needed. For quick thawing of a whole loaf, wrap it in aluminum foil and heat in a 300°F oven about 25 to 40 minutes.
Bread Names Preserve History and Folklore
Sourdough Bread
Prospectors who went to Alaska in the 1890s to seek their fortune in gold took sourdough starters with them in their knapsacks. These miners ate so much of the bread that they came to be known as sourdoughs, a term now associated with backwoodsmen in general.
1 ½ cups sourdough starter (see recipe below)
¾ cup milk
2 tbsp. sugar
2 ½ tsp. salt
2 tbsp. butter
1 package active dry yeast
½ cup warm water (105°F-115°F)
4-5 cups all-purpose flour
The sourdough starter must be prepared three days before the bread is to be made.
Scald the milk. Stir in the sugar, salt, and butter. Cool to lukewarm. In a large mixing bowl dissolve the yeast in the warm water. Add the milk mixture, the starter, and 3 cups of flour. Stir with a wooden spoon to mix. Turn the dough out on a lightly floured board, and work in one more cup of flour. Then add only enough flour to make a soft dough. Knead 10 minutes.
Place the dough in a buttered bowl, turning the dough to grease it all over. Cover and let rise in a warm, draft-free place for about an hour or until doubled in bulk.
Punch the dough down. Divide into three equal pieces. Form each piece into a smooth, round ball or a 14-in. tapered roll, and place on buttered baking sheets. With a sharp knife make several diagonal cuts about ¼ in. deep on the tops of the long loaves. Cover and let rise in a warm, draft-free place until doubled in bulk (about one hour).
Bake in a preheated 400°F oven 25 minutes or until the bottom of the loaf sounds hollow when tapped. Cool on wire racks. Makes three round or one large tapered loaf.
Sourdough Starter
3 ½cups flour
1 tbsp. sugar
1 package active dry yeast
2 cups warm water (105°F-115°F)
Combine the flour, sugar, and undissolved yeast in a large glass or ceramic bowl. Gradually add the warm water to the dry ingredients, beating until smooth. Cover with cheesecloth and let stand in a warm place three days.
After the amount needed for the recipe is removed, replenish the starter by adding 1 ½ cups flour and 1 cup warm water to remaining starter. Beat until smooth and let stand in a warm place until mixture bubbles well, at least eight hours. Store, loosely covered, in the refrigerator and use and replenish at least once every two weeks.
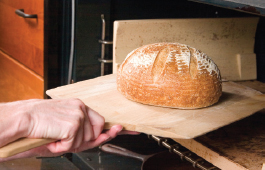
Sourdough loaf, resting on a bread peel, hot from the oven.
Kolaches
This sweet bread is attributed to immigrants from Bohemia (a region of Czechoslovakia) who emigrated to America in the 1860s, settling in Nebraska.
1 package active dry yeast
2 tbsp. lukewarm water (105°F-115°F)
1 cup lukewarm milk
4 cups all-purpose flour, approximately
1 tsp. salt
½ cup (1 stick) soft butter
¼ cup sugar
2 egg yolks
Melted butter
Confectioners' sugar
PRUNE FILLING
1½cups dried prunes
¼ cup sugar
½ tsp. cinnamon
In a large bowl sprinkle the yeast over the warm water and stir to dissolve, then add the milk. Sift the flour with the salt. Work in half the flour and beat until smooth.
Cream the butter, gradually adding the sugar. When light and fluffy, blend into the first mixture. Add the egg yolks, one at a time, beating well after each addition. Work in the remaining flour by hand. Add only enough flour to make a light dough.
Place the dough in a greased bowl. Grease the top of the dough with some melted butter, cover, and let rise in a warm, draft-free place until doubled in bulk, about 2 to 2 ½ hours.
Punch the dough down, then turn out on a lightly floured board and roll to ¼-in. thickness. Cut into circles with a 2-in. cookie cutter and place about 1½ in. apart on buttered baking sheets. Cover and let rise until doubled in bulk, about ½ hour.
With the thumb make a deep depression in the center of each roll and fill with prune filling. Let rise 10 minutes.
Bake in a preheated 400°F oven 10 to 15 minutes or until golden. Transfer to wire racks and brush the buns with melted butter. Dust with confectioners' sugar. Makes about 36 buns.
To make the filling, cook and drain the prunes. Pit and mash with a fork. Stir in sugar and cinnamon.
For a cherry filling fill each depression with cherry preserves.
Anadama Bread
The story goes that this bread was invented by a New England fisherman who was angry at his wife, Anna, for serving cornmeal and molasses day after day. One night, in an attempt to create a new dish, he mixed flour and yeast into the cornmeal and molasses and placed the mixture in the oven to bake. While eating the bread, he constantly mumbled to himself, “Anna, damn her!”
½ cup yellow cornmeal
3 tbsp. butter or shortening or shortening
¼ cup dark molasses
2 tsp. salt
¾ cup boiling water
1 package active dry yeast
¼ cup warm water (105°F-115°F)
1 egg, lightly beaten
3 cups sifted all-purpose flour
Combine the cornmeal, butter or shortening, molasses, salt, and boiling water in a small bowl. Cool until lukewarm. Sprinkle the yeast over the warm water in a large bowl. Let sit five minutes. Add the egg, cornmeal mixture, and half the flour. Beat with wooden spoon until well mixed. Stir in the remaining flour. Use hands toward the end to mix well. Shape into a ball, put in a buttered bowl, and turn to coat the surface. Cover; let rise until doubled in bulk. Punch down.
Turn into a well-buttered 9- by 5- by 3-in. loaf pan. Cover with a towel and let rise until doubled in bulk. Sprinkle the top of the dough with cornmeal. Bake in a preheated 350°F oven 40 to 45 minutes. Cool the bread on a rack. Makes one loaf.
Sally Lunn
One of the popular theories of the name's origin is that the bread was once baked as buns. The golden tops and white bottoms of the buns resembled the sun and the moon, or soleil lune, as it was called in French.
1 package active dry yeast
1/3 cup sugar
½ cup warm water (105°F-115°F)
½ cup warm milk
½ cup (1 stick) butter, melted 1 tsp. salt
3 eggs, slightly beaten
3 ½-4 cups all-purpose flour
In a mixing bowl combine the yeast, sugar, and warm water. Stir to dissolve. Add the milk, butter, and salt. Add the beaten eggs and mix well with a wooden spoon. Add about 1 cup of flour at a time, beating well after each addition. Add enough flour to make a stiff batter.
Place in a clean, well-buttered bowl, cover with a damp cloth, and let rise in a warm, draft-free place until doubled in bulk. Beal the dough hard with a wooden spoon for about one minute. Transfer to a buttered 9-in. angel food pan, and let rise in a warm place about 45 minutes or until the dough has doubled in bulk.
Bake in a preheated 350°F oven 45 to 50 minutes until golden brown on top and hollow sounding when tapped. A toothpick or metal skewer inserted into the bread will come out clean and dry. Unmold and serve hot or warm. Cut into wedges with lots of butter. Makes 8 to 10 servings.
A Collection of Quick Breads for Hurry-Up Baking
Quick breads are just that; they can be made in much less time than yeast breads because they do not require kneading or rising and can be cooked as soon as they are mixed. The leavenings used in these breads—baking powder, baking soda, steam, or air—raise the bread after it goes into the oven or onto the skillet and work much faster than yeast. Quick breads do not keep as well as yeast breads and taste best when they are eaten hot.
Steamed Boston Brown Bread
This truly American bread was created by the early settlers to accompany Boston baked beans.
1 cup yellow cornmeal
1 cup rye flour
1 cup whole-wheat flour
2 tsp. baking soda
1 tsp. salt
2 cups buttermilk
¾ cup molasses
1 cup chopped raisins
Combine the cornmeal, rye flour, whole-wheat flour, baking soda, and salt in a bowl. Then combine the buttermilk, molasses, and chopped raisins in a separate bowl. Add the buttermilk mixture to the dry ingredients, stirring only enough to moisten. Do not over-mix.
Pour the batter into two well-buttered 1-lb. coffee cans about three-quarters full. Cover the cans with aluminum foil well buttered on the underside. Make sure the seal is tight. Place the cans on a rack or trivet in a large kettle. Pour in enough boiling water to come halfway up the sides of the cans, adding more boiling water if needed. Cover tightly and steam two hours. Keep the water boiling gently at all times.
Lift the cans from the kettle, remove the foil, and run a knife around the insides of the can to loosen the bread. Unmold on a wire rack. To cut without crumbling, wrap a tough string around the loaf, cross the ends, and pull the strings to slice. Serve warm with butter. Makes two loaves.
Cranberry Nut Bread
This delicious bread is lighter in texture than many other fruit breads of this type.
2 cups sifted all-purpose flour
1 cup sugar
1 ½ tsp. baking powder
1 tsp. salt
½ tsp. baking soda
½ cup chopped pecans or ¼ cup shortening
1 tsp. grated orange peel
¾ cup orange juice
1 egg, well-beaten
1 cup fresh cranberries, coarsely chopped
½ cup chopped pecans or walnuts
Sift together the flour, sugar, baking powder, salt, and baking soda. Cut in the shortening with a pastry blender or a large fork. Combine the orange peel, orange juice, and egg. Add to the dry ingredients, mixing just to moisten. Fold in the cranberries and the chopped nuts.
Turn into a buttered 9- by 5- by 3-in. loaf pan. Bake in a preheated 350°F oven one hour. Cool. Wrap and store overnight before serving. Makes one loaf.
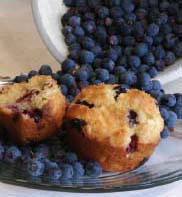
Blueberry muffins are especially delicious made with freshly picked berries.
Blueberry Muffins
The extra butter and the addition of cinnamon in this recipe make these muffins especially delicious. They are best served hot with plenty of sweet butter.
2 cups sifted all-purpose flour
4 tsp. baking powder
3 tbsp. sugar
¼ tsp. salt
¾ tsp. cinnamon
1 cup milk
1 egg, well beaten
½ cup melted butter
1 cup blueberries
Combine the sifted flour, baking powder, sugar, salt, and cinnamon, and sift again. Mix the milk, egg, melted butter, and add to the dry ingredients all at once. Stir only enough to moisten—a few swift strokes. The batter should be lumpy. Do not overmix or the muffins will be tough. Fold in the blueberries.
Butter muffin tins (bottoms only, not the sides), and fill each two-thirds full. Bake immediately in a preheated 400°F oven 25 minutes or until golden. Makes 12 muffins.
Tortillas
A favorite bread of the Southwest, the tortilla is often eaten plain, but it is also used as the foundation for many of the best-known Tex-Mex dishes, such as tacos, enchiladas, tostados, burritos, and nachos. Tortillas can also be made with wheat flour.
2 1/3 cups masa harina (corn flour)
1 tsp. salt
1 ½ cups warm water
Mix the masa harina (available in specialty stores, Latin and Mexican groceries, and some supermarkets) with the salt. Add 1 cup warm water gradually, stirring constantly. Knead the dough on a lightly floured board, adding enough of the remaining water by tablespoonfuls until the dough becomes smooth and firm and no longer sticks to the fingers.
Divide the dough into 12 equal portions and form these into balls. Place the balls between sheets of oiled paper and press them into thin, round pancakes about 5 in. in diameter. They can be pressed with a rolling pin, or use a tortilla press—a clamshell-like device with two metal plates that automatically flattens the balls of dough into tortillas.
Cook one tortilla at a time on a moderately hot ungreased griddle or skillet, about two minutes on each side, turning once with a spatula when the bottom is very lightly browned. As the tortillas are cooked, stack them on a large sheet of aluminum foil. When all are done, wrap the foil over the stack and warm the tortillas in a 300°F oven five minutes. Makes 12 tortillas.
Johnnycakes
Some authorities believe that this thin, flat bread was originally called journey cake because it was the staple food of circuit riders as they preached the Gospel from settlement to settlement.
1 cup stone-ground white cornmeal
1 tsp. salt
1 tbsp. butter
1 cup boiling water
1 tbsp. sugar (optional)
¼-½ cup milk
Bacon drippings
Combine the cornmeal, salt, butter, boiling water (and sugar if desired) in a small bowl. Add the milk and mix well. Batter should be a little thicker than pancake batter.
Drop the batter by tablespoons onto a hot griddle well greased with bacon drippings. Press the batter to about ½-in. thickness using a greased pancake turner. Cook a few at a time over moderate heat until brown and crisp, about 5 to 10 minutes. Turn and brown on the other side 5 to 10 minutes. If the batter gets too thick before all the cakes are done, just add a few tablespoons of warm water to it. Serve very hot with butter and maple syrup or molasses. Makes about four servings.
Green Pepper and Cheddar Cornbread
Records show that as early as 1612 Indians were making a type of corn cake that the white settlers called cornpone—the origin of the cornbreads we make today.
1 cup finely chopped green pepper
½ cup chopped onion
3 tbsp. butter
1 cup yellow cornmeal
½ tsp. salt
1 cup plain yogurt
4 tsp. double-acting baking powder
1 stick (½ cup) butter, melted
2 eggs, well beaten
¼ lb. sharp Cheddar cheese, very finely diced
Cook the green pepper and onion in the 3 tbsp. of butter over moderate heat until tender—about 10 minutes, stirring occasionally. Transfer to a mixing bowl and add the remaining ingredients. Mix just until moistened. Pour into a well-buttered 8-in.-square baking dish. Bake in a preheated 350°F oven 25 to 30 minutes or until a toothpick or cake tester inserted in the center of the bread comes out clean. Cut into squares. Serve very hot. Makes nine servings.