Braided Rugs
Transforming Wool Into Sturdy Rugs
Although we associate braided rugs with colonial furnishings, the colonists had neither time nor material to make them. Instead, they used sand or rushes as floor covering. In the 1830s, however, machine-made carpeting became widely available, and people soon came to favor rugs and carpets on their floors. At the same time, the introduction of machine-made yard goods reduced the cost of material and provided a source of leftover scraps and rags. Thrifty homemakers put these scraps to use by braiding them into small mats for hearth and bedside. Interest in the rugs revived in the 1920s when interior designers, wishing to create a rustic atmosphere in their clients' country homes, suggested the use of room-sized braided rugs.
Collecting and Preparing Wool
A multicolored “hit-or-miss” rug is the easiest, most traditional, and most economical type to make. You will need about 1 pound of heavy, tightly woven all-wool fabric per square foot of rug. Collect a variety of colors— bright, dull, neutral—in solids and patterns so that you can use some of each throughout your braid.
Used woolen clothing is the traditional source of braiding material, but you can also buy wool by the pound at low rates from mill outlets. To prepare clothing for braiding, first remove linings and other nonwool parts and cut the garments apart along the seams. Then wash the wool in hot water to soften and shrink it. The next step is to tear the wool into strips that can be folded into cables for braiding. It is extremely important to use the proper strip width because the rug quality depends upon the plumpness and uniformity of these cables. To determine the correct width, tear a test strip about 1 ½ inches wide from your heaviest wool and fold it as illustrated at right. It should form a plump, round cable. If the cable is wide and flat, try a narrower strip. Once the width of the test strip has been determined, use the cable it forms as a model. Fabrics that are lighter in weight will need to be torn into proportionately wider strips and their edges overlapped to form cables of the proper thickness as you braid. When tearing the strips, start each tear with scissors, then rip the rest of the way along the fabric grain. Weave a test braid with a few strips before tearing up all your fabric to be sure that the final strips make a firm and full braid.
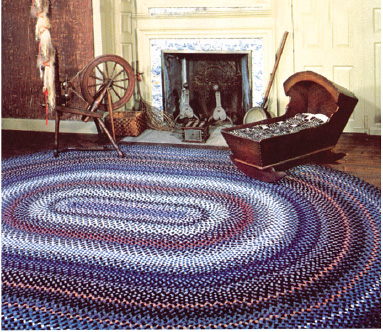
Colorful hand-braided rug radiates 19th-century aura of hominess and simple elegance.
After the strips are torn and joined, wind them into 5-inch-diameter rolls for storage. Before you start a roll, lay a 3-foot piece of string across one end of the strip, then roll up the strip around the string. Tie the string with a bowknot around the completed roll in order to keep the roll from unwinding.
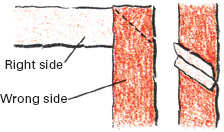
To join two strips, place them at 90° with right sides together; stitch on diagonal with matching thread, then cut off outer corners. Joined pieces open into straight strips.
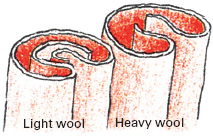
Heaviest wool determines cable plumpness. Fold strip so edges meet, then in half again to form cable. Tear thin wool into wider strips, overlap edges for equally fat cable.
Getting Ready to Braid
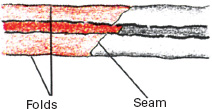
1. Join, with bias seam, the ends of two different colored strips. Fold edges inward so they meet at center of strip.
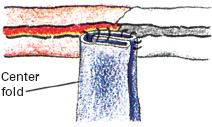
2. Fold a third strip into a cable. With its center fold to eft, place on center of strip to form a T. Stitch in place.
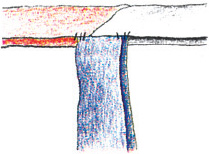
3. Fold crossbar strip in half lengthwise to enclose end of third strip. Stitch at inner corners of T.
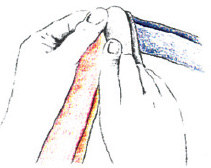
4. Fold right arm of crossbar down and to left so it lies between two other strips and its center fold faces left.
Left-handed braiding
The braiding instructions given here are for right-handed people. If you are left-handed and find it awkward to fold and braid as indicated, reverse directional instructions. In particular, keep center folds to the right, make corners that turn to left, and lace from left to right around the rug.
Sources and resources
Books
Cox, Verna. Illustrated Braiding Instructions: Braided Rug Manual. Verona Island, Maine: Cox Enterprises, 1967.
Sturges, Norma. The Braided Rug Book: Creating Your Own American Folk Art. Asheville, N.C.: Lark Books, 1995.
Materials
Braid-Aid. 466 Washington St., Pembroke, Mass. 02359.
The Basic Braiding Technique
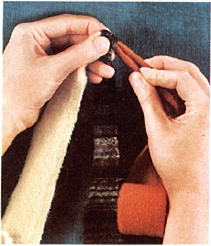
1. Grip braid start in left hand, keeping center folds facing left. Fold right-hand strip to make cable. Note: Strips are folded as you braid.
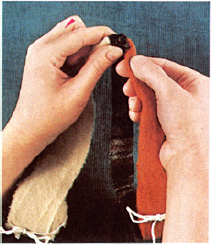
2. Bring right-hand cable over center cable, twisting it as you go so that center fold stays to left. Push cable snugly against one above.
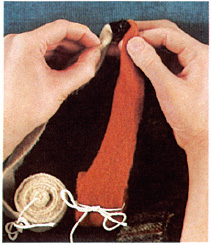
3. Shift already braided cables to right hand and use right little finger to help fold edges inward on left strip, forming more cable.
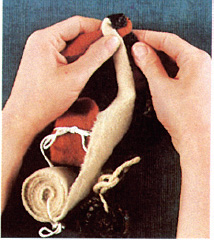
4. Bring left-hand cable over one in center, twisting to keep center fold left. Continue bringing cables over, pushing each against completed braid.
Forming the central braid
The length of the seam between the two central lengths of braid determines the size of the finished rug. Once you know the size you want, subtract the width from the length to find out how long to make the center seam. For example, a 4- by 6-foot rug needs a 2-foot-long seam.
Start your rug by making a braid length equal to the center seam. Next, make two corners in your braid (a braided corner is shown at right) to bring the braid back on itself. Continue braiding until the two lengths are equal, then sew and lace together as shown (below right).
Once the braid lengths are joined, you can easily see where to make a third corner so that when you braid further, the new braid will fit snugly against the old. After the third corner, braid only enough so that when you make a fourth corner it, too, will fit snugly. Sew and lace both corners in place. From this point lace as illustrated at far right.
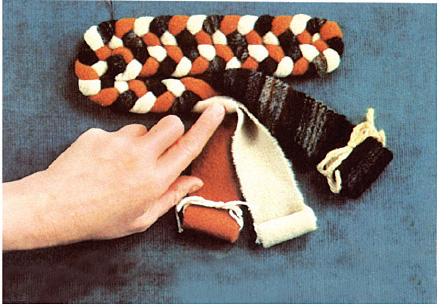
A continuous spiral of braid, laced together, forms the rug.
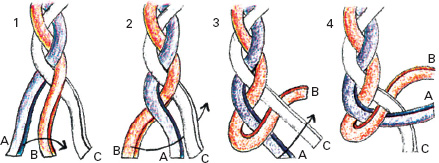
To make a corner in braid, start as shown above left. Step 1: Bring strand A over strand B and into center. Step 2: Bring B over A and under C. Step 3: Pull entire braid to right, and resume regular braiding by bringing A over C. Step 4: Hold C against A and B to maintain corner as you continue to braid.
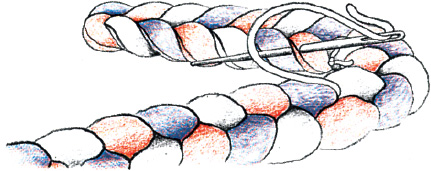
Use sew-and-lace technique to join central braid lengths. First turn braid over so side that faced you as you braided now faces away. Then knot end of thread and stitch so knot is hidden between two corners you have made in braid. Pass thread under first strand of cable on near arm of braid and pull thread tight; then stitch through the inward-folded edges of cable directly across from braid loop that has just been laced. Lace on near arm and sew on far arm for entire length.
Lacing the Rounds Together
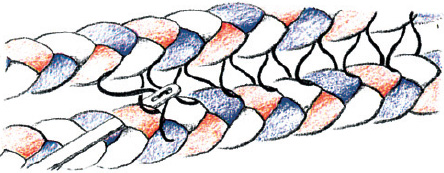
Attach rounds of braid by lacing with heavy cotton carpet thread and a blunt needle. Insert needle under braid loop and draw thread between loops and out top of braid. Work back and forth between loose braid and core of rug, lacing through each loop and pulling each stitch down into crevice of braid. Always lace on what will be back of rug because lacing will create a somewhat flattened look.
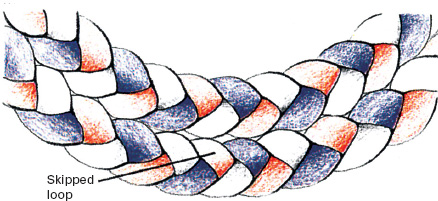
You must occasionally skip a loop on the braid you are lacing because each successive round is longer than the preceding one. When a loop of the braid being added falls opposite another braid loop (instead of in a notch between two loops), do not lace the outer loop. Skip it and lace next loop instead. Skip only on shoulders (where the rug curves) and only one loop at a time. Mark skips with pins to avoid skipping at same point in successive rounds. If the rug edge ripples, you are skipping too often; if rug edge turns up, you are skipping too seldom.
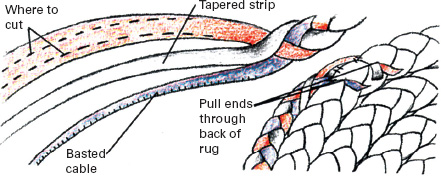
Final step is to taper last braid around a shoulder. Start by cutting off strips so they are 1 ½ times as long as the distance around the shoulder; then use scissors to taper strips along each side. Strips should be barely wide enough to fold at their ends, widening gradually to full width at top of shoulder. Fold and baste tapered strips into cables, then braid and lace. Pull braid ends through loops on rug edge, sew into place, and trim excess.