Scrimshaw
The Yankee Whaler's Art and Pastime
Scrimshaw—the etching, carving, and coloring of teeth, ivory, and bone—was invented by American whaling men as a way of whiling away the long days and weeks between whale sightings. Whenever a whale was caught, the creature's jaw was hoisted to the deck with block and tackle and its brown, ridged teeth doled out to the crew. Bone was carved into umbrella handles, canes, pie crimpers, and corset busks—complete with pictures and intimate quotations. Wives or sweethearts often received them as gifts.
Modern scrimshanders, concerned with the fate of the world's whale population, are turning to new materials, often bringing to them a level of artistic ability that few whaling men could match. But as one visit to a whaling museum's scrimshaw collection will show, a leisurely pace and an eye for detail can be more important “than artistic sophistication in this most American of crafts.
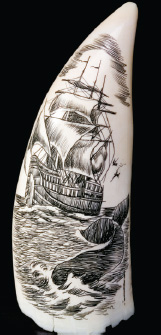
Antique scrimshaw picture, inscribed on the tooth of a sperm whale, shows a fully rigged ship—a difficult design but a favorite among whaling men.
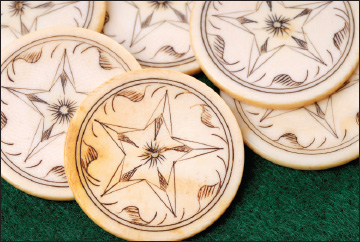
Antique poker chips are made of ivory and feature a simple scrimshaw design.
Getting and Preparing the Raw Materials
In recent years whales and ivory-bearing mammals, such as elephants and walruses, have become increasingly scarce, and the importation of teeth, bone, or ivory from many of these animals has been restricted. As a result, whale teeth, the most traditional medium for scrimshaw, are not available, while ivory must be gleaned from secondhand odds and ends: piano keys, knife handles, old billiard balls, and similar remnants.
In place of traditional materials scrimshanders are now relying increasingly on other substances. The most widely available material is beef bone; with the right preparation its outer surface can make an excellent medium for scrimshaw. Ivory nuts—compact nuts with hard white centers—are highly satisfactory for small scrimshaw items, such as jewelry. Teeth, antlers, and horns from nonendangered species also make very good surfaces as do many types of seashells.
Preliminary preparations. Animal bones should be boiled several hours to remove scraps of meat. If you are using ivory nuts, bake them for 15 minutes at 300° F to harden them, then remove the brown outer shell. Ivory, antlers, and teeth need no preliminary preparation.
Cutting and drilling. The scrimshaw material should be cut to size before it is etched. Place the bone, ivory, or nut in a vise and cut it with a sharp fine-tooth hacksaw. Cut off a large chunk if you plan on making a freestanding display or a thin slab if you intend to create a pendant or earring. If the finished piece is to be worn on a chain, you should install a metal loop in its top before you proceed further. Use a pair of sharp-nosed pliers to bend the end of a piece of 18-gauge wire into a small circle, then clip the wire off, leaving a short length for insertion into the material. Next, drill a hole in the material, insert the wire, and glue in place with epoxy cement. A finished loop is shown on the next page.
Polishing. The final step in preparing the material is to polish it. The more highly polished you make the surface, the easier it will be to wipe off excess ink after coloring. Use two or three grades of sandpaper, starting with very fine (No. 220) and finishing with superfine (No. 400 or higher). Sand carefully by hand, then buff to a high gloss with the finest grade of steel wool (No. 4/0) or a gentle polishing compound such as jeweler's rouge. Sailors used sharkskin for sanding and their own rough hands for the final buffing.
When you are sanding and polishing, work in a well-ventilated location and avoid inhaling the dust; a mask is recommended if you are doing extensive polishing. Care is particularly important when working ivory, since ivory dust does not break down after entering the lungs. Many professional scrimshanders—especially those who use motor-powered polishing wheels—have special exhaust systems that suck the dust away from them.
Animal bones are more absorbent than whalebone or ivory. After polishing them, coat them with butcher's wax or polyurethane varnish to keep the coloring agents from soaking into the unscribed surface.
From Sketch to Finished Piece: Creating a Scrimshaw Picture
After the bone has been cut and polished, the next step is to create the decoration. Beginners should choose a simple design with gently curving lines (geometric shapes and straight lines are difficult to carve). If you have a flair for drawing, you can sketch the design directly on the polished surface, but use a soft pencil to avoid scratching. Do not include every last detail, just draw the basic outlines. You can also use paper to plan the design, then transfer it to the blank with carbon paper. Another way to transfer the drawing is to glue the sketch onto the bone with some flour-and-water paste, then use a sharp-pointed scribing tool to make tiny pricks through the design outline onto the bone. Many experienced scrimshanders carve directly on the surface without making a preliminary sketch. A particularly convenient system is to paint the entire surface with black ink before beginning a design. To plan the design, gently scratch away the black coloring with your scribing tool, but be careful not to cut into the material. You can also draw or trace the design on the blackened bone with a light-colored pencil, by using the pinprick method, or by employing orange-colored carbon paper.
Scribing. Almost any sharp-pointed implement can be used; for example, a craft knife or engraver's tool, both of which are available at art and hobby supply stores. Sailors often inserted a sail needle in a wood or bone handle. An ordinary nail can be used in the same way. Pound the nail into a wooden stick, cut off the nail's head with wire cutters, then sharpen the end to a point with a file.
You will also need something to hold your piece of scrimshaw as you scribe. To make a simple holder, tack two strips of wood on a small board so that they form a V as shown at right. You can slip a small scrimshaw piece between the strips and hold it there as you work.
When scribing, hold the tool like a pencil and cut into the surface slowly and firmly. The deeper the cut, the more color the scribed line will retain; with experience you will learn how deep to cut to achieve a desired effect. Begin by scribing the design's outline, then fill in the detail. To create shaded areas, etch many close parallel lines. The closer the lines, the denser the tone will appear when colored. For deeper shading crosshatch the area by scribing a series of parallel lines in one direction, then topping with others at right angles to the first. The curve, direction, and density of the lines all influence the final appearance of the design. Study old black-and-white engravings and expertly carved scrimshaw pieces to see the range of effects that can be achieved.
Coloring. Color must be applied with care and patience. Popular coloring agents include oil paint, water color paint, dye, and indelible ink (it is better than India ink since it is more permanent). One of the whaler's favorite agents was tobacco juice. The traditional way to apply the color is by rubbing it on with your fingers. This method works especially well for oil paint. Ink, water color, or liquid dye can be applied with an artist's brush or the end of a toothpick.
The next step is to remove the excess color. This can be accomplished by wiping it off with a damp cloth, by scraping it away with the moistened end of a toothpick, or by buffing the surface with No. 4/0 steel wool. Because the dye is absorbed into the etched lines but not into the polished surface, the result is a strongly colored design in the areas that you have etched.
When creating a scrimshaw piece of more than one color, you must be careful not to let different tints run together. The recommended procedure is to scribe lines for the predominant color first, tint them, and remove excess color from the polished surface. Next, scribe lines that are to be a second shade and paint over them carefully with a fine brush or toothpick, being careful that the new color does not run into the first. Then use a toothpick to remove the second shade from the polished surface with as little smearing as possible. Additional tints are added in the same way.
After coloring, the scrimshaw piece is complete, though you may wish to polish the piece once more. If the piece is ivory or whalebone, this final polishing can be followed with a light coat of linseed oil. The oil can be reapplied every six months to protect the surface.
Sources and resources
Books and pamphlets
Collins, Blackie, and Michael Collins. How to Scrimshaw and Carve Ivory. Knoxville, Tenn.: Knife World Publications, 1978.
Hellman, Nina, and Brouwer, Norman. A Mariner's Fancy: The Whaleman's Art of Scrimshaw. New York: Balsam Press, 1992.
Lawrence, Martha. Scrimshaw, the Whaler's Legacy. Atglen, Pa.: Schiffer Publishing, 1993.
Linsley, Leslie: Scrimshaw: A Traditional Folk Art, a Contemporary Craft. New York: NAL-Dutton, 1979.
Shell, Harvey. Scrimshaw and Ivory-Working Techniques. Tulsa, Okla.: Ahio Publishing Co., 1986.
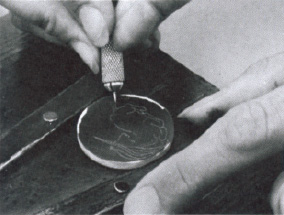
1. Blacken surface with indelible ink, then scratch very lightly to plan design.
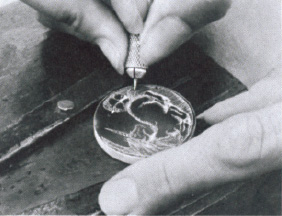
2. Press firmly with sharp tool to etch lines deep into the material.
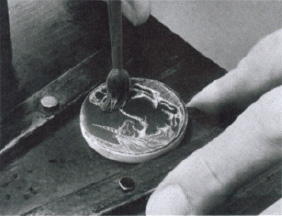
3. Brush black or colored ink over entire etched area to fill lines with color.
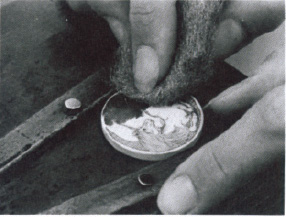
4. Let ink dry, then use No. 4/0 steel wool to rub off ink and to polish surface.
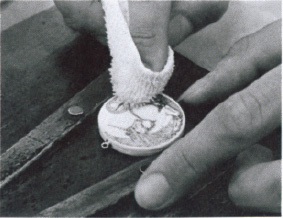
5. Wipe with clean cloth to provide a final shine. Note wire loop for chain.
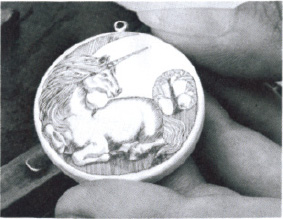
6. Ink remains only in etched lines, but not on polished surface of piece.