Candlemaking
Time-tested Methods Of Working With Wax
Autumn was candlemaking time in early America. Housewives spent long hours boiling down the fat of newly slaughtered beef and sheep into tallow. Not only was the job hot and sweaty, but the odor of the rendering fat was als unpleasant and the product was far from perfecl the candles burned too rapidly, buckled in warm weather, and gave off fumes and smoke.
Other sources of wax were available—notably bayberry and beeswax—but both were expensiv, and candles made from them were reserved for special occasions. It was not until the discovery of paraffin in the 1850s that the average family could enjoy the luxury of bright, steady, smokeless illumination.

Hand-dipped candles are beautiful but time consuming to make. Dipping several wicks at once helps to hasten the process; another way is to add alum to the mixture, since alum will cause the wax to form thicker layers.
Candles from beeswax sheets
Sheets of beeswax that are used to start new hives can be rolled into candles without being melted. Buy sheets from suppliers of beekeeping equipment or from craft shops. Sheet widths vary, but the standard length is about 16 in. On a warm day your hands will provide enough heat to make the sheets pliable. In cold weather set the sheets in a warm (80°F to 85°F) spot to soften before shaping. Cut a sheet so that the top edge slants downward about 1 in. from corner to corner. Then roll up the sheet around the wick.
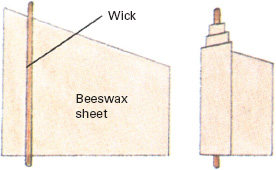
Roll beeswax sheet around wick to make a sweet-burning candle.
Waxes
Paraffin has come to be the chief ingredient in almost all candles. Beeswax is expensive, and tallow, a staple in years gone by, is seldom used today because of its many drawbacks: there are few more effective ways to dampen enthusiasm for the “good old days” than to spend a chilly winter's evening in the smoky, sputtering glow of an old-fashioned tallow candle.
Paraffin, a petroleum by-product, comes in five grades, the hardest of which is sold by craft shops for use in candlemaking. One 10-pound slab, the usual size, makes about 4 quarts of liquid wax. For firmer, brighter burning candles add 3 tablespoons of powdered stearin per pound of paraffin.
Beeswax, always a scarce commodity, is in shorter supply than ever, primarily because modern hives allow honey to be harvested without harvesting the comb in the process (see Beekeeping, pp.176–179). However, you can still buy beeswax at craft stores or you can make your own if you have a hive and are willing to sacrifice some honey (bees use up 10 pounds of honey to make 1 pound of comb). First extract the honey from the comb. Rinse the empty comb in cold running water, and place it in a pan along with 2 cups of water to prevent the wax from catching fire. Gently heat the comb until it is melted, and continue cooking for an hour. Pour the still-molten wax onto cheesecloth above a tub of cold water, and press the wax through the cloth to remove any impurities. If you are economy minded, use the beeswax as an additive only. Candles with as little as 10 percent beeswax have a better aroma and are harder than ones made entirely of paraffin or tallow.
Tallow for candlemaking is obtained by rendering animal fat (see Soapmaking, p.370). Beef fat is best, but sheep fat can also be used. To harden the candles and make them burn cleaner, add ½ pound of alum and ½ pound of saltpeter to each pound of melted tallow.
Bayberry candles, a Christmas favorite, are made from the tiny gray-green, wax-coated fruit of the bay-berry, a spicy, woody shrub that grows in sandy soil along the New England coast. Old-timers gathered the berries in autumn, then sorted them to remove leaves and twigs. Next, the berries were boiled in hot water for two hours, and the muddy green fat that floated to the top was skimmed off, reboiled, and strained. Today, most bayberry bushes are protected by law and the berries cannot be picked, but artificial colors and scents can be used instead to make paraffin candles that look like and smell like the old-fashioned bayberry ones.
Wicks
Wax is the fuel of a candle, and the wick is its burner. The wick must blot up the molten wax, provide a surface for the wax to burn on, and yet not burn up too quickly itself. To make wicks the colonial way, soak heavy cotton yarn for 12 hours in a solution of 1 tablespoon salt plus 2 tablespoons boric acid in a cup of water. (A mixture of turpentine, lime water, and vinegar will also serve.) After the yarn is dry, braid three strands together to form the wick. Wicks can also be purchased. Be sure that any wicks you buy fit the candles you plan to make as indicated in the chart: too large a wick will cause a smoky candle; too small a wick and the flame will be doused in melted wax.
Wick types and their uses
| Kind of wick | Wick size | Candle diameter |
| Flat-braided wick | 15 ply | 1″–2½″ |
| Square-braided wick | 24 ply | 3″–4″ |
| Square-braided wick | 30 ply | More than 4″ |
| Metal-core wick | Small | Less than 2″ |
| Metal-core wick | Large | 2″–4″ |
| Metal-core wick | Extra large | More than 4″ |
The Basics of Paraffin Candles
Candlemaking is a simple job requiring little in the way of special equipment. You will need an accurate candy thermometer to measure the temperature of the molten wax and plenty of newspaper (spilled wax is difficult to clean up). Whether you are making dipped candles or molded ones, the first step is to melt the wax. Wax is flammable, so never try to melt it in a container set directly over a flame. Instead, fill a wide-bottomed pan (one that is large enough to cover the burner completely) half-full of water, and place it over a low flame. Then put several chunks of wax in a can, and set the can in the center of the water-filled pan. As the chunks of wax melt, add additional pieces. If, despite your precautions, the wax should catch fire, douse the flames by covering the can with a lid or by pouring baking soda over them. Do not use water, since wax floats on it.
Once the wax is melted, add stearin (3 tablespoons per pound) and coloring. Use a liquid, solid, or powdered dye made especially for candles. Add it a little at a time, and test the color by dripping a bit on a white plate.
Sources and resources
Books
Constable, David. Candlemaking. Woodstock, N.Y.: A. Schwartz & Co., 1993.
Guy, Gary. Easy-to-Make Candles. New York: Dover, 1980.
Ickis, Marguerite, and Reba S. Esh. The Book of Arts and Crafts. New York: Dover, 1965.
Innes, Miranda. The Book of Candles. New York: Dorling Kindersley, 1991.
Meldrum, Sandie. Traditional Candlewicking. Cincinnati, Ohio: Seven Hills Books, 1994.
Seymour, John. The Forgotten Crafts. New York: Knopf, 1984.
Making dipped candles
Two cans are needed for candle dipping—one to hold molten wax, the other to hold cool water. The cans must be taller than the candles you wish to make; 48-ounce juice cans are a convenient size. Keep the melted wax at 150°F to 180°F during the dipping procedure. The water in the cooling can should be about room temperature.
Cut wicks 4 inches longer than the finished candles, and tie a washer to the lower end of each wick for weight. Dip the wicks individually or tie several to a dowel and dip them together. After cooling the first dip pull the wicks straight. It will take 30 to 40 dips to make a candle 1 inch in diameter. To harden the candle's outer layer and make the candle dripless, add an extra tablespoon of stearin per pound of wax for the final dip. After dipping is complete, cut the candle base straight with a sharp, heated knife, and trim the wick to ½ inch.
Making molded candles
Milk cartons, jars, cans, plastic cups, cardboard rolls, and many other common containers make interesting candle molds. Start by coating the interior of each mold with cooking oil or silicone spray to prevent sticking. (Waxed containers need not be coated.) If the mold is cardboard, wrap string around it so that it will hold its shape when filled. Next, prepare the container for the wick by one of the methods shown at right.
Use a coffee can for melting wax. Bend its rim to form a spout. Heat the wax to 130°F for cardboard, plastic, or glass molds; 190°F for metal molds. Turn off the flame, lift the can with potholders, and pour the wax into the molds. Let the molds cool overnight, then refrigerate them for 12 hours. Cardboard or plastic molds can be peeled off. Turn glass or metal molds upside down and tap until the candles slide out. If the candle sticks, dip the mold briefly in hot water. Smooth rough spots on the candles by rubbing with a nylon stocking. Candles should age for at least a week before use.
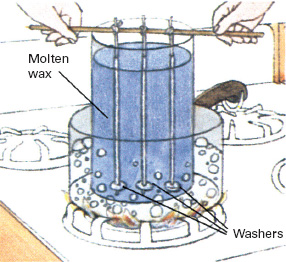
1. Dip wicks in hot wax held in tall can set in hot water. Remove wicks; let drip.
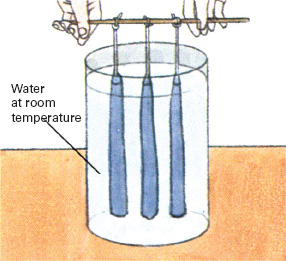
2. Dip in water, blot with paper towel, and lay on waxed paper 30 seconds.
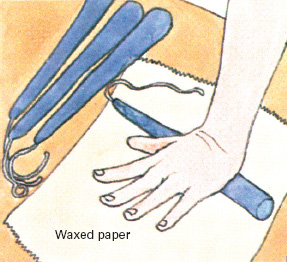
3. Dip repeatedly; roll candles on level surface occasionally to straighten them.
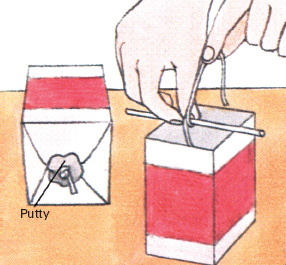
Wick-in-mold method. Cut hole in center of mold, tie washer to wick bottom, and thread wick through hole. Hold wick end in place; plug hole with putty. Pull wick taut and tie around pencil resting on top.
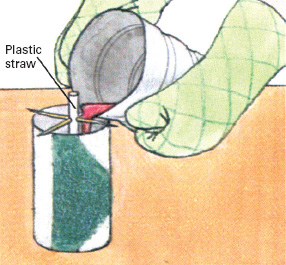
Plastic straw method. Stand straw in mold, then fill mold with wax. After wax hardens, pull out straw, tie foil to one end of wick, and thread other end through. When candle is lit, wax will fill hole.
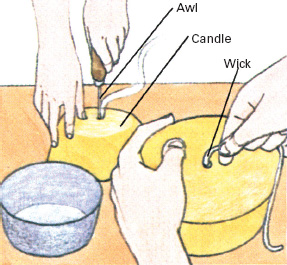
Hot-awl method. Bore hole in hardened candle with heated awl or metal knitting needle. Knot one end of wick and thread other end through hole. When the candle is used, melted wax will fill in hole.