Outdoors in Winter
Sports and Games In the Cold Season
Before jet aircraft provided quick access to the tropics, most Americans spent their winters right where they were. As a result, cold weather sports and games played a major part in their winter entertainment. Ice-skating, sledding, snow sculpture, sleigh rides, and winter sports, such as curling and ice hockey, enjoyed wide popularity. Today, a growing movement back to traditional values—plus a booming interest in physical fitness—has made winter recreation into a major growth industry, especially the energetic sports of snowshoeing and cross-country skiing.
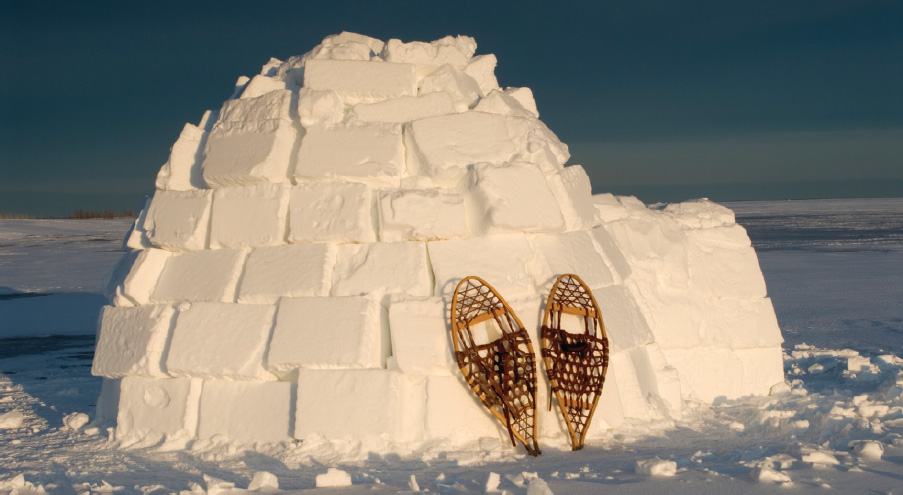
Traditional igloos are constructed from blocks of compact wind-slab snow.
Preparing for a Trip in Snow Country
Of all cold weather recreational activities, a winter backpacking trip is probably the most challenging. Cold weather camping is like summer camping only more so. You carry greater loads, expend more energy, and require more food. Your shelter must be sturdier, your physical condition better, and your route-finding abilities more accurate. In return for your effort, you will gain entry to a world that very few men or women ever have the good fortune to visit. It is an uncrowded world of remarkable beauty; a world of pure and brilliant color where the humdrum of everyday life quickly vanishes.
Careful preparation is the key to a safe and pleasurable winter excursion. There should be at least four members in your party (two of them experienced winter backpackers), so that if someone is injured, one member can stay behind to help while two go back for aid. Go over the itinerary carefully well in advance of the trip, and be sure each participant knows it thoroughly. Settle on the route to be followed, the overnight bivouac sites, and the overall goals (a circuit through a wilderness, attaining a particular peak, a traverse of a ridgeline). Such a plan will be important on the trip, since it will let you measure your progress against the rate at which you are consuming food and fuel.
Weather is of vital importance on any winter trip. Check the forecasts thoroughly before starting out. If reports indicate that severe weather is in the offing, let discretion be the better part of valor—disappointment in the form of a delayed or canceled trip is preferable to disaster. As an added margin of safety, take along a small portable radio capable of receiving weather reports from the local station.
Whether you use skis or snowshoes, the distance you will be able to travel each day will be considerably less than in summer. There are fewer hours of daylight, the packs are heavier (70 pounds or more), and the going, particularly uphill, is more difficult. Your schedule should take account of this and also allow time for relaxation and sightseeing. Also bear in mind that choosing a route along a marked trail is no guarantee against getting lost—the trail will probably he buried under several feet of powder snow, and even if the trail markers are not buried too, they are likely to be hidden under a crust of hoarfrost. Although maps and compasses can help, the only sure method of finding your way in the winter is to know the topography of the area and have the sense and experience to recognize important features in the field.
The final step before setting out on the trip is to divide up the load. There is always a great deal of communal equipment—food, fuel, cooking gear, tent, first aid kit, spare ski tips, extra snowshoe bindings—and it must be apportioned equitably, with due regard for the varying physical abilities of the party members.
A note on equipment
Most of the camping gear used in summer is also satisfactory in winter. Subzero conditions place greater demands on equipment, however; and at the same time there is less margin for error, so reliability becomes all-important.
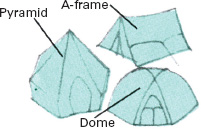
Tent. Use a wind-resistant, freestanding tent with a snow-shedding fly. Tota weight should be less than 3 lb. per man. A-frame, dome, or pyramid tents are all acceptable.
Sleeping bag. Down bags are by far the best: they weigh the east, take up the least space, and provide the most warmth. Be sure to get a bag that is rated below the coldest temperature you are likely to encounter; or take along two bags and use one inside the other. A closed-cell foam ground pad will provide insulation where you need it most—beneath your sleeping bag. A 3/8- by 21- by 72-in. pad should suffice.
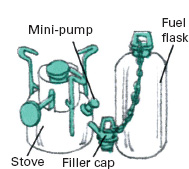
Stove. A small stove that burns unleaded gasoline is easily the best choice, since butane stoves are inefficient in cold weather. Buy one that has a mini-pump—it will simplify cold weather operation. Carry extra gasoline in an aluminum fuel flask.
Food and Water
The food you consume on a winter backpacking trip must provide an enormous amount of energy—up to 6,000 calories per day for uphill travel in deep powder conditions compared with a normal daily requirement of one-third that amount. A balanced cold weather diet consists of 40 percent protein, 40 percent fat, and 20 percent carbohydrates; and the food should be lightweight, compact, easy to cook, and immune to freezing.
Dehydrated foods provide the most food value for the least weight. Preparing them takes time, however, and such ready-to-eat items as jerky (see Preserving Meat and Fish, p.227), canned sardines, and dried fruits are valuable for quick-energy snacks. One-pot meals— planned and tested in advance of the trip—are the rule for both breakfast and dinner. For dinner, freeze-dried trail meals make cooking easier, but many campers prefer creating their own glop out of such staples as instant potatoes, instant rice, cheese, canned tuna, soup mix, and dehydrated meat. Some campers forego a hot breakfast, preferring instead a simple meal of such foods as crackers, sardines, and dried dates, so that they can get moving as soon as possible. Others insist on the psychological and physiological benefits of hot cereal and eggs, plus tea, coffee, or cocoa.
Wintertime trail cooking consists in large part of melting down snow. It takes a great deal of heat to melt a small amount of snow, so be sure to take plenty of unleaded gasoline; 2 quarts should be sufficient for a three-day, two-night excursion involving four people. Set up the stove in a spot that is thoroughly sheltered from the wind, such as the entranceway to a tent or the cooking pit in an igloo. Fill a pot with snow (be careful not to get any on the outside of the pot so as not to douse the flames) and stir frequently—snow and steam are excellent insulators, and failure to stir will result in a small layer of boiling water on the bottom of the pot capped by a mass of unthawed snow. As soon as most of the first batch of snow is melted, spoon in more. Have a second pot of snow ready to put on the stove when the first is ready, and add water from the first pot to it as a starter. Do the bulk of your cooking and rehydrating in a third pot. The fundamental idea is to conserve precious fuel by keeping the flame continuously at work.
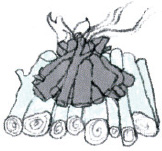
Fires are difficult to get going in the winter, so a stove is preferable. If you do try to build a fire, have plenty of dry wood and shavings on hand before you light it. Set the fire up on a platform of large logs to keep it from sinking in the snow.
Clothing
Food supplies heat, and clothing provides the protection that keeps it from being wasted. As in summertime, the layering principle applies: several light layers of comfortably fitted clothes are preferable to a single heavy layer. From the inside out, the three main layers are the under, mid, and outer. Many winter sportsmen wear wool or down garments. Down provides maximum warmth at minimum weight; wool has the important advantage of retaining its warmth even when wet.
Underlayer. Two-ply long johns and undershirts (cotton on the inside for comfort, wool on the outside for warmth) are warmer than thermal-knit underwear. Two pairs of socks—a thin pair of cotton socks beneath a heavier wool pair—are warmer and more comfortable than a single thick pair.
Midlayer. For warmth plus ventilation, wear a tightly woven wool shirt that opens down the front and a quilted jacket over it that also opens in the front. Your pants should be of tightly woven wool, cuffless, with plenty of room in the seat and legs, and flaps over the pockets to help keep snow out. For added ventilation use suspenders rather than a belt. A woolen stocking hat or a balaclava (a cap that can be pulled over the face like a mask) will stem heat loss from the head.
Outer shell. The main job of the outermost layer is to protect against wind, rain, and snow. A parka that covers the hips and has a hood and a full-length zipper is best. You will also need a windproof face mask if your route takes you above the timberline or along windswept ridges. Down pants, down mittens, and down booties are luxuries around camp but are too warm for use on the trail. Two-piece mittens—a wool liner and a nylon outer shell with a leather palm—are better than gloves.
You will also need a good pair of boots. Double boots— a felt inner liner and high-top outer boot—are warm and comfortable but are extremely expensive. A rugged mountaineering boot has many of the advantages of the double boot at considerably lower cost. Even cheaper are pac boots with rubber bottoms and leather or nylon uppers; they are a good choice for snowshoeing. Foam-insulated rubber boots will keep your toes warm in the coldest weather but may also make your feet perspire. In addition to boots you will need gaiters to prevent snow from sifting in as you travel. Or you can achieve the same result by installing metal grommets in the bottom of your pants, then lacing the pant legs snugly to the boots. Crampons are an important accessory if you venture above the timberline—their sharp points give your boots purchase on glare ice.
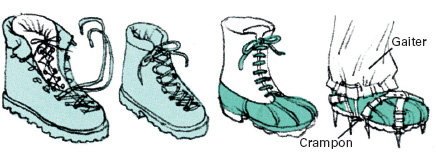
Footwear (left to right): double boot, mountaineering boot, pac, insulated rubber boot with gaiter and crampon.
Frostbite, hypothermia, and snow blindness
Frostbite is the freezing of body tissue, usually due to a combination of wind and cold. The first stage is frostnip—white patches of superficially frozen skin that appear on the fingertips, ears, toes, nose, chin, and cheekbones. Keep an eye on one another during a winter trip. If frostnip appears, warm the affected areas immediately by holding the palms of your hands over white spots on your face, tucking your fingers into your armpits, or warming your toes against a companion’s body. Deep frostbite is a serious condition whose symptoms include loss of sensation and whitening and hardening of the affected areas. Quick warming in 105°F water is the best treatment, but frostbitten feet should not be thawed until civilization is reached, since the victim will be unable to walk afterward. Never rub snow on a frostbitten area, and avoid chafing.
Hypothermia occurs when the body is unable to maintain its normal temperature. Lethargy, intense shivering, and loss of coordination are early symptoms. The primary treatment is warmth: build a fire, have the victim drink hot liquids, get him into a sleeping bag with one or two other campers. Nourishing food and adequate clothing will prevent hypothermia.
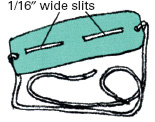
Snow blindness is the result of ultraviolet glare from snow. It can be avoided by wearing dark goggles or sunglasses. Should these become lost, improvise a pair of Eskimo goggles by cutting 1/16- by 1 ½-in. slits in cardboard, plastic, or tree bark. Symptoms of snow blindness take up to eight hours to appear. They include a gritty feeling in the eyes, loss of visual perception, swelling of the eyelids, and loss of vision. Darkness is the only cure; if possible, keep a blindfold over the eyes of the affected person during the day.
Traveling Over Snow By Snowshoe or Ski
It is almost impossible to progress more than a few hundred feet in deep powder snow without the proper equipment. But with skis or snowshoes on, winter travel can be an exhilarating pleasure. Choose your equipment to suit the purpose: narrow, lightweight touring skis for cross-country; wide, sturdy alpine skis for ski mountaineering; and snowshoes for winter hiking. For the beginner a good way to start is by renting. Complete snowshoe or ski touring packages are available at camping goods stores throughout the country.
Types of Snowshoes
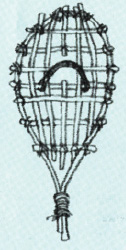
Snowshoes, an invention of the American Indian, let you “float” on snow. White ash frames and rawhide lacing are traditional, but tubular aluminum and neoprene-coated nylon are becoming popular. (Nylon lacing is stronger and more durable than rawhide and requires little maintenance.) The maneuverable bear-paw is the most popular style of snowshoe; the elongated Michigan and Alaskan are better when heavy loads are carried. When using snowshoes, step out far enough for the forward shoe to clear the edge of the rear shoe. Hesitate between strides to let the snow compact to give you a firm foundation for the next step.
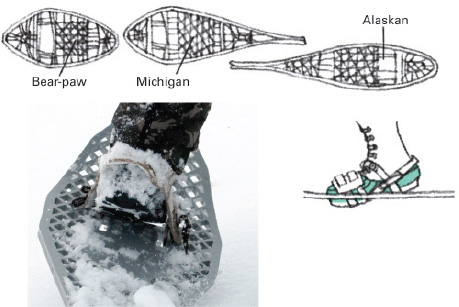
Bindings, sold separately from snowshoes, must allow boot to pivot. Note that toe penetrates snowshoe (above) for ease of walking and traction on hills.
Some Basic Maneuvers
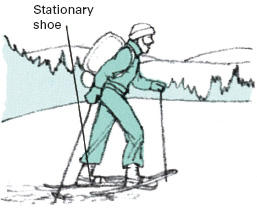
Basic step is made with feet spread no farther apart than as for normal walking. Lift one shoe up and over other far enough to completely clear the stationary shoe.
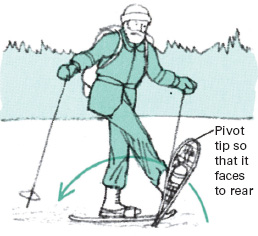
Kick turn is more acrobatic than step turn. Lift inside shoe until it is vertical, plant heel, and pivot it 180 degrees. Then swing other shoe around in pirouette movement.
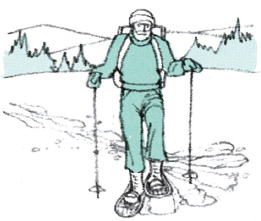
Step turn is simply walking in a tight circle. Tail of inner snowshoe remains almost stationary while its tip pivots in direction of turn. Outer shoe follows.
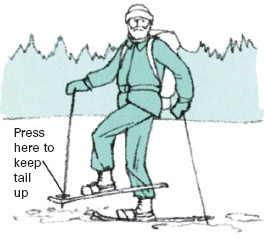
Backing up is next to impossible without ski poles. The trick is to keep the tail from digging in by pressing down the tip of the snowshoe as you step backward.
Backpacking on skis
Skis are an attractive alternative to snowshoes for winter backpacking. Although their elongated form can make them awkward to maneuver in tight turns or when sidestepping up a densely wooded slope, skis have the invaluable compensating advantage of allowing you to ski down slopes instead of being forced to walk down.
Skis used for backpacking should be wider and stronger than cross-country skis, lighter in weight than standard downhill skis, and should have stee edges to provide a grip on icy spots. Special dual-purpose bindings are needed that can be set for either hiking or skiing. When set for hiking, boot heels are free to rise; in the skiing position the heels are locked to the skis. The boots themselves are not critical. Any good mountaineering shoe will do, provided it has a notch or welt for the binding to grip. Standard ski boots can be used, but their extreme rigidity is likely to cause discomfort on extended trips.
The longer the ski, the more flotation it will provide, but the harder it will be to maneuver. If you are of average weight, select skis that reach the fingertips of your outstretched hand. The poles should have large baskets and should reach from your shoe sole to your shoulder. Mohair climbing skins that attach to the bottom of your skis are essentia accessories for moving up long, moderately steep slopes.
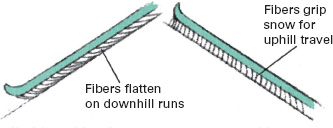
Climbing skins have a one-way nap like a cat’s back. When a ski slides forward, the fibers flatten, permitting the ski to slide easily. When you are climbing, the fibers on the stationary ski dig in to prevent it from sliding backward.

Dual-purpose bindings are necessary when skis are used for backpacking in hilly terrain. Severa styles are available. Binding at left has a cable that can be locked in place for downhill runs or left free for hiking. Step-in design at right has hinged meta plate that is locked for downhill and released for hiking and uphill work.
Cross-country Skiing
Cross-country skiing, long a major sport in the Nordic countries, is fast becoming one of America’s favorite winter recreations. It is a sport that takes you out into nature’s wilderness at its loveliest and most unspoiled, it can be enjoyed even by novices, and, unlike downhill skiing, there are no long lift lines to contend with or expensive lift tickets to buy.
In addition to the equipment shown below, take along the normal items that you would on any winter outing. Dress warmly (in layers, so you can shed clothing as you warm up), and carry along a first aid kit, trail food, and a thermos of cocoa or other hot drink. Remember to treat cold weather with respect—do not go out alone, and be sure to guard against frostbite, hypothermia, and snow blindness (see p.431).
More than any other single topic the cross-country enthusiast talks, thinks, and worries about wax. The right wax will give the ski good purchase for a strong push-off when the ski is standing still, but allow the ski to glide almost without friction once it is sliding forward. A base wax is generally applied first, followed by a final, or kicker, wax. As a rule, the colder the temperature, the harder the wax should be. When the temperature is above freezing, a sticky liquid wax called klister is used. An alternative to waxing, particularly appropriate for novice skiers, is the use of so-called waxless skis. These skis have special patterns on their running surfaces, such as diamond, fish scale, and stepped, or else have mohair strips embedded in their running surfaces.
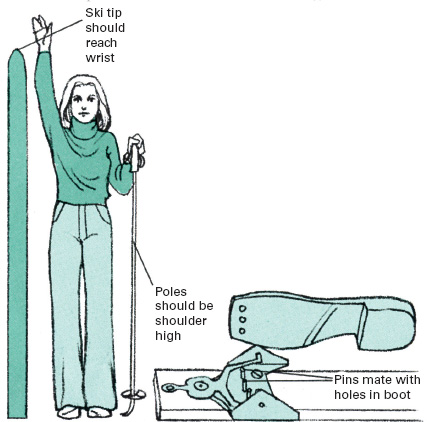
There is a welter of equipment on the market for the cross-country skier, and only experience can guide you to the right skis, poles, and boots. The trend is away from wooden skis to plastic and away from bamboo poles to aluminum or fiberglass. Properly fitted low-cut boots made specifically for cross-country skiing are best for most trails. High boots keep out snow but are constricting. Boots must mate with the bindings; most fit the standard three-pin binding, but some racing bindings require special boots. The best policy is to rent equipment and learn the sport before investing in skis, poles, and boots.
Some Basic Techniques

Diagonal stride is the cross-country skier’s basic step. First practice shuffling forward without poles. After you gain confidence, try “hopping” from one ski to the other as you transfer your weight. This hop, or kick, as skiers call it, will provide enough thrust to let you glide forward on your other ski. Full diagonal stride, shown sequentially, combines a kick with a simultaneous pole thrust on the opposite side. The movement is easy to learn because the arms and legs move as in natural walking. This skatelike stride, once mastered, has been said to give one the sensation of flying along the snow.

Snowplow and snowplow turn are downhill braking maneuvers particularly suitable for beginners or those carrying heavy packs. To do the snowplow, assume an exaggerated knock-kneed stance, and form the skis into a wedge with their inner edges digging into the snow. To make a snowplow turn, shift your weight to the ski on the side opposite the direction you want to turn—to the right ski for a left turn, to the left ski for a right turn. The arcs of snowplow turns are wide and sweeping. To slow down your descent, make the angle of the wedge wider; to speed it up, make the angle narrower.
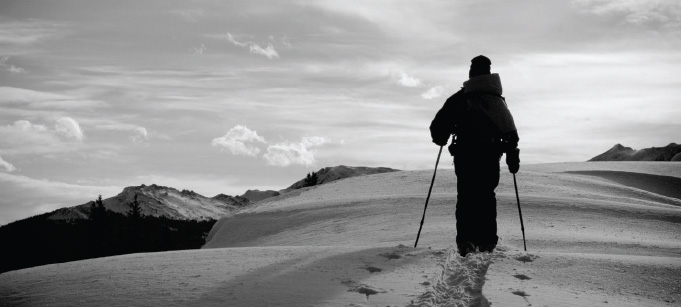
Cross-country skis allow you to explore places you might never see in the winter otherwise.
For Winter Comfort Build It From Snow
Of the various shelters that can be improvised for winter camping, igloos—an Eskimo invention—are probably the most luxurious. They take time to construct (two or three hours for an experienced team working together), but for an extended stay in the wilderness the effort is very worthwhile. Igloos are cozy and weatherproof, and the only supplies you need to build one are some well-compacted snow and a tool such as a machete or ice saw to cut it into blocks. The ideal snow for igloos is the wind-packed powder found in open terrain or above timberline. Other snow can frequently be used if it is first tramped down with skis or snowshoes. Fresh powder snow, however, does not have sufficient strength for use in constructing an igloo. Select a level site for your igloo, build up the main dome first, then construct the entranceway. Finish off the job by chinking all gaps and glazing the interior. (To glaze the igloo, warm the inside with a stove for about 15 minutes, turn off the stove, and pull out a base block to freeze the softened snow with cold outside air.) Keep the ceiling vent open when you cook, and avoid raising the interior temperature too high lest the igloo melt.
Raising an Igloo From the Ground Up
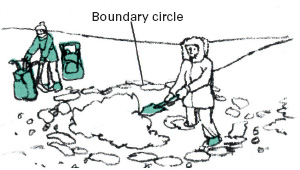
1. Lay out a circle about 10 ft. in diameter to mark the interior boundary of the igloo. Pile up a mound of snow inside the circle for use as a sleeping shelf when the igloo is completed.
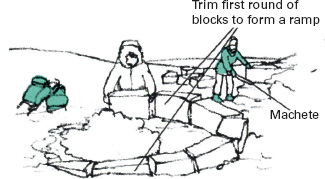
2. Use a machete or ice saw to cut ½- by 1 ½- by 2½-ft. snow blocks. Each block weighs about 40 lb., so get them from a nearby area. Place blocks around the circle, then trim to form a spiral ramp.
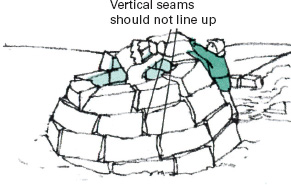
3. Lay succeeding spirals from inside the igloo. Trim the base of each block to give it an inward tilt. Lay the blocks so that vertical seams between blocks do not line up on top of one another.
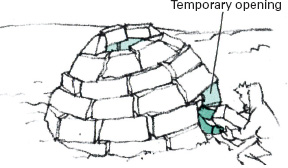
4. When walls are 3 to 4 ft. high, cut a temporary opening so blocks can be slid in. When shaping blocks, aim for a dome that will provide headroom for the tallest member of your group.
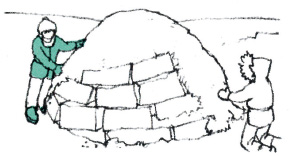
5. Final hole in roof is plugged with wedge-shaped block that serves as keystone. Chink roof and walls both inside and out with snow. Replace block in temporary opening and chink in place.
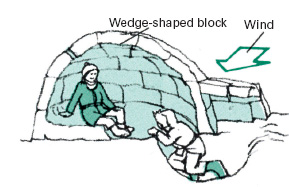
6. Build a permanent entranceway by tunneling under the igloo at a point that is 90 degrees from the prevailing wind. Finish by erecting a protective arch over the entrance tunnel.
Three Snow-Country Shelters
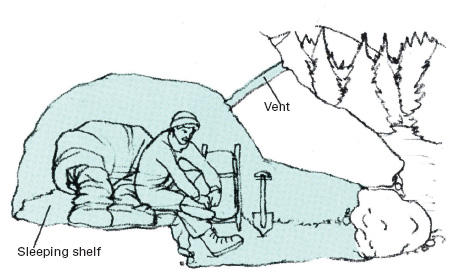
Snow cave resembles an igloo, but instead of being built of blocks, it is scooped out of a snowbank. Design shown has a rear sleeping shelf. Another style has a central cooking area with two-person sleeping shelves on each side. The roof should be at least 2 ft. thick with a sloping venthole. Check the venthole before cooking to make sure it is clear of snow. The preferred site for a snow cave is on a steep hillside in deep snow. A lot of digging is necessary, so snow shovels are a must.
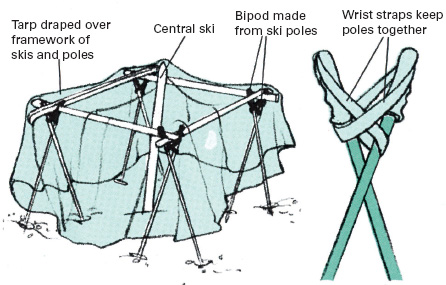
Large, lightweight nylon tarp can replace a tent at considerable savings in weight for a group traveling on skis, since skis and ski poles form the framework of the tent, eliminating the need for tent poles or stakes. Form bipods from ski poles by interlocking their straps, then plant them in the snow and hang skis between them. Drape tarp over this framework and pack snow around the base to keep snow from sifting inside. Ground cloths and a central ski that functions as a tent pole complete the shelter.
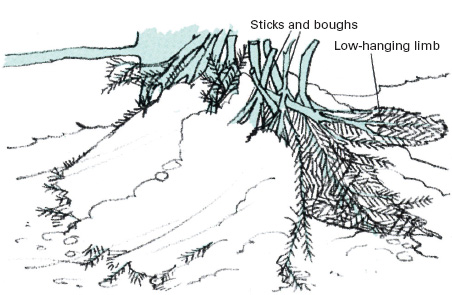
Emergency shelter can be created by forming a double lean-to from tree boughs, weeds, bushes, and sticks. A sturdy, low-hanging limb can serve as a ridgepole. Layer the sticks and boughs to provide maximum wind protection and fill the chinks with packed snow. Keep the entrance low and small to trap warm air inside, and build a windbreak of snow, sticks, or rubble in front of the entrance. The best place for such a shelter is on the lee (downwind) side of cliff.
Enjoying Wintertime In Your Own Backyard
While the more ambitious may prefer a holiday at a ski resort or a cross-country excursion through the wilderness, the traditional locale for wintertime recreation is no farther away than the backyard or at most the immediate neighborhood. Sleigh rides, tobogganing, snow sculpture, and such games as ice hockey and curling can be enjoyed almost anyplace where the weather is cold enough and the snow is deep enough.
Ice lends itself to a variety of winter sports and games. If no handy ice-skating rink or frozen pond exists nearby, you can still enjoy ice-skating by setting up your own backyard rink. A spell of cold weather, a little snow, and a level plot of ground are all you need. Scrape the snow away from a rectangular area (about 15 feet by 25 feet or larger), then pack up snow around the border of the cleared area to a height of a foot or so. Wait for a good, cold night (20°F or lower), hook up a garden hose, and cover the area with about an inch of water. The next day, when the water has frozen, set the hose on spray, and add another ½ to 1 inch. After several such treatments, the ice will be ready for skating. Keep the rink in good shape by clearing off new-fallen snow and by resurfacing the ice with more water when it becomes rutted. Be sure to drain the hose and bring it indoors after each use: in cold weather a hose can freeze and crack in minutes.
A frozen pond, of course, can make an excellent natural skating area as well as a likely spot for ice fishing, but the only way to be certain that the ice is strong enough to support your weight is if a responsible authority tests it and guarantees its safety. The general rule is that 2 inches of solid, hard, compact ice will be marginally safe for one person on foot, 3 inches will support a single person safely, and 4 inches will be safe for general pedestrian (not vehicular) use. Ice thicknesses may not be uniform, however, and ice that is tested and found safe in one location may be unsafe in a spot nearby. Springs and currents produce weak spots, and ice near the shore is almost always thinner than it is farther out. Moreover, ice that has thawed and refrozen is not nearly as strong as ice that has formed on still water and never thawed. Snow is another consideration: snow is an insulator, and ice that lies for a time beneath a covering of snow is likely to be weak, mushy, and honey-combed with air bubbles.
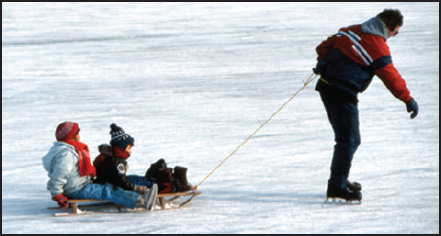
Skating and sledding will never lose their appeal for winter sports lovers.
If you are ever in a situation where someone falls through the ice, it is imperative to get him out as soon as possible—20 minutes in freezing water can be fatal. Do not go near the edge of the broken area. Instead, throw the victim a line, or lie flat on the ice and slide a board, tree branch, ski, ladder, or even one end of a coat to him, then pull him toward you. Instruct the victim to remain calm—thrashing about will only cause his garments to soak through more quickly, thereby reducing their buoyancy as well as their insulating ability. The victim should help by pulling his torso onto the ice, swinging one leg at a time onto its surface, then rolling away some distance from the weak ice before attempting to stand.
The fine old sport of curling
Curling is a centuries-old Scottish sport that resembles shuffleboard on ice. The object of the game is to slide curling stones—smooth, loaflike 40-lb. rocks with handles on top for gripping—down a 138-ft. rink in such a way that they come as close to a tee, or marker, as possible. A distinctive feature of curling is sweeping (see photo below): the players have brooms with which they control the movement of the stones by sweeping the ice in front of the stones.
There are two teams, each with four players: Lead, Two, Three, and Skip. A match consists of 10 to 17 ends, or innings. During an end each player delivers two stones, alternating throws with his opposite on the other team; the Leads throw first, the Skips throw last. The stones are delivered from the hack, a foothold at the end of the rink, and must slide beyond the farther hog line before sweeping can begin. All the stones of one side that are closer to the tee than any of the opponents’ stones score one point, provided they are within or touching the house circle.
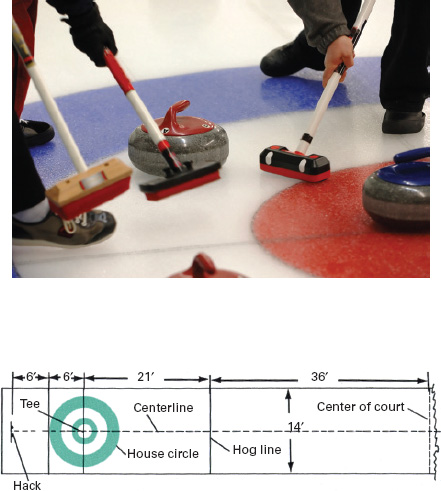
Diagram shows layout and dimensions of half a curling rink.
Sources and resources
Books
Caldwell, John. The New Cross-Country Ski Book. Gloucester, Mass.: Peter Smith, 1988.
Conover, Garrett, and Conover, Alexandra. Snow Walker’s Companion: Winter Trail Skills from the Far North. Camden, Maine: International Marine, 1994.
Edwards, Sally, and McKenzie, Melissa. Snowshoeing. Champaign, Ill.: Human Kinetics, 1995.
Gamma, Karl. The Handbook of Skiing. New York: Knopf, 1992.
Paul, Stephen L. Ski Now. Indianapolis: Masters Press, 1995.
