Chapter 10
Configuring Recovery
MICROSOFT EXAM OBJECTIVES COVERED IN THIS CHAPTER:
- ✓ Configure system recovery.
- This objective may include but is not limited to the following subobjectives: Configure a recovery drive, configure system restore, perform a refresh or recycle, perform a driver rollback, configure restore points.
- ✓ Configure file recovery.
- This objective may include but is not limited to the following subobjectives: Restore previous versions of files and folders, configure File History, recover files from OneDrive.
 Every administrator should take measures to safeguard against disaster. Keeping backups is an important component of disaster preparedness and recovery. Windows 10 has a full backup and restore application (Backup and Restore [Windows 7]) to enable you to maintain a backup copy of any of the Windows 10 component files and data files that are considered critical to the operation of your day-to-day business. You can use the backup of the files to restore files if they become unusable for various reasons such as becoming corrupt, deleted, or even modified.
If you can’t start Windows 10, there are several options and utilities that can be used to identify and resolve Windows errors. The following is a broad list of troubleshooting options (details on these options are provided throughout the chapter):
- Event Viewer
- Safe Mode
- Last Known Good Configuration
- Startup Repair tool
- Backup and Restore Center
- Driver Rollback
- System Restore
Safeguarding and Recovery Basics
One of the worst events you may experience is a computer that won’t boot. An even worse experience is discovering that there is no recent backup for that computer. The first step in preparing for disaster recovery is to expect that a disaster will happen at some point and ensure to take proactive measures to plan your recovery before the failure occurs. Here are some of the preparations you can take:
- Keep your computer up to date with Windows Update (covered in Chapter 1, “Installing Windows 10”).
- Perform regular system backups.
- Use current software to scan for malware (such as viruses, spyware, and adware), and make sure you have the most recent updates.
- Perform regular administrative functions, such as monitoring the logs in the Event Viewer utility.
No matter how many safeguards you enact, eventually you’ll likely need to recover a system. Table 10.1 summarizes all of the Windows 10 utilities and options you can use to assist in performing system recovery. All these Windows 10 recovery techniques are covered in detail in this chapter.
Table 10.1 Windows 10 recovery techniques
| Recovery Technique | When to Use |
| Event Viewer | If the Windows 10 operating system can be loaded through normal mode or Safe Mode, one of the first places to look for hints about the problem is Event Viewer. Event Viewer displays System, Security, and Application logs. |
| Safe Mode | This is generally your starting point for system recovery. Safe Mode loads the absolute minimum of services and drivers that are needed to boot Windows 10. If you can boot your computer to Safe Mode and you suspect that you have a system conflict, you can temporarily disable an application or processes, troubleshoot services, or uninstall software. |
| Startup Repair tool | If your computer will not boot to Safe Mode, you can use the Startup Repair tool to replace corrupted system files. This option will not help if you have hardware errors, however. |
| Backup and Restore | You should use this utility to safeguard your computer. If necessary, you can use the Backup and Restore (Windows 7) utility to restore personal files from backup media and to restore a complete image of your computer. |
| Driver Rollback | If you install a driver that causes issues on your system, you can use the Driver Rollback utility to return the driver to its previous version. Use Device Manager to access the Driver Rollback utility. Right-click the hardware component and choose Properties. Then click the Driver tab, and the Roll Back Driver button (Driver Rollback) will be there. |
| System Restore | System Restore is used to create known checkpoints of your system’s configuration. In the event that your system becomes misconfigured, you can restore the system configuration to an earlier version of the checkpoint. |
Using Advanced Boot Options
The Windows 10 advanced boot options can be used to troubleshoot errors that keep Windows 10 from successfully booting. Figure 10.1 shows the Advanced Boot Options screen. These advanced boot options are covered in this section.

Figure 10.1 Advanced Boot Options screen
Starting in Safe Mode
When your computer will not start, one of the fundamental troubleshooting techniques is to simplify the configuration as much as possible. This is especially important when you do not know the cause of your problem and you have a complex configuration. After you have simplified the configuration, you can determine whether the problem is in the basic configuration or is a result of your complex configuration.
If the problem is in the basic configuration, you have a starting point for troubleshooting. If the problem is not in the basic configuration, you should proceed to restore each configuration option you removed, one at a time. This helps you to identify what is causing the error.
If Windows 10 will not load, you can attempt to load the operating system in Safe Mode. When you run Windows 10 in Safe Mode, you are simplifying your Windows configuration as much as possible. Safe Mode loads only the drivers needed to get the computer up and running.
The drivers that are loaded with Safe Mode include basic ones for the mouse, monitor, keyboard, hard drive, standard video driver, and default system services.
Safe Mode is considered a diagnostic mode, so you do not have access to all of the features and devices in Windows 10 that you have access to when you boot normally, including networking capabilities.
Windows 10 offers a few Startup settings when you’re trying to repair your Windows 10 system. Figure 10.2 shows the Startup Settings that are offered when you boot into Startup Settings.
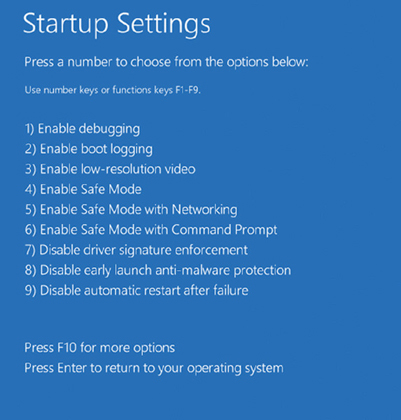
Figure 10.2 Startup Settings screen
When the Startup Settings screen appears, you then have the ability to choose to enter a Safe Mode (three versions). Once a computer is booted into Safe Mode, you will see the text Safe Mode in the four corners of your desktop, as shown in Figure 10.3.

Figure 10.3 A computer running in Safe Mode
If you boot to Safe Mode, check all of your computer’s hardware and software settings in Device Manager and try to determine why Windows 10 will not boot properly. After you take steps to fix the problem, try to boot to Windows 10 as you normally would.
In Exercise 10.1, you will boot your computer to Safe Mode.
Enabling Boot Logging
Boot logging creates a log file that tracks the loading of drivers and services. When you choose the Enable Boot Logging option from the Advanced Boot Options menu, Windows 10 loads normally, not in Safe Mode. This allows you to log all of the processes that take place during a normal boot sequence.
This log file can be used to troubleshoot the boot process. When logging is enabled, the log file is written to \WINDOWS\Ntbtlog.txt. A sample of the Ntbtlog.txt file is shown in Figure 10.6.

Figure 10.6 A Windows 10 boot log file
In Exercise 10.2, you will examine the boot log file that was created by default during Exercise 10.1.
Using Other Startup Setting Options
In this section, you will learn about additional Startup Settings menu modes. These include the following options:
1) Enable Debugging This runs the Kernel Debugger, if it is installed. The Kernel Debugger is an advanced troubleshooting utility.
2) Enable Boot Logging When you enable boot logging, a file is created called Ntbtlog.txt. This file lists all the drivers that are installed during startup and that might be useful for advanced troubleshooting.
3) Enable Low-Resolution Video This loads a standard VGA driver without starting the computer in Safe Mode. You might use this mode if you changed your video driver, did not test it, and tried to boot to Windows 10 with a bad driver that would not allow you to access video. The Enable VGA mode bails you out by loading a default driver, providing access to video so that you can properly install (and test!) the correct driver for your computer.
4) Enable Safe Mode As explained previously, entering into Safe Mode allows the system to boot up with only the minimum drivers needed to make the system operate.
5) Enable Safe Mode With Networking This is the same as the Safe Mode' option but adds networking features. You might use this mode if you need networking capabilities to download drivers or service packs from a network location.
6) Enable Safe Mode With Command Prompt This starts the computer in Safe Mode, but after you log in to Windows 10, only a command prompt is displayed. This mode does not provide access to the desktop. Experienced troubleshooters use this mode.
7) Disable Driver Signature Enforcement This allows drivers to be installed even if they do not contain valid signatures.
8) Disable Early Launch Anti-malware Protection Windows 10 has a feature called Secure Boot. Secure Boot helps protect the Windows boot configuration and its components. Secure Boot also loads an Early Launch Anti-malware (ELAM) driver. Choosing this option disables the Early Launch Anti-malware driver.
9) Disable Automatic Restart After Failure This prevents Windows from restarting when a critical error causes Windows to fail. This option should be used only when Windows fails every time you restart, preventing you from accessing the desktop or any configuration options.
Press Enter to Return to Your Operating System This boots the Windows 10 system in the default manner. This option is on the Advanced Boot Options menu in case you accidentally hit F8 during the boot process but really wanted to boot Windows 10 normally.
Launch Recovery Environment The Windows 10 Recovery Environment (WinRE) is used to repair common causes of bootable operating systems problems. By default, WinRE is preloaded into the Windows 10 for Desktop editions (Home, Pro, Enterprise, and Education).
Understanding System Restore
System restores are actually a two-part process to make work. First in the Windows 10 operating system, you create system restore points. These are snapshots of the Windows 10 system so in the event that you need to revert to one of these snapshots, you can.
So after you create some system restore points, the System Restore option in the Advanced Options allows you to revert your PC to an earlier point in time. Restore points are generated when an administrator or user installs a new application, driver, Windows update, or when you manually create a restore point.
When you restore to a previous point, the user’s personal files won’t be affected, but restores do remove applications, drivers, and updates installed after the restore point was made.
To enable System Protection (needed to create restore points), in Control Panel, choose the System icon. When the System Properties window appears, choose the System Protection tab. Click the Configure button (see Figure 10.7) to turn System Protection on.

Figure 10.7 Configure button for System Protection
Once you have enabled System Protection in Control Panel, you then need to open the System Restore application. To do that, you follow these steps:
- Right-click the Start button and then select Control Panel.
- Choose Control Panel ➢ Recovery.
- In the Recovery window, choose Configure System Restore (as shown in Figure 10.8).
- At the next screen, click the Create button. This will allow you to create a system restore point.

Figure 10.8 Open System Restore
Before you can use the system restore to fix a crashed computer, you need to create a recovery drive. Recovery drives allow you to create a backup drive in the event that a PC can’t start. After the recovery drive is created, you can then use that drive to recover from a system crash.
To use the recovery drive to fix a crashed computer, boot the system into the Advanced options and then choose System Restore. Then it will ask you for a username and then a password and the system will continue using one of the restore points that was selected.
Using the System Image Recovery
Another way to protect your Windows 10 computer system is to create and use system images. System images are exact copies of the Windows 10 drive. System images, by default, include the drives that are needed for Windows to function properly. System images include Windows and all of the system settings, programs, and files.
System images work well in the event of a major hard disk or computer crash. System images allow you to restore all of the contents of the crashed system and get the system back up and running. When you restore a crashed system from an image, the entire system is restored. It’s a complete restore of the computer system. This means that you can’t pick and choose what programs you want to install. It’s an all-or-nothing restore.
This is the reason why you should also make sure that you do regular backups. By making sure all of your backups are up to date and by making sure you have a system image, you are completely covered in the event of a major crash.
To create a system image, right-click the Start menu and choose Control Panel. In the Control Panel, open File History. Once you’re in the File History application, click the System Image Backup link in the lower-left corner (see Figure 10.9).

Figure 10.9 System Image Backup
The steps to create a System Image Backup will be explained in “Maintaining Windows 10 with Backup and Restore.”
Using the Startup Repair Tool
Another option that is available in the Advanced Options menu is the Startup Repair tool. If your Windows 10 computer will not boot because of missing or corrupted system files, you can use the Startup Repair tool to correct these problems. Startup Repair cannot repair hardware failures. Additionally, Startup Repair cannot recover personal files that have been corrupted, damaged by viruses, or deleted. To ensure that you can recover your personal files, you should use the Backup and Restore utility discussed in the next section.
If Startup Repair is unable to correct the problem, you might have to reinstall Windows 10, but this should be done as a last resort. This is one reason why you should always back up your Windows 10 machine.
Maintaining Windows 10 with Backup and Restore
The Windows 10 Backup and Restore utility enables you to create and restore backups. Backups protect your data in the event of system failure by storing the data on another medium, such as a hard disk, CD, DVD, or network location. If your original data is lost because of corruption, deletion, or media failure, you can restore the data by using your backup.
To access Backup and Restore, type backup and restore in the Windows 10 search box. Alternatively, you can choose Start ➢ Control Panel, choose either the small or large icon view, and then click Backup And Restore (Windows 7). Backup and Restore is shown in Figure 10.10.

Figure 10.10 Windows 10 Backup and Restore
Creating a Backup
You can see in Figure 10.10 that no backups of this Windows 10 machine have been taken. To set up a backup, choose the Set Up Backup link in the right side of the Backup And Restore window. Choosing Set Up Backup launches a wizard that takes you through the process of creating a backup. The Backup Wizard first asks you for a location to save your backup. This location can be a hard disk (removable or fixed), a CD, a DVD, or even a network location (if you have Windows 10 Premium or Ultimate).
Next, you are asked to either let Windows 10 choose the files and folders to back up or let you manually select the resources you want to back up. In your manual selection, you can choose just the data libraries of Windows 10 for you as a user or other users. You can also choose to create a backup of the Windows 10 system files. If you want to choose other files and folders, you have the option of selecting any resources individually on your hard disk(s).
The final page of the wizard enables you to view the items you have selected as well as set up a schedule for your backups to occur. If you’re happy with the setup, click the Save Settings And Run Backup button. The backup commences, and you are able to restore the resources if necessary in the future. Figure 10.11 shows my Windows 10 machine right after I chose to save the settings and run a backup. You can see the backup in progress and the date and time of my last backup.

Figure 10.11 Windows 10 backup status
In Exercise 10.3, you will make a backup of your files. This exercise assumes that you haven’t yet configured an automatic backup.
After you have created your backup, you can restore system files and user data files with the Backup and Restore utility.
Restoring Files from a Backup
If you have lost or destroyed files that you still want on your Windows 10 system, you can restore them from your backup. To restore files to your computer, launch the Backup and Restore program by typing backup and restore in the Windows 10 search box. Assuming the media where your backup was saved is available, you can click the Restore My Files button.
Click the Restore My Files button to launch a restore wizard that prompts you to search for the files you want to restore. You can select multiple files and folders. When you have selected all the files and folders you want to restore, click Next, and you will have one final option: to restore to the original location or pick an alternative location for restoration. After you make the restore-location decision, choose Restore. The restore operation commences, and your original files and folders are available for you from the backup media.
You also have options in the Backup And Restore window to restore all users’ files or to select another backup to restore files from. You would use this second option if you saved your backup to multiple locations and the last one (the one listed in the backup section) is not the set of backup files you want to use in your current session. Other than just restoring files and folders, you have the choice to use other advanced backup options.
In Exercise 10.4, you will restore some files. This exercise assumes that you created a backup in Exercise 10.3.
Recovering Files from OneDrive
As explained in Chapter 3, “Configuring Storage and Security,” Microsoft has a subscription-based storage system called OneDrive. Microsoft’s OneDrive is built into Windows 10 by default. OneDrive is a cloud-based storage subscription so home users can store their documents and then access those documents from anywhere in the world (provided that you have Internet access).
OneDrive was designed for the average home user who is looking to store data in a safe, secure, cloud-based environment. OneDrive, when first released, was also a consideration for corporate environments, but with the release of Windows Azure, OneDrive is really intended for the home user or corporate user who wants to store some of their own personal documents in the cloud. Corporations would be more inclined to use Microsoft Azure and all of its corporate benefits.
Exercise 10.5 will show you how to set up a OneDrive account for your user account. To do this, you must have a Microsoft account. You get 5 GB for free from Microsoft on the OneDrive cloud-based storage.
Now that the OneDrive subscription has been set up, you can recover files and folders from clicking Windows Explorer and then choosing OneDrive from the left side. You can recover any of the files and folders that were stored on OneDrive.
Using the Wbadmin Command Utility
Administrators have the ability to configure and manage backups and restores through the command prompt using a utility called Wbadmin. The Wbadmin.exe command replaces the Ntbackup.exe command that was released with previous versions of Windows. Wbadmin allows you to back up and restore your operating system, volumes, files, folders, and applications all from a command prompt.
You must be a member of the Administrators group to configure a regularly scheduled backup. To perform any other tasks using Wbadmin, you must be a member of either the Backup Operators group or the Administrators group, or you must have been delegated the appropriate permissions.
To run the Wbadmin.exe command, you must start it from an elevated command prompt. To do this, click Start, right-click the command prompt, and then click Run As Administrator.
Table 10.2 shows the Windows 10 Wbadmin command switches and their descriptions.
Table 10.2 Wbadmin switches
| Command | Description |
Wbadmin Start Backup |
Runs a one-time backup |
Wbadmin Stop job |
Stops the currently running backup or recovery |
Wbadmin get versions |
Shows the details of a backup |
Wbadmin get items |
Lists items contained in a backup |
Wbadmin get status |
Shows the status of the currently running operation |
Using Advanced Backup Options
In the main Backup And Restore window, you have options in the left pane to turn off the schedule, create a system image, and create a system repair disk.
Choosing the Turn Off Schedule option lets you take your backup out of the current backup scheduling as seen in Task Scheduler. Creating a system image lets you back up critical operating system files for restoration later if your operating system becomes corrupt. Creating a system repair disc allows you to create a bootable disc with which you will have a limited set of repair utilities and the ability to restore your backup files if necessary.
Creating a System Image
A system image enables you to take a snapshot of the entire hard disk and capture that image to a specific location so you can restore that image at a later date.
To create a system image of your entire computer, select the Create A System Image link on the left side of the Backup And Restore utility. When creating a system image, you can save that image to a hard disk, a DVD, or a network location.
In Exercise 10.6, you will create a system image and save it to a local hard disk.
After you create a system image, you may need to restore it. Let’s take a look at the steps needed to complete a restore.
Restoring an Image
When you need to restore an image, you will use the System Image Recovery tool. To restore an image using this tool, you must perform the following steps:
- Boot your computer by using the Windows 10 media, or use the recovery partition instructions provided by your computer manufacturer.
- When the Install Windows dialog box appears, select the language, the time and currency format, and the keyboard or input method. Click Next to continue.
- The Install Now button appears in the center of the screen. Click Repair Your Computer in the lower-left corner.
- Select the operating system to recover and click Next. If you do not see your operating system, you might need to load your hard-disk drivers by clicking the Load Drivers button.
- The System Recovery Options dialog box appears. You can choose one of the following options:
- Startup Repair
- System Restore
- Windows Complete PC Restore
- Windows Memory Diagnostic Tool
- Command Prompt
Choose Windows Complete PC Restore to continue.
- Select the recommended image, or select Restore A Different Backup. Click Next to continue.
- If you selected Restore A Different Backup, follow the prompts to select the location of the image and the image you want to restore.
- You will be asked to review your selections. Click Finish to continue.
- You will be asked to confirm your decision. Click the check box and click OK to restore the image.
Using System Protection
System Protection is a feature of Windows 10 that creates a backup and saves the configuration information of your computer’s system files and settings on a regular basis. System Protection saves multiple previous versions of saved configurations rather than just overwriting them. This makes it possible to return to multiple configurations in your Windows 10 history, known as restore points. These restore points are created before most significant events, such as installing a new driver. Restore points are also created automatically every seven days. System Protection is turned on by default in Windows 10 for any drive formatted with NTFS.
You manage System Protection and the restore points from the System Protection tab of the System Properties dialog box. You can also access this tab directly by typing restore point into the Windows 10 search box or by clicking the Recovery icon in Control Panel.
Clicking the System Restore button launches the System Restore Wizard, which walks you through the process of returning Windows 10 to a previous point in time.
Also within the System Protection tab of the System Properties dialog box is the Protection Settings section, where you can configure any of your available drives. Select the drive for which you would like to modify the configuration and click the Configure button. The System Protection configuration dialog box for the drive appears.
The System Protection dialog box allows you to enable or disable system protection for the drive. When you enable protection, you can opt for previous versions of files or previous versions of files and system settings. You also have the ability to set the maximum disk space that your restore points will use for storage. Another function of the System Protection dialog box for the selected disk is to delete all restore points (including system settings and previous versions of files) by clicking the Delete button.
One tool included with restore points is shadow copies. Shadow copies are copies of files and folders that Windows automatically saves as part of a restore point. Normally, restore points are made only once a day if you have enabled System Protection. If System Protection is enabled, Windows will then automatically create shadow copies of files that have been modified since the last restore point was made.
One advantage of using restore points and shadow copies is the ability to restore files and folders using the Previous Versions tab. When you click any folder and choose Properties, the last tab on the right is Previous Versions. You can easily restore any folder by choosing one of these previous versions.
Creating Restore Points
Restore points contain Registry and system information as it was at a certain point in time. These restore points are created at the following times:
- Weekly
- Before installing applications or drivers
- Before significant system events
- Before System Restore is used to restore files (so you can undo the changes if necessary)
- Manually upon request
In Exercise 10.7, you will manually create a restore point.
Restoring Restore Points
You can restore previously created restore points with System Restore. The restore operation will restore system files and settings but will not affect your personal files.
In Exercise 10.8, you will revert your system configuration to a previously captured restore point.
Cleaning Up Old Restore Points
One problem with creating multiple restore points is that they start to take up a large amount of your hard disk. You will need to clean up old restore points from time to time, and you can accomplish this task by using the Disk Cleanup utility.
The Disk Cleanup utility removes temporary files, empties the Recycle Bin, and removes a variety of system files and other items that you no longer need. When using the Disk Cleanup utility, you can also click the More Options tab and choose Programs And Features and System Restore And Shadow Copies to clean them up as well.
To use the Disk Cleanup utility, right-click Start ➢ Control Panel ➢ Administrative Tools ➢ Disk Cleanup.
Using the Recycle Bin
Now we are going to talk about an icon that we have seen on our desktop for many years called the Recycle Bin. The Recycle Bin is a temporary storage container that holds deleted files. The advantage of have a temporary storage container is that you can restore or recycle the files to their original location. So basically it allows you to undelete a deleted file.
When a file or folder is deleted on a computer, it isn’t actually deleted. When files or folders get deleted, they get placed into the Recycle Bin. This works well because if you change your mind or realize that you actually need the file or folder, you can undelete it and it gets restored. The Recycle Bin allows you to perform a refresh or recycle of files that were deleted but shouldn’t have been.
The Recycle Bin allows you to restore files or folders multiple ways. You can right-click the item and choose Restore or you can use the Manage tab (as shown in Figure 10.12).

Figure 10.12 Manage tab in Recycle Bin
In Exercise 10.9, you will create a document and then delete the document. Then you will use the Recycle Bin to restore the document to its original location.
Summary
In this chapter, you looked at the different ways to recover and protect your Windows 10 machine from hardware and software issues. We discussed using the Advanced Boot Options such as Safe Mode, Debugging Mode, and VGA Mode.
Another important item that needs to be completed on a Windows 10 machine is Backup and Restore (Windows 7). Backing up a Windows 10 machine protects data in the event of a hardware or software failure.
We also discussed how to back up a complete copy of Windows 10 by using images. An image allows you to copy the entire Windows 10 machine and then reimage the machine in the event of a major failure. Another way to protect data is by the use of shadow copies. Shadow copies, which are a part of System Protection, allow you to keep previous versions of data and revert to that previous version in the event of a problem.
Video Resources
There are no videos for this chapter.
Exam Essentials
Understand the different options for managing system recovery. Know how to use the Startup Repair tool, System Restore, and the Backup and Restore Center and when it is appropriate to use each option.
Be able to perform file recovery with the Backup and Restore Center and shadow copies. Understand the options that are supported through the Backup and Restore (Windows 7) Center and the files that are backed up using this tool. Know how to manually create a shadow copy and how to keep only the last shadow copy version.
Know how to troubleshoot using Advanced Boot Options. Be able to list the options that can be accessed through Advanced Boot Options, and know when it is appropriate to use each option. Know the difference between Last Known Good Configuration, Safe Mode, Debugging Mode, and VGA Mode.
Review Questions
-
You are the network administrator for a large organization that uses both Windows Server 2012 R2 and Windows 10. One of the Windows 10 machines needs to be backed up daily. You perform an image backup on the Windows 10 machine. The Windows 10 machine then gets struck by a virus and will not start up properly. What can you do to get the Windows 10 machine up and running the fastest possible way?
- Because of the virus, the best thing is to rebuild the machine from scratch.
- Start the computer from the Windows 10 DVD and then use the System Image Recovery tool.
- Start the computer from the Windows 10 DVD and then use the Image Restore utility.
- Use a Windows 10 boot disk and run the Image Restore utility.
-
You need to back up Windows 10, but the backup must be backed up to a local disk drive. When you start the backup, you see the screen shown in Figure 10.13.

Figure 10.13 Backup and Restore (Windows 7) error
What action do you need to perform?
- Log on as the backup administrator.
- Log on as the system administrator.
- Add a local hard disk to the machine by using Computer Management and then run the backup again.
- Run the backup utility in protected mode.
-
You are the system administrator for a large organization that uses Windows Server 2012 R2 and Windows 10. You have a Windows 10 machine and have enabled System Protection. You want the machine to retain only the last System Protection snapshot that was taken. What should you do?
- Run Disk Cleanup for System Restore and then run Shadow Copies.
- Disable Shadow Copies and run System Protection.
- Set the Keep Only Last Shadow Copy option in System Protection.
- Enable Shadow Copies and then set the Keep Only Last Shadow Copy option.
-
You are the network administrator for a small company. You manage the computers for the Marketing department, all of which are running the Windows 10 operating system. You are making several configuration changes to the manager’s computer to enhance performance. Before you make any changes, you want to create a restore point that can be used if any problems arise. How do you manually create a restore point?
- By using the System Restore utility
- By using the System Protection tab of the System Properties dialog box
- By using the System Configuration utility
- By using the Startup Repair tool
-
Your computer uses a SCSI adapter that supports a SCSI drive, which contains your Windows 10 system and boot partitions. After updating the SCSI driver, you restart your computer, but Windows 10 will not load. You need to get this computer up and running as quickly as possible. Which of the following repair strategies should you try first to correct your problem?
- Restore your computer’s configuration with your last backup.
- Boot your computer with the System Image reload.
- Boot your computer with the Safe Mode option and do a driver rollback.
- Boot your computer to the Recovery Console and manually copy the old driver back to the computer.
-
You are about to install a new driver for your CD-ROM drive, but you are not 100 percent sure that you are using the correct driver. Which of the following options will allow you to most easily return your computer to the previous state if the new driver is not correct?
- Safe Mode
- Roll Back Driver
- System Restore utility
- Startup Repair tool
-
After you updated Will’s computer, his system files became corrupted due to a virus and now need to be restored. Which of the following processes should you use to fix the problem?
- Restore a backup.
- Restore an image.
- Use the Startup Repair tool.
- Boot to Safe Mode.
-
You are unable to boot your Windows 10 computer, so you decide to boot the computer to Safe Mode. Which of the following statements regarding Safe Mode is false?
- When the computer is booted to Safe Mode, there is no network access.
- Safe Mode loads all the drivers for the hardware that is installed on the computer.
- When you run Safe Mode, boot logging is automatically enabled.
- When you run Safe Mode, the screen resolution is set to 800×600.
-
You have been having problems with your Windows 10 computer. You decide to start the computer by using the Enable Boot Logging option on the Advanced Boot Options menu. Where can you find the log file that is created?
\Windows\ntbtlog.txt\Windows\System32\ntbtlog.txt\Windows\ntboot.log\Windows\System32\ntboot.log
-
You have purchased a new computer with Windows 10 installed. After modifying the system so that it is configured just how you want it, you want to back up the system so that if anything happens, you can restore the files and settings. Which of the following should you do?
- Back up your files by using the Back Up Files button in the Backup and Restore Center.
- Create an image of your computer by using the Create An Image link in the Backup and Restore Center.
- Use the System Repair tool to make an image of your computer.
- Use Shadow Copies to create a previous version of the files.