2: iOS and the Apple ID
The Skim
iOS Basics • No Computer Needed • Wi-Fi Sync • Apple ID
Notifications • AirPlay • The Settings App • Preloaded Apps
Dictation • The Mountain Lion Connection
The iPad’s operating system, called iOS, controls its core functionality. The same iOS controls the iPad, the iPhone, and the iPod touch. Apple periodically updates the iOS to add functionality to the devices and fix any bugs. Since the release of the iPad, Apple has added built-in apps and functions tied to the iOS. With iOS 5, Apple introduced a new Notification Center, a message system, updated photo editing functions, AirPlay Mirroring, and Twitter integration, and it removed the need for the user to have a computer to use the iPad.
That’s a lot of functionality and if we go by history, Apple will not rest on its laurels and will continue to improve the functionality of the iPad with periodic iOS updates. Before looking at the new and improved functions, let’s go over the basics of using the iPad.
The Apple iPad Operating System
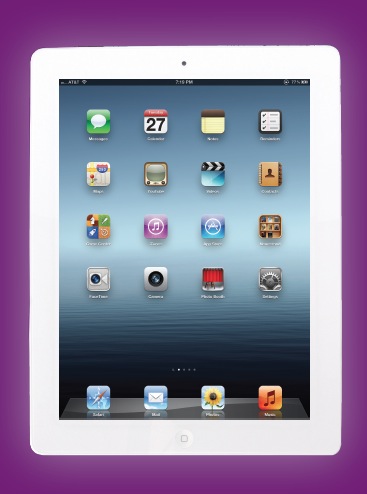
The iPad is really easy to use thanks to technology controlled by the operating system; just use your fingers to navigate around the screen. While the iPad is pretty intuitive to use, knowing a few specific things will make it easier and hopefully less frustrating.
Gestures
Controlling the iPad is done by making gestures with your finger on the touch screen. Want to run an app? Just tap on it with your finger. On a screen where you need to type something? The keyboard slides up into place. Reading an eBook and want to turn the page? Just swipe from right to left. The gestures are very intuitive and usually perform exactly like you would expect them to.
There are also some special gestures that you can use to control the iPad. These special gestures are available in iOS 5.1 and can be turned on and off as desired in the Settings app. These gestures are:
• Pinch to go the home screen. Place all five fingers on the screen and pull them together. This closes the app you are using and opens the home screen.
• Swipe up. Slide four fingers from the bottom of the screen toward the top to open the multitasking bar. I still find it easier to double tap the Home button, but this works well if you have a problem with the timing of the double tap.
• Slide between the apps. This is a neat way to switch apps; just slide four fingers from right to left to go to the next app or from left to right to go to the previous app.

Figure 2-1
Double tapping on the Home button opens the multitasking bar, showing the most recently used apps.

Figure 2-2
Swiping across the multitasking bar from the left to right brings up the controls for locking the Rotation or Mute buttons, the brightness slider, the media playback controls, the AirPlay button, and the Music app.
Multitasking
The iOS allows a form of multitasking, which you can control with the multitasking bar. This bar gives you access to the apps that are running, the brightness and volume controls, and the playback control for the music player. You can also control the Rotation Lock here. To access the multitasking bar, just tap the Home button (that’s the only button on the front of the iPad, located at the bottom just below the screen) twice in quick succession. The multitasking bar slides up from the bottom of the screen.
When the multitasking menu slides up from the bottom, the first thing you see are the most recently used apps. You can now swipe your finger across the bar from left to right, which brings up the Rotation Lock or Mute, depending on what was set up in the Settings app. To set up what that button does, you need to set the function of the side switch in the Settings app, which is covered a little later in this chapter. My preference is to set the side switch to Mute, which makes this button the Rotation Lock. Tapping the Rotation Lock button locks/unlocks the automatic orientation of the device. When the orientation is locked, it doesn’t matter what way you turn the iPad, the screen orientation stays the same. Unlock the rotation and the screen switches between portrait and landscape automatically as you move the iPad.
Next is the brightness slider that controls the brightness of the screen. Just slide to the left to dim the screen, to the right to make it brighter. Up next are the Previous, Play/Pause, and Next buttons that control the music playback. The Next button is the AirPlay button that appears if you have AirPlay devices on the network. Tap the AirPlay button and the devices that are AirPlay-enabled are listed; just tap a device from the list and the output from the iPad streams to that device. Next is the volume slider; just slide to the left to reduce the volume, to the right to increase the volume. The final button is the music source and this defaults to the iTunes player. If you use a different music player like the Pandora Music app, then this will show that app icon.
Moving Apps
When you purchase an app and download it to your iPad, the app is loaded in to the first empty spot on the iPad, starting on the second page. You can move it, though. What if you want the app to be on another page or grouped with other apps that share a common theme? It’s really easy to move apps on the iPad. To do so, follow these steps.
1. Hold your finger on the app that you want to move until it starts to wiggle.
2. Drag the app to where you want it. You can move the app from page to page just by sliding it to the edge of the page until the page changes.
3. Once you’ve moved the app to where you want it, tap the Home button once and the apps are now locked into place.
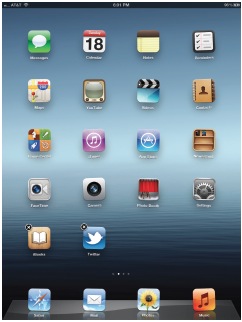
Figure 2-3
When you hold your finger on an app it starts to wiggle—now you can move it. Notice that the apps that can be deleted have an X in the top left corner.
Deleting Apps
You may not want to keep every app you download. Thankfully, deleting apps from your iPad is really easy; just do the following:
1. Hold your finger on the app that you want to delete until it starts to wiggle.
2. Tap the X on the top left corner of the app.
3. You may see a warning that you are about to delete the app and all the data associated with it.
4. Tap ok to delete the app.
That’s all there is to it. The best part is that once you purchase an app, you can always download it again anytime.
Folders
Apple has made it easy to group apps together by allowing you to make folders to store them in. All you have to do is move one app on top of another and a folder is created automatically. Here’s how you do it:
1. Hold your finger on one of the apps that you want put into a folder until the app starts to wiggle.
2. Slide one app onto the top of the second app and a folder appears with the two apps inside it.
3. You can now name the folder in the title spot, as shown in Figure 2-4.
4. You can move other apps into the folder and move the folder around the same way as you would an app.
There are a few things that are different with folders compared to apps:
• You cannot delete a folder; you have to remove or delete the apps within it and then the folder vanishes.
• You cannot have an empty folder.
• You cannot put the Newsstand app into a folder.
• You can have a maximum of 20 apps in one folder.
To access an app in a folder, just tap on the folder to open it, then tap on the app you want to launch. When you are done with the app, tap on the Home button to close the app and you will see the open folder. To close the folder you can either tap on the Home button, tap on the folder icon, or tap on the screen anywhere outside the open folder.
Periodically I like to go through my iPad and make sure that the apps are sorted in a way that makes finding then easier. For example, I like to play games on my iPad once in a while and so I like to keep them all together in one “Games” folder.
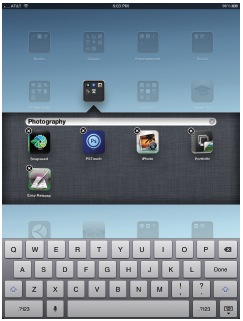
Figure 2-4
This folder has apps that are all related to photography, so I named the folder “Photography,” allowing me to find them all quickly.
No Computer Needed
When the iPad first came out, you needed to have a computer running iTunes to be able to use the tablet. When you first turned the iPad on, the first thing you had to do was attach the iPad to a computer and sync it with an iTunes account. With the release of iOS 5, this is no longer the case and the device can now be used by anyone, whether he has a computer or not.
Turn on your iPad for the first time and you no longer get a graphic that tells you to plug it into a computer running iTunes. The first screen asks you to slide your finger across the Unlock button to set up the iPad. The next screen asks you if you want to turn on Location Services, which allows the maps and other apps to gather information and use data indicating your approximate locations. If you disable Location Services you can always turn it on later.
It’s now time to connect to a Wi-Fi network, and the iPad shows you a list of the available networks. Pick yours and enter the password. Then, you get to set up the device up as a new iPad or you can restore from a previous iCloud backup or iTunes backup. Now, enter the Apple ID you use for the iCloud. If you don’t have an iCloud account, you can Create a Free Apple ID here and I suggest that you do.
The next step is to agree to the Terms and Conditions of the iOS. Feel free to read the fine print but if you Disagree you can’t use your iPad, so I suggest that you just tap on the Agree button on the bottom right. That’s it, your iPad is now ready to use.

Figure 2-5
You must agree to the Terms and Conditions before you can use your iPad.
Wi-Fi Sync and Backup
With the release of iOS 5, Apple introduced Wi-Fi syncing and backup of your iPad. This enables you to sync your iPad to your computer without having to plug the iPad into the computer. You can transfer your apps, music, movies, TV shows, and photos from the computer right to the iPad over the Wi-Fi network. Now, although this doesn’t require you to plug the iPad into the computer, you still have to plug the iPad into a power source.
For Wi-Fi sync to work you must be running iTunes 10.5 or later and iOS 5 or later, and you need to attach the iPad to the computer at least once to turn Wi-Fi sync on. First, you need to set up the sync on iTunes, and then you need to set up the sync on the iPad. Just follow these steps:
1. Turn on the computer.
2. Launch iTunes on your computer.
3. Turn on the iPad.
4. Connect the iPad to the computer using the supplied USB cable.
5. On the computer, select the iPad from the Device list in the left window in iTunes.
6. In iTunes, click on the Summary tab at the top of the window.
7. Scroll down and click the checkbox “Sync with this iPad over Wi-Fi” in the Options menu.
Now that the device is set up on the iTunes side, it’s time to set up the iPad side of things:
1. Disconnect the iPad from the computer.
2. Plug the iPad into a power supply.
3. Turn on the iPad.
4. Tap on the Settings app.
5. Tap on General.
6. Tap on iTunes Wi-Fi Sync.
7. Tap on the Sync Now button to wirelessly sync the iPad to the computer.
That’s all there is to it. Your iPad will now sync with your computer’s iTunes every time the iPad is plugged into a power supply.
If you run into problems with the wireless sync, here are some things to try:
1. Make sure that you are using iTunes 10.5 or later.
2. Quit and relaunch iTunes.
3. Restart the iPad.
4. Make sure that the iPad and the computer are on the same Wi-Fi network.
If all of these troubleshooting ideas fail to fix the problem, connect the iPad to the computer and make sure that the Wi-Fi Sync box is checked, as outlined earlier. At times there seem to be gremlins that come around and uncheck those boxes, at least they do on my computers.
Since the iPad syncs wirelessly, it also backs up wirelessly, and you can decide if those backups are stored on the computer or in the iCloud. I talk more about iCloud in Chapter 3, but if you have the iCloud service (and there is no reason not to) then you can back up your iPad data to the cloud.
To determine where your iPad backs up, turn on the computer your iPad syncs with, open iTunes, select the iPad from the device list on the left, and click on the Summary tab. Check the Backup menu and pick either Back up to the iCloud or Back up to This Computer. You can also encrypt the backup if you want.

Figure 2-6
The iTunes Wi-Fi Sync menu in the Settings app. Just tap the Sync Now button to sync your iPad with your computer’s iTunes.
Your Apple ID
The Apple ID is the key to getting the most out of your iPad and your Apple account. The Apple ID is the user name that allows you to purchase items from the iTunes Store, and log into iCloud and iChat. The most important thing to know is that purchases are tied to your Apple ID and at this time Apple IDs cannot be combined. That means you need to make sure you are always using the correct Apple ID.
To set up an Apple ID, check to see if you have one, or manage yours go to appleid.apple.com. This site allows you to manage your account, reset your password, or check to see if you have an Apple ID with a simple tap.
The following are places that you need to enter an Apple ID on your iPad.
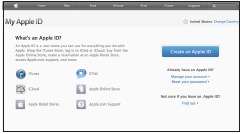
Figure 2-7
The Apple ID page where you can create an Apple ID, manage your account, reset your password, or just find out if you already have an Apple ID.
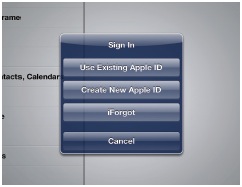
Figure 2-8
You need to sign in using an Apple ID. If you don’t have one yet, Apple gives you the option of creating one right here.
The Apple ID and Your Purchases
Any content you purchase from the iTunes Store is tied to an Apple ID. This is both really useful and really restrictive. It means that if you purchase an app for your iPad and want to have that same app on your iPhone, then you need to use the same Apple ID in the Store settings on both devices. This also works for when you have more than one iPad in a household (or business). For example, both my wife and I have iPads and we want to be able to load the same apps (and movies, music, books, etc) onto both iPads without having to purchase the content twice. Now, I have a different e-mail account and iCloud account than my wife does, but both of our iPads use the same Apple ID in the Store settings for content purchased from the iTunes Store.
To enter the Apple ID you want to use for purchases in the Store settings, just follow these simple steps:
1. Turn on the iPad.
2. Tap on the Settings app.
3. Tap on Store in the list on the left side.
4. Tap on Sign In at the top right corner of the screen; a Sign In screen opens.
5. Tap Use Existing Apple ID or Create New Apple ID as needed. If you forgot your Apple ID, then tap iForgot.
6. Enter the required information and tap Continue.
Make sure that this is the Apple ID that you want to use to purchase content with. If you want the content to be on other iPads, you will need to enter the same Apple ID in this spot on all the iPads (and iPhones and iPod Touches).
The Apple ID and Home Sharing
Home Sharing is awesome because it allows you to access the content that is in your computer’s iTunes library from your iPad (and iPhone and other computer) as long as the computer and iPad are on the same Wi-Fi network, you have Home Sharing turned on, and are using the same Apple ID.
To turn on Home Sharing on the computer in iTunes:
1. Open iTunes.
2. Click Advanced > Turn on Home Sharing.
3. The Home Sharing window opens.
4. Enter the Apple ID and Password.
5. Click on Create Home Share.
There are two places in the Settings app—Music settings and Video settings—where you can turn on Home Sharing on your iPad. When you enter the information in one spot it is automatically entered in the other.
Follow these steps to turn on Home Sharing in the Music settings on your iPad:
1. Turn on the iPad.
2. Tap on the Settings app.
3. Tap on Music in the list on the left.
4. Enter the Same Apple ID and Password that you entered in the computer in the Home Sharing settings.
You can follow these same basic steps to turn on Home Sharing in the Video settings, too.
That’s it. Home Sharing is now turned on. You can now access the iTunes library on all computers and devices that have Home Sharing enabled and are on the same Wi-Fi network.
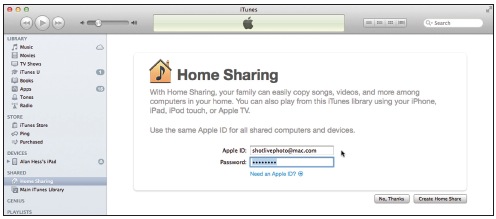
Figure 2-9
The Home Sharing sign in page in iTunes.

Figure 2-10
You can sign in to Home Sharing on the iPad in the Music settings within the Settings app.
Apple ID and FaceTime
For the video chat FaceTime software to work, it needs to be associated with an Apple ID. This does not have to be the same ID that you use for purchasing from the iTunes Store and Home Sharing. For example, the Apple ID on my wife’s iPad in the FaceTime application is different from the Apple ID used for app purchasing and Home Sharing since she doesn’t want to get calls meant for me.
To set the Apple ID and the e-mail associated with the iPad FaceTime software, go to the Settings app and tap on FaceTime on the left, and then enter the required information on the right. Simple as that!
The details on using FaceTime are covered a little later in this chapter.
iMessage
Apple has created a messaging service that works between devices using the iOS 5 or later operating system and with Apple computers running the OS 10.8. This messaging system works on the iPad, iPhone, and iPod Touch. iMessage works on Wi-Fi and 3G or 4G, and allows you to send texts, photos, videos, and map locations.
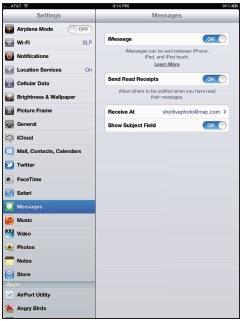
To set up iMessage on your iPad, go to the Settings app and tap on Messages. This is where you can turn on messaging and specify which e-mail account you want to use to receive the messages.
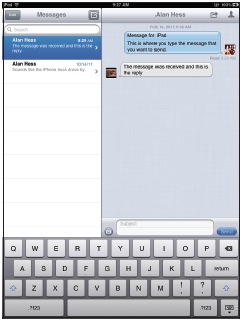
Figure 2-11
The iMessage screen showing a text conversation. It look just like a text message conversation on an iPhone.
Notification Center
Many of the apps on your iPad send you alerts when something happens. This includes new text messages, e-mails, mentions on Twitter, and just about anything else. In the past, these alerts would come up in the middle of the screen and pause whatever app you were currently using, interrupting your iPad usage. With the release of the Notification Center in iOS 5, that has all changed. Now, alerts don’t pause the currently running app. And instead of showing up in the middle of the screen, alerts now show at the top of the screen and last a few seconds before disappearing automatically. They are easy to check by just swiping down from the top of the screen.
You can customize the Notification Center in the Settings app, where you can choose which apps to include in the Notification Center and what they show. To access the Notification Center settings just turn on the iPad, tap on the Settings app, and tap on the Notifications tab.
The first option you choose is whether the apps are sorted manually or chronologically. Just click on your choice and it’s set. Then comes the fun part: setting up the notifications for apps on your iPad. Each of the app’s notification choices has a series of choices that includes if the app shows up in the Notification Center, what type of alert style is used, and any other options available.
The Notifications app is now part of the OS X 10.8 on Apple desktop computers, bringing this functionality to the desktop.
Figure 2-12
The iMessage setup screen allows you to specify the e-mail account you want to use for iMessage.
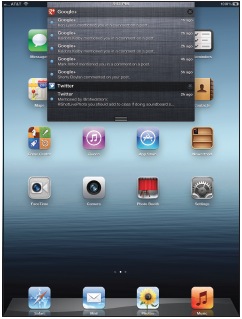
Figure 2-13
The notifications show Google+ updates and Twitter mentions.
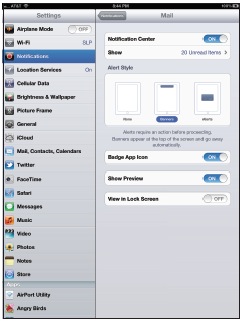
Figure 2-14
The Notification panel for my e-mail accounts. I have turned off the View in Lock Screen setting so that new e-mails are not visible when my iPad is locked.
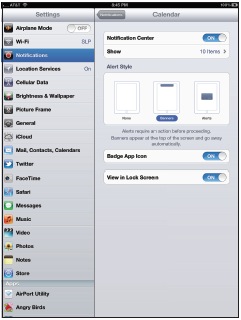
Figure 2-15
The Notification panel for my Calendar has fewer choices than the one for e-mail accounts. I allow these notifications to show up on the locked screen since they remind me of appointments.
FaceTime
FaceTime is the video chat service that runs on Apple products including the iPad 2, the new iPad, the iPhone, and the full range of Apple computers. FaceTime works only on iPads that have cameras, so it won’t work with the original iPad. You also must have a Wi-Fi connection to use FaceTime.
The first time you run FaceTime on the iPad 2 or the new iPad, it asks you to sign in with your Apple ID or create a new account. After you have signed in you are asked to specify an e-mail address for people to use when they call you. This e-mail address doesn’t have to be the same address that you used for the Apple ID.
Now, this is important: If you have multiple devices that have FaceTime capability and you want them all to ring when called, then you must use the same e-mail on each one. If you have multiple devices but want them each to be considered separate then you must use a different e-mail for each one. For example, I have a MacBook Pro that has FaceTime installed and I have an iPhone 4 with FaceTime installed. If my wife wants to call me on the iPhone 4 then she calls using the phone number. If she wants to call me on the computer, then she uses my main e-mail address. So when I got my new iPad, I set it with the same e-mail and Apple ID as my computer. I wanted it to ring when someone called the computer so that it didn’t matter if I was at my desk or sitting on the living room couch with my iPad.

Figure 2-16
When you launch FaceTime for the first time you are prompted for an Apple ID and password. It remembers this info so you don’t have to enter it again.

If your computer and iPad are using the same Apple ID but different e-mails, here is how to change the Caller ID in the Settings app so that they both ring when one e-mail is called:
1. Turn on the iPad.
2. Tap on the Settings app.
3. Tap on FaceTime in the list on the left. You will see:
• You can turn FaceTime on or off here, in case you don’t want to be disturbed.
• Your Apple ID account e-mail.
• The e-mail that you entered as the e-mail to use to call the device, along with a button to add another e-mail.
• If there is more than one e-mail entered here, there is also a Caller ID field. You must set this field to the e-mail you want for the iPad.
4. Tapping on the Caller ID field allows you to pick from the e-mails listed on the iPad for the one to use as a unique identifier.
Once you have FaceTime set up, all you have to do is use your contact list to call someone. If someone calls you, FaceTime will ring even if it isn’t currently running, and then it is just a matter of tapping the Accept or Decline button on the bottom of the screen. The video quality is pretty good, but like all live video over the Internet it is dependent on the connection speed. The better the connection and the higher the speed, the better the quality of the video.
When using FaceTime it is possible to switch between the front-facing camera and the rear-facing camera just by tapping the change camera button on the bottom of the screen.

Figure 2-17
The FaceTime app contact list.
The FaceTime interface uses the whole screen when on a FaceTime call, but when you start the app you see a list of contacts on the right side. You can easily add a contact by tapping on the + sign at the top right. Any contact you enter here appears in your address book on the iPad. If you look at the bottom of your contact list, there are two other options: You can view a list of Recent Calls and a list of Favorites. The Recent Calls list shows all the calls or just the missed calls, and by tapping Clear on the top right you can clear all the recents.
To mark a contact as a favorite:
1. Open FaceTime.
2. Tap on Contacts on the bottom right.
3. Tap on the contact you want to add as a favorite.
4. On the bottom of the Contact Information there are two buttons: Share Contact and Add to Favorites. Tap on Add to Favorites. A pop-up menu appears asking which of the contact’s phone numbers or e-mails you want to add.
5. Tap on the contact info you want added as a favorite.
To remove a favorite:
1. Open FaceTime.
2. Tap on Favorites on the bottom left to open the Favorites list.
3. Tap on the Edit button in the top left of the Favorites list.
4. A white – sign appears next to each entry; tap on the sign next to the contact to delete the entry.
5. Tap Done when you are finished.
AirPlay and AirPlay Mirroring
The AirPlay technology allows you to stream media on your iPad to other devices, the most common being the Apple TV. You can stream music, photos, and videos over Wi-Fi to an AirPlay-enabled device.
Connect the Apple TV to the television set and connect it to the same Wi-Fi as the iPad. Then, the iPad will be able to stream the content playing on the device to the TV, and with the Airplay Mirroring the content still plays on the iPad at the same time. The most important thing to know to get this to work is that the Apple TV and the iPad need to be on the same Wi-Fi network. The iPad will automatically see the Apple TV and the AirPlay button will appear in the controls. So you can be watching a movie on your iPad, walk into your living room where the Apple TV is connected to your television, and start to stream the movie from the iPad to the Television with just a tap.
Twitter Integration
Social media is everywhere these days and Apple has integrated Twitter right into the iOS of the iPad. Chapter 12 covers social media and how the integration with Twitter enables you to Tweet from inside other apps, including the Photo app and Safari.
Reminders
Reminders is a simple to-do list. This app is a great—especially for people who have multiple iOS devices—since the Reminders are shared over the iCloud service, which means that when you enter a Reminder on your iPad it shows up on your iPhone. Create a shopping list on your iPad at home and it is with you in the supermarket on your iPhone.
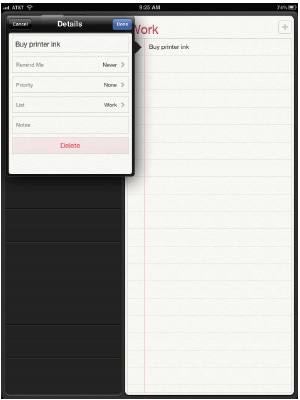
Figure 2-18
The Reminders app has a simple interface, making it easy to start entering to-do items.
The Reminder app looks very simple at first glance but it has a lot of power. When you first open the app, you see two columns: On the right are your Reminders and on the left is where you organize the Reminders. You will see two lists already there—a Completed list and a Reminders list. You can easily add more lists by just tapping on the Edit button on the top left, which allows you to Create a New List or delete the lists that you have already entered. I like to add lists for work and home, and for any books that I am writing.
Now just pick a list by tapping on it and then enter a Reminder by tapping on the + in the top right corner. Once you have typed in the Reminder, tap return and you can add another Reminder, or you can now tap on the Reminder you just created to add alerts, priority, change the list, or add a note. You can also delete the Reminder if needed here.
If you need to set a Reminder for a specific date, you can do that as well and just as easily. On the top left part of the screen you can look at the lists in List view or in Date view. In Date view, just tap on a date to see what is due that day or enter a Reminder for that day.
Game Center
The iPad is a great gaming device. I know that I use it to play games once in a while and have spent (wasted) a lot of time making sure that the Angry Birds beat the egg-stealing pigs.
Game Center is a place to find and launch the games installed on the iPad. It doesn’t matter what folders or pages the games are on, Game Center allows you to launch them from inside the Game Center app. It also allows you to play games with friends and share your accomplishments and scores to make your gaming a little more social.
The most important part of this app is the menu bar across the bottom where you can see your friends, the games you have installed, and any friend requests. Tap on the Games button to see a list of all the games installed on your iPad. Tap on any of the games and you can see the Leaderboard, Achievements, and any Players that you have played the game with. You can also launch a game just by tapping on the Play Game button.
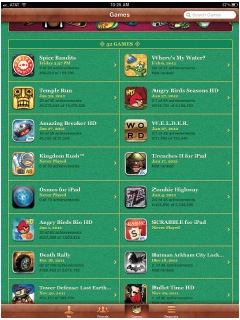
Figure 2-19
I have quite a few games loaded on my iPad and can access them all from the Game Center app.
The Settings App
The Settings app is the control panel for your iPad. It is here that you can control just about all the settings for your device. This is also the spot where a lot of apps put their settings as well. The Settings app is the most important app on the iPad and the first place to check if things are not working the way you want them to.
The Settings app is divided into two columns, with the Settings list on the left and the corresponding settings on the right, as shown in Figure 2-20
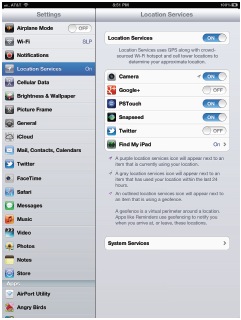
Figure 2-20
The Settings app.
The basic Settings list that comes on your iPad is a follows:
• Airplane Mode: When turned on, Airplane Mode turns off the following services on your iPad: cellular service data (for those devices that have it), Wi-Fi, Bluetooth, GPS, and Location Services. This makes your iPad comply with airline regulations. Some airlines now allow Wi-Fi and/or Bluetooth to be turned on for parts of the flight. You can do this by tapping the Wi-Fi setting and turning it on, and then selecting an available network. To turn on the Bluetooth service, tap on the General setting, then Bluetooth, and then turn it on.
• Wi-Fi: This is where you turn Wi-Fi on and off and pick a Wi-Fi network to use. Slide the Wi-Fi button on to see a list of available networks. Tap on the network you want to use and enter the password if needed.
Next to each available network name are three icons: the first is a lock that shows if the network is password protected, the second shows the signal strength, and the third is a button that opens the information panel for that network. Tapping on that third little blue arrow icon opens a page that shows technical info about that network, including the IP address, the Router address, and the very useful Forget This Network button. If you joined a network by mistake, just tap this button to stop the iPad from joining it again automatically.
On the main menu, there is also a menu choice that allows you to turn on and off the Ask to Join Networks ability. The iPad will join networks it already knows, and if there are none known available it will ask about other networks in the area as long as this is turned on. If it is off, you have to manually add any new networks.
• Notifications: This is where you control how the notifications work on your iPad. It was covered in detail earlier in this chapter in the Notification Center section.
• Location Services: This is where you can turn the Location Services on or off, or just turn the service on or off for individual apps. There are some apps that need to have Location Services turned on to work properly, but with others (such as Twitter and Facebook) I make sure they are turned off. I do not want my location tied to my Tweets or Facebook updates. The Location Services allow the location-dependant apps like the Maps app, the built-in camera, and Safari to use the data from the Wi-Fi and the GPS.
• Cellular Data: If your iPad has 3G or 4G capability then you have this option. You can turn the Cellular Data off and make the iPad use only Wi-Fi. This is also the place where you can view your data account and turn Data Roaming on and off. If you are traveling, you need to turn Data Roaming off or it is possible to run up a massive bill with your data provider.
• Brightness & Wallpaper: You can adjust the brightness of your iPad screen here and turn the Auto Brightness on or off. I have never seen a difference between having this function turned on or off. You can also set the background wallpaper for both the lock screen and the home screen here.
• Picture Frame: Your iPad can act like a digital picture frame. You can set the transitions to either dissolve between frames or transition using Origami, a cool way to see your photos. You can also set the length of time to show each photo, turn shuffle on or off, and pick which photo album to use.
• General: This is the most used and useful set of tools in the Settings app. The General settings are covered in detail right after this section.
• iCloud: This is where you can turn on and off the individual parts of the iCloud service, including:
- Contacts
- Calendars
- Reminders
- Bookmarks
- Notes
- Photo Stream
- Documents & Data
- Find My iPad
- Storage & Backups
• Mail, Contacts, Calendars: This is where you can add or edit e-mail accounts on your iPad. You can also adjust the way e-mail is shown, the order and sorting of the contact list, the calendar information, and set the reminders information.
• Twitter: This is where you can add your Twitter info and decide which apps can use the Twitter information.
• FaceTime: This is where you turn FaceTime on or off and enter the Apple ID and e-mail associated with the service.
• Safari: This is where you can set up the Safari preferences, including which search engine to use. These settings are covered in greater detail in Chapter 4.
• Messages: This is where you turn on the iMessage service, which allows messages to be sent between the iPhone, iPad, and iPod Touch. You can also turn on the Send Read Receipts here, which shows the sender when you have read a message. Since the iPad does not have a phone number, you need to set up which e-mail account to use for the messaging service.
• Music: The iPad has its roots in the iPod, and that device was all about playing music. This is where you can turn on the new iTunes Match service, decide if you want the iPad to use Cellular Data to download music (if you have a cell account), and Show All Music, which is both the songs on the iPad and those in the iTunes Match cloud. You can also turn the Sound Check on or off, set the EQ, set the volume limit, and group the songs by album artist. You can also enter the Apple ID and password for Home Sharing here.
• Video: The iPad is a great video playback device. This is where you can set the videos to start playing from the beginning or from where the video left off the last time it was played. You can also set the Apple ID and password for Home Sharing. If you change the Home Sharing Apple ID here, it automatically changes it in the Music settings.
• Photos: You can turn the Photo Stream service on or off here. For more on the Photo Stream service, check out Chapter 10. You can also set the slideshow duration, repeat, and shuffle here.
• Notes: I don’t use the Notes app much on my iPad, but it is nice to be able to change the fonts here.
• Store: The iPad allows for automatic downloads, which means that any music, apps, or books that are purchased using your Apple ID can be automatically downloaded to all your devices. This is where you can decide which of those services are turned on or off and if the downloads can use the Cellular Data (if the device has a 3G or 4G capability). There is also a list of magazines and the ability to turn on or off automatic downloads when on a Wi-Fi network.
• Apps: This list is dependent on the apps that you have installed on your iPad, but some of the more common ones include the following:
- iBooks: This is where you can set the Justification, Auto-hyphenation, and what happens when you tap the left margin. You can also set up the Sync Bookmarks and Sync Collections here so that the iBooks app looks the same on all your devices that are under the same Apple ID.
- Keynote: Set the app to use the iCloud service and turn on the spell check here.
- Numbers: Set the app to use the iCloud service for the Numbers app here.
- Pages: Set the app to use the iCloud service for the Pages app here.
The General settings tab has so many important settings that it deserves further explanation. This is where you get to set up everything from Bluetooth to the keyboard options. It is also where the Accessibility options are, which are very important for those that have difficulty with using the iPad in its standard configuration.
The General settings offer you the following information:
• About: This shows you all the info about your iPad, including the number of apps, songs, videos, and photos loaded on it. It shows the serial number; Wi-Fi address; and all legal notices, licenses, and regulatory notices.
• Software Update: In the past you would have to plug the iPad into a computer to get software updates; now all you have to do is tap this button. The iPad does need to be connected to a power supply for this to work.
• Usage: Curious as to what is taking up space on your iPad? Here you can see exactly what is using the space. It also shows the iCloud storage settings, and the amount of data sent and received over the cellular network if applicable.
• Sounds: At the top of this menu is a volume control slider. It also allows you to pick the sounds for the Text Tone, New Mail, Sent Mail, Tweet, Calendar Alerts, Reminder Alerts, Lock Sounds, and Keyboard Clicks.
• Network: This is a setting for more advanced users as it deals with VPN settings. VPN stands for Virtual Private Network, which is a service that provides remote access to a central computer system. If your business uses VPN, ask the IT department for the settings needed here. This menu also shows you the Wi-Fi settings, which is the same information as the Wi-Fi menu discussed earlier in this chapter.
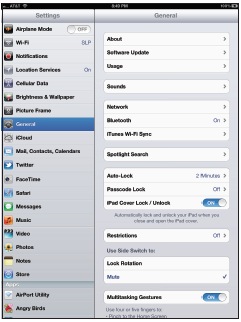
Figure 2-21
The General tab.
• Bluetooth: Turn Bluetooth on or off here. When it is turned on, a list of available devices appears. Tap on the device you want to connect to.
• iTunes Wi-Fi Sync: You no longer need to attach the iPad to the computer to sync with iTunes. The iPad automatically syncs with the iPad when it is plugged into a power supply, but you can sync anytime you want (as long as it’s still plugged in) by tapping the Sync Now button located here.
• Spotlight Search: This is where you pick what is included in the Spotlight Search on your iPad. Swipe from left to right on the Home page to access the Spotlight Search. This search page allows you to quickly search the whole iPad. If you don’t want the Spotlight Search to use certain information, just tap to uncheck. You can also adjust the order of the searched items by holding a finger on the three stripes on the right of the name and sliding the whole bar up or down.
• Auto-Lock: If the iPad is left unused it powers down and needs to be unlocked again. The amount of time it takes is set here—from 2 minutes to never.
• Passcode Lock: The iPad can be locked so that you need a passcode to use the device. There are two types of passcodes: a simple passcode that consists of 4 numbers and a more complex passcode that can use numbers and letters. You can also set the iPad to erase all the data if someone enters the wrong passcode 10 times.
• Restrictions: Here you can restrict what the user of the iPad has access to. This setting is for all users on the iPad. This is very important for using the iPad in schools, or if you have children or employees, and you need to restrict what they can or cannot access. Tap Enable Restrictions and you are prompted to enter a 4-digit passcode. This passcode must then be used to disable the restrictions when needed.
You can now disable access for: Safari, YouTube, iTunes, Ping, Installing Apps, and Deleting Apps. You can also set the Location, Accounts, and Find my Friends apps so that they allow or don’t allow changes. You can set the Ratings, Music and Podcasts, Movies, TV Shows, Apps, In-App Purchase, and how long you have until the password is required (either 15 minutes or immediately). You can also turn on or off the ability to play multiplayer games and add friends in the Game center.
• Side Switch: There are two options here for the control of the side switch on your iPad. The switch can be used for either locking the rotation or as a mute switch. Just tap on the one you want to assign to the side switch.
• Multitasking Gestures: You can turn the multitasking gestures on or off here.
• Date and Time: This is where you set the time zone, 12-hour or 24-hour time, and if you want the iPad to set the time automatically.
• Keyboard: The built-in keyboard has options that can be set here including Auto-Capitalization, Auto-Correction, Check Spelling, and Enable Caps Lock. You can also add shortcuts here.
• International: You can change the language of your iPad here and set up different keyboards, including British, French, German, and Dutch ones, among others. You can also set the region format and the type of calendar used.
• Accessibility: There are three types of settings here: Vision, Hearing, and Physical/Motor settings.
- The VoiceOver: This tool speaks the items on the screen. When you turn on VoiceOver, the iPad reads aloud whatever you tap on the screen. And with VoiceOver activated, instead of single tapping to open an app you must double tap, and you use three fingers instead of a single finger to scroll.
You can also turn on the Speak Hints option, which gives you voice directions for most situations. You can even change the rate of the speech, have the voice give you typing feedback (it speaks out the characters and words as your type), use phonetics, and change the pitch of the voice. This menu also lets you add Braille devices, and it controls the Web Rotor and Language Rotor.
- The Zoom: This allows you to magnify the whole screen. When turned on, a double tap with three fingers zooms in; a second double tap with three fingers zooms back out. To move around the zoomed-in screen, just use three fingers to navigate. To change the amount that the screen zooms, just double tap the screen with three fingers, and then drag up to zoom in or down to zoom out.
- The Large Text: This option makes the text appear larger in Mail and Notes. You can pick between 20pt, 24pt, 32pt, 40pt, 48pt, and 56pt text. This is great for those folks who find it tough to read the default size of text.
- White on Black Text: This changes the whole look of the iPad by reversing the colors, making the text white and background black. This high contrast is meant to help people with vision problems. This can also make apps look weird, since it reverses all the colors making everything look like an old film negative.
- Speak Auto-text: This setting speaks auto-corrections and auto-capitalizations.
- Mono Audio: This changes the audio output from Stereo to Mono.
- Adaptive Touch: This is one of the cooler things that I have seen on the iPad—or any device. It allows you to use the iPad with adaptive accessories and create custom gestures.
- Triple-Click Home: This setting allows you to decide what happens when you triple click the Home button. The options are:
• Off
• Toggle VoiceOver
• Toggle White on Black
• Toggle Zoom
• Toggle AssistiveTouch
• Ask
- Reset: This gives you the option to Reset All the Settings on your iPad, Erase all the Content and Settings, Reset your Network Settings, Reset the Keyboard Dictionary, Reset the Home Screen Layout, and Reset the Location Warnings.
Preloaded Apps
Your iPad came preloaded with set of apps that can get you started using your iPad right out of the box. These apps cannot be removed from the iPad.
 Camera (iPad 2 and the new iPad): The built-in Camera app allows you to take photos and videos with your iPad. This app is covered in more detail in Chapter 10.
 FaceTime (iPad 2 andthe new iPad): The video chat application that is covered earlier in this chapter.
 Photo Booth (iPad 2 and the new iPad): This app allows you to do funky stuff using the built-in camera. Add some color effects or special effects and just have fun.
 Messages: This app allows you to send and receive messages and is covered earlier in this chapter.
 Calendar. The Calendar app helps you to keep track of your important stuff. It syncs with the calendar on your iPhone and computer using iCloud or Google services.
 Notes: The note-taking app is probably the least-used app on my iPad. I actually can’t remember the last time I used it. The app allows you to take notes, and the notes can sync between different iOS devices.
 Reminders: The Reminder app is covered earlier in this chapter.
 Maps: This is the Google Maps app and it is really cool. It allows you to look at four versions of a map—a standard version, a Satellite view, a Hybrid view, and a Terrain view. You can also place a pin on the map and look at the traffic. When the map is open, just tap on the page curl on the bottom right of the page to open the Settings panel.
 YouTube: You can access YouTube on your iPad right here.
 Videos: Use this app to play videos. It is covered in greater detail in Chapter 6.
 Contacts: Your address book is stored here.
 Game Center: This is where you can sign in to the Game Center and launch those games that are Game Center–enabled.
 iTunes: This is where you buy music, movies, TV shows, audiobooks, and podcasts, and where you can access your previously purchased music, TV shows, and movies.
 App Store: This is where you buy apps on the iPad.
 Newsstand: This is where the periodicals are on your iPad. We discuss this app in more detail in Chapter 7.
 Settings: The control panel for your iPad; it’s covered in detail earlier in this chapter.
 Safari: Tap this to launch the built-in web browser. This app is covered in greater detail in Chapter 4.
 Mail: The built-in E-mail app; it’s covered in Chapter 3.
 Photos: The built-in photo viewer is covered in greater detail in Chapter 10.
 Music: This is your iPad’s music player and is covered in Chapter 5.
![]() iBooks: Technically, this app does not come preloaded on the iPad but it should. You can go to the App Store and download it. This is where you buy and read eBooks. The iBook app is covered in detail in Chapter 7.
iBooks: Technically, this app does not come preloaded on the iPad but it should. You can go to the App Store and download it. This is where you buy and read eBooks. The iBook app is covered in detail in Chapter 7.
Dictation
There is one feature that the new iPad has that none of the previous generations had, and that is the dictation ability. You can speak instead of type, and your spoken words become written words. This functionality is system wide, so it not only works with the built-in apps but with third-party apps as well.
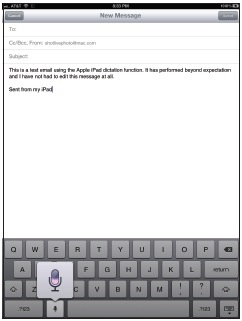
Figure 2-22
When you tap on the Microphone button you can dictate your e-mails. It works really well.
To access the dictation function, tap on the Microphone button that appears on the bottom of the keyboard to the left of the space bar. This is easy to use and works surprisingly well. For example, to use the dictation to write an e-mail, just do the following:
1. Tap on the Mail app.
2. Tap on the New Message button.
3. Enter the recipient and the subject, and then place the cursor in the message box.
4. Tap on the Microphone button.
5. Speak your message.
6. Tap on the Microphone button again to stop recording and your message appears in the message box.
7. Check the spelling.
8. Send the message.
This dictation technology works amazingly well. I plan on using it to take notes on my iPad from now on.
The Mountain Lion Connection
Apple is starting to make the desktop operating system OS X and the iDevice operating system iOS look the same. The latest version of the desktop OS, called Mountain Lion or OS X 10.8, brings many of the iPad apps to the desktop, including versions of Messages, Notes, Notification Center, Twitter, Game Center, Reminders, and AirPlay Mirroring.
There is a real push to have the iPad experience on the desktop, which will mean tighter integration for iPad owners who also have Apple computers.
