3: The iCloud and You
The Skim
iCloud vs. MobileMe • Setting Up an iCloud Account
E-Mail • Calendars • Contacts
It seems that everywhere you turn today people are talking about cloud computing as if it is the answer to all computer and technology problems. The idea is that instead of keeping your information spread out among a variety of devices and then trying to make sure that they all talk to each other, the information is stored somewhere on the Internet and is automatically updated from and to all of your devices, so the info on each of your devices is always up-to-date.
In theory this sounds like a great idea, but there are a few things to keep in mind to make it work. The first is that to access your information, you must be able to connect to the Internet. So if you are traveling or not connected by Wi-Fi, you need an iPad with a 3G or 4G chip and a data plan. That means extra costs, and since you will need to use more data sending and receiving info from the cloud there is a chance of higher data plan fees. The second thing to keep in mind is that if there is a problem with the cloud service, you are at the mercy of the service until it’s back up and running.
The Apple cloud service used to be called MobileMe but was recently changed to iCloud.
iCLOUD VS. MOBILEME
iCloud is not MobileMe. It is a replacement service and if you have MobileMe you need to transfer over to iCloud by the end of June 2012. The good news about this is that the process is pretty painless and because the iCloud basic service is free, you will also be saving money. That is one of the biggest changes to the service—the cost. The MobileMe service cost $99 a year, but the iCloud basic service is free.
So what are the differences between the two services? The iCloud service no longer offers iWeb publishing, iDisk service, or the online Photo Gallery service. The core functions are still available, meaning that Mail, Contacts, Calendars, Bookmarks, Notes, Find My iPhone (iPad), and Back to my Mac are all still there. And there are five new features: iTunes in the Cloud, Photo Stream, Documents & Data, Automatic Downloads, and Backup and Restore in the iCloud. Don’t worry; we will go over all of these features throughout the book, especially as they apply to the iPad.
The single most important part of the iCloud service is that all your purchases made in the Apple Stores are available to you at all times. That means that every movie, TV show, song, app, and eBook that you’ve purchased can be downloaded to your iPad anytime you are connected to the Internet. This is a win-win for everyone since it gives you real incentive to buy your content through Apple and it makes Apple want to offer as much content as possible. You will see mention of this over and over in this book. It is one of the best things to happen to the iPad because it allows you access to your purchased content anywhere, anytime.
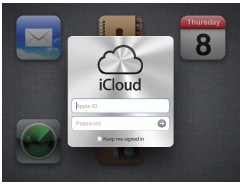
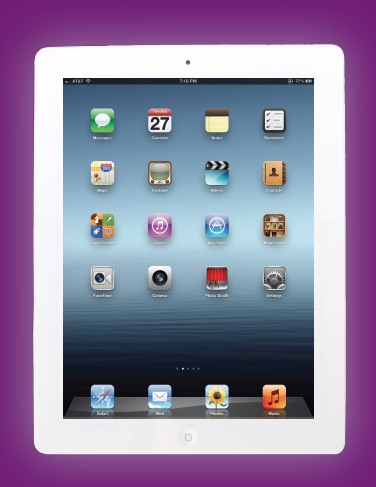
Figure 3-1
You can access your data stored on the iCloud not only from your iPad, but at the website as well—www.icloud.com.
SIGNING UP FOR AN iCLOUD ACCOUNT
Before you can use an iCloud account, you need to sign up for the iCloud service. If you previously had a MobileMe account, it’s easy—just sign into me.com and follow the directions to transfer your account to the iCloud service. The good news is that your e-mail will stay the same and the Apple ID will be your old MobileMe e-mail.
The key to the iCloud service is the Apple ID. If you do not have an Apple ID or want to edit the e-mail address that is tied to your Apple ID, go to appleid.apple.com. Once you’ve set up your Apple ID, you can turn on the iCloud service on all of your devices.
Figure 3-2
The Apple ID web portal where you can set up an Apple ID and edit the information associated with that Apple ID.
TURNING ON THE iCLOUD SERVICE
It’s easy to sign in to an iCloud account on your computer or your iPad. To set up an iCloud account on your iPad, just follow these steps:
1. Turn on the iPad.
2. Tap on the Settings app.
3. Tap on iCloud in the left menu.
4. If you need to set up the service and have an Apple ID, then sign in with the Apple ID and go to step 5. If you don’t have an Apple ID, then tap on “Create Free Apple ID” and follow the instructions.
5. Tap on Use iCloud.
6. Tap on the On/Off switches to enable the various parts of the service, which include Mail, Contacts, Calendars, Reminders, Bookmarks, Notes, Photo Stream, Documents & Data, and Find My iPad.
You can now set up the iCloud service on your computer, which will automatically sync the information from your iPad.
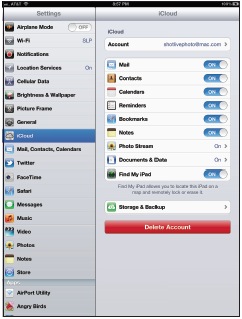
Figure 3-3
The iCloud settings on the iPad showing where you can turn on and off the individual parts of the service.
To set up an iCloud account using your Mac computer, follow these steps:
1. Turn on your computer.
2. Check to make sure that you are running the latest version of the operating system (10.7.3 or later).
3. Click the Apple icon on the top left corner of the screen.
4. Choose System Preferences.
5. Click iCloud.
6. Enter your Apple ID and password.
7. Select the services that you want to enable.
To set up an iCloud account on your Windows computer, follow these steps:
1. Turn on your computer.
2. Download the iCloud Control panel from support.apple.com/kb/DL1455.
3. From the Windows Start menu, menu choose Control Panel > Network and Internet > iCloud (or Control Panel > iCloud, depending on the version of Windows you are running).
4. Enter your Apple ID and password.
5. Select the iCloud services you want to use. (Outlook 2007 or 2012 is required for accessing iCloud e-mail, contacts, and calendars, while Safari 5.1.1 or Internet Explorer 8 or later OS is required to access your bookmarks.)
Setting up the iCloud on all your devices and computers allows automatic syncing of your data and, even better, you can access it anytime from the Internet at www.iCloud.com. You can enter your Apple ID and password to access your e-mail, contacts, and calendars.
I am addicted to checking my e-mail on the iPad. It’s fast, easy, and the size of the iPad screen makes it perfect for tasks like this. Like many people, I have multiple e-mail accounts and I can check them all on the iPad at the same time. Now Apple would love for you to use the iCloud service for e-mail but the iPad can deal with many different e-mail services, including the ability to access enterprise e-mail, which means that it can send and receive your work e-mail.
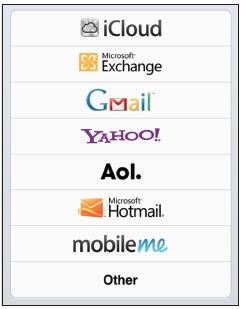
Figure 3-4
There are eight different e-mail account templates that you can use to set up your e-mail account.
First let us go though setting up the iCloud e-mail, and then we’ll add other accounts. When you first tap on the Mail app it brings up a list of eight e-mail providers that you can use to set up your e-mail. Your choices are: iCloud, Microsoft Exchange, Gmail, Yahoo, AOL, Microsoft Hotmail, MobileMe, and Other. Tap on the e-mail provider and follow the steps to set up your e-mail. Let’s walk through setting up the iCloud e-mail.
1. Tap on the Mail app.
2. Tap on iCloud.
3. Enter your Apple ID and password.
That’s all there is to it since the e-mail account is tied to the Apple ID.
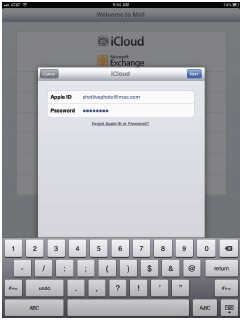
Figure 3-5
Setting up your iCloud e-mail is simple. Just enter the Apple ID and Password.
Setting up the other e-mail accounts is a little more complicated and you need to have some information about your e-mail service. To set up your iPad to access your Microsoft Exchange e-mail, just follow these steps:
1. Tap on the Settings app.
2. Tap Mail, Contacts, Calendars.
3. If there are already Mail accounts set up then tap Add account...
4. Tap Microsoft Exchange.
5. Enter your full e-mail address.
6. You may need to enter domain information. This can be a variety of things, but here are a few to try:
• Leave it blank. The information is most likely going to be found by the program automatically.
• Ask your IT department what the company domain is. (This is your best bet.)
• Try the Internet domain of your company’s website—both with the “.com” part and without it.
7. Enter your Exchange username, which is usually the first part of your e-mail address (the characters that come before the “@” symbol).
8. Enter your password. This is the same password you use at work to log in and check your e-mail.
9. Enter a description for your account. This is especially important if you plan on checking multiple e-mail accounts on your iPad.
10. Tap Next.
11. The iPad tries to verify the account information. Be patient, because this can take awhile.
If your Microsoft Exchange server does not allow for auto-discovery, you will get an error message and will need to enter the rest of the information manually. If you need to add the server data manually, the best bet is to ask your work IT department for the information and enter it in the Server field. If this request confuses the tech, just ask him for the information he would use to set up a Windows Mobile smartphone; it’s the same info.
One of the most popular e-mail services is Gmail, the Google e-mail solution—it is free and easy to use. If you used your Gmail account as the e-mail for the iCloud account and set up the iCloud e-mail, you cannot access the Gmail here as well because the iCloud e-mail is already being used. To sign up for a Gmail account, just go to gmail.com and tap CREATE AN ACCOUNT. To read your Gmail on the iPad, set up your e-mail as follows:
1. Tap on the Settings app.
2. Tap Mail, Contacts, Calendars.
3. Tap Add Account if you already have an e-mail account set up.
4. Tap Gmail.
5. Enter your name.
6. Enter your full e-mail address.
7. Enter your Gmail password.
8. Add a description for your account. This is especially important if you plan on checking multiple e-mail accounts on your iPad.
9. Tap Next.
10. You can now decide if you want to have the iPad get the Mail, Calendars, and Notes associated with the account.
It’s that easy! The other e-mail services are just as simple to set up—that is, except the Other e-mail account. The Other e-mail settings are for those of us who don’t have one of the previous types of e-mail.
These “Other” e-mail accounts are usually accounts that you have from an Internet service provider (ISP), the phone company (e.g., AT&T), a cable company (e.g., Comcast), or as part of your own website (e.g., www.ipadfullyloaded.com). Setting up these types of e-mail accounts on your iPad requires that you do a little research. You’ll want to make sure that you have the information you need to enter in to the e-mail setup menu.
The first thing you will notice here is that the setup looks just like the menu for any of the other e-mail account setups. When we set up the other accounts, you tapped on Save and the account setup was done; here, you tap Next and move on to the more complicated parts.
The first choice you have to make is between IMAP and POP, and many people have no idea what IMAP and POP are. I wasn’t sure what the difference was when I first encountered these settings.
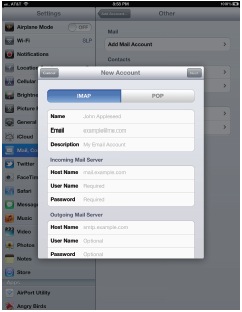
Figure 3-6
The IMAP and POP choices are at the top of the screen. You need to pick the right one for the e-mail service to work.
Here’s what you need to know: IMAP stands for Internet Message Access Protocol; it allows an e-mail client (like the Mail app on the iPad) to access e-mail messages on a remote server. What this means is that the e-mail you’re seeing is not actually on the device you’re using; instead, the device is looking at the e-mail on an external computer. The main advantage to this is the automated syncing if you have multiple devices that can access your e-mail account. If you read an e-mail on one of them, the message gets marked as Read on the server, so every other device that accesses the account shows the accurate status of your messages and activity. On the downside, if you delete a message on any device, then it is gone from all of them. Poof! Once you delete a message on the server, it is deleted on the devices as well.
The other e-mail choice is POP, which stands for Post Office Protocol. It’s used by e-mail clients to get messages from the e-mail server. What happens is that the e-mail client (such as the Mail app on the iPad) goes out on the Internet to your e-mail server and downloads the new messages directly to the device. Once you read the e-mail on the device and delete it, the message is deleted from the e-mail client (like the Mail app on the iPad). But … an important distinction here … the e-mail survives on the server. This means that when you instruct another device (your iPhone for example) to go out to the server to get e-mails, that message you deleted from the other device (your iPad) is still sitting there on the server waiting to be read. So if you have an e-mail account on an iPad and a laptop … and an iPhone and a desktop computer … you’ll get the same message four times with a POP-type e-mail account, and you’ll have to delete, file, or mark it as read on all four separate devices.
To set up the e-mail program on the iPad successfully, you need to know which of these two services you use. Different e-mail hosting companies choose the service format they prefer. Some offer IMAP service and some offer POP service. The best bet is to contact the company and ask which type of service you’re receiving.
Once you know which of the two types of account services you have, you can move onto the questions related to your incoming mail server. You’ll gather information about this from the e-mail hosting company, too. Typically, it will look something like: mail.yourdomain.com, where yourdomain.com is replaced with the name of your domain. For example, since the domain for the e-mail address I am adding is www.ipadfullyloaded.com, the incoming mail server will be: mail.ipadfullyloaded.com.
The next thing is to enter the user name for your account, which is usually the full e-mail address. If necessary, enter your password, but it should auto-fill based on your entry on the previous page. The final step is to configure an outgoing e-mail server, because we not only want to get e-mail but to send it as well. Again, all the information in this menu area is available from the company you use for your e-mail. Once you have entered your outgoing mail server and the username and password, it’s time to tap Save. That’s when the iPad goes out to see if the e-mail account information you entered is correct.
General E-mail Settings
There are some general e-mail settings that are accessible in the Settings panel. To access them, tap on the Settings app and then on Mail, Contacts, Calendars. You can set the following here:
• Show: Here you can choose the number of recent e-mails to show. You can pick 50, 100, 200, 500, or 1,000 messages. If you have more than 1,000 e-mails in an account, it will show only the most recent 1,000. This used to be capped at 200 e-mails, which always seemed a little small so the new limit of 1,000 is a great change.
• Preview: You can set the number of preview lines you see, from none to 5. I like 2, since that usually gives me enough information about the e-mail to decide if I need to open it or delete it.
• Minimum Font Size: You can pick the size of the font, from Small to Giant. I like Medium, but choose the one that looks best to you.
• Show To/CC Label: This shows or hides the To and CC fields when you’re viewing e-mail.
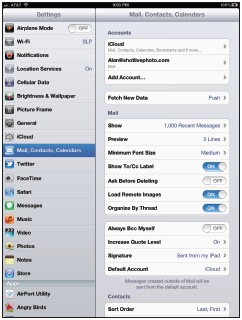
Figure 3-7
The e-mail settings available on your iPad.
• Ask Before Deleting: This asks you to confirm every deletion. I know that it is important to understand that deleting e-mails means they will go away but this just drives me crazy, so I turn it off.
• Load Remote Images: This allows images that are being sent in the e-mail to be loaded on your iPad.
• Organize By Thread: This is very cool because it allows the e-mail messages to be organized by the subject line.
• Always Bcc Myself: You can blind copy yourself on every message you send if you need to keep track of the messages sent from your iPad.
• Increase Quote Level: When you turn this on, it adds a level of indentation to the original e-mail text when you Reply or Forward. I find this makes it easier to follow the e-mail message thread so I keep it turned on.
• Signature: This designates the signature that appears at the bottom of your sent e-mails. The default is “Sent from my iPad.”
• Default Account: This is the account that the iPad will use to send e-mails from other apps.
Set these as you want to—it is your iPad, after all.
Push vs. Fetch
After choosing your e-mail settings, you need to choose how the e-mail client will go out and get the e-mails from the e-mail server.
The two methods that the iPad uses to get e-mail are Push and Fetch. If you tap on Settings, and then Mail, Contacts, and Calendars, you see a button called Fetch New Data in the middle right side of the screen. Tap on that button to bring up the Push and Fetch menus.
The first method is Push. This means that e-mails are pushed from the server to the iPad whenever new e-mails are present. E-mails are on the iPad as soon as the e-mail server receives them, as long as the iPad isn’t turned completely off and is connected to the Internet. And this is great, but the real-time service comes with a price … in the form of battery life. Constantly monitoring your account to keep your mailbox current requires power. To help users preserve battery life when enjoying Push delivery, Apple provides an off switch. When you’re running low on battery power or want to conserve your remaining power, turn off the Push service.
The other option for receiving e-mails on your iPad is to Fetch it. This is usually set up to happen in regular intervals—every 15 minutes, every 30 minutes, or hourly—or you can Fetch your messages manually. The less often you go check to see if you have new messages, the longer your iPad battery will last. So this really is a matter of priority. I usually have my iPad go Fetch new mail every 30 minutes.
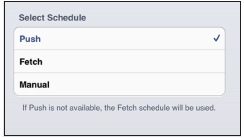
Figure 3-8
The Advanced setting showing where you can select between the Push, Fetch, and Manual delivery of your e-mail.
The Advanced button in the Fetch New Data menu is where you can change the way each e-mail account checks for mail. Those who use the Push method can use this area to switch over to Fetch or Manual delivery. Those who use the Fetch method can change delivery to Push or Manual. To change your settings, just tap on the account you want to change and pick the new method of e-mail retrieval.
There is one final way to get your e-mail and that is manually. If you change your setting from, say, a 30-minute Fetch interval to Manual retrieval, the E-mail app won’t go get new messages until you tell it to go out and Fetch your e-mail. This setting is really useful when you’re running on a low battery.
To get your e-mail when the Fetch is set to manual, you have to open the mail program, which then goes out to check if you have mail. If the Mail app is open, then you need to tap on the Update button on the bottom of the Accounts panel. It looks like a three quarter circle made up of an arrow.
Reading Your Mail
To read your e-mail, just tap on the Mail app and tap to select the inbox if you have one e-mail account. If you have multiple e-mail accounts then you have some other options. When you have multiple e-mail accounts on your iPad, you can look at the unified inbox, which shows all the e-mails from all the accounts without actually having to go into each individual account. There are also individual inboxes so that you don’t have to go into each account just to get your mail.
The iPad is pretty smart and changes what it displays depending on the orientation of the device. If you hold the iPad in portrait orientation, all you see is the currently selected message. But when you turn the iPad sideways to landscape orientation, you see not only the currently selected message but also the inbox showing the message list with a two-line preview. This is one of the reasons I like to read my e-mail in landscape orientation on my iPad—the more info on the screen, the better.
If you have multiple e-mail accounts on your iPad, it is pretty easy to change which one you’re accessing at any given time. On the top of the inbox is a button that shows the currently selected account. It also shows you how many unread e-mails are in the account and offers an Edit button when an inbox is selected. The Edit button allows you to delete or move multiple e-mails at a time. With an inbox selected, tap on Edit, and then select the e-mails you want to delete or move by tapping the messages in the list. You will know if you have selected an e-mail because a red circle with a white check mark appears in the circle to the left of selected messages. You can then Delete, Move, or Mark the selected e-mails by using the buttons on the bottom of the screen. There is no way to select multiple e-mails with a single tap; you have to select each e-mail individually. The Mark button allows you to flag the e-mail or Marked as Unread.

Figure 3-9
E-mail looks really great on the iPad in portrait mode, but as you can see in Figure 3-10, the landscape mode gives you more information.
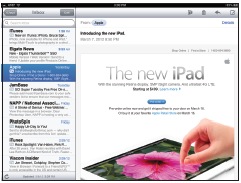
Figure 3-10
The landscape view not only gives you a view of the e-mail, it also gives you a view of the currently selected inbox.
To change e-mail accounts, tap on the account name. This takes you out of the inbox and shows you a list of accounts. Tap on one of the e-mail accounts and you can then look at the folders in that account or you can go back further to a list of accounts by tapping on the Accounts button on the top of the screen.
When you are reading an e-mail, there are some helpful tools available to help you manage your mail. The most obvious is the trash can. By tapping the trash can, you send the e-mail to the trash. Tapping the folder icon allows you to save the e-mail to any of the folders. Not all e-mail accounts have folders to which you can save e-mail. The last two options are to forward/reply to the e-mail you are reading. When you tap on the reply button you are presented with the following options: Reply, Reply All, Forward, and Print. You can print only to an AirPrint-enabled printer. You can also tap on the New Message button, which opens a blank e-mail in which you can type a new message.

Figure 3-11
The bar across the top of your e-mail message. You can see the Inbox, the Previous and Next buttons, a Folder button, and a trash can. There is also a reply icon and a new message icon.
Sending Photos
One of the easiest things to do is e-mail photos from your iPad. All you have to do is open the Photos program, tap on a folder, and then tap on the image to open it. Tap on the Share icon, which opens a drop-down menu with the share options and Email Photo is the top choice. Tap Email Photo and the Mail app opens with the image embedded in the body of the message. But what do you do if you have already written the e-mail and want to add a photo? Here is how you can do that:
1. Tap on the Mail app.
2. Start writing a new message; when you get to the place where you want to add a photo, press the Home button. (It’s the actual physical button on the bottom front of the iPad.)
3. Tap on the Photos app.
4. Navigate to the photo you want to add to the message.
5. Tap on the photo and then tap on the Share button at the top right corner of the screen.
6. Tap Copy Photo from the list of choices (it is at the bottom of the list).
7. Press the Home button.
8. Open Mail. Your half-written message should be on the screen.
9. Press and hold your finger where you want to insert the photo until the magnifier opens.
10. Remove your finger from the screen. The Select | Select All | Paste menu will appear.
11. Tap Paste and the image that you copied appears in your e-mail.
Many apps allow you to send content as an e-mail directly from the app. These apps take the content and insert it into an e-mail, allowing you to add messages and a recipient.
CALENDARS
With the release of iOS5 and iCloud, the Calendar app finally works the way you think it should. At last, the calendars on my iPad, iPhone, and computer all work the same way and all show the same information seamlessly.
I still have a calendar on my wall, but it hangs there because I like the photos—I no longer use it to keep track of important dates and events. I keep my calendar on my computer ... and on my iPad ... and on my iPhone ... and it is accessible at iCloud.com as well. You would think with the way the calendars all sync that I would never be late for a meeting, but here is one thing that you have to always remember: You need to actually look at the calendar once in a while!
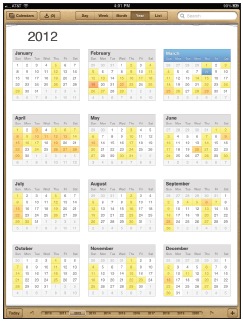
Figure 3-12
The Calendar Year view shows you the whole year at a glance.
There are five views for your calendar: Day, Week, Month, Year, and List. Each of the views offers the same information but in a different format. This versatility makes it easy to get an overview or detailed information about what’s on your calendar.
• The Day view shows you the whole day by hour at a glance.
• The Week view shows your events scheduled for the week.
• The Month view offers information for the whole month on a single page.
• The Year view shows the entire year at a glance.
• The List view is a line-by-line display of events on the left side and a detailed day view of events on the right.
Create a Calendar
You can have multiple calendars on your iPad and for the first time you can create calendars right on the iPad. On the top right of the Calendar app you can tap the Calendar button, which brings up a list of the calendars on your iPad. There is an Edit button on the top right of the Show Calendar list and when you tap it you see the option to Add Calendar ... Just tap that and you can enter the new calendar name and pick a color from the list. Each of the calendars needs a different color. You must have Calendars turned on in iCloud for Add Calendar to function correctly.
If you have the iCloud service on multiple devices, the new Calendar will be on all the devices automatically.
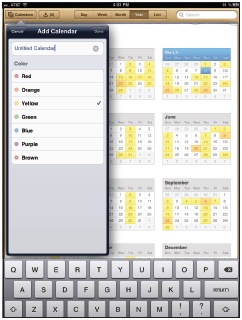
Figure 3-13
The Add Calendar option allows you to add new calendars to the iPad.
Create an Event
Calendars are helpful only if you can enter information into them. Here’s how to enter an event into your iPad calendar.
1. Tap on the Calendar app.
2. Tap the + button on the bottom right corner of the screen to open the Add Event window.
3. Enter a Title for the event.
4. If you want, add a location in the Location field or use this space as a secondary field for Event info.
5. Tap the Starts/Ends area to open the date controls.
6. Adjust the day, hour, minute, and AM/PM wheels to set the start time of the event.
7. Adjust the day, hour, minute, and AM/PM wheels to set the end time of the event.
8. Or, if the event lasts all day, like a birthday, turn on the All Day switch.
9. You can also set the Time Zone of the event. This is really useful if the event takes place at different location, like when you’re on vacation.
10. Tap Done at the top right to finish entering in the Starts and Ends times.
11. You can now set the Repeat options for recurring events. First, pick the frequency of the event. (Leave it as “None” if the event doesn’t repeat.)
12. Choose “Every Day,” “Every Week,” “Every 2 Weeks,” “Every Month,” or “Every Year.”
13. You can now add Invitees (people you want to add to the event.) When you tap this, a new window opens and you can either type in the name of people that you want to attend or tap the + button to open your contacts list, from which you can add people easily.
14. Now you can set an Alert so you have a better chance of remembering your event. Alerts can be set for five minutes before the event’s start time to two days before.
15. If you set an Alert, you can set a Second Alert. (Never miss an anniversary again!)
16. Next, you can pick which of the calendars the event should be scheduled under. For example, I make sure that all my work events are in my work calendar, while personal events are in my personal calendar.
17. Next, you can set your availability for the event—either Busy or Free.
18. You can now add a website URL and any notes for the event if you’d like.
19. Tap Done to complete the entry.
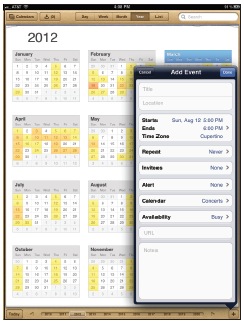
Figure 3-14
The Add Event window where you can enter all of the information about an event.
If you add attendees, the Calendar app will automatically send those folks an e-mail inviting them to the event. Once you have entered an event, it shows up in your calendar and you can edit or delete it as needed.
If you are invited to an event, then there is an invitation in the invitation box on the top of the screen. It is right next to the Calendars button. It looks like an arrow going into an open box and has a number next to the icon. The number corresponds to the number of invitations for future events that you have received.
If you have a Microsoft Exchange calendar set up at work, you can sync it with your iPad and the calendar will show up in the iPad Calendar app. You do this the same way you would set up the iPad to access a Microsoft Exchange server for your e-mail:
1. Turn on your iPad.
2. Tap on the Settings app.
3. Tap Mail, Contacts, Calendars.
4. Tap Add Account and choose Microsoft Exchange.
5. Enter your Exchange Server account information.
6. Tap Next.
7. Enter the server information.
8. Tap Next.
9. Turn on Mail, Contacts, Calendars.
Your Exchange Server accounts are now being synced wirelessly and automatically to your iPad, including the contacts and calendars.
CONTACTS
When I was younger (a lot younger) I used to be able to remember the phone numbers and addresses of my friends and family, but that was before smartphones made it easy to carry all that info with me everywhere I go. Combine that with the fact that now that people have multiple e-mail addresses, and home, work, and cell phone numbers, there is an easier way—the electronic contact list.
The Contacts app on the iPad looks much better when the device is used in landscape mode than it does in portrait mode. Check it out in Figures 3-15 and 3-16 and you’ll see what I mean.
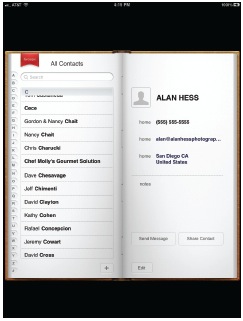
Figure 3-15
The Contacts address book in portrait mode.
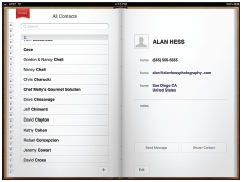
Figure 3-16
The same Contacts address book in landscape mode looks a whole lot better.
The Contact app shows all your contacts in a neat and organized way. It looks just like an old-style paper address book, with a list of contacts on the left and the individual contact information on the right.
Add a Contact
Adding a contact to your iPad address book is pretty easy. Just turn on the iPad, tap on the built-in Contacts app, and follow these steps:
1. Tap on the + located at the bottom of the screen.
2. Enter the contact’s first name, last name, and company info.
3. To add a photo, tap the add photo button in the Contacts app. This enables you to pick a photo for this contact. Choose from the images that are loaded on your iPad, or if the person is there with you, you can use the built-in camera to take her photo.
4. Tap on mobile and pick the type of phone from the pop-up menu. Enter the contact’s phone number.
5. Enter as many different phone numbers for a contact as necessary. As you start to type a new number, a new number box appears below the existing one(s).
6. Next is e-mail. Tap on the type of e-mail (e.g., home or work) to select it and then enter the e-mail address.
7. After you enter the first e-mail, you will be able to enter a second, third, fourth, and so on in the same manner you did with the phone numbers.
8. You can also enter a contact’s website (or two, three, four, etc. of them) in the home page box.
9. Next, tap in the add new address button to enter a mailing address.
10. You can then add a second address, or even a third, fourth, or fifth address, if needed.
11. Add any notes you want associated with this contact.
12. If needed, tap the add field button to add custom fields, including a prefix, the phonetic spelling of the first and/or last name, middle name, suffix, nickname, job title, department, instant message information, birthday, and/or an important date.
13. After you’ve entered all of the contact’s information, tap Done at the top right corner.
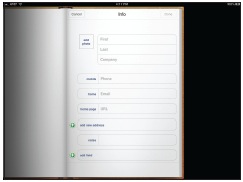
Figure 3-17
Entering the information in the address book is straightforward. Just enter the information and then tap Done.
Sharing Contacts
The default file format used for address book data is called a vCard. This format is an electronic business card and can contain not only name, phone number, e-mail, and address information; but you can actually keep the profile photo in the vCard format. The cool thing is that vCards can also be exchanged over the Internet, or even on a CD or jump drive, and can be sent in e-mails. Since the iPad doesn’t have a USB port, the only good way to get a vCard into the iPad Contacts is by e-mail. The good news is that vCards are sent as e-mail attachments or using the Message app and can be loaded instantly into the iPad’s Contacts.
Here is something that Apple did right when it comes to the address book on the iPad. They made it really easy for you to share your contacts with others. You can share any of the contacts in your address book with a simple tap.
1. Tap on the Contacts app.
2. Tap on the contact you want to share.
3. On the bottom of the screen, tap Share.
4. Choose whether you want to send the contact information by e-mail or using the Message app.
5. Tap e-mail and this opens an e-mail with the contact’s .vcf file attached and you can tap Send to mail the contact info.
6. Tap message and the Message app opens with the contact information embedded. Add a recipient and a message, and then tap Send to send the message.
The .vcf file extension is a version of the vCard, so it is compatible with all address book/contact programs that can use vCards.
iCLOUD OVERVIEW
The idea behind the iCloud service is a good one and it seems that Apple has taken what it started with MobileMe and made it really useful. During the Apple announcement of the new iPad, a lot was made of the iPad being part of the post-pc era. It is clear to me that for the iPad to rule in this post-pc world, there needs to be a way to keep your information synced between your devices and maybe more importantly a way to keep your media purchases available at all times without needing to have a computer.
The iCloud service is doing this and is a huge step forward from the lackluster MobileMe accounts of the past. The best part for the consumer is that the service is free. The only downside in my mind is that you are being locked into the Apple purchasing ecosystem, which means you are reliant on Apple not to change the way the service works, and Apple does not have a great track record of that. Just ask the people who relied on iDisk, iWeb, or iWork beta—all services that Apple has discontinued with the adoption of iCloud.