4: Internet Browsing
The Skim
Safari • Alternative Browsers • Flash and HTML5
The iPad brings Internet browsing to a portable device that is easier to use than a laptop or a smart phone and comes preloaded with Apple’s Safari Internet browser. Browsing the Internet on the iPad puts most of the Internet at your fingertips in a size that is easy to read and more convenient than using a computer. Now I said most of the Internet and not all because the iPad does not support Adobe Flash, which means that any website that uses Flash or Flash components will not render correctly on the iPad.
I use the Safari browser on my Apple laptop and desktop, so using it on my iPad is just plain easy. The same bookmarks are available on all my devices and when I update a bookmark on one device it is automatically updated on the rest because I have the iCloud service turned on.
When the original iPad was released, the included version of Safari didn’t have tabbed browsing or a bookmarks bar, while other browsers did. But Apple has not been resting—they keep improving and updating Safari and it has become better with each version. But Safari isn’t your only option—there are actually a great many browsers available for the iPad; some are free while others cost, and they all have plusses and minuses.
Safari
The iPad comes preloaded with Apple’s web browser Safari (just as the iPhone does). As the iPad and its iOS have matured and improved, the Safari web browser has drastically improved along with them. The current version of Safari supports tabbed browsing, allows you to pick which search engine to use, has a Bookmarks bar, and allows for private browsing (that is, enables the user to browse the Internet without leaving a trail). Let’s start with how to access the Safari settings and what you can and can’t do.
Safari Settings
You might think to look for the Safari settings in the Safari app, but you must access them in the Settings app. Turn on the iPad, tap on the Settings app, and then tap on Safari on the left side of the screen. This brings up the Safari option menu on the right side of the screen. You can adjust the following settings:
• Search Engine: Choose your search engine for the search bar. You choices are Google, Yahoo!, or Bing. My preference is Google, but you can choose whichever one you want. The real power here is that you can change your mind and switch to a different service at any time.
• AutoFill: The AutoFill feature allows you to save the basic information used to fill out forms on websites so that you don’t have to fill it out the next time you go to the same website. This feature is set to “off” by default. When you tap AutoFill to turn it on you are presented with a menu that allows you to Use Contact Info and then pick which contact information to use. You can also turn the Names and Passwords option on or off separately, and you can clear all old Names and Passwords. It is my preference to turn on AutoFill and turn off Names and Passwords.
• Open New Tabs in Background: This on/off switch controls how you view new tabs when you open them. When this option is turned on, new tabs are opened but the browser stays on the current tab. When this option is turned off, the browser goes to the new tab as soon as it is opened.
• Always Show Bookmarks Bar: One of the biggest changes over the years has been the inclusion of a Bookmarks bar that mimics the desktop version of the browser. I keep this option turned on so that I can access my Bookmarks bar, which holds the websites I go to the most. Later on in this chapter you’ll find out how to edit the Bookmarks bar.
• Private Browsing: When you browse the web you leave a trail, or cache, in your browser history, enabling anyone who uses your iPad access to your web browsing history. This is where you can stop that. When you turn on Private Browsing, you can search the web without leaving a trail.
• Accept Cookies: With this setting you can increase the security and privacy of your browsing by not allowing the browser to store any cookies. This does mean that the browser will not store any usernames and passwords, so you must enter them every time they are required. This feature is really useful when more than one person is using the same iPad.
• Clear History: You can clear your browsing history here. Just tap the Clear History button and a dialog box opens asking if you really want to clear your history. Tap Clear if you do or tap Cancel to return to the main menu.
• Clear Cookies and Data: If you have been allowing cookies to be stored on your iPad, you can remove that info at any time—just tap here.
• Fraud Warning: This is a simple on/off switch that should be left turned on. This setting allows Safari to try to warn you about websites that may be fraudulent.
• JavaScript: You can turn JavaScript on or off using this switch. Turning JavaScript off means that any site that uses JavaScript to display content will not look right on Safari.
• Block Pop-ups: This is where you can block pop-up ads; I keep this turned on.
• Advanced: This tab offers you access to the data that is stored on your iPad from the websites you have visited, and this is also where you can turn the Debug Console on or off. If you have Accept Cookies set to Never then there might not be any information here.
- Website Data: This is a great feature, allowing you to see which websites have left data on your iPad. The list might look rather small when you first open this menu, but tap on the Show All Sites button at the bottom of the list to see exactly what is being stored.
To delete any of the data, swipe your finger from right to left over the site name and a Delete button appears on the right; tap it to delete the info or you can tap Remove All Website Data, which removes the same data as when you tap on the Clear Cookies and Data in the main Safari menu.
- Debug Console: This option in the Advanced tab is useful for programmers and web designers to find out what went wrong when there are web page errors
There is one more setting that impacts the Safari browser and it is located in the iCloud settings menu. Tap on the Settings app, then on iCloud in the left column. If you have signed up for the iCloud service you will see that you can turn Bookmarks on or off here. Having them turned on allows the iPad and your computer to have the same set of Bookmarks, and when you update your Bookmarks on one device they get updated across all your devices that have this turned on.
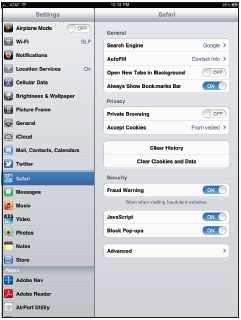
Figure 4-1
The Settings panel in the Settings app for the Safari Web Browser app.
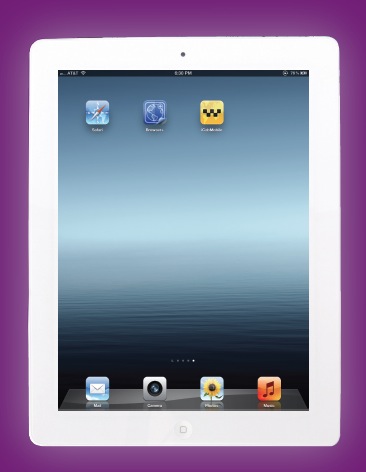
Using the Safari App
Now that you know where and how to change the settings for Safari, let’s look at how to use the app in closer detail. To launch Safari on the iPad, just tap on the Safari app icon. Across the top of the screen are the Back, Forward, Bookmarks, and Export buttons, and then the Address entry bar with Reload and Cancel buttons followed by the search bar as shown in Figure 4-2.
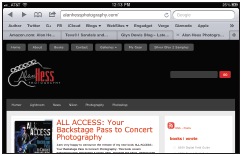
Figure 4-2
The top section of the Safari app.
The Back and Forward buttons take you to the previous web page, and if you have gone to a previous page, then the Forward button allows you to go forward. If you haven’t gone back, the button is grayed out. The Bookmarks button opens the Bookmarks folder, which includes the new Reading List. When tapped, the Export, or Share, button opens a drop-down list that allows you to:
• Add Bookmark: Tap on this to add the current page to your Bookmarks. A dialog box opens and allows you to edit the name of the bookmark and decide exactly which Bookmarks folder you want to save it in.
• Add to Reading List: The Reading List is a place to save web pages that you want to read later. This is really useful for saving websites and articles you want to read but don’t want to add as separate bookmarks. The Reading List is not meant for permanent storage but just a quick holding place, and once the content is read, the user usually deletes the link.
• Add to Home Screen: This is still one of the coolest things that you can do with a webpage on your iPad. By tapping on this button, you can add a link to the current page that shows up outside of Safari on the home screen or any other screen of the iPad. The link looks just like an app icon and behaves the same way. Tap it and Safari opens and takes you to that page. I use this to create links to sites I frequent, and then I put these links in a folder and can access them from my home screen easily. Tapping the Add a Home Screen button opens a dialog box where you can name the link, then tap Add and it’s done.
• Mail Link to this Page: A great way to share a link is to e-mail it, and this function enables you to e-mail it directly from the Safari app, instead of having to go into the e-mail app.
• Tweet: This allows you to tweet out the current page link to your followers on Twitter. Twitter is covered in more detail in Chapter 12, but this is part of the integration between the iOS and Twitter that was introduced in iOS5.
• Print: If you have an AirPrint-enabled printer, you can send the webpage directly to the printer. You can adjust the number of copies but not much else.
Below the control bar is the Bookmarks bar. This contains the Bookmarks that you have saved in the Bookmarks Bar folder. Remember you can turn this bar on or off in the Settings app. One of the really nice features is if this bar is turned off in the Settings app it still exists and comes into view when you tap in the address entry bar. Then you can tap on a bookmark in the Bookmarks bar and it automatically goes away. Next is the Tabs bar where the currently open web sites are, making it easy to switch between open sites.

Figure 4-3
The Export menu of the Safari app.
The Safari app looks really familiar to anyone who has ever used a web browser and it works exactly the way you expect it to. Just tap in the address bar, enter the website URL on the keyboard, and tap Go. The browser then opens the website—as long as the iPad is connected to the Internet either over Wi-Fi or via the cellular network. You can also access the Google Search (or Yahoo! or Bing) via the search bar on the top right part of the screen. Just tap the search bar, type in your search terms, and then tap Go. Tapping the search bar brings up a list of recent searches. And there is another search bar that pops up on top of the keyboard when you are typing anything. You can use this to search for a word or phrase on the current web page—a very nice touch.
The Safari browser has some other built-in features, including the ability to select and copy text and look up definitions of single words. Just hold your finger on a word and a magnifier appears. Make sure you have the correct word selected and then take your finger off the screen. The Copy|Define button appears, then just tap on Define and the built-in dictionary appears, giving a definition of the selected word. If there is a link on a page, you can tap on it to open the link in the current page or hold your finger on the link and a menu appears allowing you to Open the link, Open in New Tab, Add Reading list, or Copy the link.
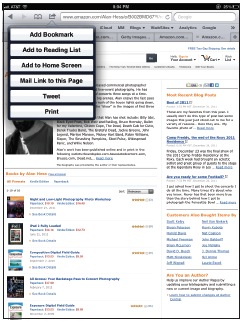
Figure 4-4
Holding your finger on a word allows you to look up the definition in the built-in dictionary.
Alternative Browsers
The built-in Safari browser has an advantage over other browsers on the iPad for the simple fact that Apple can integrate functions into the browser that other app developers don’t have access to, but there are some good alternatives. The real question to ask yourself is, “Do I need to buy a web browser when I already have Safari loaded for free?” For many people the answer is no, the built-in Safari app is just fine, but there are folks out there who want something more or just different. Here are some of the best options available to you.
Browser+ HD ($2.99)
When you launch Browser+ HD for the first time you are given the opportunity to watch a video on how to use the app. Now usually I resist apps that take something I know how to do (browse the Internet) and make it complicated, but this app takes a different approach to web browsing and I recommend that you watch the video.
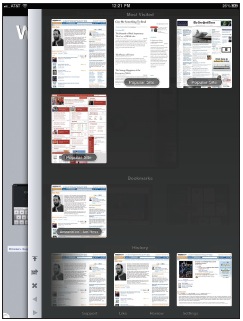
Figure 4-5
Browser+ HD showing the Bookmarks panel. The large thumbnails make it easy to find what you are looking for.
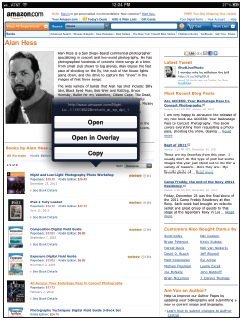
Figure 4-6
The menu options for opening a web page in Browser+ HD.
Browser+ HD uses the whole screen for your web browsing by hiding the menus on the bottom and on the right sides. To get to the address and search bar you need to swipe from the bottom of the screen—here is where it can be a little tricky, as you have to start outside of the screen on the bezel or the page just scrolls. To access the Bookmarks, History, and Settings menus you need to swipe from right to left, remembering to start outside of the viewing area. This is where the browser shines: It keeps the bookmarks as really nice thumbnails, allowing you to see your choices.
Reading websites on the browser is nice since you see only the website, not address bars, menus, or anything else. It is clean and slick looking, and adds a cool feature that opens links as an overlay instead of opening a new tab or window. Just hold your finger on the link and wait until the pop-up menu appears that gives you a choice to Open the link in that window, Open in Overlay mode, or Copy the link. If you press Open in Overlay, the new window opens over the current window and doesn’t close the original window. You can close the overlay window by tapping on the X on the top right corner. This is great for visiting websites like Facebook, where there are lots of embedded links that you might want to check out without leaving the site.
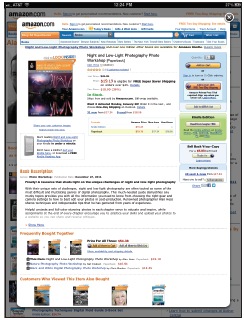
Figure 4-7
A page opened in Overlay mode in Browser+ HD.
iCab Mobile ($1.99)
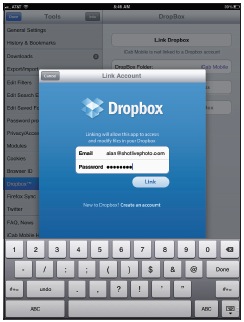
Figure 4-8
The Dropbox link page.
I covered the iCab Mobile app in the original iPad Fully Loaded book and I still use it all the time, mainly due to the great integration with Dropbox and the look and feel of the browser. The developer behind the app has not stopped updating and improving iCab Mobile, including adding support for Dropbox. iCab Mobile allows you to import and export your iCab bookmarks, and transfer downloads, files, web pages, and images to your Dropbox account. There is more on Dropbox, including how to set up a Dropbox account, in Chapter 8. To link your iCab Mobile browser to a Dropbox account, just follow these easy steps:
1. Tap on the iCab Mobile app.
2. Tap on the Settings/Tools icon on the top right corner of the screen. It looks like a little gear under the search bar.
3. Tap on Dropbox in the list on the left.
4. Tap on the Link Dropbox button and the Link Account dialog box appears.
5. Enter the e-mail address and password for your Dropbox account and tap on the Link button.
6. You can now edit the name of the folder on Dropbox and export or import your bookmarks.
If you are a user who likes a lot of lot of options, then iCab Mobile is definitely the browser for you. There are two different places on the iPad with options for you to tweak; the first is in the Settings app. Tap the Settings app and then tap on iCab Mobile. The list of apps appears on the left side of the screen. If the iCab Mobile app is not visible, you might have to scroll down—it all depends on the number of apps you have loaded on your iPad.
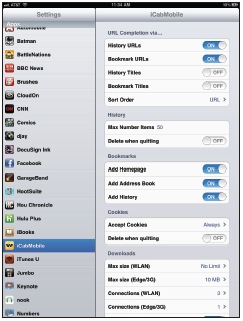
Figure 4-9
The Settings panel in the Settings app for the iCab Mobile app.
The settings for iCab Mobile in the Settings app are as follows:
• URL Completion via...: This setting allows you to control how URLs are completed when you start to enter them in the address bar of the app.
- History URLs ON/OFF
- Bookmark URLs ON/OFF
- History Titles ON/OFF
- Bookmark Titles ON/OFF
- Sort Order URL/Title
• History: These settings allow you to control the web browsing history.
- Max Number Items 50 (The default is 50, but you can enter any number here you want.)
- Delete when quitting ON/OFF
• Bookmarks: These settings allow you to control how bookmarks are added.
- Add Homepage ON/OFF
- Add Address Book ON/OFF
- Add History ON/OFF
• Cookies: These settings allow you to control the cookies that are saved on your computer.
- Accept Cookies Always/Never/Only from visited document
- Delete when quitting ON/OFF
• Downloads: These settings allow you to control the amount of data that is allowed to be downloaded depending on the connection to the Internet. This is great when you need to control the amount of data being used.
- Max size (WLAN) 10MB/25MB/50MB/100MB/200MB/400MB/No Limit
- Max size (Edge/3G) 5MB/10MB/25MB/ 50MB/100MB/200MB/No Limit
- Connections (WLAN) 1-6
- Connections (Edge/3G) 1-3
- Download Attachments ON/OFF
- Delete when quitting ON/OFF
• Kiosk Mode: This mode can be turned on and off, and when on shows you the current available updates to the app and all the information about iCab Mobile that you could want.
- Activate Kiosk Mode ON/OFF
- Navigation Controls ON/OFF
- Kiosk Homepage
- Go to Kiosk Home after (min)
- Allowed sites: 10 URL Filter entries
• Fullscreen Mode: The Fullscreen mode settings configure how the whole screen will be used in the Fullscreen mode.
- Fullscreen Icons: Visible/Transparent/Nearly invisible/Invisible
- Show Status bar: ON/OFF
- Show Progress bar: ON/OFF
• User Interface. You can tweak the user interface to your heart’s content.
- Auto clear URL: ON/OFF
- Quick Starter: ON/OFF
- Pull down to Reload: ON/OFF
- Pull to create Tab: ON/OFF
- Pull l/r to switch Tabs: ON/OFF
- Orientation: Autorotation/Portrait/Landscape
• Private Browsing. There are times that you don’t want to leave a trail when you browse the Internet and you can control those options here.
- Private Browsing: ON/OFF
- Time Until Deleting: 0min/1min/2min/3min/4min/5min/7min/10min/15min/20min/30min
- Deactivate History: ON/OFF
- Delete Cookies: ON/OFF
- Clear Session: ON/OFF
- Clear Page Storages: ON/OFF
• Other: Here are the rest of the settings that you can adjust as needed. They don’t really fit into any single category so they are listed as Other.
- Homepage: Open at Launch: Last Session/Last Page (active Tab)/Homepage/Quick Starter/Empty Page
- Display IDN: Never/Always/Only ‘safe’ ones
- Browser ID: The list here is too long to print, but this browser can mimic everything from IE 9 to the PlayStation 3 browser
- Text Encoding: The list includes everything from Standard to Hebrew
- Do Not Track: Off/Opt-Out/Opt-In
- HTTP Timeout: Standard/30 Sec/60sec/90sec/120sec/180sec
- History of Closed Tabs: Off/3/5/10/15
- Save Screenshots as: JPEG/PNG
- Always Allow Zooming: ON/OFF
- Javascript ‘print’: ON/OFF
- Auto Fill Out Forms: ON/OFF
- Apps open URL i.Tabs: ON/OFF
- VGA Output: Web Page/Screen/Screen+Touches/Off
• Low Memory Conditions
- Show Warnings: ON/OFF
- Release Tabs: No/Critical Conditions Only/Always
That may be an impressive list of settings that you can control, but it’s just the tip of the iceberg when it comes to iCab Mobile. There is a whole other set of settings that you can access from inside the app. You have already seen the list when you set up the Dropbox link. Start the iCab Mobile browser and tap on the Settings/Tools menu located on the top right corner (remember that it looks like a little gear). This is one really complete control panel, with the different menus on the left and the choices on the right, as you can see in Figure 4-10. We have already configured the Dropbox link, so there are just two other menus to cover in detail—adjusting gestures and accessing modules. The rest you can explore at your leisure.
Let’s find out how to adjust the gestures used in the iCab Mobile app. To edit what your fingers do, tap on General Settings in the left column, then in the right column located in the second panel tap on Gestures. This menu is shown in Figure 4-11 and as you can see allows you to adjust 1-finger, 2-finger, 3-finger, and 4-finger gestures. It’s a very cool bit of customization.
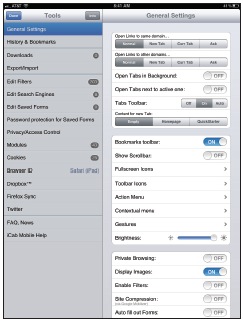
Figure 4-10
The Settings panel inside the iCab Mobile app.
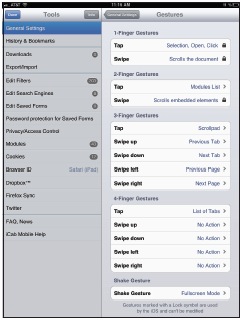
Figure 4-11
The Gestures Settings panel.
To access the Modules menu, tap on Modules in the left column and a list of plug-ins or modules is shown on the right. These include things such as: AirPlay Enabler for Video, Facebook, Translation by Google, and much more. You can install the defaults, enable all, or disable all by tapping on the buttons across the bottom or you can just tap the check marks by the individual modules to enable or disable them. You can also tap on the Module name to see the options available for that module.
To access any of the modules when you are browsing the web, tap on the Module button, which looks like a puzzle piece and is located on the right side of the Bookmarks bar under the search entry area. This brings up the list of modules and allows you to access them, or you can just tap two fingers on the screen to bring up the icon view of the Modules.
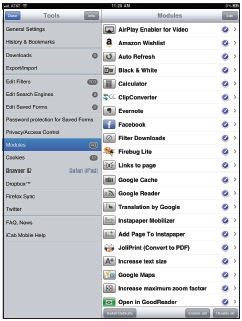
Figure 4-12
The Modules menu options.
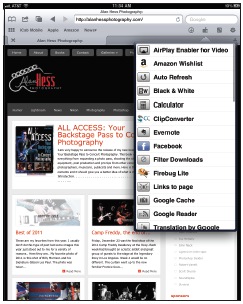
Figure 4-13
The Modules menu in use.
Flash and HTML5
Spend a couple of minutes on the Internet on your computer and chances are that you have seen a Flash movie or a Flash element. Flash is used everywhere and the iPad does not support it—never has, never will. There are two reasons for that: the first is that Apple will never support Flash and the second is that Adobe has shifted its attention from developing Flash for mobile devices to focus on PC browsing and other mobile apps. Adobe is also working on developing HTML5 to replace Flash on mobile devices. You can read the full press release at blogs.adobe.com/conversations/2011/11/flash-focus.html.
There is another reason that Apple might not want Flash to run on their devices and that is that with Flash, developers can bypass the App Store and get Flash applications on to the iPad through the web browser. This is something that Apple definitely does not want. Regardless of the reason, waiting for Flash on the iPad is a waste of time.
There is an alternative to Flash called HTML5 and it is gaining more traction all the time. Safari on the iPad supports HTML5, as do all the Apple web products. HTML5 does not play Flash movies but can be used to build websites that act like Flash without actually using Flash.

Figure 4-14
This is the website for www.wechoosethemoon.org as viewed on a computer. This website was built using Flash.
HTML stands for Hyper Text Markup Language and is the language of the Internet. HTML5 is the fifth revision of the HTML standard, which is always under development. The problem with HTML5 is that older web browsers don’t support it, so while the Safari browser on the iPad does, some others don’t. You can test to see if your browser supports HTML5 by going to html5test.com using the browser in question.
The idea behind HTML5 was to provide support for the new breed of multimedia devices while still keeping the language simple and easily readable by humans and understood on a wide range of devices. The HTML5 language would be able to handle a lot of the functions for which the browser previously needed browser plug-ins, such as Flash, to deal with.

Figure 4-15
This the same website as viewed on the iPad. If you click on the moon it just takes you to the Adobe website so that you can download Flash. Since the iPad doesn’t support Flash, there is no way to access the site.
There are some Internet browsers that are available on the iPad that can access Flash-based movies, but what they do is translate those movies to HTML5 before delivering the content to your iPad. The one browser that I use for this is Skyfire for iPad, but as HTML5 becomes more commonplace I find the need for this browser diminishing. The main thing to remember is that some websites still use Flash for their content, and these websites are not fully functional on the iPad. More and more, website developers are creating websites using HTML5 instead of Flash and these are fully compatible with the iPad.
I used to believe that the lack of Flash on the iPad was a real detriment to the user experience but now I no longer think that is true. Widespread adaptation of the HTML5 standards means that the lack of Flash support will not be noticeable in the future.