7: Books and Magazines
The Skim
Installing iBooks • Launching iBooks • The iBooks Interface
iBookstore • Reading iBooks • iBooks Alternatives
Newsstand • Subscriptions
The iPad makes for a great eBook reader. Since the release of the original iPad, I have read more books on it than I have paper versions. I love being able to carry 10 or 20 books with me without the weight or bulk of the paper versions. There is no doubt that the other eBook readers have looked at the success of the Apple tablet and have tried to compete with it by releasing devices that do more than just enable you to read eBooks. The Amazon Kindle Fire and the Nook Tablet are two good examples of this.
Apple refers to electronic books or eBooks as “iBooks,” and the app you use to read eBooks is named “iBooks” as well. This can get a little confusing. For the sake of clarity in this book, “iBooks” refers to the app that allows you to read the electronic books, and the actual electronic books are referred to as “eBooks.”
iBOOKS
The iBooks app is free, but it doesn’t come pre-installed on the iPad. So, if you want to read eBooks on your iPad, you must visit the iTunes App Store and install it. You can install it directly to your iPad or via your computer.
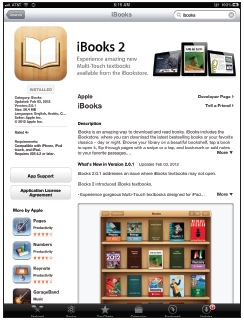
Figure 7-1
The iBooks app in the App Store.
Installing iBooks on the iPad
Getting the iBooks app on your iPad is really easy. Just follow these steps:
1. Turn on the iPad.
2. Tap on the App Store icon.
3. You should see an offer to download a free copy of iBooks. Tap Download.
4. You will be prompted to enter your Apple ID password but you will not be charged anything since the iBooks app is free.
5. If you don’t get the invitation to Download iBooks:
A. Tap in the search bar on the top right and enter iBooks, and then tap on Search.
B. The iBooks app is the first choice.
C. Tap the Free button (and, if prompted, enter your Apple ID and password) to download the app.
That’s all there is to it. Now you have the iBooks app on your iPad.
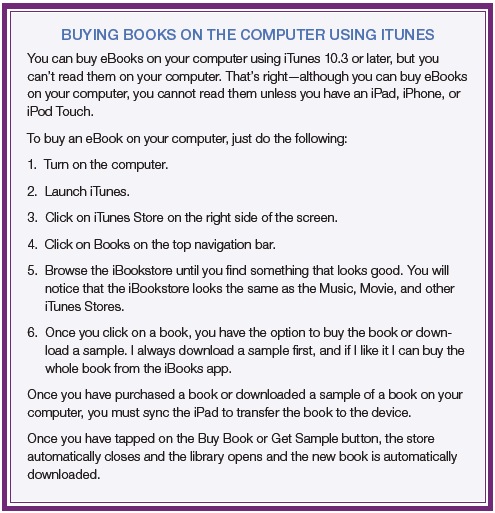
Installing iBooks on a Computer
If you would rather use your computer to get a copy of iBooks then just do the following:
1. Turn on the computer.
2. Start iTunes and click iTunes Store on the left side of the window.
3. Enter iBooks into the search bar on the top right corner.
4. Select the iBooks app that is in the iPad apps search results.
5. Once you have downloaded the iBooks app to your computer, you’ll need to sync your iPad to install it.
With the iBooks app on your iPad, you can start using your iPad as an eBook reader. The next thing you have to do is get actual eBooks onto your iPad.
Launching iBooks
To start using iBooks, tap the iBooks app, because this is not only where you read eBooks but where you can organize and purchase them as well. The first time you run the iBooks app you are asked if you want to Sync Bookmarks. Doing this allows you to keep the same bookmarks and notes on multiple devices as long as they are all using the same Apple ID.
This means that if you have an iPhone, iPod Touch, or another iPad, the books will all be on the same page no matter which device you are using. If you start reading a book on your iPad at home and want to continue reading on the train but only have your iPhone, then the books will be in sync. Just tap Sync or Don’t Sync—and don’t worry, since you can always change this setting later in the Settings app on your iPad.
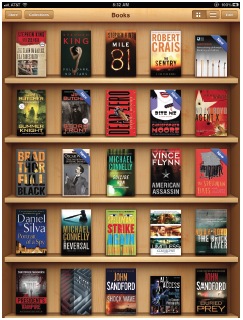
Figure 7-2
The iBooks library mode showing what eBooks I currently have on my iPad.
THE iBOOKS INTERFACE
The iBooks interface has three distinct looks:
• Library mode
• iBookstore
• Reading mode
The following sections describe these modes in detail.
LIBRARY MODE
The library mode shows you the books that you have on the iPad and in the default mode looks like a bookshelf. Across the top of the screen are four buttons: Store, Collections, View modes, and Edit. Just tap on the buttons to see the following:
• Store: This takes you to the iBookstore, where you can browse and purchase eBooks to read on your iPad.
• Collections: Tapping this button opens a drop-down menu that allows you to switch between collections, create a new collection, and edit the collections. The default is to have two collections—Books and PDFs—which you cannot delete, move, or edit.
You can create new collections for any anything you like. For example, you can create collections by author, subject, genre, or anything you want. Each eBook can be in only one collection at a time.
To create a new collection, just tap New, type in the new collection name, and tap Done. To delete, change the order of the collections, or change the name of the collection, tap on Edit to bring up the edit mode. Tap on the white dash in the red circle and the word Delete appears on the right side of the collection—tap Delete to delete the collection. Tap and hold on the three horizontal dashes on the right side of the collection and you can change the order just by dragging the collection up or down. Tap on the name of the collection and you can edit it.
• View: The View buttons allow you to switch between the Bookshelf view and a List view. The Bookshelf view is represented by the four squares and the List view is three horizontal lines. When in the Bookshelf view you can move books around by holding your finger on the book you want to move until it enlarges, and then (without moving your finger off the screen) you can drag the book anywhere on the bookshelf. When the book is in the desired position, just lift your finger. When you are in the List view, there are four ways to sort eBooks:
- Bookshelf: This keeps the books in the same order as the Bookshelf view.
- Titles: This sorts the books alphabetically by title.
- Authors: This sorts the books alphabetically by author last name.
- Categories: This sorts the books into the type of book.
• Edit: The final button on the top of the screen allows you to move books into different collections or remove them from your iPad. Tap the Edit button and you will see that the Menu buttons across the top of the screen have changed. Now there are four buttons: Move, Delete, Select All, and Done. Tap on a book to select it and the Move and Delete buttons become active. If you want to move books to different collections, do the following:
1. Tap on the Edit button.
2. Tap on the books you want to move.
3. Tap on Move.
4. Tap on a collection to move the books into it. You can also make a new collection by tapping on New, typing the name of the collection, and tapping Done. Then you can tap on the new collection and the selected books will move into that collection, and then the edit window closes and the new collection opens.
To delete books from your iPad, tap on Edit, then select the books you want to delete by tapping on them and then tap on Delete. You will be asked if you are sure you want to delete the selected books; tap Delete to remove them from the iPad or Cancel to keep them. One great thing about iBooks is that if you delete a book from the iPad that you bought on iTunes or in the iBookstore, you can always re-download the same book for free later on.
There is one more function on this page and it’s usually hidden away. There is a way for you to search your iBooks library. To get the search bar you must pull the whole bookcase toward the bottom of the screen using your finger. The search bar will appear on the top of the screen right above the top of your books.
iBOOKSTORE
The iBookstore is where you can buy eBooks on the iPad. It looks just like the other Apple stores and works in the same way, but it is accessible only through the iBooks app.

Figure 7-3
The main screen of the iBookstore looks a lot like all the other online Apple stores but instead of movies or music, it’s all about books.
At the top left corner of the iBookstore is the Library button, which allows you view the books stored on the iPad. Next are the Featured and Release Date options, which show the latest books, either in the Apple Featured view or in a simplistic Release Date view. Finally, there is a search bar that allows you to search the iBookstore.
Across the bottom of the page are the view options:
• Featured: This is where Apple shows what’s new or what they are recommending. Think of it as the display window in a store, where the products that they think will garner the most sales are displayed.
• NYTimes: Tap this to show the current New York Times best seller list in both fiction and nonfiction.
• Top Charts: These are the top-selling paid and free books in the iBookstore. Tap on any book to bring up that book’s page.
• Categories: There are 25 different categories to pick from here, ranging from Arts & Entertainment to Travel & Adventure. Tap on the category to open a page that looks just like the Featured page, but is just for those books that fit into that category.
• Browse: The Browse window is an advanced search for the store. You can pick the category, list the authors, and sort between free and paid books. Not as much fun as actually walking around a bookstore, but a lot faster.
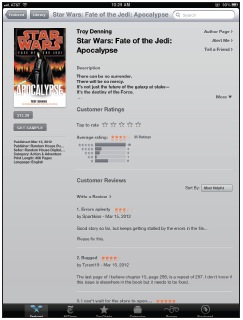
Figure 7-4
Tap on any book to go to that book’s page, where you can buy it or download a sample.
• Purchased: This is where you can go to see all the eBooks purchased under your Apple ID, and you can download any of them that are not on your iPad at any time.
Tap on any book to open that book’s page, where you can buy the book by tapping on the price (you can also buy the book by tapping on the price next to the book cover image); download a free preview by tapping on the GET SAMPLE button; go to the author’s page, where you can see other books by the same author; set an alert so that you are notified when that author releases a new book; Tell A Friend about the book, which takes the information and puts it in an e-mail for you; and see reviews of the book.
READING iBOOKS
There is more than one reading mode in iBooks, and it depends on the type of book being read. The most common type of book in the iBookstore right now is the regular eBook, which is the electronic equivalent of the printed book.
Since the iPad is an electronic device, though, a new breed of eBooks is starting to arrive. These new eBooks have extras that are not available in the printed versions, including embedded video and audio clips, hyperlinks to web services, and other extras. The third type of eBook that can be read in iBooks is a PDF file. This allows you to access any PDF in iBooks without any extra apps. (More on PDFs in Chapter 8.)
Normal Books
To read an eBook, just tap on it to open it. When the eBook first opens, the screen shows a menu bar across the top and a slider (with a page number and current location identifier) across the bottom. Both of these tools fade from view after a few minutes, but you can bring them back by tapping on the top of the page.
The menu on the top of the page consists of the following:
• Library: Tap this to go back to the Library view showing your book.
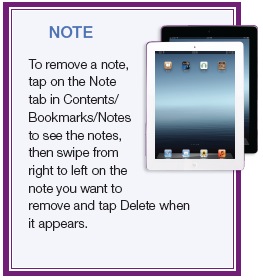
• Contents/Bookmarks/Notes: Tap this and the view changes to the Contents/Bookmarks/Notes page. This allows you to jump to any chapter or bookmark you have set. You can also see any notes or highlighted sections that you have in the book. That’s right—you can make notes or highlight text in any book easily, but it’s not obvious how to do this. To leave a note or highlight text, do the following:
1. Open a book.
2. Hold your finger on the word where you want to leave a note or highlight.
3. Wait until the Define | Highlight | Note | Search menu appears. You can now use the blue handles to select the text.
4. Tap on Define and a definition appears along with buttons that allow you to Search Web or Search Wikipedia.
5. Tap Highlight and you get a choice of five colors and the ability to add a note.
6. Tap on Note and the note form appears.
7. Tap on Search and the iBooks app will search the whole book for the term.
• Appearance: This button allows you change the brightness of the screen, change the font size and type, and change the theme. As I write this, there are three themes that you can use: Normal, Sepia, and Night. The Normal Theme is black text on a white background, the Sepia Theme is black text on a light brown background, and the Night Theme is white text on a black background. The Theme menu also allows you to turn on or off the Full Screen mode. With the full screen turned on, you get more text on the page, but in all honesty, it doesn’t make much difference.

Figure 7-5
In the Reading mode of the iBooks app, you can change the brightness, size of the text, font, and theme of the current book by tapping on the Appearance button on the top right corner.
• Search: The Search menu allows you to search for any term in the book.
• Bookmark: Tap on the bookmark icon and it places a bookmark on the current page. To get back to the bookmark, tap on the Contents/Bookmarks/Notes menu icon and pick Bookmarks.
The reading experience on the iPad is really cool and very intuitive. Want to turn the page? Just use your finger to swipe from right to left and the page turns. Swipe from left to right and the page turns back the other way. The animation that actually shows the page turning adds to the whole experience. One last thing is the slider across the bottom of the screen. This slider allows you to speedily get to any page in the book just by sliding from one side to the other. It also lets you know how many pages are left in the current chapter. Just a quick word of warning: I have inadvertently skipped back hundreds of pages instead of turning just one page when I swiped across the slider from right to left. Just make sure you swipe in the middle and not the bottom edge to turn a page.
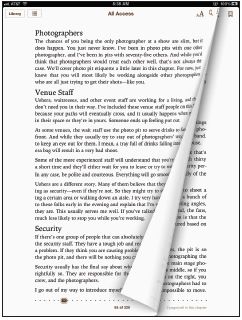
Figure 7-6
When you turn a page in an eBook, it looks as if you are actually turning the page.
Enhanced Books
Many of the newer eBooks are now embedding audio and video as part of the books. This means that there are some new controls showing up in the books themselves. One of the best examples of this is the free eBook based on The Beatles Yellow Submarine. You can get it for free in the iBookstore by searching for “Yellow Submarine” and then choosing the free iBook version. This children’s book includes animated aspects on each page along with a series of video clips. This book also has a narration feature that you can turn on by tapping on the speaker icon at the top of the screen.
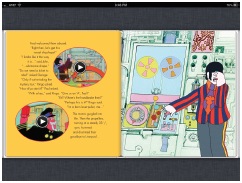
Figure 7-7
The Beatles Yellow Submarine enhanced book has embedded video clips right in the page. You just tap on the Play buttons to watch them.
PDFs
The PDF view is the simplest view of all. There are no fancy page graphics or text options. You turn the page by swiping from left to right or right to left, and you can jump to any page by using the thumbnails located across the bottom of the screen. Each page can be made bigger or smaller in the same way as you would an image—by placing two fingers on the screen and moving them together to make the page smaller or by moving them further apart to make the page bigger.
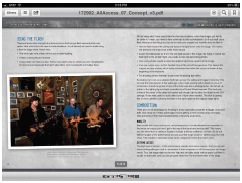
Figure 7-8
Reading a PDF proof of one of my books on the iPad gives me an idea of how the book will look when it’s printed. There are no fancy page curls when you turn pages in PDF view.
iBOOKS ALTERNATIVES
iBooks is not the only app for reading eBooks available on the iPad. There are also apps by the other big eBook reader companies including the Kindle app from Amazon and the Nook app from Barnes & Noble. There was a lot of talk in 2011 about what Amazon and Barnes & Noble were going to do regarding the terms of service for apps that allow in-app purchases, and specifically about buying content for the Kindle app or the Nook app on the iPad.
To recap the problem, Amazon and Barnes & Noble would have to pay Apple if there was to be eBook purchasing from within the apps. Both Amazon and Barnes & Noble realized that they still wanted their readers (apps) on the iPad, but without having to pay Apple a piece of each book sold, and the solution was to just remove any method of purchasing content from inside the app. So if you want to buy Kindle books or Nook eBooks you have to do it through a web browser and not through the app—there isn’t any mention of purchasing books or links to do so from the app. Lets start with the Amazon Kindle app and website, and then move to the Nook and the Barnes & Noble website.
Kindle App
The Kindle app allows you to turn your iPad into a Kindle book reader and gives you the ability to read Kindle-formatted eBooks on your iPad. This is a really good thing since Kindle is the most popular eBook reader and the Amazon Kindle store is the biggest eBook marketplace.

Figure 7-9
You must enter e-mail and password to access your Kindle books.
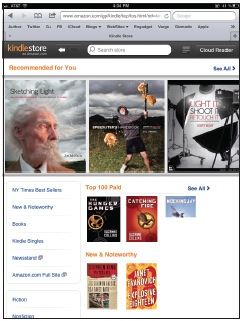
Figure 7-10
The Kindle Store on the iPad in the Safari web browser. Amazon has done a great job with this—it is easy to get around and use.
As I mentioned earlier, what this app allows you to do is read all those books on your iPad, but what it doesn’t have is a direct way to buy any of those Kindle books. It used to, but due to a change in the Apple terms of service for apps it was removed. It doesn’t matter because I will tell you how to buy Kindle books and install them on your iPad without much work.

Figure 7-11
The individual pages for the books allow you to buy right now and read in either the app or in a web browser.
The first thing that you need to do is download the Kindle app and then sign in to your Kindle account or sign up for one—you will see a window that asks for your Amazon account e-mail address and the Amazon account password. After you enter your e-mail and password, tap Register this Kindle. If you don’t have a Kindle account, you need to set one up. Here’s how:
1. Turn on the iPad.
2. Tap the Safari app.
3. Navigate to www.amazon.com/manageyourkindle.
4. A sign in screen opens, asking you to enter the e-mail you want to use at amazon.com.
5. Check the No, I am a new customer button.
6. Enter your name, e-mail, and password info. Tap on Create account and you’re done!

Figure 7-12
The NOOK app needs your Barnes & Noble account information so that your purchases in the NOOK store website will show up in the app.
You can also use your Kindle app to read documents, including PDFs and Word docs. When you register the Kindle app as a Kindle device, it gives you an e-mail address that you can send documents to. This e-mail will be in the format of xxxxxxx@kindle.com and although you can’t answer these e-mails or use it for correspondence, it is very cool that you can e-mail documents to your Kindle app. You do need an Internet connection to access these documents.
To buy Kindle books in the iPad, just do the following:
1. Turn on the iPad.
2. Tap on the Safari app.
3. Navigate to www.amazon.com/ipadkindlestore.
4. Browse the titles available. Choose one and tap on the Buy button.
5. Choose “Read in App” to read the book on your iPad Kindle app. You can also “Read in Browser” to read the book in the Kindle Cloud Reader.
6. When you tap Read in App, the Kindle app opens automatically and the book you just purchased starts downloading.
Reading your book using the Kindle app on the iPad is really easy and the controls work exactly the way you think they would. You can turn the pages by swiping right to left or left to right. Tap on the bottom of the page to bring up a menu that allows you to change the text font or point size, jump to any of the chapters, search the book, or sync the book to the furthest location across all your devices.
If you have a Kindle and want to be able to access your Kindle purchases on the iPad or would just rather shop at Amazon than the iBookstore, then this app is a must.
NOOK App
The NOOK app enables you to read books purchased for the NOOK eBook reader from Barnes & Noble on your iPad. The NOOK app requires a Barnes & Noble account, but with that you get access to free eBook samples; more than 500,000 free eBooks; and over 2 million NOOK books, magazines, and newspapers. When you first launch the app, it asks you to sign in to your account. If you have an account, then tap the sign in button and enter your information. If you don’t have an account, you need to set one up before going any further:
1. Turn on the iPad.
2. Tap on the Safari app.
3. Navigate to www.nook.com.
4. On the top of the browser page there is a My Account tab. Tap on it, and then tap on Account Settings.
5. Tap on the Create an Account button and follow the directions.
Now when you launch the iPad app, you enter that same B&N account information. To purchase NOOK books on the iPad, you need to use the Safari Internet browser because purchasing from inside the app is not supported:
1. Turn on the iPad.
2. Open the Safari app.
3. Navigate to www.nook.com.
4. Tap Sign In on the top of the page and enter your account information.
5. Tap on NOOK book.
6. Search for a book you want to buy and tap on the Buy Now button.
Now the NOOK website looks good, but in terms of use it seems to crash a lot. The NOOK app works great, but its website on the iPad can drive you crazy, since it seems to hang up during the purchasing processes, leaving you wondering what to do. I recommend using this app only if you own a NOOK and want to read your previous NOOK purchase on the iPad.
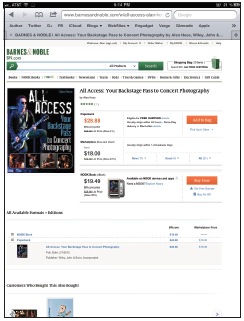
Figure 7-13
The individual book page in the NOOK store.
NEWSSTAND
When the original iPad was released, many people thought that it would be the savior of the floundering magazine and newspaper market—and with the release of the Newsstand app in iOS 5 that might just end up being the case. The app isn’t really anything special or revolutionary, but instead it just makes it much easier to keep all your magazines and newspapers in one place. It also has a direct link to the magazine and newspaper apps that can be used in the app.
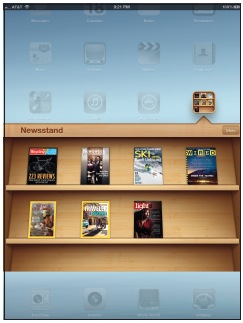
Figure 7-14
The Newsstand showing seven magazines that I currently have on my iPad. The Store button on the top right allows me to go to a special store with Newsstand content.
While many iPad users might not know what the Newsstand app does or what it is used for, others are starting to use it and publishers are seeing an increase in digital subscriptions. For example, Conde Nast reported a 268 percent jump in digital subscriptions since the Newsstand app was released in October 2011.
Using the Newsstand is really easy, since it is basically just a bookshelf accessed by a single tap. The Newsstand app comes preloaded on your iPad and when you first tap on it, it is just an empty shelf. On the top right of the book shelf is the Store button. Tap it and you are taken to the Newsstand section of the App Store where you can get a variety of publications, ranging from Good Housekeeping magazine to U.S. News Weekly for the iPad.
As you will see, most of the publications listed are free—that’s right, free. But that’s actually a little misleading since the app is only a gateway to the actual publication and most of those are not free. So for example, tap on the “free” National Geographic Traveler magazine app and the store closes and the Newsstand app opens with the new magazine on the top left part of the shelf. Tap on your new magazine and what you get is an option to buy the latest issue for $3.99, or you can subscribe to the magazine for $15.99. You can also download a free sample issue to see if you like the publication. So while the app is free, the magazine isn’t.

Figure 7-15
The National Geographic Traveler magazine is a free app and offers a free sample issue, but if you want the magazine you have to pay.
The advantage to the Newsstand app is that all your publications are in the same place and the apps are updated automatically, showing you when you have new issues of publications you subscribe to. This makes it easy to see what you have read and what’s new.
SUBSCRIPTIONS
When the iPad 2 was released, Apple announced its plans for a subscription model for content on the iPad and ignited a firestorm of controversy. To offer subscriptions on the iPad, Apple takes a 30% cut and the publisher cannot offer a link to a website that bypasses this or offer a cheaper alternative through the app. Many people believed that the subscription model would fail, but with the release of the new iPad the subscription model is still standing and growing.

Figure 7-16
One of the main sticking points for publishers when Apple announced the subscription model was that the publishers wanted the subscriber information. Now that decision is in the hands of the consumer, who can decide whether to share that info with the publisher.
I currently subscribe to two magazines on the iPad. One is Wired, a traditional paper magazine that was one of the first magazines to come out with an iPad version, the other is Light It, a magazine designed for the iPad only. Both magazines allow me to archive older issues and download newer content. One of the big differences is that although Wired still puts out a paper version of the magazine and needs to appeal to a wider audience, the Light It magazine doesn’t and can appeal to a smaller targeted audience.