14: For Fun
The Skim
Games • In-App Purchases • Art • Making Music with GarageBand
The iPad is fun. I try to pretend that everything I do is serious and important, but playing games and having fun is so easy to do with the iPad. I know I am not alone because there are a lot of games and other purely recreational apps for the iPad. That’s what this chapter is all about—having some fun with your iPad.
GAMES
If you pick up my iPad, you will see that I probably have more games on my iPad than anything else. I’m not proud of the hours I have spent flinging angry birds at egg-stealing pigs in the various Angry Bird games (yes, I have played them all) or trying to create words in W.E.L.D.E.R.
In all seriousness, gaming on the iPad is big business, and although this section covers a few specific games it also discusses the in-game purchases that developers are using to make giant profits on free games. More importantly, I’ll tell you how to turn this function off so that users of your iPad don’t inadvertently rack up huge charges on the credit card that’s tied to the App Store.

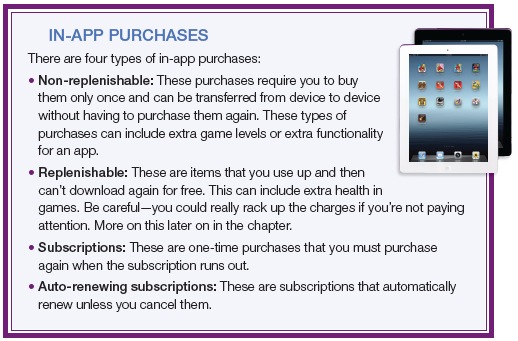
Figure 14-1
You can purchase extra Nanopods if you want them, but be careful because they cost real money.
In-App Purchases
You’ll find in-app purchasing in both free and paid apps—and therein lies the problem. You can download a free game, but at some point the game might require you to purchase game currency, which costs real-world money. For example, the popular game Battle Nations is free to download. The gameplay is pretty fun—you get to build a city, train army troops, and expand your empire. The cost becomes a factor when you realize that you need more Nanopods to train the good troops, and those Nanopods cost real money—lots of real money—as shown in Figure 14-1.
Now there is nothing wrong with companies charging for their products, but many times parents let kids play games on the iPad it can comes as a great surprise that a “free” game actually cost them $49.99 in app purchases.
The good news is that you can turn off in-app purchases! Even better, you can password protect the setting so a password is required to turn it back on. Here’s how to set up in-app purchase blocking:
1. Turn on the iPad.
2. Tap on the Settings app.
3. Tap on General on the left side of the screen.
4. Tap on Restrictions on the right side of the screen.
5. Tap Enable Restrictions on the top right corner of the screen.
6. Enter a 4-digit restriction code, and then re-enter it.
7. Turn off the in-app purchases and set the require password to Immediately.
You can now also turn on any other restriction that you might want to, depending on who uses the iPad. Now when you go to make an in-app purchase, an error message appears as in Figure 14-2.
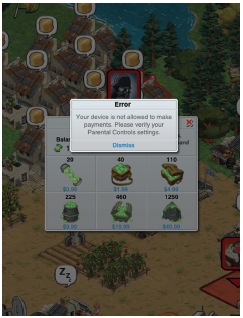
Figure 14-2
After you’ve restricted in-app purchases, an error message pops up when you try to buy something.
Angry Birds (free to $2.99)
It is impossible to discuss games on the iPad without talking about Angry Birds. This game is really simple to play and really hard to master. The idea is simple: You shoot, using different birds as ammunition, trying to knock out the pigs that have stolen your eggs. Each of the birds has a different effect on the pigs’ buildings, and you can score extra points by not using all the birds allotted in each level.

Figure 14-3
The Angry Birds interface is simple, just pull back on the slingshot with your finger and let the bird fly.

Figure 14-4
Newer versions of the game, like this image from Angry Birds Seasons, include themed backgrounds and story lines.
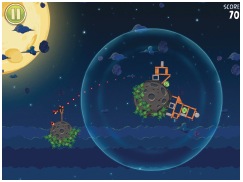
Figure 14-5
The Angry Birds Space gameplay allows the gravitational pull of the planets to affect the birds’ flights.
To play, load a bird into a catapult, pull back with your finger, and let go. Some birds have special effects that happen when you tap the screen while the bird is in the air. Simple ... and very addictive. There are currently four different Angry Birds games for the iPad: Angry Birds HD, Angry Birds Seasons HD, Angry Birds Rio HD, and Angry Birds Space HD. Both the regular Angry Birds HD and the Angry Birds Rio HD come in a free version so you can try before you buy. A word of warning—this game can be addictive.
The Angry Birds Space HD game (which sells for $2.99) changes the playing field once again. Angry Birds Space HD takes the bird-catapulting game and adds planets and gravity to the mix. This version allows you to shoot the birds from planet to planet, and the trajectory of the flying fowl is influenced by the gravity circles. There is also a guide that appears when you start to aim the birds that shows how the specific gravity will affect them in flight.
W.E.L.D.E.R ($0.99)
The W.E.L.D.E.R. game might sound like it has to do with construction, but the only things that you build are words. The idea is to move the tiles around to create words that are four letters or longer. The longer the word, the more points you get, and if you use any of the special tiles, you get extra points for that as well.
The hard part of the game is that you get only a fixed number of tile swaps and when you run out, the game is over. For every 250 points you earn, you get more swaps, but with every level you clear the starting number of swaps is reduced. What I really like about this game is that you can take your time and study the game board, looking for the best way to make words. Once you have made a word, you can tap on it in the word list and see the definition. In case you were wondering, the name W.E.L.D.E.R stands for Word Examination Laboratory for Dynamic Extraction and Reassessment.
There are also blank tiles and, just like in Scrabble, you can use them as any letter—but using one costs you a swap and the tile isn’t worth any points, so try to minimize using the blank tiles as much as possible for as long as possible. One key to the game is that at the end of the round, the number of swaps you have left helps you earn bonus swaps for start of the next round.
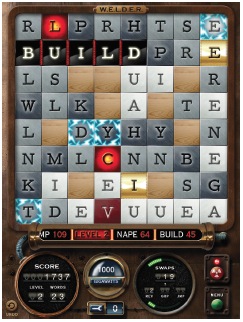
Figure 14-6
The W.E.L.D.E.R. game screen is simple. To play, just move the tiles around to form words of at least four letters.
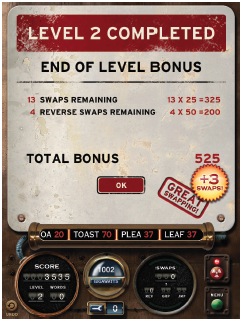
Figure 14-7
At the end of each round the remaining swaps are converted into points, and the more points you have the more swaps you start out with on the next level.
The Infinity Blade Series ($2.99 to $6.99)
If you are looking for a game that shows off the iPad, then the Infinity Blade series is for you. The graphics are stunning and the gameplay is smooth. Now this game might not be for everyone, since all you are doing is having multiple sword fights with a variety of stunningly ugly opponents and trying to earn better weapons, armor, and magic rings. This game is squarely in the sword and sorcery category that is much more likely to appeal to young men, or just men young at heart.
These games are built on the Unreal technology that powers many games for the PC, and the environments and characters are rendered very lifelike. The original Infinity Blade was released for the original iPad. Infinity Blade II came out for the iPad 2, but it also runs on the original iPad. Infinity Blade Dungeons was previewed at the new iPad announcement and was set for release in April 2012. It looks like it will change up gameplay once again, with an overhead view of the action instead of the first-person view of the first two games.
The original Infinity Blade sells for $2.99 and Infinity Blade 2 retails for $6.99. These games are not for little kids and are rated 9+ for violence. I am not sure why these get a 9+ and Batman (covered a little later in the chapter) gets a 12+, but just be aware that these games do show fights that are violent.
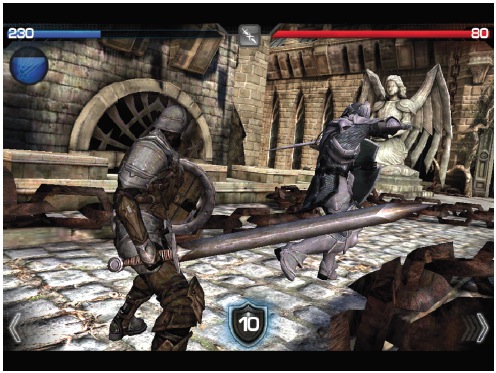
Figure 14-8
An Infinity Blade combat screen—the graphics are great.
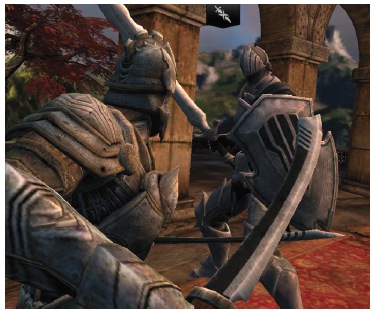
Figure 14-9
Infinity Blade II upped the ante and the graphics are even better than the first game.
Where’s My Water? ($.0.99)
The Where’s My Water? game hooked me the first time I saw my nephew playing it. Created by Disney and available for the iPad and iPhone, the idea is simple. You need to create a path for the water to reach the shower so that Swampy the Alligator can get clean. Seems easy enough, but the great part about this game is that the levels get progressively harder, not in huge leaps but in small steps, so that by the time you are halfway through, the game has become a real thinker.
I feel comfortable recommending this game for all ages. Disney has created a great website with videos, photos, and even a meet the characters section; go to disney.go.com/wheresmywater and look around.
There is a free and a paid version of this app, which means you can try it before you buy it, but at $0.99 it is worth the price for 200+ levels of gameplay.
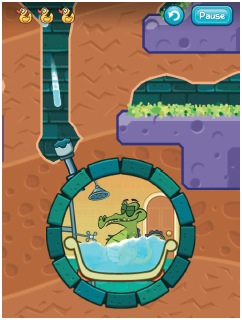
Figure 14-10
Great graphics and simple controls make the Where’s My Water? game great for all ages.
Temple Run (Free)
Want to kill a few minutes, or maybe half a day? Then check out this little doozy of a game. As far as concepts go, this game is the simplest of the bunch. Your character is running and you just need to make sure he doesn’t run into a tree or off the path. Swipe left or right to change direction, swipe up to jump, swipe down to slide, and tilt the iPad left or right to collect the coins on the path. The idea is to go as far as possible. As far as I know, there is no end to the path, or at least in my extensive “testing” of this game I have never found one.
When you have amassed enough coins, you can buy new characters and power-ups, but the game really stays the same—you just keep running. Now the little twist is that you are being chased, so if you bump into a lot of things you will slow down and get caught—and that means an end to your character until you start over and begin running again.

Figure 14-11
Temple Run is all about running and staying ahead of the pursuers. Simple and addictive.
Batman: Arkham City Lockdown ($5.99)
I have been a Batman fan since I was a little kid and the opportunity to play a game as the caped crusader on my iPad was just too appealing to pass up. The game story is pretty standard Batman fare; the bad guys have escaped from prison and you (as Batman) need to round them up and put them back behind bars. All the great Batman villains are here, including Joker, Two-Face, and Harley Quinn.
For the Batman fan, the ability to buy costumes from different eras is appealing, but this is an in-app purchase that costs real money. The advantage is that each of the different costumes comes with a slightly different set of abilities for the Batman character.
For example, the standard Batman suit that the game starts with has a Health Rating of 100, a Damage Rating of 100, and a Speed Rating of 100, but if you buy the Dark Knight Returns Batman, you get a Heath Rating of 135, a Damage Rating of 110, and a Speed Rating of 90. The cost is $0.99 per costume and that might just be worth it if you want to play as your favorite version of Batman.
If there is one downside, it is that the controls can take a little getting used to and it is tough watching the villains win time and time again. At least they tend to win when I’m playing, as I am just not that great of a Dark Knight. Also a word of warning, this game is not for the little kids, as it is rated 12+, and does contain quite a bit of violence ... actually the whole game is just Batman and his foes beating each other up.

Figure 14-12
Feeling nostalgic? You can play Batman in the classic 1970s costume.

Figure 14-13
The gameplay on Batman is similar to the Infinity Blade series and that’s because both games are built on the same platform.
ART
I am not an artist but luckily I know a few. My artistic ability tends to be more stick figure than anything else, so when I saw what artist Patrick LaMontagne (www.cartoonink.com) could do with his iPad, I was stunned.

Figure 14-14
The digital painting of a Golden Mantle Ground Squirrel done by Patrick LaMontagne on an iPad using ArtStudio © Patrick LaMontagne.
Now Patrick was already an accomplished digital painter, so for him to be able to use the apps on the iPad to produce something that looks that good wasn’t luck, but skill. The interesting part was that instead of listening to people who complained that the iPad wasn’t pressure-sensitive enough or didn’t have high enough resolution, Patrick just learned to be a better digital painter by learning to work around the limitations.
I asked Patrick to recommend some good art programs for the iPad and he suggested these two:
• Procreate
• ArtStudio
Procreate ($4.99)
The Procreate app puts the basic painting tools right at your finger tips. The controls are at the edge of the screen, which leaves most of the screen open for painting. Across the top of the screen you have:
• Gallery: Tap this to open the gallery, where you can see your artwork.
• Settings: This is where you can insert a photo into your work and control the eyedropper and artwork orientation; and you can save a canvas to Photos, which then enables you to treat the image as a photo, meaning that you can use the Photos app to share it or e-mail it out.
• Paintbrush: There are 12 different brushes that you can pick here. Just grab the one that’s right for the style you want.
• Smudge: You’ll find the same brushes here as in the Paintbrush selection, but instead of painting it’s all about smudging.
• Erase: Pick a brush style, but you’ll use this tool to erase instead of paint.
• Layers: This is where you can control the layers in your image, including the order and opacity. Tap the + in the upper right corner to add a layer or tap the trash can to get rid of one.
• Colors: This opens a color picker so you can get just the right shade in your piece.
And then down the left side of the iPad you have the brush size and opacity controls, along with the Undo and Redo buttons.
When you are in the Galleries view you can tap the + sign to start a new piece, tap the Share button to e-mail your artwork or duplicate the work, or send it to iTunes. You can also tap the trash can to delete it or open the Settings panel, where you can remember the tool size and opacity, and access the User Guide.

Figure 14-15
The Procreate screen showing the painting controls.
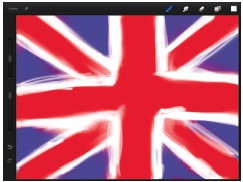
Figure 14-16
I guess listening to the Kinks while playing with the Procreate app has its consequences.
ArtStudio ($2.99)
When the ArtStudio app opens it looks like just a blank canvas. But if you look closely, you can see a little arrow in the bottom right corner. Tap it and the menu bar pops up from the bottom of the screen. It is clear from these controls that this is a very serious painting app. With a wide variety of tools and controls I found this app to be a little intimidating to use at first, but after a few minutes of experimenting I found it easy to navigate the menus and got a very fine control over the tools.
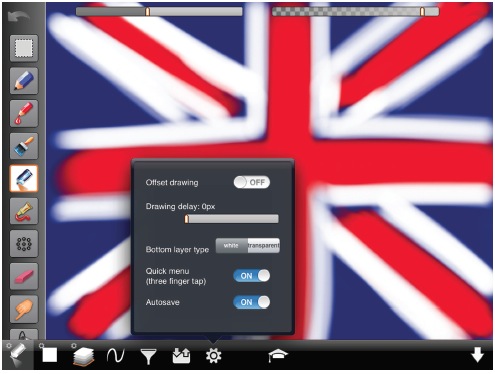
Figure 14-17
The Settings menu in the ArtStudio app—and yes, that is another one of my fine Union Jack paintings. I think I need to stick to writing and photography.
Across the bottom of the screen are the following:
• Brush menu: If you want drawing/painting tools, here they are. You get to pick between Pencil, Wet Paint Brush, Paint, Spray Paint, Paint Tube, Scatter, Eraser, Smudge, Fill, Gradient Fill, Text, Clone, Blur/Sharpen, Light Overlay (Dodge), Dark Overlay (Burn), Custom, and Saved Bushes. And each of these tools has a sub menu that gives you control over the brush. Just tap and hold on the Brush menu icon. Tap it again and the menu disappears.
• Color Palette: Tap on the color palette icon and the color swatches appear, tap and hold your finger on the icon and the color picker appears.
• Layers menu button: Tap on the Layers menu button and you see all the layers in your work on the left, but tap and hold the Layers menu button and the Layers control menu appears, allowing you to add, delete, duplicate layers, and more. You can even change the blending mode of the layer.
• Shape tool: This brings up the Shape tool with a cool mirror feature. On the top menu there is the choice for a single shape; next to it you can pick for the shape to be mirrored vertically or horizontally. This allows you to make a shape on one side that is then mirrored on the other. It’s fun to use this to make patterns.
• Effects menu: This app has a full set of filters that allows you to change the Brightness and Contrast, Hue Saturation and Lightness, and more. You can even add a border to your art.
• Import/Export menu: This is where you can save you image, create a new image, import, export, or visit the online gallery.
• Settings: Want to offset the drawing or set the bottom layer type? Then this is the menu to use.
• Lessons: There are some really good lessons on painting, not so much how to use the app, but how to actually create a dog or cat. If these were interactive demos, then it would be even better.
• Hide/Show: Tap here to hide or show the menu.
Across the top of the screen are the Undo, Brush Size, Opacity, and Redo buttons. These are easy to access, but they can also get in the way when you’re painting.
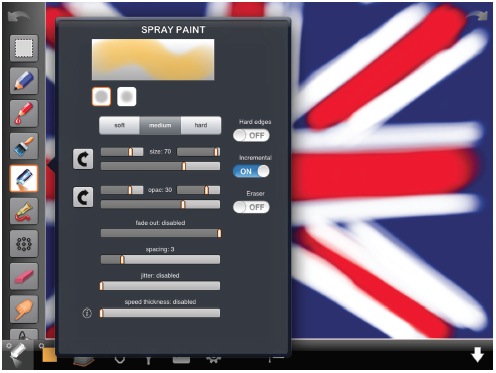
Figure 14-18
Check out the options you have for just the Spray Paint tool. Awesome.

MUSIC WITH GARAGEBAND
Creating music on the iPad is fun and easy (even for people like me who are tone-deaf and have no real music ability at all) mostly due to Apple’s GarageBand app. Apple released the GarageBand app at the same time it released the iPad 2, and it released an updated version to coincide with the new iPad release.
The key to the GarageBand app is the Smart Instruments. These gems allow anyone to create music that sounds pretty good. There are smart versions of the following instruments: drums, strings, bass, keyboards, and guitar. Each of these five instruments works in a slightly different way but the technology enables you to create music that sounds good, even if you have very little musical ability:
• Smart Drums: With the Smart Drums tool you can play drums even if you don’t have rhythm. You just place the drums by sliding them from the list on the right onto the smart pad, and your placement controls the volume and the complexity of the rhythm.
Want to experiment? Just move the drums around or tap on the dice in the bottom left corner to get a random setup. You can also change the type of drums you are playing by tapping on the drum kit on the left side of the screen. GarageBand has six different drum kits—three traditional and three drum machines.
• Smart Strings: Added to the app in 2012, with this interface you have access to a complete string section that allows you to pick between controlling a whole orchestra string section or a solo string part. You get to control violins, violas, cellos, and even upright basses. You can choose whether you want to play actual cords for the orchestra as a whole, or if you want to play notes of a single instrument. If you play on the chords setting, you can also set the Autoplay between 1 and 5, or turn it off completely. Setting it on 5 makes even me sound like a I know what I am doing.
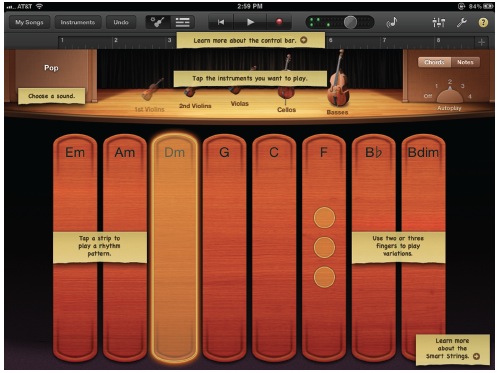
Figure 14-19
The Smart Strings interface, showing the helpful hints.
• Smart Bass: You pick between four different basses, and you can play either chords or notes. If you need some help with getting the sound right, just turn on Autoplay.
• Smart Keyboard: This instrument gives you four different choices for your keyboarding needs. From a Grand Piano to a Classic Rock Organ, you can play them all. Turn on Autoplay to let the app help you out by playing along for you. Each of the keyboards has different controls. For example, you can control the rotation of the speaker horn from slow to fast in the Classic Rock organ, or turn on the sustain and control the Auto Wah and Phaser in the Smooth Clav.
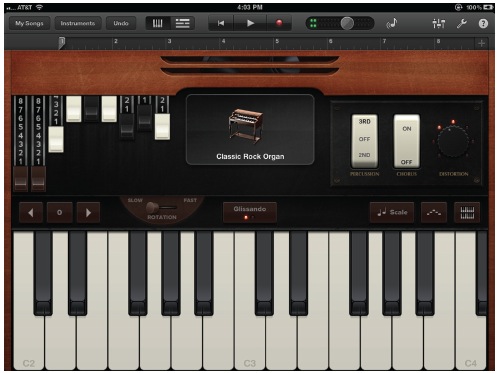
Figure 14-20
The touch keyboards showing the Classic Rock Organ.
• Smart Guitar: Ever want to play an acoustic guitar or maybe a Hard Rock guitar (looks suspiciously like a Gibson)? You can here. You get to strum the cords up and down or just tap to play each one separately. If you turn on Autoplay and pick a cord, the app does the rest and plays the guitar for you. My favorite part of using this app is watching the strings bend as they play, just like a real guitar.
There are also two touch instruments, the Drums and Keyboards. You play these instruments by just tapping on the iPad screen. The app knows if you are tapping hard or soft and the instruments respond accordingly. The touch instruments have all the same controls that the smart instruments have, just not an Autoplay mode, so you really need a bit of musical ability to be able to use them. The really fun part of using the touch drums is that you are playing a virtual drum kit. Tap on the edge of the drum and it sounds very different from banging in the middle of the drum, just like a real drum kit.
Playing the touch keyboards is like having eight different keyboards, including a Grand Piano, Classic Rock Organ, Whirly, and Heavy Metal Organ. If you choose the Classic Rock Organ, you can control the draw bars just like you would on a regular organ.
There are three ways to get music into the GarageBand app. The first is for those out there who play guitar.
• Guitar Amp: The Guitar Amp enables you to plug your real electric guitar right into the iPad. You need an adaptor, such as the Apogee JAM Guitar Input ($99), which has a 1/4-inch input for a guitar or bass and has a control knob to easily adjust the input.
After you’ve plugged in the guitar, you have the option to use a variety of Guitar Amps—there are eight different combinations in each of four categories, and each of categories has eight different amps. That’s a lot of musical choices.
You can also add up to four stomp boxes to make your own custom pedal board. Tap on the pedal icon in the top right corner, and then add, remove, or adjust the pedals to your liking. There is also a nice way to tune your guitar; just tap on the tuning fork and get that axe in tune.
• Audio Recorder: You can record audio right into GarageBand through either the built-in microphone or an external microphone. Just watch the meter and make sure it doesn’t go into the red too much because that will most likely distort the sound.

• Sampler: This allows you to record a sound and then play it back using the onscreen keyboard. The app comes with some samples already built in, but it’s easy to create your own. Just tap on the New Sample button, tap the Start button, record the sound, and then tap the Stop button. Your sample is now ready to be used.
Just playing around with a tune is one thing, but GarageBand allows you to do much more—it is an eight-track recording studio. Follow these instructions and you’ll have a good idea of how to create a song all on your own.
1. Open GarageBand and pick an instrument. It doesn’t matter which one.
2. Tap on the My Song button on the top left corner of the screen.
3. You will see the screen where the songs you create are stored.
4. Tap on + in the top left corner and then tap New Song.
5. Now you can use the instrument in Step 1 or pick another one.

Figure 14-21
The Track view of a song shows the instruments and the playback of the song, you can adjust the volume of each track on the fly.
6. Tap on the Instrument Settings button (it looks like a set of three sliders).
7. Adjust the Track Volume, Track Panning, Echo Level, Reverb Level, Quantization, Merge Recordings, and/or Master Effects. (The Master Effects controls the Echo and Reverb for the whole track.)
8. Tap on the wrench icon on the top right corner to open the Song Settings menu, giving you control over the Metronome, Count In, and Sound. You can also set the Tempo and the Key. This is also the location of the Help menu, which is very useful for finding out all about the bells and whistles in the GarageBand app.
9. Now you are ready to play, so tap the Record button and go for it.
10. Tap the Stop button when you’re done laying down a track.
11. You can now play the track back using the Play button in the top middle of the screen.
12. You can also look at the track in the Mixing Board view; it’s the icon at the top of the screen that looks like a set of parallel horizontal lines. Tap it and you can see your newly recorded track. More on the mixing a little later.
13. Tap on the Instrument button to get back to the Instrument view; it’s the button next to the Track view.
14. You can now lay down another track using the same instrument or any of the others.
15. Just switch to another instrument, check your settings, tap Record, and start playing. You will hear your previously recorded tracks playing as you lay down your new track. You can record a total of eight tracks.
16. Once you are done recording your masterpiece, just tap on the My Songs button. Your song will be saved and you can access it in the My Songs menu.
You can now edit your song using the mixing controls. From the My Songs menu, tap on the song you want to edit. If it is in the Instrument view, tap on the Track view to see the individual tracks in your song. Swipe your finger from left to right to open up the track controls.
For each of the tracks you can mute the whole track, or send that track to the headphone jack. You can also control the volume of each track to get a better mix. Double tap on the track itself and you can Cut, Copy, Delete, Loop, or Slip the track; you can also adjust the placement and the start/stop points by using the handles on the end of the selected clip. If you have fewer that eight clips, you can also use the + sign on the bottom to add another track.
After you are done, tap on the My Songs button to save your song and get back to the My Songs page. Once you are there and have a song selected you can change the name of your song by tapping once on the name and entering a new one. You can export the song by either sending it to iTunes or e-mailing the song.
From the My Songs page, you can also import songs from iTunes into the app, you can tap on the + sign to start a new song, or you can duplicate the current song. You can also delete the song if it just isn’t up to your high standards. (I have deleted a lot of songs.) To delete or share a song, do the following:
1. When on the My Songs page, tap on the Edit button on the top right corner.
2. Tap on the song you want to delete or share.
3. Tap on the trash can icon on the top row to delete or tap on the Share button on the top row and choose one of the sharing options that appears.
Up until this point, everything has been a solo effort, but in the real world it is rare that all music is created by one person. The fine folks at Apple know this so they have come up with a brilliant solution. You can have a jam session with up to four different people on four different iPads at the same time. One user creates a Jam Session and the others join in. This is how to get your Jam Session started.
1. Open GarageBand.
2. Pick an instrument.
3. On the Menu bar at the top of the screen tap the Jam Session button; it looks like a music note with two curved lines next to it.
4. One person taps Create Session while the others tap Join Session.
5. The iPad that starts the session is the Bandleader and controls the recording and playback for the Jam Session.
Play away ... and you can even change instruments without having to exit and re-enter the Jam Session.
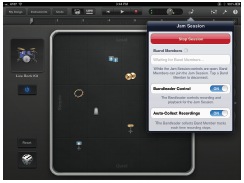
Figure 14-22
The Jam Session button opens the Jam Session menu where you can be the band leader and control the recording and playback of all the band members.
This is an amazing app for only $4.99 and if Apple keeps updating it every year, I cannot see a time when this app is not on my iPad. I can’t wait to take my iPad over to a friend’s place and see if we can live out our rock-n-roll fantasies and record a killer hit tune during our jam session.