BIRD ON A VINE PINKEEP
Stitched by Renée Plains
I really enjoyed making this small pinkeep. The wool berries, leaves, and vines were especially fun to appliqué. I used toothpick-turn appliqué for the bird and wing. I learned this great appliqué method from my late friend, Laurene Sinema. It uses a round toothpick rather than a needle to turn under the seam allowance. Before you start appliquéing, moisten the toothpick by placing it between your lips. That bit of moisture gives the wooden toothpick a little extra roughness, which makes it easier to turn the fabric under as you stitch. Give it a try. I think you will like it!
MATERIALS
Fabrics
Linen: 1 fat quarter for pinkeep body
Cotton: Brown/black checks and brown print for bird and wing appliqué
Wool: Assorted greens and red for vine, leaves, and berries appliqué
Other materials
Small bead: 4 mm (approx.) for bird’s eye
Small button: For scissor tab
Polyester fiberfill
Crushed walnut shells (Available at pet stores)
Embroidery floss: Dark brown
Cardboard: For interior base
CUTTING
Make templates from the Bird on a Vine Pinkeep patterns and cut pieces as indicated.
Linen
• Cut 1 rectangle 5˝ × 13˝.
• Cut 2 circles from circle pattern.
• Cut 1 piece from scissor tab pattern.
Cardboard
• Cut 1 circle slightly smaller than the circle pattern.
Cotton and wool
• Cut pieces from appliqué pattern (as directed in pattern).

Finished pinkeep: Approx. 4˝ × 4½˝
Sewing
1. Make a template from the Bird on a Vine Pinkeep pattern to use as a placement guide. Appliqué the pieces to the linen pinkeep body. I used a primitive stitch on the wool pieces and needle-turn appliqué for the bird and wings. Add the bead for the bird’s eye.
 The small wool berries can be punched quickly with a Fiskars ¼˝ Circle Hand Punch. (My friend, Sue Spargo, shared this great technique with me.) Another easy way to cut small wool berries is to cut a ¼˝ strip from wool with a rotary cutter. From that strip, cut ¼˝ squares and then round the corners by trimming them with scissors.
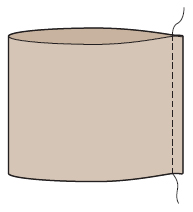
2. With right sides together, sew the short ends of the 5˝ × 13˝ rectangle together to make a tube. Fig. A

Fig. A
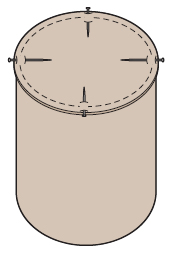
3. Using a ¼˝ seam allowance, sew one of the linen circles to the bottom of the tube by hand or machine. It helps to pin these 2 pieces together at equal intervals around the circle in 4 places. Fig. B

Fig. B
4. Turn the pinkeep right side out. Place the cardboard circle inside the pinkeep bottom to help stabilize the pinkeep.
5. Sew a running stitch around the pinkeep top ¼˝ from the top raw edge, leaving the ends long enough to tie.
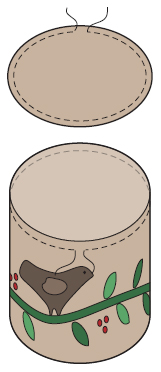
6. Sew a running stitch around the remaining linen circle (pinkeep top) ¼˝ from the raw edge, leaving the ends long enough to tie. Fig. C

Fig. C
7. Fill the pinkeep with crushed walnut shells to approximately 1˝ from the top.
8. Gather the running stitch on both the pinkeep and the top slightly.
9. Fold the scissor tab in half lengthwise and sew with a ⅛˝ seam allowance. Turn it right side out. Fig. D

Fig. D
10. Cut a small slit for the buttonhole a scant ¼˝ from the finished end of the tab. Sew a buttonhole stitch around the slit to finish the raw edge. Fig. E

Fig. E
11. Fold back the tab end about 1˝. Mark the center of the buttonhole on the tab behind the slit opening for the button placement. Sew the button in place. Fig. F

Fig. F
12. Add some polyester fiberfill over the crushed walnut shells, slightly rounding the top.
13. Place the linen top piece over the stuffing at the top of the pinkeep and pin in several places with the raw edges tucked toward the inside.
14. With the button facing up, tuck the scissor tab raw edge between the pinkeep top and side at a pleasing spot.
15. Sew a whipstitch around the top edge, securely stitching the tab in place.
16. Using embroidery floss, sew a featherstitch over the seamline around the top.
17. Add a small pair of scissors and button.

Stick a few pins and needles in your finished pinkeep, and it’s ready to use!