FLOWERED HEAT BAG
Designed and made by Anni Downs
This whimsical project combines gorgeous handkerchief linen that I happened upon one day and some wool that my husband hand-dyed. Together they make a calming heat bag, which works wonders for keeping your toes toasty warm or soothing weary shoulders after sewing all day. I even use one as a lap warmer on chilly days. To make the heat bag’s cover easy to wash, I’ve included an inner bag filled with rice and fragrant lavender. You could also use wheat or barley as fillers.
MATERIALS
Appliqué background
Brown handkerchief linen: 1 fat quarter or ¼ yard
Appliqué flowers
Wool (5 colors): 1 piece 4˝ × 4˝ of each color (I used gray/blue, caramel, beige, watermelon, and pea in various textures, such as herringbone and plaid.)
Patchwork section
Assorted cream prints: Scraps
Assorted colored prints: Scraps
Buttons: 3 light brown, 15 mm size
Inner bag
Cream homespun: ¼ yard
Long grain rice, wheat, or barley: 3–4 cups
Optional: Dried herbs such as lavender and essential oils for fragrance
Embroidery floss: Light gray/green (I used DMC 646.)
Cream piping: ¼˝ wide, 1⅓ yards
 Piping: I purchased ready-made piping for my project. If you can’t find suitable ready-made piping, you can create your own custom version, using fine cording and fabric. Simply make a bias strip of fabric double the width of the cord, plus an extra ½˝ for the seam allowance. With wrong sides together, wrap the bias strip around the cord, and align the raw edges. Using a zipper foot on your sewing machine, baste the strip ⅛˝ from the cord. This stitched line will be hidden once the cord is attached to the heat bag.

Finished bag: 6˝ × 15˝
CUTTING
Brown handkerchief linen
• Cut 1 rectangle 6½˝ × 15 ½˝.
• Cut 1 rectangle 6½˝ × 14˝.
• Cut 1 rectangle 3½˝ × 6½˝.
Assorted cream and colored prints
• Cut 18 squares 1½˝ × 1½˝.
Cream homespun
• Cut 2 rectangles 6½˝ × 15½˝ for inner bag.
Assorted wool scraps
• Cut appliqué flowers, using Flowered Heat Bag pattern.
Sewing
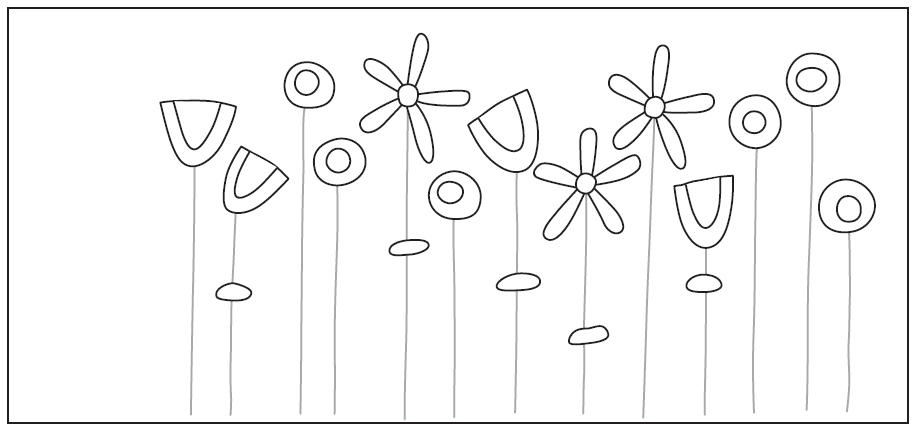
1. Referring to the guide (below), appliqué the wool flowers and leaves on the 6½˝ × 14˝ handkerchief linen background. Before appliquéing, note that 2¼˝ of the left-hand side should be blank as this section will be overlapped with the patchwork section later. Using 3 strands of embroidery floss, backstitch the stems.

Appliqué guide
2. With right sides together, sew together 2 cream homespun 6½˝ × 15˝ rectangles, leaving one short side open. Turn right side out, then fill two-thirds full with rice, wheat, or barley. If you wish, add lavender or other dried herbs for fragrance. Then sew the opening closed. This completes the inner bag. Fig. A

Fig. A
3. Sew 3 assorted colored and cream 1½˝ squares together to create a row. Repeat 5 times to create a total of 6 rows. Join the 6 rows. The resulting unit should measure 3½˝ × 6½˝. Fig. B

Fig. B
4. Sew the 3½˝ × 6½˝ brown linen strip to one side of the unit created in Step 3. Press under. Set aside. Fig. C

Fig. C
5. Turn the left side of the 6½˝ × 14˝ appliquéd linen block under ½˝. Then turn it under again to hide the raw edge. Topstitch this folded end in place. Fig. D

Fig. D
6. With right sides facing up, lay the patchwork section over the appliquéd linen block. Measure the width and overlap these 2 pieces so they total 15½˝ in width. The overlap should be 1¼˝. Then baste the top and bottom seams. This completes the heat bag front. Fig. E

Fig. E
7. Aligning the raw edges of the piping and the bag front, pin the piping around the entire perimeter of the heat bag front. Clip the seam allowance of the piping at each corner to help it lay flat. Using the zipper foot on your sewing machine, sew the piping to the heat bag front. Fig. F

Fig. F
8. Start and finish by turning the piping ends outward, away from the heat bag. Then cut off excess fabric. Fig. G

Fig. G
9. With right sides together, layer and pin together the heat bag front and back. Using a zipper foot on your sewing machine, sew around the perimeter. I finished off the seams with a zigzag stitch.
10. Turn the heat bag right side out. Referring to the project photo, sew the 3 buttons along the side of the patchwork section. Add hook-and-loop tape tabs to the underside of the patchwork flap, and secure. Then insert the inner bag into the heat bag cover.
You can heat this bag in the microwave for about 3 minutes, depending on your microwave’s strength. To avoid overheating, test the microwave in 1-minute increments.
Sit back and enjoy the warmth!
 Piping: I purchased ready-made piping for my project. If you can’t find suitable ready-made piping, you can create your own custom version, using fine cording and fabric. Simply make a bias strip of fabric double the width of the cord, plus an extra ½˝ for the seam allowance. With wrong sides together, wrap the bias strip around the cord, and align the raw edges. Using a zipper foot on your sewing machine, baste the strip ⅛˝ from the cord. This stitched line will be hidden once the cord is attached to the heat bag.


