
Riding Within the Gaits
Riding in the beginning stages is all about the working walk, the trot, and the canter, but as you advance in your skills, everything becomes more complex. For instance, you must learn how to move seamlessly from one gait to another. You need to include paces in your repertoire; for instance, the walk paces include the free walk, the medium walk, the extended walk, and the collected walk. While jumping, you must learn to adjust your stride within the speed of your canter, hand gallop, or gallop, depending on the style of fence. Advanced riders also need to learn how to advance a horse’s knowledge with a method of training. In dressage, this is primarily the training pyramid or scale. Because this is a universal, integral concept among riders of all disciplines, I urge you to incorporate this technique into your own training sessions.
Transitions
A well-ridden transition seems a simple thing. After all, in essence you are only switching gears: walk to trot, trot to canter, or trot to walk. But many things that appear easy are in actuality very hard to do. What people see in that easy transition is a horse that smoothly changes rhythm; for example, from a one-two, one-two beat in the trot to a one-two-three beat in the canter. Nothing else changes: the horse should continue to move forward with the same energy (unless you’ve halted), remain on the bit or accepting the bit, and stay balanced. But what brings about the shift in gaits is indiscernible to observers. That’s the rider’s job, to make his aids invisible to spectators and obvious only to the horse—to make the whole thing look easy. A great transition is one that is prepared and well trained, but most of all one that shows the true harmony and partnership between horse and rider that has developed over time.
If you’re a dressage rider, bad transitions will keep you stuck in Training Level because the further you advance in the levels, the more important transitions become. If you’re a hunter or jumper rider and you can’t pull off a transition on the flat, you’ll be in trouble when it comes to jumping because you won’t be able to gauge your distances. You’ll come into the fence too deeply or chip in an extra stride. Your hunter won’t make the proper strides between fences, and your jumper will most likely pull rails.
A common fault in the downward transition is that the rider leans back and braces against the horse and uses his stirrups as brake pedals. Or he leans forward and lightens his seat. Because there is no preparation, the result is an awkward transition, or the horse either braces back and ignores the rider completely or responds by going faster. When riders brace and fall to the back of the saddle, their seat drives the horse on and makes her go faster. Everyone instinctively leans back to stop, and that’s good if you’re a beginning rider and you’re going to fall off, but not at this stage in your riding. The answer is to keep your position through your transition.
Using the bit for a brake is another common fault. If this is your issue, go back and review your half halt and make sure you are applying it correctly.
Making an upward transition by chasing the horse until she reaches the required gait is also a common error. For example, instead of simply moving from the trot to the canter, riders gun the horse forward from the walk to a fast trot and then to the canter. In this error, the rider’s seat has shifted too far forward, and he has not started with his horse balanced and accepting the bit. In the upward transition, keep the energy flowing from behind. Ask when your position is correct, and don’t ask for the canter if your horse begins to run. Bring her back and try again, this time with better preparation. You may have also used too sharp an aid to jolt your horse forward. Ask with a softer cue.

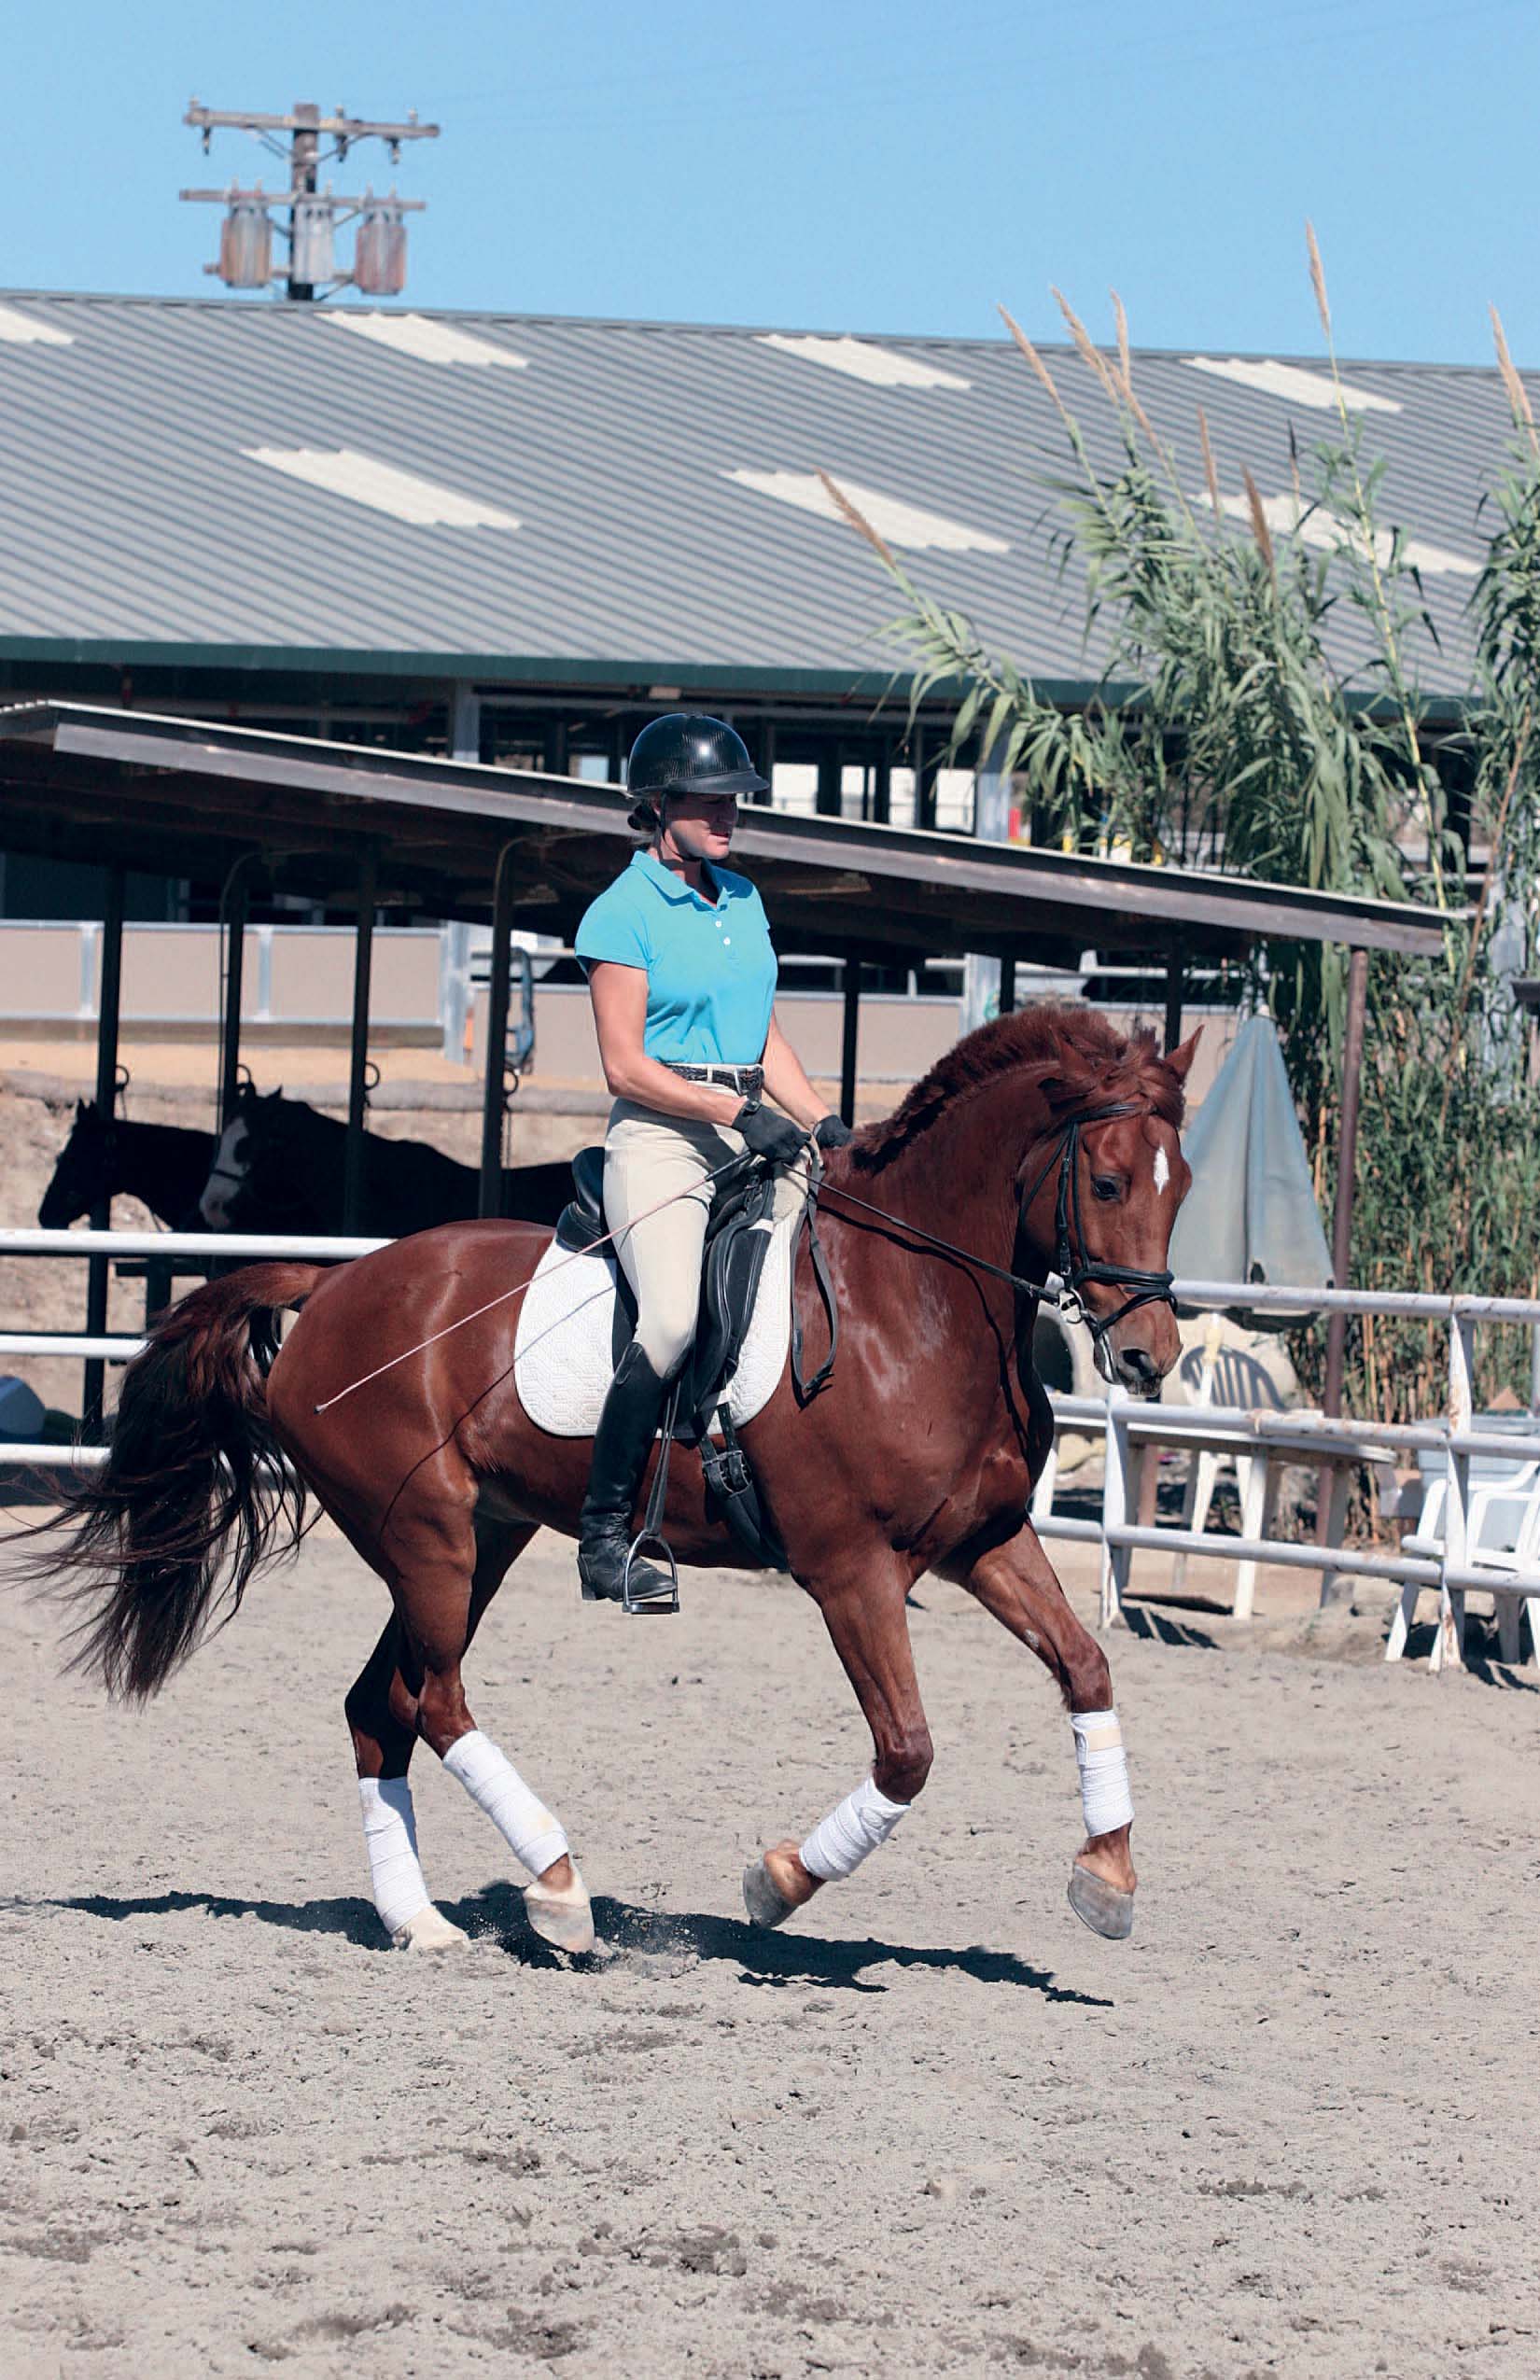
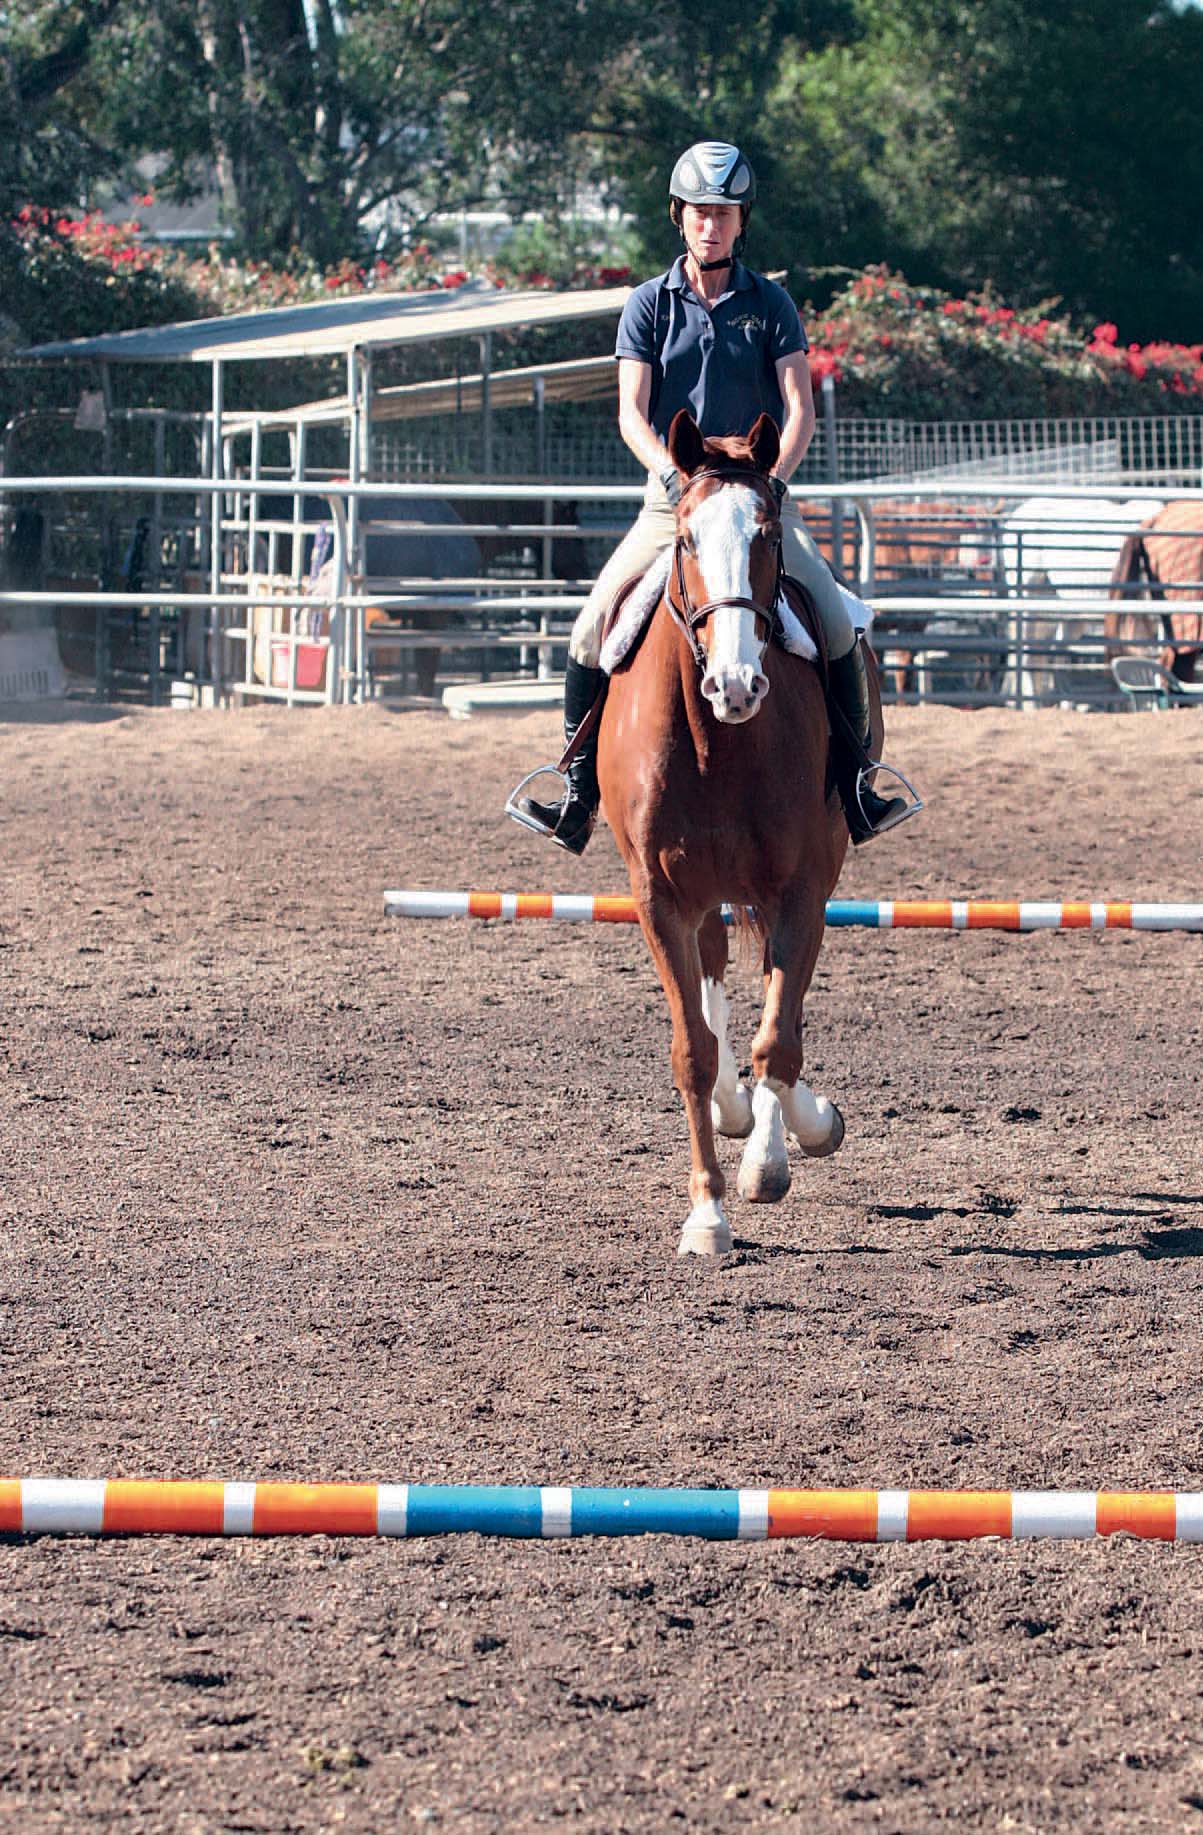
This balanced rider has her horse moving in a controlled canter, ready for a smooth downward transition.
If your horse doesn’t respond to the upward transition, chances are she’s ignoring your aids. Instead of beating a tattoo against your horse’s ribcage, reschool her to a light leg aid. Bring your horse back to the walk, and ask her to trot on. If she won’t go, pair your leg aid with a touch of your whip. If she trots on, pet her and bring her back to a walk. Then ask again with a lighter aid, turning up the volume with your whip until you can put your leg on lightly and she will trot off.
A rule of thumb for hunter and jumper/riders: If your horse is rushing and dragging you to the jump, go back and work on your transitions from the canter to the trot. If your horse is too slow and you feel that you keep getting left behind at the jump, make sure your canter departure from the walk is correct.
The Training Pyramid, or Scale
The training pyramid (also called training scale) is an important concept in dressage training. Failure to understand the dressage pyramid when training or not taking each step into account is a very common rider error. The dressage pyramid is a logical training method: each new step builds on the previous step. It begins with rhythm, followed by looseness, contact, straightness, and impulsion and ends with collection. Skip one criterion, and you won’t be heading up the scale and will have difficulty advancing.
Rhythm: A pattern of steps or strides for each gait, such as the one-two-three in the canter and the one-two, one-two in the trot. The beat should be regular, and each pattern should cover equal ground. To achieve a good rhythm, your horse must be free from any soundness issues and must be able to carry the rider while staying balanced.
Looseness: Physically and mentally free from tension. The horse accepts the rider’s aids and moves forward correctly at the tempo (speed) that the rider requests.
Contact: The horse moves forward toward the bit without apprehension or fear of the rider’s hands. (See chapter 4, Putting Your Horse on the Bit.)
Straightness: The forehand is in line with the hindquarters, and the horse’s weight is evenly distributed on both sides. If your horse is not straight, you will have trouble turning, making circles, and doing lateral work. You can feel the straightness in the ease of accomplishing all of the above.
Impulsion: Thrust or pushing power of the hind legs in the trot and the canter (the walk has no impulsion because it has no moment of suspension). The horse pushes herself through the arena instead of pulling with her front legs. With impulsion, you feel the horse taking a bigger step as you apply your legs. The gait feels stronger and more purposeful.
Collection: Increased bend of the hind legs, with the horse carrying more weight on the haunches and less on the forehand. The horse’s movements are easier to ride. (See the following section.)
Collection
When a horse is collected, she brings her hind legs farther underneath her body and carries more weight in her haunches. The working gait does not require the horse to do this. The working gait also lacks a certain amount of impulsion and engagement of the hind legs. Riders often mistake collection with riding very slowly, but in truth the tempo alters very little. The horse’s neck must not get shorter; in fact, it won’t change in length through the dressage levels. Instead, the horse’s outline will be more uphill because her front end will rise as she takes more weight back onto her haunches. Some of the hallmarks of collection are the ability to ride movements with ease and smooth and steady transitions.

This upper-level dressage horse performs the piaffe, one of the highest demonstrations of collection.
At the early levels of collection, there is only a slight difference between working and collected gaits. The collected trot you see at the lower levels is a different collected trot from that seen at Grand Prix because the horse is stronger at the higher levels. At the higher levels, collection is highlighted in advanced movements such as piaffe and passage. At the lower levels, it is demonstrated in movements such as shoulder-in and the extended gaits.
Strengthening exercises are helpful for collection. Ten-meter circles engage the inside hind leg and develop the muscles. Transitions work to develop the all-important impulsion or thrust from the hindquarters required for collection. Too much work in collection can be tiring, so keep your workout appropriate to your horse’s level of training. And always end your sessions with a stretching circle.
Ride a ten-meter circle to engage the inside hind leg and develop the muscles of the hindquarters, as shown.
Extensions
Many riders are confused about what constitutes an extension. An overstride in the medium and extended walk is a requirement in the dressage tests, but how much overstride is inconsequential; judges take into account the horse’s breed, confirmation, and ability. Clarity of the rhythm, elasticity to the walk, and whether a horse moves over his topline are more important. In the trot, the horse ideally should step over the prints of his front hooves. In the canter, the horse must cover more ground.
The Extended Walk
Pay special attention to the walk because it is the easiest gait to ruin and the most difficult to correct. The extended walk paces include the free walk, the medium walk, and the extended walk. In the free walk, the horse is allowed to lower and stretch the head and neck on a loose or free rein. The medium walk should have an overstride, and the horse should stretch to and remain on the bit. In the extended walk, the horse covers more ground and stretches the head and neck out while still maintaining contact. All the walk paces should march forward with good energy and have a purity of rhythm.
In dressage competition, the walk is valuable. For instance, there are fifty points related to the walk in many of the Training and First Level tests, which incorporate the medium walk, the free walk, and the gaits scores. The free walk score is doubled. The points for the walk are high because the gait is an indicator of the quality and progress of training. A walk that becomes impure in any way or is a little uneven because of crookedness or resistance can hurt the submission score as well.
It’s not just the quality of the walk that matters but also the way it’s ridden. Riders often impede the horse by failing to allow her to oscillate and move her whole body. The hands are too still, trying to keep the horse on the bit. And in the free walk, riders often don’t allow the horse to stretch as far as she wants to. They spend too much time worrying that she will jig or break into the trot.
This is a good example of free walk on a long rein.
You can practice the various phases of the walk at home by teaching the horse to march across the diagonal of the arena or the pattern in your dressage test. Keep the horse moving forward, in front of your leg. Never become complacent and let your horse become lazy, even when warming up or finishing your schooling session.
The Extended Trot and Canter
There are three different paces of the extended trot and canter: lengthening (encountered at First Level), medium (beginning at Second Level), and extended (found at Third Level and up). Each pace builds on the next as the horse begins to bring her balance uphill. The more collection and strength a horse builds, the bigger your extension will be, depending on your horse’s ability.
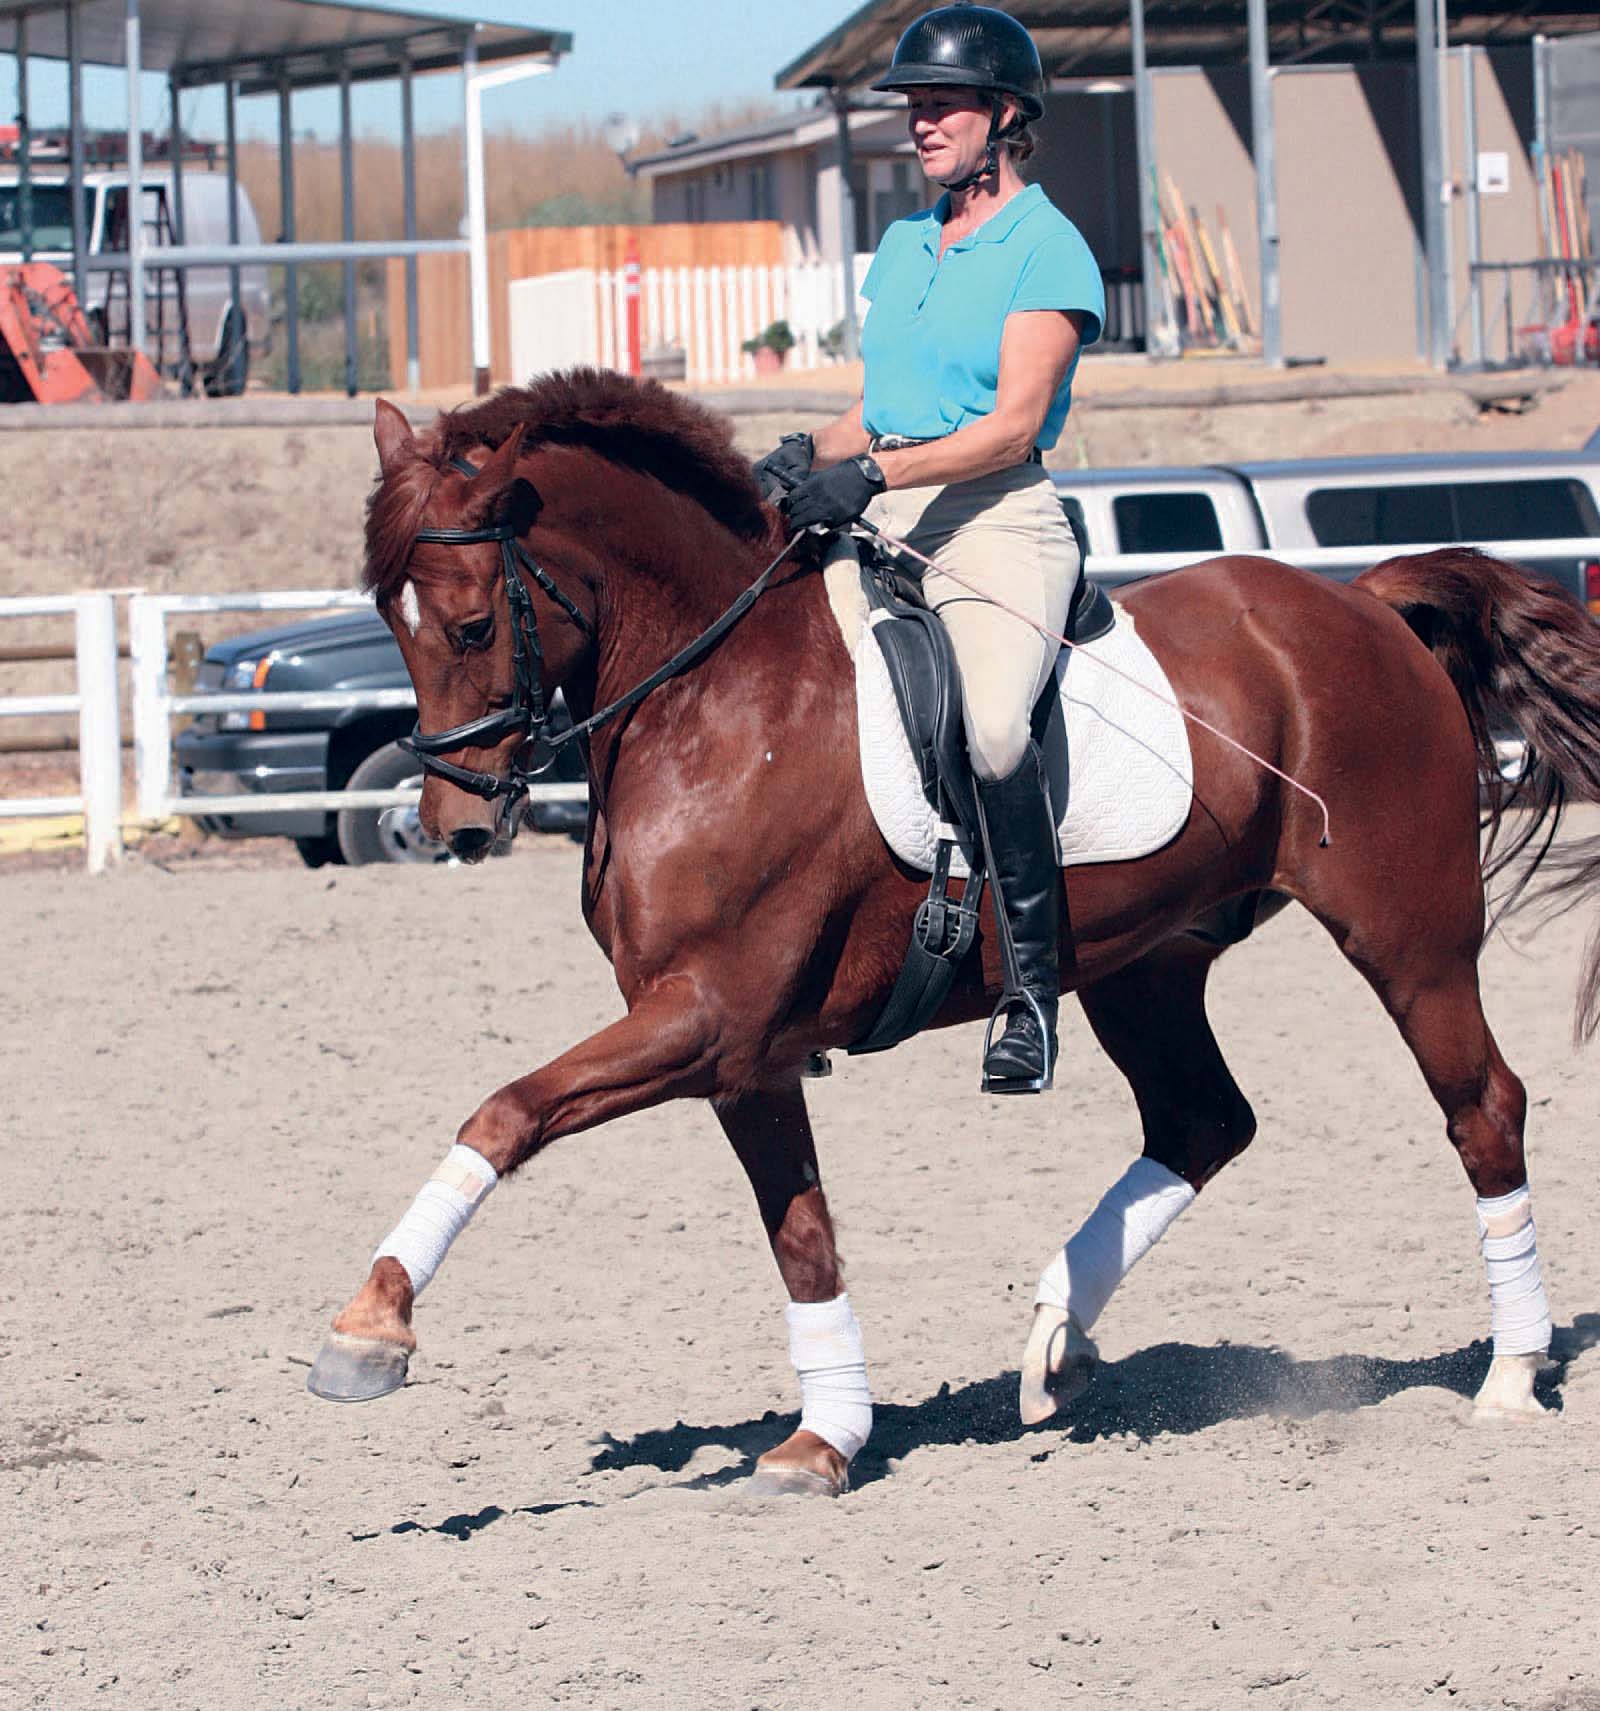
A dressage horse and rider perform an extended trot.
Lengthening is developed from a working gait. Lengthenings are the precursors to extensions, but lengthenings are often mistaken for changes of speed rather than length of stride. When you lengthen a gait, the horse’s frame should lengthen as well. The medium trot builds from a collected gait. When you ask for medium, you’ll get more impulsion from the hind legs and a bigger stride. The extended trot is a bigger medium trot with a larger reach of the front end and stretch of the topline. A horse that brings the front legs high in front in a park-horse motion is not displaying the extension required in dressage.
It seems counterintuitive, but you won’t achieve better extensions by practicing extensions. Instead, work toward extensions by developing your horse’s strength through transitions. Increased strength gives you pushing power, which is what produces the longer stride. All transitions are worthy: within the gaits, from one gait to another, to the halt, and from the halt. You can then ask for your desired extension for a few steps and then come back to your collected or working gait. Shoulder-in (see chapter 6, Lateral Work) is a good advanced exercise for the medium and the extended trot. Ride a few steps of shoulder-in, then ask for a few steps of the medium or the extended gait. When schooling extensions, it is imperative that the horse stays balanced and that the rhythm and tempo remain the same. If you feel your horse faltering, bring her back, reestablish, then ask again.
Adjusting the Stride
Event riders must be able to adjust their canter, hand gallop, and gallop to three different stride lengths to be successful and, most important, safe while riding a cross-country course. Jumper riders need this skill for the odd strides often required in show jumping courses.
The three lengths include a regular stride, a short stride, and a long stride. The long stride is needed for jumps that require big strides such as ditches or water jumps. The short stride is needed for jumps that require careful riding such as the downhill approach to a bounce with vertical rails or a shortened stride in a combination. A regular stride is needed for jumps that can be taken out of the normal stride such as logs, brush jumps, or verticals.
To learn the three stride types, begin at the canter. Set two poles on the ground. For the regular stride, set them eight strides (twelve feet equals one average canter stride) apart, and count your strides as you canter from pole to pole. Canter over the first pole and say “jump,” then count each following stride aloud and say “jump” as you go over the second pole. If you can count eight strides, you will have ridden regular canter strides.
To produce the more forward long canter, start with a regular canter stride. As you approach the pole, release with your elbows, put your hands forward, close your legs, and allow your horse to go in a bigger canter. You should be able to ride seven strides between the poles.
For the short stride, approach again in a regular canter, but before you approach the pole, apply a half halt to shorten the stride. You should be able to ride nine strides between the poles. With practice, you will be able to feel how much half halt you will need to shorten.
As you progress, you can increase or decrease your strides further. Challenge yourself. Instead of nine shortened strides, ask for ten. Instead of seven long strides, try for six. Once you learn this skill at the canter, you will also be able to apply it to the hand gallop and the gallop.
Flying Changes
If flying changes are not taught properly or are rushed, or if the horse is pushed, you can set back your horse’s training significantly. Your horse must have solid basics before you move forward with a flying change. She must understand a half halt; complete downward and upward transitions without anticipating or objecting; and have a balanced, controlled, straight canter. If you have reached this point, then the next step is teaching your horse a simple change, which means the horse will change through either the walk or the trot. Your horse must “nail” these changes in every way. She must grasp the concept of new bend equals new lead. You can practice your simple changes through a figure eight, breaking it down to the very foundation. As you complete each circle or loop of the figure eight and approach the center, bring your horse down to a calm, straight walk for a few strides. Then look toward the new direction, bend your horse slightly, and use your new outside leg behind the girth. This will ensure a crisp canter depart onto the next lead.
Next, slowly but surely, ask for a lead change by making a simple half turn while cantering around your entire arena. For instance, while cantering on the left lead, canter down the long side and ride into the corner. Give yourself plenty of time to reverse on a twenty-meter half circle, making a diagonal line back to the long side toward the next corner. About the time you rejoin the long side, you should be at the corner. This gives your horse a visual cue that the arena rail is bending right. As you join the rail, half halt your horse so she’s aware you’re about to ask for a transition, then look right, bend right, and ask for your flying lead change as your horse is in the suspension phase of the canter. One tip is to put a pole on the ground to encourage the moment of suspension; this is also a good visual cue for you.
You can learn to adjust the canter stride with the aid of ground poles, as demonstrated.
Do not shove or spur. Use the same aids you use in the simple changes. The only difference is that as you make your half halt you won’t be changing gaits. If your horse gives you even half of a change, reward her. If you are frustrated and resort to using harsh aids, you will create a monster, and your horse will learn to hate her lead changes. Some horses are more talented at lead changes than others and learn faster. Some take a long time.
The breakdown for the flying change is: half halt, slight new bend with your new inside hand to the new direction. At about the same time, apply your new outside leg behind the girth as the driving aid. In dressage, you will also change your seat bone.
Changing the lead in the air is more a jumper aspect than a hunter aspect because it saves time when riding against the clock. The danger for hunters in doing a lead change in the air is that it sometimes produces a contortion in the rider’s position, because you shift your weight as you ask the horse to land in the desired lead. However, some hunters have difficulty doing lead changes on the ground and so must do them in the air. To do a change in the air, look where you want to go, use your opening rein in the new direction, shift your weight slightly in the new direction, and place your outside calf against the horse’s side. If you want to land on the left lead, for example, look left, use a left opening rein in midair, and squeeze with your right leg.
You can introduce this concept in your flatwork sessions. Place a pole on the ground and canter in a twenty-meter circle on the right lead. As you approach the ground pole, look left. Use a left opening rein as your horse takes the final canter stride at the base of the pole. The timing of your aids is crucial. At the moment of suspension, when she’s actually over the pole, squeeze hard with your right leg as if you’re asking for the left lead during a canter depart on the flat. Practice in both directions so your hunter becomes ambidextrous, but don’t force the issue and sacrifice the horse’s jumping technique.

Here a rider looks right and uses an opening right rein to ask for the lead change as her horse canters over a ground pole.