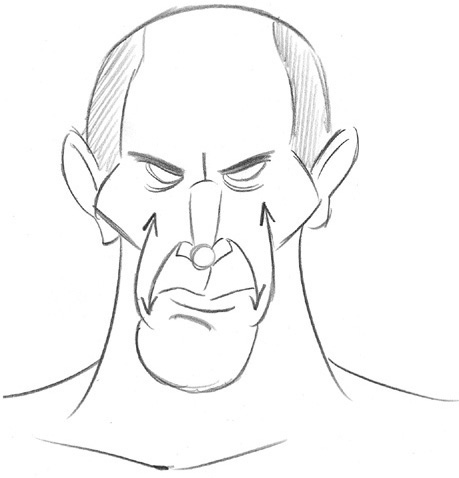
We’ve learned a good deal in the past chapter about the structure of the head and face. We’re like architects who have designed a very good floor plan. But we still have to put something inside of the house. And in this metaphor, of course, I’m referring to the features of the face. Features are by and large varied, personal, and unique. However, we’re going to generalize a bit, in order to give guidelines from which you can make adjustments according to your own style.
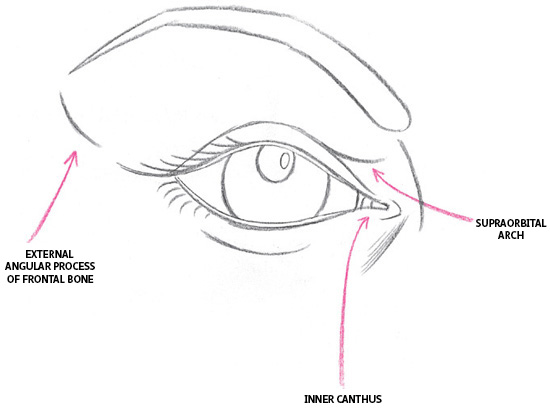
The eye can prove difficult to draw unless you are aware of the way the upper and lower eyelids curve around the opened eye.
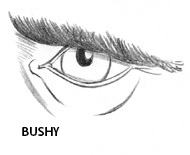
THE DRAMATIC EYE
A deft touch, attention to detail, and some shading are required to create a finished look.

ASYMMETRY OF THE EYE
It is important that you do not draw the upper eyelid the same way you draw the lower eyelid. Each eyelid crests at a different place. Note the two bulges of the eyelids.

THE LINES OF THE EYE
Notice that toward the inner canthus, the lines are short and at a more severe angle. Away from the inner canthus (toward the ear), the lines are longer and at a gentler angle. Notice that the top eyelid, as it sweeps toward the ear, overlaps the lower eyelid.

TILT OF THE EYES
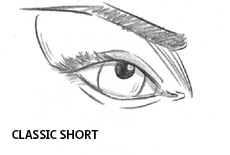
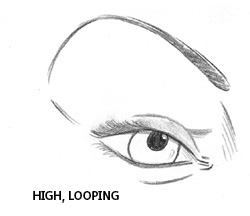
On women, it is appealing to raise the outer corner of the eyes, so that the eyes appear to tilt inward toward the nose.

When the head moves at a significant angle, such as the head of this woman, the shape of the eyeball must change with it. It’s a good idea to lightly sketch a guideline under the eyes to make sure that they remain at one level. In this position, the eye is less round and more oval.


As the eye tilts back, it becomes less circular and more elliptical.

The pupil protrudes beyond the eyeball and can be seen protruding in profiles, as shown.
THE ELLIPTICAL NATURE OF THE EYE IN PERSPECTIVE
In a 3/4 view, as opposed to a front shot, the eye is also elliptical, not round. Is this detail important? In itself, no, but a drawing is made up of many details, and the more accurate the sum of the details are, the more convincing your drawing will be.

The eyebrows accentuate and underscore any expression. They open the eyes when they rise up and narrow them when they bear down. Without a strong eyebrow, the eye tends to lose impact. Here are some common types of eyebrows. Note that the upper eyelid casts a small shadow on the eye itself. This touch adds depth and interest to the eye.
WOMEN’S EYEBROWS


MEN’S EYEBROWS


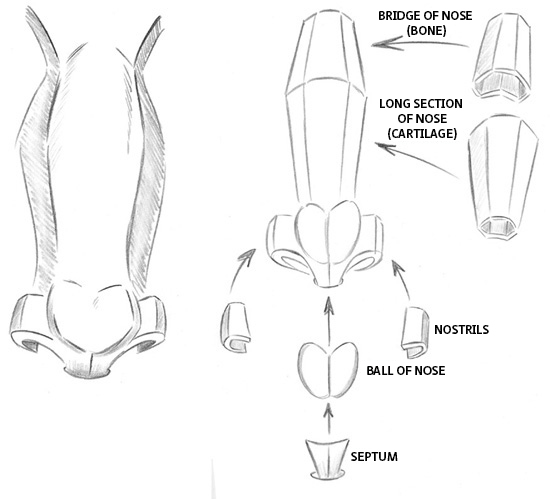
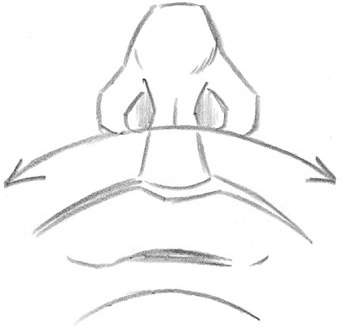
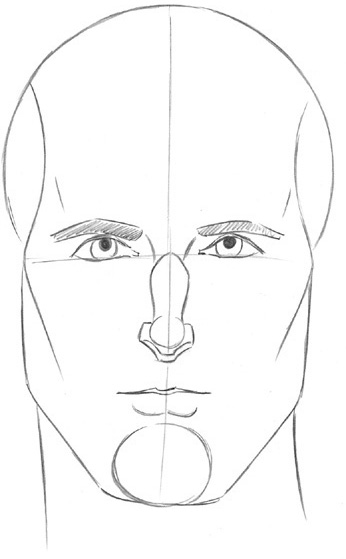
The nose is the only feature of the face that sticks out from the face plate and becomes a separate structure. It therefore draws attention to itself if it isn’t illustrated correctly. The nose is comprised of several sections with many angles, not just a straight line.
SECTIONS OF THE NOSE
The nose is divided into three sections: the bridge of the nose, which is the bony part of the skull; the cartilage; and the ball of the nose, which is, as we will see in the following example, two pieces of cartilage joined together.
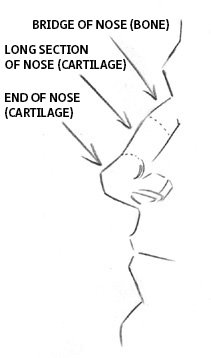
THE ANGLES OF THE NOSE
The angle of the nose changes at each point that a piece of bone or cartilage connects to another piece of cartilage.

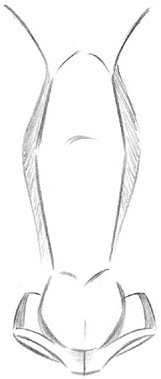
DEPTH OF THE NOSE
This is vitally important. The nose is not flat. Therefore, you must draw it as if it has sides to it, because in fact it does.

Everyone focuses on the eyes, yet the nose is a more complex structure, which can nonetheless be simplified by breaking it down into its elements.
Just as an art student will practice drawing the head from various angles, he or she must equally practice drawing the features of the face from various angles.
FRONT

¾

PROFILE, UP

PROFILE, LEFT
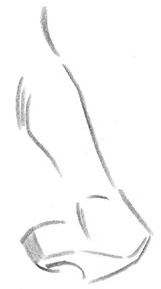
The bottom of the nose follows the curve of the face.
PROFILE, RIGHT
Women’s noses are constructed the same way as a man’s, however, the angles are much less sharp. It’s a good idea to leave out the angle where the bridge of the nose attaches to the cartilage, and instead, draw it as a straight line. However, the ball of the nose can be accentuated. Women’s noses, by and large, are drawn by leaving details out, thereby softening the look. Other noses may be adjusted to create other looks.


Examples of a differently shaped nose—shorter and thicker.
When the face is tilted downward, the bridge of the nose is more prominent, and the tip of the nose may appear to overlap the upper lip.

It’s not necessary to define the bridge of the Asian nose.
The lips are a rather simple form. Therefore, it’s important not to skip over this area, because learning this material will so easily bear fruit. The lips are created by gently curving lines that are pleasing to the eye. The curves are subtle, but the line should be bold. Let’s take a look at the basics.
The bottom lip is divided into two masses, whereas the top lip can be divided into three.

In some poses the top and bottom lips, when closed, will appear to join at the ends, but more often, closer inspection will reveal that the top lip overlaps the bottom.
Both top and bottom lip indent in the middle, toward each other.
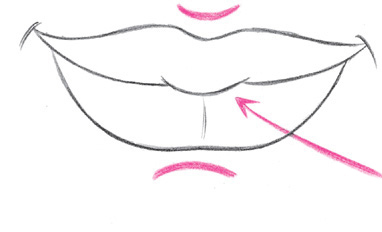
The top lip extends beyond the bottom lip.
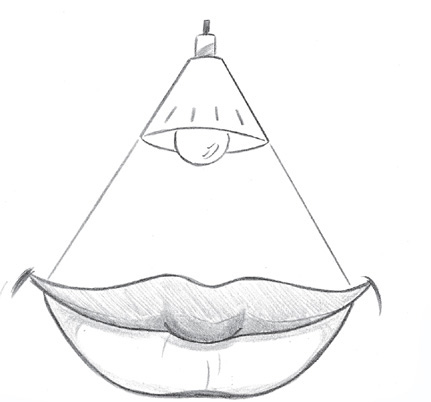
The top lip is usually darker, because of the cast shadow from overhead light. The bottom lip is usually lighter, as it reflects the light.
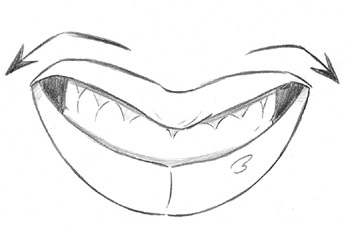
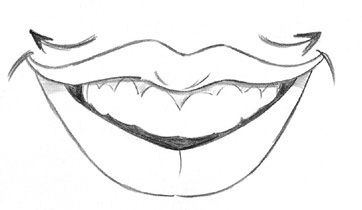
There are many types of smiles, and only one of them is the classic “happy face” where the upper lip and the bottom lip both curve upward in the extreme. More often, there is some downturn in the upper lip, even in a smile. This in no way dampens the cheerfulness of the expression. The smile expression is more a result of the upward curve of the lower lip, not the upper lip. The most appealing smiles show teeth, with just a hint of the upper gums. Too much gum is unappealing. Observe a few common examples here.
1. DOWNWARD SMILE WITH UPTURNED ENDS
This is perhaps the most common type of smile. The bottom lip curves up, but the top lip curves down, until the very end, where it curves up slightly.

2. DOWNTURNED SMILE, WITH DIP IN THE MIDDLE
Surprisingly, the down turned smile is one of the most appealing and thoroughly happy smiles. This smile is most effective if there are small pockets of space left between the teeth and the sides of the mouth.
3. UPTURNED SMILE
Despite popular belief, this is not the smile that most people make, but some do, so it’s worth addressing. The sharp upward turn of the upper lip must begin early, or you end up with smile #1.
4. DOWNTURNED SMILE
The upper lip is shaped like a horizontal crescent moon.

Many people draw men’s lips as a straight line, fearful that full lips will feminize the character. And while it is true that full lips would not work on a man, there is a method of drawing a man’s mouth that makes it appear more realistic than two simple lines do, at the same time retaining the masculinity of the subject.
THE ELEMENTS OF A MAN’S LIPS
The upper lip should have some thickness in the middle, but quickly becomes very thin at the sides, thinning to a single line at the ends. The ends of the bottom lip should not attach to the top lip, as they do on a woman’s, but should instead remain open.

A MAN’S MOUTH IN PROFILE
Notice the slight rise toward the back of the lips, which gives a rugged look. Also note that the teeth recede from the end of the lips.

SMILE
Downturned upper lip, with a slightly upturned lower lip.

FROWN
Upper lip pushes down while lower lip pushes up at the middle. There are several creases at the sides of the mouth.

RAGE
Widely stretched lips, revealing large pockets on either side of the bottom teeth. Lower lip peaks in the middle, as upper lip dips in the middle. Upper teeth overlap lower teeth.

Practice a few of these, and you should find yourself internalizing the idea rapidly. Some artists use a desktop mirror to model their own expressions.

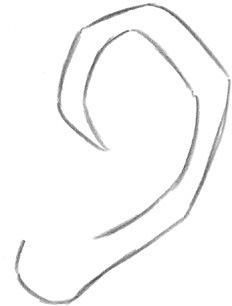
Although I can demonstrate step by step how to draw the ear, it remains a difficult task no matter how one slices it. This small part of the body is precisely formed with many curves and crannies in order to bring us the richest volume of sound possible. We can clarify the patterns of the ear, thereby making it easier to reproduce.
DIAGRAM OF THE EAR
Do not memorize this. I include this simply to demonstrate that the ear, although it may look like a jumble of lines that can be fudged, actually has a specific pattern that must be followed. That being said, all ears differ. Some are wider, some curl more, or less, some have long or short earlobes. But they all have these identifiable parts, which are labeled below.

THE EAR, STEP BY STEP
Taking the ear piecemeal, starting with the outline of the ear, and working our way inward, will be the easiest method.
Draw the outline of the ear, defining the first crease, as well as the earlobe.

Add the part we’ll casually call the “flap.”

Here’s the tricky part. Think of this part as an oddly shaped letter “y”.
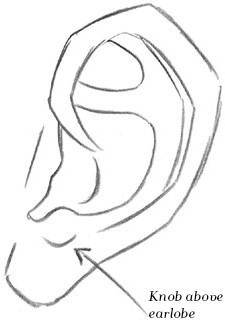
Define the ear canal and add a “knob” just above the earlobe.

Add some shadows to the recessed areas to show depth.
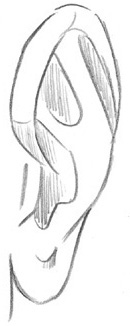
Some examples of the ear in common positions:

REAR VIEW
Note the cuplike attachment of the ear to the head, which can only be seen in this view.

¾ VIEW, front
In this view, the antihelix appears to protrude past the rim of the ear.
SIDE VIEW, RIGHT
Here is another example of the profile.

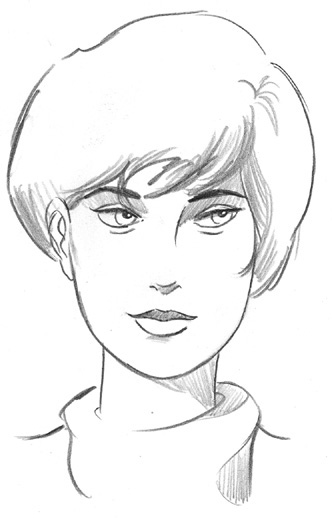
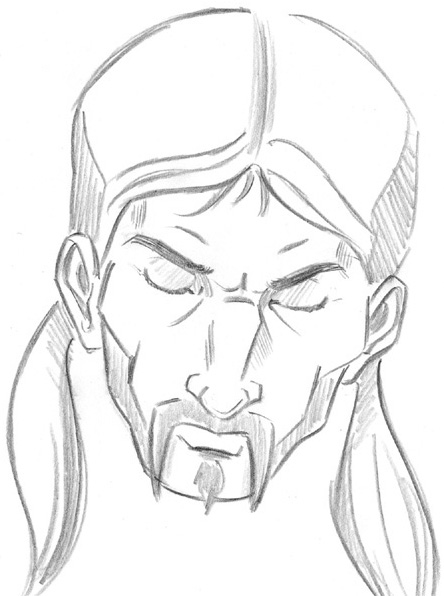
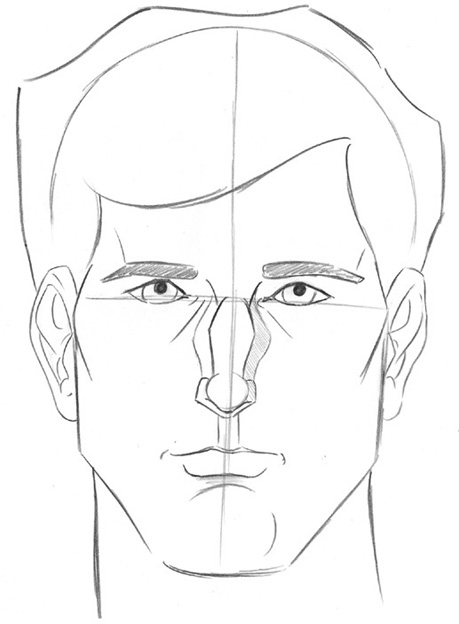
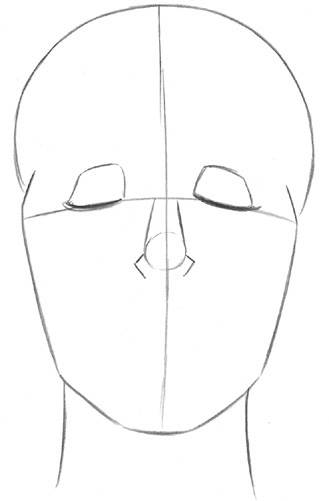
Now that we have familiarized ourselves with the shape of the skull, the proportions of the face, the planes of the face and the features, let’s put it all together from scratch, using our newfound knowledge. In the opening chapter, we outlined the head before adding the features, then padded the sides of the cranium to give it more width. This time, let’s add the extra width at the outset.
1
Start with the outline of the head. Lightly sketch the guidelines.

2
Add the eyes along the horizontal guidelines. Build the nose in segments. The cheekbones flow toward the mouth. Every person has unique features. I’ve given this man a small mouth and wide cheekbones. As a result, the cheekbones will not flow directly to the edges of the lips, as they do on many other people, but they still flow in that general direction. Small changes such as this one, as long as they do not interfere with the anatomy of the subject, are what make individuals unique.

3
Continue to define the skull’s temporal ridge (the indented, curved sides of the skull) and chin. Add eyebrows. This fellow has eyebrows that rest right on top of the eyes. Other people may have more room between the eyes and eyebrows, another individual trait. Blend the segments of the nose into one form. Flesh out the lips.
4
Add the hair and begin to accentuate the hills and valleys of the face.
5
Continue to define the hills and valleys of the face.

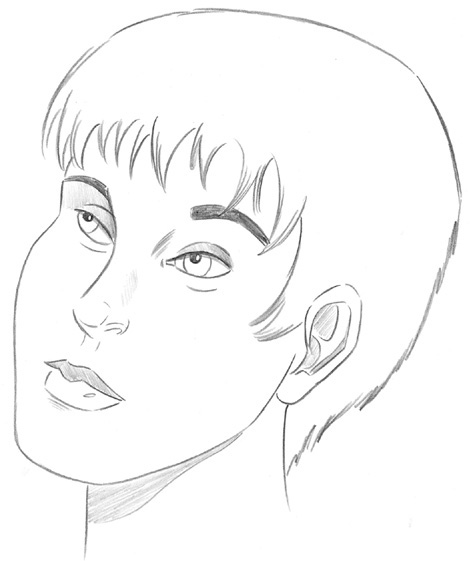
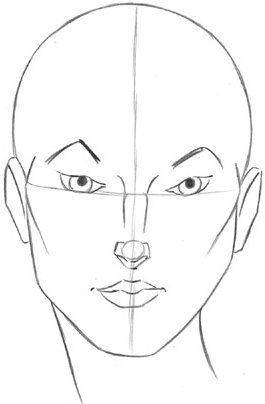
This head is tilted slightly upward, which gives the subject an interesting mood. Because of the tilt, we will see more of the underside of the nose, and a bit of the underside of the chin. In addition, the top of the head (skull) will appear to be smaller in comparison to the jaw section, due to the tilt of the head. Notice that the bridge of the female nose makes a much less pronounced break from the rest of the nose than the male’s.


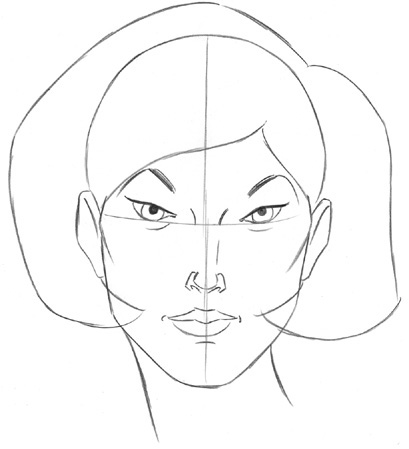
Notice how minor alterations in the basic structure of the head result in a significantly different person. The shape of this woman’s head started out with more pronounced cheekbones, a sharper angle of the jaw, and a more angular chin.


Exaggerating the actual anatomy of the head and following the patterns of creases left by expression marks can turn a realistic drawing into a cartoon creation.